
marionrav
Marion R
Writer on AO3 (MarionRav) and other places. (She / Her, over 30 for folks worried about that.)
180 posts
Last active 2 hours ago
Don't wanna be here? Send us removal request.
Last Seen Blogs

ferudasosug
Untitled

voxpopularis
pax et lux

nightmare-chan1-blog
Animes épicos 💟

altethansblog
Untitled
kiayung
Untitled
Text
Testing Elizabeth Friendship's Making Working Women's Costume
One thing about using drafting methods is that you've got to have an idea what size you are, and your general shape. So, for example, I've got a curvy figure, big hips, and a longish torso. The book goes up to a size 22, and my measurements are probably closer to a size 24.
The book mostly has roomy clothing, so the main points where that would matter are my hips, biceps, and neck.
So, I drafted up a 1900's blouse to see how well it'd work.
So, let's use my typical proportions I'd use for finished garment sizes. I'm usually looking for something like b 48, w 46, h 57 ish. Actual body sizes fluctuate, but I'm closer to a 46, 44, 53 depending on multiple factors. The book's size 22 in cm is 115, 90, 120, which comes out to 45 (ignoring an extra 1/4"), 35, 47. The bicep is 33 cm or about 13".
In actuality, I needed about 4" on the waist (added some to the side panel to make seams match and took out a tuck,) about 8" to the hips, and about 4" to the bicep (below the elbow, things were fine.) All seams had 5/8" added, all seams were done at 1/4". All the seams behaved nicely other than the side back seam matching the front side seam. I had maybe 1/2" max for two seams not meeting up and that was frequently near places with a lot of bias. I did walk my seams before cutting my test fabric.
I did my own choice of measurements for the button placket, since it's simpler to do it the way I'm familiar with folding the fabric.
For shirts, I tend to do 1/4" inch seams for texture reasons. The 3rd tuck would've pulled out another inch, and I had room for it, but I wanted some roominess in the shirt for ease reasons. I suspect if you were within the size range of the book, you might be able to draft your size and be utterly fine (just check that bicep measurement.)
So, how did I know what to put into my paper pattern? I did check my various measurements against the pattern, but had no idea if the drafted neck would be fine. A raw measurement of shirts I owned and my own neck said it was probably okay, and making something bigger is easy enough. I did add 4" to the bicep since I checked mine, added 2" inches for ease, and knew that there was no way the drafted sleeve would fit my arm. I knew from the starting measurements that I would need more for the hip area, so I measured the curve as written, and added to it. I over estimated how much I'd need, but that's utterly manageable.
When sewing up the test draft (in a non-stretchy but ancient fitted sheet,) I basted all the seams so I could check for fit before serging them to take care of raw edges. For an idea of fabric usage, one shirt + 1 potential collar, cut according to the grain lines of the pattern, took about 1' less than a twin sized fitted sheet. I've got plenty of scrap fabric if I want to cut a cuff (don't need one) or add a more complex collar on top of the collar stand.
Shirts are usually like that. On average a non poofy wrist length sleeve is about the same size as the front of your shirt just due to the strangeness in grain requirements / ease / shoulder cap needs. If you can't fit three copies of your front of your shirt on the fabric, you likely can't get your fronts, back, and sleeves on the fabric. A short sleeved shirt hitting a bit above your elbow will often need half the size of your front to fit on your fabric.
I'm pretty happy with the results.
2 notes
·
View notes
Text
"Don't have time for this" reading method
My mother has specific tastes in books. She likes slice of life books, though not heavy romance novels. She likes mystery novels (more in the cozy family versus gritty ones.) She also likes science fiction (again, less gritty ones and more cheerful ones.)
Since about the 90's, she's started applying the rule of "check the back and a random page" for certain unknown authors.
By that, I mean she checks the ending of a mystery, or a random bit of the book to see if it goes over her limit of depressing / pointlessly grim. While she'll read more gritty stuff if the things around the story are good, she doesn't want to get wrapped up in a story and then find out that it's the opposite of a good time.
You could argue the "can you pet the dog" or "does the dog die" kind of warnings for movies / video games is the same sort of deal. People who aren't in the mood for pointless grim stuff can avoid it, and you can get a feel for what the story is like.
I do the same thing in books I read. On average, I forget the ending of the book well before the midpoint. I don't care if I know that Mr. Pebbscott killed the butler with a spatula in revenge for a yodelling competition because my interest isn't in figuring out who the murderer was.
I also do the same thing with fanfiction. Part of that is my own fault. I love "things were bad, but got better" and "hurt/comfort" style stuff. Found families and people making a better future are super appealing.
Unfortunately, the same kinds of authors who write concepts like that also do the "and now Character X suffers" or "things are bad" style stories.
So, if the story says things will get better, and on chapter 60 of a 100,000 word story, nothing is better at all, or even worse there's an author note suggesting that nah, maybe nothing will improve at all - Yeah. I'm glad I got spoiled paragraph one, rather than 60 chapters in.
Some authors are mostly interested in the emotional mess of things being bad and someone realizing it, but not in writing the process of what happens next. I find this to be a bit of a damp firework. If I read through a crescendo of stuff leading up to the stuff I'm interested in, and then just get a paragraph of "of course they need to work on things, and it will get better," I did get what I wanted, but at the same time, I didn't get it at all, did I?
(This, of course, applies to stories where the kink is the misery. If I'm not into that, and there's three chapters and an ending in a 21 chapter thing that isn't misery, then I'd sooner know that going in.)
Another issue is stories where the focus of the story isn't where I want. Obviously, this is purely my problem, but let me try to explain. A story I read had a lot of people being jerks. The main character was not good at explaining people were jerks, and his behavior wasn't perfect. Things got to a climax over two chapters, and then a six month wait in writing time, and then there were two chapters of folks apologizing. The author commented on the fact that multiple people called one specific love interest abusive, and that several people were very upset. After the apologies, the main character is happily having a date with one of the people.
The story was aimed at having said relationship happen, but at the same time, it felt like there was multiple chapters of people not being great in various levels of not being great, and the two chapters of folks realizing it and saying sorry didn't prove their awareness of it. Using my "checking ahead" method, the only thing I would tell is that things were bad several chapters in, and by some point, things were better.
I'd check the story to see if it dealt with some of the earlier tension, but I'm not rereading it until it feels less like a desperate teenager happy to date a thoughtless jerk. Everyone were adults, but that kind of relationship can go very bad, and like Chekhov's gun, I can still fear it going off.
I apply these same rules to random books as well. I've avoided rape in romance novels, random "the main character was the sociopath all along," eugenics in vintage pulp novels, and so on. I distinctly remember trying three different sci-fi novels before deciding I hated the series since every single book in the series started with the hero sad about not having his own ship and his progress, and ended with him tootling sadly about gloom and doom and his lack of a ship.
The writing wasn't bad, but honestly if I saw a story where he went rogue and just got a ship and some friends, I would've been a lot more happy to see what happened. I wanted to see his leadership skills proven and him to gain friends and happiness. Instead, he managed to survive, but blamed himself and was sad.
In the era of everything being a thick four to six book series in fantasy novels, I remember one author who adored having random (usually young men or women) dying, usually due to a random minor injury in war. The books were thick, had fairly decent female characters, but I eventually stopped after a flag-bearer kid died because someone stabbed a pin in his skin while getting dressed and the magic of the world channeled through it during a massive spell, killing him.
The kid had plenty of time to take the pin out, realize what the pin was doing, etc. etc. but nope, he was too busy being brave and holding a flag to not die. The book focused on how people thought the kid was brave, and that death was sad, and I was sick of the angst and needless loss of life.
A very popular mystery series started out gritty with a big city reporter ending up with money and living in the country, but settled into a more cozy thing. Much like Nancy Drew's auburn hair and her lawyer dad, the books had repetitive elements popping up and the plot largely didn't advance beyond the setup for the next mystery. He had a housekeeper that he knew who cooked lovely food, a mousey librarian who was a love interest, and a flashy Carmen Miranda esque lady from the big city.
And, 10 or so books later, the housekeeper was dead (the murderer wanted to steal a biscuit recipe), the lady from the big city was dead (something with journalism, as I remember,) and the series just kept going along, growing more formulaic by the book.
I think if you're fine with maybe remembering that the metaphorical spatula is important, reading ahead might have the stories you choose to read be more pleasant.
0 notes
Text
Books about poor new wives
You could argue that Bettina's cookbooks are aimed at economy, but there's so much "spend money on this object to save money" and fixation on filling the husband that it feels more like a "live like this to make your family happy."
A lot of "How to Please a Husband" for example fixates on having a house, a fireless cooker, a refrigerator, and assumes you're buying magazines / newspapers to get more ideas. Another issue with Bettina is 99% of her cooking can be summed up with "did you try pimentos?" or "a pinch of paprika makes this exciting." A prune whip is declared by her daughter to be incredibly exciting. It is not.
For the comfort of the family is another book that suffers from "just buy these things."
So what else have I read?
"Ten Dollars Enough" is a book about a plucky young wife and a husband from a more prosperous family. Her husband's family is terrible and it basically says that they're rude but caring about her husband so she decides to put up with it for his sake. The book talks about charitable cooking, the need for a servant for at least some heavy labor, and how to treat your servant's well.
Servants are treated as people who might not be educated in all the most efficient options, but also deserving to get as much money as they can for the hard labor they do. It could be more racist, but the author is aware of class issues. The housewife's neighbor, for example, is someone with a limited budget and multiple children.
Since she does not know how to cook well, and she spends a lot of time sewing fancy clothes, her kids and her are dressed well, but she's exhausted and not well fed at the end of the day. The author argues hiring someone to help with some basic chores and simple cooking gave the housewife time to actually relax in the evening.
The actual cooking is mostly focused on cooking sensible portions and not compromising on the luxuries she enjoys. British puddings and German breads are considered interesting things to experiment with.
"Living on a Little" by Caroline French Benton is pretty similar to Ten Dollars Enough, but I found the emphasis on not letting the husband know if you were struggling to keep your menu together to be annoying.
This book felt like you were a general attacking a thankless battle plan to survive in a hot miserable kitchen. Other people may prefer this book to the other.
"Three Girl Chums and Their Life in London Rooms" is a direct link to copies from the magazine where they were printed in 1899. It talks about buying materials, saving supplies on heating / laundry and seasonal cooking. I find the menus to be surprisingly modern. There's a tomato salad complete with discussions about how to transport it in hot summer weather that I could see someone making today.
This last book I'll give a massive dated warning on. It's published in 1855, so predates the Civil War, and there are mentions of slaves / kitchen servants. While everyone in the book is white, there's a good deal of discussion of labor and work.
However, if you can ignore that the author likely has opinions on race, Home Comforts is an interesting example of this genre. There's a lot of focus on growing fruit / raising chickens and a fair amount of discussion as to how to treat elderly people in your community or how to live within your means. Two families are compared within the book.
Both are married to a blue collar trade husband, but one attempts to live in town and fancily and the other lives outside of town and a much more simple lifestyle. A middle class girl is going to marry a mechanic, and wants to live with the "simple" lifestyle family to learn how to happily live within her means.
A lot of the moralizing in the book talks about reading good books, not drinking or using tobacco, and how to eat well. The book also focuses on the importance of showing loving care toward yourself and others in your community. Most of the cooking is making simple multi-grain bread / salads / enjoying fruit / cornbread in various forms.
The book is not actually the same sort of "stories about life." Instead, this is a book from 1879 after a major crushing depression. Janet Corson worked on books / classes to offer attempts to have crushingly poor families survive. One book was Twenty-Five Cent Dinners for Families of Six.
This book assumes when you get a bird that it'll be dead and not much more prep done to it, and that your stove is not going to be a modern stove. However, if you compare some of the text to 1940's British books about surviving the war, you can find a lot of similarities.
For example, if you boil anything in anything, you use that liquid again. Either it's a drink (barley water) or a "broth" (boiled veggies or meat.) You try to get your calories in milk and bread.
You throw apples in your potatoes for more calories / sweetness under your roast meat so the meat (even if it's a little) will flavor your roast veggies.
I find this book and her other cookbook to be a little depressing, since it's very clear that the point of the book is survival and little more. I believe someone did the math and found you needed to add all the fat you could, since modern low fat cooking would've been dangerously low in calories.
0 notes
Text
Baked Potato Soup
So let's talk about baked potato soup. This is something my parents made after a big meal, or just in general in the winter. It's cheap, tasty, and you can, like anything, make it fancier.
1 potato per person (remove skins if wanted, roughly chop)
2 parts onion to the potatoes (go by weight if you want, or volume), roughly chop (chop more finely if you have no blender handy)
Water to cover
Fry your onions first in a little butter or water to wilt them if you're in a hurry, otherwise they can take up to 20 minutes to get tender in simmering water. Add your water, or a thin watery broth to the onions. You want to add the potatoes later, since baked potatoes and raw potatoes can stick to the pan.
You can use carrots (for a carrot soup), or any other root vegetable to replace 1/2 the potatoes, or cauliflower for 1/2 the potatoes. Go over 1/2 with cauliflower, and the lack of starch will make the soup settle out and feel thin instead of creamy. You could use any thickener you want (including leftover bread / flour) but you do risk having it get pasty.
Cook until the potatoes and onions are tender. Blend, use a food mill, or use a potato masher to get a texture you like. You may find it needs more broth to not be too thick. A good amount of salt and pepper makes a tasty soup.
Variations:
Use some green onions / leeks or a bit of a green mild tasting leafy veggie for your onion portion. The green color makes the soup look more appetizing to me, and I swear it tastes better.
Add some milk or cream, either swirled in at the end or mix into the soup. If you chill the soup, and top with chives, this is a super traditional soup. You will find it will want more salt if it's chilled.
Top with chopped bacon, those 100% cheese crackers, garlic flavored bread croutons, etc. Leftovers (so, say, ham) would also be tasty.
Some flavored salt ala Lawry's salt adds some garlic powder / color / salt. You could obviously use your own spices to taste.
0 notes
Text
Reviews of a few books I've used for psuedo-Edwardian sewing
One issue with drafting manuals is that they assume you're familiar with basic construction techniques. They often have mistakes or sloppiness based on being one artist writing down their familiar techniques. You might run into "draft a coat, draft a collar, then modify it to what you want" or run into "here's three triangles, finish the fitting in the usual manner." You might also run into "do 1/2 a hip, but for pants, I really mean 1/4th, since it's half a pant."
The Voice of Fashion by Frances Grimble is from a big series of books, but some of the books are very expensive. They involve a measuring tape for your specific body part, and then using it to measure out numbers.
It assumes you've got a corseted and padded figure so you may need to use your waist measuring proportions for all "waist" related measurements and your bust one for all bust ones. Often the hips are so loose as to not matter. Here's Morgan Donner using the drafting system (and basically finding that draping on a good dressform is faster, but there's some inherent things you need to have to do that.
Mrs. Depew has some books from the same series which include better rulers and tips, but the one I got is now out of print. Kristina Harris does not provide the rulers, but has a lot of affordable books. Here's a link to one.
I've sewn some bloomers (a pair that were more trim were fine, but a bike set were about 4 times the size of my hips.) A chemise worked fine, but needed some adjustment for my non-stick like arms.
Lilja Husmo used Elizabeth Friendship's patterns for a 1900s farmer's outfit. This actually sold me on trying the book. Most of the reviews mentioned it had a lot of square patterning patterns, which don't interest me that much. However, the outfit she made worked fine on a more curvy figure. Also, I found reviews that said the book had options to go up to a size 22 figure (48" bust, 47" hips, if I'm reading things right), or to draft things to your proportions.
I haven't tried the book yet, but I am interested in trying the book out.
2 notes
·
View notes
Text
Square Construction
If you get back into historical fashion, especially from areas where fabric was extremely expensive, you'll run into garments where the construction was squares, rectangles, and occasionally triangles.
That's not to say, mind you, that these garments were bad, but I think it's important to look at how they were used. Take, for example, 18th century shirts. These, quite often, were undergarments, and would be worn under a vest / coat / cravat. In this video, people who are familiar with surviving ones mention that you'd often have one for every day of the week since it's simply hard to boil them clean again.
There's also talk about how simplified construction at the shoulders or bad construction can have the entire shirt pulling backwards on you.
Here's a Viking reenactor talking about his generic Viking clothing. Again, most of these can be made from very simple shapes and are often loose enough that "fit" issues aren't really the same. In this video, he made some pants based on some that survived due to being used as ship caulking. They're once again very simple shapes.
(There's also this style of construction in various traditional dress, world wide, but I'm definitely not an expert.)
So, what can you pick up from looking at square construction styles?
They're very fabric efficient, but high end / fancy versions of things often have extra reinforcement / or extra features. A basic simplified version of something may have fit issues due to being built more to be clothing versus be comfortable / stylish clothing. An example of "extra" pieces might be all the reinforcement patches called for in the Workwomen's Guide by a Lady. Here's a basic review of the book.
Some of these garments are far easier to stitch partially by hand due to fitting parts together. Shannon Makes mentions this when she tries making a pirate shirt as quickly as possible. In an era where some or all of your sewing was by hand, it's no surprise that something would have elements easier done by hand.
There is no reason why a top, skirt, pants, or any other garment would be automatically better when made by square construction methods. People are complex 3D shapes that move around and vary from person to person.
In an era where you might be wearing clothing until it simply cannot be patched again, you might be more "luxurious" than you think. The Welsh Viking's generic Viking clothes are mostly not aimed at a extremely high end person's clothing, but he used color, trim, and elements to add luxury. He also pointed out how much some of his clothing shows totally reasonable and historically accurate wear.
If you have 1 week's worth of underthings (or less,) and 2 complete outfits at most, the cost of your clothing is a different sort of math. This is true for many eras. Nicole Rudolph, for example, built a 1920's wardrobe for a month long trip. This included formal clothes, high end fabric, and more casual clothes. She said later that she likely had too many blouses especially due to the unusually warm weather she encountered. By modern standards (ignoring the fancy ball gowns) you could argue that there's not that much clothing in her wardrobe.
6 notes
·
View notes
Text
Had to load this up to find the third party sharing options link that worked.

They are already selling data to midjourney, and it's very likely your work is already being used to train their models because you have to OPT OUT of this, not opt in. Very scummy of them to roll this out unannounced.
96K notes
·
View notes
Photo
The fact the mouth looks so much bigger than the head really adds to it.
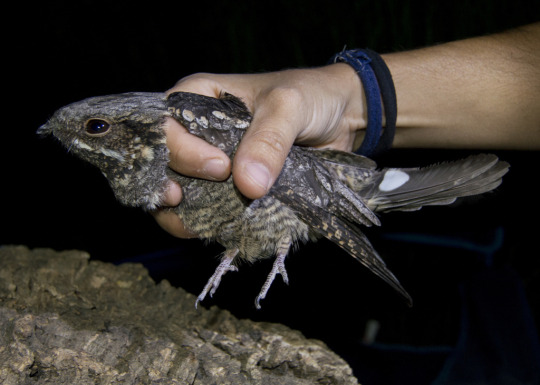
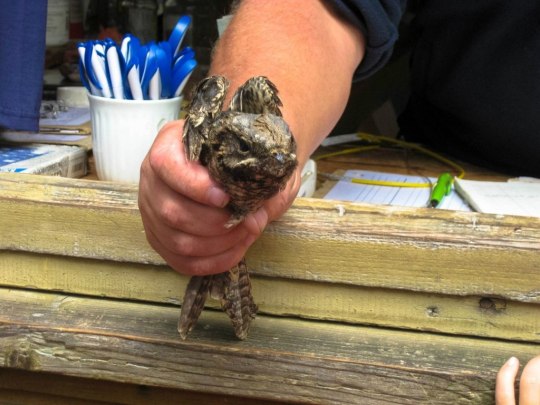

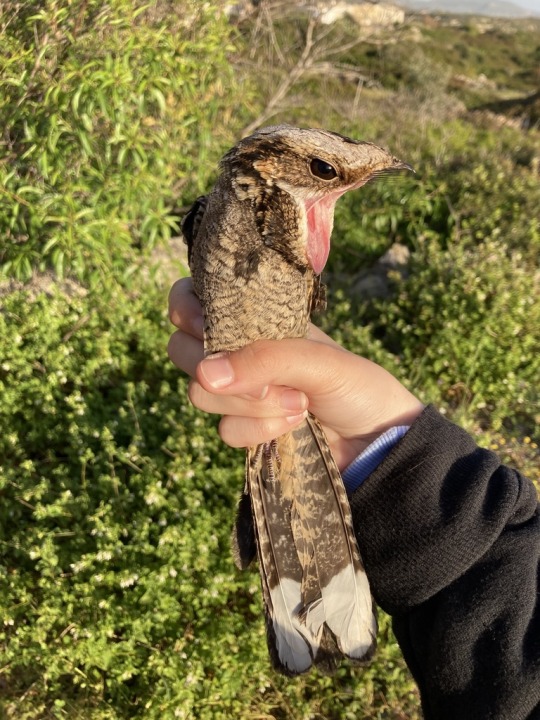
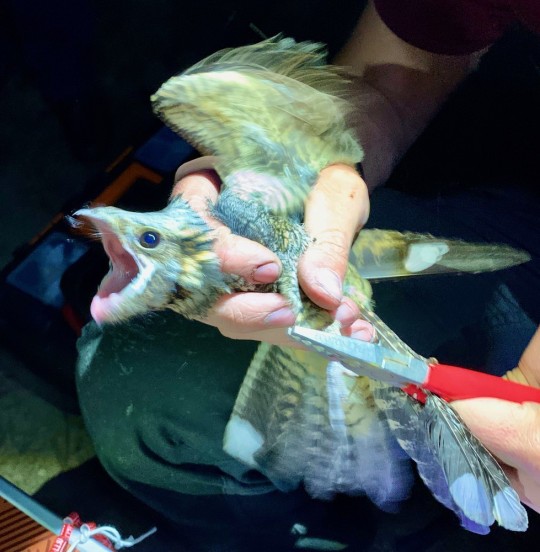

i would like to introduce you all to my favorite genre of photo: nightjars being grasped firmly
all photos sourced from inaturalist, links in the image captions. these guys are being held for banding by professionals
12K notes
·
View notes
Text
Sweet Holiday Breads
So by this I'm talking about those cinnamon raisin breads you might see in the store, or a generic rich bread that might have chopped fruit in it. This isn't brioche, or laminated bread, or even something using tangzhong.
Here, a half loaf is about 8 bucks, which is ridiculous.
I've done this with leftover dough, but you will need to have an idea of how much flour you've got in there, or an approximate amount compared to your loaf pan.
A basic recipe, using Bernard Clayton's Babka bread, would be this:
2 cup flour (this will likely need another 1/4 cup to come together)
1 Tb yeast (You can go down to 1 tsp, but we're aiming for cheap and fast)
3/4 ish cups milk (potato cooking water for an ultra tender dough, milk and water, etc.)
1 tsp salt (you might be able to get by with 3/4 tsp, but I find that this amount works nicely)
2 eggs or 1 yolks 1 egg depending on the dryness of the day and size of eggs you have. Save extra whites if you want to brush the top.
1/4 cup very soft or melted but not super hot butter (can go down to 2 TB, but you do need some.)
1/4 cup sugar (I do not add this. I do add 1 TB honey for rising speed + helping the bread keep longer, but it will get you closer to the commercial levels of sugar.)
Mix up with flavorings of choice, and let rise. You do not need to knead heavily, but you do want no flour lumps and at least a minute of vigorous troubling. When you're ready to fill it, work in enough flour that it's not sticking to your hands, but do not go until it's not sticking to a dry board. Prep a greased loaf pan before you get to filling, since your hands might be too sticky afterwards.
Flavorings:
1/4 tsp vanilla extract
small pinch ground cardamom. I buy the seeds and run them through a mortar and pestle for price reasons. You could also do a pinch of saffron in the milk, but that's not cheap.
Do not mix in cinnamon in the dough unless you have plenty of time. Cinnamon slows the action of yeast, and can make your bread take twice as long to rise.
Fillings:
(Pat out your dough to about a 6 inch by 10 inch rectangle and spread out to taste. You can knead chopped fruit in, but hold back having it break the surface. Raisins or the like will turn very dark and puff up, which is a favorite treat for my father, but can be aesthetically unpleasing. PIck about three of these at most at first.)
1/2 cup raisins / dried mixed fruit (rehydrate in rum / brandy / water that you've heated up if it seems very dry.)
1/2 cup nuts (toasted pecans, walnuts, slivered almonds. Cut up into smaller pieces for easier cutting.)
1/2 cup chocolate chopped (do not get near the surface of the dough, since it will make a mess.)
1/2 cup almond paste (make your own with 50 g almond flour, 50 g sugar of choice, 1 egg, almond seasoning.)
1/4 cup cinnamon sugar paste (2 TB butter, 2 TB sugar, as much cinnamon as you deem necessary. 2 TB?)
8 sugar cubes, smashed lightly with 1 TB cinnamon
Roll up, put in greased pan, cover to not dry out, and it'll rise in about an hour. Brush with egg if you want.
Bake 350 for 45. You may find it done at 35, and want to roll it out of the pan to brown the bottom a little more. Allow to cool to barely warm, or it will crush itself when you try to cut it. Freezes well.
Combinations:
Cinnamon sugar paste, raisins, pecans or walnuts: a standard fancy breakfast bread here
Dried fruit of choice, almond paste, chocolate: Babka esque
Double the dried fruit (must add prunes / figs if you're being super traditional) and nuts, knead it in: a version of schnitzbrot
Make the dough in rolls fill with cinnamon and sugar or the sugar paste, put cinnamon and sugar paste in the bottom, add pecans to taste inside and below: Pecan sticky buns. Be careful when you remove from the pan because the sugar + butter will make lava like cinnamon caramel.
Sugar cubes and cinnamon = A fast version of Danish sugar lump bread.
0 notes
Text
Gluten free baking / tips
So, I was diagnosed with a gluten allergy when I was tiny. Probably - six or so? Later, my allergist recommended that I try returning to a less restrictive diet, since I seemed okay.
Needless to say, it became clear that later, I did still have a gluten sensitivity. I basically get borderline asthma / chronic sinusitis on gluten, and I'm far more comfortable without. So, I swapped back to no gluten.
There's two things to know about allergies. First of all, you have to keep a varied diet. It's very likely, if your body decides to be a pain, that you'll suddenly gain something else that hates you. Therefore, you want to be cautious. While restricting foods is always iffy on a healthy diet sense, it is better to be cautious eating common foods. Don't swap to 100% soy flour, don't eat eggs daily, don't eat peanuts with every meal. It's already a pain not eating gluten, and you do not want to suddenly find out that you need to carry an epi-pen just because you really liked peanut butter.
Secondly, if your allergy is not one that's part of the health conscious zeitgeist, it helps to know what you can do. When I was a kid, Skittles, McDonald's fries, and some vending machine chips were it for quick easy gluten free options. If you're someone who does not cook, it might help to look at low gluten cultural diets to have ideas for how to make quick breakfast / lunch / and dinner options.
For a while there, there was a lot of gluten free books from people who had never cooked a day in their life, and they were shocked at the idea they couldn't go to Starbucks or McDonalds and order three things and run. For them, frying an egg was a shocking experiment in frustration, and the lack of toast was infuriating.
But you say, I don't want dinner leftovers, oatmeal, or a bowl of rice in the morning.
Here's my top tips for gluten free baking :
Look at the photos of the recipe. There's a lot of recipes out there (especially from the keto community) that talk up a recipe, and then show things that do not look like what you expect. If their best quality photo of their "perfect no bake chewy brownie" looks instead like chunky frosting, you might expect the result to come out in similar shape.
On average, a gluten free recipe consists of multiple flour replacements. A typical ratio is about 2/3rds "dry" flours, and 1/3rds "sticky" flours. Dry = something you add boiling water to and it does not turn into a clear sticky gel. Rice flour, oat flour, rye flour, coconut flour (see tip 3) all fall in this category. Corn starch, potato starch, arrowroot starch, tapioca starch all fall in the "sticky" category. Too much sticky flour = gummy sticky results. Too much dry = weak cracker-like results.
Be cautious of coconut flour. In "fat head" style keto doughs with cheese, the risks of it are mitigated, but coconut flour has two characteristics. It, first of all, absorbs surprising amounts of water, and then suddenly stops absorbing water. This is great for a wet enough dough that is a little sloppy, but bad if you're replacing rice flour with coconut flour. (You'll literally have chunky concrete that suddenly turns sloppily wet as you try to get it to the perfect texture.) Secondly, due to it being a higher fat content, it will brown more quickly than other flours. Nut flours have the "browns too quick" problem as well.
On average, 1 - 2 TB of fat (per a 1 - 2 cup batch of flour) will not be held within the gluten free mix. This doesn't matter for, say, a tablespoon of butter in your waffles, but your biscuits will weep, and your pie crust will swim. America's Test Kitchen (and my experience) says you'll get better luck replacing that amount of fat with sour cream in cases of high fat doughs.
Assuming you can have eggs, please use eggs in your gluten free baking. I find eggs make gluten free baking stay fresh longer by holding in moisture. They make your dough more strong, even if you're using xanthum gum or guar gum for strength. It also tends to give a pleasant wheat like color to your noodles / breads.
Try psyllium husk powder. Gluten free baking tends to be almost zero fiber. You can obviously add fiber in your choices, but psyllium husk powder (the same stuff in fiber pills) is flavorless, adds a pleasant whole wheat appearance, and, much like eggs, helps binds things together. There's even a gluten free seedy bread that uses it to amazing results (yes, follow tip 7 and add an egg instead of the chia seeds, please.)
Tint what you're making. Adding 1 - 2 TB of cocoa powder, ground pecans or almonds, or some spices or fruit will often hide the greyish / pale / weird color of gluten free doughs.
And if you got this far - here's my killer almond cake from Marcy Tilton.
200 g butter (you can go as low as 170g)
200 g sugar (you can go as low as 170g without changing the texture)
200 g almond flour (or other nut flours)
5 egg
2 T cornstarch (or cocoa powder or other flour)
1 T rum (vanilla / other flavorings are fine. Orange juice and cocoa is nice. Lemon and vanilla are nice. Raspberry and cocoa was also popular).
Melt butter, mix all in it (don't bother cooling the butter since the sugar and almonds will do it for you.)
325 till done (browned on edges, springy to the touch, clean toothpick, about 45 minutes.) Makes 1 large loaf, but does not care what pan you use. A half recipe is a half loaf pan. Freezes well, servable while frozen due to the high fat / sugar.
0 notes
Text
Before the Tumblr porn ban, I was getting untagged robot dick on my dashboard on a near-daily basis.
Now, I'm getting untagged clown girl inflation, often from the very same people who used to be all about robot dick.
It's not like I didn't know that banning porn never actually gets rid of the porn, it just makes the porn weirder, but I don't think I've ever seen that principle illustrated quite so starkly.
6K notes
·
View notes
Text
i refuse to do any of those monthly art challenges if i post one good thing that's a direct blessing from god
12K notes
·
View notes
Text
Fast dinners
One thing I've found super useful is to actually look at fast dinner options used in places. Now bear in mind I'm working with gluten free + lowish carbs as two limiting factors.
I'm not claiming any of this stuff is authentic, but I'm aiming for "you could walk into a restaurant / get a tv dinner and not be too upset" levels of a food product.
So, let's pretend you're making a bento. There's plenty of people uploading quick bento meals on the internet. Here's one. She also does cheap dinners using a set of ingredients over a week. The bentos are meant to be food stable until lunch at room temperature or slightly chilled, and the dinners are served right away.
What can you see? Well, there's usually a rice portion, a protein, sometimes some egg, and a salty or sometimes slightly sour vegetable. There's usually at least three to four colors and textures. Quite often there's some sauce to flavor the rice a bit.
Italian? There's hundreds of "make some pasta, flavor it to taste" recipes out there. There's also hundreds of "make some polenta and put stuff on it."
Heck, look at American cooking. There's a lot of places where "make a gumbo and a scoop of rice and maybe potato salad" is how you make dinner. There's places where it's a protein, some mashed potatoes, and gravy with a vegetable. There's places where you make biscuits and something to have with them.
So how do you handle allergies / household preferences? You can often find that there's variations depending on where you're from. There's parts of South America / Mexico where the default carbohydrate is a flour tortilla. You can also find areas where it's corn tortillas instead. There's a lot of naan as a fast carbohydrate in Indian meals, but you can find rice, or even flat breads made with rice or lentils.
Sometimes inspiration can come from a sort of rebellion in frustration. I watched some folks making sandwiches, and they managed to make a terrible cubano sandwich, followed by someone making a better one (the main tips from the better place was to try mustard and pickles after you fry it.) We've had about six cubano sandwich dinners after that, and enjoyed every single one.
The first batch, mind you, was just ham and swiss, but we did make some Cuban style roast pork for the second, and the experimentation was fun.
0 notes
Text
Using a sewing pattern
So I'm working on a "new" shirt pattern. My old faithful still works, but I lost the original paper pattern, and I want to tweak the sizing a little. Without the original pattern, sloppy pattern drafting can get worse when you modify a modified pattern, so having a "fresh" draft to work from helps.
Now, mind you I'm using a 1970's shirt pattern set, since it looked interesting, and was affordable. I was forewarned that 1970's shirts can run "small" in the sleeves, even when the ease in the other areas were fine.
So, what's the steps to make a copy for myself?
Check my measurements. The seam allowance in the pattern is 5/8" seams, but I tend to serge at a 1/4" inch. I'm looking for a vintage loose shirt, suitable to tuck in a skirt, or wear untucked over jeans, so exact fit / perfect bust darts doesn't matter. I measured my bust, waist, and armpit to waist numbers, using my old shirt pattern to have a reasonable ease around my armpit. The results came back good. 3" of ease on the bust, 2 - 3 on the waist, and the only problem was if the hem was 2" inches longer to fit my preferred length, it was about 1 - 2" tighter than I'd like on my hips. I'd sooner have it a bit loose on the hips versus cut it long and find that it's too tight on my hips. The original pattern had curves and a slit on the hips, so there was ease for varying body shapes, but I want to do a flat simple hem (this also helps where narrow hems on bad fabric simply won't work well.) Comparing the pieces with my original pattern, they were similar in shoulder size, width (save for the hips,) and waist placement.
Changing the pattern for preferences. I hate button plackets with an interfaced facing you fold in, lightly tack down, and then use. I hate the texture of fixing the edge if the fabric is at all crabby. I hate how bad interfacing can fall apart or not stick well. I've seen some nice versions where you have the facing go all the way into the shoulder, but this pattern is not that. So, I simply added a folded twice and sewn down placket. For super light fabrics, you would want to interface it, but for a basic shirting fabric you should be fine. Similarly, the poofy sleeve is probably going to get edited if I don't feel like using it. I'm not planning on doing a cuffed sleeve at this time, but modifying the cuff is basically playing with a rectangle and a placket to let your arm in. It's easy.
Known issues. Remember how I said I was warned about 1970's sleeves? I checked my bicep, and at the original seam allowance, the sleeve was a half inch too small. So, I checked my sleeve patterns. My slightly puffed one was three inches bigger (with SA) than the pattern. My just barely big enough to fit the armscye one was two inches bigger (with SA.) So, I'd need to widen the sleeve, and then tweak the curves of the sleeve to have a similar "size" to fit in the arm hole. Since many commercial sleeve patterns have too much fabric in the top of the sleeve, I'm not super worried about getting this perfect. That's something that's easier to edit when you're actually looking at fabric on a body, versus a flat piece of paper.
Finally, it's nice to "walk" the seams. Fold in any darts on the side of your fabric, and then check that the length of one side matches the length of another side. Ditto for collars to necklines, shoulders, cuffs to very roughly pleated sleeves. Sleeve heads to armscyes tends to be annoying due to the curves, bias fabric, and general awkwardness of putting a flat object over a complex mobile one. Exact perfection can be fun, but I don't worry about getting side seams over darts to be perfect. Let's face it. I need to re-trace the pattern with my modifications. I need to check if my modifications worked. I will, on average, sew the shoulders the same every time, but darts are easier for me to check on the body. I may find the darts don't sew nicely (too low or high, too pointy, too biased and wrinkling,) or work with my body shape, and that would mean that worrying about perfect alignment would just get changed if I edit anything.
0 notes
Text
Sweater resizing
There's a million tutorials out there, but I'm just talking about what I'm working on.
In the sweater I'm working on, the sleeves seem to be on the bicep. It strongly looks like there's a box pleat at the top, which is a very common 1940's style shaping. Here's a video by Engineering Knits with a similar "make a tab at the top of the sleeve" instruction, and I strongly suspect the sleeve will sew up a similar way.
So, let's start with the instructions. For copyright, and poor quality scan reasons, I'll rewrite these in my own words. "Using a knitted on cast on, cast on 44 stitches and knit in the back of the stitches. Then increase at the start end the end of a row, working all other stitches in pattern, and work a row normally in pattern. Repeat until you have 82 stitches. Cast off 3 stitches at the start of the next 4 rows. Cast off 1 stitch at the beginning of each row until you are back at 44 stitches. Knit in pattern for 3 inches. Cast off. To sew up, connect sleeve seams, work seams into the armscye, pleat in fullness at top of arm."
The original row gauge is 6 stitches to the inch, and 6 rows to the inch. I'm closer to 6 stitches to the inch and closer to 8 rows to the inch.
So, let's do some math. The sleeve is originally 7 inches around, in a stretchy broken rib pattern. Let's look at a size chart to see how this works for standard "modern" sizing. Looking at the actual size of the stitches, you've got a 30 inch waist / high hip, a 35 inch bust (pattern mentions a 34 inch bust), and now we know the bicep ish is 7 inches. It's probably meant to be snug on the arm to not slide down and lose the poof at the top of the shoulder.
So, measure your own bicep. I like some room in my sleeves, so I measured around my arm with a finger under the tape and got about 15". My cast on is 90 stitches.
Now 38 stitches, every other row, that is between 76 to 75 rows, depending on if you end on a blank row. That'll come out to about 12 inches in height. Now, I need to calculate how big I need to go. Lazy math says it's a little under double the stitches, but let's do the proper math. 82 divided by 44 says you've got a ratio of 1.86 and some repeating numbers. That makes sense, since we already know it's a bit less than two.
Multiply it times 90, and we get 167.7272 repeating. The next nearest even number is 168, so we need to add 78 stitches over 12 inches.
If you do the original instructions of "increase pattern increase, blank row in pattern," then you'll get 78 rows. 12 times 8 = 96 rows. Therefore, add another blank row during your early increases 18 times to get yourself up to 96 rows. The slightly slower pitch will just give you more of a cuff at the bottom.
How do you decrease? You remove 12 stitches over 4 rows. That means you go from 82 to 70. The ratio of that is 70 divided by 82 = .85365. I'm at 168 and the ratio says I'm going to 143.4 - let's say that's 26 stitches removed.
Now, the upper part of the sleeve is decreased one each row from 70 to 44. That means 30 rows happen from the start of the decreases to the end of the decreases. That should be 5 inches. We instead have 40 rows to play with.
7, 7, 6, 6 = 4 rows and 26 stitches, ending at 142
2, 2, 2, 2, 2, 2, 2, 2, 2, 2 = 20 stitches, over 10 rows
2, 2, 2, 2 = 8 over 4 rows. (22 rows left, 24 stitches left)
2, 2, 1, 1, 1, 1, 1, 1, 1, 1, 1,
1, 1, 1, 1, 1, 1, 1, 1, 1, 1, 1 = 24 stitches over 22 rows
Could this be a more "elegant" decrease pattern? Sure. But this would get you close to the "size" of the decreases wanted, while preserving the ratio of puff the original wanted.
1 note
·
View note
Text
Updating on vintage projects
1) Feather and Fan Dressing Jacket
Knit in Lion Brand Babysoft in Pansy, US 3
Despite consistently measuring for a 50″ bust, it came out quite form fitting on a 48″ bust. Quite attractive, with raglan sleeves, but it’s definitely small in the shoulders. My row gauge was usually twice of what they expected for the proportions they wanted, yet the shoulders seem compressed and tight. I think some of that is the garter stitch needing to relax, but some of that is the design.
2) Diagonal Ribs in Grey
Used almost exactly 1 1/2 balls of Lion Brand Mandala in Niffler, alternative yarn for pocket bags, US 3
Back has a smaller rib than the front, and feels like it’s intended to be a bit high compared to the front. I think a crochet edging around the entire vest would improve the texture of the edge stitches, but it’s totally workable. Button holes need a little reinforcement, but this is fine for a 48″ bust. My row gauge is again off of what they expected, but it was easily fixed. Quite attractive, though a bit gaudy in the striping yarn.
3) Sweet Simplicity Wins
Yet another rough newspaper scan.
It’s got a broken rib on one side, and a seed stitch on the other, and zero clear indication if the rib or the seed stitch is the right side. Original proportions (linen thread, so this would stretch and slump with time) are - waist / high hip = 30″, bust = 35″, bicep = 7″, max puff on sleeve = 13″, center of neck opening 3″
This is a bit small for an XS in common sweater sizing. I suspect I’ll hate how the puffed sleeves look, but I’m knitting as intended (with changes for size + yarn). The pattern seems to imply back button opening, but I’m strongly inclined to do shoulder buttons instead. I’m doing this in my leftover Babysoft Pansy / some Narnia Lion Brand Mandala Baby on US 4s.
1 note
·
View note
Text
Doilies / Trim and other Lace
So let’s talk a bit about lace knitting.
Bear in mind that I’m mostly talking about knitting, since I find crochet lace to be rough on my wrists. On average, you can get beginner tools (number 10 crochet thread, some US 1 dpns) for about 15$ US, but there’s obviously a million options. Here’s someone using some achingly fine silk, and another person literally using sewing thread.
There’s hundreds of books of lace patterns / trim, and multiple free resources out there on the internet. One example might be Knitting-and.com which has tons of various historical lace patterns.
You can also find a few museums with original magazines, such as this one from the 1930s.
So, let’s go through some of the things you might care about -
Knitting your own lace trim is affordable, infinitely customizable, and also slow. A blouse might need a minimum of a yard of trim for say the cuffs and neckline, but that might take a beginner a few hours. The longer you work, the faster you get.
A doily can, on larger needles, be a scarf or a parasol, or even a tablecloth could be turned into a blanket. At the original size, doilies can be little potato chip like projects that you can carry around that slowly turn into lumpy twisted snoods of fabric. A fast knitter can often do a six inch doily in a couple of days, but that varies depending on complexity, knitting speed, etc. Stretching out a doily after you wash it can involve wires / tons of pins / a lot of work.
Lace curtains can be enjoyable for small windows, and actually get easier since you’re usually repeating the same thing for long periods of time.
Things that you’ll often hear if you’re looking at lace:
Angled decreases - If you look at very old lace patterns, you’ll often find that everything is a knit two together, or some variation on a three stitch decrease. While you can add in left leaning decreases where appropriate, often you’ll find the pattern looks fine with the original instructions. You can use knit to together through the back, or slip one, knit one, pass the slipped stitch over, and there’s multiple variations between knit three together, slip one, knit two together, psso, or slip two, knit one, psso. When you get up to huge decreases, you can start to run into things like knit seven together, or knit nine together. There’s multiple solutions for stitches like this. You might do slip 5, knit 4, psso, or you might do slip 9, then use a hook / dentist tool to pull the yarn through, or you might do some variant of slip a number of stitches, knit 2 together, psso.
Multiple increases - Let’s say you’re adding 4 stitches in one stitch. A common solution is to knit one in the old stitch, purl one, knit one, purl one. Some people suggest for larger increases doing knit one, yarn over, purl one so you’re not pulling the old stitch to be too huge. If you’re adding multiple yarn overs, you may find the yarn overs look floppy, large, and unpleasant on the next row. Some people knit the yarn overs twisted to pull them tighter, and other people suggest reducing the amount of yarn overs you do. So, let’s say the pattern has five yarn overs. It’s huge in your tension / yarn / whatever. You hate it. Knit a smaller number of yarn overs, and then knit one, purl one in your yarn overs to make the stitch count you need.
“True” lace - this is lace that has complicated stitches on every row. This tends to be more “open” and airy, but also tends to be more tricky. A blank row of just knitting or purling gives you time to check your stitches, check your count, and gives your lace fabric space to settle any tension issues. It can be more difficult to do that if you’re doing complex stitches every row. Here’s an example of a “true” lace doily. Here’s an example of one that has those restful rows of plain knitting that has similar “leaf” motifs, and another one with a more open design.
Estonian lace - this often has interesting wrapped stitches, pulling up stitches from other rows to make star like shapes, or nupps (basically making tiny bobbles,) but you can find these stitch techniques in other knitting. This will be difficult if you’re not used to doing the stitches, and can be hard if your tension is very tight, since, like cables, you’re twisting yarn around or dealing with a lot of stitches. While this is not Estonian lace, this doily has wrapped stitches in the center of the violets and this one has nupp like stitches. If you see this kind of texture, you want a strong yarn, and to test the stitches before you commence. The last thing you want is your yarn to snap every time you hit one of those fancy stitches.
Filet - Filet crochet / knitting is based off of netting where you’d fill or not fill in various squares in a grid. Here’s an assortment of filet patterns. Filet tends to be a little tedious if you have tension issues since having a “true” square helps a lot with making your grid look correct.
Twisted stitches - While yarn overs and angled decreases will obviously twist stitches, you can also get right twist / left twist, which are basically tiny cables. These also pop up in 1940′s style cable knitting for yarn efficient texture. In doilies, you can see this pop up for grid shapes, starting the angles of the edge of something, or for texture like wheat. These can be fiddly to do, but are doable without a cable needle. On a slippery yarn, tight tension, hard to use needles, you might find it infuriating.
A final common thing to pop up is hex mesh - Any time you see a decrease, two yarn overs, and then a decrease, you’re probably looking at a variation on hex mesh. This can get super repetitive, and there’s actually variations among various designers as to if they have the decreases angle in to the yarn overs, or out, if they just use the same decrease, etc. Here’s a very standard doily that uses hex mesh. Some people loathe hex mesh since it can be tedious and easy to lose your place. If they have tension issues with the double yarn overs, it becomes a sea of repetitive stuff to be careful doing. Other people find it super relaxing to just fill in hex mesh until you get to the edges of the pattern (this also means that mistakes in charts love to lurk in the edges of hex mesh, since people often don’t count until they get to the pattern.)
3 notes
·
View notes