
website : twitter : facebook : ask A place where I will express myself and share the latest about decorative plumbing industry and technology.
Don't wanna be here? Send us removal request.
Statistics
We looked inside some of the posts by martinsiwy-blog and here's what we found interesting.
Average Info
Notes Per Post
279
Likes Per Post
275
Reblog Per Post
3
Reply Per Post
0
Time Between Posts
2 months
Number of Posts By Type
Text
10
Video
3
Quote
4
Last Seen Tumblr Blogs


Fun Fact
Tumblr Inc. has $15.1M in annual revenue.
Text
Open Box and Installation of Touchless Toilet Flush Kit by Kohler
You probably wondering and asking why? Well, if you have young kids you will understand. With two little girls at 3 and 6 "flushing" may be challenging at times due to the strength needed to push down on the lever. On the other hand when you have older kids come by the house it's hard to keep them off hanging onto levers. Things break, they forget to flush needless to say it is not always a good experience. I found this Touchless Toilet Flush Kit and decided to give it a try and so far we love it. Here is to the new "flushing" experience! It's a Kohler product item number 1954-0. Retail Price: $99.97 Front of the box:

Taken out of the box:

All the included component:

I started with getting the power batteries situated. Insert the provided (4) AA Batteries to the Battery Holder

Find the throne that you want to convert to no touch flushing system. In my case its a Toto Drake toilet. Here is the link to all compatible Kohler and Sterling toilets.
START by turning off the water at your supply and flush the big john manually one last time!

Remove the tank cover/lid

Remove the existing lever assembly and disconnect the chain link from the lever assembly.


Since you removed the lever you got a "hole" to fill. Take the hole cover and the nut then put in place of your old lever.

Looking good

Take the adapter and attach to the module

This adapter will tell you if your toilet is compatible with the kit. It all depends if you can slide that adapter over your water tank's back wall. If the wall if not too thick and the adapter fits over it you are in a good shape. Don't force it since you will break it. Take the tank cover/lid and put in on top to make sure that the module is not too high or too low. You want the module to be as close as possible to the tank cover/lid. Adjust it now.

Make sure that the rotating wheel is in line with your flapper. You want the chain link to be in-line as much as possible.
I kept my original flapper chain link since I didn't want to mess with it and I extended the chain link.
You want to rotate the wheel on the model to have the mount on the top

Trim your chain link as necessary. Leave couple extra links just in case and make sure the flapper is all the way up (in open position). Connect the chain link to the wheel on the module.

Move the wheel on the module and make a complete rotation to make sure the flapper will open/close properly.
Put the (4) Pads on the top corners of your tank.


Open the top cover on the module and insert the battery holder into it.


Close the lid
Open water supply to the toilet
Wait for the tank to fill
Test drive it by putting your hand over the module!
It should flush :)
Video Link
If everything works as it shoud put the tank cover/lid on top half way. Take the Hand Emblem and and put it as close as you can in relation to where the module's sensor is. BTW removing the Hand Emblem when your close friends come over maybe one of the best pranks ever! :)


You are done!
Here is the Video Link of completed installation.
0 notes
Text
That awesome presentation that you nurtured for years.
When was the last time you created a PowerPoint or Keynote presentation from scratch?
I bet you that most if not all of your presentations are in standard screen ratio mode (4:3). You didn't even think about the ratio when you created them. Do you know that by simply "upgrading" them to 16:9 widescreen ratio you will gain 33% more space per slide? Now, don’t go adding extra bullet points. Spread out the content, make the font larger than 24 point, making it cleaner, sharper and you gain a high definition look. Most likely you can also consolidate your presentation to less slides. I am a strong believer in less is more! Also, since you are probably using HD screen or HD projector now you will have a true full screen presentation without “stretching” it or the black rectangular border on both sides.

0 notes
Text
Using AppleTV in your showrooms

I am doing at least one showroom presentation a day that requires a projector or TV for my iPad or my laptop. I realize that most decorative plumbing showrooms already have TV's in their showroom however most are utilized for some sort of slideshow or loop presentations.
I would like to show you how you can convert your TV into a very powerful presentation tool for your sales people, trade professionals visiting your showroom or manufacturers when doing PKs or CEUs.
There are many advantages of using TV screens vs projectors. The biggest advantages are the brightness and picture quality of a TV are far superior to that of a projector. As a bonus you also gain sound through the TV speakers and will not have to listen to noise generated from the cooling fans of an overheating projector.
I think we can safely say by now all of the flat screen TVs come with at least one HDMI input. Your TV will need to have at least one HDMI input to complete the setup . Additionally you will need WiFi within the showroom in order to network the AppleTV, and of course you will need to purchase the AppleTV itself ($99 www.apple.com/appletv).
By connecting the AppleTV to your TV screen in your showroom and configuring it with your WiFi network you will create a wireless “bridge". This will allow you to mirror the screen of any other WiFi enabled devices like iPads or/and laptops onto your TV screen completely wirelessly through WiFi. If you are going to have people trying to connect to your AppleTV using Windows laptops they now can do it by downloading the AirParrot program onto their computers ($10 www.airsquirrels.com/airparrot/). Apple products will work without AirParrot using AirPlay technology.
Once you complete this setup you can walk around the showroom with your iPad or laptop and whenever you want to show off something, within one click you can mirror the image onto your TV without any wires or adapters attached. You can utilize this setup for PKs and CEUs done by manufacturers or simply to impress your customers or trade professionals.
Please contact me with any questions you may have and I look forward to the first showroom to implement this powerful presentation tool.
0 notes
Text
New ways of doing business through the use of new technology
It was three years ago when I signed up for www.square.com just for fun and to see how it works. The Square app allows you to accept credit cards using your phone or tablet with a free card reader. Yup, free service that charges less than 3% percent per credit card transaction and delivers money right into your bank account. So anyone can accept all of the major credit cards at the same low fee without any monthly fees. I knew then that the credit card merchants will start disappearing or at least try to adjust their way of doing business. Why would any business want to pay for an expensive equipment and high fees just to be able slide your credit card? Square changed that. What about if I tell you that there is a 28 years old Ben Milne from Iowa and his mission is to take credit card companies out of business. Ladies and gentlemen check out www.dwolla.com. By introducing a “new” way of processing a payment at $.25 per transaction through an app so far he helped avoid $48 billion in swipe fees!
Is your business still not accepting credit cards? Are you not accepting certain types of credit cards because your merchant is overcharging you on fees? You should rethink the way you are doing business and stop refusing payment which ultimately means you are refusing business!
According to the Fed survey from 1997 - 2007 America's credit card debt balances increased by 75%, imagine what that number is today in 2013!
But it's not the credit cards that I want to be writing about in this post. It's the taxi and limousine industry. It was yesterday when I heard about www.lyft.me . I can comfortably say that in the next few years you will see less taxis on the road with very few limo services left at least in Los Angeles area and here is why.
What is www.lyft.me? Basically it's a ride-sharing service that provides commuters with less expensive and more social way to get around. I became really interested in this program since I use car service often to get to and from the airport. I can never justify the $100/25 mile each way ride, it just hurts every time. So I downloaded lyft app while at the Denver airport awaiting my flight home.
Although right from the get-go I had some hesitations and had to do some research. Since when you download the app, you must sign in with your Facebook account which I rarely feel comfortable doing due to my privacy paranoia. After a little bit more of research I decided it's worth it since the app looked legit. Onto step two, they asked to provide them with my credit card info. I couldn't resist the urge to save money on my regular ride to and from the airport. I just did it…
By now I am up in the air and I cannot wait to try lyft. I knew when I land I will meet up with my buddy John and Stephen for some drinks. When we got to John's place I told them about the lyft app and they were just laughing about it since none of us really knew how this program works. Well I decided to open the app to request a “Lyft” since we wanted to grab a bite and none of us wanted to drive. As shown below, you can see where the registered drivers currently are.

It showed me that there was a driver 2 minutes away from our location. I hit the button; we went outside to wait for our ride (laughing in anticipation). Oh!, and when you Request Lyft the picture of the driver and picture of the car appears on your screen so you know who is picking you up. In our case it was Rogelio. Literary about a minute after I Requested Lyft, I received a text message informing that our ride was almost here. Shortly after, a silver Toyota Camry with pink mustache as pictured pulls over to pick us up. A friendly Rogelio asked us about the destination. We couldn't stop asking him questions. How does this work? He told us anyone can become a driver after going through a two week approval process including DMV check with a car that's 4-door and newer than year 2000. Our ride was about 5 minutes and we asked Rogelio about the fare. Well there isn't a set fare, once the ride is complete you get a window within the app to donate whatever you feel is fair for the ride. We decided that was a fair $8 ride. Out of which the lyft keeps 20% and the driver gets the rest. I say pretty fair and convenient for both parties! The driver can work anytime of the day or night and the customer can Request Lyft especially if you can’t or don’t want to afford a cab or if you simply want to have a DD after couple of drinks.
And in case you do not pay, the drivers can rate their customers so if you get bad reviews good luck with any lyft drivers picking you up in the near future.
This is another example how ordinary things in our lives with the help of technology can make the process more interesting, more affordable and convenient for all.
Before yesterday, neither you nor I probably knew that something like Lyft existed. Today, I am putting this on the web for anyone to see and hopefully you will share and come back to see how many people we reached and how many are using this new technology to get around.
It's truly amazing how technology is changing our lives for better or worse.
Be open minded, don't be afraid to try and you will succeed. You cannot limit yourself by your own level of comfort and you must look outside the box.
Currently the lyft service is only available in Los Angeles and San Francisco area. I understand this concept probably won't work in cities like NYC but I am super excited to request my next lyft soon! What do you think?
1 note
·
View note
Text
PowerFlush vs. Others

All steam generator manufacturers point out how a 20-minute steam bath conserves water. The claims vary between 1 and 3 gallons of water usage per 20-minute steam session, of course depending on the kW of the unit. But, let's look at something that you're not being told.
Keeping it simple... let's assume all tanks are 1 gallon in capacity and an average steam session is 20 minutes.
Other than ThermaSol, purchasing the highly recommended solenoid valve that drains the tank automatically after each steam session, you will be wasting precious gallons of water without even realizing it. To be precise, 263% more in this example. Additionally, you'll be paying more for the installation with these manufacturers since the plumber is required to run a pipe from the generator outlet valve to an approved drain.
ThermaSol is the only manufacturer in the category to provide you with a truly effective inner-tank maintenance and cleaning system, PowerFlush. It comes standard on ALL ThermaSol generators and uses household water line pressure, and engineered speed slots to create a pressure cleaning system that actually works... it's so much more efficient than simply draining the water via gravity.
The PowerFlush system is activated by the user after 1000 minutes of use or 50 steam sessions, since we used the average steam session to be 20 minutes. PowerFlush uses about 19 gallons of water when activated, the other manufacturers are literally throwing 31 additional gallons of water down the drain since they're draining their tank after each use. You can only imagine how many hundreds of gallons will be wasted during the lifetime of their generators. Now you know! Save water, Steam ThermaSol.
Click here to learn more about PowerFlush.
#ThermaSol#steam shower#steam room#powerflush#martin siwy#generator#I bet you didn't know#made in usa#save water#steam
2 notes
·
View notes
Text
Solitude App by ThermaSol
Solitude Mobile Application by ThermaSol After receiving many emails from you with questions I am super excited to blog about the Solitude Mobile Application. It has been a long time in the making and I think it’s THE product of 2012 in the Decorative Plumbing and Hardware industry. That’s right; technology meets the shower environment! I am so proud to be a part of the ThermaSol family. Steam showers have been around for thousands of years, but who would have thought you would eventually be able to control heat settings, maintenance and even lighting and sound with a wireless device you hold in your hand? Yep, you heard it right! Now I can control my Nest thermostat and ThermaSol steam shower, via cell phone or tablet device, from anywhere within my home’s Wi-Fi range. Think about it; most of us have our phones or tablets with us at all times. My charging station is next to my bed. Now I can now wake up and turn on my steam shower from the bed! This allows me to preheat the shower so it’s nice and steamy when I get up and in. So let me take a minute to give you a tour of the app and what it can do. Here’s a screenshot of the Dashboard:

On the left side is your menu with the following options: Home, Steam, Music, Light, User1 and User2. Main screen (top) you have the Temperature Gauge and Session Time Gauge. On the bottom you will find the Lights and Music simplified controls. On the top right you’ll find Options and AUX, which I will cover later in the blog.
Steam Option:

Here you can slide your finger to the desired temperature and session time. Or you can press the “-” and “+” buttons for a more precise setting. The current temperature will display on the bottom of the Temperature Gauge and time left will display on the bottom of Session Time Gauge.
Also on the top you find the ON/OFF button for steam.
Since the system communicates with your cell phone or tablet via an easily installed module, the response time is really fast (almost instantaneous). The inside shower controller and your app are synchronized at all times.
Music Option:

This is where the true “entertainment” begins in your bathroom :). On the top you can slide your finger and control the Volume or you can Mute the music.
EQ - Equalizer, where you can adjust your Treble, Mid and Bass
You can press the FM button and you will be able tune to any FM station. You can also have six presets on your screen.
Input 1 and Input 2. You have up to two different music sources besides the FM. Bluetooth takes one and is included with your Light and Music System. The second RCA type of connection can be used for TV or anything else you would like to connect.
Light Options:

On top you have a Shower Light option. When pressed, the “white” light turns on or off. Below the button you can adjust Intensity. This feature is only available through the Solitude Mobile App.
When the Mood Light option is turned on the lights will gradually go through different colors so you can enjoy the full spectrum of colors in the shower. You also have the option to adjust the light Intensity.
Chromatherapy is very interesting. If you believe in the power of Chakras you will be in heaven with this feature. Many people say colors can have a beneficial effect on specific areas of your body. Well, with your health and relaxation in mind, ThermaSol has preset these healing colors into the system so you can enjoy them at your fingertips.
You can actually share your Facebook status on what color you are using with your friends!
User 1 and User 2
You can Preset the steam shower system for two different users. This is very convenient, since by pressing one button you can turn everything on and off to the previous setting used.
Let me know what you think or if you have any questions. Like I said, this is so far the coolest and most functional item I’ve seen in the bathroom category this year.
Download your ThermaSol Solitude App from iTunes or Google Play now and let me know what you think!
0 notes
Video
ThermaSol Steam Shower in action with Bluetooth Serenity Light and Music System
3 notes
·
View notes
Text
Nest Thermostat (THE thermostat) Part 2
Part 1 of the Nest thermostat blog was so much fun for me so here we go with Part 2.
It has been 8 days since my Nest installation. The thermostat finished its learning process on day 5. So far so good - I only had to adjust the Nest a few times since the installation and it really learned and remembered all the temperatures I set it to.
In the past 3 days I only had to adjust it once, which is better than expected. I feel that it is efficient and convenient.
After several days of learning, the Nest is gradually becoming more accurate in its prediction of how long it would take to meet the temperature setting. As an example when I change the temperature, Nest now displays how long it is going to take to reach the new set temperature and it is pretty much on spot. See the picture below.

So basically Nest is telling me that currently it is 74 degrees in the house and I want it at 75. So it will take 35 mins to reach 75 degrees. It will keep it at 75 until next scheduled temperature change.
Let's look at some of the menu options. Here is a shot of Main Menu when you press the Nest.

When you press the Nest on the red/blue dot it goes to the Heat/Cool/Off selection.

Main Menu/Schedule

Here you can add/change any of the times and temperatures that Nest has learned. It is very easy to do.

Main Menu/Energy


Here you can actually see how long you had the Heating or Cooling running for each day for the past week. Not sure how the Nest determines what's an "Average" though.

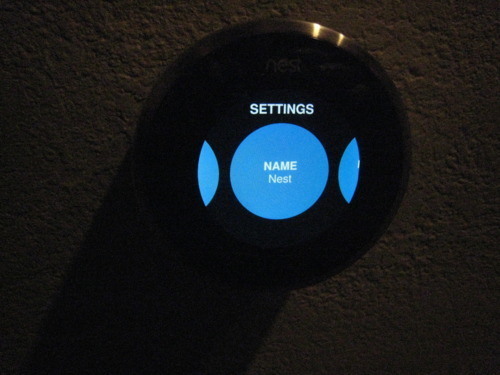
Main Menu/Settings

Under the Setting you will find the following options:

Option of Fan Auto or ON

You can Lock the Nest

Next is the Learning Setting


Brightness

Here you can set the Brightness of the screen to Low, Medium, High or Auto.
Screen On allows you to enable the motion sensor so when you approach the Nest it turns on or you can set it to when you press the Nest it will turn on the screen.

Click Sound

Fahrenheit/Celsius

Name (I like Nest)
Network

Nest Account (for privacy purposes I will not upload the screen shot)
Zip Code

Date and Time

Wiring


Advanced


Technical Info


Legal Info


Reset

We covered all of the options under the Settings
There is one more option under Main Menu I didn't cover - Away


If you are going on vacation or you know you will be away for a longer period of time, you can manually set your Nest to Away Mode. In the Away Mode, Nest will ONLY keep your home/business in min/max range you set it initially.
For full explanation on how the Away Mode works click here.
If I had to grade this product I would give it A-
There is always room for improvement. I really tried hard to find something wrong with this product though. Nest folks really thought of everything. Although here are my thoughts/suggestions.
As I mentioned in Part 1 I would have some sort of plastic "blade" glued on top of packaging. This "blade" could be used to open the plastic foil with an ease.
I miss the Time display that was on my old thermostat. Never thought about it until I uninstalled my old thermostat that I actually regularly checked the time on the thermostat. I am sure that can be added with a future update.
Last thing is a filter replacement reminder. My old thermostat reminded me when it is the time to replace the filter. Couldn't find this option on the Nest.
Overall, I love this product and I would absolutely recommended to you all.
My most favorite feature is the remote access and control of the Nest which I will cover in Part 3 together with energy consumption.
By the way, if you want to see if Nest is compatible with your existing HVAC system click here.
Thank you again for reading and "Stay Warm"
Martin
117 notes
·
View notes
Text
Nest Thermostat (THE thermostat)
It was 2007 when we purchased the house and one of the first upgrades on my list was to do home automation. Since I am A DIY kinda guy and didn't want to spend too much money on it, I decided to go with Insteon from Smarthome. I automated everything except for the thermostat. I live in California and I always wanted to turn on my AC remotely so when I get home the house will be nice and cool (not necessarily the most energy efficient all the time but on a day when it's triple digits, I NEED it to be cool when I get home). Insteon has an option for the thermostat but I am not a fan of their RF (radio frequency) products. Never had any luck with them. Also the $200+ price tag just for a regular Venstar 7-day programmable thermostat with an adapter was not something I was convinced about.
Fast forward to October 25, 2011. I saw a Facebook post on DCUBE fan page about the Nest and this video. I did a quick research about the company and the inventor and had to have it! The Nest story is great and the product looked awesome. I even emailed the VP and Founder of Nest to congratulate them. BTW he never got back to me. :)
On the same day, I placed an order! Luckily (for me) I did that because I found out five days later that they sold out - no new orders until some time in 2012! I waited over a month and at long last, my Nest thermostat arrived on December 1, 2011! Imagine my excitement - those who know me can!!
For the past week I was thinking of selling it on eBay since they are selling for $650-$1000. Yes, I know, that is crazy! As a birthday gift to myself, on December 2nd, I had to install it! So here we go:
This is the packaging it came in:

Very nice, heavy duty packaging that is covered with a clear plastic. An afterthought and suggestion: You thought of pretty much everything but wouldn't it be nice to include a "plastic" blade that would be taped to the box for easy opening? :). That way I wouldn't have to look for knife, key or scissor. (credit goes to my wife Betty)
Side of the box:

Other Side:

Top View:

And once you remove the sleeve:

Now the exciting moment. Open Sesame.

Notice the mold made specifically for the thermostat's shape which also has a clear plastic cover for extra protection. Let's pick up the Nest.

It feels heavy and quality built. Even though mostly made out of plastic with a brushed metal ring which is the only moving part and a controller for the unit. Let's look at the back side.

On the bottom you got the serial connector that will connect with the base on the wall and on the left we got a mysterious USB connector. Not sure what this is for but I assume it may play a role in testing and possible access to internal program. Very nice so far. Except (that is my personal thing) on the right you will see "Designed in the US, Build in China"). Come on guys, we need to keep the manufacturing in US. I bet you could of done it in the US for a little bit more money and you wouldn't have to deal with copies that probably will be in stock before your product. Ok that's enough...let's move on www.facebook.com/nocopies
Underneath the plastic mold you find a very nice literature with instructions booklet. Here are the pictures:


What's really neat is that in the instruction booklet has these stickers:

Really cool to see that they even thought of this. Again, that is why I am so happy and excited to review a thermostat (Nest that is :)). What makes the product user friendly are the details like this and the ease of operation.
Under all the literature you will find this:

On the left a screwdriver? Not just a screwdriver...

A super cool screwdriver with 4 bits. You know that every installer will keep this in their toolbox ... genius marketing and a "free" tool.
Then on the right we have the base that will mount on the wall.

Notice the built in level on the unit :)...that is just to make sure that you will install it just right...again ... awesome.

They even supplied the screws and anchors:

Let's move to the bottom of the box.
You will find two plate covers, in case you are too lazy to patch your existing holes you can use these to cover them up. It also comes with a metal plate for installation over an electrical box.


I am done covering the content of the box. Let's go and install the Nest.
This is what I am going to replace with the Nest.


This is where I used the supplied stickers to label the wires.


Now I patched the holes, painted the area and installed the base.

Pushed down the grey buttons and insert the wires as marked and of course check if the base is level :)

Now it's time to put the cover on :)

Pretty cool stuff! :)
As you can see the built in WiFi picked up my network and its time to set it up.


What I want to point out here is the purple dot on top of the Nest. There are 2 of them that you CANNOT see with the naked eye. These are motion sensors so when you walk by the Nest it turns ON to show you the preset and current temperature. It's really cool!


That's right, it updates itself!


Once you get the internet going, you then have to set up the heating and cooling.

Nest actually shows you which cables you connected and what they are! Until now I never knew what the cables actually were.


Once you finish the setup, this is what the screen looks like. It will show you what the heat/cool temperatures are set at and the smaller number is the current temperature.

Next what you need to do is go to www.nest.com and create your account so you can access the Nest remotely through your iPad/iPhone App (Droid App coming soon). The free app is already on iTunes waiting for you.
Here is the screen shot of the web based account info.

It is awesome and simple to use. From anywhere in the world you can access it via net and fully control your HVAC at home or business. I am going to stop here. Next when time allows, I will cover the Apps and Learning experience that my Nest is going through for the next 7 days. Let me know if you have any questions in the comments below.
For now, "Stay Warm"!
Martin
75 notes
·
View notes
Text
From the Showroom with Martin Siwy – The Bluetooth Zone
At ThermaSol, we love to push the boundaries of technology and design.
With our new Bluetooth enabled technology, we’ve once again brought innovation to the shower. As I travel around the country to present ThermaSol’s Bluetooth technology, I use a smart device (iPad, iPhone, Droid etc.) to show how easily you are able to leave the system on and stream it at any time. For example, in the shower you can stream news uninterrupted – a feature people really respond to. It’s so easy to connect and to sync, even with multiple people in the house – each person can stream their own music and play list into the shower!
To make the technology even easier for customers to understand, ThermaSol created something we call the Bluetooth Zone for our showrooms. It’s a display item that showrooms can purchase – a 2 foot diameter floor mat that people step on which syncs their device to ThermaSol’s Light & Music system. It has signage to alert customers when they’ve entered the Bluetooth Zone and it explains how they can sync, so that any customer who is browsing in a showroom can test it out themselves right on the spot.
An additional benefit to our showrooms is that any showroom who purchases the mat is then listed on the ThermaSol website as a dealer with the Bluetooth Zone for a demonstration.
If you attended the recent DPHA Conference and Product Showcase, then you saw a ‘live’ example of the Bluetooth Zone. ThermaSol’s booth was unlike any year before; in fact, it was unlike anything the DPHA show has seen. With the help of designer Susan Bacchi and Napoleon At Home, ThermaSol brought show attendees to the “Letting Off Steam Lounge,” a luxurious seating area complete with spa-like food and beverages in a serene, ocean-side inspired themed environment. We invited attendees to come and experience ThermaSol’s newest line of products including our Modern Collection controls and Serenity Light & Music system featuring the Bluetooth Zone experience. Most importantly, they were able to let off some steam after a long day at the show!
If you are interested in learning more about the Bluetooth Zone for your showroom, please contact me.
Martin Siwy Western Regional Sales Manager
22 notes
·
View notes
Text
Martin Siwy of ThermaSol® Presented with Two Prestigious Awards at DPHA Annual Conference
Siwy Recognized For Achievement and Unsurpassed Dedication to Plumbing Industry at Key Show
San Jose, Calif. – Martin Siwy, Western Regional Sales Manager for ThermaSol®, was honored with the Manufacturing Professional of the Year and Distinguished Service Awards at the Decorative Plumbing and Hardware Association’s (DPHA) annual conference Oct. 14-16, 2011. The ceremony generated public recognition of outstanding products, individuals and performance and acts as an extension of the decorative plumbing and hardware channel. The awards program aims to recognize distinguished individuals, corporate performance and unprecedented innovation within the decorative plumbing and hardware industry. The Manufacturing Professional of the Year award is bestowed to a decorative plumbing and hardware (DPH) manufacturer member who has made outstanding contributions to advance the DPH profession. Judging criteria for this award includes degree of involvement in DPHA activities, personal achievements in the industry, pursuit of personal improvement and education, job performance and accomplishments, involvement in and support of other DPH-related organizations, and finally public recognition for a deed or accomplishment which may or may not pertain to the DPH industry but reflects favorably on the individual as a DPHA member. The Distinguished Service Award recipient was selected by DPHA’s 2011 President, Steven Weinberg, and was awarded to Siwy for volunteering his time and resources to achieve the association’s goals. Siwy also proved to be an invaluable supporter of the association during the president’s term. Martin Siwy (right) accepting his award with Mitch Altman (left), CEO of ThermaSol® “I am truly honored to be the recipient of not only one, but two distinguished awards from DPHA,” said Siwy. “ThermaSol’s dedication to innovation and customer service makes it easy to support and align ourselves with DPHA’s industry commitments. Our unrelenting pledge to steam shower innovation has kept ThermaSol at the forefront of the industry and we are honored to have been recognized by such a force.” ThermaSol exhibited at the DPHA show with tremendous success as a myriad of attendees took the opportunity to relax at the “Letting Off Steam" lounge designed by Susan Bacchi and Napoleon at Home Interior Design. Complete with plush seating, fresh fruit, chromotherapy, custom artwork and soothing music, the booth brought the ThermaSol experience to guests. The show was an opportunity for ThermaSol to showcase their modern style controls as well as their Bluetooth® Zone that allowed guests to sync up their music players to the Serenity Light & Music system and help create the booth’s ambiance.
0 notes
Quote
"In the past year, 70% OF ARCHITECTS AND 49% OF INTERIOIR DESIGNERS SPECIFIED SUSTAINABLE PRODUCTS in their projects "very often" or "always."
http://www.facebook.com/martinsblog
19 notes
·
View notes
Quote
The primary reason architects (58%) and interior designers (56%) specify sustainable is for THEIR OWN PROFESSIONAL SENSE OF ENVIORNMENTAL RESPOSIBILITY.
http://www.facebook.com/martinsblog
18 notes
·
View notes
Quote
Only 23% of Architects and 32% of Interior Designers agree that manufacturers' sustainability product claims are credible
http://sustainability.imre.com/
22 notes
·
View notes
Quote
They aren't completely confident. Only 2% of Architects and 3% of Interior Designers are "completely confident" in manufacturers' claims about sustainable products.
http://sustainability.imre.com/
0 notes