
Comic-Con@Home Masquerade: the official costume competition of San Diego Comic-Con International
Don't wanna be here? Send us removal request.
Statistics
We looked inside some of the posts by masquerade-at-home and here's what we found interesting.
Average Info
Notes Per Post
2K
Likes Per Post
2K
Reblog Per Post
391
Reply Per Post
9
Time Between Posts
3 hours
Number of Posts By Type
Text
9
Video
5
Photo
3
Last Seen Tumblr Blogs


Fun Fact
Tumblr was named as a finalist in Lead411’s New York City Hot 125 in Aug 2010.
Text
Comic-Con@Home announces the 2021 Masquerade Costume Competition Winners
Best in Show: "Valkyrie (Jane Foster)", crafted by The Queen’s Armory. Beautiful and with extensive hand-leather work that wowed the judges, it lights up, too! A stunning interpretation from the Marvel universe.
-as well as-
Winner: Frank and Son Collectible Show Award of $1,000.
Winner: The Costume Designers' Guild Spotlight Award, to include a costume design book, a $100 Amazon card, and more.
* The Judges' Choice Award resulted in a TIE of two very different costumes! *
Judges' Choice: "Obsidian Desert Queen Zagara", Broodmother of the Swarm from Heroes of the Storm, crafted by international Korean cosplayer MyBoo Cosplay

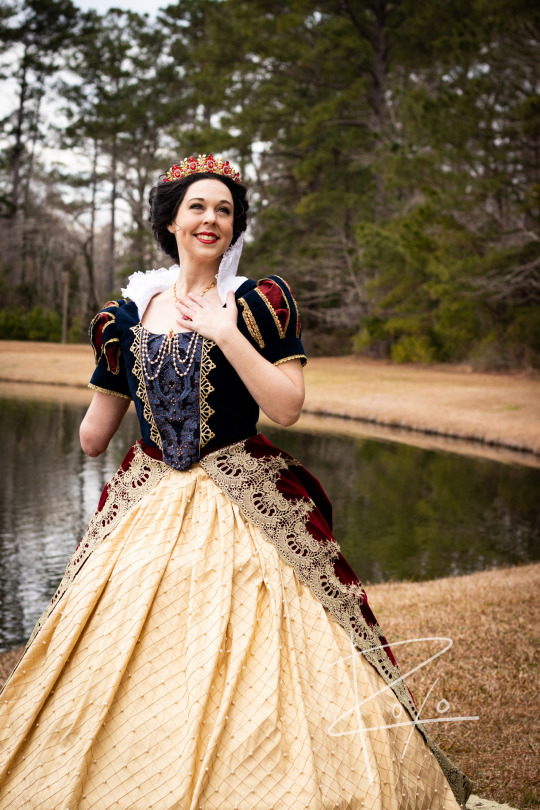
Judges' Choice: "Snow White", an original imagining of the joyful Queen's Happily Ever After, with exceptionally embellished historical design by Mandy Pursley / Be The Spark Cosplay
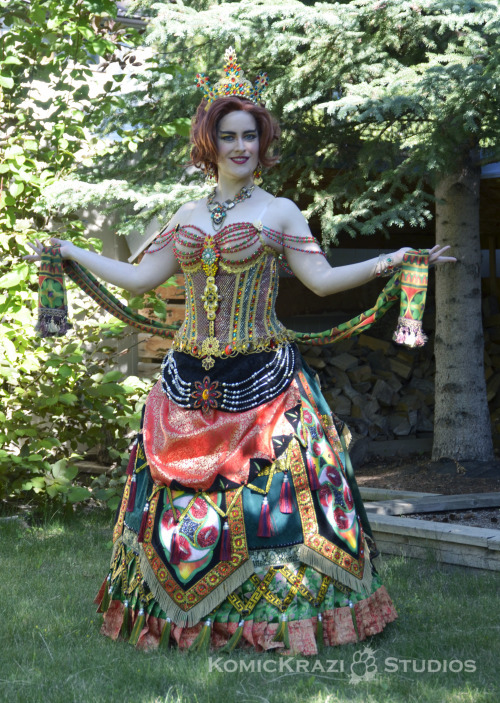
Best Re-Creation: "Arachne". Japanese artist and illustrator Sakizou's character cleverly and skillfully translated from 2-dimensional artist canvas to real life by Nina London Cosplay
Best Original Design: "Goodbye Beach City", a beautiful homage to Steven Universe, any way she turns, there’s a detailed story sewn into her dress! From Moria Magre/MinesOfMoriaCosplays

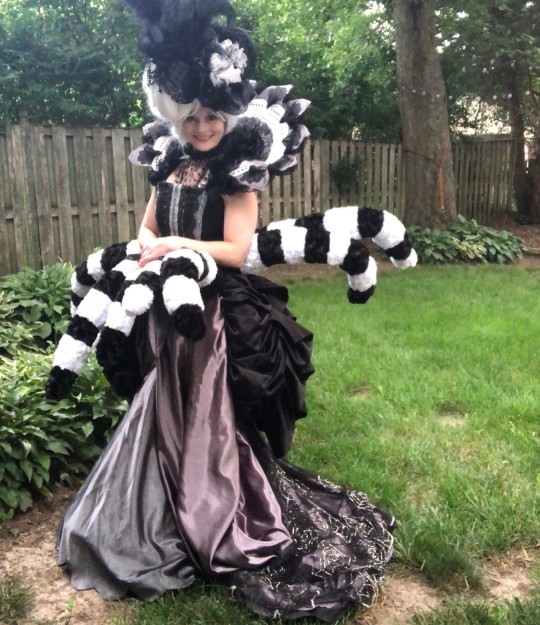
Best Workmanship: "Carlotta, from Phantom of the Opera", a highly detailed re-creation of Carlotta's Hannibal dress of the Broadway show, crafted wonderfully by Canadian Devon Baker / Komickrazi Studios
Most Beautiful: "Lady Loki in Armor", a striking original interpretation of the character in resplendent battle armor and impressive weapon too, designed and crafted by VivSai

Most Humorous: "Yo, Ho, Yo, Ho, A Batman's Life for Me". Perhaps in some alternate universe, Batman and Robin could be partying pirates? A jovial imagining by Jeanie Lopez, plus Lucas and Joe Queen

Best Group: "Lord Captain America and Iron Lady", an Avengers Masquerade, cleverly imagining two Marvel heroes in refined and elegant period costuming, as crafted by Miguel and Lucy Capuchino / Capuchino Cosplay

And some Honorable Mentions: Here’s a few entries just as loved by the judges that nearly won trophies. Even though they scored slightly lower than the top choices, they still deserve recognition for achievement:
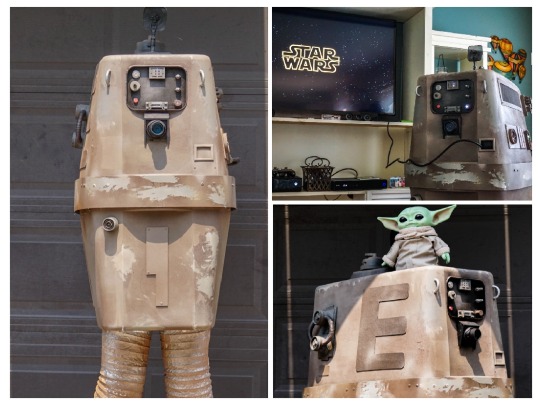
Honorable Mention: "Gonk (gonk guh gonk gonk gonk)" a fun re-created screen-accurate Star Wars GNK power droid with moving parts, constructed by Kaiweevil
-as well as-
Winner: The David C. Copley Award for Most Innovative Costume: $500 in Amazon cards from UCLA’s Copley Center for the Study of Costume Design.
Honorable Mentions:
"Edgar Markov", (lower left) an armored character from the terror-rife gothic plane of Innistrad in the Magic the Gathering game universe, brought to you wonderfully by Kensadi / Kensadi Cosplay
"Varian Wrynn", (lower right) World of Warcraft's King of Stormwind and High King of the Alliance in amazingly constructed armor, from international Korean cosplayer Sin_Moon

- - - - - - - - - - - - - - - - - - - - - - - - - - - - - - - - -
San Diego Comic-Con gives a big "Thank You" to the contestants for all their work and talent,
to the guest judges Jennifer May Nickel, Dr. Deborah Nadoolman Landis PhD, Garnet Filo, Allan Lavigne and Gigi Bannister for their time and expertise,
to Phil and Kaja Foglio for being our Masters of Ceremonies,
to the Frank and Son Collectible Show, the UCLA David C. Copley Center For the Study of Costume Design, and the Costume Designers' Guild IATSE 892 for their generous support of the event,
and to our convention friends & family both near and far for joining us online- until we meet again!
Learn more about our Guest Judges, Sponsors and 2021 Awards here!
602 notes
·
View notes
Video


Comic-Con@Home Masquerade Entry: [MyBooCosplay] Costume Title: [Obsidian Desert Queen Zagara] Costume Description: [Re-creation. game, Heroes of the Storm]
I took 6 months to produce this costume. All of these costumes were made by myself. It is designed to move the tail, legs, and LED spheres of the outfit. The tail connects to my ankle and moves every time I walk. Legs connect to my thighs and move every time I walk. The LED sphere in the middle is made using Arduino and a servo motor, and it opens when a button embedded in the glove is pressed. I can hardly feel the weight because I made a costume based on a support walker. The size of the costume is large, but it is designed not to feel like I’m on it, but to move my tail and legs to make it look like a creature. This outfit took the most time and money out of all the clothes I have made and is my favorite.
Bio: I’m all-rounder cosplayer all costumes & props, styling wigs, makeup, and editing photos & videos by myself.
* Cosplay Guest, Comic Con Paris 2019 Korean Pavilion Booth (Paris, France) * Cosplay Judge, Comic Con Seoul Korea Championships of Cosplay 2019 * Korean Champion, C2E2 Crown Championships of Cosplay 2019 (Chicago, U.S) * Comic Con Seoul Korea Championship of Cosplay 2018 First Place * G-STAR 2017 WEGL Cosplay Contest Grand Award * Comic Con Seoul Korea Championships of Cosplay 2017 2nd Place
https://www.instagram.com/myboo_cosplay/
https://www.facebook.com/MyBooCosplay/
https://www.youtube.com/c/MyBooCosplay
https://www.tiktok.com/@myboo_cosplay
#Comic-ConAtHome
#Comic-ConAtHome2021
#Comic-ConAtHomeMasquerade
#comic-conathome#comic-conathome2021#comic con@home#comicconathomemasquerade#sdcc#cosplay#queen zagara
102 notes
·
View notes
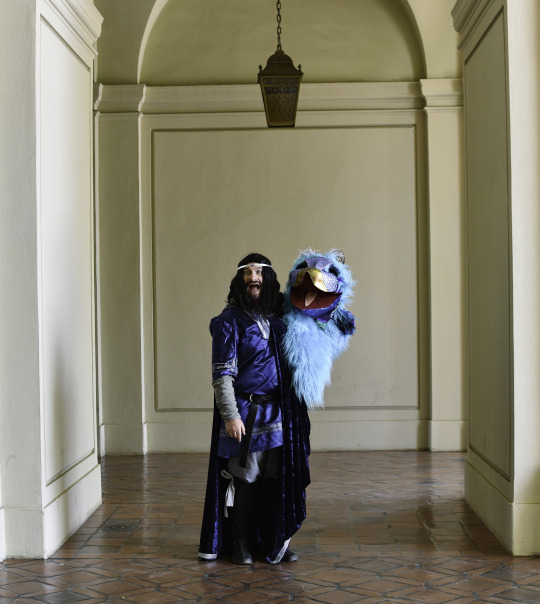
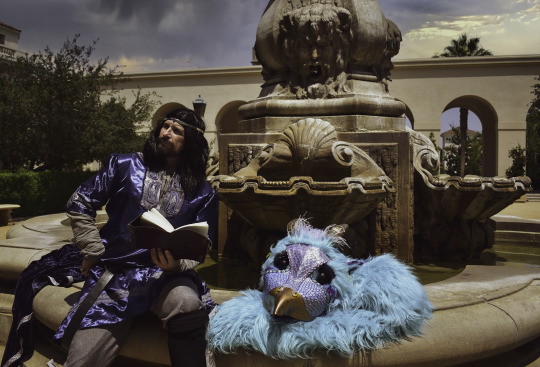
Text
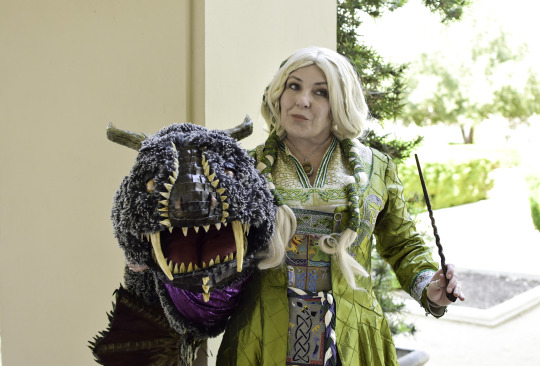
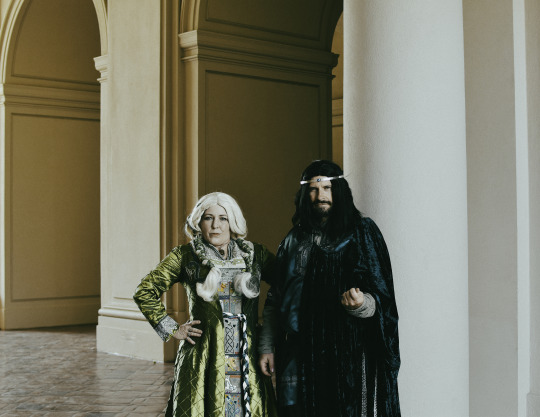
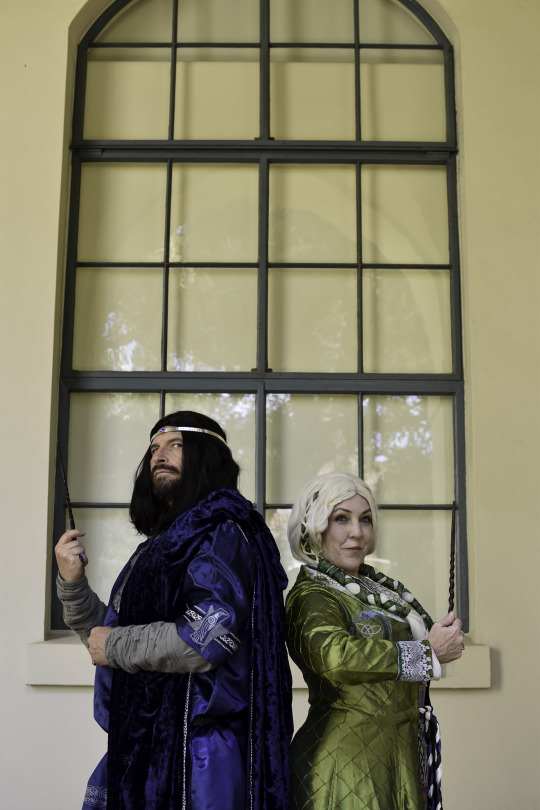
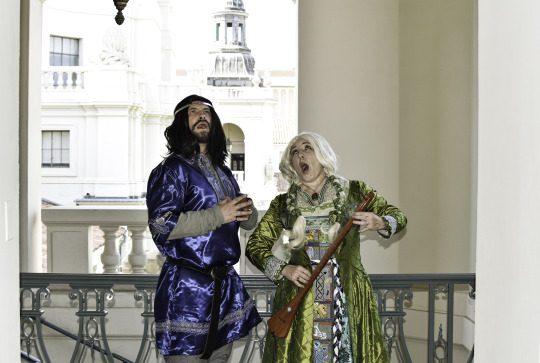
10th Century Fantastic Beasts
by Ken Hazlett and Nat Lawson
Costume Description: Original design of the Hogwarts Founders from the Wizarding World of Harry Potter
Bio: We are cosplayers from Southern California who occasionally combine our cosplaying with our other pastime- surfing.

The Case of the Missing Founder (CLOSED)
By Epiphelia Holmes
Abstract: Circa 1010 common era (CE), Salazar Slytherin, learned magicker, scholar, world traveler, and basilisk breeder, disappeared. All wizarding histories, including the penultimate source on Hogwarts, Hogwarts, A History (Bagshot, 1905), note that Slytherin disagreed with the other three Founders on the teaching of magic to the Muggle-born, and thus, left Hogwarts, angry and disillusioned. Through dogged research and exhaustive detective work, the author of this paper reveals the true fate of Salazar Slytherin, and surprisingly, the fate of Rowen Ravenclaw, utilizing the early enchanted and startlingly lifelike paintings of Grimhilde of Bingen and Hildegard of Bingen, as well as accounts from Slytherin’s own newly discovered journal for Year 1032, 33, revealing the magicker as an avid naturalist of Fantastic Beasts, who extensively traveled the various routes of the Silk Road with Rowen Ravenclaw, after Ravenclaw’s ‘death’. Additionally, this article presents new evidence regarding a second Ravenclaw diadem, created after the infamous theft of the original artefact.
Excerpt from Section 1.3 History of the Artists:
Note: Artist history is primarily sourced from Vasari, 1569, unless otherwise noted.
Grimhilde of Bingen (b. 964 d. 1138), a most misunderstood woman of her time, largely due to an ungrateful stepdaughter widely known primarily for her snow white skin, was, in actuality, a writer, composer, mystic, and artist of the 10th century. Forced to leave her homeland, in the Rhine, due to the aforementioned stepdaughter and an unfortunate incident involving a huntsman and several angry miners, Grimhilde settled in the region of what is now Cornwall in England. Her many interests and skills led her to the creation of an enchanted paintbrush, which created paintings, so lifelike, they are nearly indistinguishable from the photographs of today.
Although Grimhilde’s paintings and writings became well known in the Wizarding world, her scholarly pursuits were not her only passion and she married and bore one daughter, also an artist, composer, and mystic. Grimhilde’s granddaughter, however, was born a Squib, which may have been what drove her to successes even beyond her mother and grandmother. Hildegard of Bingen (b. 1098 d. 1179) returned to her grandmother’s homeland as a young adult and became a German Benedictine abbess, a writer, a composer, a philosopher, a mystic, a visionary, a polymath, an artist, and is considered among Wizards and Muggles alike, to be the founder of scientific natural history in the Germanic region.

Among their many accomplishments, Grimhilde and Hildegard painted several important wizarding figures of their day, most notably, Salazar Slytherin and Rowen Ravenclaw. Grimhilde completed a series of paintings of the pair between 1026 and 1028. Hildegard, who inherited the enchanted brush, also painted Slytherin and Ravenclaw, circa 1132. These paintings, which show the two Founders, reunited, after Slytherin’s disappearance and Ravenclaw’s death as the witch, Rowena Ravenclaw, are masterfully created and provide a number of interesting facts regarding Slytherin’s mysterious disappearance from the school and Ravenclaw’s supposed death of a broken heart. The series of paintings of Slytherin and Ravenclaw by the two artists is known in the Wizarding art world as the dual Bingen series.
Excerpt from 2.1 Archival Research:
[…] No one in the Kavalier family possessed an ounce of magic any longer and thus, no one over the ages was able to decipher the ancient text, largely written in a combination of Middle Irish, Old Norse, Latin, and a code, possibly based on spoken Parseltongue. The journal, a simple leather book labeled “MXXXII, MXXXIII, A.D.”, containing sketches of strange beasts, was an unreadable text among nearly two dozen aged tomes, and almost universally ignored by the family over time. Indeed, until the late 1980s, when Mr. Clay Kavalier, a graphic novel artist, discovered the sketches of the Fantastic Beasts in the journal and used them as an inspiration for his drawings, the book was almost never opened. Mr. Kavalier’s highly accurate depictions of various Fantastic Beasts, found in a Muggle ‘comic book’, led the author of this article to the Slytherin journal, carefully stored and preserved by the Kavalier family, now, of Orange, California, USA. The authenticity of the journal was verified by the Historical Records Department, Ministry of Magic, in 2020.

[…] The depiction of the diadem in the dual Bingen series has long puzzled wizarding scholars, as it is widely known and accepted that Ravenclaw’s diadem was stolen by Helena Ravenclaw and hidden, only surfacing during the reign of He Who Must Not Be Named in the modern era. The original diadem possessed an oval blue jewel and “was said to grant wisdom to the wearer” (Bagshot, 1905). A description of the dual Bingen series diadem is included in Section 3.1; it is noted here, however, that the two artefacts are different. Considering the possibility that Ravenclaw crafted a second diadem, the author of this article researched Wizarding metalworkers of the 10th century, finally discovering among the preserved papers of Lillith Helmschmied, the most famous female Wizarding metalworker of the 10th and 11th centuries, a sketch of the diadem depicted in the dual Bingen series. Unfortunately, Helmschmied does not indicate if the new diadem possessed the same abilities as the original. If, as many scholars opine, Ravenclaw enchanted the jewel herself (Bagshot, 1905), it seems likely that the second jewel was also enchanted.
Excerpt from 3.1 Description of the Garb:
The dual Bingen series may be the most important depiction of any of the Founders completed to date. Not only is the garb consistent with 10th century fashions, and thus, likely representing one of the more accurate portrayals of the Founders, there are accents to the garb which offer insight into the Founders themselves. The paintings in the series were created nearly 100 years apart. Neither Founder appears to have aged between the sessions and both are garbed identically in all paintings in the dual series. There is agreement among experts that Hildegard likely created her paintings from sketches completed by Grimhilde.
Salazar Slytherin left Viking occupied lands, in what is now Ireland, as a young adult, and the garb the Founder wears in the paintings reflects the Founder’s roots in Viking Age Ireland. Salazar is painted wearing a green dress over a léine; the dress is heavily embroidered with Fantastic Beasts, including a zouwu, a demiguise (both visible and invisible), a phoenix, a unicorn, a manticore, an occamy, and a basilisk, all done in the style of the Book of Kells. One of the embroidery designs shows a kelpie, which are known to live in Black Lake, at Hogwarts. Snakes are embroidered over a border of Celtic knot work that runs along the base of the dress. The top of the dress and the top of the léine are both decorated with lace that incorporates Book of Kells style snakes. Salazar also wears a green coat, adorned with still more snakes. The paintings indicate that the Founder preferred fancy Wizarding fabrics and possessed an almost excessive flair. The coat is pinned with metal brooches to show off the dress embroidery and like many items made at the time, the base of the coat is lined with fur. From the painting, it is not possible to definitively ascertain the type of fur, but magi-biologists generally agree that it is likely Bodmin Moorcat (Challenger, 1899, Mirza et al., 2018).

Rowen Ravenclaw, who originated from the Kingdom of Alba (now, approximately the lowlands of Scotland), is painted in traditional Anglo-Saxon garb. Like Salazar, Rowen also wears fancy wizarding fabric unavailable to the Muggles of the time. Celtic style ravens are embroidered on the sleeves and around the keyhole opening of the long tunica. Chain embroidery winds around the ravens. Celtic knot work is embroidered along the base of the tunic. Consistent with Anglo-Saxon fashions, Ravenclaw is wearing short pants tucked into high socks that are secured with ties. Ravenclaw’s simple silver band diadem is completely consistent with Muggle styles of the day and contains the Celtic phrase, “Cíall gan chiomhsa • Maoin mór duini”, in a version of Gaelic spoken in Alba. The phrase approximates “Wit without limit: great treasure of Men”. According to Helmschmied, the band is made of silver and the words are stamped into the band. The jewel is noted as a sapphire and it is also set in silver. Rowen’s rich cloak is decorated around the base with silver trim and it is worn draped, similar to a Roman toga. Generally, Rowen’s garb is less decorated than Salazar’s garb. It is thought among some scholars that the Founder of the Ravenclaw House was more reserved than his Slytherin counterpart. The dual Bingen series would counter this idea.
Excerpt from 3.2 Description of the Fantastic Beasts
There are few records regarding the Fantastic Beasts depicted in the paintings, which include an occamy and a basilisk. Salazar’s journal records the names of both beasts who appear in the dual Bingen series and notes that the basilisk was one of three successful hatchings. The occamy is called Ocarina and the basilisk is King George. The occamy could be of any age, as occamy will grow or shrink to whatever size to occupy space, an ability they possess immediately after hatching. The basilisk is clearly a youngster, as it is small and still has wings, as compared to the centuries old and massively huge wingless basilisk found in the Chamber of Secrets at Hogwarts in 1992. Salazar’s journal does not include any dates for the hatchings and says nothing about the other two successful hatchings. The journal also does not offer any information regarding how Slytherin, Ravenclaw, and Grimhilde of Bingen all lived beyond the sketching and painting sessions involving the basilisk. As breeding of basilisks is currently illegal and has been illegal for centuries, very little is known about them. Magi-biologists generally agree that the most likely scenario is that the beast had either not yet developed any of the paralyzing or killing abilities possessed by the Chamber of Secrets basilisk or he was able to control his abilities (Verne, 1863, Challenger, 1891). Opinion is split regarding whether the basilisk himself decided against rampaging during the sessions or whether Salazar was able to train the beast (Mirza, 2020).
Excerpt from Appendix 2, The Bingen Wizarding Collection
[…] and in 1947, Ginger Bingen, used the ragged and worn set of paintbrushes to create her own series of Wizard paintings of Slytherin and Ravenclaw. Ginger Bingen’s paintings incorporate the last of her many times removed Great Aunt Grimhilde’s sketches and notes of her sessions with the two Founders. Experts do not agree on whether the paintings accurately reflect the two Founders, as the paintings have only recently been made public. For one, many say, the Founders are speaking modern English. Although the paintings were rumored to exist, the Bingen Wizarding collection remained in private hands until 2017. That year, the four paintings below were stolen from the estate of the last Bingen by a self-styled modern-day Robin Hood and hung in the toilet of Ye Olde Trip to Jerusalem (well known even among Muggles as the oldest pub in England), when the pub was closed for the night. As there were no heirs to the estate and no will, and no one really owned the paintings or knew what to do with them, they were left in place at the pub and secured with heavy charms and curses.
youtube
#comic-conathome#comic-conathome2021#comic-conathomemasquerade#comic con@home#sdcc#cosplay#fantastic beasts#harry potter#rowena ravenclaw#salazar slytherin
20 notes
·
View notes
Text


Comic-con Masquerade Contest: Merida of clan Dunbroch
Costume Name: Merida & Angus
Costume Description: Reproduction of these characters from the Disney/Pixar movie “Brave”
Bio: When not plotting her next cosplay, or procrastinating on an existing one, this cosplayer also enjoys acting in community theatre, and walking or hiking in the great outdoors with her hubby. Many years have gone by since her equestrian show-jumping days and it was perfectly wonderful to get back in the saddle again for Merida! Thank you to everyone involved!
Photo credit: My heartfelt thanks and appreciation to Andrew Conrad, aka “Conrad the Designer” for his exceptional work of photography and videography. http://conradthedesigner.com/ https://www.facebook.com/ConradTheDesigner https://www.instagram.com/conrad_the_designer/
Be sure to follow #Comic-ConAtHome!
#Comic-ConAtHome
#Comic-ConAtHome2021
#Comic-ConAtHomeMasquerade
#comic-conathome#comic-conathome2021#comic con@home#comic-conathomemasquerade#sdcc#cosplay#disney brave#merida
34 notes
·
View notes
Text


originally hailing from Niceville, Florida and now living in Meridian, Mississippi…I have been making and wearing costumes for more than 30 years. My first costumes when I became internet connected were Jedi suits for me and my then 10 year old son. I eventually moved on to one of my first infatuations…BATMAN. Now at 57, I’m one of the oldest cosplayers that I know. 😜
Everything on the Red Guardian costume was made from found items and things I already had in my closet. I sculpted, molded and cast the helmet in urethane. The shield was made from a combination of EVA foam sheeting with fiberglass reinforcement.
Below is a picture from the 7/09 premier of Black Widow. Enjoy!

#comic-conathome#comic-conathome2021#comic-conathomemasquerade#comic con@home#sdcc#cosplay#red guardian#black widow#mcu
23 notes
·
View notes
Photo


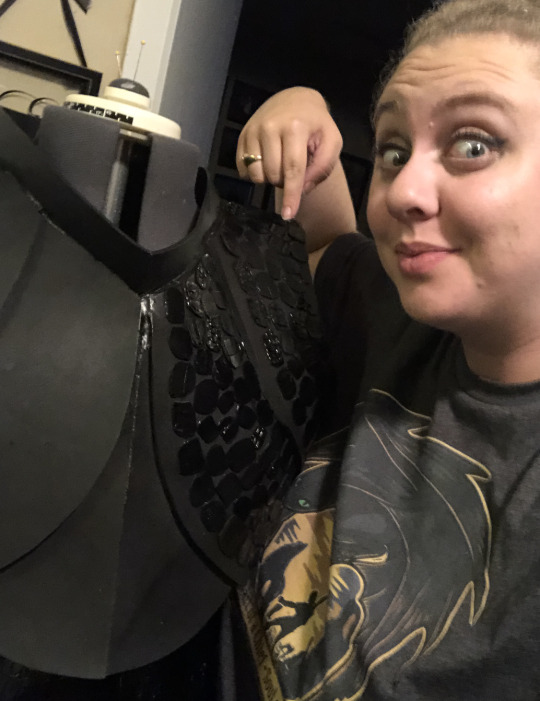


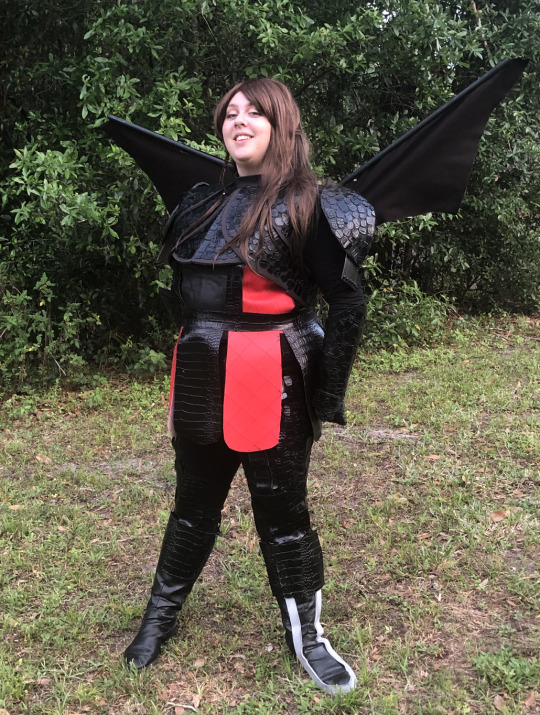


#comic-conathome#comic-conathome2021#comic-conathomemasquerade#comic con@home#sdcc#how to train your dragon#cosplay
50 notes
·
View notes
Video
Valkyrie (Jane Foster)

Comic-Con@Home Masquerade Entry: The Queen’s Armory
Costume Entry Title: Valkyrie (Jane Foster)
Costume Description:
Leatherwork is, in many ways, a lesser known form of art, especially for the purpose of costuming (you’ve seen belts, you’ve seen saddles, but have you seen…pauldrons!?). I wanted to take some time to explain the process for anyone unfamiliar with traditional tooling methods. (I also created a slideshow video showing some of the process). It’s rather lengthy, but it explains in detail what went into Valkyrie. Thanks for reading!
Quick Facts
Time to complete: 383 hours and 37 minutes as measured by my handy-dandy kitchen timer.
Individual pieces: Counting lining, light panel underlayment, straps and individual feathers (on the chestplate) around 350. Yes, that is insane; most of them are in the chest plate that has around 130 individual feathers and the gauntlet that has around 50 individual pieces. I also made rivet covers stamped from leather that I have neither the time nor energy to count…so many…oh, and decorative anchors for the straps…
Materials: Around 40 square feet of leather, 39 oz of paint, two bottles of sealant, 25 buckles, 50 some knife blades, over 170 mini LEDs, a whole lot of rivets and more determination than I knew I had.
Weight: Just under 25 lbs.
Awesome factor: 1000%

Inspiration / Jane Foster
My first introduction to the Marvel character Jane Foster came in the original Thor movie. I’d been reading comics for a few years, but hadn’t really run into her character much in the books I was reading. It wasn’t until Marvel launched The Mighty Thor comic that I really got to know Jane. I will confess, initially, the idea of anyone other than Odinson wielding Mjornir was not appealing, but the art looked amazing and I took a chance on issue #1. All it took was one issue and I had a new favorite character. Jane (written by the amazing Jason Aaron) was not a traditional hero- at least, not in the way I’d come to expect. The real enemy, the one Jane so valiantly fought- was cancer. There was no easy fix, no magic, no miracle cure. Jane battled cancer with more bravery and courage than any character I have encountered. She chose to become Thor and do what was right even knowing that the transformation removed the progress she’d made with chemo. I fell in love with Jane’s unbreakable spirit and have never admired a character more. In fact, one of my very first cosplays was Jane’s Mighty Thor (based on the Sideshow Figurine).
To cosplay Jane, for me, is not so much a reproduction of a character, but a chance to emulate- even in a small way- some of the bravery and strength that makes a true hero. And while Jane’s time as Thor came to an end and she triumphed over cancer, her character continues to fascinate and inspire me. When I saw Jane’s new persona of Valkyrie, I knew I had to make her costume.
Valkyrie’s costume as represented in the comics is a beautiful set of armor worn over a black bodysuit. It has been mentioned before, but I absolutely love armor. I have studied medieval plate armor in depth and have done extensive research to understand how it was constructed and how it moves. My true passion is in design and I love creating suits of functional armor.
I wanted to design a suit of armor for Valkyrie that was still recognizable as the character but far more detailed and exquisite than the original. I tried to keep the basic shapes and profile such as the chest plate, the legs, the pauldrons and the gauntlet, but I really went to town with the details.
Fun fact: I set out to make this armor ‘simple’ in comparison to what I usually design.
Yeah, you can see how that worked out… I literally can not help myself…
My vision was an exquisite suit of armor, functional and decorated with Celtic knot designs with bands of glowing magic. My aim was to create a sort of ‘enchanted’ armor look, especially with her golden gauntlet which is actually Undrajarn, the All Weapon.
Unlike most of my designs, I did not do extensive sketches as I had no idea how to draw Celtic knots and figured I would just have to learn on the way (I did learn, although it took a good two weeks). This suit was designed as it was made, really. I had a basic idea of the shapes I wanted and just added elements and components as I went.

Patterning / Celtic Knot Designs
“AKA, I am really going to hate myself when it comes time to tool all of this…”
Patterning is extremely important when designing a suit of armor, especially if it will be made from leather. The plates have to fit together perfectly or it will not move like it should and even a small error can make the entire suit fit wrong. I make all of my patterns to fit my body perfectly with the greatest mobility possible. Complicated articulation on the knees, shoulders, waist and feet allow for full range of motion, a must if you’re going to spend a long time wearing a 30- 50 lb suit of armor.
Once I had a workable pattern, I cut everything from foam to create a mock-up to test fit and function. The gauntlets especially required a lot of trial and error as there are over 50 tiny pieces, all of which have to flex and move on fingers that have multiple points of articulation. Gauntlets are probably the most difficult patterns to design but there is nothing more satisfying than trying on a completed gauntlet for the first time and having full mobility.
Once I had the basic pattern shapes refined, I set out to decorate them in a way that was worthy of a Valkyrie.
I confess, when I set out to make this costume, I vastly underestimated how difficult it would be to create Celtic knot designs. I’d decided early on that I did not want to use templates or copy existing designs but wanted to create all of my Celtic knot designs entirely myself. Two weeks later and I was covered in graphite and tears. Triumphant tears, but tears nonetheless.
Designing Celtic knots is difficult, I discovered, because you are drawing a design that is dependent on the rest of the design to know where it’s going but the rest of the design isn’t there because you haven’t drawn it yet. It’s like an infinity knot of nothingness with a lot of paper and a lot of spent erasers. After going through a questionable amount of materials and pencil leads, I figured out a pretty good method for drawing these complicated works of art and created patterns to adorn the armor plates.
Since Valkyrie rides a pegasus in the books (the incredible Mr. Horse), I decided to include a pegasus on the hip panels. It’s an original sketch. I was horse crazy as a kid (yeah, you never grow out of that) and have been sketching horses for as long as I could hold a pen. I also included Odin’s ravens Huginn and Muninn, depicted on the medallions at the shoulders.
One element I did recreate from an existing design is the representation of Mjonir on the backplate. I wanted to honor Jane’s time as Thor, so I did a recreation of the design seen on her backplate represented on the extremely detailed Sideshow figurine. The hammer and scrollwork around it are a nod to her tenure as the God of Thunder.
On another note, while I was drawing all of those celtic knots, I was acutely aware of how much work they would be to tool and the fact that I was probably going to hate myself when it came time to bevel all of those lines…

Transferring the Patterns / Cutting the Leather
“AKA, this is why I will never be a hand model.”
I always end up needing more leather than I anticipate, especially if I’m making a suit with light panels as they require several stacked layers. I ended up using a little over two half hides, or around 40 square feet. I use a variety of weights for different components, everything from super thin goat skin for small plates to 8 oz. heavy cowhide for larger pieces.
As you can imagine, leather is really tough and really hard to cut. Adding to the challenge is the fact that the density of leather varies, so you can be going along with your knife, applying a lot of pressure, when suddenly you hit a soft spot and the knife slips. Any little nick or misplaced cut is there forever. I went through 50-some blades cutting the pieces out. This may sound really obvious, but knives are sharp and when it takes hours and hours just to cut the pieces out…well, mistakes were made and I now have a lovely new scar on my thumb to go along with all of my other ‘battle scars’.
Once the leather pieces are cut out, I transfer the decorative designs by tracing over the lines with a stylus. This is both time consuming and really hard on the hands as you have to apply a fair amount of pressure to make a visible impression in the leather. If the impressions are not clear enough or hard to see, sometimes I’ll go back with a leather marking pen and retrace what I can to make it easier to see the design.

Tooling!
“AKA, oh surprise- as predicted, I do in fact hate myself for all these designs that now need to be tooled.”
Tooling leather is the most time consuming, mind numbing, maddening part of the process. I can not afford high quality leather, but I have had fairly good luck with the ‘economy’ hides, although I will freely admit, the good stuff is a lot easier to work with.
In order to tool, leather must be wetted down to the right moisture level to allow your tools to make good impressions without being sloppy or not leaving an impression at all. This magical state of moisture balance is referred to as ‘casing’. Google how to know if your leather is properly cased and you’ll find suggestions of everything from holding it to your face to determine if it’s cold to watching the color as it dries and waiting for the right shade of tan. Basically, there’s no definitive way to determine if your leather is properly cased, you just sort of learn to have a feel for it.
Tooling starts by cutting the design lines with a tool called a swivel knife. The knife is used to slice just the surface of the leather, or slightly deeper such as around the edges to make a deeper line. The blade dulls very quickly and has to be sharpened every few inches with a strope. I use a compass a lot when I’m cutting lines as it provides a reliable means of making equal, consistent borders and margins. I also used my swivel knife to create a “rope” edge on the borders of the knee plates and the feet.
Then comes beveling…
So much beveling…
Beveling is the process of compressing one side of the leather on a line to ‘raise’ the other side, thus creating dimension. To bevel a line, you take your beveler tool and place the ‘toe’ in the cut line then strike it with a hammer continuously, moving the stamp in tiny increments. Beveling is exhausting, I’d compare it to running a marathon with your arms. (Have I been working out? Why yes, I’ve been beveling). This does, in fact, take forever, but it really can’t be rushed. Good beveling will create a smooth line. If your leather isn’t cased right or you try to go too fast, you’ll leave behind ugly bevel marks that look like little dips and ridges.
Behold! Beveling!

Yes, I swear, the stamp is moving…very…very slowly.
Anyway, after all the lines are beveled, I move on to stamp work. I utilize a variety of stamps (some custom made) to create different effects. Everything from the detailed borders to the chainmail plates to the textured underlayment seen beneath the light windows is created using stamps. Each detail has to be carefully aligned and stamped one by one. There is no forgiveness in leather. If your stamps get going off kilter or you accidentally use one upside down (it’s okay to cry if this happens, especially if you’ve already put five hours into the piece) there is no way to erase it and usually, the only answer is to cut a new piece and start from the beginning.
Each plate takes a very long time to tool. The backplate alone, just the upper portion (not including the two plates hanging beneath or the back of the gorget) took me nine hours just to tool. Leatherwork is also very hard on your hands, especially if you have a deadline and are working as long as 15 hours a day (please, do not try this) to get a costume done!
I had never tooled feathers before, and that was another sort of ‘figure it out as you go’ thing. They turned out to be a pretty intense, multi-step process. I first cut the shapes with my swivel knife, then beveled, then I went back with an undercut beveler (also known as a petal lifter) which further undercuts the edge. I also took my X-Acto knife and at an almost flat angle, cut the underside of the feather to lift it further. I then used my spoon tool to draw the individual feather lines and later went back with a skiver (a very sharp knife used to split leather) to thin the edges of the feathers out so they would have, well- a feather edge.

Cutwork
“AKA, this is why I buy X-Acto knife blades in bulk…”
In order to create the openwork light windows, I hand-cut each tiny little window from inside and around the Celtic knot designs. This was by far the most nerve racking step in the creation of this armor. As mentioned, leather is heavy and very hard to cut, especially in tiny details like that. One slip of the knife and oops, there goes your beautiful, 10 hour tooled design. I made a few mistakes and had to remake a couple pieces but failure was not an option. Crying yes, crying is okay. Failure? Nope.
Skiving
“If it sounds dangerous, it’s because it is…”
Skiving is the process of using a very sharp knife tool to shave off bits of leather in order to reduce its thickness. You can see a lot of this on the edges of the feathers. I also do a lot of skiving on straps and certain panels to reduce their bulk. You go through a lot of blades when you skive as they dull very quickly. A dull blade will easily cut too deep. You have to be very careful not to cut all the way through your leather!
Edging / Wet Moulding
“Wait, bevel, or bevel?”
After tooling, the edges must be beveled then polished. When I say ‘beveled’ here, I am not referring to the stamping process, but rather to a process where you take a different tool (also called a beveler, which is not at all confusing) that actually cuts a small amount of leather from the edge. Basically, you’re cutting off the sharp corners to make a rounded profile. Then, to seal and smooth, a burnishing compound is applied that is then rubbed vigorously with a little round wooden tool. It is labor intensive…there are a lot of edges.
Leather will hold its shape if it’s thoroughly wetted then allowed to dry. I usually use a mannequin to wet mould, but the mannequin is in storage and I did not have time to dig it out. Therefore, I used everything from paper towel rolls to recycled coffee cans to strap the wet leather pieces to so they would dry in the right shape.

Painting / Dyeing
“Also, just a little bit of actual dying because yeah…there are a lot of pieces…”
I really wanted Valkyrie’s armor to be exquisite and royal, so I went with a silver and gold palette. I used three shades of silver and three shades of gold to create dimension and depth. For the base silver, I was able to borrow an airbrush which was a learning process as I have never used an airbrush before and, apparently, metallics like to clog. Or maybe it was the paint consistency, or the air pressure, or the nozzle or the moon phase because Google had a lot of answers and I tried everything. After a fair amount of frustration and brush cleaning, I was able to apply a good, smooth base coat.
To highlight the tooling, I used a darker shade of silver to add shading then a lighter hue on the high points. I used three shades of gold to bring the Celtic knots to life. The gold components required three coats of base gold to achieve a good color then a coat of shading and a coat of highlight. Painting is a long and meticulous process, especially with all the tiny details, but I am happy to report that I only managed to get a small amount of paint on the ceiling this time and it’s hardly noticeable.
Seriously, it’s hardly noticeable.
I then seal everything in three coats of sealant.
Finishing the Underside / Lining
“AKA, the best solution is prevention.”
The back side of leather, also known as the suede side, absolutely must be sealed or finished in some way. Otherwise, it’s basically a sponge and will absorb…everything. I always paint the inside of my armor, or line it where possible. I added a soft sheepskin lining to the crown and several other pieces (where functionally possible). It looks nice and heck, it smells nice too. Or nicer, consequently.

Assembly / Straps / Lights
“Avengers, a-!” Sorry, couldn’t resist.
Assembly is both exhilarating and frustrating. Exhilarating because you start to see the costume come together and frustrating because there is still so much more to be done. For instance, 130 individual feathers that have to be carefully shaped and hand sewn to a leather base.
I make all of my straps from leather and take the time to tool each one. That means more beveling, stamping, edge finishing, top coat and back sealing, though for the straps I use a beeswax solution to seal. I usually make the straps at the very end because I’m never sure how long or how many I’ll need. I even made little decorative leather anchors for the straps so they wouldn’t just be riveted on there. I really wanted Undrajarn (the gauntlet) to stand out from the rest of the armor. I chose an all gold pallette to echo the comic book representation and dyed the straps black with a wash of gold to add sparkle. I also created strap end caps from sheet metal that I embossed with a Celtic knot design.
I have mentioned in the past that I am not that great with electronics, but like anything else, it’s a learning process. For the magic glowing bands of enchantment and light windows, I used around 170 mini LEDs. I can buy them in bulk (fairly cheaply), they have pre-soldered wires (so I just need to solder them in series) and I can run a dozen off of a couple little coin cell batteries. They’re easy to hide and my chances of setting myself on fire are relatively low…(I mean, it’s me, so we’re still looking at like, 25% chance of spontaneous combustion, but hey, you gotta take the small wins). I don’t have an air extractor so I do my work on a bench outside which is…interesting…

Word of warning though, it’s a good idea to mark where you’re going to be punching rivet holes because there is nothing more heartbreaking than wiring in a dozen LEDs, closing off the panel, then accidentally punching a hole through your wires!
Assembling everything is a process which I have to make an effort not to rush. It’s easy to get excited and punch a hole in the wrong place. Leather is a stiff, heavy material that has to be riveted or hand sewn with heavy thread. Glue, I have learned the hard way, will always fail me. I do not trust glue to bond anything but my fingertips (at the worst possible time). Sewing and riveting everything is yet another labor intensive process, but the last thing you want is for something to fall apart, especially after you’ve already put so much work into it!

Sewing / Wig…wait, is that a wig?
“-and then I’ll brush and brush and brush and brush my hair…-”
I sewed a quick bodysuit to wear under the armor. Initially, I had a rather elaborate original design I wanted to craft but simply ran out of time, and a stretchy bodysuit is a lot faster to sew than piped edges and twenty-some panels. I also sewed the gloves and skirt from my own drafted pattern.
Valkyrie’s belt was a bit of a challenge as it just floats on her hips with no other form of attachment. I knew it had to be sturdy enough to support two heavy hip panels, a skirt, and help to hold up the upper legs. I figured out (what I think anyway) is a rather clever way to attach the belt without any visible straps. I think it turned out rather nice and, hey, it holds everything so we’ll call that a win.
When Jane Foster is Valkyrie, she has a beautiful, long brunette braid. This is the first character I have portrayed that allows me to use my own, real hair! I started growing my hair out about seven years ago for my grail cosplay (which I have just started working on) and it’s over three feet unbraided. A simple loose braid to match Valkyrie’s style was all I needed.

Photos / Conclusion
“Thank you for reading all of this!”
I have to give credit to my amazing mom who is both my handler and photographer. She does an amazing job and was even able to capture some of the fireflies which were out during the evening photos (you can see a lot of them in the background behind me).
Valkyrie started out as what I thought would be a simple design. It snowballed a bit because, again, I can not stop myself, but some projects are like that. You just have to go with it, even if it takes over 380 hours and your hands may or may not be usable again. I have calluses and scars from this project, but so does Jane, so in a way, I think I would have made her character proud.
Thanks for reading!!!
Bio:
Sarah is an aspiring costume designer living in the rural midwest. She works every day towards her dream of becoming a professional costume designer and hopes to one day be able to attend some of the larger comic-cons. Until then, you will find her working away on one project or another, learning new skills and always creating. Supported by her family and a cat with too many toes (shout-out to Luthien, the polydactyl kitty who knows who’s really in charge), Sarah has more ideas than time, but never gives up.

#comic-conathome#comic-conathome2021#comic-conathomemasquerade#comic con@home#sdcc#cosplay#valkyrie#jane foster#thor mcu
57 notes
·
View notes
Text


Chad Edward Lee Evet
AKA Chadhatter
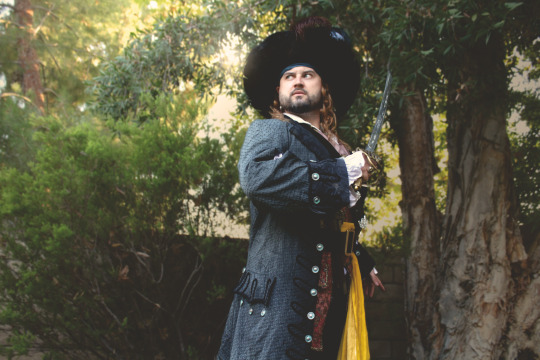
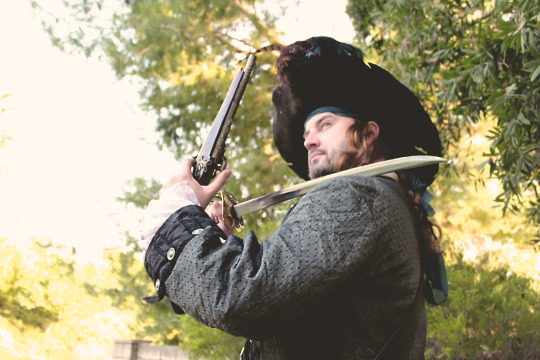
YOUNG BARBOSSA-pirates of the carribean
Description:
So the idea came about because some friends of mine and I were watching the pirates films, and barbossa is so gnarled and weathered we started to joke about what he might have looked like right out the gate.
His coat, waistcoat and breeches are cleaner, newer, and not as worn. His waistcoat here is similar to the one worn in the films, but different (in an attempt to create the feeling of an evolution of character.) his hat I decided was one he found so it’s still beat up but not quite as much as it is by the time the pirates movies take place. Same as with his boots.
The coat was a pattern I drafted myself, and the coat is made out of an upholstery material lined in Moiré that I then dyed charcoal and airbrushed for texture. The trim is soutache and teeny Rick-rack layered together. The buttons were hand painted to look like they had a patina from ocean air. The waistcoat is also upholstery that I dyed a dark crimson and then trimmed with gold, it’s lined in a silk that I then dunked in coffee. The gold trim was burned off to give it some age and to keep the trim from looking cheap. The breeches are a pinstriped linen dyed chocolate brown.
Recreation: based specifically on the costume worn by Geoffrey rush in the original “Pirates” trilogy.
Bio-I’m a freelance artist currently living in Los Angeles, California. I moved here from Colorado in 2015 to pursue a career in film.
These photos taken before final fitting:


#comic-conathome#comic-conathome2021#comic-conathomemasquerade#comic con@home#sdcc#cosplay#barbosa#pirates of the caribbean
13 notes
·
View notes
Photo


youtube
Comic-Con@Home Masquerade Entry: SotoGrant
Costume Title: Namaari
Costume Description: Re-creation from “Raya and the Last Dragon” movie 🐉
Bio: I am a cosplayer, cosmaker and propmaker. I live in Costa Rica 🇨🇷
I liked this movie because it represents the leadership that women can perform. Namaari is strong and independent, her personality attracted me a lot and that’s why I wanted to cosplay. All started because she wanted to see if she could make the earring. When I did it, I thought, “what if I make the blouse?” and I ended up doing the full cosplay 😅
I am passionate about making the complete costume, each new cosplay presents a challenge of how to solve the pieces, choose fabrics and make the props. In this suit I did everything, except for one thing: the pants (I already had a jogger pants that worked well for the character). The base shape of the wooden spear was made by a friend, later I sanded it, painted it and added the details of the strings.
All the pieces of the costume I made myself, for example, for the hair I disassembled a wig so that I could make clip extensions and put them over another short wig and make the effect of a half shaved head. For the earring I did many tests of materials and versions until I got it to fit my ear perfectly.
As I am a graphic designer, I made the pattern of the print in vectors and had it sublimated on fabric to later sew the socks and the skirt.
Normally I take the photos and videos myself, but in this case my husband did me the favor of recording me and I did the video editing.
I hope you like my Namaari because I really enjoyed the process of making it and playing the character 😁
——
Music: Rice Field Crop - A (ID 541) by Lobo Loco. Hare Krisha (Price the Lord) ft. Billie Waves & Mukti Bird by Siddhartha Corsus
https://linktr.ee/sotogrant
#comic-conathome#comic-conathome2021#comic-conathomemasquerade#comic con@home#sdcc#cosplay#namaari#raya and the last dragon
429 notes
·
View notes
Video
Joe Queen
Yo Ho, Yo Ho, a Batman’s Life for Me!
Original Design
USA, Costumes worn and created by Jeanie Lopez; and Lucas and Joe Queen. Video completed by Jessalyn Queen
Music by Tim Beek (timbeek.com) Licensed under Creative Commons: By Attribution 4.0 http://creativecommons.org/licenses/by/4.0/


#comic-conathome#comic-conathome2021#comic-conathomemasquerade#comic con@home#sdcc#cosplay#batman#pirates
39 notes
·
View notes
Video


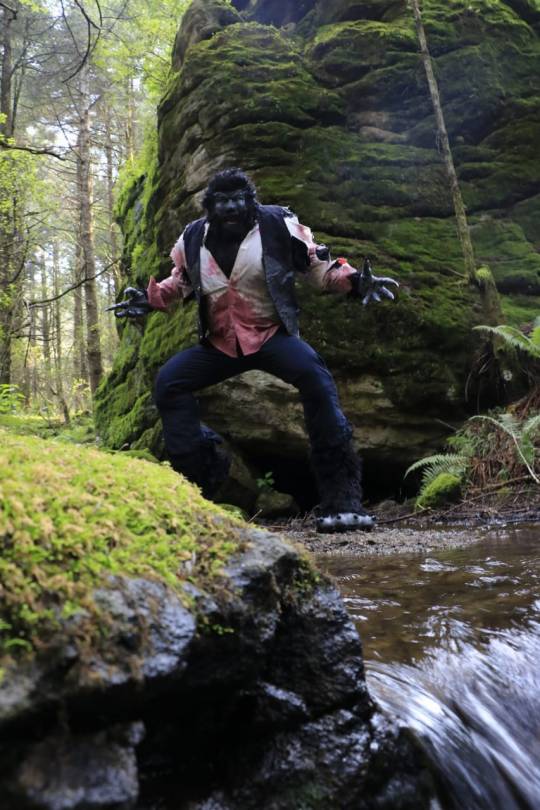

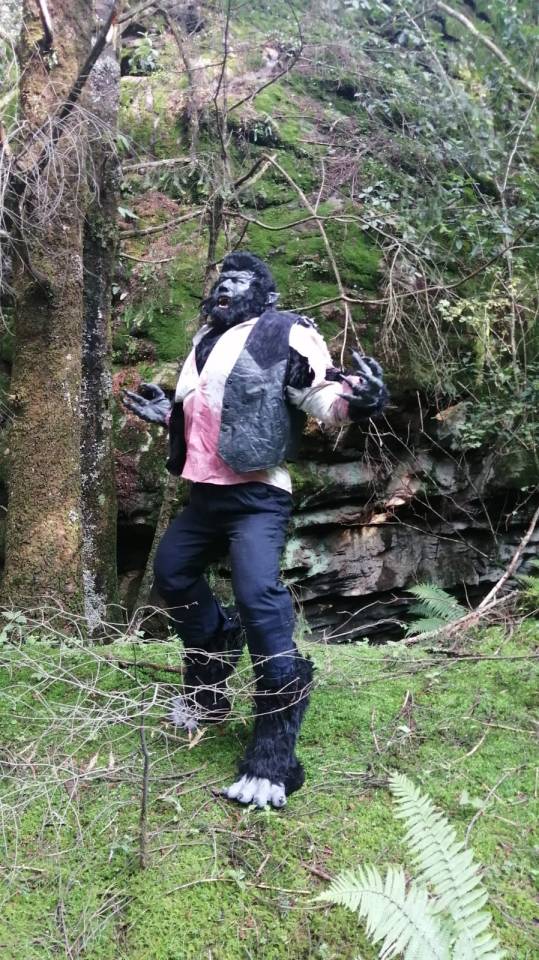


-My Name: NOE ERNESTO CRUZ VARGAS (LOBISON-X)
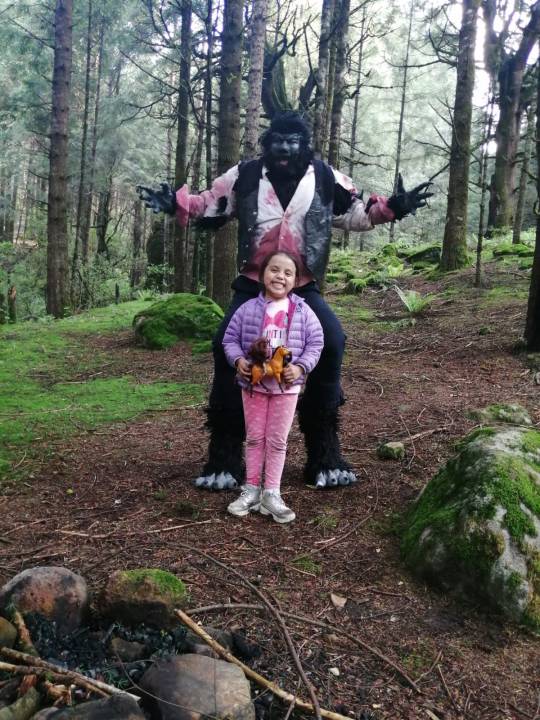
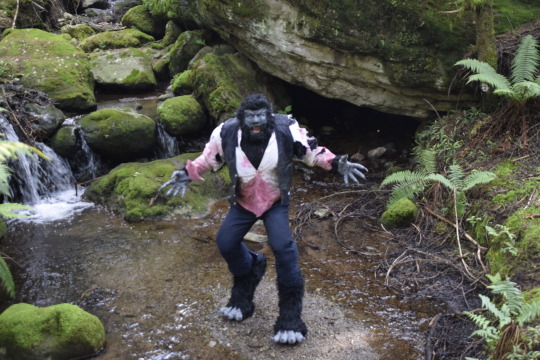
- Costume Entry Title: THE WOLFMAN
- Costume Description: My werewolf costume is based on the 2010 movie “the wolfman”. I use stilts, makeup, false hair, specific clothes and prosthetics, the costume is made by myself almost completely (except fangs and contact lenses) I am happy to be participating in the fabulous COMICCON, and I wish everyone around the world good luck !
- Bio: I live in Mexico and I am a designer, a martial arts teacher and also a cosplayer. I have been disguising myself for more than 20 years, attending conventions with my characterizations and enjoying the fan world.
MY FACEBOOK PAGE! https://www.facebook.com/lobisonx/
MY INSTAGRAM PAGE: https://www.instagram.com/lobisonx/?hl=es-la/live
THANKS TO MY STUDENTS and FRIENDS
José Antonio Aguirre Villedas
Jonathan Gomez Tagle (Jonxy Tengu Koga)
Quetzalli Gomez Tagle
John Hernàndez
Joaquín Aguirre García
Santiago Breceda Rueda
Benjamin Acevedo Tellez
Ismael Osvaldo Estrada Silva
Emiliano Patiño
And my beloved wife
Elizabeth Herver Mora
#Comic-ConAtHome
#Comic-ConAtHome2021
#Comic-ConAtHomeMasquerade
#comic-conathome#comic-conathome2021#comic-conathomemasquerade#comic con@home#sdcc#cosplay#the wolfman#universal monsters#universal pictures
15 notes
·
View notes
Text


Julieta Ravencrest - Miss Ravencrest
- Costume Entry Title: Judgement Paladin
- Costume Description: Re-creation: Art by Weis 2008 World of Warcraft Judgement Blood Elf Paladin
- Bio: Hello! I am a cosplayer in British Columbia Canada! I do a game, anime, and art cosplay. Armor and props are what bring me joy. My husband is my amazing photographer!
The individual strands from the waist piece, each of the gold lining were initially hand stitched on and then sewn over to create a smooth look and avoid stretching.
This cosplay was made in two countries! When I lived down in California USA and finished after the move up to Canada.
#comic-conathome#comic-conathome2021#comic-conathomemasquerade#comic con@home#sdcc#cosplay#judgement paladin#world of warcraft#wow
56 notes
·
View notes
Text


Kensadi Cosplay Cosplay: Edgar Markov Costume Description: Character is from Magic the Gathering and is from the gothic plane of Innistrad which is rife with terrors, only some of which happen to be vampires. This cosplay took me roughly 8 months. It's difficult to really figure out how many hours because I worked on it off and on. 95% of the armor is EVA foam of varying thicknesses. The gauntlets are made of worbla's black art and is backed by worbla's fine art. The sword has a wooden ruler and foamboard as the base and is wrapped in worbla's black art. The chest piece is a heavily modified pattern by Cyreah Cosplay and the gauntlet pattern is by Guyton Armor. The rest I patterned myself. The skirt is made of a red velveteen. The cape is fully lined and made of an jacquard upholstery fabric remnant.
I'm from the US and I have been cosplaying for seven years now. Most of my cosplays are from Magic the Gathering. The artwork inspires me like no other franchise.
#comic-conathome#comic-conathome2021#comic-conathomemasquerade#comic con@home#sdcc#cosplay#edgar markov#magic the gathering#mtg
30 notes
·
View notes
Text
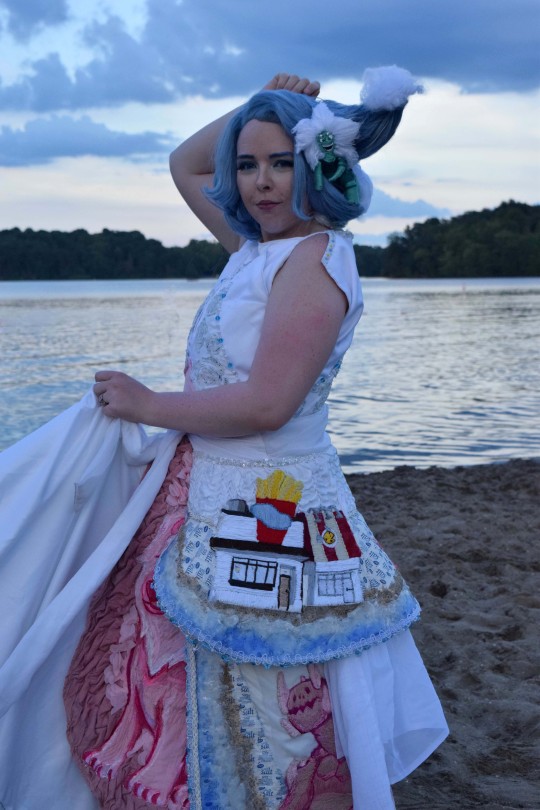
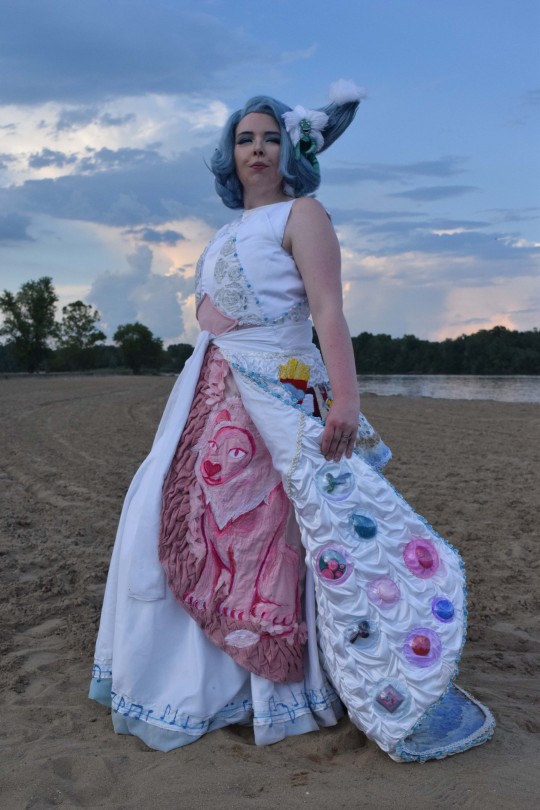
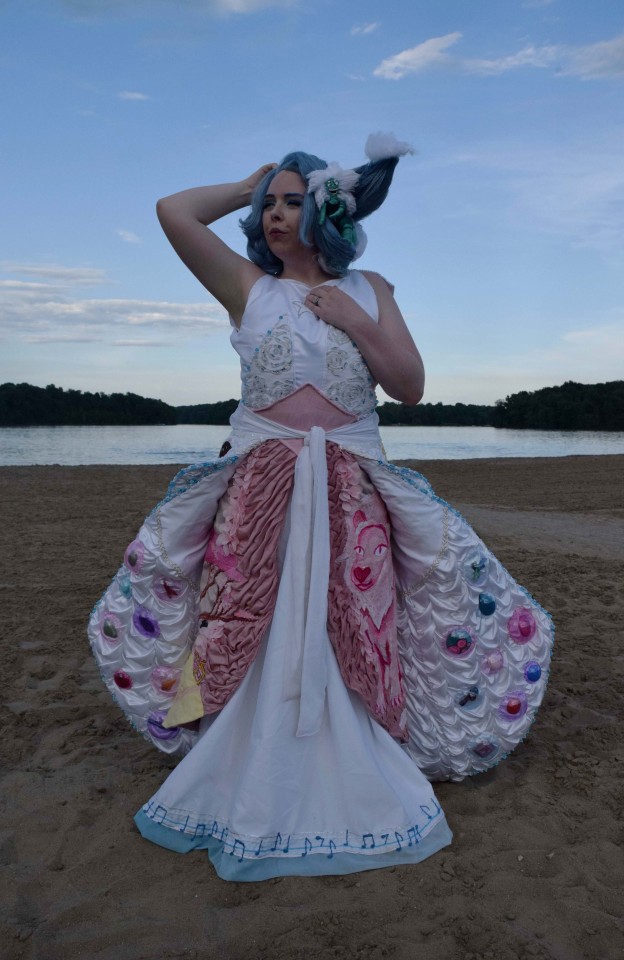
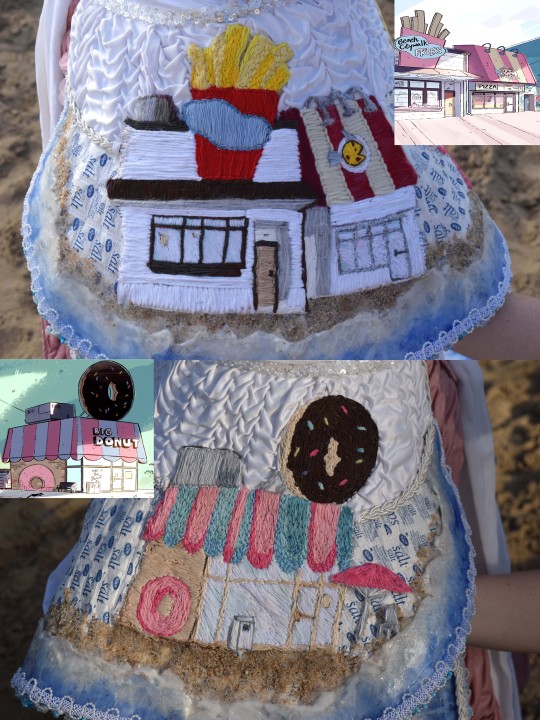
Goodbye Beach City

Comic Con Masquerade Contest: Moria Magre- Mines of Moria Cosplays
Costume Entry Title: Goodbye Beach City
Inspired by Steven Universe
Costume Description:So, this costume was around 400 hours of work. It was a behemoth of a costume. I genuinely don't know where to start in describing it, but I guess starting from head to toe.
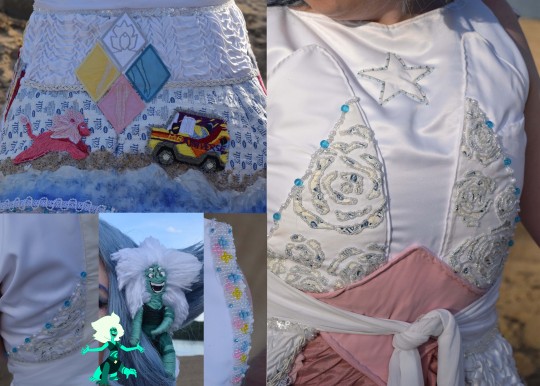
WIG: So the wig is styled by me, the figure in the wig is a small little Malachite figure as in season 1 of Steven Universe Malachite pulled themselves into the sea, so the wig is styled to be like the ocean, much the same as the rest of the dress. Malachite is an old worn out sock of my partners that was stuffed and cut and painted. Wire is in the legs and arms to make them movable. Then every piece of the little figure is hand stitched with embroidery floss. The face itself is actually iron on applique (because I feel the face detail wouldn't have been able to show on such a small figure otherwise) The other side of the wig has seashells and such to stick with the ocean motif.
BODICE: The bodice part of the dress is an old 1960s pattern design I modified from an old pattern my grandma had. I took that pattern and laid it on paper and reworked it and had to do SEVERAL tests with old sheets to make the pieces work for me (her pattern wasn't designed for... plus sized girls). On the upper shoulders are hand woven beaded strings that are in the shape of the diamond authority with 2mm beads which are so dang tiny ;_; On the lower part of the bodice is hand stitched flower motifs. I made the flower appliques themselves out of salt packets (since the dress is based on a beach and beaches are salty, salt made sense! I want to transport you guys to beach city with this dress!!!) Salt packets are cut open, empties, Elmer’s glued together then sewn down together on a fabric sheet, then cut out and attached with iron on interfacing. Along each edge of the flower pieces are again 2mm beads patterned into a 3:1:3 pattern with transparent then opaque then shiny.
SHORT BEACH SKIRT:All the skirts in the piece are all patterned by me, no base pattern at all, I genuinely did trial and error for all the skirts from here on. The belt there is attached to the skirts with heavy duty embroidery floss as the two skirts combined weigh close to 30 lbs. Now the first thing from the white dress to this that you see is white smocking. The smocking was all patterned by me with a bunch of error. The idea is from basic Canadian smocking but finding a lot of patterns for smocking is hard and it’s easier to make your own. For the patterning of the smocking I made a wooden template. I made the squares (for this piece the squares are 1cm wide) on the piece of wood and then put holes where each line meets of the squares then traced the little dots on the fabric with water soluble ink. (its quicker than measuring them all out) There are 64 rows of smoking and they are about each row is 38 cm long. Each 2 rows take about 1.25 hours. (Smocking is so relaxing-- that is until you hit row 40. Then it’s just tiring. GOTTA PULL THROUGH THOUGH) After the smocking you then see the salt packet sheets, I described above. Same technique but this time sewn into larger sheets and used as a base for the beach and locations themselves. The salt packets are almost like interfacing with how much it stiffens everything. The salt is still inside for these pieces unlike the roses pieces above so if I hop around you can hear the salt moving (which is quite rhythmic). After the salt packets is the locations. Now these are where it gets intense. (yeah, I know HERE is where it gets intense-- HA!) But the locations-- the fry shack/fish stew pizza, the Mr. Universe van/Lion and the big donut are first done on bedsheets I stretch over canvas (Almost all of the fabric for this costume are bedsheets and curtains-- I gotta be cheap and economical, costume supplies do add up ;_; ) So then patterns are drawn on the canvas, I paint the designs on doing color blocking so when I stitch the fabric is a matching color. They are then hand stitched on the canvas. ( I actually made 2 more designs, one being the car-wash and the other being Mr. Smileys fun land but couldn't find a place to put them so they got scrapped) After they are sewn, I add double sided interfacing to the back to seal up the extra strings and make sure they are flat. I do iron it on to the salt packets and then hand-stitch them on again. On the back of the skirt is a diamond shape I did with my embroidery machine of the diamond authority with the parts of the giant robot they control (talk about a weird plot twist tbh) Under the locations is the sand which is attached via clear caulk and then sand is smooshed in. The beach water is underneath, so the beach water is actually rubber resin (it is a heavy duty type and isn't sold most places, its sortof uncommon) So, there were 3 trial and errors for the water, I first did it in regular resin but added less hardener and coated it in clear acrylic in order to make it still mildly malleable but not tacky. It was more malleable than normal but not as much as I needed. Moving on- I tried the first batch of rubber resin. If you don't buy the kind without the alumilite it will yellow (and this resin is sorta weird and acts strange because of it) and guess what, blue and yellow make green. And the water looked so YUCKY. Third try. So important clarification- this resin also hardens in oh idk maybe 15 minutes max on a good day. 8 minutes on a bad day. I had both. So, because of the short time I had my partner help me mix up the batches. I had to have light, dark, and white for mixing. I had the fabric shape drawn onto dollar tree clear curtains that were taped to my porch ground. I then poured the dark, then light, then white. With gloves on I mixed it to give that watery affect. (not enough time to treat it like an acrylic pour but man I wish) Once it dries it is then attached to the dress with clear caulk. On the edge of the skirt is a ribbon and then a handwoven bead string that is beaded like a braid. So, you have the main bead
bit in the center and then 3 other bead bits. I had 3 needles and braided it like that.
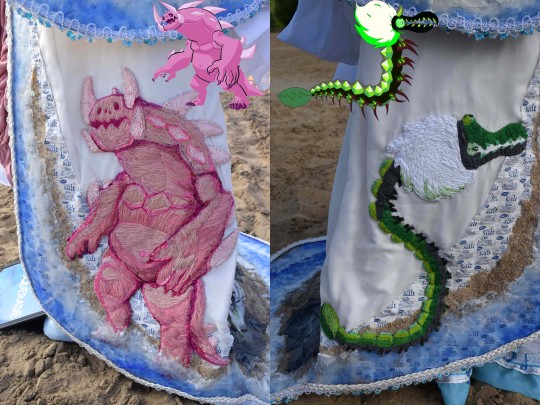
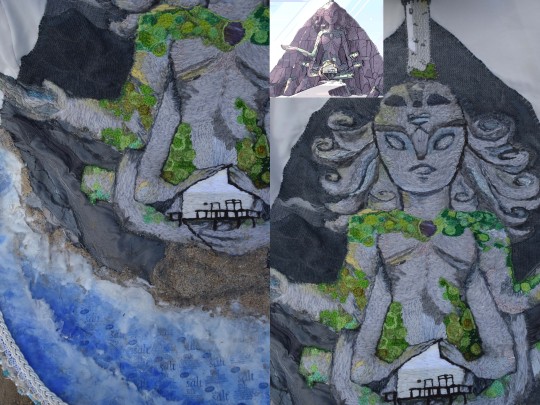
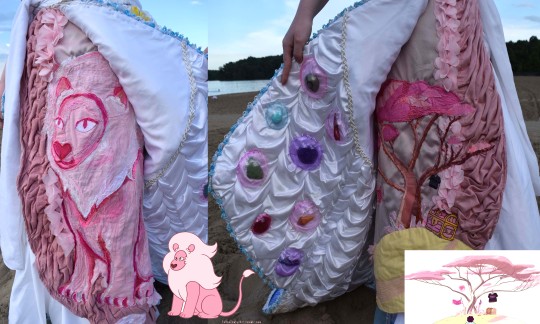
LONG BEACH SKIRT: So, the second skirt is built very similar to the original. The pieces on the skirt are more symbolic of the show. The villain of the first episode is Centipeedle and then the villain of the last episode (SPOILER SORRY) is Monster Steven then on the back is the giant Obsidian temple. The obsidian temple came first and took the longest racking in a whopping 60 hours. I will say these jumbo designs are a little different from the smaller counterparts because these were the ones I started when the pandemic started and TAKE A GUESS WHAT HOBBY EVERYONE TOOK UP?! Yeah needlepoint, or it seemed like it and every hobby store was SOLD OUT of almost all embroidery floss. So, all the floss is hand dyed and colored because I LITERALLY COULDN'T GET MATERIALS (IMSTILLMADABOUTIT) Which took so many hours to get the colors I needed. Especially the grey. The grey for Obsidian and Monster Steven is yarn and not floss because I could not get any more floss). The mountain underneath Obsidian is a textile manipulation piece, so multiple fabric pieces are roughly sewn down to get the texture and coloring you need. I used mostly denims and cottons to get the rough texture to match a mountainside. The little lighthouse is embroidered on my embroidery machine from a file I made.
UNDERNEATH LONG BEACH SKIRT: Underneath the big skirt is a whole other world to immerse yourself in Steven universe. So once again-Smocking. The white as we call "frosting" smocking technique is 1.25-inch squares compared to the 1 cm ones of before. I made a second wood board with the 1in squares since the smocking underneath is literally like 6 yards of fabric (I know it doesn't look like it but man does smocking go through fabric) On the underside in the photos you can really see the blue braid woven beads I mentioned in "short beach skirt". Along with that bead line you can also see little bubbles hand-sewn to the dress! the bubbles there are literal Christmas ornaments cut in half and alcohol dyed. (I used sharpies, alcohol and a spray bottle) They are then clear coated with clear spray-paint to ensure they stay colored and the color doesn't rub off. Inside the bubbles are clay gems, painted and coated with resin to ensure stability. I sanded the bottoms and used hot glue to attach them as heavy-duty adhesives tend to yellow or bleed through and since the fabric (where there isn't salt) is pretty thin and I didn't want to take the chance. Each gem is one we have seen in the show, so we have our main characters, then we have corrupted gems and then the gems with Lars on homeworld like Rutile and all them! Both sides have between 8-10 gems each. (try and guess the gems! <3)
PINK UNDERSKIRT PANELS: Once again for these pink panels I used smocking, you can see it on the outermost side. I used 1in squares for this one so I made a third board for smocking (3 boards in total- S, M, L) This part of the skirt on both sides kinda represented Stevens Pink Diamond abilities like portal making (is that even what it would be considered???) any who, since these panels are hidden until shown it seemed fitting so I put the inside of Lions's Mane on one side and Lion on the other. For Lion I once again did the textile painting technique like I did with the mountain and textured him with dozens of different pink fabrics, string and paper. (yes, I sewed through paper to get some of the pink textures). I did a bit of paint for the eyes to make them pop a bit better. The other side is an applique I did with spray adhesive for the tree base and branches, then they are hand stitched on top of to make it pop. I also machine stitched on top to ensure all pieces are well attached. For the small parts of the design like the t-shirt, and the treasure chest I used my embroidery machine to make the pieces.
MAIN WHITE SKIRT TRIM: The last part is the center white skirt! So, for starters, I can’t read sheet music. I never took music classes as a kid since I always took art (believe me, I regret it now) So I kinda had to teach myself music stuff in order to read the sheet music. So, the music notes on the bottom are from the Steven Universe intro song "we are the crystal gems!" I sewed down 5 different strings about the same distance apart to be the bars (I think that’s what they are called) then drew on the music notes with water soluble ink and started stitchin! My friend taught me what the notes meant and what parts were important on a sheet music sheet to include (like the pauses and stuff) and I can mostly understand it! (I love the music of SU and it’s such an integral part I HAD to include it) So the whole song wraps around the bottom of the white skirt. If I were to take off the over skirt I could twirl in a circle and you could read the whole thing (theoretically)
THAT WAS SO MANY WORDS AND IF YOU STUCK IT OUT TO READ TILL THE END YOU ARE THE REAL MVP. TBH I AM ALWAYS SHOCKED WHEN I MAKE SOMETHING AT THE END. I'M LIKE WOAH DUDE I MADE THAT NO WAY. SHOCK. I DONT FULLY KNOW WHY I WENT SO HARDCORE ON THIS PIECE BUT IT IS AWESOME SO OH WELL. (Tbh it may have been a coping mechanism for this whole pandemic business but haha that's just the way it is guess)
Bio: So, this dress was made originally for the HER Universe fashion show this year. I got declined before they saw the full piece. (I'm not salty, you're salty!) but I designed the dress because I wanted to say goodbye to beach city, as the show's finale was last year. The dress was going to go to San Diego comic con and be my way of ushering the show out. Showing the whole world how much I loved it. Steven Universe meant a lot in different ways to different people but for me it was a lot about pure friendship. I got to watch the show with my best friends and cosplay with them for years. The original Steven universe was just our show and was for us and I will always love it for that
But Steven Universe future was different, it was for me. I saw myself in Steven in so many heartbreaking ways. As a caretaker I saw how much Steven sacrificed and when he stopped taking care of the world, he felt he had no purpose. And I cried after so many episodes because no one talks about what happens to the hero after they hand up the cape, after they settle down. And I saw it. I saw me and it meant so much to just see myself. I love Steven universe for that reason alone, if not for the 500 amazing reasons too :))
Photo Credit:My husband Victor! :) (Photo location: Lake Hardy, Indiana)
Video Credit:My best man Lucy (she is one of those folks I mentioned above that watched this show with me from the start and I’m happy to have done this little shoot with her and man I just love her ok)
GOODBYE BEACH CITY THANKS FOR BEING MY HOME FOR ALL THESE YEARS!
Country: United States
#comic-conathome#comic con@home#comic-conathome2021#comic-conathomemasquerade#sdcc#cosplay#steven universe#beach city
469 notes
·
View notes
Text
Ein from “Fist of the North Star” by Maxwell @thatguywithagameboycamera Scheller
https://instagram.com/thatguywithagameboycamera
https://www.facebook.com/thatguywithagameboycamera/
https://twitter.com/ThatGuyWithAGa1
Let’s start with a costuming tip:
Now for the rest of the costume:


I did this costume because I was looking over characters from the franchise and couldn’t find any cosplays on Google images. That’s why I Cosplay anything.
I wanted this costume to be based on all interpretations of Ein from all media and have it look like it could be in the Mad Max movies, which Fist of the North Star takes inspiration from (obviously), rather than look like typical Anime Cosplay.
I got costuming tips from madmaxcostumes.com and Nuclear Snail on YouTube. My spurs were 3D-Printed. The belt was found at Tandy Leather. Much of the Leather Jacket and Pants were painted with Acrylic paint. The Shoulder armor came from “Football Armor”. Gloves modified with Leather strips and those paper-binding “things” to make studs.


#comic-conathome#comic-conathome2021#comic con@home#comic-conathomemasquerade#sdcc#cosplay#ein#fist of the north star
18 notes
·
View notes
Video


Comic Con Masquerade Contest: Natalie Lucia
Costume Name: Yennefer of Vengerberg
Costume Description: This costume is worn by Yennefer in season 2 of “The Witcher.” The costume consists of an underdress made of black jacquard. It has a fitted bodice and front placket panel with button closures on either side. I drafted the dress from scratch.
The coat is made of taffeta, Chinese brocade & satin. The coat was drafted by me to match references. It consists of a black, satin underskirt that is lined with a matte purple satin. The overskirt is made with Chinese brocade and gathered to form split panels. The upper part of the coat has lace detail appliqué that I carefully cut out with a wood burning tool and hand stitched to the jacket. It closes in front with two frog clasps. The outfit is set off with Yennefer’s signature leather choker and pendant. This costume took over 50 hours to make and contains over 20 yards of fabric.
Bio: Natalie is an avid costumer who enjoys learning new skills with every costume she makes. She has made costumes from fandoms such as Jurassic Park, Shadow and Bone, Star Wars, Marvel and DC. In the real world, Natalie teaches music to students of all ages.
Photos by Nick Ryu
#comic-conathome#comic-conathome2021#comic-conathomemasquerade#comic con@home#sdcc#cosplay#yennefer of vengerberg#the witcher
40 notes
·
View notes
Photo
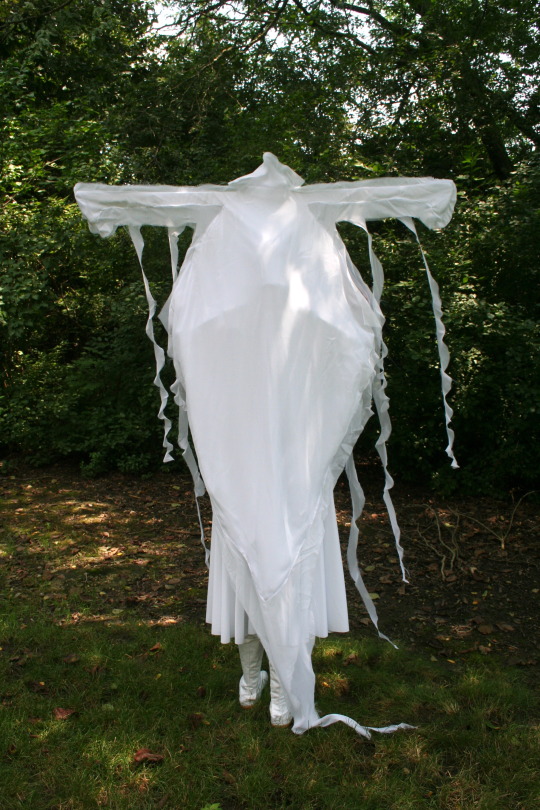

In the days before Raava, the spirit of light and peace, met Wan, the man who was to become the first Avatar, she spent her days in the wilds, joyful and carefree.
Young Raava enjoyed the sunlight.
She delighted in the warm breeze.
She took in all nature had to offer.
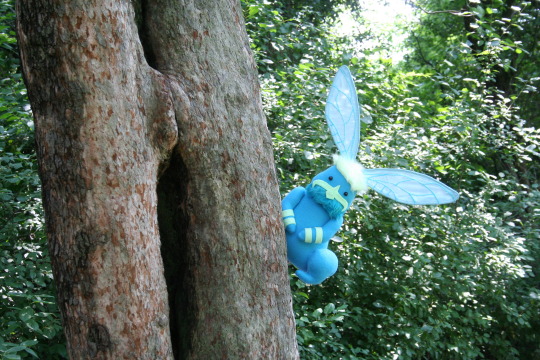
But what’s this? A dragonfly bunny spirit!
Raava made a friend!
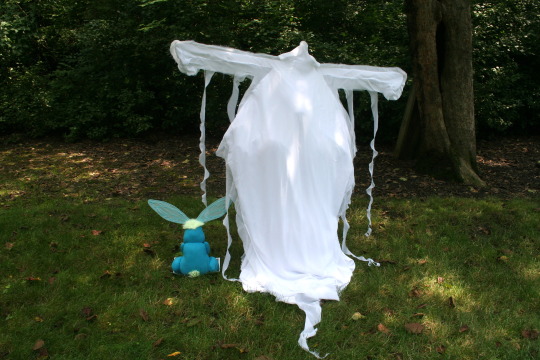
These good times may not have lasted…But they were golden while they were to be had.
*this story is purely fictional and is not Avatar the Last Airbender/Legend of Korra canon.
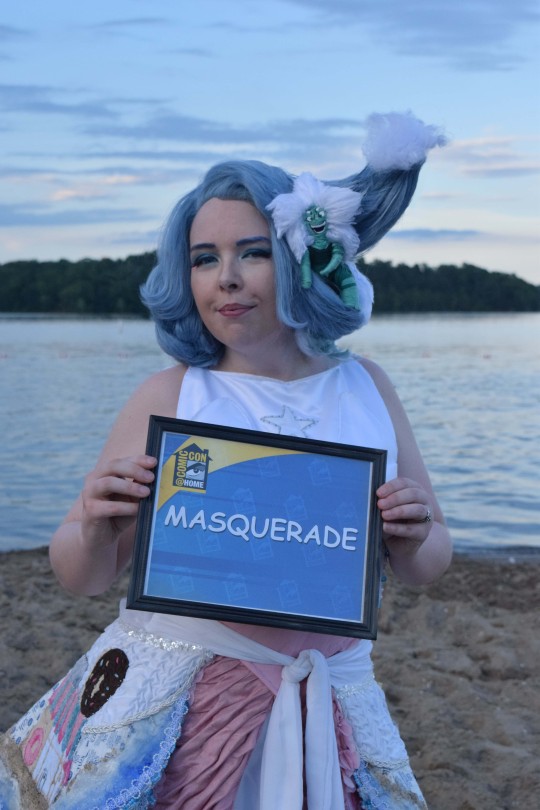
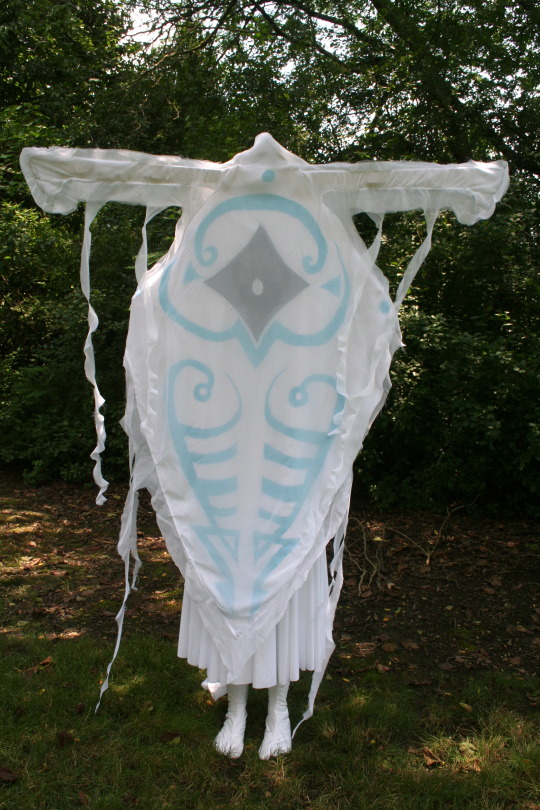
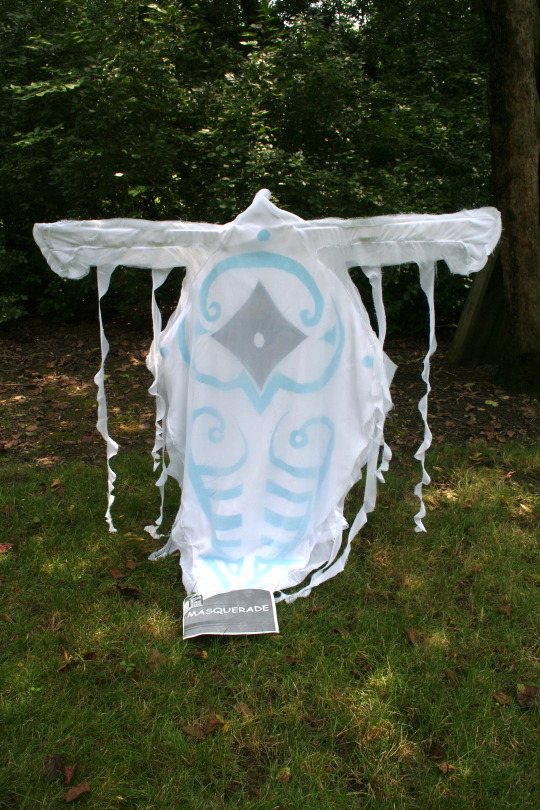
Comic-Con@Home Masquerade Entry: Kathryn Henzlere
Costume Title: Raava’s Day Out
Costume Description: Re-creation, The Legend of Korra (part of the Avatar The Last Airbender universe)
The Raava costume/puppet is a combination of a wood, plastic, and wire frame, with a hand-painted fabric overlay which has a mesh panel for visibility by the wearer. The overlay has an outer layer of chiffon to add a ghost-like affect, with curling tendrils along the edges. When worn by a person instead of being used as a puppet, the costume includes a skirt, leggings, and split-toe shoes (the only part not made by hand). The Bumju plushie is made of fleece, felt, cotton batting, and faux fur, with wire and embroidered chiffon ears, button eyes, and a hook at the back for using it also as a puppet.
Bio: Kathryn Henzler is an award-winning designer and creator of theatrical costumes, cosplay, skating costumes, and geek couture. She has exhibited at conventions and art museums and is a four-time Her Universe Fashion Show contestant. In her day-to-day, she is also a Japanese-English translator, composer/musician/audio engineer, actress, activist, archer, and adult figure skater.
Direction: Kathryn Henzler
Photo Credit: Elizabeth Emmert
#comic-conathome#comic-conathome2021#comic-conathomemasquerade#comic con@home#sdcc#cosplay#raava#legend of korra
26 notes
·
View notes