
Statistics
We looked inside some of the posts by moonfeatherquill and here's what we found interesting.
Average Info
Notes Per Post
569
Likes Per Post
389
Reblog Per Post
177
Reply Per Post
3
Time Between Posts
2 months
Number of Posts By Type
Text
13
Last Seen Tumblr Blogs


Fun Fact
Average visit duration of Tumblr.com is 10 mins and 25 secs.
Text

I learned to print and bind actual text by practicing on my own stuff!
This is a running stitch binding a single signature into a soft cover (made of an old classification folder) with a little spine. The sheets are cream-colored legal paper cut in half.
Openclipart.org graphic. Enabled by Impose Online, if anyone else was looking for a good imposer!
#hey remember when i said there were other types of pamphlet with more fun stitching#i did this in 2022
8 notes
·
View notes
Text


I had two knitters on my gift list, so I made them themed crisscross (AKA "secret Belgian") notebooks. The sheep are hand-embroidered. The yarn graphic was done by hand with a foil quill pen on cardstock and inset in the cover. (I overdid the inset on the green one...)
You can see I tried out two different types of closures. I'm not sure I love the wraparound ribbon for practical purposes, since it doesn't grip itself well, but it does look nicer than the hemp cord wrapped around the button.
The crisscross binding is fun because the books lie perfectly flat, and the cover bends all the way backwards with no trouble at all. Sewing them can be a little fiddly, though.
Paper is 9"x12" Pacon drawing paper cut in half to make it short-grain suitable for folding into folios. So these books are a little larger than 4.5"x6".
27 notes
·
View notes
Text

I made these Xena-themed journals with the stiffened paper binding technique. I designed the graphic myself and cut them with a Cricut Joy, and the endpapers are hand-stamped cardstock.
12 notes
·
View notes
Text


This Xena-themed journal has a hand-embroidered cover, a faux leather spine, and hand-stamped endpapers. The cute horse button came from Sniggle Sloth, as did the stamps!
12 notes
·
View notes
Text
PAMPHLET-MAKING MATERIALS
Literally any paper, for filler
Cover paper, meaning a stiffer paper at least as large as your other paper. Or cardstock, or a cereal box, or anything you wanna play with. I've chosen linen-textured scrapbooking paper.*
A bone folder is best, but a butter knife or a thick ruler is fine
Thread, preferably thicker than hand-sewing thread, but honestly that’ll still work. Embroidery floss would also work. I like size 8 pearl cotton, which is cheap and comes in lots of colors.
A needle appropriate to your thread
An awl**
A ruler
Scissors or thread clippers. If you need to trim your cover paper, you can use those scissors or a paper cutter or a craft knife and self-healing cutting pad.

*A cover is actually optional. If all you want to do is elevate a zine or handout with a personal touch, you can skip the cover and just do the hand-stitching. **If you don’t have one, I’m sure you can get creative with your needle and do okay, but it really is easier with an awl.
Most bookbinding starter guides will tell you that you need a lot more and more specialized stuff than this, and they will also wax poetic about paper grain, but don’t worry about that. We’re making a pamphlet.
If you want to spend like $10, you can get a bookbinding starter kit with more than you even need right now. Here’s the one I got a while back.
Get your filler paper. If it’s thin paper, your pamphlet can fit quite a few sheets without looking too bulky or refusing to lay right. What I have here is slightly thicker than cheap copy paper, and I’m using 10 sheets. If you fold yours and don’t like how it looks, just remove some outer sheets until you are happy. No harm done!
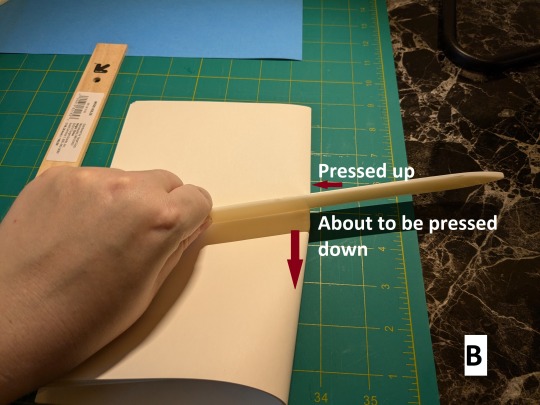
Now, take your paper and lightly fold it in half crosswise to make a book shape. If you want it to look extra nice, tap it on your work surface so it’s all square, then let it fan out juuuust a little bit when you lift the short edge before you grip it together.(A) When you fold a pile of paper this way, you get a little point that looks fancy.(C) If you keep one edge square, their other edges will have a more dramatic fall-off. But that’s still fine and will work!
Use your bone folder or butter knife to set the fold. Press it into the middle of your fold and press outward from there, returning the center before pressing out the other direction.(B) This is less likely to cause drift in your fold. Look how crisp it is compared to hand-pressing! You can go over it again with your bone folder if you want.


Open your paper up and lay a ruler against the crease. Use it and the awl to punch a hole in the very center and a hole about a half inch from the top and bottom, making three total holes. You can pre-mark the hole locations in pencil or just go straight to the awl.(D) Do not stab the awl into your table, however. Place a cutting mat or some cardboard or a junk magazine underneath to protect it.
Next, fold your stiffer paper in half in a direction that’s logical for making a cover, but don’t crisp the fold with a bone folder. It has to wrap around the outermost sheet of filler paper, which is the least crisp one, and they won’t nest as well if the cover is so severe.
If you need to trim your cover paper, now is a good time. I recommend making it about 4mm taller than your filler and measuring out about 3mm from the fore-edge to trim that.(E)
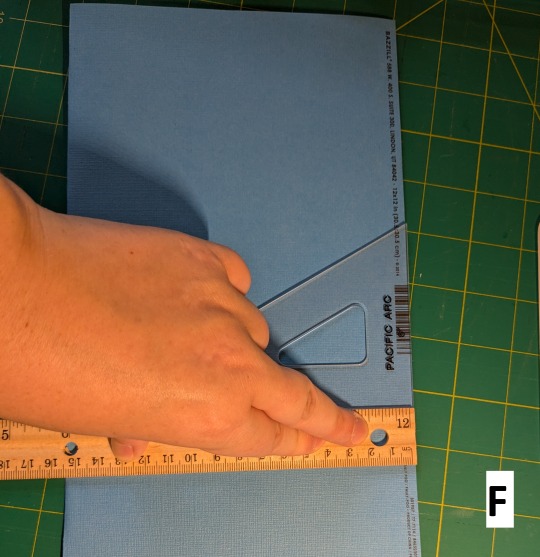
Notes about cutting: First, I measured where I wanted my edges to be and punched in some marks with my knife. Then, I removed the filler paper, flipped the cover over, and used those holes as a set point to line up my ruler with the help of a square.(F) I could have also measured things and cut them with a paper cutter, or penciled in a line and used scissors. Do what makes you most comfortable; just be aware that cutting things square is, to some (me), the most maddening aspect of bookbinding. It's okay if it's not perfect!


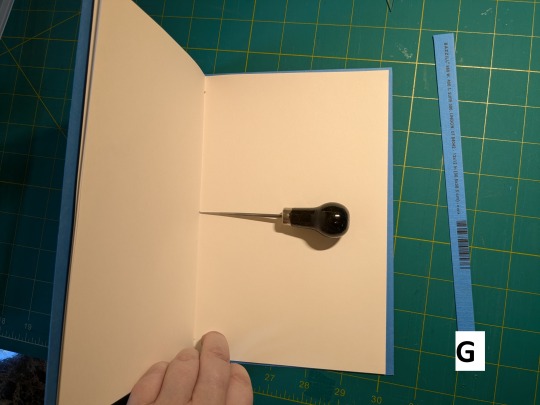
Center the filler inside your cover, then put the awl through the holes you made earlier to pierce the cover.(G) For extra neatness points, put the awl through the cover holes (but not the filler paper holes) again, from the outside, to smooth out the spine.
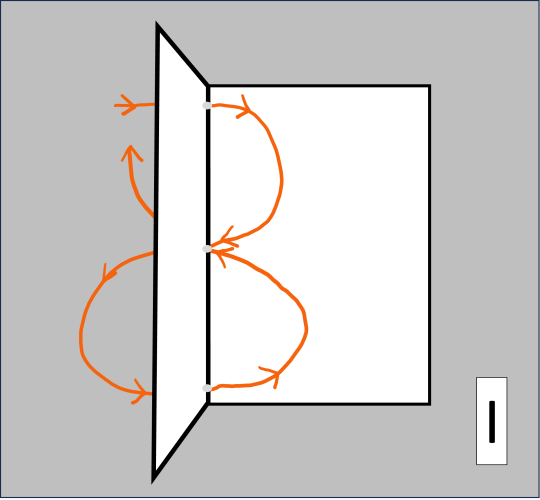
Now thread your needle with thread that's about three times as long as your pamphlet is tall, just to be safe.
Starting from outside the spine, pass the needle through the top hole, then out the middle. Pass it into the bottom hole and out the middle again, being careful not to pierce the thread that’s already there. (That will make tightening everything difficult). Tighten up your thread until it’s taut but not straining and tie the ends of your thread together.(H,I)

If your cover was the same size as your paper, and you don’t like that the paper is sticking out at the fore-edge, you can use a ruler and a craft knife (and, ideally, a square) to cut that whole edge flush. Just push down hard with your ruler and cut along it, making several passes until you’re through all layers of paper.
You’re done! You have made a pamphlet!


Now you can decorate it if you want! If you leave some extra thread, you can put beads on it or braid it all pretty. You can draw or paint on the cover. Or put a sticker on it, or use a foil quill. Have fun with it! For this one, I did beads and some Cricut-assisted papercraft. Cat silhouette courtesy of Mungang Kim of the Noun Project.

Did you make a mistake? You probably learned something, and without the stress of ruining a long, printed manuscript or a fancy covering material.
If you liked doing this, consider what other materials might be fun to experiment with.
If you’re eager to move to more complex bindings, may I suggest a criss-cross binding or Coptic binding? Or some other varieties of pamphlet! Do you want words printed into your pamphlet? Look up “imposition” in bookbinding or watch this space for another tutorial.
Make a pamphlet
Tons of people are realizing that you can make books at home, a fact that totally floored me two years ago when I found out about it. Is that you? You should make a pamphlet!
Sometimes, people show up to the bookbinding community and ask something like, “I would like to bind a 100,000-word fan fiction into an heirloom object/gift. Where do I start?” You should start by making a pamphlet.
I think some of them don’t like hearing that, and I think I understand why. They are not approaching bookbinding as a hobby to learn and explore; they want a DIY project that will result in An Object. But this isn’t like when I painted my shutters, and all I needed was a paint sprayer, some fasteners, a chisel, and YouTube to get me going. For most folks, it’s more like if you wanted to design and build a shed from scratch, and you’d never held a saw. Why not draw up and make a little firewood shelter out of cheap lumber first?
Why not make a pamphlet?
Now, if you are coming from a strong crafter background, and especially if you already do a lot of papercraft or chipboard box-making, you can admittedly skip the pamphlet phase. But should you?
Pamphlets are cheap! Quick! Fun! Pamphlets and other simple bindings let you play with tools, materials, and techniques without expending excessive time or precious materials. You probably have everything you need already. Bookbinding is a craft with dozens of best practices and rules of thumb and recommended materials, and each one is negotiable. If you truly understand the importance of a given recommendation or standard, you can decide how much it’s worth to you and your projects. If you’re a novice crafter, you’ll quickly figure out if this fussy paper-bending nonsense is enjoyable for you at all–without buying a bunch of tools you may not use again. If you’re experienced, you’ll have a quick win, get to play with new kinds of paper, and see how different materials work together.
And you can explore how to decorate books!
So please, if you’re even curious about bookbinding, make a pamphlet.
I’ll even tell you how. With pictures!

101 notes
·
View notes
Text
Make a pamphlet
Tons of people are realizing that you can make books at home, a fact that totally floored me two years ago when I found out about it. Is that you? You should make a pamphlet!
Sometimes, people show up to the bookbinding community and ask something like, “I would like to bind a 100,000-word fan fiction into an heirloom object/gift. Where do I start?” You should start by making a pamphlet.
I think some of them don’t like hearing that, and I think I understand why. They are not approaching bookbinding as a hobby to learn and explore; they want a DIY project that will result in An Object. But this isn’t like when I painted my shutters, and all I needed was a paint sprayer, some fasteners, a chisel, and YouTube to get me going. For most folks, it’s more like if you wanted to design and build a shed from scratch, and you’d never held a saw. Why not draw up and make a little firewood shelter out of cheap lumber first?
Why not make a pamphlet?
Now, if you are coming from a strong crafter background, and especially if you already do a lot of papercraft or chipboard box-making, you can admittedly skip the pamphlet phase. But should you?
Pamphlets are cheap! Quick! Fun! Pamphlets and other simple bindings let you play with tools, materials, and techniques without expending excessive time or precious materials. You probably have everything you need already. Bookbinding is a craft with dozens of best practices and rules of thumb and recommended materials, and each one is negotiable. If you truly understand the importance of a given recommendation or standard, you can decide how much it’s worth to you and your projects. If you’re a novice crafter, you’ll quickly figure out if this fussy paper-bending nonsense is enjoyable for you at all–without buying a bunch of tools you may not use again. If you’re experienced, you’ll have a quick win, get to play with new kinds of paper, and see how different materials work together.
And you can explore how to decorate books!
So please, if you’re even curious about bookbinding, make a pamphlet.
I’ll even tell you how. With pictures!
101 notes
·
View notes
Text


In April-May, I made a bunch of journals/sketchbooks to sell at Xenite Retreat.
Most of the books are covered in my original Xena fabric pattern, which you can buy on Spoonflower if you happen to like it! It comes in two sizes.
For the last three books, I used heat-transfer vinyl and a graphic I designed last year. I should have made more of these. 😅
Construction notes under the cut.
All of them are soft-spine books filled with Finch Fine Opaque Bright White Paper 80 lb Text, which I paid The Papermill Store to cut from 11"x17" long grain into 8.5"x11" short grain. I'm very pleased with this paper choice; it takes my fountain pen beautifully.
End papers are hand-stamped with Sniggle Sloth stamps I purchased last year.
It was probably not necessary for me to do an Oxford hollow on these, but I wanted to practice it, and I can now tell you these books are STURDY. Below are the completed text blocks before casing-in. Don't mind the wax paper guarding the inside of the hollows while they dry. I also finally purchased real mull instead of fighting with starched cheesecloth or other substitutes.
They are not perfect, but I hope the people who bought them are enjoying them. (I did have some left over, oops)

#bookbinding#handmade journal#xwp#xena warrior princess#xena#spoonflower#cricut#there was some strife with the htv#soft apparel cottons are not a good substrate if there's glue that can leak through turns out
9 notes
·
View notes
Text


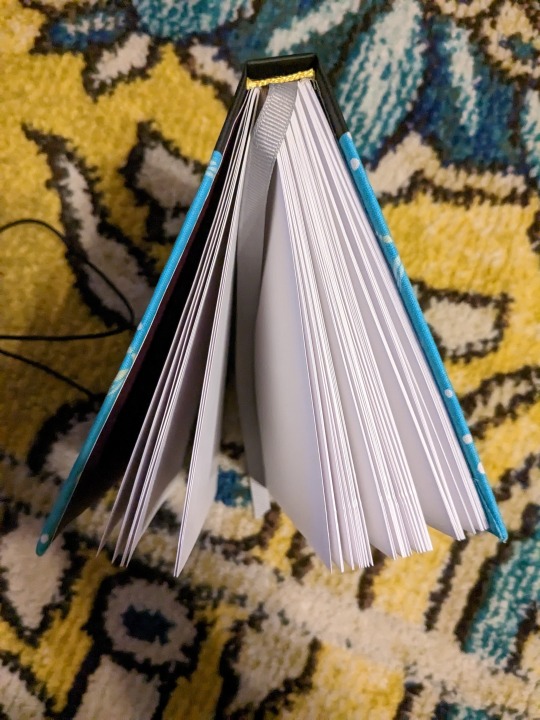
In April, after a long break from bookbinding, I made these soft-spine books using an Oxford hollow, canvas I had lying around, and some new paper.
I didn't end up loving the paper (for pen, anyway), but I did like how the soft spine lets the books lay open, and I did have good luck using heat-transfer vinyl (HTV) for the first time! And it was cool to finally use short-grain, letter-sized paper in a book.
The tree graphic is courtesy of Ahmad Ishaq and The Noun Project!
#bookbinding#handmade journal#oxford hollow#I will print text on that paper in the future#i like the hue also#cricut#penguins
7 notes
·
View notes
Text

I've been having fun with stiffened paper binding! These are very sturdy, with sewn-in end papers fully pasted into thick chipboard.
The spines are homemade book cloth, and the covers are textured cardstock.
14 notes
·
View notes
Text

I made myself a new sketchbook last weekend!
The Bienfang drawing paper, LaCreme faux leather spine, and quilting cotton were all purchased on clearance at different times. The button closure is made of some old leather cord I had lying around and a one-off, painted, wooden button I found at a random sewing shop when I was on vacation last year.
The moral of the story is yes, we can absolutely get around to using those random craft supplies we have accumulated. Eventually.
2 notes
·
View notes
Text
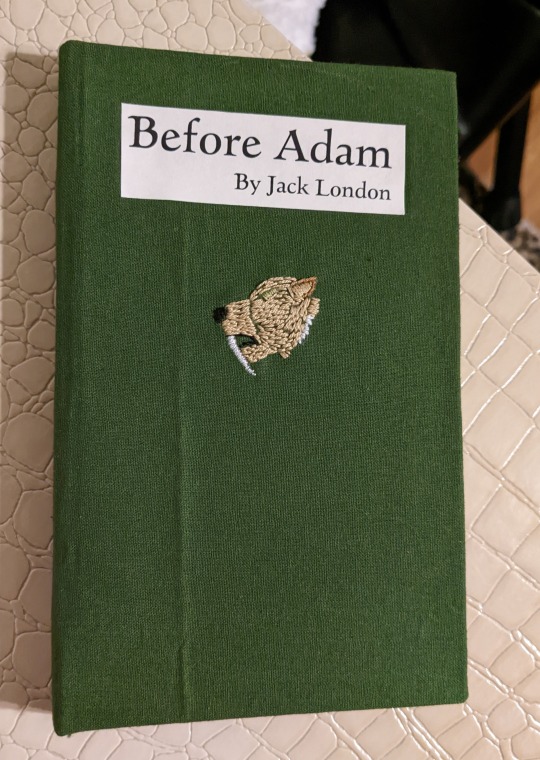


I hand-made a copy of Jack London's Before Adam for my friend's birthday. The little sabretooth is hand-embroidered, and the title is slightly inset.
Text courtesy of Project Gutenberg but formatted by me! Oh, and the oak leaf is courtesy of Openclipart.
Don't mind the crease on the front... I was am still working out how to properly iron fat quarters.
5 notes
·
View notes
Text


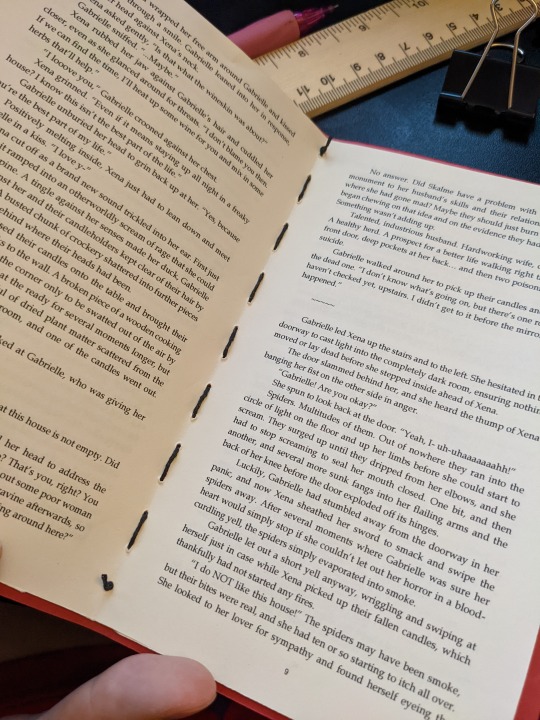
I hand-bound a transcript of the Xena: Warrior Princess episode "Many Happy Returns" and hand-embroidered covers for it. Both designs are my own, one Xena-themed, one Gabrielle-themed.
Definitely a learning experience that pushed my bookbinding AND embroidering abilities!
262 notes
·
View notes
Text
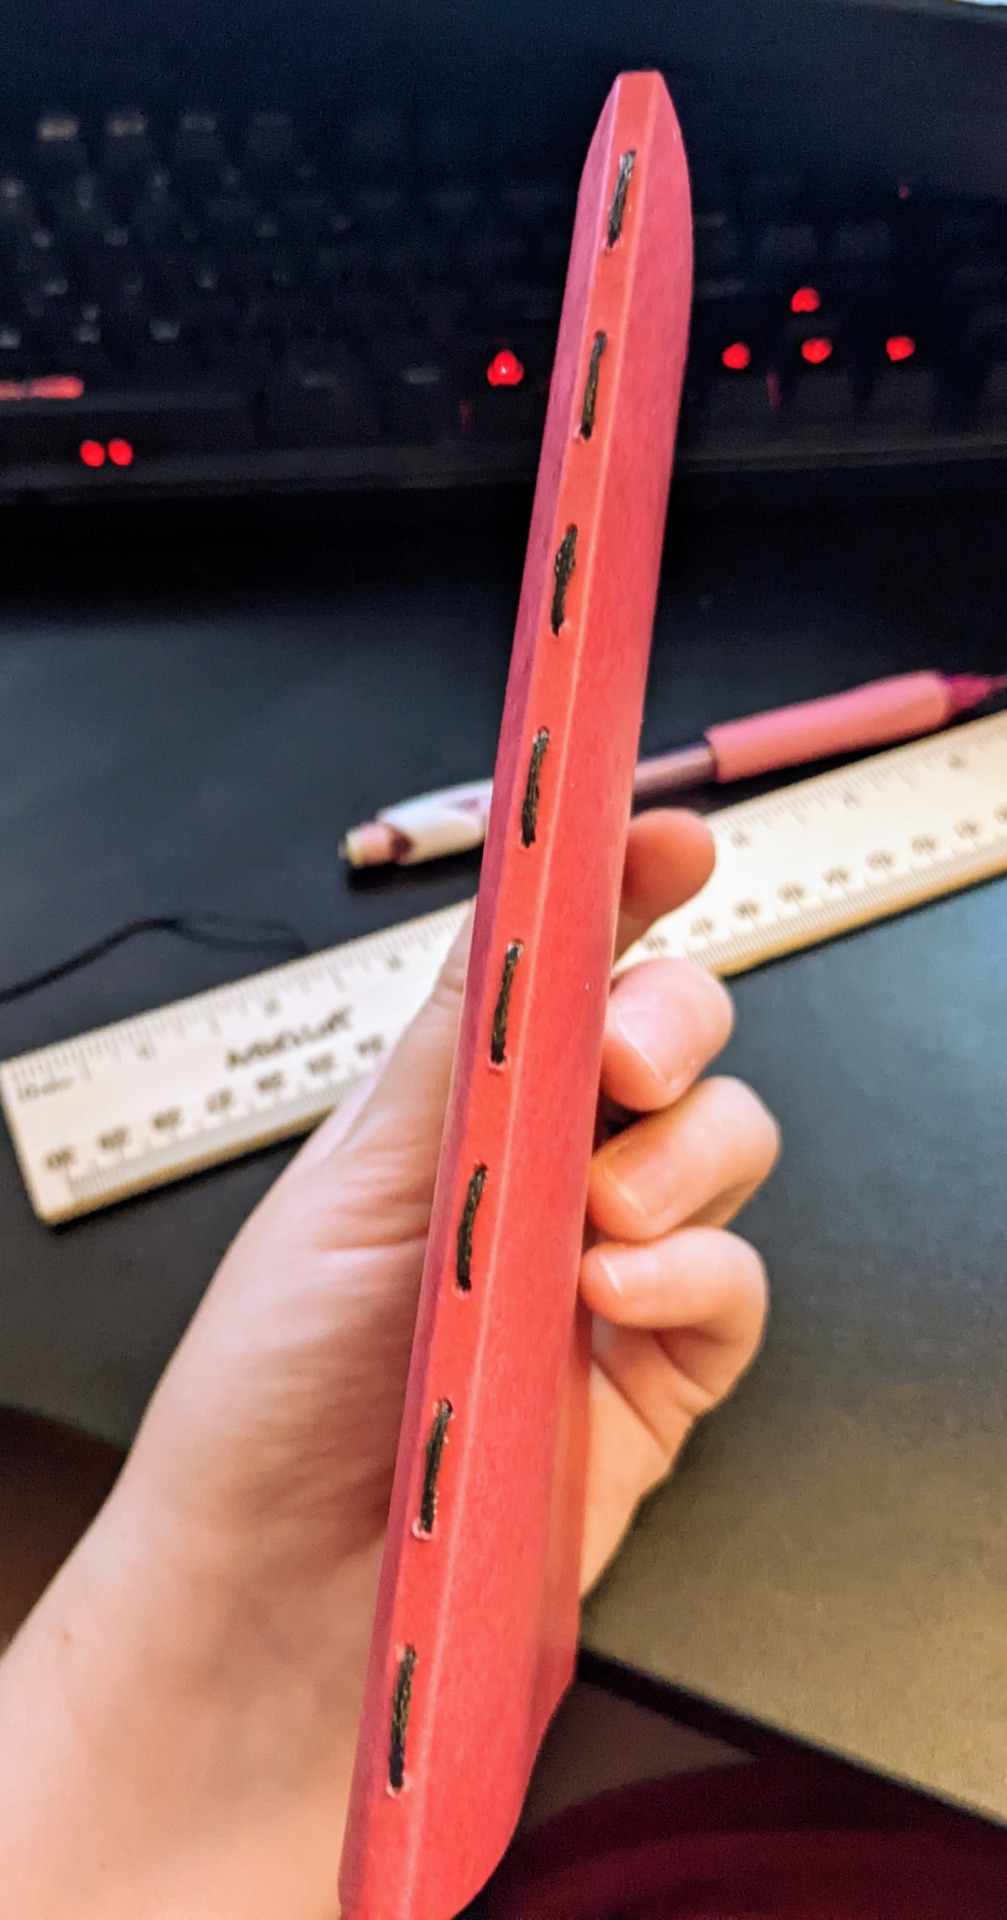
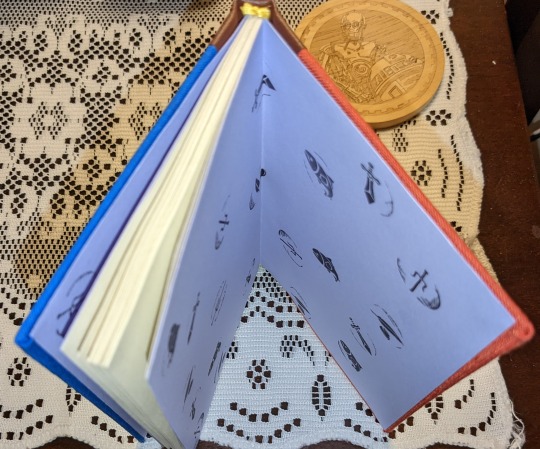
"The Call of Cthulhu" in a double pamphlet binding with a foiled cover made of an old file folder.


I made the graphics myself, and the foil was done with a foil quill pen. A better look at the binding:


It was really rewarding to put old and new skills and materials together to make this!
9 notes
·
View notes