#spoonflower
Note
could you tell me more about spoonflower? i'm interested in uploading my own designs, but i'm not entirely sure how it works or how much it pays. thank you!
Sure!
When you first upload your design, it'll look like this.
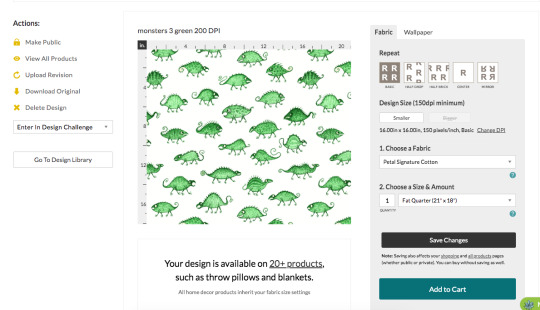
The standard DPI for printing on all the fabric sites I've seen is 150, and since I made this pattern at 200 DPI that means Spoonflower will print it bigger than I want it unless I change it here.
So I click on the "change DPI" thing, type in "200" and click "change". Sometimes I find it doesn't save, so I always go back later to check and make sure it did save the right DPI.

(You can avoid this by just changing your image to the right DPI before uploading, but sometimes I want the option to make it a bit bigger, just in case.)
If you want to make multiple sizes of the same pattern available you'll have to upload a different version for each one and change the size individually.
For example, I drew my Bathroom Dinosaurs pattern pretty large and at 150 DPI, and left that as is for the big version.

But I wanted a small version too, so for that one I changed it to 670 pixels per inch so it'd print much smaller.

You write in the title, tags, and description, and you can put any links to other pages or references in the "Additional Details" section.
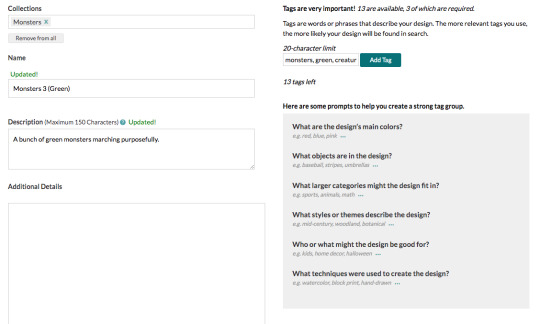
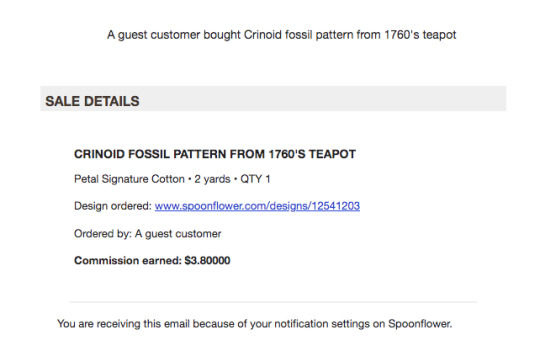
(Leaving links isn't usually necessary, but sometimes it is, like how I wanted to leave a link to the original 1760's teapot for my crinoid fossil pattern.)
At this point, you can order things printed with your design, but nobody else can yet. You have the option to show the design publicly, but I like to keep it private until I've ordered my proofs and can sell it.
Now, to order proofs! DO NOT GET THE CUT SWATCHES!!! They are SO much more expensive than getting a fill-a-yard, because cutting and packaging all the little pieces is a lot of extra labour.
Wether you have a few designs, or a lot, just get a fill-a-yard.
To make a fill-a-yard you first need to make a collection. Collections can be either public or private, so I keep a private collection called "new designs to proof", and I put all my new designs in there until I've ordered them.
You can also add other people's patterns to a collection, so if you have extra space to fill up or you want little bits of a bunch of other people's patterns for a quilt or something, add whatever you want to your collection.
On the collections page when you hover your mouse over one you'll see a little patchwork symbol show up in the middle along the bottom edge, and you click on that.

That'll take you here, and you choose a layout and a fabric.
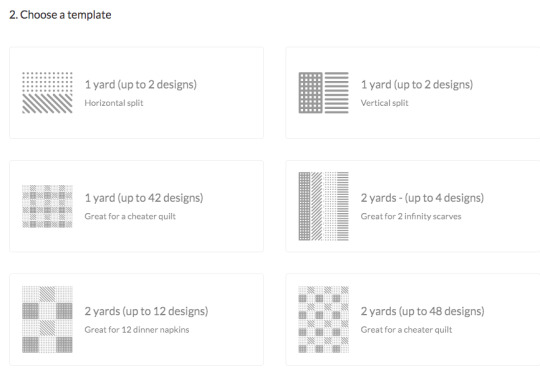
For some reason the fabric options here are a bit limited and vary depending on the layout. I like to get either the 1 yard/42 designs in cotton poplin, or the 2 yards/48 designs in cotton sateen, but there are plenty more you could try.
I'll click the latter for this example. (The squares in this one are the perfect size for pleated face masks, and I have a few made from mine and my friend's fabrics.)

Then you just click on a design and click on however many squares/rectangles you want it to fill. It usually takes a few seconds for them to show up.

You can have just one little sample of each, or you could make half the fabric be one design and fill up the rest with little samples.
(That's what I did for my brown monster waistcoat - I printed juuuust enough of a fill-a-yard to cut out a waistcoat from, and the rest was other samples.)

You can change it around if you want. Once you're happy with it, put it in the cart and buy it!

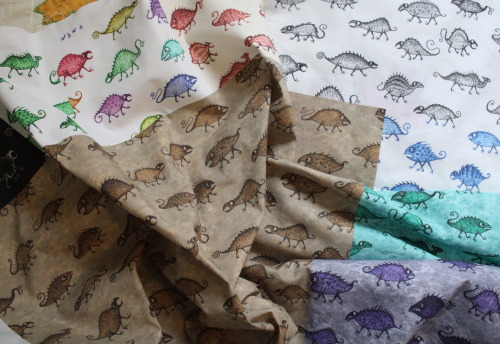
I'm not going to order this one since it's an example with designs I've already proofed, but here's what my monster patterns looked like when they arrived.
Also, I want to point out that you could VERY easily make some really fun pride flags using the fill-a-yard! You might have to have it be only part of the fabric, depending on the number of stripes, but you could make it be any texture or pattern you want. Here's a quick example I did with other people's patterns by searching "(colour) marble texture".
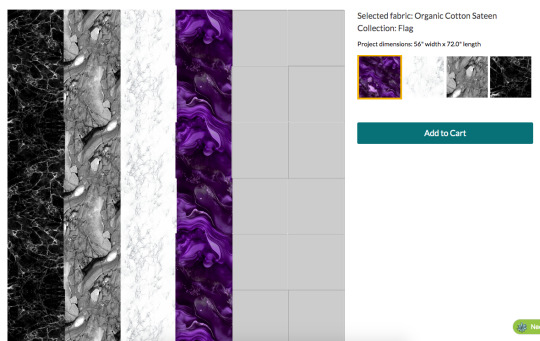
With only 4 stripes I'd have to fill the rest of the space in with something else and cut it off, but it would still be pretty big! (The edge of that purple stripe looks jagged in the preview, but they print perfectly straight.)
I have not done this, but someone should! Just wash it, trim the blank edges off, hem it, and you've got a flag!
(Don't do this with the 2 yards/4 designs option though, it looks like nice stripes in the thumbnail but it's made for infinity scarves and there's a gap and dotted line down the middle for cutting. Bleh.)
Anyways, once your samples arrive you can make the designs available for sale! If you have any changes you'd like to make, to the size it prints at or the pattern itself, you can make them now.
I found the small version of the Bathroom Dinosaurs print was too small when I first got my proofs, so I just reduced the DPI a bit.
And you can replace the image with a new, edited version by clicking "upload revision".

So when my brown coffin pattern printed really washed out and grey, I replaced it with a more saturated version and was good to go, no need to order another proof.
Down at the bottom of the design editing page you can now click on the options to list it publicly, and to sell it on fabric and/or wallpaper. I make all of them available on fabric, and some on wallpaper if I deem them to be appropriately large.
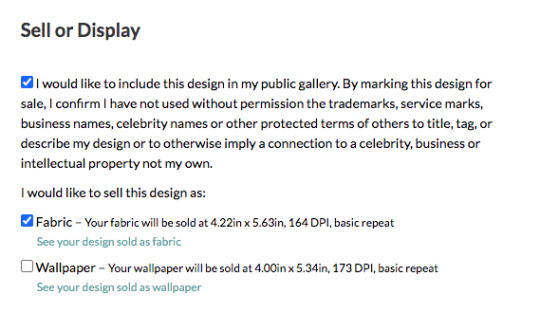
They'll pay you 10% of the sales price of the fabric, or slightly more if you sell over a certain amount in a month. There's a whole page of questions and answers about it.
You also get a 10% discount if you order fabrics with your own designs.
(Although, personally, if I'm ordering my own designs on fabrics for me then I'd prefer to get them from somewhere like ArtFabrics, since they use reactive dyes instead of inks, so their blacks actually print black and don't make the fabric stiffer like Spoonflower's do. And also because they're here in Canada so there's less shipping cost. Sadly they don't have an option to sell your designs though.)
Spoonflower also has weekly design contests which are announced a few weeks in advance and have pretty big store credit prizes (the first place one is 200 USD), and I've entered a few times, but I don't vote often because Spoonflower is such a huge site that there are frequently over a thousand entries and it's really time consuming to scroll through them all.
Ok, that's everything I can think of! I also put all my patterns on sone things on Redbubble, since they have options for repeating patterns on some things.
2K notes
·
View notes
Text

Hey yall!! Introducing one of my favorite pieces of the last few years, Sea Oddity: a repeating pattern of hand drawn and watercolor rendered jellyfish, horseshoe crabs, nudibranchs, and sea monkeys. (repeating watermark added just to be safe <3)
I uploaded it to Spoonflower last year as part of the assignment I made it for, and now it's publicly available to purchase on there as well as on my brand new Society6 shop! If you want a little sea critter print or some fabric to make a sea critter sewing project, this might be the perfect one!
#my art#artists on tumblr#marine biology#repeating pattern#spoonflower#horseshoe crab#nudibranch#nudibranchs#sea creatures#jellyfish#blue lagoon jellyfish#spotted jellyfish#princess jellyfish#horse shoe crab#hiii here's something original!#I finally got around to making a society6 lol if that tells u abt my financial situation#the spoonflower pattern has actually been available for a while! I got hounded into making it publicly available#but purchases are still kinda rare and I only make a few cents whenever someone DOES buy a yard or 2 of fabric so#I figured getting this out there before the holidays might be a good idea
170 notes
·
View notes
Photo

Flying Raptors repeating pattern that I entered in Spoonflower’s “Birds of Prey Wallpaper” design challenge.
224 notes
·
View notes
Text

Bats & Pomegranates
The theme for this week is Whimsigothic Wallpaper, and like. There was no way I wasn't going to enter. Whimsigoth is my THING. So after a lot of brainstorming, I decided to combine the ultimate Spooky Animal with the ultimate Spooky Fruit. And this is the result.
I really like how it turned out! I did have to restart the pomegranates a couple of times- I couldn't quite get the style right. It was frustrating, but the time spent redoing them was well spent- I think they look lovely now.
You can vote here on Spoonflower. Thank you!
---
Gumroad | Redbubble | Spoonflower | Patreon | Twitch | Instagram
#art#illustration#digital art#surface pattern#pattern design#spoonflower#fabric#gothic#goth#whimsigoth#bats#pomegranate#autumn#fall#digital#2023
104 notes
·
View notes
Text
so my Spoonflower fabric for my corset arrived (dark teal cotton sateen)
and like
maybe this is on me for ordering a fabric with the color printed on instead of dyed but it feels like. painted fabric
the part with the color is stiffer than the white margins, and feels slightly...tacky, I guess? it LOOKS right- like dyed dark teal sateen, with the sheen and everything. it just feels frankly awful
has anyone else had an experience like this? everywhere I looked for reviews RAVED about the Spoonflower cotton sateen, even other people who ordered solids or patterns with large areas of dark printed color
I'm not sure I want to make my corset out of what feels like a canvas backdrop for a high school play, and I'm pissed because I'm chomping at the bit to get started on it already. I have an October deadline for an event dress, and I'm starting fully from scratch- not even a single fitted bodice pattern to my name. I need this corset, but I really really hate the way the fabric I waited weeks for feels
I don't want a half-assed corset the way the entire rest of my sad little post-fire wardrobe is currently half-assed. if that makes sense
#sewing#operation corset#spoonflower#re-sewing things feels like staring up a hill with a boulder like sisyphys#I currently have only four-ish outfits to my name and parts of all of them are thrifted and only Sort Of what I like#I feel so. I don't know. pathetic? I guess?#like I had all these beautiful things that made me feel Good About Myself and now most of them are gone
57 notes
·
View notes
Photo
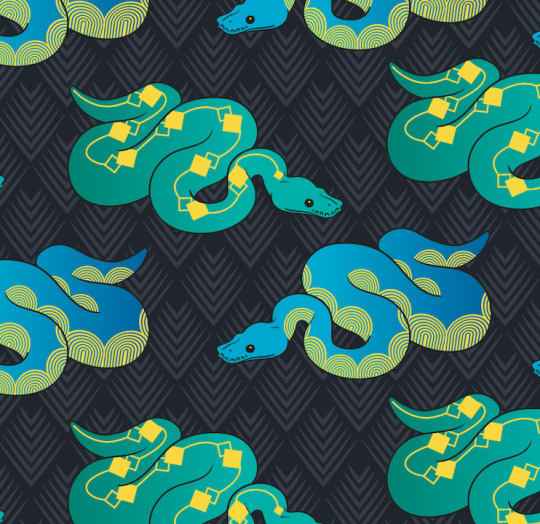
Finally had some time to myself to create another pattern! This one is for the Hissterical Snakes Spoonflower design contest. I've titled it Art Sneko
If you have the time to vote, click here! Voting closes June 28th. Remember, you can always scroll until the designs are all loaded and ctrl+f "leegoguen" to find my design.
Thanks to anyone who takes the time to vote!
#spoonflower#spoonflower challenge#art#design#lgbtq+ artist#fabric#design challenge#snakes#snake#art deco inspired#cute#ball python
1K notes
·
View notes
Text

Big Man printed plushie
15 notes
·
View notes
Text
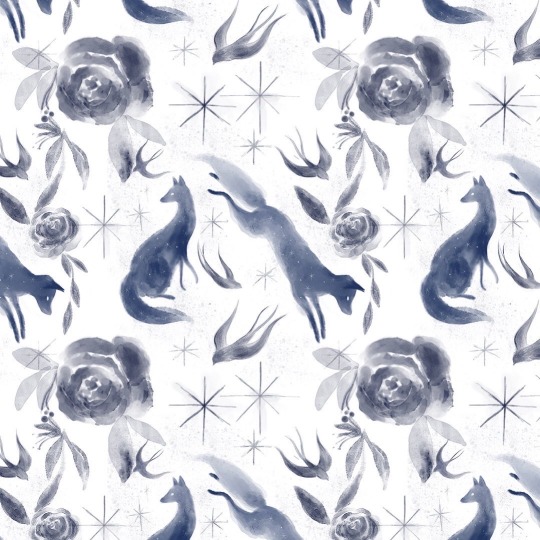
Another little hand drawn painting pattern that I’ve added to my new Spoonflower shop as a fabric or wallpaper pattern. Link in my link tree via my Instagram @thisspeckledwood
#pattern#spoonflower#foxes#painting#illustrator on tumblr#homedesign#interior decor#design#art#wildlife#animals#nature#magic#artists on tumblr
44 notes
·
View notes
Text

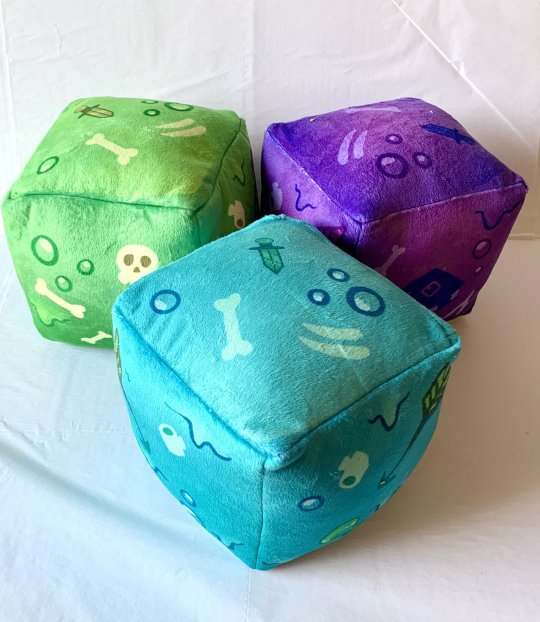
Gelatinous Cube Plushies!
Easily make your own with a cut-and-sew pattern available on my Spoonflower!
476 notes
·
View notes
Text

57 notes
·
View notes
Text
Just in case anyone was wondering what I use all the color palettes I make for, it’s usually fabric design.
For example, here’s a fabric collection using the Defiant Daylilies Blooming at Night palette:
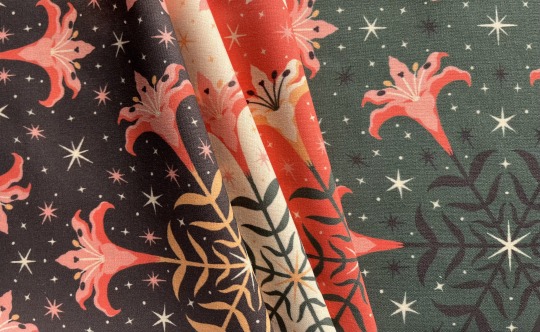


This collection (the same name as the palette) can be found in my Spoonflower shop.
57 notes
·
View notes
Note
How do you make a continuous design for fabric like that?
(Link to the post about how to use Spoonflower)
The very very short answer is that I draw stuff in the middle of the document, roll the edges around using the offset filter, and then draw more stuff in the middle, which is now the blank bits that used to be the edges. Just keep doing that until the whole thing is filled in with pattern. If there are multiple layers it still works, you just need to make sure all the layers are selected before doing it.
I do my drawing in Clip Studio Paint, which doesn't have an offset filter, so I've been saving my file and going and doing the offsetting in photopea.com, but it can be a bit glitchy sometimes. (Photoshop has an offset filter, but I don't have photoshop.)
Ooh I just found a tutorial for how to make an offset tool in CSP, so I'll have to try that!
I'd like to make a long and detailed tutorial for how I make repeating patterns, but that won't be for a while. There are other tutorials for it online though, and different ways of doing it!
You can also do the same sort of thing on paper, by cutting the sheet into quarters and moving the pieces around so the edges and middle are reversed, or just using 4 or more sheets of paper.
I like to do that for the sketching stage of my larger designs, and then just fit a photo of the sketch to a document of the same size, then do the final drawing digitally.
I prefer the offset filter, but my friend @leegoguen uses Illustrator and does it in a completely different way.
You can also make repeating textures in the same way, by taking a picture of some Texture and moving the edges to the middle, then covering them up with the cloning stamp. I've done that with scribbles, scans of watercolour mottled with coarse salt, photos of concrete, etc.
112 notes
·
View notes
Text

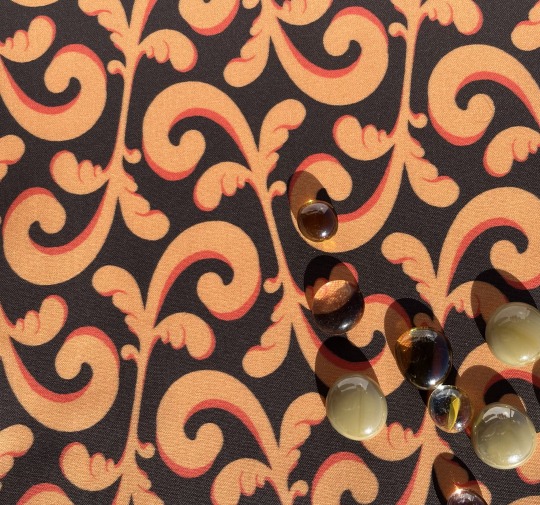
Do you know the Black History of Hoodoo? It was the basis for my pattern I submitted for the Whimsigothic design challenge, now on sale at Spoonflower and just in time for spooky season 👻
Buy Hoodoo Pattern
21 notes
·
View notes
Text
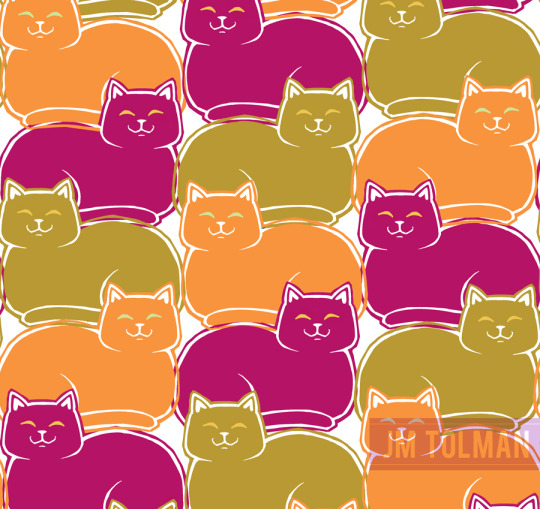
Candy Woodcut Cats
I made this for the Block-Print Inspired challenge! The cats were my second attempt at a block print style- the first didn't really sell the look. I made four custom cat brushes and used them for several designs, but the simple cat stack here won out. In these colors, they kinda remind me of jellybeans!
You can vote here on Spoonflower. Thank you!
---
Gumroad | Redbubble | Spoonflower | Patreon | Twitch | Instagram
#art#illustration#graphic design#surface pattern#spoonflower#fabric#cats#cute#block print#colorful#digital#2023
45 notes
·
View notes
Text
Gelatinous Cubes by Noxxplush on Etsy
My cube patterns are available at Spoonflower for DIY, or I have finished ones available through my Etsy!
100 notes
·
View notes
Photo

A new picture of the snow-covered pine trees embroidery project concept I'd like to offer. Two ideas for this print, one as a piece with minimal stitching details, highlighting the 3D effect of snow on the trees like the above hooped sample. For the other, I think a wider color palette version with the trees fully stitched out - and maybe a piece of light felt for foreground snow - sounds pretty too.
#embroidery#embroidery art#embroidery design#embroidery pattern#sewing#fabric#fabric print#spoonflower
58 notes
·
View notes
Last Seen Blogs
ray-of-midnight-storm
Yall Can Call Me Ray

kimiscloset
Kimi's
sc4llywag
My Healthy Obsession 🥰

wordpress
WordPress

grupo-interdac-inc
Consultoría Ambiental - Grupo INTERDAC INC