
Don't wanna be here? Send us removal request.
Statistics
We looked inside some of the posts by partofart-8 and here's what we found interesting.
Average Info
Notes Per Post
1
Likes Per Post
1
Reblog Per Post
0
Reply Per Post
0
Time Between Posts
39 minutes
Number of Posts By Type
Text
17
Last Seen Tumblr Blogs


Fun Fact
The total number of visits Tumblr.com received during January 2021 is 327 million.
Text
The End Is Here, Compositing And Sound Design - Krishi Motiyani
Coming to the final part of the project, there were three main things i had to take care of in compositing and sound design :
Make sure the cave is visible in the dome :
When my teammates rendered the animation, the lighting of the scene got little bit darker, specially in the beginning and during trial run of the dome that we need to brighten it up. The lighting in some parts of the animation was good so you could not keep the same colour correction for the entire video and had to keep changing it up and as we go through the video. Here is the Before and After images of the scene.
Before After


2. Jellyfish lighting up in sequence :
One of the other problems that occurred during the render was that my teammate animated a scene where the jellyfish light up in sequence but in render they just lit up together, we really need to light them up in sequence because it created this surprise and delight effect which was one of the criteria given to us for this project and also acted as the big reveal. So by combining 24 masks in after effects I managed to make them appear that way.
3. Sound design for the jellyfish :
One of our problems for the background track was taken care off by Miguel Gonzalez Del Rio, letting us use one of his tracks. Now i really wanted to make the audience feel like the jellyfish that guides us is alive so i wanted the perfect sound for it but could not find the exact one anywhere. So instead i started altering a basic jellyfish sound in After Effects and with the help of effects like Reverb, time mapping and eq I was able to create the sound that i wanted.
0 notes
Text
Belbin Is Old And So Is His Test (Respectfully) - Krishi Motiyani
In today's day and age the creative industry works on and requires collaboration, fluidity in team dynamics and experimentation. The interdisciplinary team that I am currently part of is working on an immersive art project that includes animation, digital storytelling and many other different things which makes it essential to understand how individuals affect and contribute to a team's success. Dr. Meredith Belbin's Team Roles test created in the 1960s has been one of the established works that is used to analyse an individual's role in a team. This test was made environments that were corporate and managerial in nature, taking nine team roles to classify individuals and out of them I got two ; Plant and Monitor Evaluator as my result. But the times have changed, the way people work in a team is different and specially when it comes to creative field is the Belbin Test still relevant?

The Origin :
Dr.Meredith Beblin conducted a research at Henley Management College on the basis of which the team roles were developed. He primary objective was to understand why certain teams performed better than the others, this led to him identifying nine separate roles which contributed to the efficiency of the team (Belbin, 1981). Every role out of the 9 is based on a certain quality like Plants : creative problem solvers, Monitor Evaluators : logical decision makers , Implementers : structured executors, etc. But it is crucial for us to consider that Beblin test was created with a traditional and corporate structure in mind where it was dominated by structured workflows , hierarchy and roles that were predefined.
Creative fields have different criteria for a successful workflow, they require people being able to think unconventionally, collaborate fluidly and responsibilities that overlap. When it comes to the interdisciplinary team that I am currently a part of, where immersive art and animation come into play, sticking to set roles does not enable us to take into account the difficulties and complexity of creative teamwork. So this does raise an important question, can something that was designed for business management be used for creative fields?
Creativity is Limited in a Confined Role :
There are distinct differences in the way business oriented teams function and the way creative industry does. It is essential to have clarity and efficiency in roles if you are in a corporate setting but when collaborating creatively you are depending on your iteration, ability to adapt and bouncing off different ideas to create a new one. Creativity emerges from interaction, improvisation and collective problem solving instead of sticking to your adhered role (Keith Sawyer, 2017). This idea goes against the approach Belbin came up with which suggests that to get the best contribution out of a person they need to stick to a predefined role.
In our immersive art project, I was more involved in the preproduction while two of my teammates were dominantly on the technical 3d production side of things. But we still had overlapping insights on each others work. Corey, a member of my team helped in asset creation and pre production, and alerted Aryan who was handling the animation about one of the camera movements that could have left the audience nauseated. While I was working on the storyline, animatic, the look of the film it was not a linear single handed job. The ideas I had were discussed with my teammates and built upon with their ideas and feedback. Similar things happened during the production part of it, because Aryan kept us updated with the work he was doing, I was able to talk to him about the additional time we would require for our ending scene which led to him shortening one of the sequences before to make time. This made all of our roles more dynamic then what Beblin's test would suggest.
What do Plant and Monitor Evaluator do in a Creative Team :
My results for the Belbin test came out to be as a Plant ; creative problem solver and a Monitor Evaluator ; an analytical thinker. On face value it looks like an ideal combination for creative work, as a Plant i can come up with ideas and assess the feasibility of them as a Monitor Evaluator. This was true to some extent and it did work that way but it does not define my role entirely, it is a simplistic attempt at classifying the complex roles that exist in the creative field.
Plant is defined as someone who can come up with original ideas but has difficulty executing it practically (Beblin, 1981). On the other end being detached, rational and focusing on analysing things critically are the characteristics of a Monitor Evaluator. But in a creative environment and idea is no good if it can not be executed, which means you practically cannot be a Plant in this industry. Part of generating the idea is thinking about the production process of it. Along with this the critical nature of a Monitor Evaluator can come in between of thinking creatively. This also came into play during one of the decisions the team made where we had to decide on the design of our underwater cave, while i wanted an enclosed circular cave with the exit on top the team wanted a sunken underwater wreckage kind of established place with the exit in front. Due to the issues in projecting that surface on the dome we had to go with the enclosed circular cave I suggested but we still found a way eventually and ended up combining the ideas with part of the cave being circular with the exit on top but we start of in a more dungeon type structure. If I had been too rigid with my ideas, I would have never accepted or found the possibility of the environment we ended up creating.
Teamwork : Hierarchy to Fuiditiy
One of the main reasons why this test by Beblin does not do justice to people in the creative industries is because the team structures are not what they used to be, they have gone from being hierarchical to fluid collaboration. You can see team operating with properly defined responsibilities, roles and decision making process in a traditional business setting. But in creative industries like animations, immersive exhibitions or storytelling the roles that exist are intertwined.
For example when you are working on an animated short film the storyboard artist, animator and director can be seen collaborating frequently, and contributing wherever required in-spite of their designated role. You can look at teams in the creative industries as an ecosystem where the skills are changing and evolving as the project progresses. Design thinking moves forward on collaboration instead of rigid role assignment (Tim Brown, 2009), putting even more emphasis on the restrictions on the framework of Beblin's Test.
Help Or Hinder, Creative Collaboration ? :
If you can distinguish between how rigid to be when considering the Beblin model in a creative environment, then there are even pros attached to it, with some obvious downsides as well.
Pros :
Self awareness - It gives you an insight on what your natural instinct in a team is.
Optimising team - Knowing your team member's basic nature can help you in maximising their strengths and minimising their weaknesses
Resolving conflict - Having a basic idea of who the person is can at least tell you about the way the function and avoid conflict, at least initially.
Cons :
Simplifying roles - Simplifying roles restrict creativity by not enabling them to explore and adapt.
Limiting ideas - Creativity can come from anywhere and needs to be accepted regardless, it cannot be restricted to someone with a Plant role or any other pre defined role.
Overlapping skills - This test does not take into account that there is no separation of functions, in a creative setting the skills are overlapping and thus the roles are too.
Alternatives to Beblin :
While Beblin does give us some basic insights it does not give us all. There are models that work better for the creative industries like the model of the concept of T-shaped individuals, popularised by IDEO, it tell us about people who have expertise in one area (vertical bar of "T") but also tells their skills across disciplines (horizontal bar). This model is more suitable for people in creative industries because it informs us about their expertise and their adaptability.

Mihaly Csikszentmihalyi's (1996) theory of flow in creativity is also relevant here, it talks about how when a person is fully immersed in what they are doing and expertise and exploration are together then the innovation in that environment will excel. While Beblin talked about roles being static, Mihaly talked about the nature of creativity being dynamic.
Conclusion :
The Belbin test gives some sort of an insight and is structured in nature but it is limited in the information it can give when applied to creative industries. From rigid roles in corporate environments of the 1960s to the fluid and collaborative working nature of the creative fields, a lot has changed. So in environments where adaptability and collaborating across departments exists, Beblin test can only give insights about the strengths and weaknesses of an individual to a certain extent.
T-shaped skills model or Csikszentmihalyi's flow theory is more effective to people in creative industry to foster an environment that promotes innovation. Not only allowing but promoting individuals to contribute beyond their role is essential in building a better creative team.
References :
Belbin, M. (1981). Management Teams: Why They Succeed or Fail. Heinemann.
Brown, T. (2009). Change by Design: How Design Thinking Creates New Alternatives for Business and Society. Harper Business.
Csikszentmihalyi, M. (1996). Creativity: Flow and the Psychology of Discovery and Invention. HarperCollins.
Sawyer, K. (2017). Group Genius: The Creative Power of Collaboration. Basic Books.
0 notes
Text
Make A Home In A Dome With Immersion, Storytelling and Medium -Krishi Motiyani
Introduction :
Art and storytelling have been evolving through time and are now challenging the traditional ways of consuming art. We have improved digitally leading to larger scale and sensory exhibitions that make art immersive. Whether it is Monet and Van Gogh or Frameless and Olafur Eliasson, every installation has improved and taken the viewing experience further in their own way. One of the main aspect that i believe enhances the experience is the spatial design.
As a part of my interdisciplinary project in my MA programme, I along with my 3 other team members have produced an immersive art piece subjected around a jellyfish in an underwater setting that will be displayed in a dome. The challenges that we faced in terms of telling a story, composition and animation were unique. But the common point for all of them was anything that we do should create an immersive environment.
Space And Story In Immersive Art :
You know your story is immersive if it transports audiences into a narrative world where they feel physically and emotionally involved (Marie-Laure Ryan, 2001). This also comes into play due to digital storytelling being more dependent on space that linear narrative (Lev Manovich's, 2001). When it came to developing a narrative for our project, unlike a traditional story which uses cuts and edits we had to use the 270 degree look provided by the dome as part of our composition, lighting and movement to convey our idea.
The strongest immersive experience can be created when the visual and spatial boundaries do not exist. You can see this in play in planetariums and some cinemas with a full dome as the experience they create is more engulfing. Since our project was going to be displayed in a 270 degree dome, we also aimed to create an immersive project, specially by using methods like the glow of the jellyfish and it's movement around the entire dome to direct the gaze of the audience.
Domes Are Superior Than Rectangles - Tangled To HIRAETH :
How do we know that spatial design is important, because of Disney's immersive exhibition of Tangled. They made the exhibition with rectangular screens, it is not that it wasn't beautiful but it just felt like it could have been so much more, instead it was held back and never reached its potential. New media borrows some of the characteristics from the older media, restraining it from being completely immersive (Bolter and Gruisin, 1999). In this case it was the traditional rectangular frame, that did not do justice to magical lantern scene that occurs at the climax of the film. A dome could have replicated the environment of the scene better, and made the audience feel like they actually existed in that moment instead of looking at it from outside thereby making them feel surreal for being a part of one of the iconic scenes from Disney.

Now how you use environment to take the narrative ahead is something we can learn from HIRAETH. Till now, cinema used the movement from the camera to guide the eye of the audience but HIRAETH had the elements in its environment moving in order guide the viewer. In our underwater project we have mixed the traditional with the new age techniques. While we use the 360 movement from jellyfish around the dome to guide the audience's view, we still use the camera to eventually follow the jellyfish, not pointing at it but following in the same path as the jellyfish.

Designing Our Dome Experience (Process And Challenges) :
Crafting an immersive narrative without cuts - Immersion is heightened when you place the audience physically in the virtual space (McMahan's, 2003). Placing the camera in between of the cave and generating a 270 degree view for our project, is done with the intention that the audience will feel as if they are within the cave itself. The jellyfish making it's way up and just letting the camera follow it hopefully makes the audience feel as if they themselves are following and there is no need for external cuts or direction thereby making it feel natural.
2. Directing audience focus in a 270 degree space - The difference between absorption and immersion is engagement through story and engagement through environment respectively (Ernest Adams, 2004). This aligns with our use of movement and light from jellyfish as elements used to guide the audience. The natural flow and the seamlessness allows the audience to accept and believe the space they are in (Mel Slater, 2009).
3. Artistic vision in collaboration - Everyone has their own artistic vision in a team, but having 3 goals set in place helped us reach a conclusion :
The visuals should flow in a way that setting looks natural
Colour pallet and lighting that help immerse the audience
The communication and acceptance between the team of each others artistic vision.
Conclusion - The Future :
Immersive storytelling still has not peaked, there still holds room for evolution specially in domed spaces due to sensory engagement, audience perception and spatialized media. In terms of our Underwater project and the existing exhibitions i talked about, it tells us how heavily dependant the narrative is on spatial design, maybe domes are the next step in terms of digital storytelling.
References :
Adams, E. (2004). Fundamentals of Game Design. Pearson.
Bolter, J. D., & Grusin, R. (1999). Remediation: Understanding New Media. MIT Press.
Manovich, L. (2001). The Language of New Media. MIT Press.
McMahan, A. (2003). Immersion, Engagement, and Presence: A Method for Analyzing 3D Video Games. In The Video Game Theory Reader, Routledge.
Ryan, M.-L. (2001). Narrative as Virtual Reality: Immersion and Interactivity in Literature and Electronic Media. Johns Hopkins University Press.
Slater, M. (2009). Place Illusion and Plausibility Can Lead to Realistic Behaviour in Immersive Virtual Environments. Philosophical Transactions of the Royal Society B: Biological Sciences, 364(1535), 3549-3557.
HIRAETH - Immersive Art & Music Experience (360) (2022) YouTube video, 18 October. Available at: https://www.youtube.com/watch?v=rwwIUXnAdb0
0 notes
Text
I Can't Visualize A Dome I Need Preproduction - Krishi Motiyani
It does not matter what kind of an animated project it is, preproduction will always be a necessity and an integral part. But the traditional techniques have to switched up when a domed space comes into play. Due to the construction of the dome, the traditional way of making storyboards does not convey your artistic vision accurately. Instead, making animatics in a circular formats and later on in the process testing stills in dome projections is useful. In order to convey to my team the storyline and movement of jellyfish in our underwater dome project, I decided to make the animatic in a circular way so it is easier for the team to visualise and have proper communication between the team.
Although it was my first time making an animatic for a dome so while I did do some things to improve the visualisation there were things I missed out on and plan to implement if the opportunity ever arrives again. I have more about this space during my project whether it was through different techniques or case studies, so lets talk about a few of them.
Reinventing Storyboards - Rectangle To Circle :
If you're making a Hollywood film, Netflix show or a 2d animated short film, traditional storyboard is the way to go. But when it comes to making immersive art for dome, there is no border or defined frame, the entire dome is your canvas. When you project your video on to the dome the visuals should align with an infinite spherical surface instead of being restricted to a single viewpoint.
Creating a circular storyboard for my team project allowed us to visualize to a certain extent how it would look in a dome, you can see in the animatic attached how the jellyfish is being followed to the exit of the cave which is in the centre, which eventually slides down from the edges. This composition was made specifically with the dome in mind and how this effect would look enhanced in a dome, I was able to convey this to my team due to the circular frame. We had to think what the audience will look at whether it was above, around or behind.
Eliza McNitt's "Spheres" (2018) is an immersive VR instalment made to be projected in a dome. Her team made their storyboards in a 360 degree format from the start, which really boosted their visualization process in a spherical space. Due to this they skipped out on a lot of mistakes like misplaced focal points, jittered transitions or to many visual elements in one particular section.
Distortion In Domes :
In terms of distortion that will occur when our work is projected onto the dome since it is a curved surface, I could have done a better job in taking that into account. There is a traditional way also to take care of that problem to a certain extent, which is just better drawing but the technical solution in this new age is using a fish eye lens.
Specifically along the edge of the dome the visual elements are subjected to stretching but when fisheye is used during previsualization, it tells us how the image will warp when displayed in a dome. This idea is something that I could have used but missed out on and we did face some difficulties because of it, it was not anything major just some points I had to emphasise on to my teammates and my professor, something that could have been avoided.
SAT (Société des arts technologiques) Dome in Montreal, was made by artists who used real time mapping in dome to make sure the visuals worked before the final projection. It gave them time to correct any place a distortion occurred, making everything work in the final presentation.
Different Tools And Technologies For Dome :
Technology has been evolving, which has led to us now having several software tools :
Blendy Dome VJ - A projection mapping tool that can show us how the content will appear on the curved surface in real-time.
TouchDesigner - It enables us to make interactive dome content with visuals getting affected in real time, we can even adjust distortions dynamically.
Dome Master Format - It has a built in distortion correction which comes in handy and a standard 4k or 8k format to render for animations inside a dome.
Unity And Unreal Engine - Something that we were introduced to during our course and this project, although due to my lack of experience in 3d I was not able to take advantage of it in terms of the virtual dome that it provides to test movement and scale. But i plan to fix this in my next semester.
Existing Works Of Art :
While I am still figuring my way around this there are some people out there who already have so lets talk about them for a bit.
Frameless London - Multi-Surface Projection Model
Frameless is an immersive art exhibition that takes famous artworks and projects them onto the surface around you, walls, ceilings etc. It might not be a dome but what i find the most fascinating about them is that they use artworks that used to be on a 2d plane but when they project it on the surface they face distortion challenges, perspectives etc. Personally for a 2d artist seeing them able to do that is really inspiring and motivating.
2. Fractal Domes by Julius
Julius is an artist who makes mathematical and fractal animations and these animations are usually projected in planetariums with domes. Julius has set up his process in a way that allows him to achieve seamless integration when projecting on the dome. From the start he makes his animations on a spherical projected format. His process and art makes you realise how much beneficial it is to plan your art for spatial flow form the start instead of making adjustments to a traditional animation to fit inside the dome.

3. Envelop SF - Audio and Visual Performance in A 360 Degree Space
A 360 degree sound and projection exhibition in San Francisco where an immersive environment is used to map the visuals. It makes us realise what makes a dome based immersive art impressive is not just the visuals but the sound also and it needs to be taken into account from pre production itself if we plan to immerse the audience completely.
Conclusion : Different Canvas, Different Preproduction Techniques
This Underwater Dome Project has taught me that the purpose of preproduction is constant but the way it is done depends from project to project and to keep up we have to keep learning new techniques. If there exists a fault in your composition or distortion of some kind then the audience is less likely to be immersed in your art. Few Ways to prevent that is :
Circular storyboards to have a 360 degree view
Fisheye projection for animatics to plan for distortion
Preview tools that help to plan for motion in real time
Domes are old enough to be part of a way we tell a story but new enough for us to still evolve our techniques and the way we see things. Those who embrace these techniques and find a new way to visualise will have an edge in the art of immersive story telling.
References :
McNitt, E. (2018). Spheres: Immersive Storytelling in a 360-Degree Space.
Horsthuis, J. (2020). Fractal Explorations in Dome Environments.
SAT Montreal. (2021). Dome Projection Techniques and Immersive Storytelling.
Frameless London. (2023). Multi-Surface Projection Mapping and Perspective Challenges.
Envelop SF. (2022). 360-Degree Audio-Visual Performance Spaces and Their Unique Preproduction Needs.
0 notes
Text
Multiple Variants of Jellyfish and environment (Ali Kharaghanian)
In the next step, I focused on replicating the jellyfish in different shapes, creating jellyfish with various head designs, sizes, and both short and long tentacles. Since all the jellyfish were created using Geometry Nodes, they were lightweight, which prevented them from making the project too heavy for rendering, and they were also highly flexible for shaping.


The environment of the project was a cave, which Aryan had created. After designing it, he sent it to me, and I worked on enhancing the scene by adding plants, shells, corals, and seabed details to complete the project environment.


This teamwork experience, in a group where everyone was responsible and helped each other move the project forward, gave me the opportunity to become familiar with the way others think and how they approach projects. It also allowed me to identify my strengths and weaknesses in communication and teamwork, so I could focus on improving and working on them.
0 notes
Text
Simulation Jellyfish (Ali Kharaghanian)
The jellyfish I had designed needed to move, but according to the scenario, it wasn’t supposed to move upward; it was meant to stay in place. We required a simulation for this jellyfish, as both its bell (head) needed to move in a wavelike motion and its tentacles needed to sway simultaneously to give the illusion of swimming in the water.The jellyfish I had designed needed to move, but according to the scenario, it wasn’t supposed to move upward; it was meant to stay in place. We required a simulation for this jellyfish, as both its bell (head) needed to move in a wavelike motion and its tentacles needed to sway simultaneously to give the illusion of swimming in the water.

For the head, I used a color ramp to define a gradient from gray to black, giving the jellyfish a subtle movement.
Additionally, I applied a noise texture to the tentacles, creating a flowing, dancing motion in the water, which enhanced the sense of movement and realism.
0 notes
Text
Designing Jellyfish (Ali Kharaghanian)
After our next meeting with the team, it was decided that we needed a main jellyfish that would move through the scene and travel through the project space, eventually reaching a group of larger jellyfish at the end of its journey. I started designing a larger jellyfish with more details. Since the plan was to duplicate this jellyfish multiple times, I began using Geometry Nodes in Blender to design the jellyfish. This allowed us to save time by randomly generating multiple jellyfish, so we could have various versions without needing to model each one individually.


For the material, I gave the jellyfish a transparent, colorless appearance that would take on a blue hue from the water. I also added a pink glow so that it could shine in the water, creating a more dynamic and captivating effect.

0 notes
Text
Simulation bubbles (Ali Kharaghanian)
After our initial meeting, we decided to focus on an underwater project. I was assigned to work on the simulation aspect, and since the project was set underwater, I began learning how to create simulations for bubbles and jellyfish in Blender. This was my first experience working with Geometry Nodes in Blender. I started by designing a group of bubbles, and then I simulated their movement through the water. I adjusted the speed and number of bubbles according to the aquatic creatures that would be featured in the project.

0 notes
Text
Individual research (Ali Kharaghanian)
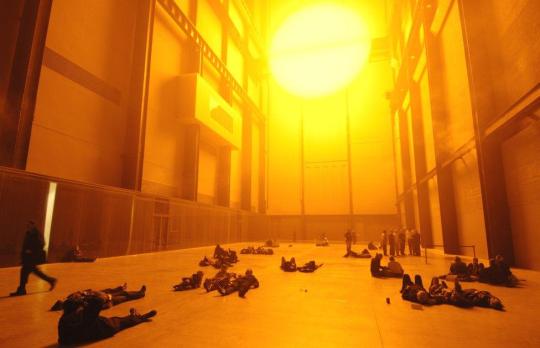
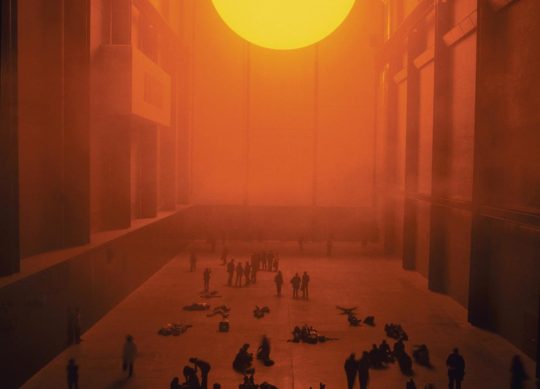
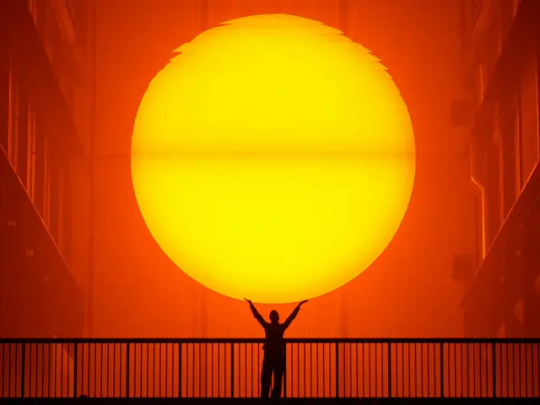
One of the most fascinating immersive art pieces I came across was The Weather Project at the Tate Modern, where a massive sun was created, casting a warm atmosphere and a misty space that evoked a strange and captivating feeling for visitors. Mirrors were installed on the ceiling, allowing visitors to lie on the museum floor and see their reflections, making them feel like part of the artwork.
It felt like a land with a radiant yellow sun and an intensely warm atmosphere. The project’s concept offers a clear perspective on environmental issues and global warming, and even visitors who may not deeply engage with the topic can still feel its meaning and impact simply by being in the space.
What stood out to me was the way the project engaged the audience, inviting them to become part of the experience. In my interpretation, the people lying on the floor of the exhibition within this heated atmosphere symbolize those who, in the future, may perish due to rising global temperatures.

In Infinity Room by Refik Anadol, the most impactful aspect is the use of mirrors to create an endless, infinite space. Stepping into these mirrored rooms alters one’s perception of spatial dimensions, making it feel as though physical boundaries dissolve.
The installation features luminous geometric shapes that move fluidly within the space, drawing the viewer’s eye and creating a hypnotic visual experience. Accompanied by a slow, rhythmic soundtrack, the environment becomes immersive, pulling visitors deeper into the experience.
This sense of placelessness offers a new kind of experience—one that feels like a dimensionless dream. Moreover, the installation presents a modern interpretation of art and artistic experiences, introducing audiences to a level of immersion they may have never encountered before.
youtube
explored many immersive art installations, but since many of them shared similarities and had already been analyzed, I sought out projects that integrated with natural environments and utilized their surroundings as part of the experience.
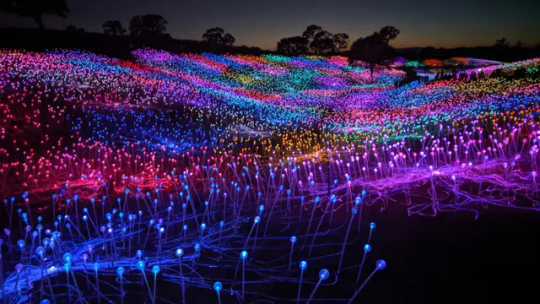
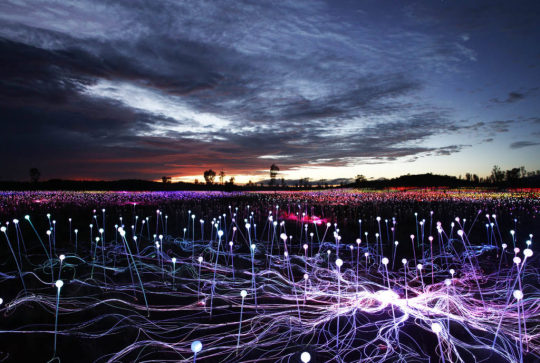
One such work is Field of Light by Bruce Munro, which transforms a natural garden setting into a surreal and extraordinary space using ground-level lights. The contrast between the complete darkness of night and the soft, glowing lights creates a meditative atmosphere, offering a deep sense of tranquility to visitors.
What makes this project even more remarkable is its harmony with the environment. The installation does not harm the surrounding greenery, and the use of solar panels to power the lights reflects the artist’s commitment to sustainability. Field of Light is not just a visual experience—it is a thoughtful blend of art, nature, and environmental consciousness.
youtube
The Weather Project, Tate Modern
Eliasson, O. (2003) The Weather Project. [Exhibition] Tate Modern, London. Available at: https://www.tate.org.uk/whats-on/tate-modern/unilever-series/unilever-series-olafur-eliasson-weather-project .
Rain Room (2012), UK
Random International (2012) Rain Room. [Exhibition] Barbican Centre, London. Available at: https://www.barbican.org.uk/digital-programmes/rain-room .
teamLab Borderless, Tokyo
teamLab (2018) teamLab Borderless. [Exhibition] MORI Building Digital Art Museum, Tokyo. Available at: https://borderless.teamlab.art/ .
Field of Light, Bruce Munro
Munro, B. (2016) Field of Light. [Exhibition] Uluru, Australia. Available at: https://www.brucemunro.co.uk/installations/field-of-light/ .
The Museum of Feelings, New York
Glade (2015) The Museum of Feelings. [Exhibition] Brookfield Place, New York. Available at: https://www.themuseumoffeelings.com/ .
Atelier des Lumières, Paris
Culturespaces (2018) Atelier des Lumières. [Exhibition] Paris. Available at: https://www.atelier-lumieres.com/ .
Infinity Room, Refik Anadol
Anadol, R. (2015) Infinity Room. [Exhibition] Zorlu Performing Arts Center, Istanbul. Available at: https://refikanadol.com/works/infinity-room/ .
0 notes
Text
Lighting and Rendering - Conclusion (Aryan Raj Adhikari)
This was the final phase of my individual production. I took it upon myself to light up the cave environment appropriately so that the narrative feels as it is submerged underwater. Creating a water simulation that would cover the entire environment was out of question as it would increase the render times immensely and our deadline was approaching closer.
I employed a simple trick of assigning a blue volumetric cube that envelops the entire cave environment. This would provide a blue volumetric tint and fake the simulation of being underwater.
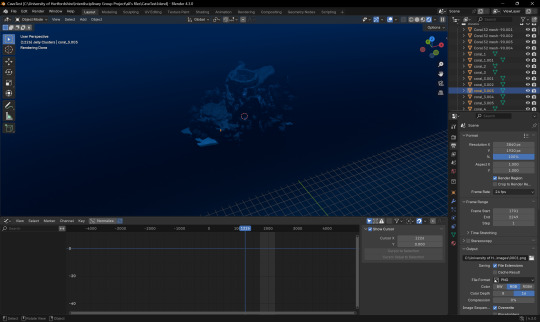
Figure 1 (Volumetric cube enveloping the cave environment)
The creation of a volumetric cube influences lighting systems in Blender. There is a way to unlink them so that they both act separately, however, this proved to be a blessing as the lighting was perfect for the scene.
I added a couple of point lights with varying power and an appropriate color tone to set the ambience of the narrative to a theme of smooth, relaxing meditation. A couple of lights were also added inside the tunnel so that it is properly lit.

Figure 2 (Lighting up the cave environment)
After properly lighting up the cave environment, I decided to create a bioluminescent shader to the jellyfish so that it illuminates its pathing during the phase of its animation. A simple node setup with a Fresnel texture linked to its coating and emission did the trick and made the jellyfish stand out as the focal asset for the audience to pay attention to, hereby increasing the immersion of the 360 narrative.

Figure 3 (Simple jellyfish shader setup)
For some final touchups, I imported the animation of the background jellyfishes that Ali created and the movement of a school of fishes created by Corey and placed them appropriately at the perfect places that would surround the camera, making it more immersive for the audience.
Krishi wanted a simple transition where the entire glow of the cave transitions into darkness before the illumination of the jellyfishes at the end of the sequence would envelop individually all around the screen. This was pretty easy to animate as I just animated a simple transition of the intensity of the lights decrease to the value of '0' and again reverting it back to its original power when appropriate.
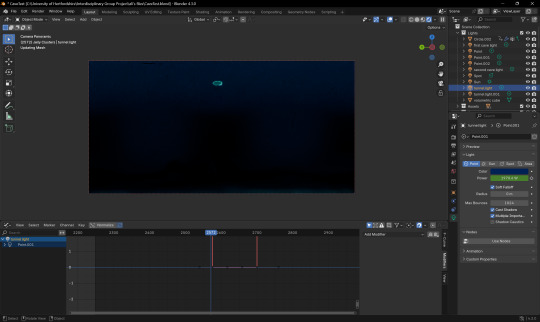
Figure 4 (Animation of the intensity of the lights)
The render settings is set to a 4K resolution in a 2:1 equirectangular panoramic export format. The render times for an 8K resolution would have take longer and exceeded the deadlines and as such, we had to settle for a 4K resolution. However, the quality of the immersive image sequence after rendering is really crisp and visually pleasing and this formally concluded my role for the Interdisciplinary Group Project.
To efficiently render the image sequence of the animation, we split the render between me, Ali and Corey and after the completion of the render, we sent it to Krishi who was tasked with the visual composition and the 2D effects for the animation.
Conclusion
I am sincerely grateful towards the professors Ian Willcock and Saint Walker for this invaluable opportunity to have been part of this engaging group assignment. It was a precious experience to be working alongside students from other disciplines that allowed me to gain different diverse perspectives on a common narrative. We certainly faced obstacles as one does in a diverse group but we were able to adapt and overcome and come up with a beautiful underwater narrative that hopefully captivates the audience and contributes to their immersion.
I would also like to thank Miguel Gonzalez Del Rio for allowing us to use one of his own personal music tracks he worked on to aid in the ambience of the underwater narrative. Without his helpful assistance, we would not have achieved a total immersive 360 ambient underwater experience.
I truly appreciate the chance to learn and grow through this teamwork and hope to apply what I have learned during this 3 week project for future relevant projects.
0 notes
Text
Obstacle (Aryan Raj Adhikari)
This is an update to a major obstacle we faced after we did our group discussion on the updates of the work we were individually tasked with.
Corey updated us that the stylization could prove to impact the render time of the entire animation sequence. I decided to test it on my laptop and because of how heavy the scene already was due to kitbash assets using high resolution textures and a 4K resolution render, the file kept crashing.
Thus, we had to part with our brilliant idea of applying stylization to the entire scene and carry on with a realistic approach. This meant using the pre-existing textures of our kitbash assets and assigning a new texture to the jellyfish.

Figure 1 (Realistic shading in Blender)
0 notes
Text
Jellyfish and Camera Animation (Aryan Raj Adhikari)
At this point, I would say we have approached the 70% mark for the completion of our immersive narrative animation. This will be a pretty short update as it is all about linking the jellyfish inside our cave kitbash and animating it, while also animating our panoramic camera side by side.
Since I had already keyframed the swimming animation of the jellyfish in its armature, I didn't want to modify its original keyframes as this could lead to more confusion down the line. Therefore, I employed a cheap method of animating the mesh instead of its armature to make sure the keyframes don't overlap each other while swimming in the water.
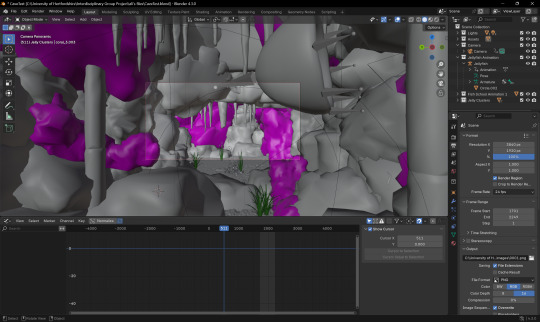
Figure 1 (Animating the jellyfish)
I simply started moving the jellyfish inside the cave and animated it in different positions while checking and smoothing the keyframes in the graph editor. As this is a 360 camera projection, I decided to create some immersive animation where the jellyfish moves from one side to the other while rotating a complete 360 degrees as the audience would be faced in a circular arc and they could see the jellyfish move around the dome, hereby increasing the immersion for the audience.

Figure 2 (Movement of jellyfish around the dome)
If you do check it in the rendered view from time to time, the distortion might throw off the spatial perception of the panoramic render. However, no need to fret as this is how it is supposed to be as when it's converted to a full dome, the distortion is removed hereby allowing the audience to see the jellyfish move around the dome.
After the animation for the jellyfish was done, I decided on animating the movements of the camera. At first, I animated camera with fancy rotations but after sending a demo tape of the animation, it was brought to my attention from Corey that employing such rotation and tilts in the camera movement could make the audience susceptible to nausea. Thus, I animated the camera in a very simple format where its only movement was a straight forward, a diagonal forward and a vertical elevation.

Figure 3 (Animating the camera movements)
Personally, I enjoyed this phase more than the others as I could explore my roots tied back to animation again. It felt really good to breath life into this inanimate digital jellyfish and see it moving around.
0 notes
Text
Creation of the Bioluminescent Jellyfish (Aryan Raj Adhikari)
As the main focal asset of our underwater narrative, I set out to create our little friend. Since jellyfish come in all shapes and size, it was time to go into the rabbit hole of jellyfishes. I particularly liked the design of the moon jellyfish, especially its spherical rotational arrangement of smooth diamond shaped gastric pouches. This particular detail drew me in and I set out to create it in Blender.

Figure 1 (Moon Jellyfish, (CRITTERFACTS, n.d.))
The shape of the jellyfish can be easily created using a UV sphere inside the Blender where you can then manipulate the rotation to introduce a caved in vaccum inside its body. The body of the jellyfish can easily be created by employing different techniques but I ran into a big obstacle of having to create its tentacles which could also be animated for the immersive narrative.
The bobbing animation of the head of the jellyfish was easily created using the innovative shape keys inside Blender. This was a really fun phase of animating the head as I explored my initial roots as a 3D animation student. The shape keys allow for animation of different expressions of meshes that can be edited to a certain proportion as the user wants. This can then be keyframed and looped to produce the bobbing effect of the jellyfish.
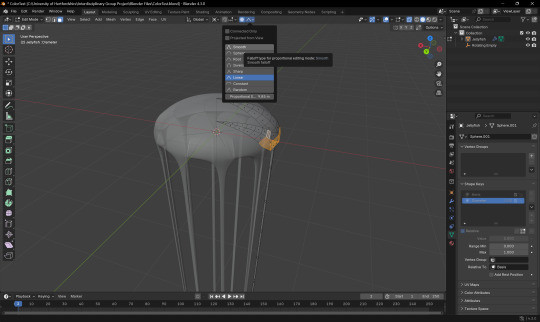
Figure 2 (Animating using Shape Keys)
This tied my work to the initial days of me as a Bachelors student creating characters and rigging them in Maya. I figured that since I already had the initial knowledge of creating tentacles that could move, I could easily translate it into Blender using its native tools.
After a lot of researching and iterative experimentation, I did two definitive tests that could be used for our immersive animation. The first method involved creating the tentacles and assigning a cloth modifier to it. This would allow me to use real life physics simulation to simulate a tentacle moving up and down with the help of a wind or a vortex emitter.
The tentacles were extruded at set intervals from the bottom of the faces of the jellyfish and were assigned the cloth modifier. I then proceeded to link a wind emitter to the jellyfish and animated the wind in opposite directions as a loop so that the tentacles would move up and down as if the jellyfish was swimming through the water.

Figure 3 (Jellyfish with a Cloth modifier)
This posed a very significant problem. It would be very difficult to sync the movement of the head and the tentacles of the jellyfish together. I could have potentially improved upon the syncing of the movements of the jellyfish to make it appear more natural, however the time constraint was our biggest limitation. Thus, I adopted for the second approach.
The second approach included creating an IK rig system that would be linked from the head of the jellyfish to its tentacles. An IK (Inverse Kinematics) rig system as opposed to a FK (Forward Kinematics) allows us to place the main bone on the head so that any other bones parented to the main bones moves as influenced by the main head bone. This would allow us to simply move the parent bone which would influence the child bones, i.e. tentacles in this context, that would simply move naturally under the head's movement.
After I created the entire rig system for the jellyfish, I linked the armature to the jelly mesh and create a hair particle system on each of the tentacle rig joints. This allowed for the hair particles to follow the movements of the jellyfish swimming in the water while syncing both the movements of the head and the hair tentacles perfectly.
Figure 4 (Jelly rig test)
For the animation movement, I simply added an additive modifier with a keyframe set in the Y-axis and offset amplitude values so that when the jellyfish moves vertically, the hair particles naturally follow the amplitude movements.
REFERENCES
CRITTERFACTS, n.d. CRITTERFACTS. [Online] Available at: https://critterfacts.com/moonjellyfish/?doing_wp_cron=1739318472.7156469821929931640625 [Accessed 30 January 2025].
0 notes
Text
Camera Tweaks (Aryan Raj Adhikari)
The camera projection will be done in a dome for visitors to view and the video will be displayed in a 360 degree format. This is my first time ever working on creation of an immersive 360 image or a video. Thus, before working on the jellyfish, I decided to finalize the camera settings beforehand so that it would not pose problems during the render phase of our animation export.
I researched on few blogs that detail about 360 domes and the principles they employ to project an immersive video. For instance, the camera should and always be a 360 capture and the quality of the render should at minimum be a 4K or an 8K resolution for crisp visual quality.
There are a couple of real life practical examples that demonstrate the visual prowess of a 360 dome projection with the most notable and perhaps the largest inflation dome projection in Miami. It was installed by Broadwell, a global leader in air domes and they hosted over 60,000 guests in a span of 3 days.

Figure 1 (Miami dome projection, (Anon., n.d.))
The fully-immersive video projection set-up was creating with a total of 24 18K Lumen HD Laser projectors from Lumen & Forge and covers an area of 40000 square feet.
Another impressive example of a beautiful projection system can be seen when the Planetarium 1 team opened the world's largest planetarium in 2017 in Western Russia with a dome diameter of 18 metres that utilized Benq LU950 projectors with a brightness of 5000 ANSI lumens. The laser light source of those projectors has an almost eternal source which doesn't require replacement and there is no need to worry about the decay of the image quality over time.
Figure 2 (Planetarium 1 projection, (BenQ, 2022))
Our director, Ian Willcock had iteratively emphasized on the proper export of the render in a 2:1 aspect ratio with either 4K resolution minimum or an 8K resolution if feasible in an equirectangular format. This aligns with one of the principles listed in Lumen & Forge's EVERYTHING YOU NEED TO KNOW ABOUT 360 DOMES; "Advanced software renders the 360 content into ultra high-res equirectangular or cubic projections optimized for dome projection" (Lumen & Forge, 2023). This format can later be changed in Adobe After Effects by applying a VR Converter modifier which changes it into a full dome projection sequence.
Inside Blender, I started tinkering with the camera settings and found out that while panoramic 360 export is not supported in the 'Eevee' render engine, it is however supported in the 'Cycles' render engine. This pretty much dictated that we would be using the 'Cycles' render engine to render out our entire image sequence.
It is imperative to note that you can only render the image sequence in an equirectangular panoramic format if you render using the supported model of the 'Cycles' engine as opposed to its experimental variant.
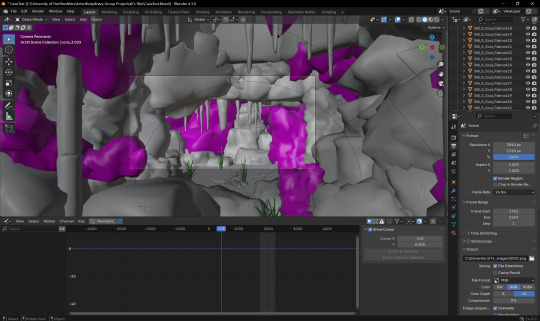
Figure 3 (Camera settings in Blender 1)
While inside the camera settings inside Blender, you can also set the camera type to Panaromic and change the panorama type to Equirectangular format.
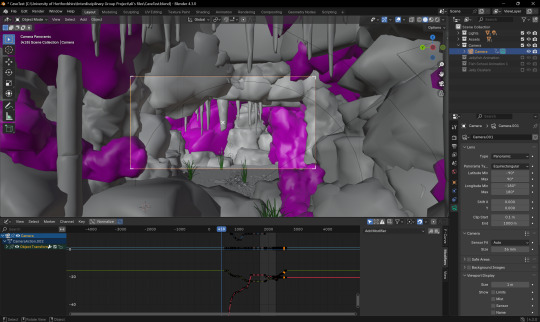
Figure 4 (Camera settings in Blender 2)
REFERENCES
Anon., n.d. Broadwell Air Domes. [Online] Available at: https://broadwellairdomes.com/dome-options/video-projection/#:~:text=In%202019%2C%20Broadwell%20created%20the%20largest%20projection%20dome,three%20days%2C%20the%20dome%20hosted%20over%2060%2C000%20guests. [Accessed 29 January 2025].
BenQ, 2022. BenQ. [Online] Available at: https://www.benq.eu/en-eu/business/resource/case-study/full-dome-projection-system-for-immersive-experience-in-planetarium-1.html [Accessed 29 January 2025].
Lumen & Forge, 2023. Everything You Need to Know About 360 Domes. [Online] Available at: https://lumenandforge.com/everything-you-need-to-know-about-360-domes/ [Accessed 29 January 2025].
0 notes
Text
Individual Research (Aryan Raj Adhikari)
Example #1
Immersive Planet Simulation Dome
This is back from when I was young as a kid, probably in my fifth or sixth grade. Memory is a bit hazy but I do remember this one particular Tuesday afternoon when a couple of guys came in to our school and set up a small dome which could house 30-35 people at once. We were then brought to enter the dome, class by class, in anticipation of what would be a very immersive life changing experience which still holds true for me.

Figure 1 (Image of a dome, (Bourke, n.d.))
Once we were all properly seated inside the dome, the guys then fired up a projector which started showing visual simulations of different planets and astrological bodies. It was jaw-dropping for me to sit on the basketball court of our school and interact with the Sun or Saturn and its rings or even finding little speckles of craters zoomed on different moons.
Now that I recall that fond memory of mine, I believe this to be one of the core turning points for me being vastly fascinated with the wonders of creative arts. Had it not been for that experience inside that dome, I would have probably ventured down a different path working in a different field in a completely different discipline.
Although cliche, planet simulation inside a dome is indeed a marvelous immersive visual experience that one must try in their lifetime. It captivates the audience completely as it throws them into the galaxy as a cosmic entity, with the entire discoverable universe for them to see and observe. More common than ever, this does require extensive workforce and modern technologies to achieve the simulation.
-x-x-x-x-x-x-x-x-x-x-x-x-x-x-x-x-x-x-x-x-x-x-x-x-x-x-x-x-x-x-x-x-x-x-x-x-
Example #2
Monopoly Lifesized: Immersive Gaming Brought to Scale
Located in Central London, Monopoly Lifesized revives a classic popular boardgame and brings it to life. I mean this in a literal sense. The monopoly board has the scale of 15X15m and players play on the board itself. This is such an interesting integration of an immersive experience and board gaming brought to fruition which engages players against others in a game of wit, luck and money.

Figure 2 (Monopoly Lifesized, (Milazzo, 2022))
Players participating move around the giant board and complete different escape room challenges which allows them to win properties and conclude the game. This is an 80 minute experience that offers four different board options: Luxury, Classic, City and Classic: Own It All. While the original board game pits each player against the others, this is a collaborative teamwork where the members of each group get assigned roles such as bankers or property agents.
This is a very interesting example of an immersive game with a classic hit at its core which introduces complex challenges to progress forward. As is with the board game, this relies upon luck (although, that's what I keep telling myself!) and is a fun experience overall.
-x-x-x-x-x-x-x-x-x-x-x-x-x-x-x-x-x-x-x-x-x-x-x-x-x-x-x-x-x-x-x-x-x-x-x-x-
Example #3
Moonshine Saloon London: A Callback to the Wild West
Located in London, Moonshine Saloon is a captivating, engaging immersive experience that throws you into the center of an undercover moonshine empire where you play a role of a bootlegger with the chance to end up rich, famous or dead (not literally!).
Inspired by the tales of the Wild West and the covert operations behind it, be it illegal smuggling or bounty hunting, Moonshine Saloon does an absolute wonderful job of portraying what it feels like to be part of the fun adventures of the Wild West.

Figure 3 (Moonshine Saloon London, (Moonshine Saloon, n.d.))
With a solid cast of actors portraying roles of the outlaws, the sheriff or the bartender and fabulous choices of cocktails to back it up, it is a really engaging experience for people wishing to go inside a time capsule of the late 1860s.
What's not to like about it, you get to dress up as the perfect cowboy you envisioned, you get to bring in your own liquors (illegally) and create a concoction of your own and rub shoulders with the locals to catch the outlaws. With secret backdoors and mysteries, Moonshine Saloon does an excellent job of creating an immersive Wild West experience for the people to partake and enjoy.
-x-x-x-x-x-x-x-x-x-x-x-x-x-x-x-x-x-x-x-x-x-x-x-x-x-x-x-x-x-x-x-x-x-x-x-x-
REFERENCES
Bourke, P., n.d. Image Gallery of Dome Installations. [Online] Available at: http://www.paulbourke.net/dome/domeinstall/ [Accessed 23 January 2025].
Milazzo, F., 2022. Broadway World. [Online] Available at: https://www.broadwayworld.com/westend/article/Review-MONOPOLY-LIFESIZED-London-20221205 [Accessed 23 January 2025].
Moonshine Saloon, n.d. Moonshine Saloon. [Online] Available at: https://moonshinesaloon.com/london/ [Accessed 23 January 2025].
0 notes
Text
Kitbash Scene Development (Aryan Raj Adhikari)
As the theme for our immersive narrative was set to be underwater, we decided that caves would be the perfect scene to showcase and assist the jellyfish swimming through water. Caves are intricate organic structure that you can easily kitbash, provided you have a correct asset pack that meshes with each other perfectly.
In early 2014, to demonstrate high-end engine capabilities on mobile devices, Unreal Engine released a Soul demo. This included Soul: City and Soul: Cave, two collections of high-quality props, rocks and water props along with their materials and textures.

Figure 1 (Soul: City, (Ivey, 2018))

Figure 2 (Soul: Cave, (Ivey, 2018))
Epic Games released these pack of high quality assets for free on 2018. While the City doesn't really support our vision of an underwater environment, Cave works perfectly to create an underwater cave with pillar beams and tunnels with aquatic fauna.
At the same time, me and Corey were in heavy discussion about the potential utilization of stylized shaders to incorporate into the cave assets. This would require the application of stylization over pre-existing image textures of the cave assets so that we achieve a stylized painterly look in the final render of the animation.
I then proceeded to download the Soul: Cave assets to start working on the environment based on the concepts from Corey and researches on underwater caves. We decided that irrespective of the cave shape or the design, it should include two elements for the bioluminescent jellyfish to sign, those being a hollow interior and a vertical tunnel opening. For this entire workflow, we decided on using Blender for the production process. All of the texturing, shading, kitbashing and animation will be done and rendered in Blender itself.

Figure 3 (Visual reference for the cave interior, (Elite Divers International, n.d.))
We did think of Unreal Engine as a potential software but settled on Blender as it has certain native particle animation settings that would be difficult to achieve in Unreal. This is where I ran into our first obstacle before even starting the kitbash. The asset pack is only meant to be used for Unreal Engine and thus had no particular support available for Blender.
I decided to take a roundabout way of kitbashing the cave inside the Unreal Engine and then exporting the cave as a GLTF (Graphics Library Transmission Format) file which provides its corresponding OBJ (Wavefront) file and the image textures which can then be appended inside Blender.

Figure 4 (Kitbashing the cave inside UE)
The kitbashing process is pretty straightforward. You are introduced to an array of 3D meshes with textures already linked and you just take a couple of assets, move their orientation, resize them as necessary and duplicate it. Using the reference image above, I started to kitbash my own cave using support beams, big rocks, cluster of small rocks while making sure there are a couple of crevice gaps for the jellyfish to enter through.

Figure 5 (Kitbashing the vertical tunnel inside UE)
As Krishi, the guy responsible for post and 2D effects emphasized, I worked on creating a vertical tunnel that would be connected to the cave through which our jellyfish would emerge into the deep sea. Luckily, the asset pack also included a stone structure that had a respectable arch. I simply duplicated the arch, reoriented them and created a rough spherical opening on its top. Then, the entire mesh was reduplicated and rotated so that it would appear natural and organic.
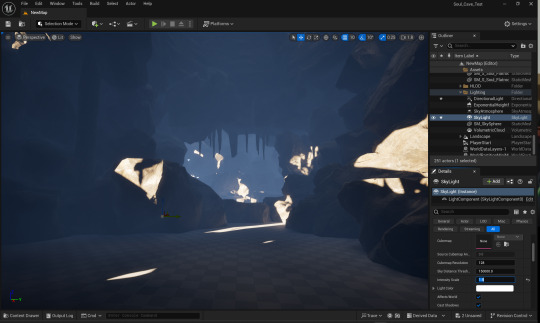
Figure 6 (Finalizing the cave kitbashing)
After decorating the cave with a couple of stalagmites hanging from the opening of the tunnel, I ran a quick lighting test with Unreal Engine's native Lumen system to see if it would be properly lit and oriented the camera for a future reference screenshot that would be helpful when animating it in Blender.
The entire cave selection was exported as a GLTF file and then appended inside Blender. Sometimes, exporting from one platform to another could pose texture linking problems which can be seen below.
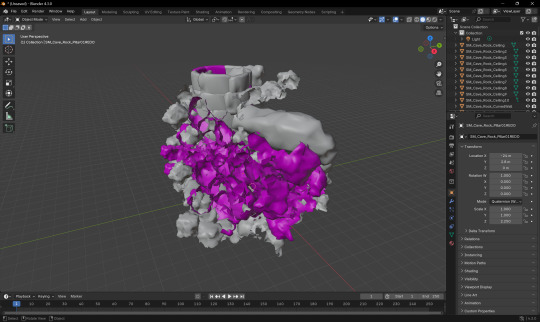
Figure 7 (Exterior texture unlinked in Blender 1)

Figure 8 (Interior texture unlinked in Blender 2)
In many cases, the problem is quickly solved by relinking the textures to its directory or manually assigning said texture images inside your chosen platform. However, since the asset pack didn't originally have support for Blender, it meant I had to spend a bit relinking it manually. Thankfully, the name of the assets and the textures followed proper conventions and I easily linked the missing textures to its corresponding assets.

Figure 9 (Relinking textures in Blender)
I added a simple light to the scene and added a floor plane on the bottom just to render out a single still frame in 4K to see if everything is working correctly.

Figure 10 (Simple render test in 4K)
REFERENCES
Ivey, C., 2018. Unreal Engine. [Online] Available at: https://www.unrealengine.com/en-US/blog/soul-city-soul-cave-assets-released-for-free [Accessed 28 January 2025].
Elite Divers International, n.d. Elite Divers International. [Online] Available at: https://elitediversinternational.com/ [Accessed 28 January 2025].
1 note
·
View note
Text
Creative Documentation (Aryan Raj Adhikari)
After a thorough discussion with our group during the first workshop held on Friday, our group decided to pursue an underwater narrative that highlighted a bioluminescent jellyfish as its main focal asset. With the help of Corey who was our main concept artist but also assisted me in 3D alongside Ali, we narrowed down possible assets that could be used to create an environment for the scene.
Time was of the essence and in hindsight, it would have been foolish to start creating the entire environment from scratch so we decided to kitbash the environment using free assets we could find online. Luckily, 'Kitbash 3D' hosts plethora of kitbash assets that could be used to create a 3D environment and from there, we narrowed down other asset packs which could be used for the underwater scene.

Figure 1 (A rough idea of the caves, (pxfuel, n.d.))

Figure 2 (Envision of the tunnel in the caves, (juanox23, 2020))
These were the two pictures that stood out to me the most when visualizing on a 3d cave and how the jellyfish would interact around it.
The first picture depicts a closed off underwater cave lit mostly by the caustics of the water, giving off a gentle blue tint where majority of the narrative surrounding the jellyfish plays out. The second picture depicts a vertical opening in the cave which would be extended further and this change in the environment would help the narrative of the bioluminescent jellyfish to swim through near the conclusion of the immersive video concept.
The environment would further be dressed up with corals, shells and underwater flora that would help increase the immersion of the viewers. We decided to adopt a stylized look for the entire environment so that it is more soft and gentle to capture the audience's attention and further aid in improving the immersion of the 360 video.

Figure 3 (Research on painterly shaders, (Marceau, 2020))
We looked into a couple of stylization techniques, with the inclusion of cel-shading, impressionism and even cartoony shading. After iterative researching, we landed on a painterly stylization that improved the visual aesthetics of the assets and the environment which would further aid us in improving the immersion of the audience. This artstyle, neither sharp or too bland, provides a relaxed approach with a wet painted effect onto the visuals.
REFERENCES
pxfuel, n.d. pxfuel. [Online] Available at: https://www.pxfuel.com/en/desktop-wallpaper-zuyhc [Accessed 26 January 2025].
juanox23, 2020. WallpaperCave. [Online] Available at: https://wallpapercave.com/w/wp4039938 [Accessed 26 January 2025].
Marceau, 2020. Gumroad. [Online] Available at: https://tonolimarceau.gumroad.com/l/BrushStrokeSetup [Accessed 26 January 2025].
0 notes