
sims2tutorials
The Sims 2 Tutorials
A tutorials resource for The Sims 2
358 posts
Don't wanna be here? Send us removal request.
Last Seen Blogs

teganfrid
Doodle Blog

letsfawc-blog
Let's FAWC baby!

lookingkindofdumb
Untitled

innovationjewelry
Innovation Jewelry

cumrotts
Doesn’t It?
Text
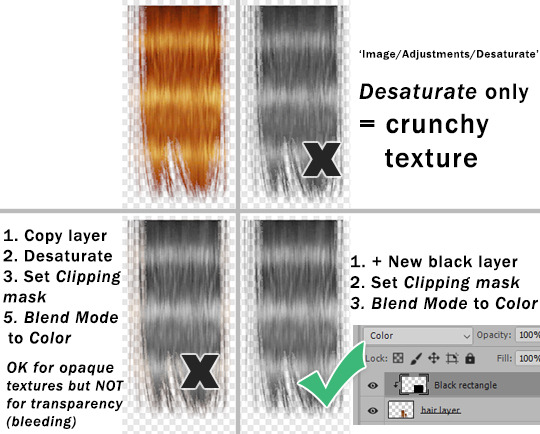
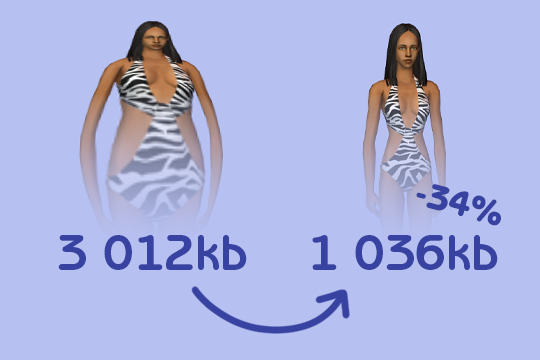
This is my response to this post by @goatskickin - a second version. That's the best way to desaturate hair texture or other stuff with alpha transparency ( thanks @paluding).
Desaturate or Hue/Saturation often makes textures crunchy.
You'll get best results if you create plain black layer and set blend mode to Color. Adjust Opacity as needed. In case of alpha stuff you also need to create Clipping mask.
When doing color actions on hair textures (or anything else) - if Hue/Saturation adjustment layer step does -83 Saturation (for example), instead you can do what I described above and set black layer Opacity to 83%.
Also, use SimPE to build textures as DXT5, do not rely on Bodyshop 'cuz it will always f*ck it up.
317 notes
·
View notes
Text

Okay, they're here! WSOs for better-looking fat male sims, based on ambodypoloshirtoverhang (as sugested by @episims). These are meant to cause minimal texture stretching and can be used for full body outfits (ambody_Morphs_Clothed) and long, untucked tops (which is most tops) (amtop_Morphs_Clothed). I wouldn't use these for bottoms or tucked tops though, since the waist placement differs from standard Maxis fat waist (which is the source of texture stretching). Preg morph is included as well, and based on ambodymaternitycomfy. In my testing, morphs still needed some manual edit to look really smooth™, but I think these still look decent enough to share.
Download SFS | Dropbox
THESE ARE RESOURCES FOR CREATORS!
As a general rule for WSOs: the more similar your base and reference meshes are, the better results will be. In this case, the reference mesh is 2K polys. Results will be better if you use a high "number of interpolation points" (the highest value posible is 10 in the version of the Mesh Toolkit I have).
I made a bunch of morph edits while testing these, which you can have if you want. Most of them are pictured below.


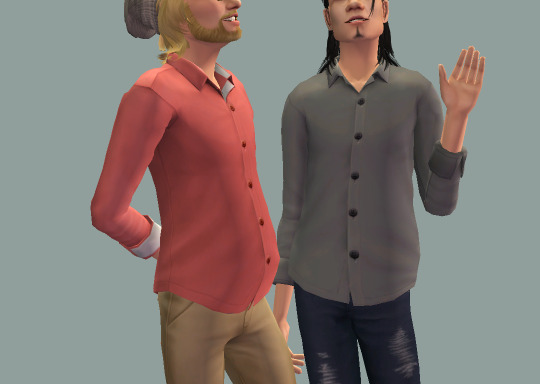

Blond sim is preg, black-haired sim is fat.
MDP 4t2 Denim Shirt.
MDP 4t2 Shirt Collared.
MDP 4t2 Button Down Open.
MDP 4t2 Half Tucked Shirt.
WBP 4t2 Pullover Loose.
WBP 4t2 Sweater Jacket (this one is for Will :P).
Download SFS | Dropbox
These are just the meshes; you need to download the recolours from the links above.
I swear I will update my default replacements at some point 👉👈
Please let me know if there's anything wrong with these, I've never made a WSO before (it was suspiciously easy), and I'm very far from being an expert mesher. Anyway. Enjoy! Credit and thanks go to Maxis, Epi and Lifa.
75 notes
·
View notes
Text
youtube
SIMS 2 || How to Make UNIQUE Families & Sims!
Give it a watch! I'd appreciate it alot ♥
Realized I forgot to share this here!
16 notes
·
View notes
Text
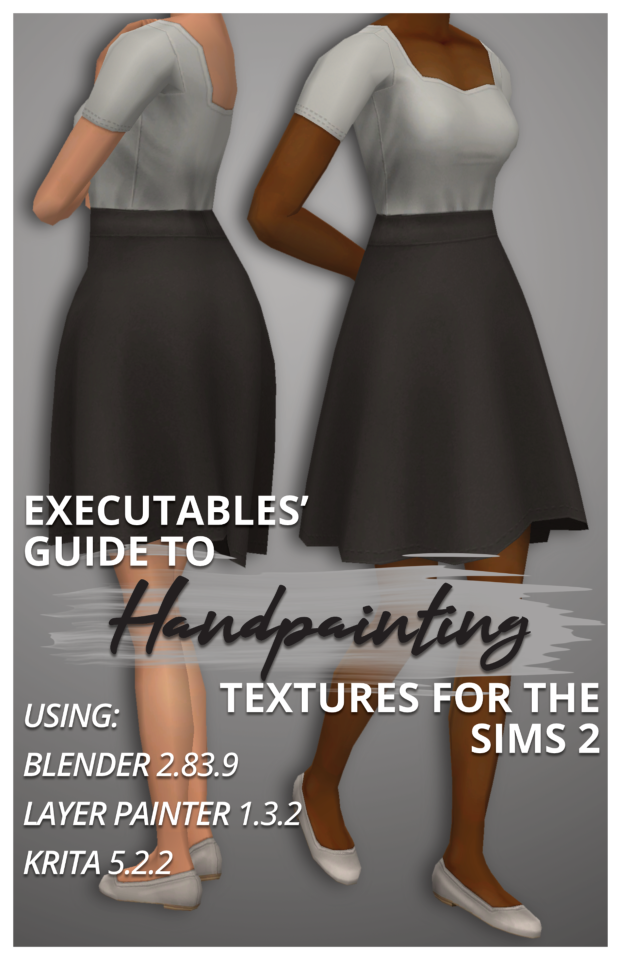
Executables' Guide to Handpainting Textures for The Sims 2 | Download PDF (65 pages)
Have you ever wondered how to paint clothing textures from scratch?
I've been using paid software like Milkshape, Photoshop, and 3D Coat Textura to texture Sims 2 models for years, but I've managed to translate my process to completely free open-source software!
I've broken down the entire process from start to finish for complete beginners (who may never have made a clothing recolour package before), but more experienced CC creators can skip around as needed using the PDF bookmarks.
You don't need a graphics tablet– but you may want one once you've played around with this! :)
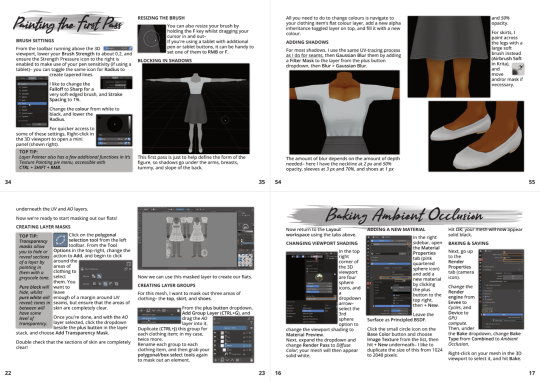
The clothing shown on the cover is also downloadable through the document.
Hope this inspires you to make something! :D
201 notes
·
View notes
Text
How to Divide an Object into Multiple Subsets in Milkshape 3D
i made my very first ever tutorial!! on how to divide an object into more than one group or subset in milkshape. this is v handy for when an object originally has one subset, but you want to make two recolorable subsets. 💕
is this helpful to anyone?? idk i hope so lol.
i did a quick written doc too, if that's more up your alley. it's more simplified than the video, but you still get the gist i think.
youtube
74 notes
·
View notes
Text
How to repository clothes using the Repository Wizard (duh)
I wrote a tutorial on how to use the Repository Wizard for clothes. It covers the utility's basic usage, as well as providing some more "advanced" tips and explaining what the program does for you.
Hopefully this can help anyone who's been meaning to give it a try a helping hand to dive in. It's really simple to use, and it can speed up the time spent preparing all the packages, and not just when repositorying stuff (thanks to the Standalone mode).
If that interests you, here's the link to that:
@sims2tutorials could you please archive my post? 😇
I should mention that the tutorial was put together before v2.3 which added a small advance feature. Therefore the tutorial won't cover it, but I plan on updating it soon and as often as I can.
103 notes
·
View notes
Text
Resource: extracted ts3 fabrics

I extracted a bunch of fabrics from ts3 a while ago to use them on clothing textures, to give them a little more texture / depth, y'know? Lately I realized I could share it in case they'd be useful for anyone else 😊
They're pretty well-sized for use, and they're of course, seamless. I literally just extracted them from ts3 so no need to credit me or anything.
Download - Alternate
#resources#creator resources#texture resources#recoloring#retexturing#deedee-sims#clothing retexture#object retexture
200 notes
·
View notes
Link
Here’s a very helpful tutorial for those who are interested in making sliders for TS2! It’s still a work in progress, but there are very handy explanations on how to make them.
45 notes
·
View notes
Text
Differences between DXT5 / DXT3 / DXT1
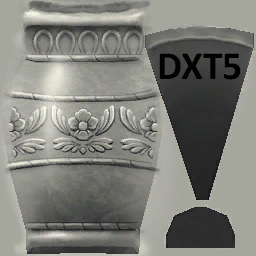

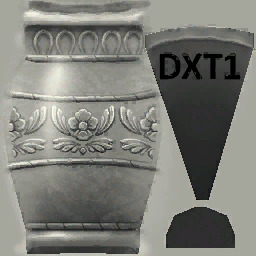


The images above are all imported with SimPe's Built DXT... option, and then exported for previewing. The short version is:
You can't go wrong with DXT5 :)
I'll go through the differences under the cut.
DXT5
Supports transparency (alpha channel)
Preserves texture details well
Smooth gradient transparency
Filesize of the vase texture: 25 KB
Filesize of the plant texture with gradient alpha channel: 26 KB
Filesize of the plant texture without the gradient part: 20 KB
Useful for: textures that are solid or have a complex alpha channel.
Shouldn't be used for: –
DXT3
Supports transparency (alpha channel)
Preserves texture details well
Causes stripes on alpha channel gradients
Filesize of the vase texture: 25 KB
Filesize of the plant texture with gradient alpha channel: 20 KB
Filesize of the plant texture without the gradient part: 19 KB
Useful for: textures that are solid or have a well-defined alpha channel.
Shouldn't be used for: textures with alpha channel gradients.
DXT1
Doesn't support transparency (no alpha channel)
Pixelates texture details
Filesize of the vase texture: 21 KB
Filesize of the plant texture: 14 KB
Useful for: solid one color textures with no details.
Shouldn't be used for: detailed textures, textures with transparency.
Both textures l used are 256x256. They came from TS4, thanks to @tvickiesims for extracting the textures! I added the gradient bit to the plant one.
175 notes
·
View notes
Text
It is up! It is up! It is up!

84 notes
·
View notes
Text
Mini-tutorial - Wall Masks Made Easy
I could not send this to someone's DMs, so I thought I would post here!
This is purely to show how easy wall masks can be made! It assumes that you know how to do basic editing in a photo editor, I prefer to use paint.net as its simple!
70 notes
·
View notes
Text

So this is new... This is what my bodyshop does with high poly meshes. While it is a great incentive to cut down on those polycounts, I would really like to know what causes this, and how to fix it.
I did the graphic rules maker, of course, and Google is being no help. It only mentions high poly meshes not showing at all. But I have tried all fixes for those regardless. So I'm throwing it out here. Does anyone know what I could do to fix this?
122 notes
·
View notes
Text
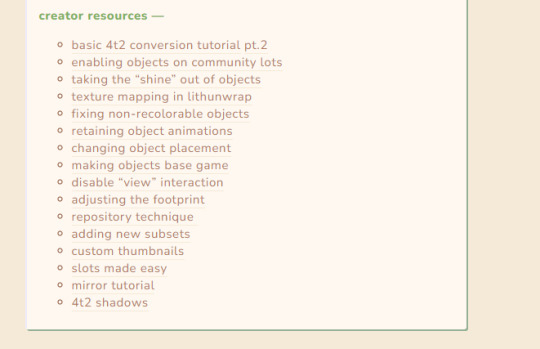
i dont think i ever made a public post about this, but i do have a list of creator resources for anyone interested! this list is ofc specific to objects and 4t2 conversions.
the list is continually updated, really whenever i come across something that has helped me in object creation/conversions. the latest addition being: texture mapping in lithunwrap. this came in super handy when remapping the pretzel display by pandorasims. :]
80 notes
·
View notes
Text

Did you accidentally make your fence too short, and now there's an ugly extra fence post in the way? Think you'll have to rebuild that whole section of fence to get rid of it? Worry not!

Simply attach another piece of fence to the post you want gone...
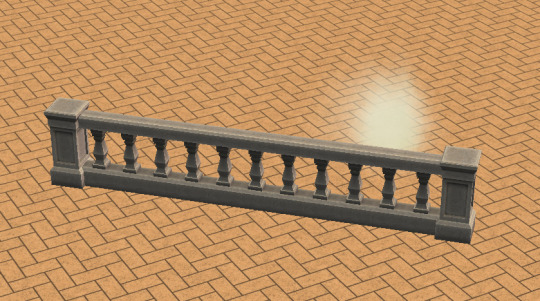
... and then manually remove it. The fence post will be removed as well.
Apologies if this is common knowledge, but I only figured it out recently and it's saved me a lot of building time/mild annoyance!
503 notes
·
View notes
Text
(not really) a tutorial on how to add backfaces/undersides/whatever you call it to your 4t2 plants. It applies not only to the garden mode plants but also to any potted plants, flowers, pretty much any plant from ts4.
Long rambly part you can skip:
I know there are already tutorials on this (maybe I even mentioned it at some point? can't remember), some even dating back to 2006, but I keep seeing this problem in new conversions and it's a shame because they're so beautiful and I'm too lazy to fix it myself.
I made this mistake too with all my early plant conversions, most of them still haven't been fixed *shame on me.*
It's an easy mistake to make because it shows up on every plant from ts4 and no one explains how to fix it in basic converting tutorials.
I took my old pine conversion as an example, so an not to upset or call out anyone, but sometimes it is even more noticeable on smaller potted plants and bouquets.

Problem: plant undersides are invisible and it's really noticeable at certain camera angles.
Solution: TXMT edit in SimPE or mesh edit in Milkshape.
Both fixes are very simple and don't require any special skills.
The easiest fix:
- open mesh (prior to making any recolors) in SimPE
- go to TXMT
- look for "stdMatCullMode", it'll be set to "cullClockwise"
- change it to "none," commit and save.
Done!
But wait. It won't work for any plant, unfortunately.
It works well for trees and most shrubs, but on some meshes it will create "shadows" where you don't want them. So if after you've done this fix you see any weird dark spots on your plant, reverse everything and use the second method instead. This requiers Milkshape but you don't need to be skilled at it.
(this can also be done in Blender with Solidify modifier but it's less precise and will add more polys to the mesh)
I will not write down this part of a tutorial because it is already written for me. I first stumbled upon this solution here, in this tutorial by Ikari-sims. I know what you're thinking, it's a hair converting tutorial for ts3, what it has to do with anything? Just skip all of it and go to the "STEP SIX: Making the new undersides (or backfaces)". It explains how to select, copy, paste and flip faces in your mesh. So basically you're just slightly resizing and turning them into undersides. Trust me, it's very easy, you don't have to know anything about meshing.
That's it. Let's make this journey to bushier plants together! (no double entendre intended, or…)
upd: check the notes for additions from goingsimcrazy ↓
#cullclockwise mode#editwithsimpe#milkshape tutorial#blender tutorial#meshing#material defnitions#suratan-zir
68 notes
·
View notes
Text
How I draw: Silver Metallic Buttons for Sims 2 Textures
As we all know, Sims 2 doesn't really appreciate large file sizes/dimensions for it's textures, so sometimes you have work very closely with the individual pixels. Here is how I draw buttons. Video is sped up so don't feel like you need to draw as fast as me!
Side note: this tutorial is created on the basis that you already know how to use the basic functions of Sims BodyShop to extract the texture file. There's plenty of tutorials out there explaining that so please don't ask me to clarify on that part. Anyway, on to the buttons...↓↓↓
What you need:
A PC
Digital Drawing app (like Photoshop, Krita etc)
A Graphics Tablet with pen - you could try this with a mouse but I wouldn't recommend!
And obviously Sims 2/Sims 2 BodyShop
First off, create a new layer - we don't want this button permanently stuck to our base texture. Then I get a standard hard edge brush (I use Krita as my drawing software, so just use whatever hard brush is available in your preferred software/app). Because I'm making relatively small buttons, I make my brush 7.09px in size. Select a mid to light grey colour as the base. Make a single circle.
Then decrease the brush size to be nice and small. As a comparison to my 7.09px circle, I decrease to 0.01px for this next step. Choose a slightly darker grey colour and lightly sketch in a 'semi-circular line' about 3/4 of the way around just in from the edge of the circle. By lightly sketching - and not pressing down hard, you'll get varying tones on each pixel to represent different reflections on the 'metal'.
Next choose a darker grey again, and lightly sketch around the similar area as the last colour, but don't be too fussy on hitting the same pixels - we want varying tonal values for our shadows.
Then choose white and lightly sketch the 'catch light' part of the button. This doesn't need to be right in the centre, in fact it's better if it's off to the side, or towards the top more. We're not always facing directly towards a light source so this creates a more realistic lighting effect. You'll see me select the same mid to light base grey I used just to lightly dust over the edges of the white area to soften it a tiny bit (only do this if your white edge is a little to crisp).
After that I go back and forth between a few different tones of grey to lightly sketch over the parts we haven't really drawn on yet. This just helps create some gradual shading that enhances the 'roundness' of our very flat, very 2D button texture.
Once you're happy with the shadowing (remember it looks somewhat janky this close up, but you can always zoom out to see if the button looks more smooth when further away), you can then make another layer, and drag it below your newly made button layer in the layer menu. Select a soft edge brush and increase the size to slightly wider than your buttons overall size (I chose 9.14px compared to my 7.09px button)
Choose black from the colour wheel/palette and lightly build up the shadow underneath the button, gradually increasing size and opacity until desired tone. If the colour of the 'garment' in this texture is light then keep the shadow to a minimum, if it's dark then the shadow needs to be deep enough to show up.
Zoom out and inspect how this button looks further out. If you're satisfied, then merge the button and shadow layers together, copy/paste it as many times as needed for the garment you're texturing and Voila! You made buttons for a Sims 2 Texture!!
Feel free to ask any questions below - I'm definitely no professional, especially in creating tutorials so I'm more than happy to clarify if something didn't make sense.
86 notes
·
View notes
Text
How to make a CC-free game folder for testing purposes
When people report problems with my content I often ask if they have tried the thing in a CC-free game. And often, they haven't.
I assume they might find it troublesome. If you always take backups and move your Downloads folder away and avoid saving, I agree, that is pretty troublesome. Also prone to mistakes – I stopped doing it after the one time I got my multi-PT mod messed up.
So I wrote a quick tutorial for how to do it with a separate folder system instead. The benefit of this setup is that you'll only need to do it once, after that it's very quick to switch folders at any time.
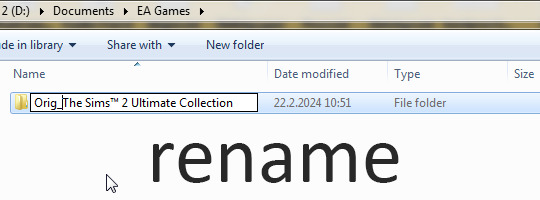
Go to the Documents directory where your game folder is located.
Rename the folder. I use something sensible at the start so I can easily recognize the folder, but it can be anything.
Then in the same directory, make a new folder.
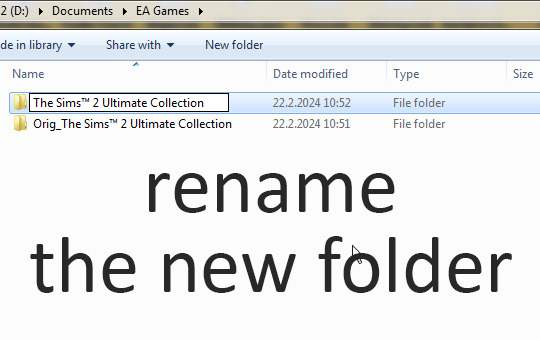
Rename the new folder as The Sims™ 2 Ultimate Collection or whatever it should be, depending on your installation.
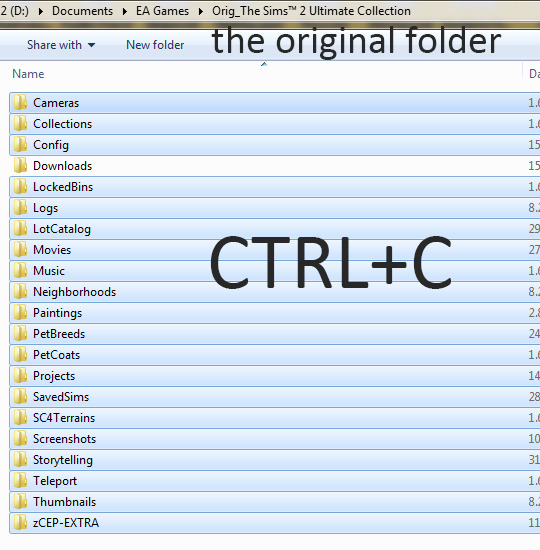
Go the the original game folder and copy everything but the Downloads folder.
This way you'll get your startup cheats, neighborhoods, and CEP-Extras carried to the new game folder. I also include Projects and SavedSims myself as these separate folders are handy to have for Body Shop work, too.
Go to the new folder and paste.
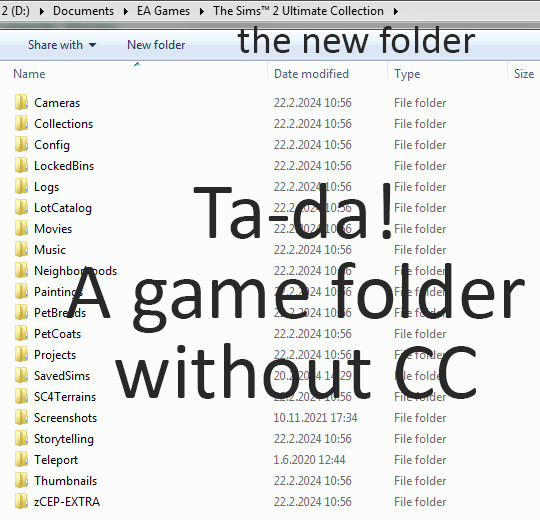
Now you may want to create a new Downloads folder here, that you can put that one piece you want to test without other CC in :)
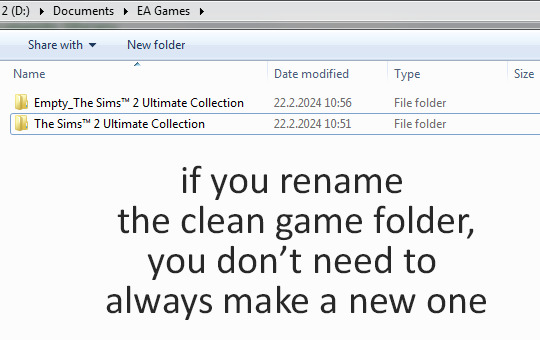
This is the main advantage here. Moving things around and taking backups takes a lot of time compared to just changing the names of two folders.
You can also generate a new game folder by launching the game after renaming the other folders in this directory. It's useful if you want a truly fresh folder.
132 notes
·
View notes