#milkshape tutorial
Text

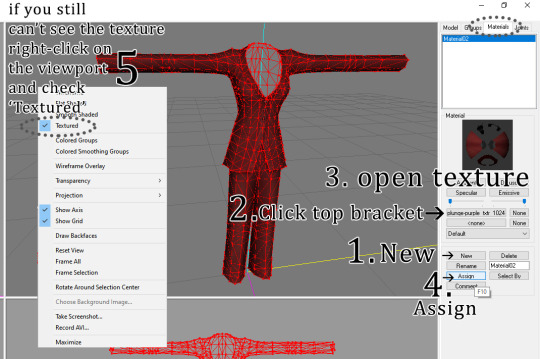
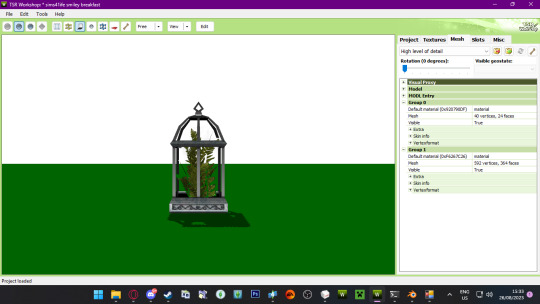
Mini-tut: How to add texture to object in Milkshape3D
Select the model by double-clicking the name in the Groups tab, then open Materials tab, create new Material, open texture and Assign material to your model.
If you still can't see the texture, right-click the viewport and check the "Textured" option. You can also change "Transparency" mode if your object is using alpha texture and it looks weird.
52 notes
·
View notes
Text
This is for Milkshape users (not for beginners)
When your legs move like this in Milkshape:
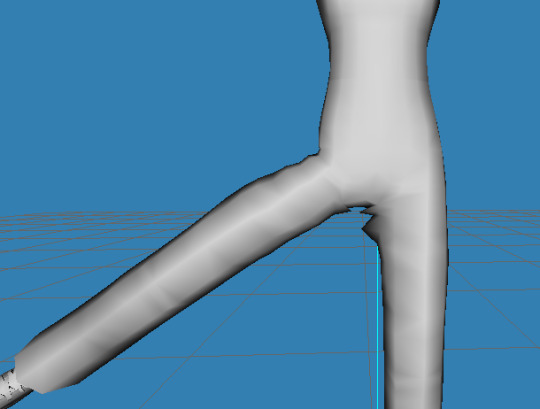

You might want to manually change the bone assignment. This happens a lot after using the MeshToolKit. Somehow a part of the right leg is attached to the left leg. And vice versa.
All you have to do is... back-up first! (serious, save your project, use autosave, whatever)
Then select the vertices that cause this problem and open the Extended Manual Edit (under Vertex)

(Not all in once, just a couple and after some more)
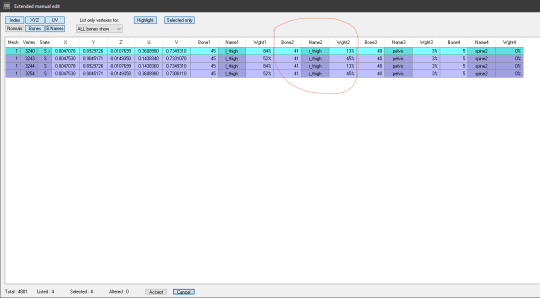
You see the left leg, but for the mesh it's their right, and they don't want their right leg attached to their left, so make it zero (0). It's math: Bones are 100%, pelvis wants 3%, left leg is zero, so right leg will have 97%.
I move the numbers of pelvis to column of the right leg, because otherwise in bodyshop I get moving vertices. Something like this, don't know why??
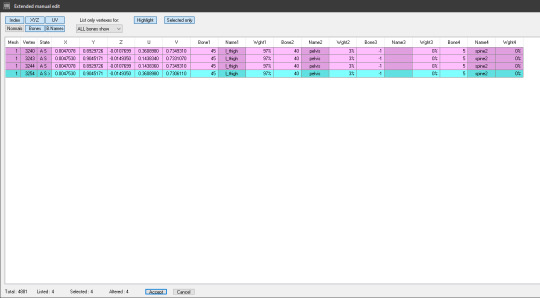
It will look like this after.

I hope this will help some of you. And serious... save your project first before changing bones.
44 notes
·
View notes
Text
Separate Accidental Regroup in Milkshape
Hi everyone, I'm not sure who all uses Milkshape but I do when I make my Sims 3 CC. I recently had to look up/read different tutorials on how to fix an issue when you merged two groups together, and actually need them separated.
Firstly, double click the Group you need to fix.
Go to edit > duplicate selection or use CTRL D hotkey.
Click on the duplicated group, and rename it otherwise if you adjust either one it'll mimic the original you duplicated from.
Hide all groups you're not adjusting.
Go to the Model tab and press Select, then Face.
Select the parts you don't need and go to edit > delete selection then vice versa on the duplicated group
WALLA! You have now separated the "accidental" regrouped meshes.
#tutorial#milkshape#milkshapetutorial#s3tutorial#sims3#sims3tutorial#s3milkshapetut#tut#s3tut#sims3tut
5 notes
·
View notes
Text
It took me all fucking day (because my reading comprehension skills apparently suck) but I finally figured out how to make my own custom BSOK/organization thing.
#beatrice succeeds at something#finally#now all i need to learn is how to work milkshape#and wso actions#is that in milkshape?#I think there was a tutorial for that recently#i watched the convert 4t2 tutorial#got lost in the milkshape section
4 notes
·
View notes
Text
Having an ADHD sort of day lads but in the I am trying to do 5 different things at once way thankfully not the Stare at wall while elevator music plays way
#babble#we've gone from Im just gonna tidy up my mods folder a bit and test something and then download some new hairs >#to im gonna completely revamp my mods folder in setup and appearance to reduce load time but make it feel less cluttered also#> to im going to carefully rename my cc and merge what feels right like recolors of hairs#> to hours browsing new sims 2 cc and trying to catch up on what ive missed#> to damn you know theres really some nice hairs i want for sims 2 but im not sure i wanna wait for them....#> to downloading milkshape#> to watching a tutorial#> to reorganizing my ts2 tools folder and making my own little workshop folder#genuinely have lost the plot but its ok im bouncing back and forth between everything#oh cant forget the fact ive also spent at least an hour in photoshop today making icos for the folders#which honestly. does make it feel a bit less congested
1 note
·
View note
Text
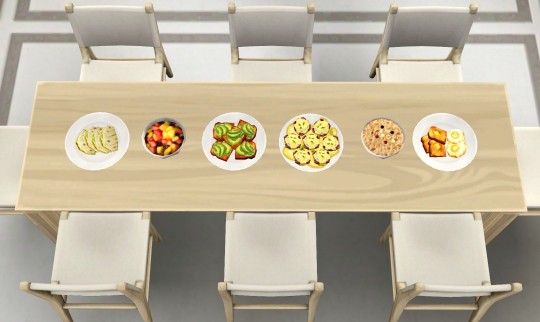
Breakfast At Twinsimming’s by Twinsimming 🥞
This mod adds six new breakfast recipes converted from The Sims 4, along with one new custom Avocado harvestable, and one new custom Butter ingredient!
The recipes, harvestable, and ingredient can all be placed in your Packages folder. They were created and tested on 1.69, but should work fine on 1.67.
(Yes, the title is a play on Breakfast At Tiffany’s, and no, I have not seen the movie lol)
Requirements
This mod requires CCLoader to function.
Overview
New Recipes
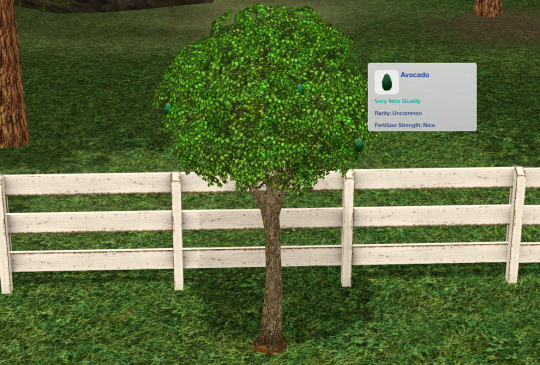
Avocado Harvestable
Butter Ingredient
New Recipes
All of the recipes are breakfast themed, but they’re enabled to be prepared at any time of day. They are also all Vegetarian safe!
Cooking Overhaul mods make the recipes require more ingredients, but they are not required to use this mod. Cooking Overhaul ingredients will have an (*) symbol next to them. From left to right in the preview photo:
*Edit: Cooking Overhaul mods are required for this version of the mod. If you do not have one, please download the [No Cooking Overhaul] version now included in the latest update.
Baleada (Level 2): Cheese, Egg, and Avocado
Fruit Salad (Level 0, under Dessert): Any Fruit x3
Avocado Toast (Level 0): *Bread, Avocado, and Butter
Eggs Benedict (Level 6, requires recipe book): Egg, Butter, and *Milk
Oatmeal (Level 0): Any Fruit, *Milk, and *Granola
Eggs and Toast (Level 0): Egg, *Bread, and Butter
Avocado Harvestable
The Avocado harvestable is a conversion from The Sims 4: Jungle Adventure. It can be bought at the grocery store for §6 or planted and grown at Level 6 of the Gardening skill.
Note: There is no auto soil for the Avocado tree at this time. Hopefully I can find a working tutorial and make this a reality in the future!
Butter Ingredient
Butter is a new, non-plantable ingredient that can be purchased at the grocery store for §5. It can also be made using my Pasteurize Milk Mod.
If you have my Pasteurize Milk Mod already installed, you do not need the Butter file included with these recipes as it is the same ingredient as the one included in that mod.
Note: This Butter ingredient is different from the one included in icemunmun’s Baker's Basket Plants, Ingredients and Recipes mod, so both can be installed at the same time.

Conflicts & Known Issues
This is a new script mod so there shouldn’t be any conflicts.
Credits
EA/Maxis for The Sims 3 and The Sims 4, Blender, s3pe, TSRW, Gimp, Milkshape, Notepad++, and CCLoader.
Thank You
A special thank you to @bietjie, @echoweaver, @zoeoe-sims, @simsdeogloria, @omedapixel, and @puffkins2000!
If you like my work, please consider tipping me on Ko-fi 💙
Download @ ModTheSims
640 notes
·
View notes
Photo

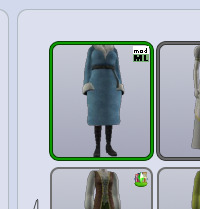
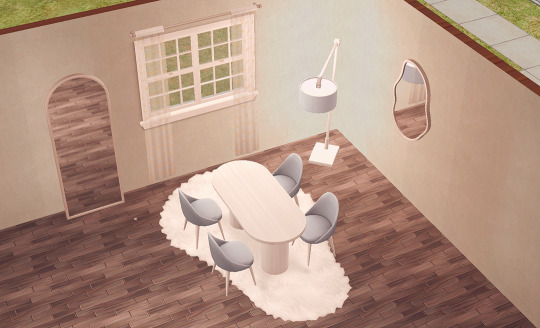
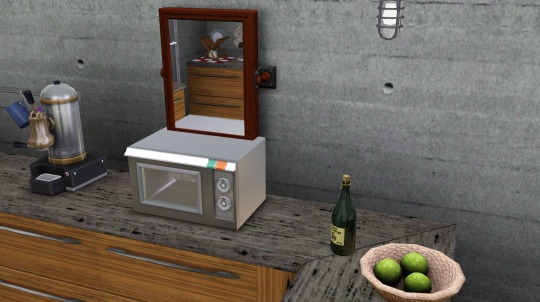
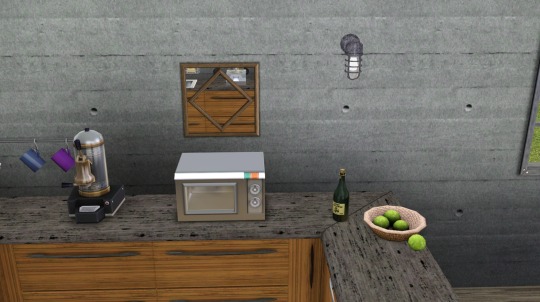
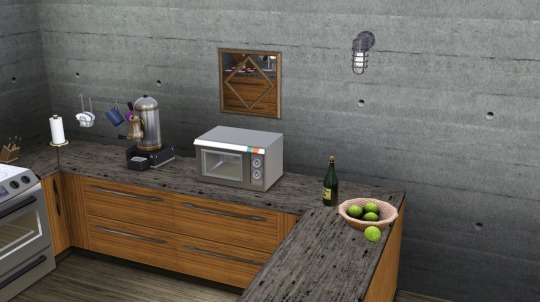
〰️ 4t2 the KERV collection: part one 〰️
i kept adding to my wip folder, so i finally tackled something that’s been long overdue to come out! here is greenllamas’ kerv collection part one!
i started on this back in january 2022, but knew absolutely nothing about converting mirrors. thanks to @kayleigh-83‘s super duper awesome tutorial since then, i knew i could tackle this on. not to mention the lamp, lol. i’d rather fight with mirrors than any lights but hey! my persistence paid off, i’m pretty happy with the outcome. :] stay tuned for part two of the collection! as always, please lmk if you run into any issues. enjoy!~ ✧٩(•́ ᴗ •́๑)و ✧
files are compressed. collection file included. polycount under the cut.
update: pearphone mirror guid fixed, thank u anon. ♡♡
download: [sfs] | [box] ♡
credits: @greenllamas.

OBJECT LIST:
Leggy Dining Chair - 422 polys | $80
Bone Dance Floor Lamp - 688 polys | $200
Inkblot Rug - 2 polys | $300
Leaning Mirror - 362 polys | $200
Pearphone Mirror - 797 polys | $190
Round and Round Dining Table - 364 polys | $200
note: the leaning mirror doesn’t rest on the wall without cheats. i tried moving the mesh in milkshape, but the mirror was not having it lol. i also removed the old shadow from the table, i hadn’t done so in the preview.
#ts2 download#ts2cc#s2cc#4t2#4t2cc#4t2 conversion#sims 2 cc#ts2 maxis match#s2mm#ts2 object#trying to get back into the swing of things#not only cc just like sims stuff in general#i'm still lurking here n there!!#but ya! part 2 coming sooon :]
786 notes
·
View notes
Text
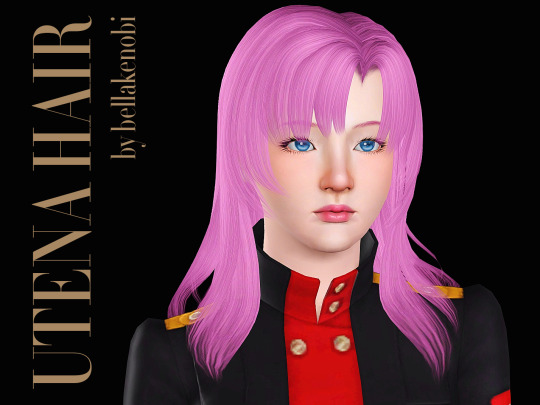
Utena Hair
It's alive!!!
Revolutionary Girl Utena is my favorite anime of all time, and when I stumbled upon a hair cards tutorial on youtube, instead of testing it with a easy simple bob, of course I went to do something complicated as Utena's hair. And here it is 😊 I'm quite astonished I was able to put this together, even with its own issues etc.
For female, teen - elder, not valid for random
EA highlights
No morphs, but won't clip in fat sims
Polycount: 6k lod0
Known issue: it has some tiny transparency issues on the sides and in the back, mainly caused by the undersides, because you know, one does not simply makes a hair for The Sims 3 '-'
Download at:
Mod The Sims | Simblr.cc | Sim File Share | Mediafire
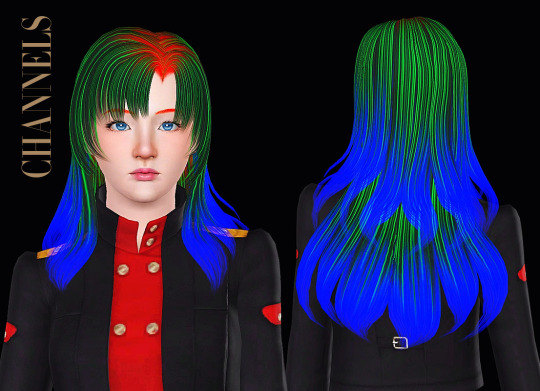
Credits: Mesh by yours truly, texture Pooklet with hand painted alpha by me, control by Anubis.
Read my TOU here.
Control Preview and links to the stuff used on the hair below the cut.
Stuff I used to create this hair:
Blender, Milkshape (ugh), Photoshop CC 2015, DABOOBS, Dynamic Hairy Brushes by Arrsistable,
Tutorials that helped me to create this hair:
- Blender 3.0 Easy Hair Cards with Curves by ELIZA
- Hair Creation Start to Finish by @CardinalSims
- Smooth Bone Assignment in Blender by RedSimmer
#sims 3#ts3#simblr#the sims 3#s3cc#sims 3 download#sims 3 hair#utena#shoujo kakumei utena#revolutionary girl utena#sims 3 anime cc#s3 female hair#bellakenobi hairs#bellakenobi hair
126 notes
·
View notes
Text
Tutorial - extracting stuff from Disco Elysium (+ viewing the models in blender)
Due to... recent events, I decided to finally get myself to write a tutorial about this, because all I found was some half-assed reddit comments when I was trying to figure out how to do it sometime last year.
I'll show you how to extract... pretty much everything (including voice lines) from the game.
This is a beginner tutorial, so you don't have to know shit about any of these programs, I'll try to explain everything.
I promise it's pretty easy! I extracted stuff from various games, and this is one of the easiest I ever did, so yeah.
You'll need:
Disco Elysium on PC
AssetStudio
Blender
+1 Interfacing
+2 Endurance (mostly to survive my bad jokes)
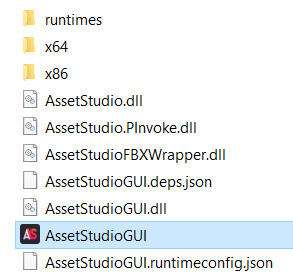
First of all, open AssetStudio. You don't have to install it or anything, just unzip the file you downloaded and open the program inside (AssetStudioGUI).
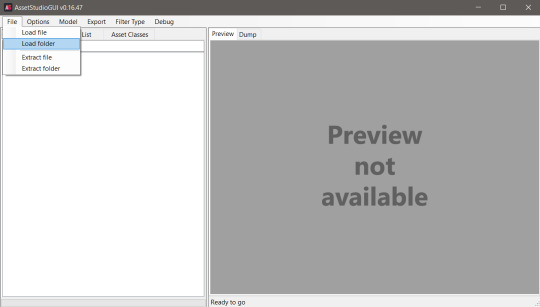
This is how the bad boy looks like, we'll be able to see the asset list on the left and the preview on the right.
Click on File../Load Folder.
Select the folder where the game is installed. For me it's Steam\steamapps\common\Disco Elysium\disco_Data. You can load individual files too, but it's easier to just list everything and then filter them imo.
Wait... for a while. It's a lot of assets. Make a tea or something (hydration is important).

After everything loaded up, click on the Asset List tab. You can see all the stuff! Well, it's rather confusing. Let's see what is what!
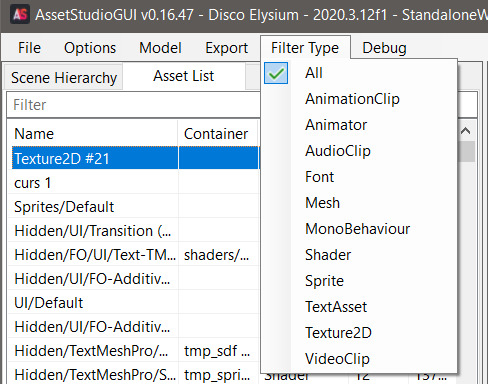
If you click on Filter Type, you can see the types of the assets. These are:
AnimationClip: I think these are supposed to be the animations, you can export them if you select an animator asset alongside and right click Export Animator + selected Animation Clips (couldn't get the animation to play but that's probably on me).
Animator: These are the rigged models, you can export them to .fbx format, but I couldn't figure out what to do with them in Blender because they were kinda distorted (funnily enough, when I imported it to the shitty Milkshape program it showed up just fine... and people wonder why I prefer shitty Milkshape XD) Anyway, I hope someone can figure this out that actually knows something about Blender lol.
Audio Clip: Sounds, voice lines, background music. (.wav format)
Font: Well, fonts. Can be exported and installed to your device like any fonts.
Mesh: 3D models of the characters, objects, scenes. (.obj format)
MonoBehaviour: No fucking clue.
Shader: Shaders for the game. Not interesting in our case.
Sprite: Images that the game uses: portraits, object thumbnails, user interface elements.
Texture 2D: The textures that belong to the 3D models. (.png format)
TextAsset: ??
VideoClip: The stuff that plays when you open the game.

You can preview any assets (well, the ones that you can preview), if you click on them. You can view them in the right panel.

You can extract by left click on the asset in the list -> Export selected assets. You can select multiple assets and export them at the same time.

The program will ask you to select a folder where you want to export the stuff. It'll export them into separate folders, by assets.
Well, yeah, now you know what is what, and how to extract them, but there are still a lot of assets. Good news, you can filter them with the little search bar too, if you type in some gibberish! Some stuff are a little tricky to find.

Voice lines are grouped by task / place, so if you know where the particular thing takes place, you can try to filter for those. The assets are named with the speaker's name - either a character or a skill. I think the numbers mean some kind of order, but I couldn't really figure it out. If you click on one of them, you can preview, and listen to it in the right panel! Super easy! (if you want your own daba-doop-doop-dead it's Kim Kitsuragi-YARD HANGED MAN-556. Just saying)
For objects and characters, you can find them by name, although some characters are named differently. Like, Harry is referred as Tequila in the game files.
Basically if you want to have a character or an object extracted, you’ll need to extract a mesh and a texture that belongs to it. You can quite literally play dress-up game with Harry, because all of his clothes are separate files (and named with kinda the clothing item name). The Kineema has multiple parts (exterior - interior - door - whatever else).
Anyway, let's move on to the Blender part before I forget how to do it (I learned it this morning lol).
(Disclaimer: I don't know jack shit about Blender, I use it for extracting stuff and creating the simplest shapes in existence. I use the godforsaken program Milkshape on a daily basis.)
Open Blender.
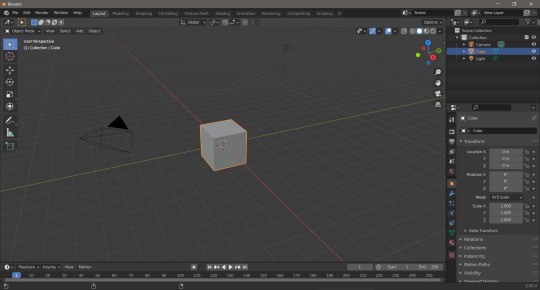
Hit delete to get rid of this beautiful default cube.
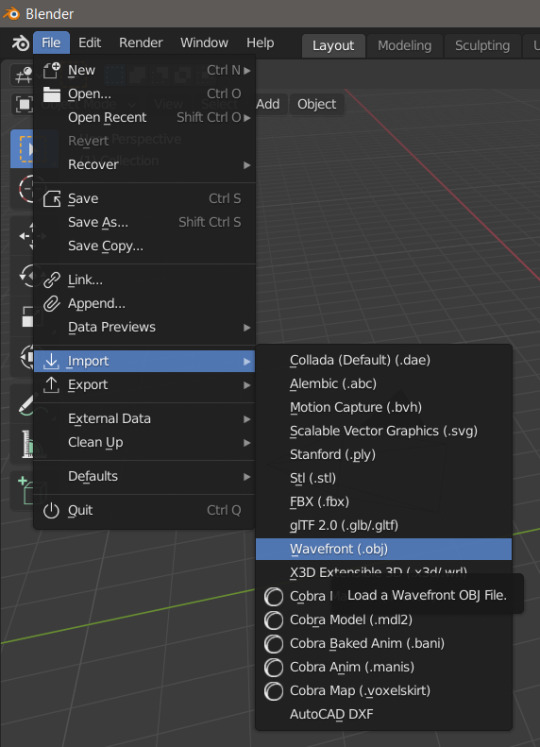
File.../Import.../Wavefront (.obj)

Select the thing you want to import (I'll import the gremlin child).

There he is! And he doesn't fucking care!
Btw, you can zoom with the middle mouse button scroll or middle mouse button + Ctrl, rotate with middle mouse button, move the view with middle mouse button + Shift. So you can see his itty-witty mischievous face from very close!

Now, that's great, but he doesn't have textures still. First of all, change the Viewport Shading to Material Preview.

Select him (just click on him, you'll see an orange outline). And go to the Material Properties tab on the side.
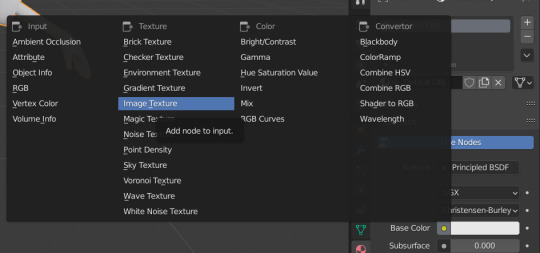
Click on the little dot next to Base Color, and select Image Texture.


Click on the Open button that appeared out of nowhere, and search for the Cuno texture.
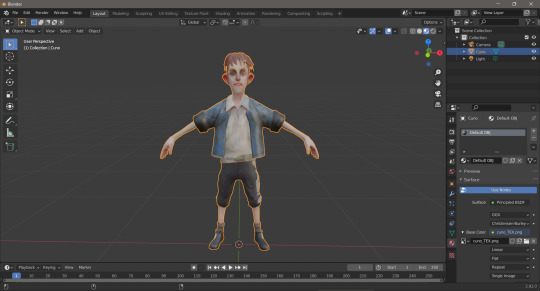
Tada! He looks beautiful now! (and he still doesn’t fucking care)
You can do the same with any 3D models, objects from the game, really.
Well, that's it lol. I hope it made sense! And I really hope someone runs away with extracting the animators + animations, because I'm pretty sure it's doable, I just have no clue how.
500 notes
·
View notes
Text
*Pay Attention - Part 2 - Tutorial*
I was about to go back to my business and quietly leave y'all with a word of wisdom but the very next package I opened raised my hackles. So here we go, hold on to your seat.
Disclaimer for younger/sweeter - followers - this has language in it because I'm pissed... I apologize in advance.
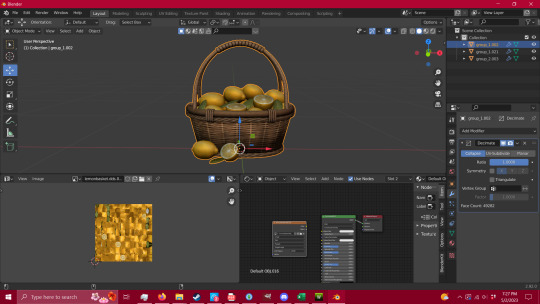
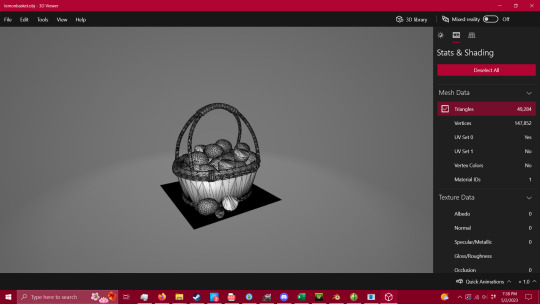
49,282 Polycounts. That's 50K for a fucking basket!!!
It's pretty, it's beautiful, and I downloaded it because it's everything you could want out of a basket of lemons... whoever created it did an outstanding job... for a movie production.
NOT PC GAMES.
So let's fix it - and let's hold our creators and converters to a higher standard or send them along to a different platform where they can create without our bitching.
First off, there's 3 or 4 ways you can check polycounts.
1 - TSRW under Mesh tab
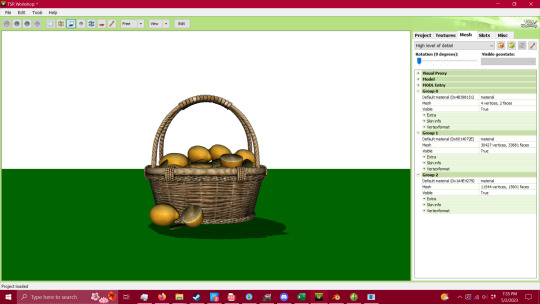
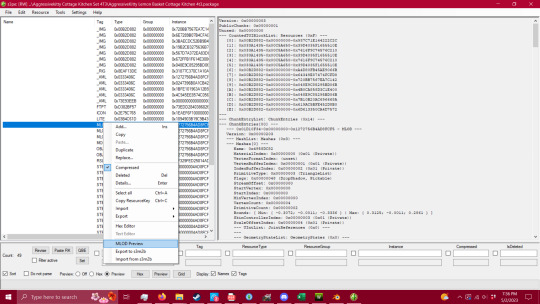
2 - S3PE (Pretty sure you have to have an addon to do this - I'll try to find it when I'm done and add the link) Under MLOD, right click and go down to Preview. It'll open up a window and you can view the model and the polycount.

3 - 3D Viewer on your computer
4 - Blender or Milkshape

Now that we have the ability to check our polycount - we're gonna fix this mesh. I'm not going to show you how to package it, there are other tutorials for that part, but this is VITAL to having a healthy game, and honestly, being a creator or converter for this game. I do understand that you have to have the knowledge before you can fix a problem, so here it is - literally handed to you in a basket. I also understand that there are creators/converters who don't post polycounts because they're afraid people won't download it - that is inexcusable. If that's the case then you will eventually be boycotted by the players who know better.
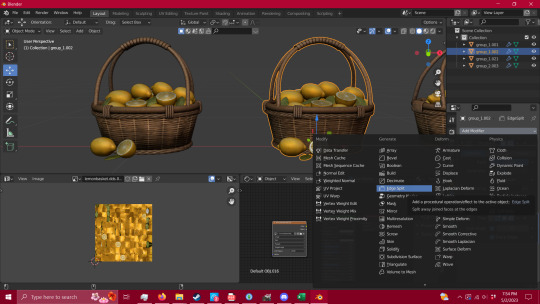
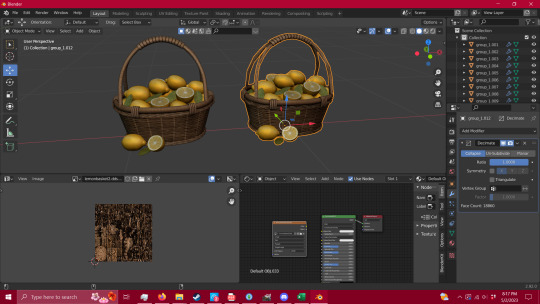
Alright, so step one - you're going to want to get into blender after exporting your mesh. You're going open the modifier properties and add a decimate modifier (the wrench circled in red, and the add modifier drop down menu).
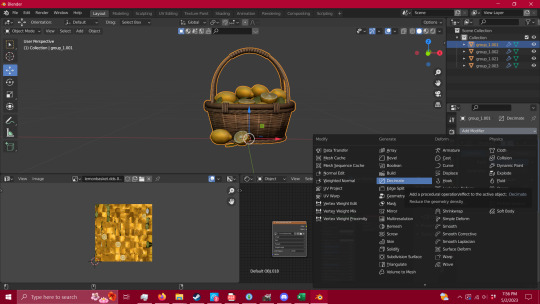
Keep it in Collapse, not un-subdivide. It's gentler on the mesh itself and you'll get a lot farther with it. You're also going to want your UV map to match what you're doing with your mesh, in case you need it for selection (I'll explain that in a minute) and have faces tagged so the selection is easier.
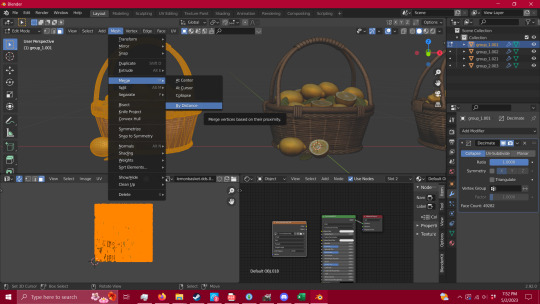
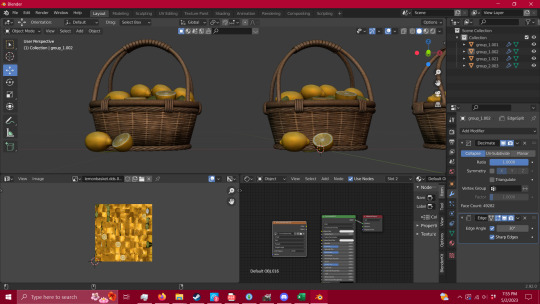
Now that you have that set up, you're gonna want to remove unnecessary vertices. See the shadows on the bottom of the basket? Here's how to fix that - hit tab, press A to select everything, and then go to MESH/MERGE/BY DISTANCE. This removed 16,900 loose vertices that didn't need to be there.
Go back to your modifiers and add an edge split modifier and hit apply.
Boom - no shadows.
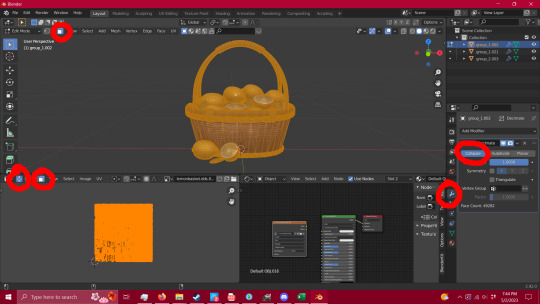
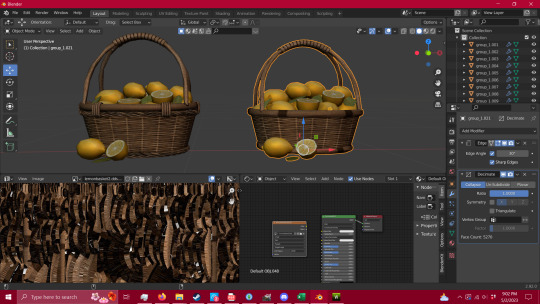
Now that that is all done you're going to go in to edit mode (tab) and press L while hovering over what you're wanting to select. This is going to select all of the islands in your UV, and it's the fastest way (that I've found) to quickly select pieces of your mesh.
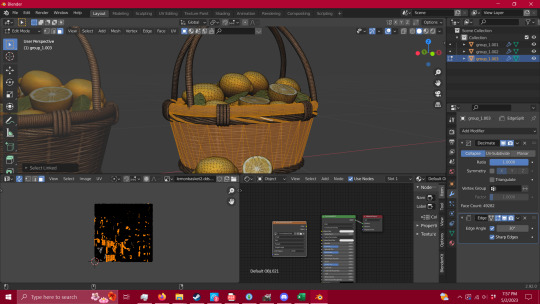
When you have your whole group selected (you can also figure out at this point what pieces need alternate textures or groups for TSRW later in your packaging process) you're going to hit P-Selection. That's gonna split whatever you have selected into a separate group.

Now, you can do that to however many pieces you see fit, but for this I'm just gonna stick with two - the lemons and the basket itself. You're going to click the blue Ratio box - and type in .5 and hit enter. That will collapse your polycount in half - (you can move that ratio box lower if you wish, but this way is the gentlest way possible and I've gotten better results. So play with it and see for yourself if you wish to. ) - Now repeat the process until your mesh starts to lose quality, I tend to stop there unless I can push it a bit further without making it look bad.
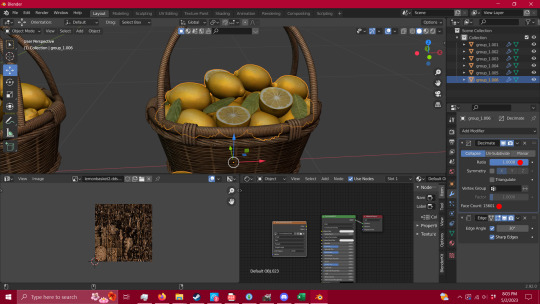
Now repeat that process with all groups.
Given that this particular mesh was such high polycount and an intricate mesh, I could only manage to get it from 49,282 faces (polys) down to 18,860. This is absolutely not okay for TS3 - and I'm using as a lesson rather than using something that I can get down to an okay level - because this is what you're going to run into when getting meshes that start in the tens of thousands of polys. THIS IS NOT MEANT FOR TS3, it's beautiful, yes, but you are putting people's equipment at risk by advertising a mesh for a 13 year old game without disclaiming that it's dangerous for it.
This tutorial will absolutely work for most objects, and I've used this process for a couple of years now with success, but you have to be able to decide what you're willing to put into TS3. We have all of these tutorials for reducing lag in this old as dirt game, but NONE of that matters if you're carrying objects like this - no matter how pretty they are.
If you need it that bad, figure out how to make a version of it that CAN look as good as this with a little less detail (think the spirals in the wicker that is actually meshed rather than just textured), or ask a creator to make something for you.
If you have any questions, please feel free to ask. If I have the time, I try to help whoever comes into my inbox. If I can't help, there is a hoard of creators out there that probably can.
So have fun, CHECK YOUR CONTENT, and keep your computer safe.
And creators/converters - do better.
Edit to add - to the creators/converters who do put out their polycounts, or a disclaimer of high poly/photo use only - thank you. I do understand the need for high poly objects for photo-op purposes, and I'm not here to attack anyone's preferred gaming style. I just want people to be safe while they play, as there are those who don't know what they're putting into their games. Let's help ensure that everyone has a chance to play whether they're experienced creators or regular game-players.
Edit to add 2 -
To add a bit of context - I was able to get the reduced mesh even further by removing some of the intricate details of the mesh, to create a simpler version. This is now down to 5,270 - and it could be lowered even further by removing the top of the handle - which is 1700 by itself because it's spiraled. So when you're dealing with a high mesh object such as this, pay attention to what's really adding weight, and if you can replace/remove it without taking too much away. The shadows can be fixed in gimp as well.
308 notes
·
View notes
Text
Mini-tutorial: how to fix TS2 CC opacity issues
This method is mostly used to solve hair transparency problems, but will work for basically anything else that's using alpha blend mode. Glasses, window panes, flower vases, shadows, light patterns etc.
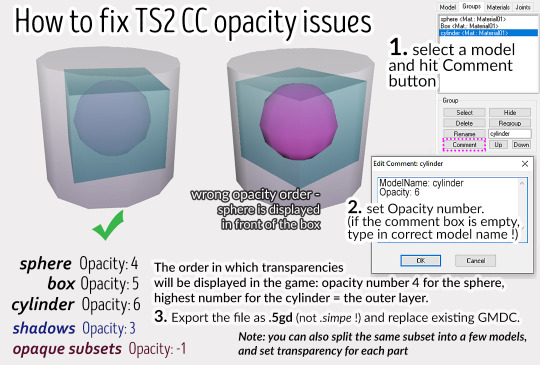
You need a 3D software with GMDC plugin, like Milkshape. Import GMDC you'd like to edit. If it's a simple decor object you can import .obj model and add missing comments (because .obj format doesn't store those). BTW make sure sharp eges are split before exporting stuff directly from Blender as GMDC.
When editing Comments, pay attention to spacing! It's also worth to mention that if you merge models, Comments also get merged and need to be cleaned up.
It's crucial you export your file as .5gd format, not .simpe - as my Milkshape seems to do by default. GMDC exported with .simpe extension can carry unfixable transparency glitches (or at least I didn't find an easy way to fix it).
180 notes
·
View notes
Text
Stuck at making mirrors? A tiptorial..
I discovered something while pulling my hair out of frustration in creating a custom mirror in TS3.
So the usual flow in creating mirrors is to clone a mirror (preferably a base game one), replace the mesh with your self-made or converted mesh while keeping the mirror group, resize the mirror group accordingly, assign bones if needed, import your mesh, edit textures and catalog info, then export and test in game.
Usually having the w values (more info here) untouched results in mirrors reflecting the backside and is usually resolved by setting the w value with negative values or just zero. The reflection will show up just fine.

However...
Once you rotate to a certain angle, some reflected objects disappear from view (example in left, right one is the vanilla base game mirror showing reflected objects normally).
It seems that the 1x1 base game mirrors are the culprit! Cloning any of them will produce the same result.

Avoid cloning them at all costs, and clone the 2x1 ones instead:

I cloned the 'mirror wall contemporary' and followed the same procedure. If you want your mirror as a single tile object you can just adjust the footprint to 1x1 (tutorial here, go instead for the predefined width x depth section and select 1x1). This will result in a mirror showing the correct reflections without even touching the w values!
I hope this helps!
ADDENDUM 28 OCT: Some EA mirror meshes have visible faces on both the front and back sides, that will most likely cause the "backside reflection" error ingame. Below is an example of how the mirror mesh is shown in Milkshape:

It will be resolved by removing the faces on the back side of the mesh (illustrated above, the back side is selected in red), so that only the front face will be rendered. So in other words, make sure the mirror mesh faces only the front side so that it will render properly ingame.
56 notes
·
View notes
Text
Sims 2 Render Tutorial
Welcome to yet another sims 2 render tutorial; this one aims to be comprehensive like bruised-pixel’s, yet easy to understand for those who are not so familiar with blender like I was when I started out. This is also for those who would like to follow along a written (with pics ofc) tutorial if following visually is way too daunting. My information comes from my own experience, my good friend @simminglytimeladies’ tips she’s handed to me along the way and various Youtube videos.
Best of luck to those who choose to follow my tutorial :D
103 notes
·
View notes
Text
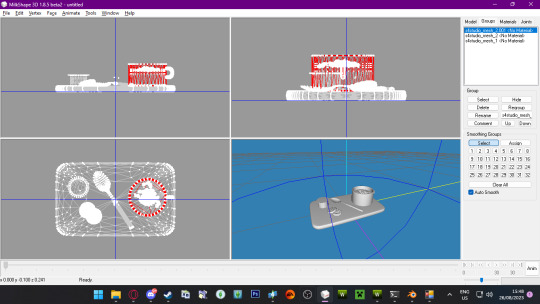
Short tutorial on how i put textures on glass TS3
So i was thinking a wile back this might help some creators/converters when it comes to glass textures
well in this tutorial im gone convert a object with a glass object and texture on it
Step 1:
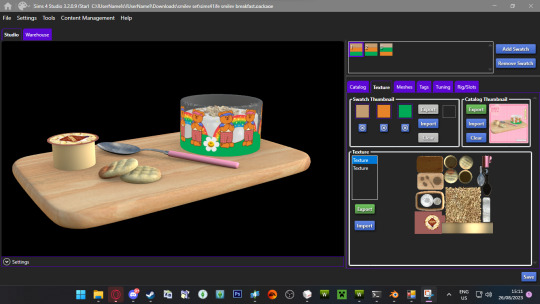
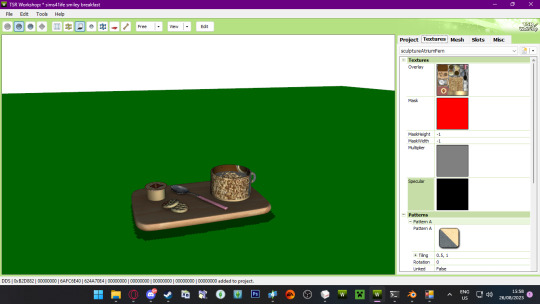
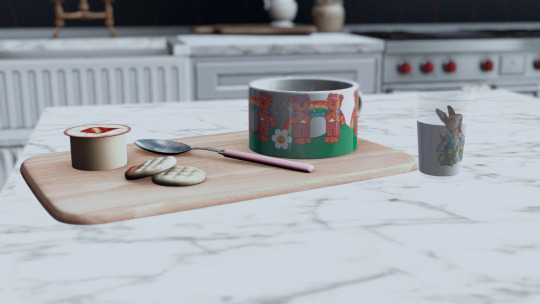
okay so this is the object i gone convert yours might be different ofc but you see the object of mine has 2 textures.
Texture one for me has the small object on the bords textures like the cookies and spoon exsport it!
and texture 2 has the glass objects texture as shown in the image bellow
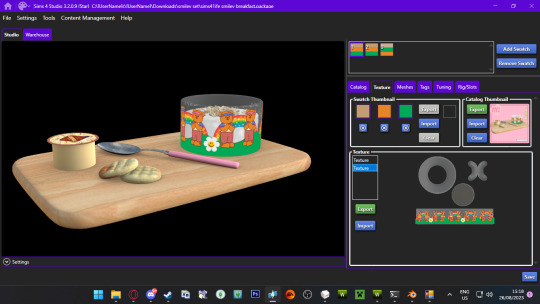
Export it aswell just as it is!
note some objects textures might be just one texture but its okay! just exsport and work with it! :)
STEP 2:
After you exsported your mesh from S4S (sims 4 studio) open it in blender
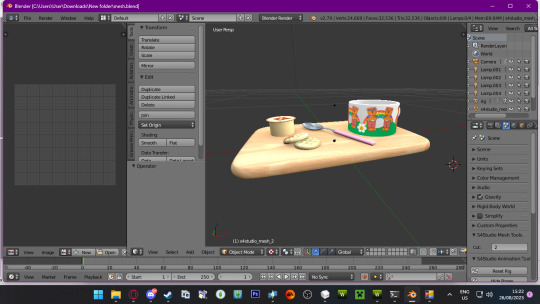
it will look like this ones it in blender now what i gone do is find the glass part of the object and duplicate it
now you can export it out of blender ;)
STEP 3:
Now open TSRW
So sins this is a small decor object i gone use a plant mesh as my reference but we need a specific one so the mesh looks fine in game with its glass texture
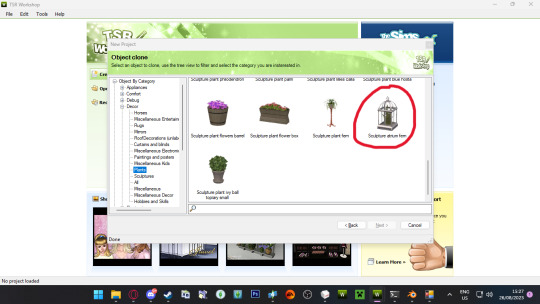
pick the refence plant called Sculpture atrium fern i recommend using this as a reference when making small decor when having a glass mesh in the object
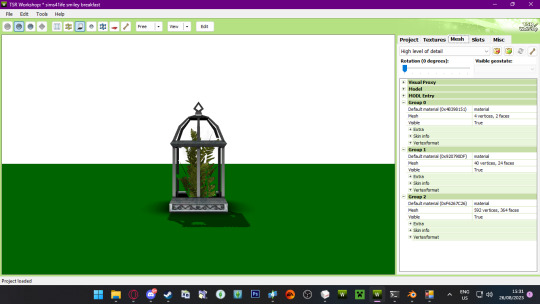
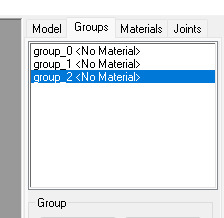
now it has 3 groups
group 0 (shaddow map)
group 1 (glass group)
group 2 ( and the other parts of the mesh thats not glass)
now i normally delete my shadow group sins i dont use it with my cc but you dont have to if you dont want to
now sins i deleted my group 0 i have no shadow group and only 2 groups is left
now its
group 0 (glass group)
group 1 ( and the other parts of the mesh thats not glass)
i am gone duplicate group 1 and now i will have 3 groups and remember to rename the 3rd group as 'group 2" and as you remember you made 3 groups in blender where there was only 2 groups before sometimes there is more depends really but for me there was 2 groups of meshes now there is 3 after i duplicated the glass mesh
remember to rename the 3rd group as 'group 2"
export your mesh as a .wso object!
STEP 4:
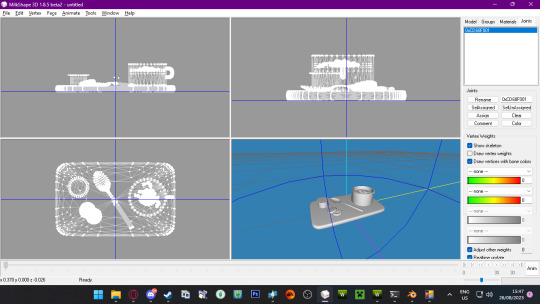
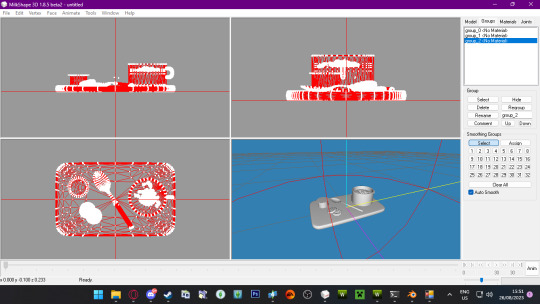
Open milkshape and import your mesh you just exported out tsrw
your mesh will now look like this delete all the groups and you will see the blue bubble thing well thats a bone that will not be deleted go to the joints tab and you will see this
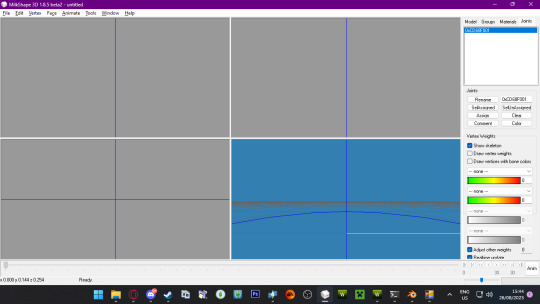
some numbers thats just the bone name if im right DONT MESS WITH IT keep it as it is just click on 'draw vertices with bone colors'
thic the box next to it and it will turn blue :)
NOW you can import you mesh you exported from blender that is a ,obj file
now you can check what mesh you are on by just pressing select on the group and it will turn red in the 3d view
like i can see im on on of the glass parts now but aside from that
now its time for renaming
simple just rename them as this :)
after that click on Edit>Select All and you will see all your meshes has turned red in the 3d windows
like this and go back to joints tab and click on assign your mesh will turn yellow now thats good! that means you have done good so far :D
and you have done it right!
now you can export your mesh out as a .wso object
STEP 5:
Now go back to TSRW and now you almost done yay!
After you imported you mesh just import your textures as normal
might look weird but we gone fix that!
now go back to the mesh tab and click on group 0 and click on the 3 little dots next to materials
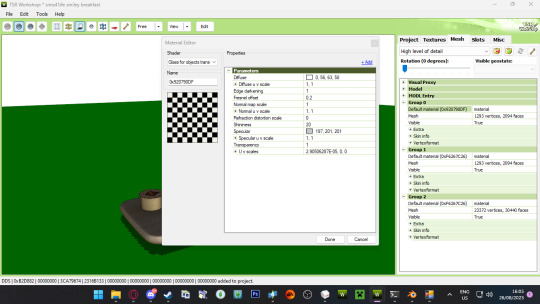
click on the arrow down by diffuse and change the numbers to "65,65,64,100" in the little boxes as show below

click done and if there comes a pop up just click on yes
but then you see nothing has changed dont worry its only the glass texture you fixed we gone add the texture on the glass now
now click on group 1 and then on the 3 dots again
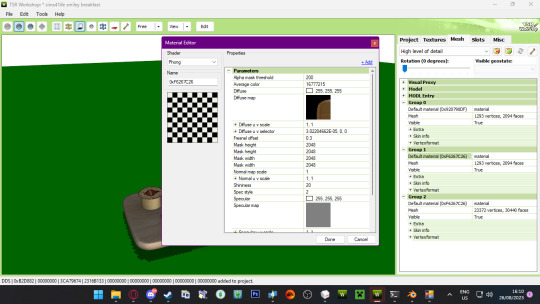
this will open click on where there stand phong and a menu will drop down here is a tutorial where i showed how to add 2 textures on a mesh but i will show you here anyway aswell
click on the drop down and click on phong alpha and a pop up will appear and click yes, click on phong alpha again and change it back to phong and click yes
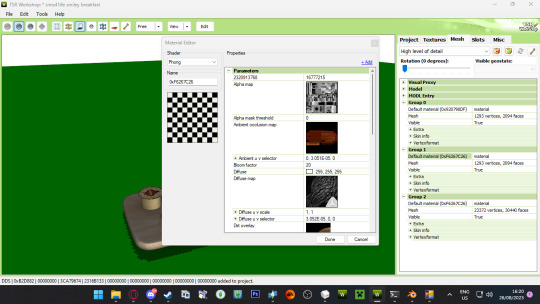
it will look like this and delete alpha map, ambient occlusion map,dirt overlay,normal map and sparkle cube
now click on diffuse map>edit and import the texture thats gone be on the glass
and when thats done click done and 2 pop ups will appear just click yes to both
and now it will look like this!

perfect!!
the same needs to be done for medium level of detail
Now test it in game to see how it looks!
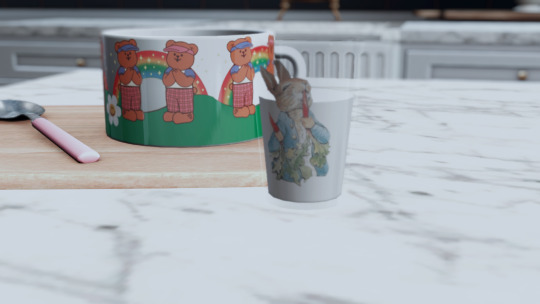
this is mine in game not gone lie its not looking perfect but i gone fix that latter but the glass next to it was also made this way and it come out perfect ;)
hope this help some people out
81 notes
·
View notes
Text

Full disclaimer to begin with. This is just how I do conversions. There are no doubt other ways, possibly even better ways to convert objects, but this is the way I know how. This post is going to be long and image heavy and I am going to walk through it slowly so nothing is missed. If any of it is still confusing once you've gotten through it, feel free to send me an ask and I will answer to the best of my ability. Part One of the tutorial under the cut!
Programs You Will Need (and links where you can find them):
SimPE
Sims 4 Studio
Blender
Milkshape
Not Strictly Necessary, But Certainly Nice To Have:
The Compressorizer by JFade or @lazyduchess edit which can be found here
A Photo Editing Program - I use Photoshop, but GIMP is a completely free, open-source program and it would work just as well for recolors or texture editing.
Now onto the tutorial!
Step One - Launch Sims 4 Studio. If it is your first time launching Sims 4 Studio or if you had launched it before without maybe knowing what to do, click on "Settings" and make sure everything is pointing where it needs to.
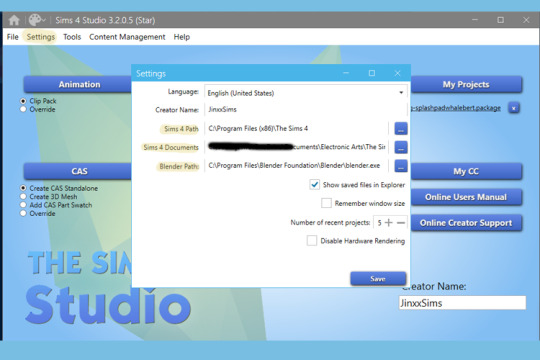
If it's not, the objects from the Sims 4 games, EPs, and kits you own won't show once you get into the studio. Once you've adjusted the paths, hit "Save."
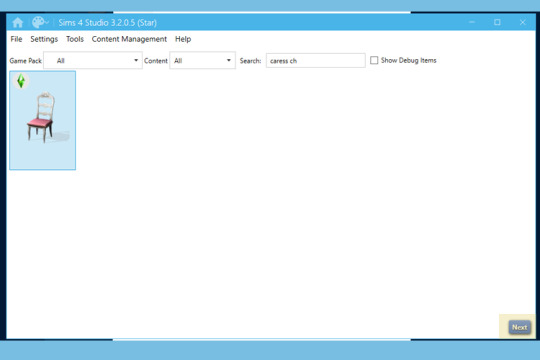
Step Two - From the main screen of Sims 4 Studio, select the "Object" header.
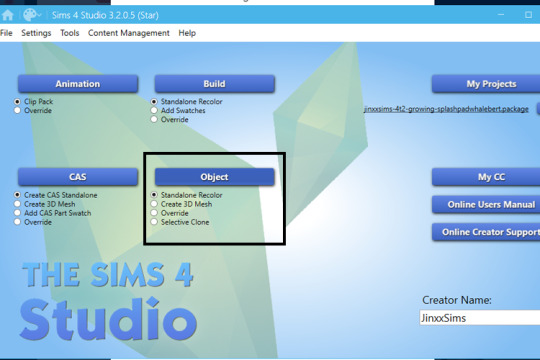
Leave it on "Standalone Recolor." Once you hit the "Object" header, the studio will begin loading all the Sims 4 meshes in your game. It will just take a few seconds for the objects to populate.
Step Three - Choose the object you want to convert.

You can use the "Game Pack" or the Search fields (which I highlighted above) to narrow down the items instead of being bombarded with all of them at once. For this tutorial, I'm going to be converting the "Caress Chair" from the Base Game.
@sims4t2bb is the most amazing database of 4t2 content. Here you can find the various packs and kits and see what has been converted already, so you don't end up converting something that's already out there available for download. Seriously, this is an amazing resource. @lafeeverte-sims and @twentyfourfirst-sims update this database in practically real time. I don't know how they do it. This is easily one of the single greatest resources for the 4t2 converters out there. Bookmark it and check it often.
Step Four - Select the item you're going to convert and hit "next" down in the bottom, right-hand corner.
Once you've clicked "next," you'll be prompted to give your file a name and choose where to save it. THIS FILE IS USELESS. It will not be used at any point during the conversion process. In fact, you can delete it the moment Sims 4 Studio creates it. If having a lot of files around confuses you more, get rid of it right away.
For my own part, I keep it around because I have the short term memory of a goldfish. I use it to set up what I'm eventually going to name my mesh file. So in this particular instance, I named this pointless file jinxxsims-4t2-base-caresschair because it is the Caress Chair and it is from the Base Game. I know, super original, right? It works for me though.
You could name this thing xyz, it wouldn't matter. As I said, the file is never going to be used. Give it a name, hit "save," and Sims 4 Studio will spend a few moments getting the file up and ready.
Step Five - It's time to gather the components of the object. First, let's get the mesh.
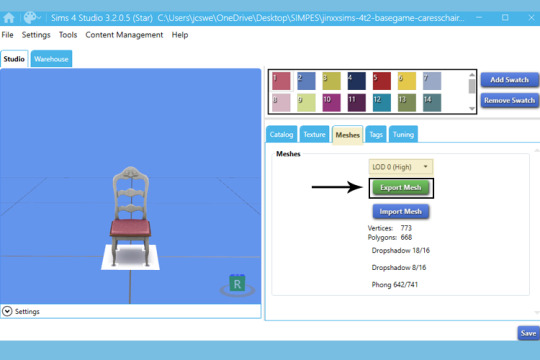
Choose the "Meshes" tab. The LOD 0 (High) field should already be selected. Don't change it. Finally, choose "Export Mesh." You'll be prompted to give your mesh a name. I always just name mine "mesh," because I want there to be no doubt about what files I have floating around in my WIP folder.
Once you click "save," the game will spend a few seconds extracting the mesh as a blender file. Once it's done, go to the "Texture" tab.
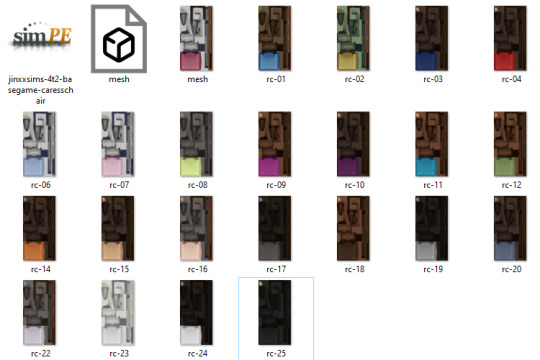
Step Six - Gather the textures.

Highlight one of the color swatches at the top of the window. The first one will always be the "mesh" color. Click "export." You'll be prompted to give your texture a name. I always save the first one as "mesh."
Click on each swatch and extract the textures the same way. You will be prompted to save each swatch when exporting them. I name all of mine in the simplest way possible.... rc-1, rc-2, and so on.
KEEP IT SIMPLE. Especially when just getting started. Feel free to get fancy once you get the hang of things, but when starting out... simple is best.
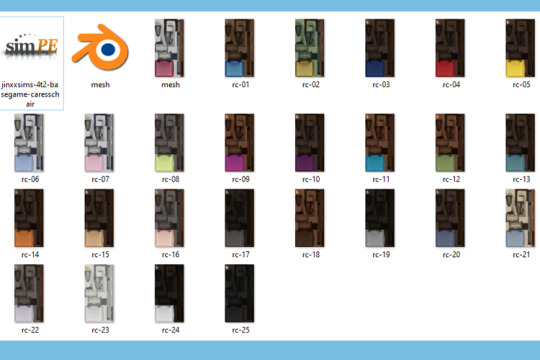
This is what my WIP folder looks like after I've exported all the textures. Regardless of what you're converting, yours should look similar.
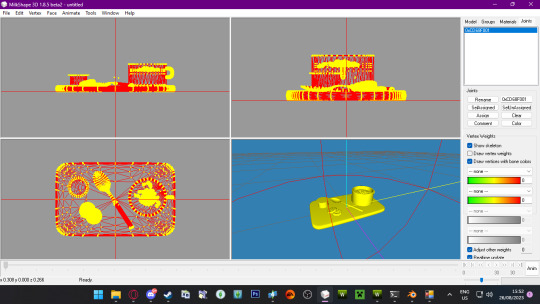
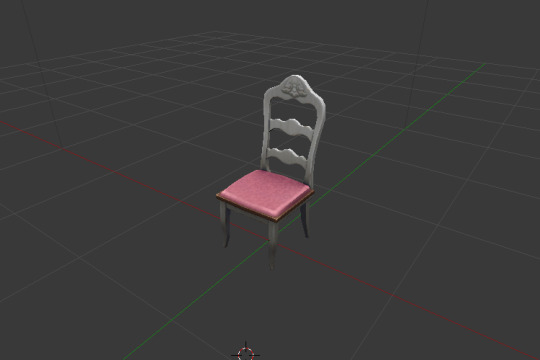
Step Seven - Double-click the "mesh" file to have it open in Blender.
Full disclosure. Blender absolutely baffles me. I know there are people who can create objects from scratch in it and do other, all kinds of impressive things, but... that is not me. I use it for roughly sixty seconds, just to get the mesh in a format that Milkshape will accept, and that's it.

The first thing we need to do is eliminate the white boxes beneath the chair until the only thing left is the mesh. On the right hand side of the window, there are listings of what the mesh is currently composed of. "s4studio_mesh_0," "s4studio_mesh_1," and "s4studio_mesh_2." Next to each, there is what looks like a little eyeball. Click the eyeball and what that part of the mesh is will disappear.
In this case, when you click the eyeball next to "s4studio_mesh_0," the big white box disappears.

So, we know that "s4studio_mesh_0" is really just that white box. Go ahead and delete it by right clicking "s4studio_mesh_0" and choosing "Delete" from the drop-down menu.
Next, click the eyeball next to "s4studio_mesh_1" and the tiny white squares under each leg disappear, so we know that that layer of the mesh is just more white boxes. Right click "s4studio_mesh_1" and choose "Delete" from the drop-down menu.
You're left with just the mesh on its own, and that's perfect! In my experience, the white boxes are almost always on layers 0 and 1 if there are 2 sets of white boxes.
Step Eight - Export the mesh as an OBJ.

Go to File > Export > Wavefront (.obj)

A panel with settings will appear on the left side of the screen. Leave the default settings, but uncheck "Write Materials" beneath "Include UVs." If you leave it checked, that's ultimately fine. All it does is create an unnecessary file in your WIP folder. I uncheck it because the less unnecessary files you have floating around, the better, because there's less of a chance of confusing yourself.

Set your file path to your WIP folder (that's the black line in the image above) and give your mesh a name if you want to rename it (I just leave mine as mesh) and then click "Export OBJ." Once you've done so, you can exit Blender and delete the Blender file that Sims 4 Studio created.
This is what my WIP folder looks like now:
Step Nine - Launch SimPE. Once the program has opened, launch the Object Workshop. I have mine in a side panel, but you can also launch it by going to Tools > Object Creation > Object Workshop. When the Workshop launches, it will ask you to choose between "Start" or "Open...".
"Start" is for cloning and recoloring Maxis objects. "Open..." is for cloning and recoloring custom objects. When doing conversions of things like chairs, tables, beds, etc., choose "Start" and clone from Maxis objects. Clone from "Open..." when creating objects Maxis doesn't really have in the catalog... like the sprinkler I just shared, the single-tile workout bags I shared, or like an end table with multiple slots when you don't want to add the slots in yourself.
Since this is just a basic dining chair, we're going to choose "Start." This will take a little while for SimPE to load the whole Sims 2 catalog. Just be patient. When it's finished loading, you'll be presented with a list that looks like this:
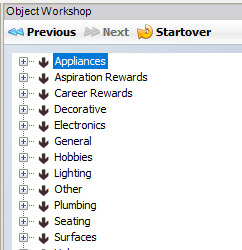
In this instance, I'm going to choose "Seating" and then "Dining Room" since I'm converting a dining chair. This will make sure that the chair I'm converting has all the functions of a dining chair... like it will be pushed in under a desk or a table rather than be stationary like a living chair.
How do you know which object to clone? Honestly, sometimes it's a bit of a crapshoot. IgnorantBliss on MTS has compiled a list of easy-to-clone objects here that you can download and reference when cloning. I used it A LOT when I first started converting.
When you select an item to clone, most of the time it will tell you which EP it is from. I think it's generally most accepted to clone from Base Game items if there is a Base Game item available to clone from, because the most people will be able to use it, but in my own personal opinion... at this stage in the game and time, clone whatever works for you. The Sims 2 is abandonware. Everyone who wants to play the Sims 2 has access to the full game, with all its EPs for free.
OldGamesDownload works in partnership with the Internet Archive to preserve games that have been abandoned by their creators and keep them available to the public. All Sims 2 (and Sims 1!) games can be found on their website, free of charge.
I say all of that just to say... if you clone a dining chair from Apartment Life rather than the base game... that's fine! You're not obligated to meet everyone's needs, and if someone doesn't have Apartment Life but really wants your dining chair, the means to get it are out there. Create for yourself and your own convenience first.
For this tutiorial, I'm going to clone the base game dining chair "Tea Party in Teak." Once I've highlighted it in the list, I'm going to choose "Next" at the top of the Object Workshop panel.
Step Ten - Clone the object. Under "Task," choose Clone in the drop down menu. My settings look like this:

Once yours match, choose "Start."
This will bring up a panel for you to choose the name, price, and catalog description for your item. Notice how I never told you to close Sims4Studio? That's because I go back to it now to copy the information from Sims 4.
In the Sims 4 Studio window, choose the "Catalog" subheading and copy the information over to SimPE.


I always add a line beneath the description with my screenname. If I'm converting CC from Sims 4 rather than EA content, I also always include the original creator's name. I would encourage others to do the same. This way, if there's a problem with something you shared, people know who to contact. Or, if someone gets a WCIF for an object you shared, it's easy for them to know who the maker is to help a fellow Simmer out. And if you convert someone else's object, it's just in good taste to give them the credit they are due.
Once you've given your object a title, price, and description, click "Finish" in the Object Workshop. You can also close Sims4Studio at this time.
Step Eleven - Finish preparing the clone and save your mesh.
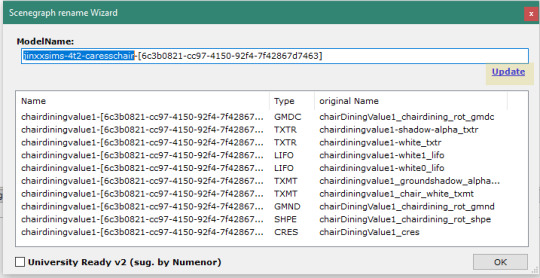
The Scenegraph rename Wizard comes up after you hit finish. In the ModelName field, give your object a name. Not everyone does this, but I do, for neatness and clarity's sake. Once you've given it a name, click "Update," and all the values in the field will be adjusted.
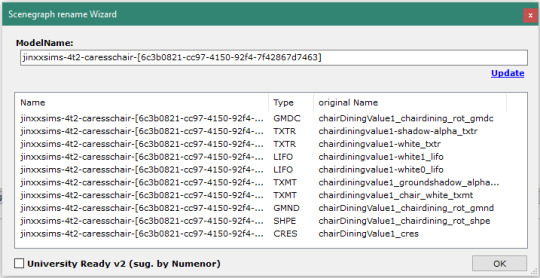
Ta-da! Click "OK" and you'll be prompted to save your mesh. This is when I use that dummy file that I said you could delete immediately from Sims 4 Studio. I click it so it automatically names my new save, then I add -MESH at the end.
In this case, my save file is now jinxxsims-4t2-basegame-caresschair-MESH. I always do all capitalized "MESH" because I think there's less of a chance of anyone deleting the mesh accidentally when it's there all big and bold.
Click "Save" and SimPE will create the file for you. If you hung on to the dummy file like I did, at this point, you can delete it.
And that's where I'm ending "Part One" of this tutorial. I will work on "Part Two" which will take you the rest of the way through conversions later today and hopefully have it up tonight or tomorrow!
149 notes
·
View notes
Text
How to Divide an Object into Multiple Subsets in Milkshape 3D
i made my very first ever tutorial!! on how to divide an object into more than one group or subset in milkshape. this is v handy for when an object originally has one subset, but you want to make two recolorable subsets. 💕
is this helpful to anyone?? idk i hope so lol.
i did a quick written doc too, if that's more up your alley. it's more simplified than the video, but you still get the gist i think.
youtube
#sims 2#ts2#ts2 tutorial#sims 2 tutorial#creator resources#posts this and runs tf away LMAO#this makes me feel perceived and i hate it sdfmnsdfd#but idk if there's a recent tutorial on it? idk i hope its helpful to someone out there#Youtube
78 notes
·
View notes
Last Seen Blogs