#editwithsimpe
Explore tagged Tumblr posts
Visit Tumblr Blog
Explore Tumblr blogs with no restrictions, modern design and the best experience.
Last Seen Tumblr Blogs


Fun Fact
Average visit duration of Tumblr.com is 10 mins and 25 secs.
Note
Hi!
Is there an option in SimPe where I can edit a mod to add a description?
boost!
7 notes
·
View notes
Text
Video Tutorial Here:
youtube
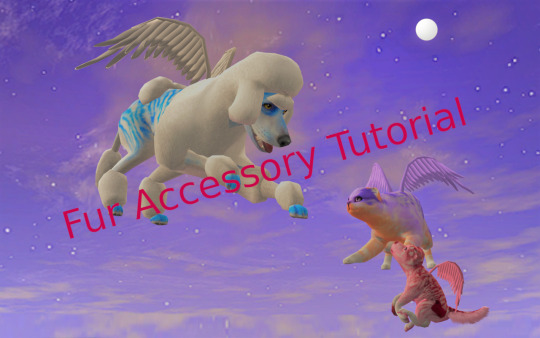
Custom Fur Accessory Tutorial
I have been meaning to put this together for a loooonnnng time, but as there is still a lot of information about the process that is undiscovered, I held off. I didn't have the energy to deep dive and solve those mysteries either, so I just kept delaying and delaying. The circle of procrastination in progress!
It's long overdue though, and even though the mysteries still remain, I am sure there are others eager for even the partial scoop of knowledge I've managed to glean. And also thanks @angelapleasant for helping re-motivate me! I appreciate the patience as I worked through to remember all the steps.
This assumes you already know the main basics of making a mesh and using SimPE, so I won't go over every excruciating detail for this. I personally will be using a cat mesh for this tutorial, but the method is the same for dogs as well (they just have way more meshes/resources).
Tools: SimPE, a mesh editor such as MilkShape, and a photoeditor. I also put together some Custom Pet Genetics Resources, which includes everything pet related I've ever utilized when making pet cc. Everything is separated by cats or dogs, and then sorted even further. For this tutorial, I will be making a cat item, so the resources I'm using will be from there. If you're making an item for dogs, just follow the same steps but using the dog equivalent of each resource instead. I tried to make it organized, but it's probably still messy.
Step 1 - Slaved Vs Recolorable: There are two types of Fur Accessories: slaved and recolorable. I will only go over the process for slaved furcards, but the process for recolorable is pretty much the same except at one part.
• Slaved are my personal favorite fur accessories; they grab their color from that of the pet’s coat color. They don’t require any recolors, just one simple package and they’re all done. The only downside is that they don't have their own textures. Examples of slaved furcards are the furry belly fluff on cats and dogs.
• Recolorable is by far the most tedious of all versions, as it requires an additional recolor of the accessory to be made for every single fur color, and any fur colors that don’t have a recolor made for them will default to white. Do yourself a favor and avoid recolorable accessory furs at all costs. Examples of recolorable furcards are dog beards, dog eyebrows, and poodle fluff.
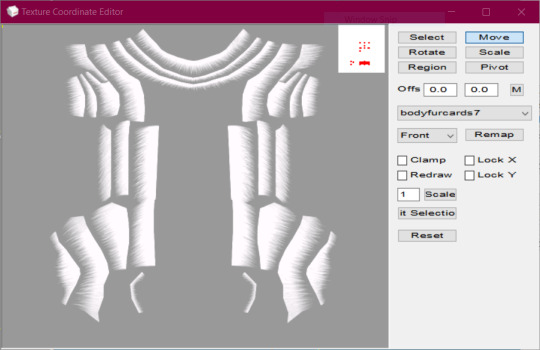
Step 2 - Make the Mesh: Open MilkShape and import "bodyfurcards.5gd" from the zMeshResources folder.* There's 5 groups, don't delete any, just make your mesh on one of the group layers already available. I, personally, put my meshes on the bodyfurcards7 group.

After you've made your mesh, map the textures to "fubodyaccflowingfurcardREMAKE.png" in the zMaterialDefinitions folder. This is from my AccFurCardsTextureOct2018.package, which is a default replacement of Maxis' original body furcard texture. It adds a square in the corner (for the dog equivalent, it adds a teeny tiny rectangle near where the eye texture normally is).
Once you're satisfied with the mapping, then make sure all the comments and joints are correct, and export. As a fair warning, pet weights are super weird, so your mesh might wind up with some strange issues such as morphing or floating.
*There is also a facefurcards version, but my attempts to use that one for custom fur accessories have been unsuccessful. I included it if anyone else wanted to try their hand at it.
Step 3 - Make the Mesh Package: In the zMeshResource folder find the BodyFlowingFurCardsMesh package. Open it in SimPE, Fix Integrity, then Save As under a new name. Then replace the GMDC with your exported Milkshape mesh, and save. Or don't, if you prefer a different way of mesh making. The TRULY important part is the Shape (shpe) file. Click it and make sure it has the correct number of parts in Plugin view. BodyFlowing (Cat) for example has 5 groups, so it should look like this:

Make sure the new mesh is in your Downloads folder, if you haven't already put it there.
Step 4 - Make An Accessory: Open up Bodyshop and make a brand new accessory. To make it easier on yourself, I would suggest choosing an accessory that has only 1 or 2 ages or genders. One age group if you are making a mesh for only adult cats, two if it will be for cats and kittens, etc. That way you won't need to delete unneeded overlays and other resources from the package.
Other than the number of ages, don't worry about anything else. Immediately import the accessory project into Bodyshop, and then close the program.
Step 5 - Clean Out Unneeded Textures: Inside your SavedSims folder should be the new accessory package you just made. Open it, and delete all the Material Definitions (TXMT) and Texture Images (TXTR). The only exception would be if you're making Recolorable Fur Accessories, then skip this step instead and skip step 6 as well. For the Recolorables' case, here is where you would import your recolor. Remember, each fur coat color will require their own recolors of your mesh, which means you will need to make a new accessory in bodyshop for every single fur color.
Step 6 - Link To Furcard Material Definition: Click on the 3IDR resources and let them load. Pick 3IDR, if it has a Resource Node and a Shape listed in the plugin view, perfect. Find the first available material definition line, and change it to the appropriate File type - SubType/Class ID - Group - Instance and delete any material definition lines underneath it.
0x49596978 - 0x08CCE154 - 0x1C0532FA - 0xFF7FC524
It's the same for both cats and dogs for some reason. I also included the "FUBodyAccFlowingFurcards.5tm.xml" in the MaterialDefinitions folder, if you prefer the package method. Repeat for additional 3IDR that have material definitions, ignore 3IDR that don't.
Step 7 - Link Accessory Package to Mesh: If you already know how to link, feel free to jump ahead. While still on the the 3IDRs, pick one that has a Resource Node and a Shape listed in the plugin view. Memorize the chosen 3IDR's instance. I picked the one with an instance of 0x00000801, which is usually the instance for adult female accessories. Click on Tools>PJSE>Body Mesh Tool>Linking Stage. Then select the mesh you made in step 3. Click on any other resource available, then save.
Step 8 - Edit Overlay XML: Click on the XMOL with the same instance as the 3IDR from step 7. As a reminder, I picked the adult female instance of 0x00000801 for this tutorial. Find the family string value, and copy it with ctrl+c and make sure you put it somewhere you won't lose it.
From there, right-click the XMOL and select "replace", then select the "XMOLReference.xmol.xmol" in the main folder. Paste the family value you copied earlier into the new XMOL, then save.
Click on the XMOL again and change the values of any lines necessary. For the Species line use 8 (cats), 2 (big dogs), 4 (little dogs), or 6 (big & little dogs, AKA puppies). For the Gender line use 3 (unisex). For the Age line use 18 (adults & elders), or 20 (kittens/puppies). The Parts line should be 8 or 2 (use 2 for meshes that need to morph and move with the pet's body/face, like the face fur cards). The Category line should be 7, but if they aren't then fix them. Delete the Outfit and Priority line, if they haven't been already. Override0subset needs to say bodyfurcards.
Step 9 - Choose A SubtypexBin: The most frustrating part about pet cc is that they have big limitations. For example, pets can only wear one "collar", and only a small number of custom fur accessories are allowed to be worn at once. You can have as many fur accessories as you want in the game, but if any two fur accessories share the same subtype and bin combo, then they can’t be used together at the same time. Pets can have a total of 10 fur accessories without conflict, but once you exceed 10 eventually some will have to use the same SubtypeXBin combo and thus be unusable together.
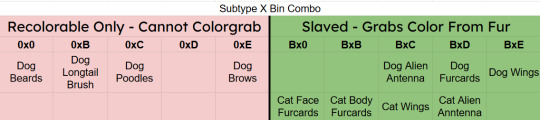
In the XMOL, change the Subtype line to B, if you're making a Slaved Fur Accessory*. If you're making a Recolorable one instead, use 0 as your subtype. Then change your Bin to either 0, B, C, D, or E. Now save.
Depending on your project, I might even suggest you choose a slot already filled instead of a free slot. For example, if you are making a wing accessory then choose BxC (BxE for dogs), or a head accessory that would look terrible with antenna then choose BxD (BxC for dogs), etc.
*There is a way to trick the game into allowing slaved fur accessories to use the 0 subtype. It involves loading the game with the fur accessory as a normal B subtype first, and then changing the subtype after. The game will then use the "old" version of the accessory, but with the subtype permissions of the "new" version.
Step 10 - Repeat Steps 6-9 For Additional Ages/Species: As it says, if you plan on making versions for kittens/big dogs/little dogs/puppies/etc. Have all of them share the same family, so that way they are all connected and can be passed down to offspring.
At the end, each XMOL should roughly resemble this, but with whatever their appropriate values are:

Don't forget to make sure the override0resourcekeyidx is correct for whatever line the material definition is in the 3IDR! ("4" means the 5th line, etc. The first line is number "0", so count the lines then minus 1.)
Step 11 - Delete Cache/Thumbnails/Registry: To quote @angelapleasant who worded it perfectly, pet cc is sticky. The game frequently gets stuck on old versions, and has to be forcibly updated. This stickiness is exactly yeah the subtype loophole mentioned earlier exists, but it can be very frustrating when testing new cc. In your game folder delete the Accessory.cache, Group.cache, cigen.package, ContentRegistry, and Thumbnails folder. Make sure AccFurCardsTextureOct2018.package is in your Downloads folder. Then load up the game, and check out your custom fur accessory.

If it all worked out, congrats! For Dogs if you mapped onto the tiny rectangle, then slaved fur accessory will appear gold with Maxis fur colors but custom colors will work just fine. Recolorable dog accessories on the other hand will require my MaxisAccFurDogFix to work.
I think that's everything, and good luck! Feel free to ask questions or reach out, I'll do my best to help. And if you do wind up making something, please let me know; I love seeing what people create!
102 notes
·
View notes
Note
Hello, I have questions about showerproof accessories. Do you have any tutorials regarding checking the showerproofiness of accessories and/or making it showerproof? Thanks!
Hello, ferryghost!
You can find what you need in Hat-Plays-Sims' simPE tutorial. Information will be in the Category section
7 notes
·
View notes
Note

Hello! I have been converting some surfaces from the Sims 4 to the Sims 2 but I have not yet figured out how to make these surfaces have a "custom" height, that is: the objective is for the small objects to be placed at the height I want. and they do not remain, as in this example, floating :/. If any of you know the answer, I would greatly appreciate it.
I would recommend pforestsims' mini tutorial on editing slot placement.
12 notes
·
View notes
Text
Understanding the Scenegraph
https://modthesims.info/wiki.php?title=Tutorials:Understanding_the_Scenegraph
10 notes
·
View notes
Text
Using this as a reminder that we have similar information on cc optimization avaliable at least on Meshing and Recolouring pages at the very top, titled “USEFUL INFO TO LEARN/UNDERSTAND AT THE BEGINNING“. Those tutorials by Skell might even be easier to use, as they teach to export and import whole TXMT properties, that you can save with distinctive names.
Take a look at least on Texture-less Groups tutorial, if nothing else. There is no need to use empty textures, for any cc, including clothing and hairs, which very often have this issue!


Short tutorial on how to fix a TS2 Buymode/Buildmode CC mesh with two subsets and two identical textures
I still see that duplicated texture thing happen in new CC and it's really not great. Especially that it's so easy to make it right... 😖
Please note this method can also be used to fix recolour files!
197 notes
·
View notes
Text
33 notes
·
View notes
Text
21 notes
·
View notes
Text
#nenna#youtube#tutorial playlist#split levels#change LTW#change screen size#how to export sims#build/buy basics#basements#how to change baby clothes#create L stairs#create U stairs#how to get debug content#play the game#building#download#installation#setting up the game#editwithsimpe
15 notes
·
View notes
Note
Do you know of any good tutorials for making default replacement hairs? The marja one doesn't seem to correspond to my copy of simpe (I may be stupid though) and none of the other tutorials I found were accessible (blocked by the platform, or taken down by the author). Thank you very much.
hey, anon! Unfortunately, the video tutorials were taken down by the owner due to unnecessary and hurtful comments.
I do try to reblog/post tutorials as I find them, however there are not many. I would suggest Mooglesims's tutorial here as it's what a lot of people have used.
If you have any questions, please send them in and myself and/or the community will do our best to help you!
4 notes
·
View notes
Note
Do you know any tutorials on how to make skin overlays?
Hello, anon! Your question is a bit vague to me. If you're asking about mapping textures to TS2 pinketamine goes over that process a bit in this tutorial:
How to create default SUPERNATURAL skins by pinketamin
themeasureofasim has wonderful tutorials that walk you through how to make skin overlay boxes:
Overlay Boxes: A Questionable Tutorial
Understanding Overlays
Hope this helps and if anyone would like to provide other tutorials, please comment here :)
17 notes
·
View notes
Note
Hi, do you know any tutorials that teach how to re-catalog objects?
hi anon!
There is a new program that will do that in bulk by pick-n-mix sims. You can find that here
HugeLunatic wrote a tutorial on changing/hiding objects in a catalog. Check it out here
4 notes
·
View notes
Note
Hi! Dumb question, is it possible to make skin overlays like in Sims 4? As the grey ones which take the Sim's skintone.
Hi anon, first and foremost, great question! Yes, it is possible to make skin overlays. It can be done via an overlay box (tutorials here, here, and here)
If you are looking to update the default overlays for supernaturals, there is a tutorial here
I hope this helps! If there are more tutorials, please comment down below 🤗
6 notes
·
View notes
Note
Hi! I was trying to find an easy to follow tutorial on putting in downloads as default replacements, but I'm not sure where to begin. Any help would be appreciated.
Hi @amybabyssims2 ! Sorry if I don't understand your question, are you asking how to turn custom downloads into default replacements? Or how to install default replacements? You may want to start here at the editwithsimpe page - there are a lot great tutorials. For CAS items, I highly recommend rudhira's tutorials. If it's to install default replacement packages, you'd want to drop those into your downloads folder - just make sure you have one default replacement for each in-game item
If this isn't what you meant, please comment below and we'll do our best to assist you further!
6 notes
·
View notes