
Statistics
We looked inside some of the posts by sirink and here's what we found interesting.
Average Info
Notes Per Post
11
Likes Per Post
11
Reblog Per Post
0
Reply Per Post
0
Time Between Posts
4 months
Number of Posts By Type
Text
17
Last Seen Tumblr Blogs


Fun Fact
In 2020, 44% of users from Denmark used Tumblr daily.
Text
Munich – The Edge of War
Even if you want to keep peace and love with your loved ones, the true fate will make you an enemy of your loved one's just to keep you moving forward to accomplish the true fate or to pay the real price of your old sin.
-Sirin
5 notes
·
View notes
Text
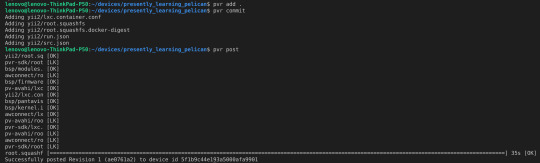
Start using Laravel 7.12.0 on Raspberry Pi3 (RPI3) via Pantahub
Note:Pantahub is the only place where Linux firmware can be shared and deployed for any device, You can signup @pantahub here:http://www.pantahub.com
Make your RPI3 device ready to deploy Laravel 7.12.0 by following 6 Steps
Step 1: Burn the RPI3 initial stable image into your sd card.
a) Download RPI3 image
Click to download
b) unxz the device image
Run $ unxz rpi3_initial_stable.img.xz
c) Burn image into sd card using Raspberry Pi Imager 1.2

Step 2: Boot your RPI3
a) Insert your sd card and supply the power

Step 3: Singup @pantahub here http://www.pantahub.com
Step 4: Download & Install a CLI tool “pvr”
Note: pvr is a CLI tool which can be used to interact with your device through pantahub platform. Note: Using pvr you can share your firmware and projects as simple as with a git tree: Note: Move the pvr binary to your bin folder after download.
Linux(AMD64): Download Linux(ARM32v6): Download Darwin(AMD64): Download
pvr clone; pvr commit; pvr post
To install from github source code:
$ go get gitlab.com/pantacor/pvr $ go build -o ~/bin/pvr gitlab.com/pantacor/pvr
Note: You need “GOLANG” to be installed in your system for building pvr from github source code.
Step 5: Detect & Claim your device
a) Connect a LAN cable between your RPI3 & computer/Router.

b) Open your terminal & run $ pvr scan

c) Claim your device
$ pvr claim -c merely-regular-gorilla https://api.pantahub.com:443/devices/5f1b9c44e193a5000afa9901

d) Log into Panthub.com and check whether the newly claimed device appeared in the dashboard or not.

Step 6: Clone the device to your computer using the Clone URL of your device
$ pvr clone https://pvr.pantahub.com/sirinibin/presently_learning_pelican/0 presently_learning_pelican

Now your device is ready to deploy your Laravel 7.12.0 app
Deploy your Laravel 7.12.0 app to the device by following 5 Steps
Step 1: Move to device root dir
`$ cd presently_learning_pelican`
Step 2: Add a new app “laravel” into the device
sirinibin/arm32v7-laravel-7.12.0:latest is a Docker image made for the devices with ARM32 architecture
You can customise the docker image for your custom Laravel app.
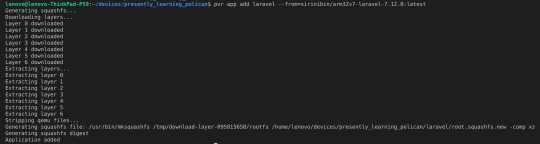
$ pvr app add laravel --from=sirinibin/arm32v7-laravel-7.12.0latest
Step 3: Deploy the changes to the device
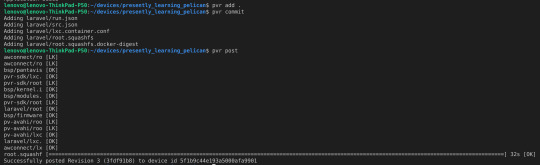
$ pvr add . $ pvr commit $ pvr post
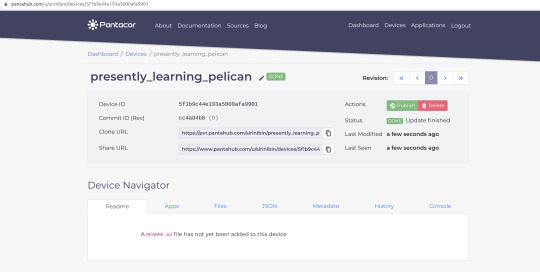
Step 4: Check the device status changes in Pantahub.com dashboard & wait for the status to become "DONE"
Status 1:

Status 2:

Status 3:

Status 4:

Step 5: Verify the “laravel” app deployment
Access the device IP: http://10.42.0.231 in your web browser.
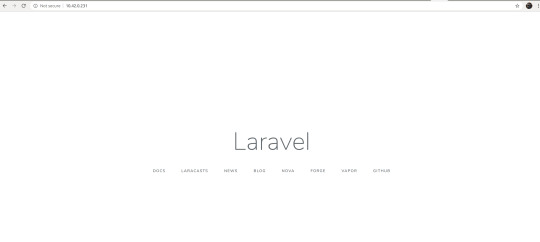
You are done!
2 notes
·
View notes
Text
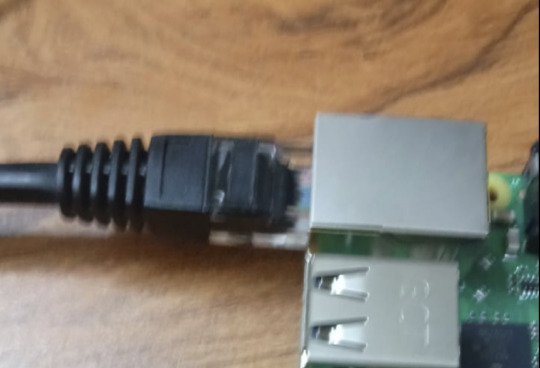
Start using Yii2 in a Raspberry Pi 3 (RPI 3) B+(ARM32) to code & manage it via Pantahub
Note:Pantahub is the only place where Linux firmware can be shared and deployed for any device, You can signup @pantahub here:http://www.pantahub.com
Make your RPI3 device ready to deploy Yii2 by following 6 Steps
Step 1: Burn the RPI3 initial stable image into your sd card.
a) Download RPI3 image
Click to download: https://pantavisor-ci.s3.amazonaws.com/pv-initial-devices/tags/012-rc2/162943661/rpi3_initial_stable.img.xz
b) unxz the device image
Run $ unxz rpi3_initial_stable.img.xz
c) Burn image into sd card using Raspberry Pi Imager 1.2

Step 2: Boot your RPI3
a) Insert your sd card and supply the power

Step 3: Singup @pantahub here http://www.pantahub.com
Step 4: Download & Install a CLI tool “pvr”
Note: pvr is a CLI tool which can be used to interact with your device through pantahub platform. Note: Using pvr you can share your firmware and projects as simple as with a git tree: pvr clone; pvr commit; pvr post
$ go get gitlab.com/pantacor/pvr $ go build -o ~/bin/pvr gitlab.com/pantacor/pvr
Note: You need “GOLANG” to be installed in your system for building pvr from source code.
Step 5: Detect & Claim your device
a) Connect a LAN cable between your RPI3 & computer/Router.
b) Open your terminal & run $ pvr scan

c) Claim your device
$ pvr claim -c merely-regular-gorilla https://api.pantahub.com:443/devices/5f1b9c44e193a5000afa9901

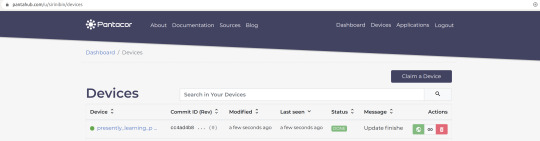
d) Log into Panthub.com and check whether the newly claimed device appeared in the dashboard or not.

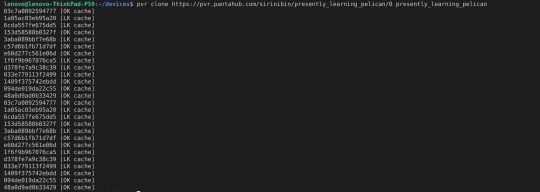
Step 6: Clone the device to your computer using the Clone URL of your device
$ pvr clone https://pvr.pantahub.com/sirinibin/presently_learning_pelican/0 presently_learning_pelican
Now your device is ready to deploy your Yii2 app
Deploy your Yii2 app to the device by following 5 Steps
Step 1: Move to device root dir
`$ cd presently_learning_pelican`
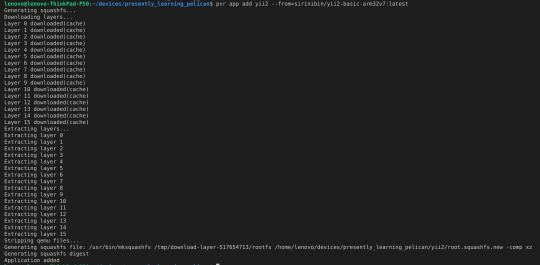
Step 2: Add a new app “yii2” into the device
sirinibin/yii2-basic-arm32v7:latest is a Docker image made for the devices with ARM32 architecture
You can customise the docker image for your custom Yii2 app.
$ pvr app add yii2 --from=sirinibin/yii2-basic-arm32v7:latest
Step 3: Deploy the changes to the device
$ pvr add . $ pvr commit $ pvr post
Step 4: Check the device status changes in Pantahub.com dashboard & wait for the status to become "DONE"
Status 1:

Status 2:

Status 3:

Status 4:

Step 5: Verify the “yii2” app deployment
Access the device IP: http://10.42.0.231/myapp1/web/ in your web browser.
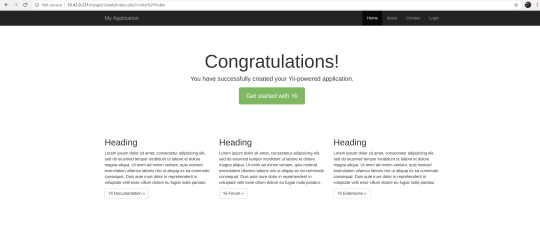
You are done!
1 note
·
View note
Text
Install php7.2-gd extension in your armhf/arm32 Architectured Machine/Docker container
Step 1: Install gdebi
apt-get install gdebi
Note:gdebi will look for all the dependencies of the .deb file, and will install them before attempting to install the .deb file
Step 2: Download & Install php-common
$curl -o php-common.deb http://ports.ubuntu.com/pool/main/p/php-defaults/php-common_60ubuntu1_all.deb $curl -o php7.2-common.deb http://ports.ubuntu.com/pool/main/p/php7.2/php7.2-common_7.2.3-1ubuntu1_armhf.deb
$ gdebi php-common.deb $ gdebi php7.2-common.deb
Step 3: Download & Install php7.2-gd
Reference:https://ubuntu.pkgs.org/18.04/ubuntu-main-armhf/php7.2-gd_7.2.3-1ubuntu1_armhf.deb.html
$ curl -o php7.2-gd.deb http://ports.ubuntu.com/pool/main/p/php7.2/php7.2-gd_7.2.3-1ubuntu1_armhf.deb
$ gdebi php7.2-gd.deb
Step 4: Edit php.ini
Note: Check phpinfo() to get the exact path of your php.ini Note: The default path of gd.so extension is /usr/lib/php/20170718/gd.so
vim php.ini extensions=/usr/lib/php/20170718/gd.so
Step 5: Restart/Reload Apache server
service apache2 reload/restart
1 note
·
View note
Text
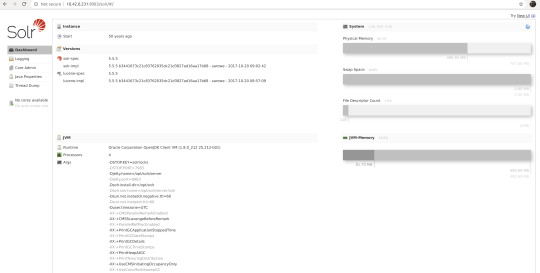
Deploy Solr Search Engine into a Pantahub device(RPI3)
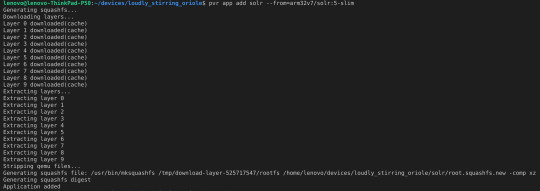
Step 1: Add new app “solr” into the device
$ pvr app add solr --from=arm32v7/solr:5-slim
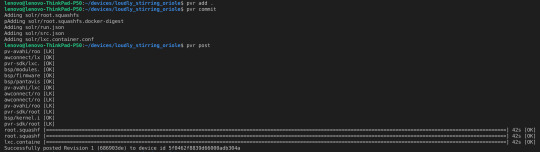
Step 2: Deploy the changes to the device
$ pvr add . $ pvr commit $ pvr post
Step 3: Access the Solr dashboard
http://10.42.0.231:8983/
Step 4: Try creating your 1st Solr Core
a) SSH into the app container “solr”
ssh -p 8222 [email protected]

b) Create a new core
$ cd /opt/solr/bin $ ./solr create -c "core1"
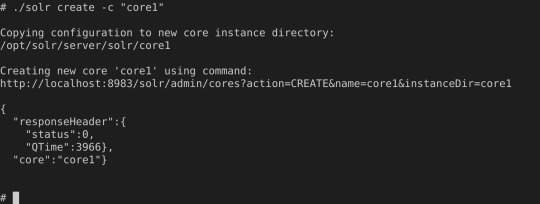
c) Access the Solr core you just created
http://10.42.0.231:8983/solr/#/~cores
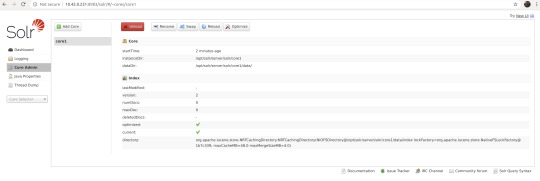
You are Done!
0 notes
Text
Set up LAMP stack in a Pantahub device(RPI3 B+)
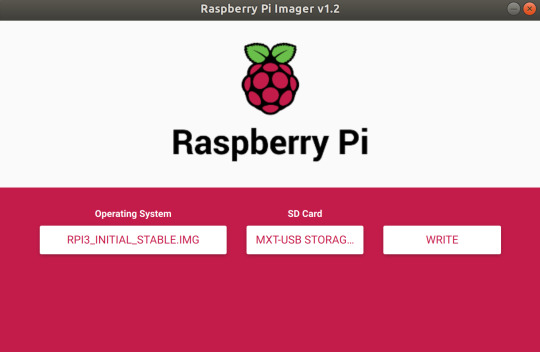
Step 1: Burn the RPI3 initial stable image into your sd card.
a) Download RPI3 image
Click to download: https://pantavisor-ci.s3.amazonaws.com/pv-initial-devices/tags/012-rc2/162943661/rpi3_initial_stable.img.xz
b) unxz the device image
Run $ unxz rpi3_initial_stable.img.xz
c) Burn image into sd card using Raspberry Pi Imager 1.2
Step 2: Boot your RPI3
a) Insert your sd card and supply the power

Step 3: Detect & Claim your device
a) Connect a LAN cable between your RPI3 & computer/Router.

b) Open your terminal & run $pvr scan

c) Claim your device
$ pvr claim -c grossly-pleasant-polliwog https://api.pantahub.com:443/devices/5f0316884f8811000a191ab3

d) Log into Panthub.com and check whether the newly claimed device appeared in the dashboard or not.

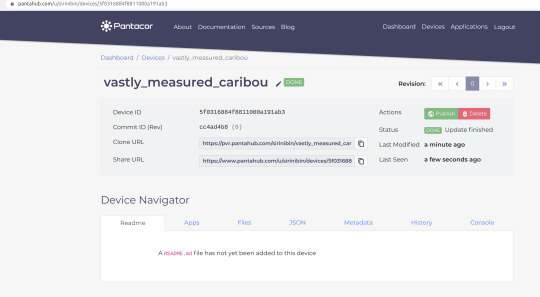
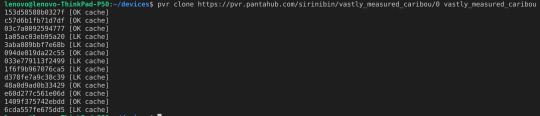
Step 4: Clone the device to your computer
$ pvr clone https://pvr.pantahub.com/sirinibin/vastly_measured_caribou/0 vastly_measured_caribou
Step 5: Add a new app named “apache-php” & Deploy to the device
a) Move to device root dir
`$ cd vastly_measured_caribou`
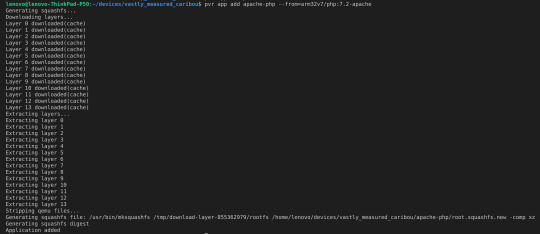
b) Add new app “apache-php” into the device
$ pvr app add apache-php --from=arm32v7/php:7.2-apache
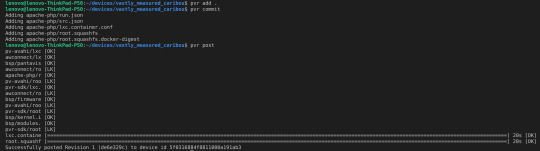
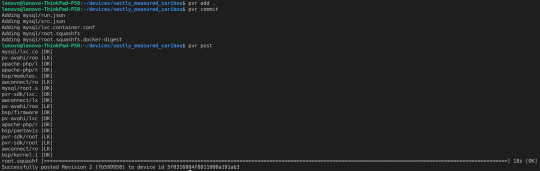
c) Deploy the changes to the device
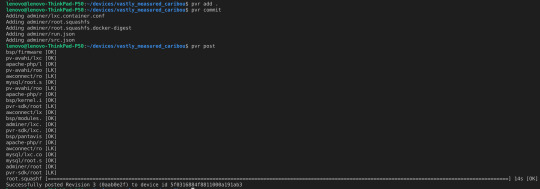
$ pvr add . $ pvr commit $ pvr post
d) Check the device status changes in Pantahub.com dashboard & wait for the status to become "DONE"
Status 1:

Status 2:

Status 3:

Status 4:

e) Verify the “apache-php” installation
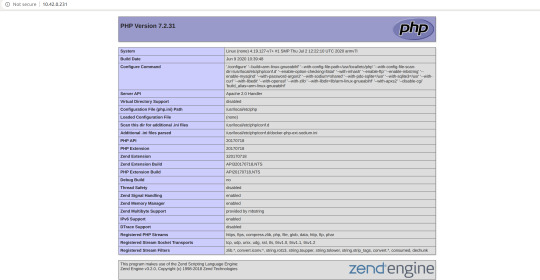
Access the device IP: http://10.42.0.231 in your web browser.

Now you can see that the Apache server is started serving on port 80 in your RPI3 device. But it is showing as “Forbidden” because there is nothing to serve.
Step 6: Serve a php script using the newly installed apache2.4 server
a) Add your ssh key to your device user meta data using pantahub.com dashboard
Note: the key name you should use is pvr-sdk.authorized_keys

b) SSH to the newly created app container “apache-php”
$ ssh -p 8222 [email protected]

c) Install vim editor
$ apt-get update $ apt-get install vim
d) Place a PHP script index.php inside the apache Document Root folder
$ cd /var/www/html $ vim index.php <?php phpinfo() ?>
e) Access your device IP: http://10.42.0.231/ in your web browser
Step 7: Add “mysql” app to the device & deploy the change
a) Add “mysql” app
$ pvr app add mysql --from=yobasystems/alpine-mariadb:arm32v7 --config-json=<(echo -n -e '{ "Env": [ "PATH=/usr/local/sbin:/usr/local/bin:/usr/sbin:/usr/bin:/sbin:/bin", "MYSQL_DATABASE=testdb", "MYSQL_USER=testuser", "MYSQL_PASSWORD=123", "MYSQL_ROOT_PASSWORD=123", "MYSQL_CHARSET=utf8", "MYSQL_COLLATION=utf8_general_ci" ] }')
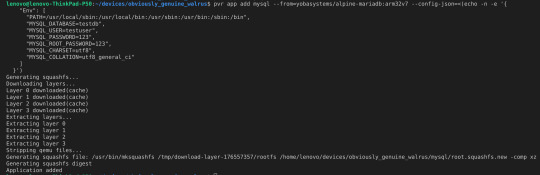
b) Deploy the changes
$ pvr add . $ pvr commit $ pvr post
Step 8: Add “adminer” app to the device for managing the mysql database
Adminer is a dashboard app which can be used to visually manage the mysql database
By default Adminer will be server through port 8080
a) Add “adminer” app
pvr app add adminer --from=arm32v7/adminer
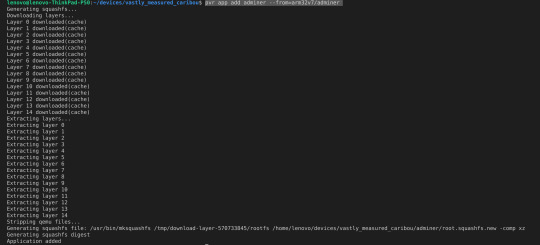
b) Deploy the changes
$ pvr add . $ pvr commit $ pvr post
c) Access the Adminer dashboard by using http://10.42.0.231:8080/

d) Log into the Adminer dasdhboard by entering the below mysql credentials
Server:10.42.0.231 Username:root Password:123
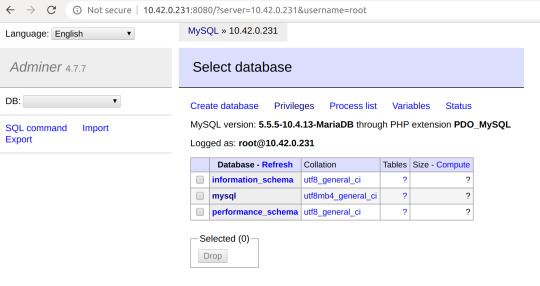
Now you can easily Create/update/delete mysql databases/tables through Adminer Now you can deploy your custom LAMP app source code into the dir: /var/www/html of docker image:arm32v7/php:7.2-apache and update docker image tag in src.json then run
pvr app update apache-php --from=arm32v7/php:<NewTag>
1 note
·
View note
Text
Installing Python3.8 on Ubuntu 18.04
sudo apt update
sudo apt install software-properties-common sudo apt update
sudo apt install python3.8 sudo nano /usr/bin/gnome-terminal Change #!/usr/bin/python3 to #!/usr/bin/python3.8
Now open a terminal and type “python3.8” Python 3.8.0 (default, Oct 28 2019, 16:14:01) [GCC 8.3.0] on linux Type "help", "copyright", "credits" or "license" for more information. >>>
0 notes
Text
[SOLVED]exec: "gcc": executable file not found in %PATH%
This error will popup in windows 10 when you have no gcc installed.
Step 1 : Install MinGW using choco
choco install -y mingw Step 2 : Restart your machine.
0 notes
Text
Set up Golang 1.13.5 in Windows 10 within just 8 Steps
You can follow the below instructions to quickly set up Golang 1.13.5 in Windows 10
Step 1 : Open the Power sell as Administrator
Step 2: Change the directory to home by running cd ~
Step 3: Set the Execution policy by running ,
set-ExecutionPolicy -Scope CurrentUser
Step 4: When asked provide the value “RemoteSigned” Step 5: Install the package manager chocolately
Run $script = New-Object Net.WebClient
Run $script.DownloadString("https://chocolatey.org/install.ps1")
Run iwr https://chocolatey.org/install.ps1 -UseBasicParsing | iex
Run choco upgrade chocolatey Step 6 : Install Go
Run choco install -y golang
Step 7: Close & Re-open the Power shell as Administrator
Run go version
go version go1.13.5 windows/amd64 Step 8 : Create Work directories
Run cd $HOME Run mkdir go/bin, go/src
Thanks -Sirin
0 notes
Text
[SOLVED]Activation of Network connection failed in Ubuntu 18
This is an issue i found when when i connected my RPI3 with my Ubuntu 18 using a LAN cable.
i solved it by changing the ipv4 method from auto to shared
Step 1: Find the UUID of your ethernet connection
Open your terminal and Run “nmcli c show”
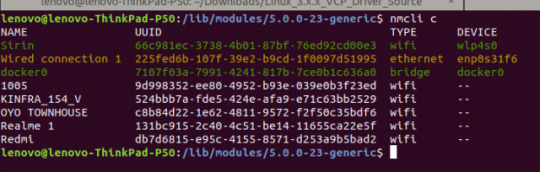
Step 2: Change the ipv4 method from auto to shared
Run “nmcli connection modify 225fed6b-107f-39e2-b9cd-1f0097d51995 ipv4.method shared “
Syntax: nmcli connection modify <UUID> ipv4.method shared

Now you can try re-plug your LAN cable and restart your RPI3 device. it will work.
0 notes
Text
A little Note about Deep Learning
-Invented by Geoffrey Hinton from Google in 1980′s
-What we are trying to do here is to Mimic how a human brain works.
-In Human brain there are 100 billion’s of Neurons. -Each many are connected to 1000′s of its neighbours.
Neuron Representation in a human brain

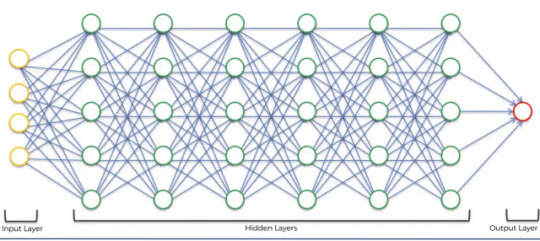
-To recreate this in a computer we create an Artificial Structure called Artifical Neural net where we have nodes or Neurons. -We will have some Neurons for input values which is called input layer.
-we will have a Neuron which gives output and that we call it as our output layer.
-In between Input & Output layers we will have many no.of Neurons that we call it as Hidden layer.
-Input layers connected to the Hidden layer and Hidden layer connected to the output layer. -We will probably have huge no.of Hidden Layers
Basic Structure of a Neural Network in a computer
0 notes
Text
Design patterns in php
Here i’m describing few of the common design patters used in php based frameworks for web development.
1.Factory
A factory is an object used to create another objects , this is a commonly used pattern.In this a class simply creates the object of another class you want to use.
eg: <?php class Automobile { private $vehicleMake; private $vehicleModel; public function __construct($make, $model) { $this->vehicleMake = $make; $this->vehicleModel = $model; } public function getMakeAndModel() { return $this->vehicleMake . ' ' . $this->vehicleModel; } } class AutomobileFactory { public static function create($make, $model) { return new Automobile($make, $model); } } // have the factory create the Automobile object $veyron = AutomobileFactory::create('Bugatti', 'Veyron'); print_r($veyron->getMakeAndModel()); // outputs "Bugatti Veyron"
2.Singleton
The concept of Singleton pattern is that restricting a class to have only one single object for it.
3.Strategy The basic form of Strategy design pattern is achieved by taking the benefits of interface. An interface is nothing but a collection of member functions with same name in different classes with different implementations in it. In strategy design pattern interface is used as a place holder to create instances of any classes which contain the different implementations of the methods specified in that interface so basically what happens here is that in some client classes the interface is used as parameter of a member function and that function is used to create instances of any classes which have the interface function implementations.
eg:
<?php interface OutputInterface { public function load(); } class SerializedArrayOutput implements OutputInterface { public function load() { return serialize($arrayOfData); } } class JsonStringOutput implements OutputInterface { public function load() { return json_encode($arrayOfData); } } class ArrayOutput implements OutputInterface { public function load() { return $arrayOfData; } } class SomeClient { private $output; public function setOutput(OutputInterface $outputType) { $this->output = $outputType; } public function loadOutput() { return $this->output->load(); } } $client = new SomeClient(); // Want an array? $client->setOutput(new ArrayOutput()); $data = $client->loadOutput(); // Want some JSON? $client->setOutput(new JsonStringOutput()); $data = $client->loadOutput();
4.Front Controller
The front controller pattern is where you have a single entrance point for your web application (e.g. index.php) that handles all of the requests. This code is responsible for loading all of the dependencies, processing the request and sending the response to the browser. The front controller pattern can be beneficial because it encourages modular code and gives you a central place to hook in code that should be run for every request (such as input sanitization).
5.Mode-View Controller (MVC)
The model-view-controller (MVC) pattern and its relatives HMVC and MVVM lets you break up code into logical objects that serve very specific purposes. Models serve as a data access layer where data is fetched and returned in formats usable throughout your application. Controllers handle the request, process the data returned from models and load views to send in the response. And views are display templates (markup, xml, etc) that are sent in the response to the web browser. -Sirin
0 notes
Text
#Tip to Change port of Spring boot App & Enable Auto build in Eclipse.
To change the port of the Spring boot web app you just need to add the below line inside the main function.
System.getProperties().put( "server.port", 8083 ); //8083 port is set here eg: package hello; import java.util.Arrays; import org.springframework.boot.SpringApplication; import org.springframework.boot.autoconfigure.SpringBootApplication; import org.springframework.context.ApplicationContext; @SpringBootApplication public class Application { public static void main(String[] args) { System.getProperties().put( "server.port", 8083 ); //8083 port is set here ApplicationContext ctx = SpringApplication.run(Application.class, args); System.out.println("Let's inspect the beans provided by Spring Boot:"); String[] beanNames = ctx.getBeanDefinitionNames(); Arrays.sort(beanNames); for (String beanName : beanNames) { System.out.println(beanName); } } }
To Enable autobuild for spring boot app to reflect the changes into the browser from eclipse you just need to make a small update in src/pom.xml
please add the below line into one of the dependency <scope>runtime</scope> eg: <dependency> <groupId>org.springframework.boot</groupId> <artifactId>spring-boot-starter-web</artifactId> <scope>runtime</scope> </dependency>
Hope this helps
0 notes
Text
Yii2 RESTful API with OAuth 2.0

Overview
This article is for the one’s who is already working with PHP/Yii2 or who wants to quick start developing a RESTful API using Yii2 framework with
OAuth 2.0 authentication
A developer dashboard
API documentation template
Here I'm sharing the Live demo and Source code of a RESTful API with OAuth2 authentication/security developed using Yii2 framework You can use this if you want to quick start developing your own custom RESTful API by skipping 95% of your scratch works. Hopefully this will save lot of your time as this API includes all the basic stuffs you need to get started.
Developer Dashboard
This API also includes a developer dashboard with the API documentation which is developed in Yii2 framework. This will be useful to manage your developers access to the API documentation.
Why Yii2?

It's Fast, It’s Secure and Professional!. Yii comes with rich features: MVC, DAO/ActiveRecord, I18N/L10N, caching, authentication and role-based access control, scaffolding, testing, etc. It can reduce your development time significantly.
What is a RESTful API?
REST is an architectural style for building APIs. It stands for “Representational State Transfer”. It means when we build an API, we build it in a way that HTTP methods and URIs mean something, and the API has to respond in a way that’s expected.
Something about OAuth 2.0
The OAuth 2.0 is an authorization framework which enables a third-party application to obtain limited access to an HTTP service.
DEMO
http://yii2-rest.dockerboxes.us Login: developer/developer
Source Code
https://github.com/sirinibin/Yii2-RESTful-API-with-OAuth2
Official Documentation
Documentation for this RESTful API can be found on the Yii2 RESTful API with OAuth2 Documenation.
Security Vulnerabilities
If you discover a security vulnerability within this API, please send an e-mail to Sirin k at [email protected]. All security vulnerabilities will be promptly addressed.
Installation instructions
https://github.com/sirinibin/Yii2-RESTful-API-with-OAuth2
- Sirin K
0 notes
Text
Laravel 5.5 Lumen 5.5 RESTful API with OAuth 2.0

Overview
This article is for the one's who is already working with PHP/Laravel or who wants to quick start developing RESTful API with OAuth2.0 security using Laravel 5.5 Lumen 5.5.
Here I'm sharing the Live demo and Source code of a RESTful API with OAuth2 authentication/security developed using Laravel Lumen 5.5.0. You can use this if you want to quick start developing your own custom RESTful API by skipping 95% of your scratch works. Hopefully this will save lot of your time as this API includes all the basic stuffs you need to get started.
Developer Dashboard
This API also includes a developer dashboard with the API documentation which is developed in Laravel 5.5. This will be useful to manage your developers access to the API documentation.
Why Laravel Lumen?

In short, It’s fast, light, and easy!. Lumen eliminates all the unnecessary and heavy features in Laravel and load only components like Eloquent, middleware, authentication & authorization, …etc which keeps it light and fast. Lumen focuses on building Stateless APIs. Therefore, sessions and views are no longer included in the latest version of Lumen.
What is a RESTful API?
REST is an architectural style for building APIs. It stands for “Representational State Transfer”. It means when we build an API, we build it in a way that HTTP methods and URIs mean something, and the API has to respond in a way that’s expected.
Something about OAuth 2.0

The OAuth 2.0 is an authorization framework which enables a third-party application to obtain limited access to an HTTP service.
DEMO
http://laravel-lumen-rest.dockerboxes.us Login: developer/developer
Source Code
https://github.com/sirinibin/laravel-5.5-lumen-5.5-with-OAuth2
Official Documentation
Documentation for this RESTful API can be found on the Lumen RESTful API with OAuth2 Documenation.
Security Vulnerabilities
If you discover a security vulnerability within this API, please send an e-mail to Sirin k at [email protected]. All security vulnerabilities will be promptly addressed.
Installation instructions
https://github.com/sirinibin/laravel-5.5-lumen-5.5-with-OAuth2
- Sirin K
1 note
·
View note
Text
Installing/Upgrading to php7.1 on Ubuntu 16.04
You can use below commands if you want to install/upgrade your php version on your Ubuntu 16.04 platform which will be required if you want to install Laravel/Lumen on your Ubuntu 16.04 server. Hope this helps.
sudo apt-get install -y python-software-properties sudo add-apt-repository -y ppa:ondrej/php sudo apt-get update -y Then you can list all of the available PHP 7.1-related packages for review: sudo apt-cache pkgnames | grep php7.1 sudo apt-get install -y php7.1 libapache2-mod-php7.1 php7.1-memcached php7.1-fpm php7.1-cli php7.1-common php7.1-mbstring php7.1-gd php7.1-intl php7.1-xml php7.1-mysql php7.1-mcrypt php7.1-zip
0 notes
Text
Installing/upgrading php5.6 to php7.1 in your MacOS Sierra V10.12.06
Execute the below commands to install/upgrade and enable php7.1 version in your MacOS Sierra Environment.
$ curl -s http://php-osx.liip.ch/install.sh | bash -s 7.1 $ sudo vi ~/.bash_profile export PATH=/usr/local/php5/bin:$PATH $ source ~/.bash_profile $ sudo apachectl restart $ php -v
Hope this helps. -Sirin
0 notes