#Apache2
Explore tagged Tumblr posts
Visit Tumblr Blog
Explore Tumblr blogs with no restrictions, modern design and the best experience.
Last Seen Tumblr Blogs


Fun Fact
Women make up for the other 50% of Tumblr’s audience.
Photo


(via A woman laying on a bed with a pink blanket. - Glam Girl X)
#javascript#python#html#cryptocurrency#blockchain#django#payments#paymentprocessing#stripe#square#helcim#apache2
1 note
·
View note
Text
Configure apache to log the real client IP instead of cloudflare IP in http access logs (Wordpress)
If you are running a WordPress site and you have cloudflare setup, you may have noticed that the http access logs log the IP of cloudflare instead of the actual client IP. This is a guide to enable logging of the real client IP instead of the cloudflare IP in the apache2 logs. This was tested on a Ubuntu 20.04 machine + apache2 and traffic is proxied from cloudflare. – Install…
0 notes
Text
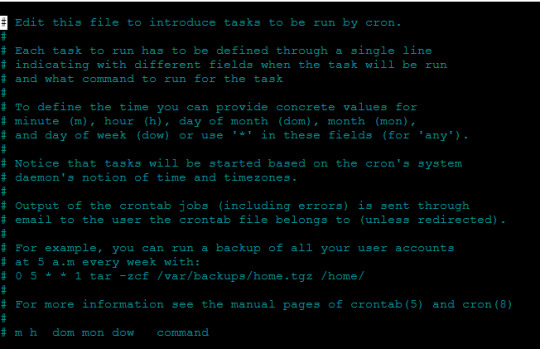
Tutorial: Sistema de bajo presupuesto de respaldo para servidores
Hoy quiero compartir tres script rápidos para gestión de respaldo local y remoto mediante tareas CRON, porque no siempre se requieren cosas demasiado complicadas para lidiar con problemas sencillos.
Hoy quiero compartir tres script rápidos para gestión de respaldo local y remoto mediante tareas CRON, porque no siempre se requieren cosas demasiado complicadas para lidiar con problemas sencillos. Continue reading Untitled
View On WordPress
0 notes
Text
How to enable permalinks in WordPress - Ubuntu Apache2
To enable permalinks in WordPress while hosting on an Ubuntu server with Apache2, you can follow these steps: 1. Log into your server: Ensure that you have SSH access to your Ubuntu server. 2. Install WordPress: If you haven’t already, install WordPress on your server. You can follow the WordPress installation guide for Ubuntu:…

View On WordPress
0 notes
Text
Basic Linux Security (Updated 2025)
Install Unattended Upgrades and enable the "unattended-upgrades" service.
Install ClamAV and enable "clamav-freshclam" service.
Install and run Lynis to audit your OS.
Use the "last -20" command to see the last 20 users that have been on the system.
Install UFW and enable the service.
Check your repo sources (eg; /etc/apt/).
Check the /etc/passwd and /etc/shadow lists for any unusual accounts.
User the finger command to check on activity summaries.
Check /var/logs for unusual activity.
Use "ps -aux | grep TERM" or "ps -ef | grep TERM" to check for suspicious ongoing processes.
Check for failed sudo attempts with "grep "NOT in sudoers" /var/log/auth.log.
Check journalctl for system messages.
Check to make sure rsyslog is running with "sudo systemctl status rsyslog" (or "sudo service rsyslog status") and if it's not enable with "sudo systemctl enable rsyslog".
Perform an nmap scan on your machine/network.
Use netstat to check for unusual network activity.
Use various security apps to test you machine and network.
Change your config files for various services (ssh, apache2, etc) to non-standard configurations.
Disabled guest accounts.
Double up on ssh security by requiring both keys and passwords.
Check your package manager for any install suspicious apps (keyloggers, cleaners, etc).
Use Rootkit Scanners (chkrootkit, rkhunter).
Double SSH Security (Key + Password).
Disabled Guest Accounts.
Enabled Software Limiters (Fail2Ban, AppArmor).
Verify System Integrity via fsck.
Utilize ngrep/other networking apps to monitor traffic.
Utilize common honeypot software (endlessh).
Create new system-launch subroutines via crontab or shell scripts.
Ensure System Backups are Enabled (rsnapshot).
Check for suspicious kernel modules with "lsmod"
#linux#security#linuxsecurity#computersecurity#networking#networksecurity#opensource#open source#linux security#network#ubuntu#kali#parrot#debian#gentoo#redhat
171 notes
·
View notes
Text
#WP-#hosting nasazuje #nejrychlejsti #webserver ve verzi #OpenLiteSpeed
🚀 Novinka na WP-Hosting! 🚀
Přidali jsme možnost aktivovat OpenLiteSpeed místo #Apache2!
🔥 Rychlejší načítání, nižší zatížení #server.u a lepší #vykon pro #WordPress:
✅ aktivace na pár kliknutí
✅ změna DNS záznamů na pár kliknutí
✅ neskutečná #rychlost pro #hosting #web.u
Podrobnosti a #navod na blogu https://www.wp-hosting.cz/openlitespeed-na-hostingu/
1 note
·
View note
Video
youtube
Configuring Apache2 to use HTTPS on Ubuntu Linux
0 notes
Text
CI/CD Pipeline Automation Using Ansible and Jenkins
Introduction
In today’s fast-paced DevOps environment, automation is essential for streamlining software development and deployment. Jenkins, a widely used CI/CD tool, helps automate building, testing, and deployment, while Ansible simplifies infrastructure automation and configuration management. By integrating Ansible with Jenkins, teams can create a fully automated CI/CD pipeline that ensures smooth software delivery with minimal manual intervention.
In this article, we will explore how to automate a CI/CD pipeline using Jenkins and Ansible, from setup to execution.
Why Use Jenkins and Ansible Together?
✅ Jenkins for CI/CD:
Automates code integration, testing, and deployment
Supports plugins for various DevOps tools
Manages complex pipelines with Jenkinsfile
✅ Ansible for Automation:
Agentless configuration management
Simplifies deployment across multiple environments
Uses YAML-based playbooks for easy automation
By integrating Jenkins with Ansible, we can achieve automated deployments, infrastructure provisioning, and configuration management in one streamlined workflow.
Step-by-Step Guide: Integrating Ansible with Jenkins
Step 1: Install Jenkins and Ansible
📌 Install Jenkins on a Linux Server
wget -O /usr/share/keyrings/jenkins-keyring.asc \
echo "deb [signed-by=/usr/share/keyrings/jenkins-keyring.asc] \
https://pkg.jenkins.io/debian binary/" | sudo tee /etc/apt/sources.list.d/jenkins.list > /dev/null
sudo apt update
sudo apt install jenkins -y
sudo systemctl start jenkins
sudo systemctl enable jenkins
Access Jenkins UI at http://<your-server-ip>:8080
📌 Install Ansible
sudo apt update
sudo apt install ansible -y
ansible --version
Ensure that Ansible is installed and accessible from Jenkins.
Step 2: Configure Jenkins for Ansible
📌 Install Required Jenkins Plugins
Navigate to Jenkins Dashboard → Manage Jenkins → Manage Plugins
Install:
Ansible Plugin
Pipeline Plugin
Git Plugin
📌 Add Ansible to Jenkins Global Tool Configuration
Go to Manage Jenkins → Global Tool Configuration
Under Ansible, define the installation path (/usr/bin/ansible)
Step 3: Create an Ansible Playbook for Deployment
Example Playbook: Deploying a Web Application
📄 deploy.yml
---
- name: Deploy Web Application
hosts: web_servers
become: yes
tasks:
- name: Install Apache
apt:
name: apache2
state: present
- name: Start Apache
service:
name: apache2
state: started
enabled: yes
- name: Deploy Application Code
copy:
src: /var/lib/jenkins/workspace/app/
dest: /var/www/html/
This playbook: ✅ Installs Apache ✅ Starts the web server ✅ Deploys the application code
Step 4: Create a Jenkins Pipeline for CI/CD
📄 Jenkinsfile (Declarative Pipeline)
pipeline {
agent any
stages {
stage('Clone Repository') {
steps {
git 'https://github.com/your-repo/app.git'
}
}
stage('Build') {
steps {
sh 'echo "Building Application..."'
}
}
stage('Deploy with Ansible') {
steps {
ansiblePlaybook credentialsId: 'ansible-ssh-key',
inventory: 'inventory.ini',
playbook: 'deploy.yml'
}
}
}
}
This Jenkins pipeline: ✅ Clones the repository ✅ Builds the application ✅ Deploys using Ansible
Step 5: Trigger the CI/CD Pipeline
Go to Jenkins Dashboard → New Item → Pipeline
Add your Jenkinsfile
Click Build Now
Jenkins will execute the CI/CD pipeline, deploying the application using Ansible! 🚀
Benefits of Automating CI/CD with Ansible & Jenkins
🔹 Faster deployments with minimal manual intervention 🔹 Consistent and repeatable infrastructure automation 🔹 Improved security by managing configurations with Ansible 🔹 Scalability for handling multi-server deployments
Conclusion
By integrating Ansible with Jenkins, DevOps teams can fully automate CI/CD pipelines, ensuring faster, reliable, and consistent deployments. Whether deploying a simple web app or a complex microservices architecture, this approach enhances efficiency and reduces deployment risks.
Ready to implement Ansible and Jenkins for your DevOps automation? Start today and streamline your CI/CD workflow!
💡 Need help setting up your automation? Contact HawkStack Technologies for expert DevOps solutions!
For more details click www.hawkstack.com
0 notes
Text
The Role of Automation in DevOps: Beyond CI/CD

Infrastructure as Code (IaC) & Configuration Management in DevOps Automation
In modern DevOps practices, Infrastructure as Code (IaC) and Configuration Management play a vital role in automating infrastructure provisioning, scaling, and maintenance. These practices help teams manage complex environments efficiently while ensuring consistency, scalability, and security.
1. Infrastructure as Code (IaC): Automating Infrastructure Provisioning
What is IaC?
Infrastructure as Code (IaC) is a practice that allows developers to define and manage infrastructure through code, rather than manual processes. This ensures consistency, repeatability, and scalability across environments.
Benefits of IaC:
✅ Eliminates Manual Configuration Errors — Reduces human intervention and mistakes. ✅ Speeds Up Deployments — Automates provisioning of servers, databases, and networking. ✅ Enhances Scalability — Dynamically provisions and scales infrastructure as needed. ✅ Improves Disaster Recovery — Infrastructure can be rebuilt quickly using stored configurations.
Popular IaC Tools:
Terraform — Cloud-agnostic tool for defining infrastructure using declarative syntax.
AWS CloudFormation — AWS-specific IaC tool for automating cloud resource creation.
Pulumi — Uses familiar programming languages (Python, TypeScript, Go) for infrastructure automation.
Azure Resource Manager (ARM) — Automates infrastructure deployment on Azure.
Example: Terraform Script for Provisioning an EC2 Instance in AWS
hprovider "aws" { region = "us-east-1" }resource "aws_instance" "example" { ami = "ami-0c55b159cbfafe1f0" # Replace with a valid AMI ID instance_type = "t2.micro" tags = { Name = "MyTerraformInstance" } }
This Terraform script provisions an EC2 instance in AWS, ensuring consistency across multiple deployments.
2. Configuration Management: Automating System Configurations
What is Configuration Management?
Configuration Management (CM) automates the setup and maintenance of software, ensuring all systems are configured consistently and correctly across different environments.
Why is Configuration Management Important?
✅ Ensures Consistency — Standardizes configurations across all servers. ✅ Simplifies Updates & Patching — Automates software updates and system changes. ✅ Enhances Security — Ensures systems comply with security policies. ✅ Enables Faster Disaster Recovery — Quickly restores failed configurations.
Popular Configuration Management Tools:
Ansible — Agentless automation tool using YAML playbooks.
Chef — Uses Ruby-based recipes for system automation.
Puppet — Declarative automation for large-scale environments.
SaltStack — High-speed, event-driven automation.
Example: Ansible Playbook to Install Apache on a Server
yaml- name: Install Apache Web Server hosts: web_servers become: yes tasks: - name: Install Apache apt: name: apache2 state: present - name: Start Apache Service service: name: apache2 state: started
This Ansible playbook installs and starts Apache on a group of web servers automatically.
3. Best Practices for Implementing IaC & Configuration Management
✅ Use Version Control (Git, GitHub, GitLab) — Store infrastructure code in repositories for tracking changes. ✅ Follow the DRY Principle (Don’t Repeat Yourself) — Reuse modules and scripts to reduce duplication. ✅ Implement Security Best Practices — Avoid hardcoded credentials; use secrets management tools (e.g., AWS Secrets Manager, HashiCorp Vault). ✅ Test Infrastructure Code (Terraform Plan, Ansible Dry Run) — Validate configurations before deployment. ✅ Integrate with CI/CD Pipelines — Automate infrastructure provisioning as part of DevOps workflows.
Conclusion
Infrastructure as Code (IaC) and Configuration Management are essential components of DevOps automation beyond CI/CD. By implementing IaC tools like Terraform and Cloud Formation and Configuration Management tools like Ansible and Chef, teams can achieve faster, more reliable, and scalable infrastructure management.
WEBSITE: https://www.ficusoft.in/devops-training-in-chennai/
0 notes
Text
Ansible Là Gì? Cách Cài Đặt Ansible trên Ubuntu 22.04
Ansible là một công cụ tự động hóa mã nguồn mở mạnh mẽ, đơn giản và dễ học. Nó được sử dụng để tự động hóa việc cấu hình và quản lý hệ thống, triển khai ứng dụng và nhiều tác vụ khác. Ansible giúp giảm thiểu công sức và thời gian cần thiết để quản lý một số lượng lớn máy chủ, từ vài máy đến hàng nghìn máy.

Tại sao Ansible lại phổ biến?
Ansible có nhiều ưu điểm khiến nó trở thành một lựa chọn phổ biến trong giới DevOps:
Đơn giản: Ansible sử dụng cú pháp YAML đơn giản và dễ đọc, giúp người dùng dễ dàng viết các playbook (tập lệnh của Ansible).
Không cần cài đặt tác nhân: Ansible không yêu cầu cài đặt bất kỳ tác nhân nào trên các máy chủ được quản lý, giúp đơn giản hóa quá trình cài đặt và bảo trì.
Mạnh mẽ: Ansible có khả năng tự động hóa nhiều tác vụ phức tạp, từ cấu hình hệ thống đến triển khai ứng dụng.
Linh hoạt: Ansible có thể được sử dụng để quản lý nhiều loại hệ điều hành và nền tảng khác nhau.
Cộng đồng lớn: Ansible có một cộng đồng người dùng lớn và tích cực, cung cấp nhiều tài liệu, hướng dẫn và module (thành phần mở rộng của Ansible) hữu ích.
Cách Ansible hoạt động
Ansible hoạt động dựa trên nguyên tắc "push-based", nghĩa là nó kết nối đến các máy chủ được quản lý và thực hiện các tác vụ được chỉ định trong playbook. Ansible sử dụng SSH để kết nối đến các máy chủ, do đó yêu cầu duy nhất là máy chủ quản lý (nơi cài đặt Ansible) có thể kết nối SSH đến các máy chủ được quản lý.
Cài đặt Ansible trên Ubuntu 22.04
Để cài đặt Ansible trên Ubuntu 22.04, bạn có thể thực hiện theo các bước sau:
Cập nhật danh sách gói:Bash sudo apt update
Cài đặt các gói phụ thuộc:Bash sudo apt install software-properties-common
Thêm kho lưu trữ Ansible PPA:Bash sudo add-apt-repository ppa:ansible/ansible
Cập nhật lại danh sách gói:Bash sudo apt update
Cài đặt Ansible:Bash sudo apt install ansible
Kiểm tra cài đặt:Bash ansible --version Nếu bạn thấy thông tin về phiên bản Ansible, nghĩa là bạn đã cài đặt thành công.
Cấu hình Ansible
Sau khi cài đặt Ansible, bạn cần cấu hình nó để có thể quản lý các máy chủ. Hai thành phần quan trọng cần cấu hình là:
Inventory: File chứa danh sách các máy chủ được quản lý.
Playbook: File chứa các tập lệnh tự động hóa.
1. Inventory
File inventory mặc định của Ansible nằm tại /etc/ansible/hosts. Bạn có thể tạo một file inventory mới hoặc sử dụng file mặc định.
Ví dụ, để quản lý hai máy chủ có địa chỉ IP là 192.168.1.10 và 192.168.1.20, bạn có thể thêm chúng vào file inventory như sau:
Ini, TOML[webservers] 192.168.1.10 192.168.1.20
Bạn cũng có thể nhóm các máy chủ lại với nhau:
Ini, TOML[webservers] 192.168.1.10 192.168.1.20 [databases] 192.168.1.30
2. Playbook
Playbook là một file YAML chứa các tập lệnh tự động hóa. Ví dụ, để cài đặt Apache trên hai máy chủ webservers, bạn có thể tạo một playbook có tên install_apache.yml như sau:
YAML--- - hosts: webservers become: true tasks: - name: Cài đặt Apache apt: name: apache2 state: present
Để chạy playbook này, bạn sử dụng lệnh sau:
Bashansible-playbook install_apache.yml
Kết luận
Ansible là một công cụ tự động hóa mạnh mẽ và dễ sử dụng, giúp đơn giản hóa việc quản lý và cấu hình hệ thống. Hy vọng bài viết này đã giúp bạn hiểu rõ hơn về Ansible và cách cài đặt nó tr��n Ubuntu 22.04.
Nguồn tham khảo: https://thuegpu.vn/ansible-la-gi-cach-cai-dat-ansible-tren-ubuntu-22-04/
1 note
·
View note
Text
Ansible Playbook for Apache2 Configuration
Streamline your web server setup with an Ansible Playbook for Apache2 configuration. Automate installation, setup, and management effortlessly.

1 note
·
View note
Text
HTTPD
httpd stands for HyperText Transfer Protocol Daemon. It is a software program, or server, that handles the serving of web pages over the HTTP protocol. Most commonly, it refers to the Apache HTTP Server (apache2), one of the most widely used web servers.
Here’s what httpd does:
Web Server Functionality: It listens for incoming HTTP requests from web browsers or clients and responds with the requested resources, such as HTML pages, images, or other content.
Daemon: The term "daemon" refers to a background service that runs on a server. httpd works continuously, waiting for requests and serving them without requiring constant user intervention.
Apache HTTP Server: The most common httpd is Apache's web server software, which is responsible for serving static content (like HTML) as well as dynamic content generated by applications (using technologies like PHP, Python, or others).
Key Features of httpd (Apache HTTP Server):
Configuration: It can be configured using the httpd.conf file, where administrators can set parameters like port numbers, security rules, directories, etc.
Extensibility: Apache supports modules that extend its capabilities, such as SSL/TLS encryption (with mod_ssl), URL rewriting (mod_rewrite), and more.
Virtual Hosts: Apache can handle multiple websites (virtual hosts) on a single server, making it a powerful choice for shared hosting environments.
Basic Command (Linux):
To start the httpd service: sudo systemctl start httpd
To stop the httpd service: sudo systemctl stop httpd
To restart the service (after making changes to configuration): sudo systemctl restart httpd
httpd is essential for delivering web content and is a cornerstone of the internet's infrastructure.
for more details please visit
www.qcsdclabs.com,
www.hawkstack.com
0 notes
Text
Tutorial: Solución a problemas de carga de Moodle con Nginx
Entre las cosas que he aprendido, también he desplegado un sistema Moodle en aulavirtual.interlan.ec con apache2, pero tras algunos cambios me he enfrentado a la tarea de configurar Moodle con Nginx. Moodle es una plataforma de gestión del aprendizaje (LM
Entre las cosas que he aprendido, también he desplegado un sistema Moodle en aulavirtual.interlan.ec con apache2, pero tras algunos cambios me he enfrentado a la tarea de configurar Moodle con Nginx. Moodle es una plataforma de gestión del aprendizaje (LMS) de código abierto que permite a los instructores crear y gestionar cursos en línea. Para comenzar, primero necesito instalar Nginx en mi…
0 notes
Text
Setting Up WordPress on Ubuntu with Apache2, MySQL, and SSL
Ubuntu is a great hosting environment choice if you want to build a strong and secure WordPress website. In this tutorial, we’ll show you how to install WordPress, Apache, MySQL, and SSL encryption on a server running Ubuntu. You’ll have a fully operational WordPress site with HTTPS enabled by the end of this lesson. Step 1: Install Apache Server To start, let’s install the Apache web server on…

View On WordPress
0 notes
Text
How to install LiteCart with Apache on Ubuntu 24.04
This article explains installing LiteCart with Apache on Ubuntu 24.04. LiteCart is an eCommerce platform built with PHP, jQuery, and HTML 5. It’s lightweight, fast, clean, straightforward, easy to install and use, and supports jQuery and the latest HTML 5. Apache2 HTTP Server is the most popular web server in use and is the preferred web server for LiteCart. Installing LiteCart on Ubuntu Linux…
0 notes
Text
Fix the Port used for the Virtualhost is not an Apache Listen Port
In this short blogpost, we shall discuss how to Fix the Port used for the Virtualhost is not an Apache Listen Port. In Apache, the Listen directive in the configuration file (httpd.conf or apache2.conf, depending on the system) specifies the port number on which Apache will listen for incoming connections. Please see Setup VirtualHost with SSL on WAMP Server, how to Configure SQL Server Instance…
#Apache listen port error#Apache port and VirtualHost issue#Apache port error solution#Apache port setup#Apache server troubleshooting#Apache VirtualHost configuration error#configure Apache listen port#fix Apache VirtualHost port issue#how to fix Apache port not listening#resolve Apache port conflict#VirtualHost listen port fix#VirtualHost not listening on port#VirtualHost not responding on port#VirtualHost port not working#Windows#Windows Server#Windows Server 2012#Windows Server 2016#Windows Server 2019
0 notes