#php7.2-gd
Explore tagged Tumblr posts
Visit Tumblr Blog
Explore Tumblr blogs with no restrictions, modern design and the best experience.
Last Seen Tumblr Blogs


Fun Fact
In February 2021, Tumblr had 518.6 million blog accounts.
Text
Install php7.2-gd extension in your armhf/arm32 Architectured Machine/Docker container
Step 1: Install gdebi
apt-get install gdebi
Note:gdebi will look for all the dependencies of the .deb file, and will install them before attempting to install the .deb file
Step 2: Download & Install php-common
$curl -o php-common.deb http://ports.ubuntu.com/pool/main/p/php-defaults/php-common_60ubuntu1_all.deb $curl -o php7.2-common.deb http://ports.ubuntu.com/pool/main/p/php7.2/php7.2-common_7.2.3-1ubuntu1_armhf.deb
$ gdebi php-common.deb $ gdebi php7.2-common.deb
Step 3: Download & Install php7.2-gd
Reference:https://ubuntu.pkgs.org/18.04/ubuntu-main-armhf/php7.2-gd_7.2.3-1ubuntu1_armhf.deb.html
$ curl -o php7.2-gd.deb http://ports.ubuntu.com/pool/main/p/php7.2/php7.2-gd_7.2.3-1ubuntu1_armhf.deb
$ gdebi php7.2-gd.deb
Step 4: Edit php.ini
Note: Check phpinfo() to get the exact path of your php.ini Note: The default path of gd.so extension is /usr/lib/php/20170718/gd.so
vim php.ini extensions=/usr/lib/php/20170718/gd.so
Step 5: Restart/Reload Apache server
service apache2 reload/restart
1 note
·
View note
Text
Instalando o Laravel no Linux
Abra o terminal.
Primeiro atualizamos a lista de pacotes.
sudo apt update
Agora começamos instalando o Apache2, nosso servidor web livre.
sudo apt install apache2
Instalando ferramentas necessárias.
sudo apt install curl git unzip
Instalando as principais bibliotecas PHP utilizadas pelo Laravel.
sudo apt install php7.2 libapache2-mod-php7.2 php7.2-mbstring php7.2-xmlrpc php7.2-soap php7.2-gd php7.2-xml php7.2-cli php7.2-zip
Instalando MySql e o driver de acesso PHP.
sudo apt install mysql-server-5.7 php-mysql php7.2-mysql mysql-client-core-5.7
Configurando a senha do mysql.
sudo mysql_secure_installation
Execute o mysql no modo sudo para criar um novo usuário.
GRANT ALL PRIVILEGES ON *.* TO 'user'@'localhost' IDENTIFIED BY 'user';
Renicie o terminal.
Logue como root e vá a raiz.
sudo -i
cd
Agora como root baixe e instale o composer.
curl -sS https://getcomposer.org/installer | sudo php -- --install-dir=/usr/local/bin --filename=composer
Saia do usuário root.
exit
Instale o pacote global de criação de projetos Laravel.
composer global require laravel/installer
Adicione o path do pacote anterior à variável de ambiente PATH.
Edite o arquivo com o seguinte comando:
gedit ~/.bashrc
2. Acrescente na ultima linha do txt o seguinte:
export PATH=${PATH}:$HOME/.config/composer/vendor/bin
Pronto. Agora teste a instalação e comece com seus projetos.
Exemplo de teste.
cd ~ mkdir projetos cd projetos laravel new teste cd teste php artisan serve
1 note
·
View note
Text
WordPress is an open source content management system (CMS) written entirely in PHP. It uses MySQL or MariaDB database server to store its data and website configurations. WordPress is designed to be modular with template system which enables developers to design their own themes and plugins. In this article we will be doing installation of PHP, MySQL and WordPress on Amazon Linux 2 powered by Nginx Web server. You should have a running Amazon Linux 2 server with Bash shell access. A user with sudo privileges is required for escalation to root during installation of packages and modification of configuration files. The minimum requirements for this setup are: Amazon Linux 2 server Memory: 512 MB vCPU: 1 Disk Space: 1GB Internet access Domain name for your website Once you have a Server running you need to configure your DNS by creating an A record pointing to your Amazon Linux 2 public IP address. My test domain used in this guide is mysite.computingpost.com pointing to 35.20.11.34 Step 1: Update Amazon Linux Server As always we work on a server that has been updated to ensure patches are applied to guarantee server security. sudo yum -y update Wait for the updates to be applied then reboot your server. sudo systemctl reboot Login back once the server is up. $ ssh ec2-user@serverip Last login: Wed Aug 12 17:07:32 2020 from 10.0.2.2 __| __|_ ) _| ( / Amazon Linux 2 AMI ___|\___|___| https://aws.amazon.com/amazon-linux-2/ Step 2: Install PHP on Amazon Linux The versions of PHP packages available on Amazon Linux extras repository are more than one. You can list them with the command below. $ sudo amazon-linux-extras | grep php NOTE: The livepatch extra is in public preview, not meant for production use 15 php7.2 available \ 17 lamp-mariadb10.2-php7.2 available \ 31 php7.3 available \ 42 php7.4 available [ =stable ] In this guide we’ll go with the latest stable release of PHP. Enable PHP 7.4 topic. sudo amazon-linux-extras enable php7.4 Then install all required PHP extensions on Amazon Linux 2 server. sudo yum clean metadata sudo yum install php php-cli,fpm,pear,cgi,common,curl,mbstring,gd,mysqlnd,gettext,bcmath,json,xml,intl,zip,imap Accept installation prompt. Dependencies Resolved ================================================================================================================================================================== Package Arch Version Repository Size ================================================================================================================================================================== Installing: php x86_64 7.4.7-1.amzn2 amzn2extra-php7.4 3.2 M php-bcmath x86_64 7.4.7-1.amzn2 amzn2extra-php7.4 68 k php-cli x86_64 7.4.7-1.amzn2 amzn2extra-php7.4 4.9 M php-common x86_64 7.4.7-1.amzn2 amzn2extra-php7.4 1.1 M php-fpm x86_64 7.4.7-1.amzn2 amzn2extra-php7.4 1.7 M php-gd x86_64 7.4.7-1.amzn2 amzn2extra-php7.4 180 k php-intl x86_64 7.4.7-1.amzn2 amzn2extra-php7.4 221 k
php-json x86_64 7.4.7-1.amzn2 amzn2extra-php7.4 70 k php-mbstring x86_64 7.4.7-1.amzn2 amzn2extra-php7.4 513 k php-mysqlnd x86_64 7.4.7-1.amzn2 amzn2extra-php7.4 238 k php-pear noarch 1:1.10.7-3.amzn2.0.1 amzn2-core 354 k php-xml x86_64 7.4.7-1.amzn2 amzn2extra-php7.4 198 k Installing for dependencies: apr x86_64 1.6.3-5.amzn2.0.2 amzn2-core 118 k apr-util x86_64 1.6.1-5.amzn2.0.2 amzn2-core 99 k apr-util-bdb x86_64 1.6.1-5.amzn2.0.2 amzn2-core 19 k generic-logos-httpd noarch 18.0.0-4.amzn2 amzn2-core 19 k httpd x86_64 2.4.43-1.amzn2 amzn2-core 1.3 M httpd-filesystem noarch 2.4.43-1.amzn2 amzn2-core 23 k httpd-tools x86_64 2.4.43-1.amzn2 amzn2-core 87 k libxslt x86_64 1.1.28-5.amzn2.0.2 amzn2-core 243 k libzip x86_64 1.3.2-1.amzn2.0.1 amzn2-core 62 k mailcap noarch 2.1.41-2.amzn2 amzn2-core 31 k mod_http2 x86_64 1.15.3-2.amzn2 amzn2-core 146 k oniguruma x86_64 5.9.6-1.amzn2.0.3 amzn2-core 127 k php-pdo x86_64 7.4.7-1.amzn2 amzn2extra-php7.4 134 k php-process x86_64 7.4.7-1.amzn2 amzn2extra-php7.4 88 k Transaction Summary ================================================================================================================================================================== Install 12 Packages (+14 Dependent packages) Total download size: 15 M Installed size: 61 M Is this ok [y/d/N]: y Verify default PHP version in your system. $ php --version PHP 7.4.7 (cli) (built: Jul 2 2020 23:17:59) ( NTS ) Copyright (c) The PHP Group Zend Engine v3.4.0, Copyright (c) Zend Technologies Step 3: Install Nginx web server As stated earlier we’ll be using Nginx web server to host our WordPress website. Enable nginx topic. sudo amazon-linux-extras enable nginx1 Install Nginx package from extras repository. sudo yum clean metadata sudo yum -y install nginx Start and enable nginx service. sudo systemctl enable --now nginx The service should show status as running
$ systemctl status nginx ● nginx.service - The nginx HTTP and reverse proxy server Loaded: loaded (/usr/lib/systemd/system/nginx.service; enabled; vendor preset: disabled) Drop-In: /usr/lib/systemd/system/nginx.service.d └─php-fpm.conf Active: active (running) since Wed 2020-08-12 19:15:09 UTC; 6s ago Process: 3358 ExecStart=/usr/sbin/nginx (code=exited, status=0/SUCCESS) Process: 3355 ExecStartPre=/usr/sbin/nginx -t (code=exited, status=0/SUCCESS) Process: 3351 ExecStartPre=/usr/bin/rm -f /run/nginx.pid (code=exited, status=0/SUCCESS) Main PID: 3360 (nginx) CGroup: /system.slice/nginx.service ├─3360 nginx: master process /usr/sbin/nginx └─3361 nginx: worker process Aug 12 19:15:09 amazon-linux systemd[1]: Starting The nginx HTTP and reverse proxy server... Aug 12 19:15:09 amazon-linux nginx[3355]: nginx: the configuration file /etc/nginx/nginx.conf syntax is ok Aug 12 19:15:09 amazon-linux nginx[3355]: nginx: configuration file /etc/nginx/nginx.conf test is successful Aug 12 19:15:09 amazon-linux systemd[1]: Failed to read PID from file /run/nginx.pid: Invalid argument Aug 12 19:15:09 amazon-linux systemd[1]: Started The nginx HTTP and reverse proxy server If you have firewalld service active, allow http and https services. sudo firewall-cmd --add-service=http,https --permanent sudo firewall-cmd --reload List allowed services. $ sudo firewall-cmd --list-all public target: default icmp-block-inversion: no interfaces: sources: services: ssh dhcpv6-client http https ports: protocols: masquerade: no forward-ports: source-ports: icmp-blocks: rich rules: Step 4: Configure PHP FPM Service As we’ll be using Nginx web server, we need to configure FastCGI Process Manager (FPM) service. You can check cool features of FPM implementation. By default it is set to use apache user and group and we’ll need to update to nginx $ sudo vim /etc/php-fpm.d/www.conf user = nginx group = nginx Make sure it is listening on unix socket to accept FastCGI requests. listen = /run/php-fpm/www.sock Let’s also set permissions for unix socket: listen.acl_users = apache,nginx Set how the process manager will control the number of child processes to ondemand to save on memory utilization. pm = ondemand When done start and enable php-fpm service. sudo systemctl enable php-fpm sudo systemctl restart php-fpm Check the service status with systemctl command: $ systemctl status php-fpm ● php-fpm.service - The PHP FastCGI Process Manager Loaded: loaded (/usr/lib/systemd/system/php-fpm.service; disabled; vendor preset: disabled) Active: active (running) since Wed 2020-08-12 19:20:53 UTC; 8s ago Main PID: 3657 (php-fpm) Status: "Ready to handle connections" CGroup: /system.slice/php-fpm.service └─3657 php-fpm: master process (/etc/php-fpm.conf) Aug 12 19:20:53 amazon-linux systemd[1]: Starting The PHP FastCGI Process Manager... Aug 12 19:20:53 amazon-linux systemd[1]: Started The PHP FastCGI Process Manager. Step 5: Install and Configure MariaDB / MySQL Database server. You can use either MySQL or MariaDB Database server. Refer to the guides below for installation steps. Install MySQL 8 on Amazon Linux 2 Install MariaDB 10.5 on Amazon Linux 2 With database server installed and started, create a user and database for WordPress website. $ mysql -u root -p CREATE DATABASE mysite; CREATE USER "mysiteuser"@"localhost" IDENTIFIED BY "DBStr0ngP@sswOd#"; GRANT ALL PRIVILEGES ON mysite.* TO "mysiteuser"@"localhost"; FLUSH PRIVILEGES; \q Where: mysite is to be replaced with the name of database to be created. mysiteuser – Name of database user with access to mysite database DBStr0ngP@sswOd# – Database user password Access granted to localhost user. For remote replace localhost with application server IP address. Test database connection: $ mysql -u mysiteuser -p'DBStr0ngP@sswOd#';
mysql: [Warning] Using a password on the command line interface can be insecure. Welcome to the MySQL monitor. Commands end with ; or \g. Your MySQL connection id is 9 Server version: 8.0.21 MySQL Community Server - GPL Copyright (c) 2000, 2020, Oracle and/or its affiliates. All rights reserved. Oracle is a registered trademark of Oracle Corporation and/or its affiliates. Other names may be trademarks of their respective owners. Type 'help;' or '\h' for help. Type '\c' to clear the current input statement. mysql> SHOW DATABASES; +--------------------+ | Database | +--------------------+ | information_schema | | mysite | +--------------------+ 2 rows in set (0.01 sec) mysql> QUIT Bye Step 6: Install WordPress 5.5 on Amazon Linux 2 With PHP and Nginx installed we should be able to download the latest release of WordPress to our local server and configure our first website. Install wget if now available already. sudo yum -y install wget Download the latest release of WordPress. wget wordpress.org/latest.tar.gz Extract downloaded package. tar xvf latest.tar.gz Move wordpress folder to /var/www directory. sudo mv wordpress /var/www/mysite.computingpost.com Create WordPress configuration file from example configuration template. cd /var/www/mysite.computingpost.com sudo cp wp-config-sample.php wp-config.php Edit the configuration file to set database connection details. $ sudo vim wp-config.php define( 'DB_NAME', 'mysite' ); define( 'DB_USER', 'mysiteuser' ); define( 'DB_PASSWORD', 'DBStr0ngP@sswOd#' ); Step 7: Create Nginx Configuration file for WordPress Let’s create a new Nginx configuration file for our website. sudo vim /etc/nginx/conf.d/mysite.conf This a basic site configuration file which can be improved for advanced settings. server files)/.*\.php$ deny all; location ~ \.php$ try_files $uri =404; include /etc/nginx/fastcgi_params; fastcgi_read_timeout 3600s; fastcgi_buffer_size 128k; fastcgi_buffers 4 128k; fastcgi_param SCRIPT_FILENAME $document_root$fastcgi_script_name; fastcgi_pass unix:/run/php-fpm/www.sock; fastcgi_index index.php; Verify configuration file syntax: $ sudo nginx -t nginx: the configuration file /etc/nginx/nginx.conf syntax is ok nginx: configuration file /etc/nginx/nginx.conf test is successful Set web directory permissions: sudo chown -R nginx:nginx /var/www/mysite.computingpost.com Restart nginx service. sudo systemctl restart nginx Access your website domain on a browser to complete WordPress setup. Provide site title and admin username, email and password. Hit the login button after installation. Use username and password that you set in previous step. There you have WordPress dashboard. You’re good to proceed with Website design and installation of plugins which provide additional features suiting your use cases.
0 notes
Text
Installation and Migration Process to Magento 2 Platform
In the previous article, we have covered the understanding of Magento migration process. We learned about the review of the Magento 1 and the importance of extension. Let us move forward with the installation process of Magento 2.
The next step is to install Magento 2. Here is the list of the system tools you will need for the successful migration process.
Operating System: Must be a Linux x86-64 distribution such as Ubuntu or Debian. Windows or Mac does not support Magento installation or migration.
Memory: Minimum 2 GB of RAM is necessary to have.
Composer: This PHP package manager is used to install Magento elements.
Web Servers: Apache 2.4 along with enabled Apache mod_rewrite and mod_version modules and Nginx 1.x
Database: You must have one of each MySQL 5.6, 5.7, NDB Cluster 7.4; MariaDB 10.0, 10.1, 10.2 and Percona 5.7
PHP Version: PHP7.2 or 7.3 will support.
PHP Extensions: ext-ctype, ext-curl, ext-dom, ext-gd, ext-iconv, ext-intl, ext-mbstring,ext-bcmath, ext-openssl, ext-hash, ext-pdo_mysql, ext-simplexml, ext-soap, ext-xsl, ext-zip, lib-libxml
SSL: It requires a valid security certificate. Magento migration will not work with the self-signed certificates
Other System Accessories: bash, gzip, lsof, nice, sed, tar
Do a Test Run
Yes, as being a Magento development company, we advise you to do the actual test run before you actually opt for the migration process. It will save the countless time of yours to go back and fix errors. It will give a dedicated Magento developer a broad idea about where he might occur error and how to solve or how to get the guidance on it without extending downtime. Do not forget to copy your Magento 1 store to the temporary server and move the copy to Magento 2 to test the process out. Also, take the back up of all the data you have got till this point. Now we will move forward to complete the Magento migration process.
Use the Data Migration Tool
The data migration tool will require access to the databases of Magento 1 and 2. So, you have to open up the necessary ports in your firewall. It will require you to stop all the activities of the Admin panel. Though, It will not disturb the order management activities like shipping, invoice generation. It will work as it was working. After that, the dedicated Magento developer will move forward to transfer your setting and data to the Magento 2 platform. The developer will install the extensions of Magento 1 you want to keep for Magento 2 priorly.
Manual Data Migration
Do not be dependent on the data migration tool for everything. It can do the rest expect the four types of data. That includes:
Media
Storefront design
Admin user accounts
Access control lists
Magento development companies India developer can copy the media files directly from Magento 1 to (root)/pub/media folder in Magento 2. There is no need to copy .htaccess files from the Magento 1 to Magento 2 as it will already be there. The coping over will overwrite the files.
The Magento migration process will end here.
Go Live!
Now your Magento store is all set with updated settings, data and media. You can make it open for your web store visitors. Follow the listed steps to make it available for your visitors.
Activate the maintenance mode of Magento 1 to kick off the downtime of the website.
Move to data migration tool window and press CTRL +C. It will stop the incremental updates.
Go to Magento 2 platform and start all your scheduled jobs, reindex the stock indexer and cache the pages.
For the final step, Point your DNS, load balancers, etc. to your new production hardware.
Now, end the downtime as Your Magento 2 store is all ready to manage the visitor and your daily actions. For more information on migrating to Magento 2, contact top Magento development company India today.
0 notes
Text
Actualizar PHP 7.0 a 7.2 en Ubuntu 16.04
Utilizar DigitalOcean como host para servidores es de gran ayuda en la facilidad de poner en funcionamiento los deployments y los excelentes precios que ofrecen. También ofrecen aplicaciones de un click para obtener un servidor LAMP en Ubuntu 16.04 sin preocuparse por la instalación y configuración de todo el software necesario. Como trabajo en una estación con el mismo sistema operativo, es una opción ideal. El único problema que tengo en este momento es que Ubuntu 16.04 solo tiene acceso a PHP 7.0 en repositorios apt-get predeterminados.
PHP 7.1 ya salió, y Laravel 5.6 necesita que se instale (gracias a un paquete de Doctrine), ¡así que vamos a instalarlo!.
Añadir el repositorio PPA Ondrejs
$ sudo add-apt-repository ppa:ondrej/php $ sudo apt-get update
Instalar PHP 7.1
Vamos a detener nuestro servidor primero, luego instalamos PHP 7.1.
$ service apache2 stop $ sudo apt-get install php7.1 php7.1-common
También instalaremos algunos paquetes adicionales para nuestra instalación de PHP. ¡Estos son necesarios para Laravel y Composer!
$ sudo apt-get install php7.1-curl php7.1-xml php7.1-zip php7.1-gd php7.1-mysql php7.1-mbstring
Una vez hecho esto, verificamos que PHP se actualice en la CLI
$ php -v
Si la primera fila se ve así, ¡hasta ahora lo hemos hecho bien!
PHP 7.2.4–1+ubuntu16.04.1+deb.sury.org+1 (cli) (built: Apr 5 2018 08:53:57) ( NTS )
Remover PHP 7.0
Ahora tenemos PHP7.2, vamos a deshacernos de PHP7.0
$ sudo apt-get purge php7.0 php7.0-common
Una vez hecho esto, reiniciamos el servidor.
$ sudo shutdown -r now
Hacer que Apache utilice PHP7.2
Finalmente, indicamos a Apache que use PHP7.2 ahora que ya no se está utilizando PHP 7.0. Esto Permite habilitar el mod PHP!
$ sudo a2enmod php7.2 $ service apache2 restart
Eso es todo, PHP ahora debería usar PHP 7.2. ¡Disfruta de tus nuevas características increíbles, como los tipos de devolución de funciones y las múltiples capturas de error!
1 note
·
View note
Text
Instalar Ganglia Monitoring Server en Ubuntu

Instalar Ganglia Monitoring Server en Ubuntu. Ganglia, es un sistema de monitoreo para sistemas y redes de alto rendimiento. Creado en 2002 bajo licencia BSD por la Universidad de Berkeley, es la base de muchos de los sistemas de monitorización que todos conocemos. Ganglia utiliza estructuras de datos y algoritmos especialmente diseñados para lograr un consumo mínimo del sistema, independientemente de los datos masivos a recolectar. Dado su carácter poderoso y robusto, actualmente se usa en miles de clusters de todo el mundo, también se admite en la mayoría de sistemas basados en Unix, y varias arquitecturas. En este articulo veremos como instalar y configurar un servidor Ganglia (especifico), para monitorizar varios servidores, vps o clusters.
Instalar Ganglia Monitoring Server en Ubuntu
Nosotros instalamos Ganglia Monitoring en Ubuntu 18.04 LTS, pero también es valido para otros sistemas similares. Comenzamos. Instalar Apache Instalamos el servidor Apache. sudo apt update sudo apt install apache2 Iniciamos y habilitamos Apache con el inicio del sistema. sudo systemctl start apache2.service sudo systemctl enable apache2.service Ya tenemos Apache instalado y corriendo en nuestro servidor. Instalar PHP 7.2 La versión 7.2 de php viene de manera predeterminada en los repositorios de Ubuntu 18.04 LTS, si instalas Ganglia en otras versiones como por ejemplo Ubuntu 16.04 LTS debes agregar el siguiente repositorio (si no es tu caso, omite). sudo apt-get install software-properties-common sudo add-apt-repository ppa:ondrej/php Actualizamos e instalamos PHP 7.2 con los módulos necesarios para el correcto funcionamiento de Ganglia. sudo apt update sudo apt install php7.2 libapache2-mod-php7.2 php7.2-common php7.2-gmp php7.2-curl php7.2-intl php7.2-mbstring php7.2-xmlrpc php7.2-mysql php7.2-gd php7.2-xml php7.2-cli php7.2-zip Ahora vamos a configurar php.ini. sudo nano /etc/php/7.2/apache2/php.ini La configuración que te propongo es correcta para Glanglia, aun así, puedes modificarla dependiendo de tus necesidades. file_uploads = On allow_url_fopen = On short_open_tag = On memory_limit = 256M upload_max_filesize = 100M max_execution_time = 360 max_input_vars = 1500 date.timezone = Europe/Madrid Reiniciamos Apache. sudo systemctl restart apache2.service La instalación de php a terminado, vamos a instalar el monitoring server. Instalamos la herramienta Ganglia Nuestro servidor web ya está en marcha, continuamos con la instalación de Ganglia desde los repositorios oficiales predeterminados. sudo apt update sudo apt install ganglia-monitor rrdtool gmetad ganglia-webfrontend Una vez termine la instalación, iniciamos y habilitamos la herramienta para que arranque con el sistema. sudo systemctl start ganglia-monitor.service sudo systemctl enable ganglia-monitor.service Puedes verificar que se instalo correctamente y que está corriendo, con el comando... systemctl status ganglia-monitor.service ejemplo de salida valida... ● ganglia-monitor.service Loaded: loaded (/etc/init.d/ganglia-monitor; generated) Active: active (running) since Wed 2020-01-23 07:12:46 CST; 38s ago Docs: man:systemd-sysv-generator(8) Tasks: 2 (limit: 3927) CGroup: /system.slice/ganglia-monitor.service └─20853 /usr/sbin/gmond --pid-file /var/run/gmond.pid Jan 23 07:12:46 ubuntu1804 systemd: Starting ganglia-monitor.service... Jan 23 07:12:46 ubuntu1804 ganglia-monitor: Starting Ganglia Monitor Daemon: gmond. Jan 23 07:12:46 ubuntu1804 systemd: Started ganglia-monitor.service. Perfecto... Ganglia ya funciona. Configurar Ganglia El archivo de configuración predeterminado es "gmetad.conf", para que Glangios nos funcione bien debemos hacer algunas modificaciones. sudo nano /etc/ganglia/gmetad.conf Edita la ip de "my cluster". Esta IP debe ser del servidor que trabajara como nodo principal. # A list of machines which service the data source follows, in the # format ip:port, or name:port. If a port is not specified then 8649 # (the default gmond port) is assumed. # default: There is no default value # # data_source "my cluster" 10 localhost my.machine.edu:8649 1.2.3.5:8655 # data_source "my grid" 50 1.3.4.7:8655 grid.org:8651 grid-backup.org:8651 # data_source "another source" 1.3.4.7:8655 1.3.4.8 data_source "my cluster" 50 192.168.0.100:8655 Read the full article
#accederaGanglia#clientesdeGanglia#ConfigurarGanglia#configurarphp.ini#configurarunservidorGanglia#Ganglia#GangliaMonitoring#herramientaGanglia#instalarapache#InstalarGanglia#InstalarGangliaMonitoring#InstalarPHP7.2#LicenciaBSD#MonitoringServer#servidorApache#ubuntu#Ubuntu16.04LTS#Ubuntu18.04LTS#UniversidaddeBerkeley
0 notes
Text
How to install Nginx + php + MySQL on WSL Windows 10

Although Nginx is available for Windows 10/8/7, however, to really understand, experience, build or test web application around, I recommend to use it on Linux. And the Windows 10 WSL is the best option to run Linux+Nginx+PHP+MySQL stack to get a complete Linux based web server without really installing a separate Linux distro. Thus, let's see how to install Linux+Nginx+PHP+MySQL stack on Windows 10 WSL (Windows Subsystem for Linux). What is Nginx? Nginx (engine x) is a high-performance HTTP and reverse proxy web server that also provides IMAP/pop3/smtp services. It is distributed under a BSD-like agreement and characterized by less memory and strong concurrent power. Nginx can be compiled and run on most Unix & Linux os and has a Windows port too. In the case of high concurrency, Nginx is a good alternative to the Apache service: Nginx is one of the software platforms that bosses web hosting business supporting responses up to 50 000 concurrent connections thanks to Nginx for choosing Epoll and Kqueue as the development model. The Nginx code is written entirely from the c language and has been ported to many architectures and operating systems including Linux, FreeBSD, Solaris, mac os x, AIX and Microsoft windows. Nginx has its own library of functions, and in addition to zlib, PCRE, and OpenSSL, standard modules only use system C library functions. Also, these third-party libraries may not be used if you do not need or consider potential authorization conflicts.
Step 1: Install Windows 10 WSL for Nginx + php
If you don't have Windows 10 WSL (Windows Subsystem for Linux) enabled on your system yet, then simply go to the search section of Windows 10 and type "Turn Windows feature on or off" after that scroll and look for Windows subsystem for Linux option, check it and click on the OK button. This will enable it on your system. For step by step guide see this: How to enable WSL on Windows 10.
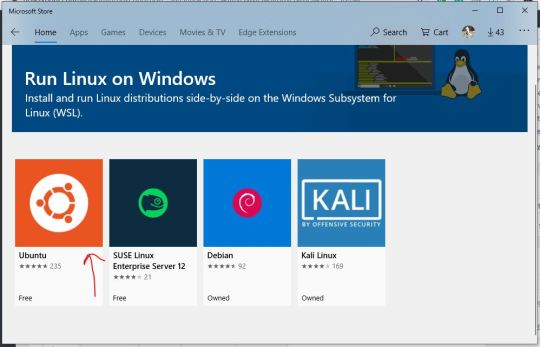
Step 2: Choose Linux Distro App for WIndows 10 WSL
Once you enabled WSL on your system, the next step is to procure some Linux distro app from Microsoft store. Here we are installing and using Ubuntu app on Windows 10 WSL. Just search for Microsoft store on your Windows 10 system and then in the search box type: Run Linux on Windows. The instructions of installing Nginx stack will be the same for Debian and Kali Linux WSL images. And select Ubuntu and then Get it.
Step 3: Run Ubuntu to install Nginx + php on Windows 10 WSL
Once you open the Linux Ubuntu 18.04 WSL on your Windows 10 system it will exactly look and behave like any other Linux command terminal. The first thing which we do is to update the Ubuntu Wsl, use the below-given command: sudo apt-get update sudo apt-get upgrade Second is running of commands to install Nginx on Windows 10 Ubuntu WSL: sudo add-apt-repository ppa:nginx/stable sudo apt-get update sudo apt-get install -y nginx
Step 4: Start Nginx web server service on WSL
We have successfully installed the Nginx on our Windows 10 WSL Linux app, now the thing which we have to do is starting off its service. For that use the below command sudo service nginx start

Step 5: Test Nginx Webserver
Open your Windows 10 browser and type http:localhost:80 It will show the welcome screen of this web server as shown below in the screenshot. "Welcome to nginx! If you see this page, the nginx web server is successfully installed and working. Further configuration is required. For online documentation and support please refer to nginx.org. Commercial support is available at nginx.com. Thank you for using nginx."

Step 6: Installing PHP for Nginx on Windows 10 WSL
The Webserver is ready now we have to install and configure PHP to use with Nginx open-source web server. Here we install modules PHP-FPM and PHP-MySQL to use PHP with both Nginx and MySQL. Add repo: sudo add-apt-repository ppa:ondrej/php Check latest PHP version available to install sudo apt-cache show php According to the available version, install the following PHP modules, in our case the latest version was php7.2 sudo apt-get install php7.2-cli php7.2-fpm php7.2-curl php7.2-gd php7.2-mysql php7.2-mbstring zip unzip Check the installed version php --version Output: h2s@DESKTOP-9OOKS69:~$ php --version PHP 7.2.19-0ubuntu0.18.04.2 (cli) (built: Aug 12 2019 19:34:28) ( NTS ) Copyright (c) 1997-2018 The PHP Group Zend Engine v3.2.0, Copyright (c) 1998-2018 Zend Technologies with Zend OPcache v7.2.19-0ubuntu0.18.04.2, Copyright (c) 1999-2018, by Zend Technologies

Step 7: Start PHP-fpm service
Here is the command to start the installed PHP-fpm service sudo service php7.2-fpm start
Step 8: Configure PHP-fpm for Nginx on Windows 10 WSL
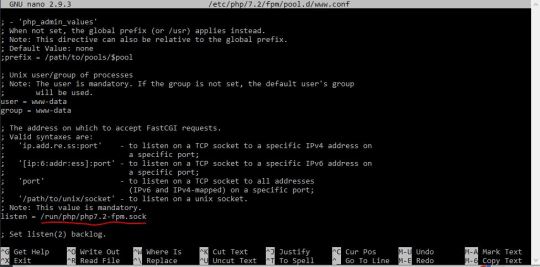
We have to configure PHP-fpm for Nginx otherwise PHP would not be able to contact Nginx and it through an error such as: "502 Bad Gateway” “502 Bad Gateway NGINX” “502 Proxy Error” “502 Service Temporarily Overloaded” “Error 502” “HTTP Error 502 – Bad Gateway” “HTTP 502 Bad Gateway” Thus, open the php-fpm configuration file sudo nano /etc/php/7.2/fpm/pool.d/www.conf In the file find the php-fpm listening socket path In our case, it was like given below and might be same in yours too. /run/php/php7.2-fpm.sock Copy it.
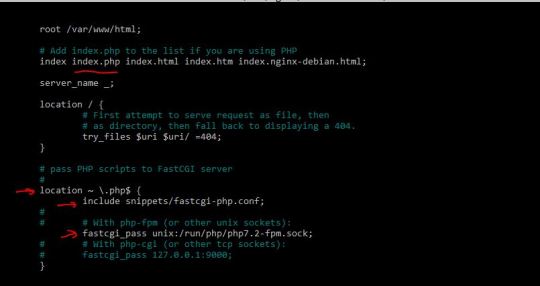
Now, open Nginx Default site configuration sudo nano/etc/nginx/sites-available/default Here find: If we want to use PHP with Nginx, first we have to add index.php in the Nginx configuration file... # Add index.php to the list if you are using PHP index index.html index.htm index.nginx-debian.html; # Add index.php to the list if you are using PHP index index.php index.html index.htm index.nginx-debian.html; Now find the below lines and do editing as mentioned below: #location ~ \.php$ { # include snippets/fastcgi-php.conf; # # # With php-fpm (or other unix sockets): # fastcgi_pass unix:/var/run/php/php7.0-fpm.sock; # # With php-cgi (or other tcp sockets): # fastcgi_pass 127.0.0.1:9000; #} Remove the # or uncomment the following things which are in yellow colour and also change the socket path from /var/run/php/php7.0-fpm.sock; to /run/php/php7.2-fpm.sock; location ~ \.php$ { include snippets/fastcgi-php.conf; # # # With php-fpm (or other unix sockets): fastcgi_pass unix:/run/php/php7.2-fpm.sock; # # With php-cgi (or other tcp sockets): # fastcgi_pass 127.0.0.1:9000; }
After all the changes press CTRL+X and type Y and then press the Enter button to save the changes. Restart Nginx and PHP-FPM services sudo service nginx reload sudo service php7.2-fpm restart
Step 9: Create a test PHP file
Create an index.php file sudo touch /var/www/html/index.php Open it: sudo nano /var/www/html/index.php And add the following lines in that ] Read the full article
#LinuxTutorial#nginx#nginxphpmysqlwindows#nginxphpwindows#nginxserver#nginxstackwindows#phpmysql#phpserverhost#tutorial#windows10
0 notes
Text
How To Install Webmin, nginx on Ubuntu 16.04 or 18.04
Webmin is a web-based control panel for any Linux machine which lets you manage your server through a modern web-based interface. With Webmin, you can change settings for common packages on the fly, including web servers and databases, as well as manage users, groups, and software packages.
In this tutorial, you’ll install and configure Webmin on your server and secure access to the interface with a valid certificate using Let’s Encrypt and Apache. You’ll then use Webmin to add new user accounts, and update all packages on your server from the dashboard.
Prerequisites To complete this tutorial, you will need:
– One fresh Ubuntu 16.04 or 18.04 server , including a sudo non-root user and a firewall. – A Fully-Qualified Domain Name (FQDN), with a DNS A record pointing to the IP address of your server. – Certbot installed by following Step 1 of How To Secure Apache with Let’s Encrypt on Ubuntu 16.04 or 18.04. You’ll use Certbot to generate the TLS/SSL certificate for Webmin.
Step 1 — Installing Webmin First, we need to add the Webmin repository so that we can easily install and update Webmin using our package manager. We do this by adding the repository to the /etc/apt/sources.list file.
Open the file in your editor:
sudo nano /etc/apt/sources.list
Then add this line to the bottom of the file to add the new repository:
/etc/apt/sources.list
deb http://download.webmin.com/download/repository sarge contrib Save the file and exit the editor.
Next, add the Webmin PGP key so that your system will trust the new repository:
wget http://www.webmin.com/jcameron-key.asc sudo apt-key add jcameron-key.asc
Next, update the list of packages to include the Webmin repository:
sudo apt update
if server ask for dependencies, just run this command: add-apt-repository universe Then install Webmin:
sudo apt install webmin
Once the installation finishes, you’ll be presented with the following output:
Webmin install complete. You can now login to https://your_server_ip:10000 as root with your root password, or as any user who can use `sudo`.
Now, let’s secure access to Webmin by putting it behind the Apache web server and adding a valid TLS/SSL certificate.
Step 2: Accessing Webmin Now that Webmin is installed, you can access the interface by opening your web browser and browsing the the server hostname or IP address followed by port 10000. ex. https://localhost:10000 If you’re coming from a remote location, you must add the IP address to the allowed list… you can do that by running the commands below to open Webmin default configuration file. sudo nano /etc/webmin/miniserv.conf Then adding a new line to allow a specific IP or subnet. allow=192.168.X.X Save the file… you should be able to access Webmin
Step 3: Installing Virtualmin Virtualmin only supports Ubuntu LTS versions. If you don’t have those versions of Ubuntu, Virtualmin will fail to install… If you do, then continue below. Now that Webmin is installed, go and install Virtualmin.. Virtualmin allows you to manage nginx virtual hosts and DNS, just like you have with cPanel and other hosted packages. I’m going to assume that you already have a VPS with root access. If you don’t, you can get one from a unmanaged VPS provider I recommend. Logged in to Ubuntu 16.04 server as root user, run following command to check your server’s hostname. hostname -f If the output is anything other than your domain name or a sub-domain, you should change it before you install Virtualmin with nginx. Refer to change Ubuntu 16.04 hostname from command line tutorial and change it now. Let’s start by updating apt cache, apt update This part is similar on all Linux distributions. Download the Virtualmin installation script to your server, wget http://software.virtualmin.com/gpl/scripts/install.sh Then make the script executable sudo chmod +x install.sh Finally, run the commands below to install Virtualmin sh install.sh -b LEMP or sh install.sh --bundle LEMP in case, you want to uninstall: sh install.sh --uninstall Accept the default setting and install. When that’s done, you should have Virtualmin module enabled for Webmin and begin configuring your systems. For ubuntu 16, in case, this error appears: The repository ‘cdrom://Ubuntu-Server 16.04.5 LTS _Xenial Xerus_ – Release amd64 (20180731) xenial Release’ does not have a Release file. just edit : sudo nano /etc/apt/sources.list and comment or remove lines that include cdrom. eg: deb cdrom:[Ubuntu-Server 16.04 LTS _Xenial Xerus_ - Release amd64 (20160420.3)]/ xenial main restricted
INSTALLING MULTIPLE PHP VERSIONS There are few major PHP versions out there such as PHP 5.6, PHP 7.0, PHP 7.1 and PHP 7.2. We should always try to use latest version of the software, sometimes we have to stick with an older version due to compatibility issues with the application we are running. If you’re in a such situation, this post will show you how to use multiple PHP versions with Virtualmin and Nginx server. Why use multiple PHP versions with Virtualmin and Nginx? I was in a such situation recently. I wanted to have WordPress and CPVLab installed on the same VPS. WordPress is compatible with PHP 7.2 but CPVLab isn’t. Only version of PHP CPVLab supported was PHP 5.6. While I could have both WordPress and CPVLab installed with PHP 5.6, that isn’t optimal solution. So I decided to install PHP 7.2 for WordPress and PHP 5.6 for CPVLab. While my reason to use multiple PHP versions with Virtualmin and Nginx only involves PHP 5.6 and PHP 7.2, I’ll list instructions for all four major PHP versions mentioned earlier. These are the PHP versions with ongoing support at the moment of writing. And before we begin, I’m going to assume you have built your Ubuntu 16.04 server with Virtualmin and Nginx and have created at least one virtual server to host a website. Adding Ondřej Surý Repo to the server: Ubuntu 16.04 doesn’t offer newer versions of PHP than PHP v7.0.30 yet. We can get around this by adding ondrej/php PPA to the server. No matter which PHP version you’re planning to install, you should start by adding ondrej/php PPA to be able to use multiple PHP versions with Virtualmin and Nginx. add-apt-repository ppa:ondrej/php Update apt cache apt update Server is now ready to have multiple versions of PHP running at the same time. Let’s start with PHP 5.6. Note that Virtualmin, by default use latest version of PHP available on the server for new virtual servers. This can be changed within the virtual server settings itself after creation or you can specify a default PHP version for new servers from Virtualmin settings. More on that later on this tutorial. Install PHP 5.6 and PHP 7.0 with Virtualmin and Nginx We already have PHP 7.0 running on the server. Let’s install PHP 5.6. Following command will install PHP 5.6 and all essential PHP 5.6 modules. apt install php5.6-cgi php5.6-mysql php5.6-curl php5.6-gd php5.6-imap php5.6-mcrypt php5.6-tidy php5.6-xmlrpc php5.6-xsl php5.6-mbstring php5.6-zip php5.6-cli Install PHP 7.1 and PHP 7.0 with Virtualmin and Nginx If the version of PHP you want is PHP 7.1, following command should take care of it. apt install php7.1-cgi php7.1-mysql php7.1-curl php7.1-gd php7.1-imap php7.1-mcrypt php7.1-tidy php7.1-xmlrpc php7.1-xsl php7.1-mbstring php7.1-zip php7.1-cli Install PHP 7.2 and PHP 7.0 with Virtualmin and Nginx And if you want latest version (PHP 7.2) on your server, following command will do the magic. apt install php7.2-cgi php7.2-mysql php7.2-curl php7.2-gd php7.2-imap php7.2-tidy php7.2-xmlrpc php7.2-xsl php7.2-mbstring php7.2-zip php7.2-cli You can run one or more of above commands and have one or more extra PHP versions running on your server. If you run all three commands above, you’ll have all four version of PHP available to you on the server. Configure Virtualmin to use a Specific PHP Version Virtualmin will use latest available version of PHP for new virtual servers. Old virtual servers will not be affected by above commands. If you need a different version of PHP for existing virtual server, you can go to Virtualmin > Domain Name > Server Configuration > PHP Version and select the PHP version you want from the list. use multiple PHP versions with Virtualmin and Nginx And if you want to change default PHP version for new virtual servers to other than the latest version available on the server, you can change it from Virtualmin > System Settings > Server Templates > Default Settings > PHP Options. A drop down list of available PHP versions will be shown to you. virtualmin-change-php-version Select the version you want and click save. Selected PHP version will be used for all newly created servers. Option to change PHP version from virtual server settings will also be available to all newly created servers. Set Default PHP Version for Command Line When you have multiple php versions on your server, system will use latest version to process PHP commands. Although you can change this on Virtualmin as shown above, it doesn’t change default PHP version for command line. phpinfo page on your browser might say PHP 5.6 but PHP -v command on Putty might say PHP 7.2. This can lead to conflicts in some cases. Especially if your application need to run cronjobs. Solution will be to change default PHP version for command line to match what your application is running. This command will display PHP versions available to you with paths, update-alternatives --list php Following command should change default php version to PHP 7.1. update-alternatives --set php /usr/bin/php7.1 Change the path to PHP as your needs. For configuring with nginx. go to: sudo nano /etc/php/7.2/fpm/php.ini edit the next file: cgi.fix_pathinfo=0 finally, restart php service sudo systemctl restart php7.2-fpm For getting php.ini file dir: php -i | grep 'php.ini' INSTALLLING CLOUDMIN this ony worked on ubuntu 16.04 and it is only for managing cloud virtual server inside your server. In order to install it, just follow the next: wget http://cloudmin.virtualmin.com/gpl/scripts/cloudmin-kvm-debian-install.sh Then make the script executable sudo chmod +x cloudmin-kvm-debian-install.sh Finally, run the commands below to install Virtualmin sh cloudmin-kvm-debian-install.sh Useful commands Just run this command from the command line and it will bring the webmin service up again fresh. # /etc/init.d/webmin restart file configuration for webmin sudo nano /etc/webmin/config sudo nano /etc/webmin/miniserv.conf For adding allow Ip, just edit: sudo nano /etc/webmin/miniserv.conf and edit: allow = localhost 192.168.0.197 # /etc/init.d/webmin restart some virtual configurations here: https://github.com/webmin/webmin/issues/420 installing FPM support Currently, there is no official PHP-FPM support in Virtualmin, so you need to download and install a third-party Virtualmin plugin to create Nginx and PHP-FPM powered websites for domains.Currently, there is no official PHP-FPM support in Virtualmin, so you need to download and install a third-party Virtualmin plugin to create Nginx and PHP-FPM powered websites for domains. cd /opt git clone https://github.com/Real-Gecko/virtualmin-nginx-fpm.git tar -zcf virtualmin-nginx-fpm.tar.gz virtualmin-nginx-fpm Open https://your_server_IP:10000 , click on the Webmin icon >> select ‘Webmin configuration’ from the Webmin menu >> Mebmin module >> Install Module >> From local file >> enter /opt/virtualmin-nginx-fpm.tar.gz >> click ‘Install Module’. Then, click on the Virtualmin icon >> go to ‘System Settings’ >> Features and Plugins >> click configure next to ‘Nginx PHP-FPM website’ feature and set:
Full path to php-fpm command /usr/sbin/php-fpm7.2 Command to start PHP-FPM service php7.2-fpm start Command to stop PHP-FPM service php7.2-fpm stop Command to reload PHP-FPM service php7.2-fpm restart Path to pools configuration directory /etc/php/7.2/fpm/pool.d
Then, click on the Virtualmin icon >> go to >> System Settings >> Features and Plugins >> check ‘Nginx PHP-FPM website’ feature, and disable the ‘Apache website’ , ‘SSL website’, ‘AWstats reporting’ and ‘DAV Login’ and features. That is it. Virtualmin with Nginx and PHP-FPM support has been successfully installed on your server. Add swap Disabling unnecesary services from webmin In my case, I have another email provider so I will disabled some services related with email:
sudo /etc/init.d/clamav-daemon stop systemctl disable clamav-daemon ADDING SWAP MEMORY Before we begin, we can check if the system already has some swap space available. It is possible to have multiple swap files or swap partitions, but generally one should be enough. We can see if the system has any configured swap by typing: sudo swapon --show If you don’t get back any output, this means your system does not have swap space available currently. You can verify that there is no active swap using the free utility: free -h Output total used free shared buff/cache available Mem: 985M 84M 222M 680K 678M 721M Swap: 0B 0B 0B As you can see in the Swap row of the output, no swap is active on the system. Step 2 – Checking Available Space on the Hard Drive Partition Before we create our swap file, we’ll check our current disk usage to make sure we have enough space. Do this by entering: df -h Output Filesystem Size Used Avail Use% Mounted on udev 481M 0 481M 0% /dev tmpfs 99M 656K 98M 1% /run /dev/vda1 25G 1.4G 23G 6% / tmpfs 493M 0 493M 0% /dev/shm tmpfs 5.0M 0 5.0M 0% /run/lock tmpfs 493M 0 493M 0% /sys/fs/cgroup /dev/vda15 105M 3.4M 102M 4% /boot/efi tmpfs 99M 0 99M 0% /run/user/1000 The device with / in the Mounted on column is our disk in this case. We have plenty of space available in this example (only 1.4G used). Your usage will probably be different. Although there are many opinions about the appropriate size of a swap space, it really depends on your personal preferences and your application requirements. Generally, an amount equal to or double the amount of RAM on your system is a good starting point. Another good rule of thumb is that anything over 4G of swap is probably unnecessary if you are just using it as a RAM fallback. Step 3 – Creating a Swap File Now that we know our available hard drive space, we can create a swap file on our filesystem. We will allocate a file of the swap size that we want called swapfile in our root (/) directory. The best way of creating a swap file is with the fallocate program. This command instantly creates a file of the specified size. Since the server in our example has 1G of RAM, we will create a 1G file in this guide. Adjust this to meet the needs of your own server: sudo fallocate -l 1G /swapfile2 We can verify that the correct amount of space was reserved by typing: ls -lh /swapfile2 -rw-r–r– 1 root root 1.0G Apr 25 11:14 /swapfile2 Our file has been created with the correct amount of space set aside. Step 4 – Enabling the Swap File Now that we have a file of the correct size available, we need to actually turn this into swap space. First, we need to lock down the permissions of the file so that only the users with root privileges can read the contents. This prevents normal users from being able to access the file, which would have significant security implications. Make the file only accessible to root by typing: sudo chmod 600 /swapfile2 Verify the permissions change by typing: ls -lh /swapfile2 Output -rw——- 1 root root 1.0G Apr 25 11:14 /swapfile As you can see, only the root user has the read and write flags enabled. We can now mark the file as swap space by typing: sudo mkswap /swapfile2 Output Setting up swapspace version 1, size = 1024 MiB (1073737728 bytes) no label, UUID=6e965805-2ab9-450f-aed6-577e74089dbf After marking the file, we can enable the swap file, allowing our system to start utilizing it: sudo swapon /swapfile2 Verify that the swap is available by typing: sudo swapon --show Output NAME TYPE SIZE USED PRIO /swapfile2 file 1024M 0B -2 We can check the output of the free utility again to corroborate our findings: free -h Output total used free shared buff/cache available Mem: 985M 84M 220M 680K 680M 722M Swap: 1.0G 0B 1.0G Our swap has been set up successfully and our operating system will begin to use it as necessary. Step 5 – Making the Swap File Permanent Our recent changes have enabled the swap file for the current session. However, if we reboot, the server will not retain the swap settings automatically. We can change this by adding the swap file to our /etc/fstab file. Back up the /etc/fstab file in case anything goes wrong: sudo cp /etc/fstab /etc/fstab.bak Add the swap file information to the end of your /etc/fstab file by typing: echo '/swapfile2 none swap sw 0 0' | sudo tee -a /etc/fstab Next we’ll review some settings we can update to tune our swap space. Step 6 – Tuning your Swap Settings There are a few options that you can configure that will have an impact on your system’s performance when dealing with swap. Adjusting the Swappiness Property The swappiness parameter configures how often your system swaps data out of RAM to the swap space. This is a value between 0 and 100 that represents a percentage. With values close to zero, the kernel will not swap data to the disk unless absolutely necessary. Remember, interactions with the swap file are “expensive” in that they take a lot longer than interactions with RAM and they can cause a significant reduction in performance. Telling the system not to rely on the swap much will generally make your system faster. Values that are closer to 100 will try to put more data into swap in an effort to keep more RAM space free. Depending on your applications’ memory profile or what you are using your server for, this might be better in some cases. We can see the current swappiness value by typing: cat /proc/sys/vm/swappiness Output 60 For a Desktop, a swappiness setting of 60 is not a bad value. For a server, you might want to move it closer to 0. We can set the swappiness to a different value by using the sysctl command. For instance, to set the swappiness to 10, we could type: sudo sysctl vm.swappiness=10 Output vm.swappiness = 10 This setting will persist until the next reboot. We can set this value automatically at restart by adding the line to our /etc/sysctl.conf file: sudo nano /etc/sysctl.conf At the bottom, you can add: vm.swappiness=10 Save and close the file when you are finished. Adjusting the Cache Pressure Setting Another related value that you might want to modify is the vfs_cache_pressure. This setting configures how much the system will choose to cache inode and dentry information over other data. Basically, this is access data about the filesystem. This is generally very costly to look up and very frequently requested, so it’s an excellent thing for your system to cache. You can see the current value by querying the proc filesystem again: cat /proc/sys/vm/vfs_cache_pressure Output 100 As it is currently configured, our system removes inode information from the cache too quickly. We can set this to a more conservative setting like 50 by typing: sudo sysctl vm.vfs_cache_pressure=50 Output vm.vfs_cache_pressure = 50 Again, this is only valid for our current session. We can change that by adding it to our configuration file like we did with our swappiness setting: sudo nano /etc/sysctl.conf At the bottom, add the line that specifies your new value: vm.vfs_cache_pressure=50 Save and close the file when you are finished. Some tweaks to mysql add the next lines to mysql configuration:
sudo nano /etc/mysql/mysql.cnf
[mysqld] max_allowed_packet=500M sql_mode = STRICT_TRANS_TABLES,NO_ZERO_IN_DATE,NO_ZERO_DATE,ERROR_FOR_DIVISION_BY_ZERO,NO_AUTO_CREATE_USER,NO_ENGINE_SUBSTITUTION it will allow to import large file sql files.
then restart mysql service mysql restart Tweaking nginx file: sudo nano /etc/nginx/nginx.conf
user www-data; worker_processes auto; pid /run/nginx.pid; include /etc/nginx/modules-enabled/*.conf; events { worker_connections 768; # multi_accept on; } http { ## # Basic Settings ## sendfile on; tcp_nopush on; tcp_nodelay on; keepalive_timeout 65; types_hash_max_size 2048; # server_tokens off; server_names_hash_bucket_size 128; # server_name_in_redirect off; include /etc/nginx/mime.types; default_type application/octet-stream; ## # SSL Settings ## ssl_protocols TLSv1 TLSv1.1 TLSv1.2; # Dropping SSLv3, ref: POODLE ssl_prefer_server_ciphers on; ## # Logging Settings ## access_log /var/log/nginx/access.log; error_log /var/log/nginx/error.log; # Log format set_real_ip_from 127.0.0.1; real_ip_header X-Forwarded-For; log_format main '$remote_addr - $remote_user [$time_local] $status ' '"$request" $body_bytes_sent "$http_referer" ' '"$http_user_agent" "$http_x_forwarded_for"'; # Hide the Nginx version number server_tokens off; # Timeouts client_body_timeout 30; client_header_timeout 30; send_timeout 30; client_max_body_size 20M; reset_timedout_connection on; ## # Gzip Settings ## # Gzip module configuration gzip on; gzip_disable "MSIE [1-6].(?!.*SV1)"; gzip_vary on; gzip_comp_level 3; gzip_proxied any; gzip_buffers 16 8k; # gzip_vary on; # gzip_proxied any; # gzip_comp_level 6; # gzip_buffers 16 8k; # gzip_http_version 1.1; # gzip_types text/plain text/css application/json application/javascript text/xml application/xml application/xml+rss text/javascript; ## # Virtual Host Configs ## include /etc/nginx/conf.d/*.conf; include /etc/nginx/sites-enabled/*; }
save changes and restart service: service nginx restart
0 notes
Text
Install CMS Litecart di ubuntu 18.04
Install CMS Litecart di ubuntu 18.04
Step by step :
Install LAMP # apt-get install apache2 mariadb-server php7.2 libapache2-mod-php7.2 php7.2-common php7.2-mbstring php7.2-xmlrpc php7.2-soap php7.2-gd php7.2-xml php7.2-intl php7.2-mysql php7.2-cli php7.2-zip php7.2-curl php7.2-soap unzip -y
Enable dan start apache2 mariadb # systemctl start apache2 # systemctl start mariadb # systemctl enable apache2 # systemctl enable mariadb
Create…
View On WordPress
0 notes
Text
How can one install PHP 7.4,7.3 or 7.2 on an Amazon Linux 2 virtual machine. Amazon Linux is an operating system designed to provide a stable, secure, and high performance execution environment for applications running on Amazon EC2. This guide will show you how you can easily install PHP 7.x on Amazon Linux 2 instance running in AWS or your development environment. Confirm that the amazon-linux-extras package is installed: $ which amazon-linux-extras /usr/bin/amazon-linux-extras If the command doesn’t return any output, then install the package that will configure the repository: sudo yum install -y amazon-linux-extras Install PHP 7.4, 7.3, 7.2 on Amazon Linux 2 Let’s confirm that PHP 7.x topic is available in our Amazon Linux 2 machine: $ sudo amazon-linux-extras | grep php 15 php7.2 available \ 17 lamp-mariadb10.2-php7.2 available \ 31 php7.3 available \ 42 php7.4 available [ =stable ] 51 php8.0 available [ =stable ] As we can see all PHP 7 topics, in this example we’ll enable php7.4 topic. sudo amazon-linux-extras enable php7.4 Now install PHP packages from the repository. sudo yum clean metadata sudo yum install php php-pear,cgi,common,curl,mbstring,gd,mysqlnd,gettext,bcmath,json,xml,fpm,intl,zip,imap Accept installation of PHP 7 packages on Amazon Linux 2. Dependencies Resolved ======================================================================================================================================================== Package Arch Version Repository Size ======================================================================================================================================================== Installing: php x86_64 7.4.5-1.amzn2 amzn2extra-php7.4 3.2 M php-bcmath x86_64 7.4.5-1.amzn2 amzn2extra-php7.4 68 k php-cli x86_64 7.4.5-1.amzn2 amzn2extra-php7.4 4.9 M php-common x86_64 7.4.5-1.amzn2 amzn2extra-php7.4 1.1 M php-fpm x86_64 7.4.5-1.amzn2 amzn2extra-php7.4 1.7 M php-gd x86_64 7.4.5-1.amzn2 amzn2extra-php7.4 180 k php-intl x86_64 7.4.5-1.amzn2 amzn2extra-php7.4 221 k php-json x86_64 7.4.5-1.amzn2 amzn2extra-php7.4 70 k php-mbstring x86_64 7.4.5-1.amzn2 amzn2extra-php7.4 511 k php-mysqlnd x86_64 7.4.5-1.amzn2 amzn2extra-php7.4 238 k php-pear noarch 1:1.10.7-3.amzn2.0.1 amzn2-core 354 k php-xml x86_64 7.4.5-1.amzn2 amzn2extra-php7.4 198 k Installing for dependencies: apr x86_64 1.6.3-5.amzn2.0.2 amzn2-core 118 k apr-util x86_64 1.6.1-5.amzn2.0.2 amzn2-core 99 k
apr-util-bdb x86_64 1.6.1-5.amzn2.0.2 amzn2-core 19 k generic-logos-httpd noarch 18.0.0-4.amzn2 amzn2-core 19 k httpd x86_64 2.4.43-1.amzn2 amzn2-core 1.3 M httpd-filesystem noarch 2.4.43-1.amzn2 amzn2-core 23 k httpd-tools x86_64 2.4.43-1.amzn2 amzn2-core 87 k libxslt x86_64 1.1.28-5.amzn2.0.2 amzn2-core 243 k libzip x86_64 1.3.2-1.amzn2.0.1 amzn2-core 62 k mailcap noarch 2.1.41-2.amzn2 amzn2-core 31 k mod_http2 x86_64 1.15.3-2.amzn2 amzn2-core 146 k oniguruma x86_64 5.9.6-1.amzn2.0.3 amzn2-core 127 k php-pdo x86_64 7.4.5-1.amzn2 amzn2extra-php7.4 133 k php-process x86_64 7.4.5-1.amzn2 amzn2extra-php7.4 88 k Transaction Summary ======================================================================================================================================================== Install 12 Packages (+14 Dependent packages) Total download size: 15 M Installed size: 61 M Is this ok [y/d/N]: y Check default PHP version: $ php --version PHP 7.4.5 (cli) (built: Apr 23 2020 00:10:21) ( NTS ) Copyright (c) The PHP Group Zend Engine v3.4.0, Copyright (c) Zend Technologies To install PHP 7.2, make sure you disable 7.4 and 7.3 then enable 7.2. sudo amazon-linux-extras disable php7.4 sudo amazon-linux-extras disable php7.3 sudo amazon-linux-extras enable php7.2 sudo yum install php php-pear,cgi,common,curl,mbstring,gd,mysqlnd,gettext,bcmath,json,xml,fpm,intl,zip,imap Confirm version of PHP. $ php -v PHP 7.2.31 (cli) (built: Jul 2 2020 23:17:00) ( NTS ) Copyright (c) 1997-2018 The PHP Group Zend Engine v3.2.0, Copyright (c) 1998-2018 Zend Technologies Similar commands should be used when installing PHP 7.3 on Amazon Linux 2. sudo amazon-linux-extras disable php7.4 sudo amazon-linux-extras disable php7.2 sudo amazon-linux-extras enable php7.3 sudo yum install php php-pear,cgi,common,curl,mbstring,gd,mysqlnd,gettext,bcmath,json,xml,fpm,intl,zip,imap
0 notes
Text
تنصيب php7.2 على توزيعة centos7 بأسهل الطرق فقط على معهد العراق
السلام عليكم و رحمة الله و بركاتة اهلا بكم في معهد العراق لتطوير الويب نقدم لكم شرح تنصيب php بأحدث اصداراته و هي php7.2 على توزيعة centos7 بأسهل الطرق نبدأ على بركة الله ندخل من خلال ssh الى سيرفر يعمل على توزيعة centos7 ثم نظيف الأمرين التاليين
كود:
# yum install http://ift.tt/2h5GJQs] [B] # yum install http://ift.tt/1M6Cafj
بعدها نقوم بتنصيب yum-utils الاضافة اللازمة لتنصيب php7.2 بعدها نقوم بتفعيل Remi , yum-config-manager اللازمة لتنصيب php و حسب الامر التالي
كود:
# yum-config-manager --enable remi-php70 [Install PHP 7.0]
بعدها يمكنك اختيار تنصيب php7.1 او php7.2 على سيرفرك و حسب احتياجك من خلال الامرين التاليين اختر واحد
كود:
# yum-config-manager --enable remi-php71 [Install PHP 7.1] # yum-config-manager --enable remi-php72 [Install PHP 7.2]
بعدها نضيف الامر التالي لتنصب php و اضافاته بكل سهولة من خلال الامر التالي
كود:
# yum install php php-mcrypt php-cli php-gd php-curl php-mysql php-ldap php-zip php-fileinfo
مشاهدة المرفق 48 بعد النصيب نظيف الامر php -v لمشاهدة تنصيب اخر اصدارات php على centos7 مشاهدة المرفق 49 from معهد العراق لتطوير الويب http://ift.tt/2h3OBBR via معهد العراق لتطوير الويب
0 notes
Text
Bolt is a lightweight content management system based on PHP. It is build from the beginning on Silex microftamework which makes it easy to start working on small applications. Bolt provides a good alternative for developers looking for a modern PHP system in place on WordPress. In this blog post we will be performing an installation of Bolt CMS with MySQL on Ubuntu 20.04|18.04. Cool features of Bolt CMS Clean architecture built with Silex, very easy to learn Standard components for Forms and Database Clean purpose, not trying to solve every problem Step 1: Update Ubuntu System First update and upgrade your server before installations sudo apt-get -y update sudo apt-get -y upgrade Also Set your timezone with the below command sudo dpkg-reconfigure tzdata Reboot your system after updates sudo reboot Step 2: Install required packages The below packages are required for the installation of Bolt, run the below command to install them: sudo apt install -y curl wget vim git unzip socat bash-completion apt-transport-https Install PHP on Ubuntu Here, we are going to install PHP 7.x and some of the required modules. sudo apt install -y php php-cli php-fpm php-common php-mbstring php-zip php-pgsql php-sqlite3 php-curl php-gd php-mysql php-intl php-json php-opcache php-xml Install Nginx on Ubuntu Run the below command to install Nginx on Ubuntu 20.04 server machine. sudo apt-get install nginx Start and enable Nginx with the following commands: sudo systemctl start nginx sudo systemctl enable nginx Install MySQL and Create a Database for Bolt Run the commands below to install MySQL database server: sudo apt -y install mysql-server sudo systemctl start mysql sudo systemctl enable mysql Secure mysql installation $ sudo mysql_secure_istallation Would you like to setup VALIDATE PASSWORD plugin? N New password: your_secure_password Re-enter new password: your_secure_password Remove anonymous users? [Y/n] Y Disallow root login remotely? [Y/n] Y Remove test database and access to it? [Y/n] Y Reload privilege tables now? [Y/n] Y Connect to mysql to create a database for Bolt sudo mysql -u root -p Enter root password created above. Once connected, run the following commands to create a database and database user. CREATE DATABASE bolt; CREATE USER 'bolt'@'localhost' IDENTIFIED BY 'mypassword'; GRANT ALL ON bolt.* TO 'bolt'@'localhost'; mysql> FLUSH PRIVILEGES; mysql> exit Step 3: Configure Nginx for Bolt CMS Create a file called bolt.conf in nginx path as shown. sudo vim /etc/nginx/sites-available/bolt.conf Add the following content into the created file server $) try_files /index.php =404; fastcgi_split_path_info ^(.+\.php)(/.+)$; fastcgi_index index.php; fastcgi_pass unix:/var/run/php/php7.2-fpm.sock; include fastcgi_params; fastcgi_param PATH_INFO $fastcgi_path_info; fastcgi_param SCRIPT_FILENAME $document_root$fastcgi_script_name; location = /bolt try_files $uri /index.php?$query_string; location ^~ /bolt/ try_files $uri /index.php?$query_string; Enable the created website by creating a simlink as shown: sudo ln -s /etc/nginx/sites-available/bolt.conf /etc/nginx/sites-enabled/bolt.conf Check nginx configiration and restart nginx $ sudo nginx -t nginx: the configuration file /etc/nginx/nginx.conf syntax is ok nginx: configuration file /etc/nginx/nginx.conf test is successful $ sudo systemctl restart nginx Step 4: Download Bolt CMS on Ubuntu 20.04|18.04 Change to your root directory cd /var/www/ Now download the latest version of Bolt CMS from github with the below command: sudo git clone https://github.com/bolt/bolt.git Once downloaded, you should see a directory named ‘bolt’. Change to the directory and install bolt cd bolt sudo composer install Set up Bolt permissions Bolt directory should be owned by nginx.
chown -R www-data:www-data /var/www/bolt chmod -R 755 /var/www/bolt Configure bolt configuration file sudo cp app/config/config.yml.dist app/config/config.yml Now open Bolt from your browser to continue with the installations: http://bolt.example.com/. You should get a page as below. Fill the requirements to create a user. Once you submit the user settings, you should be taken to a page as shown You should be done with installation. To access Bolt CMS admin, append Bolt on your url: http://bolt.example.com/bolt. Enjoy working with Bolt CMS
0 notes
Text
Instalar Drupal en Ubuntu Server

Instalar Drupal en Ubuntu Server. Junto con Wordpress y Joomla, Drupal es uno de los CMS más utilizados, lógico, es buenísimo, altamente seguro y de código abierto. En este articulo instalaremos un servidor para Drupal desde cero en Ubuntu Server 18.04 LTS (es valido para sus derivados y otras versiones), con las siguientes características: MySQL, PHP-FPM 7.2 y Nginx. Solo debes seguir los pasos indicados uno por uno.
Instalar Drupal en Ubuntu Server
Antes de comenzar, actualizamos el sistema e instalamos el descompresor unzip. sudo apt update && sudo apt upgrade sudo apt install unzip Instalar y configurar MySQL Ahora procedemos a instalar MySQL o MariaDB, nuestro Ubuntu 18.04 viene por defecto con MySQL. sudo apt-get install mysql-server Aseguramos la instalacion: mysql_secure_installation Responde a las siguientes preguntas: Configurar la contraseña de root. N Eliminar usuarios anónimos. Y Deshabilitar el inicio de sesión remoto para el usuario root. Y Borrar la base de datos demo y los accesos. Y Puedes configurar una password especifica o no, es tu decisión. En el resto de preguntas responde siempre "Y", esto eliminará los usuarios anónimos, la base de datos demo, deshabilitará los inicios de sesión remotos, y cargará las nuevas reglas de MySQL. La base de datos ya esta configurada y lista para ser usada. Se supone que debería estar corriendo, por si acaso la iniciamos manualmente y habilitamos su arranque con el sistema. systemctl start mysql systemctl enable mysql Bien... nos falta crear una base de datos para Drupal y su usuario. Nosotros insertaremos como usuario de MySQL el nombre drupal, no te olvides de insertar una contraseña segura. Abrimos la consola de MySQL. sudo mysql Linea por linea ejecuta lo siguiente: mysql> CREATE DATABASE drupal; mysql> GRANT ALL PRIVILEGES ON drupal.* TO 'drupal'@'localhost' IDENTIFIED BY 'mi-password-seguro'; mysql> FLUSH PRIVILEGES; mysql> \q Instalar y configurar PHP Vamos con el php, en este caso instalaremos la versión 7.2. sudo apt install php7.2-cli php7.2-fpm php7.2-mysql php7.2-json php7.2-opcache php7.2-mbstring php7.2-xml php7.2-gd php7.2-curl Al instalar Drupal necesitamos unos requisitos un poco superiores a Wordpress, aplicamos los mínimos en el archivo php.ini desde nuestra terminal (puedes aumentarlos si es necesario) sudo sed -i "s/memory_limit = .*/memory_limit = 256/" /etc/php/7.2/fpm/php.ini sudo sed -i "s/upload_max_filesize = .*/upload_max_filesize = 128M/" /etc/php/7.2/fpm/php.ini sudo sed -i "s/post_max_size = .*/post_max_size = 128M/" /etc/php/7.2/fpm/php.ini sudo sed -i "s/max_execution_time = .*/max_execution_time = 3000/" /etc/php/7.2/fpm/php.ini Instalar y configurar Nginx Llego el momento de instalar Nginx, no perdamos más tiempo. sudo apt install nginx Creamos el archivo de configuración de nuestro sitio web Drupal. sudo nano /etc/nginx/sites-available/tu-dominio.com Copia y pega lo siguiente, OJO!!!, con tu nombre de dominio. server { listen 80; server_name tu-dominio.com www.tu-dominio.com; root /var/www/tu-dominio.com; index index.html index.htm index.php; charset utf-8; access_log /var/log/nginx/tu-dominio.com.access.log; error_log /var/log/nginx/tu-dominio.com.error.log info; location ~ \..*/.*\.php$ { return 403; } location ~ ^/sites/.*/private/ { return 403; } location ~ ^/sites/+/files/.*\.php$ { deny all; } location ~ (^|/)\. { return 403; } location / { try_files $uri /index.php?$query_string; } location @rewrite { rewrite ^/(.*)$ /index.php?q=$1; } location ~ /vendor/.*\.php$ { deny all; return 404; } location = /favicon.ico { access_log off; log_not_found off; } location = /robots.txt { access_log off; log_not_found off; } location ~ '\.php$|^/update.php' { fastcgi_pass unix:/var/run/php/php7.2-fpm.sock; fastcgi_index index.php; include fastcgi_params; fastcgi_param SCRIPT_FILENAME $document_root$fastcgi_script_name; include /etc/nginx/fastcgi.conf; } location ~ ^/sites/.*/files/styles/ { try_files $uri @rewrite; } location ~ ^(/+)?/system/files/ { try_files $uri /index.php?$query_string; } location ~* \.(js|css|png|jpg|jpeg|gif|ico|svg)$ { try_files $uri @rewrite; expires max; log_not_found off; } location ~ /.(?!well-known).* { deny all; } } Guarda el archivo y cierra el editor. Creamos un enlace simbólico para no permitir el acceso al archivo original. sudo ln -s /etc/nginx/sites-available/tu-dominio.com /etc/nginx/sites-enabled/tu-dominio.com Verificamos que la configuración es valida y reiniciamos el servicio. sudo nginx -t sudo systemctl restart nginx Una vez concluido el ultimo paso, ya tenemos listo nuestro servidor web. Te recomiendo reiniciar el sistema antes de instalar Drupal. reboot Instalar Drupal Descargamos la ultima versión estable de Drupal, en este caso la 8.8.0 (puedes revisar si existen nuevas versiones aquí). wget https://ftp.drupal.org/files/projects/drupal-8.8.0.zip -O drupal.zip Descomprimimos el archivo descargado y lo movemos al directorio de nuestro sitio web. sudo unzip drupal.zip sudo mv drupal-8.8.0/ /var/www/tu-dominio.com No olvides conceder los permisos necesarios, es importante. sudo chown -R www-data: /var/www/tu-dominio.com El ultimo paso es acceder desde tu navegador web a la url del dominio, y finalizar el proceso de instalación.
Instalar Drupal Te recomiendo que revises la documentación de Drupal, no te arrepentirás. Espero que este articulo te sea de utilidad, puedes ayudarnos a mantener el servidor con una donación (paypal), o también colaborar con el simple gesto de compartir nuestros artículos en tu sitio web, blog, foro o redes sociales. Read the full article
#cms#documentacióndeDrupal#drupal#InstalarDrupal#InstalarNginx#Joomla#mysql#nginx#php#PHP-FPM#ubuntu#UbuntuServer#Ubuntuserver18.04LTS#unzip#wordpress
0 notes
Text
Instalar Dolibarr en Ubuntu 18.04 LTS

Instalar Dolibarr en Ubuntu 18.04 LTS. Dolibarr es una aplicación ERP y CRM de código abierto muy fácil de usar. Es muy útil para administrar de forma simple y efectiva empresas, autónomos, organizaciones y más. Para crear

este articulo nos hemos basado en un servidor Ubuntu 18.04, pero es valido para cualquiera de sus derivados o servidores / VPS que montan Debian. Dolibarr es una conocida herramienta altamente valorada por profesionales y usuarios en general, por todo ello no vamos a perder el tiempo explicando sus bondades, todos las conocemos. Así que vamos al grano, instalamos Dolibarr en un servidor o vps desde cero.
Instalar Dolibarr en Ubuntu 18.04 LTS
Como es habitual comenzamos actualizando nuestro sistema. apt-get update && apt-get upgrade Dolibarr necesita Apache, PHP, y Mysql / MariaDB, por tanto nos aseguramos de que el firewall UFW de Ubuntu tiene los puertos abiertos. sudo ufw app info "Apache Full" En el caso de que no veas los puertos abiertos, ejecuta lo siguiente. sudo ufw allow in "Apache Full" Continuamos con la instalación de Apache. sudo apt install apache2 Habilitamos el inicio automático con el sistema. systemctl enable apache2 Podemos verificar que Apache se instalo correctamente, y que está corriendo en nuestro servidor con el siguiente comando. systemctl status apache2 ejemplo de salida correcta... ● apache2.service - The Apache HTTP Server Loaded: loaded (/lib/systemd/system/apache2.service; enabled; vendor preset: enabled) Drop-In: /lib/systemd/system/apache2.service.d └─apache2-systemd.conf Active: active (running) since Fri 2019-11-16 09:23:09 CDT; 14min ago Si te da algún error inicias Apache de forma manual. sudo systemctl start apache2 Ahora instalamos el servidor MySQL. Recuerda que Ubuntu no viene por defecto con MariaDB (supongo que Oracle debe apoyar económicamente el proyecto, sino, no lo entiendo) , así que instalaremos MySQL 5.7. sudo apt-get install mysql-client-5.7 mysql-client-core-5.7 mysql-common mysql-server-5.7 mysql-server-core-5.7 Aseguramos la instalación. sudo mysql_secure_installation Lo que vamos a hacer es: Configurar la contraseña de root. Eliminar usuarios anónimos. Deshabilitar el inicio de sesión remoto para el usuario root. Borrar la base de datos demo y los accesos. Puedes configurar una password especifica o no, es tu decisión (normalmente como root, pulsa «Y»). En el resto de preguntas responde siempre «Y», esto eliminará los usuarios anónimos y la base de datos de prueba, también deshabilitará el inicio de sesión remoto, y cargará las nuevas reglas para que MySQL aplique inmediatamente los cambios que hemos realizado. La base de datos ya esta configurada y lista para ser utilizada. Nos falta iniciarla (normalmente ya debería estarlo), y hacer que arranque con el sistema. sudo systemctl start mysql sudo systemctl enable mysql Creamos una nueva base de datos, y el usuario necesario para instalar Dolibarr. Abrimos la consola MySQL. sudo mysql -uroot -p No olvides insertar tu password. mysql> CREATE DATABASE dolibarr character set UTF8 collate utf8_bin; mysql> GRANT ALL PRIVILEGES ON dolibarr.* TO 'dolibarr'@'localhost' IDENTIFIED BY 'Mi-Password'; mysql> FLUSH PRIVILEGES; mysql> quit Reiniciamos MySQL. sudo systemctl restart mysql Bien, vamos con php y las extensiones necesarias. apt-get install php7.2 php7.2-cli php7.2-common php7.2-curl php7.2-gd php7.2-intl php7.2-json php7.2-mbstring php7.2-mysql php7.2-soap php7.2-xml php7.2-xmlrpc php7.2-zip libapache2-mod-php7.2 Reiniciamos Apache. systemctl restart apache2 Para poder operar con Dolibarr es necesario crear un archivo de configuración en Apache, lo que se conoce como Virtualhost. nano /etc/apache2/sites-available/dolibarr.conf Copia y pega lo siguiente (con el nombre de tu dominio): ServerName midominio.com DocumentRoot /var/www/dolibarr/htdocs CustomLog ${APACHE_LOG_DIR}/dolibarr.domain.com.access.log combined ErrorLog ${APACHE_LOG_DIR}/dolibarr.domain.com.error.log DirectoryIndex index.php Options -Indexes AllowOverride All Order allow,deny allow from all Guarda el archivo y cierra el editor. Creamos el directorio Dolibarr. mkdir -p /var/www/dolibarr Habilitamos el archivo de configuración (Virtualhost) que hemos creado en el paso anterior. sudo a2ensite dolibarr Deshabilitamos el archivo de configuración predeterminado. sudo a2dissite 000-default No te olvides de habilitar el rewrite. sudo a2enmod rewrite Verificamos que la configuración es correcta. sudo apachectl -t ejemplo de salida correcta... Syntax OK Reiniciamos el servicio. sudo systemctl restart apache2.service Instalar Dolibarr Instalamos la ultima versión, en este caso la 10.0.3. Puedes verificarla en la siguiente URL. cd /var/www/ wget https://sourceforge.net/projects/dolibarr/files/Dolibarr%20ERP-CRM/10.0.3/ Descomprimimos la herramienta y modificamos el nombre por defecto. gunzip -c dolibarr.tgz | tar xvf - mv dolibarr-* dolibarr Concedemos permisos. chown www-data: -R /var/www/dolibarr Bien... ya lo tenemos. Desde tu navegador web preferido, accede a la url del dominio que colocamos en el virtualhost de Apache. En el proceso de instalación te solicitara los datos de MySQL. Database name: dolibarr Driver type: mysqli Database server: localhost Port: 3306 Login: dolibarr Password: Mi-Password Después configuras el usuario y la contraseña del usuario administrador de Dolibarr. Haces click en siguiente y accederás por primera vez a la zona admin, configura según tus necesidades.
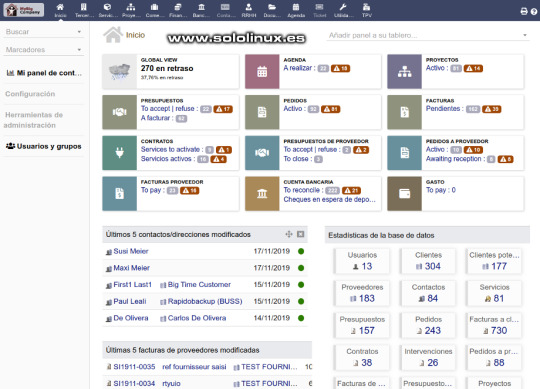
Dolibarr ERP Ya tienes instalado tu servidor Dolibarr, felicidades. Espero que este articulo te sea de utilidad, puedes ayudarnos a mantener el servidor con una donación (paypal), o también colaborar con el simple gesto de compartir nuestros artículos en tu sitio web, blog, foro o redes sociales. Read the full article
#Apache#codigoabierto#debian#Dolibarr#firewallUFW#InstalarDolibarr#lts#mysql#oracle#password#php#servidorDolibarr#ubuntu#Ubuntu18.04
0 notes