
Statistics
We looked inside some of the posts by smubuh and here's what we found interesting.
Average Info
Notes Per Post
2K
Likes Per Post
2K
Reblog Per Post
243
Reply Per Post
24
Time Between Posts
1 month
Number of Posts By Type
Photo
4
Text
3
Note
10
Last Seen Tumblr Blogs


Fun Fact
Celebrities use Tumblr as well.
Photo


Hello everyone! It’s been such a long time since I have jumped on tumblr! I have no idea what is going on in the community these days but I hope wonderful and creative things are being shared :) We have been enjoying married life, almost 2 years now! We also finally moved into our house last summer and I have been busy decorating. Mila turned 2 in March, she is just as crazy and adorable as ever! Ryan and I also took our first trip to Europe and went to Ireland for 10 days, an absolutely amazing and an unforgettable experience! I’m still teaching, I will be starting my 6th year in the fall! Also still very busy with Etsy orders!
I sincerely hope everyone is healthy and happy! All of my content and resources will be available as long as tumblr allows! Stay safe! <3
144 notes
·
View notes
Text
What’s Up...
Miss you guys! Last day of teaching was last week and I have just been enjoying summer, reading, and working hard on my etsy shop. Our house should be done in 2 months(ish) so Mila can have more room to play. We have been hiking recently - the weather has been so nice. I won’t really be on but my tumblr will continue to be available for you, keep making awesome things! :)

156 notes
·
View notes
Text
update finally
Hello everyone! I hope you are all doing well! So I have been absent from Tumblr for about a month now. Nothing bad has happened or anything, I just sort of pushed Tumblr to the bottom of my priority list for now.
I have been working hard teaching art, we have been doing clay so I have been firing the kiln for the last couple of weeks. I have have also been working on my etsy shop quite a bit, I hope to continue to grow it every year, as it helps supplement my teacher income (yay for teacher salaries!)
Our house is supposed to be done in July, as of right now we have windows and it is completely framed. Once we move in, I imagine I will have some projects such as organizing, hanging things up, decorating, and setting up appointments. I am very excited though to have more space for Mila.
Speaking of Mila, she turns one tomorrow?! I can’t believe it! She is currently 47 pounds and has a ton of energy. I try to take her on 3 walks a day and dog park at least twice a week. She is such a snuggle bug and I love playing fetch with her.
I guess we have just been busy with friends, family, Mila, and work and I sort of forgot about Tumblr. I love you all very much and really appreciate the support and kindness. All of my resources will remain on my page, but for now I will not really be updating anything or answering any questions.
Please stay safe and keep designing, writing, and creating amazing things!
150 notes
·
View notes
Note
⛸
⛸ Ice skating or roller skating? I am far better at roller skating than ice skating! :P
50 notes
·
View notes
Photo

♡ How to make an Action - Photoshop Tutorial ♡
Hello everyone! I am finally writing another tutorial after taking a couple weeks off. This tutorial will cover some of the basics of making an action in photoshop. Keep reading to go to the tutorial.
Step 1. First make sure that you have the actions window open, go to Window>Actions. To make a new action set, click on the little folder icon and then name your set. Click Ok when done.

Step 2. Next we are going to make a new action by click the Create New Action icon, name your action. Once you hit record, whatever you click or adjust will be recorded into the new action you just created.

Step 3. The recording should now be going, and to begin the action we will put everything into a folder and name it “Original” incase something goes wrong. Go to Select>>All Layers. Then click Layer>>Group Layers.

Step 4. Now double click on the new layer group and change the name to Original, this is where the original image will be.

Step 5. Next you need to duplicate the group by right clicking on the “Original” group and clicking Duplicate Group... Then right click the Original Copy group and select Merge Group.

Step 6. Go ahead and click on the stop icon in the actions window to stop the action for now. Your steps should look something like mine above. I will sometimes stop the action so I can plan what I am going to do next.

Step 7. Now let’s make a folder for the action. Press the record icon on the actions layer to start recording again. Make sure that the Original Copy layer is selected and go to Layer>>Group Layers. Double click on this new folder and rename it to your action.

Step 8. Now this where you can start adding adjustment layers and adding any blurs, etc. What I will usually do is stop the action and test things out first and write down what I do. Once I like what I have come up with, I delete my “practice” layers and then start recording using my notes of the steps I did.
A couple of things to remember, if you don’t like a step you can click on it and delete it using the trash can icon. You can also double click on a step to edit it if needed.
Another helpful tool to use is the little grey square with dots in it, this will toggle a dialog box. For example I have turned it on for the motion blur step. That means that instead of the action just running the motion blur automatically, the motion blur window will pop up and allow the person using the action to change the settings if they want.

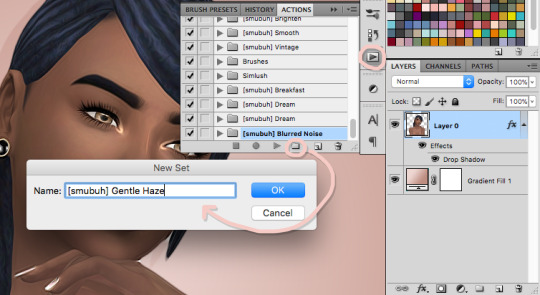
Step 9. To save your action, click on the action set and then click on the icon in the top right of the action window to reveal this drop down. Choose Save Actions... and then name it whatever you would like!
Remember that actions can be a lot of trial and error. I would recommend testing the action out on a image a couple times to make sure it works how you want. I hope this was helpful!
566 notes
·
View notes
Note
🏅! :3
🏅 What’s your best achievement? Being the first in my family to graduate college (student loans are brutal though!)
51 notes
·
View notes
Note
🐉
🐉 What’s your favourite mythical/extinct creature? I think Hobbits are pretty cool, they love a simple life of reading books, gardening and sitting by the fire :)
46 notes
·
View notes
Note
😶 and 👄
😶 What’s your ethnicity? I’m pretty mixed I think, my grandma is Native American, my grandpa is Italian, and maybe some European from my grandma and grandpa?!
👄What’s your first language? English :)
43 notes
·
View notes
Note
For what it's worth, I think you're exactly the sort of person that should be a teacher. You're a really bright, positive person and I know that I've enjoyed being your student, and I'm sure your littler ones feel the same way. I don't know if teaching is the place for you, but I do know that I think you're a very good teacher and a very good person, and I think the world would be sweeter and kinder if more children got to have more teachers like you.
Seriously thank you for taking the time out of your day to send this to me! I think the past two weeks have been sort of difficult, the kiddos have been pretty mean to each other and they have just been disrespectful to the supplies and the room. I had to stop my 1st graders mid project and we all gave each other compliments because I couldn’t do the negativity anymore. I had two 5th grade girls fighting with each other so I skipped my lunch and the three of us just sat and talked in my room on my rug and worked it out. I sometimes think I need to find a new career, but I honestly love what I do and I would do anything for my students. They have so much potential I just want so badly for them to know how much they matter and I want them to know that they are truly capable of extraordinary things. <3
68 notes
·
View notes
Note
Hello, Abby! I was wondering if you'd prefer those that recolor your cc, to not include the mesh? I plan on recoloring something, but I won't include the mesh just in case, and will credit you ♥
Hello! You don’t have to include the mesh, it’s only if you want to! Thank you for asking and have a great week!
32 notes
·
View notes
Note
You remind me of a really great teacher I had in middle school. Before that teacher, I couldn't do math for the life of me. And she taught so well that in high school I never got anything short of an a in math. And it's similar with you, but for Photoshop instead of math. I didn't understand Photoshop at all until I found your tutorials and they taught me some of the necessities in a way that I could understand. As someone with a learning disability, I thank you for all you've done.
Aww thank you so much!! This really means a lot to me! Sometimes I wonder if teaching is where I am supposed to be, it’s hard a lot of days, but things like this remind me of the importance of teaching and how rewarding it is! I am so sorry for the lack the tutorials recently, I have just felt kinda meh and I have been working on other things in my life. I love you all and I hope you have an amazing day!
56 notes
·
View notes
Note
Hi! Could you please do the simple enhance gimp tutorial for photoshop? Thanks 💙
Hello! :)) I have it on my tutorial to-do list :) Hopefully in the next month or two! Have a great day!

73 notes
·
View notes
Note
hi love. hope you’re having s great day. just wondering if you had any other blogs besides this? or social media’s we can follow that you feel comfortable sharing? i love your acc and if you don’t already you should make a cc finds blog because your taste and style is so beautiful. 💕
Hello! I hope you are having a great day as well! That is too kind of you to say! I think my style is pretty mild and plain, but i appreciate that! So I do have a couple other things you could follow below:Smubuhfinds.tumblr.comEditcoffeeshop.tumblr.comPinterest.com/abigailheartsry*I would only feel comfortable sharing my insta with people I’m close with, so just message me if we chat a lot :)
45 notes
·
View notes
Text
30 Questions Tag
Thank you @kerrits @mamabearssims @clubuh @livvsims @rheathesims @peachiepixels @hazelpxls for tagging me! Sorry I am so late to post this!
~(^з^)-♡
Rules: Answer 30 questions and tag 10 people Nickname(s): Abs, Abagee, Smubuh, Spoda, Baby Abs Gender: Female Sign: Virgo Height: 5′2″ Time: 8:08 PM Birthday: September 4th Favourite Band(s): Fall Out Boy, Panic! At the Disco, Cobra Starship Favourite Solo Artist(s): Amos Lee, Jasmine Thompson Song Stuck In My Head: “Music of the Night” from Phantom of the Opera Last Movie I Watched: We just watched “LOGAN” last night Last Show I Watched: Planet Earth II When Did I Create This Blog: I created it sometime in early 2016, but really started posting in November or December of 2016. What Do I Post: Mostly tutorials and asks, sometimes edits or builds What Did I Last Google: Can dogs go potty on synthetic turf? Haha weird I KNOW! :P Other Blogs: I have my smubuhfinds blog and the editcoffeeshop blog. Do I Get Asks: Yes, and I feel so bad I am bad at keeping up with them! Why Did I Choose This Url: Ryan started calling me smubuh during our freshmen year of college and it just stuck?! Following: 493 Followers: 12,317 Average Hours of Sleep: Probably about 7ish?! Lucky Number: 2, it was always my softball number! Instrument: I wish! I attempted to play the clarinet in middle school but that was a total fail! What Am I Wearing: Grey sweater, black pants, and fuzzy socks! Dream Job: I love my job as an art teacher actually and I can’t imagine doing anything else! Last Book I Read: Probably “Room”?? 3 Favourite Fandoms: Avatar the Last Airbender, LOTR/Hobbit, Gravity Falls maybe?
I will tag @simblrbreezycakes @viiavi @caprisims @toastiesims @pxelmango @rootivy @citrusio @acidbulb @taeskii @ayshio @tangandzing, I apologize if you did this already!
77 notes
·
View notes
Photo

Photoshop stuff, video tutorials, and random questions!
hello! could you please upload the psd from your halo tutorial post? Hello! :) I just added it to the end of the tutorial if you want to check it out :)
Hi, I'm sorry if you've answered this already, but could you please do the simple enhance tutorial for gimp, for photoshop? Hello! I just added it to the list, hopefully I can get to it in the next couple months!
Heyy :) Your tutorials are amazing! I just wanted to know if there's a way to smooth the sims' edges on photoshop, because I enabled it in game and it keeps closing. I just want to smooth their edges and keep the background. Have a nice day/night! 💕 Hello! I think you may want to use the refine edge option. So if you make a selection, go to select>>refine edge and then you can smooth the edge there :)
I prefer written tutorials (it's easier to click between a tutorial and what I'm doing than to press pause/play on a video) but it could be cool if you did like, a video a week/every other week (as your schedule allows of course) your tutorials/resources are wonderful and I look forward to more, no matter how you share them! Thank you so much for the kind message! I totally agree! Maybe I can look into some video tutorials over the summer or something! :)
Hello! I don’t know if you’ve answered this before as I’m a newer follower but what photoshop do you use? Love your blog ♡ Hiya! I use photoshop cs5, I purchased it in like 2010.
jfc you are so beautiful and you are my inspiration and words can't express how much I look up to you. You have so much dedication and everythng you do is amaxing <3 You are so kind and sweet! I appreciate the nice message, it means a lot! Please have a wonderful week!!!!
Hey I'm new to the sims 4 poses, where do you suggest finding them and how do I use them I would highly recommend checking out this page��http://sssvitlans.tumblr.com/poses for tutorials!
57 notes
·
View notes
Note
Wcif the hair you used on the first sim in your random screenshot dump? Thanks so much!!!

Hello! :) That beautiful hair retexture is by the amazing @cakenoodles
[ hair ]
101 notes
·
View notes
Photo

♡ Particle Effect - Gimp Tutorial ♡
This is was requested quite a bit, so I finally took time to sit down and write the tutorial. You can download GIMP for free here. Keep reading for the tutorial.

Step 1. Start off by cutting out your sim, you can find a tutorial here. Then create a new Transparency Layer but clicking on the new layer icon at the bottom of the layers window. Make sure the new layer is under the sim layer.

Step 2. Next click on the gradient tool and choose two colors for your gradient. Set the gradient to FG to BG (RGB). Then click and drag on the image to create your gradient. This should be done on the new layer we just created.
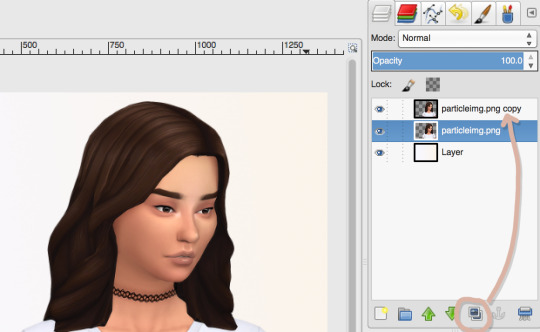
Step 3. Now duplicate the sim layer by clicking the duplicate layer icon at the bottom of the layers window.
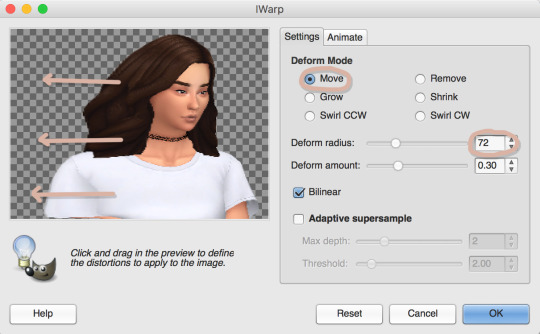
Step 4. Select the bottom sim layer and then go to Filters>>Distorts>>IWarp. Set the Deform Mode to Move. I changed the radius to 72. Then click and drag the side where you want the particles to be. The further out you drag, the more particles you will be able to have. Click OK when done.

Step 5. Make sure the distorted layer is still selected and go to Filter>>Blur>>Gaussian Blur. I set the radius to 9.0 for both horizontal and vertical. Click OK when done.
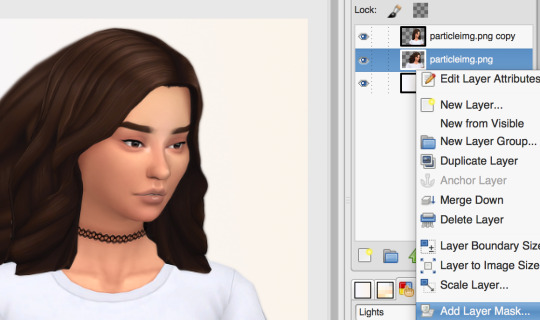
Step 6. Now to create some masks. The masks just show and hide what you want. Right click on the distorted layer and select Add Layer Mask... then choose Black (full transparency). This will hide the distorted layer for now.

Step 7. Now right click on the top sim layer and click on Add Layer Mask. Set this mask to White (full opacity). Your top sim layer should now have a white layer mask and your bottom sim layer should have a black layer mask.

Step 8. Now choose the brush tool and set the color to black. Make sure the brush is round with a hardness of 100. I changed the size to 8.00. You need to check Apply Jitter and set it to something close to 45.00.
Make sure the White Mask is selected in the layers window. Now start clicking and dragging on the edge of the sim. It will start to erase part of the sim. If you want to add more of the sim back in, change the color to white. I went back and forth with the size from 5.00 to 8.00 and I also switched back and forth between white and black to add more variation.
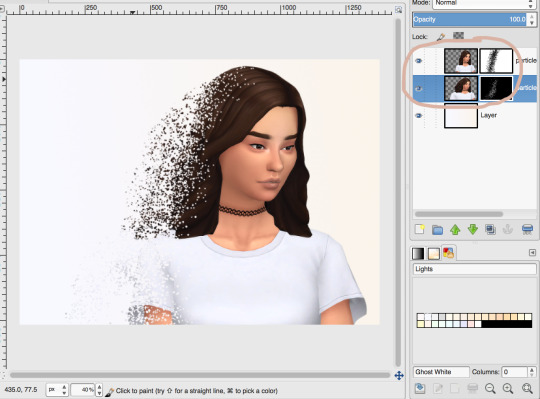
Step 9. Now click on the Black Layer Mask and change the color the brush to white. Start draggin the brush to slowly start adding the distorted layer back in. Once again I switched back and forth between white and black and 5.00 and 8.00. Keep playing around with it until you feel it looks good. You can see what my layers look like in the photo above.

Step 10. This step is not necessary but if you want to blur the edges click on the Black Layer Mask. Then choose the blur tool. Set the brush to round with a hardness of about 075. I changed the size to about 150. Start to blur particles on the edge. This will soften them a bit.
That’s all for this tutorial, tag me so I can see your amazing creations!
516 notes
·
View notes