#“C programming pointers tutorial”
Explore tagged Tumblr posts
Visit Tumblr Blog
Explore Tumblr blogs with no restrictions, modern design and the best experience.
Last Seen Tumblr Blogs


Fun Fact
Tumblr posted its first advertisements in May 2012 and subsequently earned $13M in revenue.
Text
Learn Advanced Pointers in C In Sunbeam Institute
Are you ready to take your C programming skills to the next level? Join Sunbeam Institute’s highly anticipated webinar on Advanced Pointers in C and become a master in one of the most crucial aspects of C programming. Pointers in C are more than just a feature; they are a powerful tool that allows you to directly manipulate memory, optimize code performance, and handle complex data structures with ease.
In this Advanced Pointer in C webinar, our expert instructors will dive deep into the concepts that are often challenging to grasp. You’ll learn:
How to effectively manage memory and avoid common pitfalls.
Techniques for handling arrays, strings, and dynamic memory allocation with pointers.
Understanding of pointer arithmetic and how to use it to manipulate data efficiently.
Tips for using pointers with functions and multi-dimensional arrays.
Best practices for debugging pointer-related issues in your code.
This webinar is perfect for experienced C programmers who want to refine their skills and apply advanced techniques to their projects. Whether you’re working on embedded systems, software development, or high-performance applications, mastering pointers will give you an edge in the competitive programming world.
Don’t miss this opportunity to learn from the best! Register now for Sunbeam Institute’s Advanced Pointer in C webinar and become an expert in one of the most powerful features of the C language.
Seats are limited, so secure your spot today!
#“Advanced Pointer in C”#“C programming pointers tutorial”#“Pointers in C for beginners”#“Advanced C programming techniques”#“Mastering pointers in C”#“C pointers and memory management”
0 notes
Note
hihii i saw your “bird that kills you” post and i was curious on whether you had pointers on where 2 modify the game text…
I talk about some of that in this post! If you want to see that
All of the game text is kept in
C:\Program Files (x86)\Steam\steamapps\common\LobotomyCorp\LobotomyCorp_Data\ExternalData\xml\Language
On my computer, anyway...it depends on where you put your steam folder when you installed it. You'll see this:
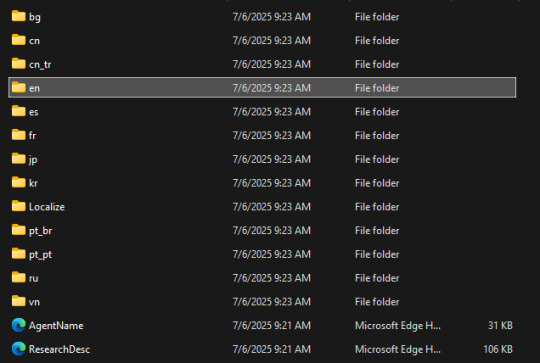
I know it's weird that all the files say they're from yesterday, but that's because I just got a new computer. The two files at the bottom are pretty straightforward. They're the employee names, and descriptions for the department research
From there, if you click on the folder with your language (mine is en) you're taken here:
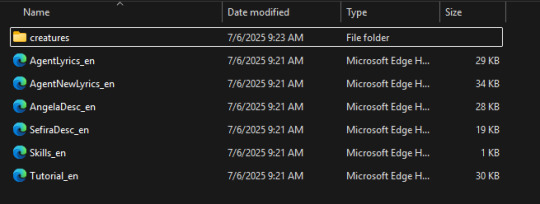
creatures - all the info for the abnormalities is in here. the names don't match up exactly, and it's more like a vague description of them, but they're kind of funny (Mountain of Smiling Bodies = DangoCreature) .
AgentLyrics and AgentNewLyrics - the stuff the employees say are here. The first one is left over from legacy. also apparently includes things abnormalities say, if they talk at all
AngelaDesc - stuff Angela says during gameplay. She used to talk a lot more in legacy, before the sephirot were added, so most of her lines are left over from there
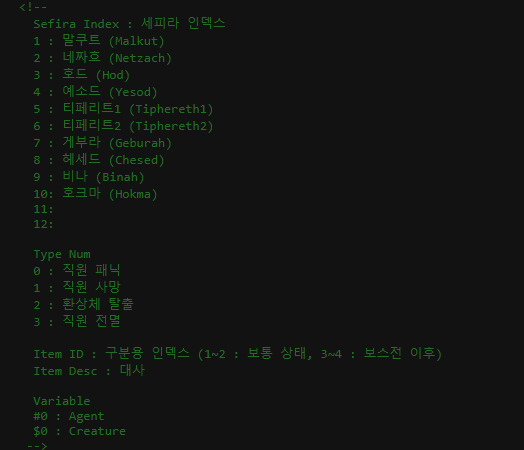
SefiraDesc - this is the stuff the sephirot say! the other post is about that. they do keep a guide to the file's layout in there, but it's in korean
Skills - looks like these define the work types?
Tutorial - these are Angela's lines during the tutorial
But wait.............we're not even done..................if you go back to the language folder, then to Localize\en , you will find more xml files......
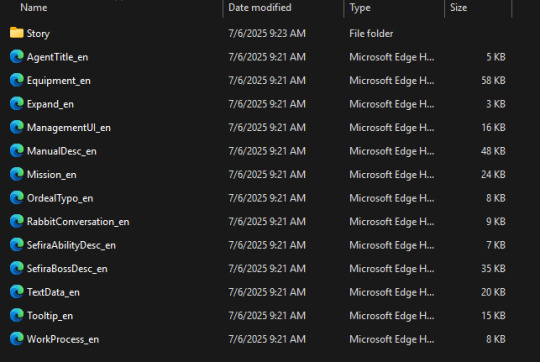
Story - all the story is in here. shocker! Angela_Qliphoth seems to be the Seed of Light dialogue, you know, when you complete a certain number of meltdowns.. there's also scrapped lines here. I remember distinctly there was one from Carmen
AgentTitle - These are the titles that appear below your employees. I never really paid a lot of attention to these but you can change it to something funny if you want
Equipment - Names and descriptions for armor, weapons, and ego gifts are here
Expand - What each sephirah says when you expand their department. As you know, it's different when you open the department for the first time
ManagementUI - from a quick glance, this is essentially most of the UI text. Thankfully, they all have titles, so you can infer what each is used for
ManualDesc - This is the text in the manual
Missions - The missions and their descriptions. You can read what the sephirot say here, too, if you clicked off it too fast like I did....several times
OrdealTypo - Everything relating to the ordeals. Shocker!
RabbitConversation - Myo and the Rabbits' lines. Myo has special lines for Gebura and Binah suppression, so you can see that here if you'd like
SefiraAbilityDesc - Clerk and post-suppression bonuses are here
SefiraBossDesc - The text that scrolls across the screen during core suppressions. If you cleared day 48 and 49 through Gebura and Binah's routes (not sure why you would want to do it the more painful way) you can see the lines you missed from Abram and Adam here.
TextData - looks like another mess of UI stuff, pertaining mostly to the main menu and the day setup
Tooltip - This is the text that appears when you hover over stuff. You probably didn't need me to tell you that if you already know what a tooltip is
WorkProcess - The text that appears in containment units when the abnormality is being worked on
I hope that's enough. Or maybe it's way too much and almost a little unnecessary. But now, you too can have the Bird That Kills You in your game......
7 notes
·
View notes
Note
hello! i'm a new college student, and the syllabus says c and java are the languages they'll teach in the first two semester. could you direct me to some resources or someone who could help if you're not interested? no pressure, thank you!
hey! i'm unsure how helpful my advice will be because i've only dabbled in c and java, but i can certainly point you in the right direction. i know how much of a pain searching for beginner-friendly resources can be. good luck in your studies, and welcome to college!
GENERAL:
there are a lot of community-curated resources in the tag awesome-list on github. check it out here, and have fun going through them all because you'll never escape
w3schools is great for referencing
this basically gives you the equivalent to a bachelor's degree in computer science and is completely free
freecomputerbooks has a c and java language category. i can't recommend you specific books though
i only discovered wikiversity was a thing when i became an adult, which is a right shame. there's free courses for computer science and information technology
C LANGUAGE:
harvard has an online course called cs50 you can find for free on freecodecamp's youtube channel (the cs50 website also includes notes for the course). it introduces computer science (and the basics of c) pretty nicely
wikiversity's "C Programming" and its wikibook companion
freecodecamp's "C Programming Handbook for Beginners"
if you ever get confused about pointers: A Tutorial on Pointers and Arrays in C
commonly asked c programming questions & answers are in this FAQ
the article "What A C Programmer Should Know About Memory" (a bit more intermediate)
JAVA LANGUAGE:
the wikibook "Java Programming"
wikiversity's java portal has links to both internal and external java resources. i'd recommend looking through it
freecodecamp's "The Java Handbook – Learn Java Programming for Beginners"
freecodecamp's online course "Java Programming for Beginners"
dev.java's "Learn Java"
the free training course offered by oracle
if anyone else has anything to add, feel free to chime in! i hope this helps :)
18 notes
·
View notes
Text
Three simple ways to code finite state machines

This tutorial will show you three simple ways to code finite state machines using the C++ programming language in Visual Studio.
1. Enum and Switch Case
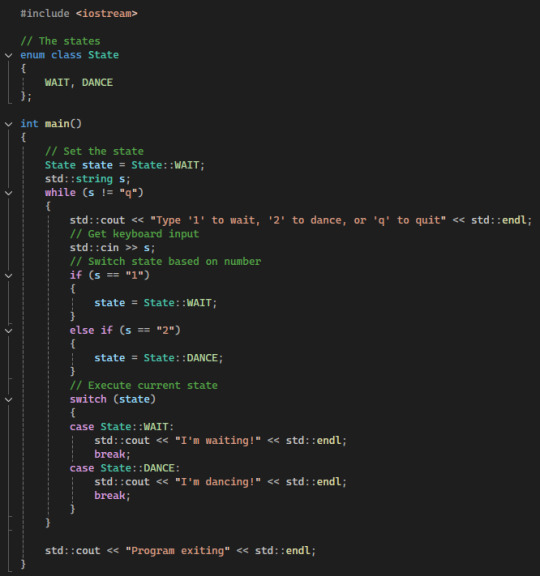
2. Inheritance and Polymorphism
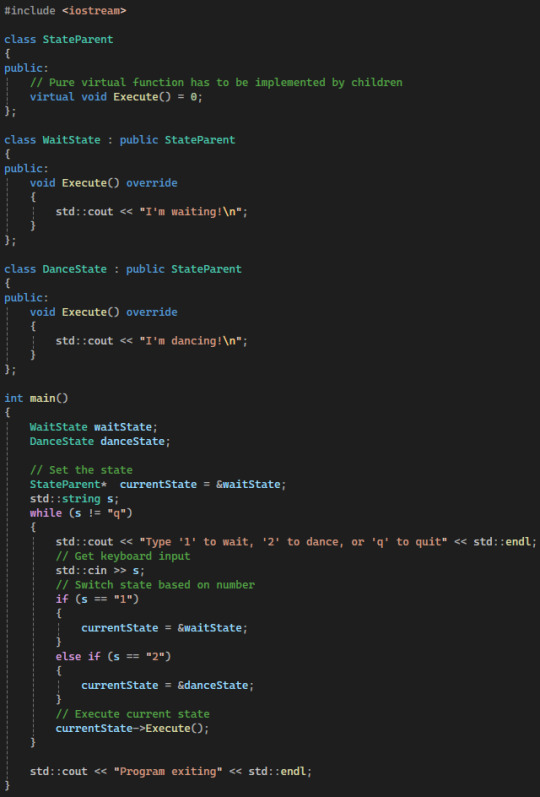
3. Function Pointer
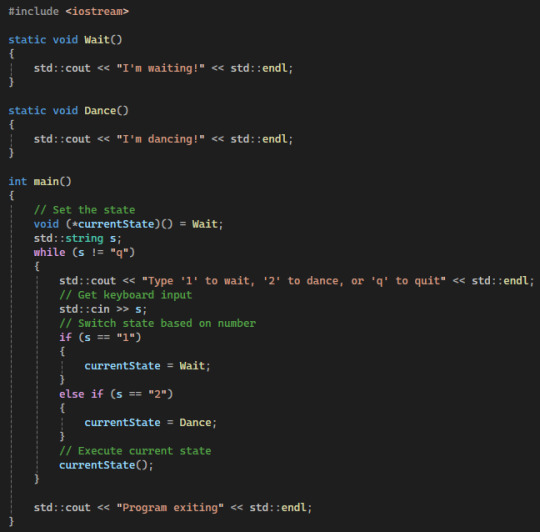
See the blog post for a full code walkthrough:
7 notes
·
View notes
Note
I'm thinking of trying my hand at some GBA Fire Emblem ROM hacking, and I was wondering, what software/program/whatever was used to make Sacred Echoes?
My workflow for Sacred Echoes ended up being pretty similar to how the original devs built FE8 - meaning I was mostly working with source code and the compiler with various command-line utilities to convert my asset files into a data format the GBA could handle. When I started the project in mid-2018, I already had some formal education and work experience in programming, so I was past the steepest part of the learning curve for these specific tools.
Please note that my methods are NOT the methods I would recommend for a first project unless you're already familiar with the software development process and using command-line tools. I went into Sacred Echoes knowing I would need to write a bunch of custom code to modify the game mechanics beyond what the beginner tools at the time allowed me to do, so I chose the more complex path. If you're looking for an all-in-one graphical editor that's more friendly to beginners, FEBuilder is amazing and constantly updated with new functions. Whichever method you decide on using, the FE Universe forum and discord are full of resources, tutorials, and helpful people, and I wouldn't have been able to succeed without them. Best of luck on your project!
That said, here's all the technical details and links to all the tools I used:
Sacred Echoes was built using a combination of GNU make (a build system used to automatically detect and compile changes to source code in large projects) and Event Assembler, a utility primarily built for editing the GBA Fire Emblem games. Event Assembler is used with a method called the buildfile, which is essentially a fancy text file with instructions for Event Assembler to insert source files into a ROM and linking different parts together. This meant I used different tools for creating each type of data. Unlike with a ROM editor (such as FEBuilder), I wasn't constantly saving my changes to the same ROM file, but instead freshly building it each time I made a change and wanted to test. This meant that if I messed up (very common when writing custom code), I could just comment out the relevant code or instructions in the buildfile and rebuild from source, rather than try to pick through the ROM by hand to fix issues.
There were cases where I would need to view and edit raw binary data with a hex editor (usually to find a pointer to compressed graphics or a data table); I prefer HxD for that.
For graphics, use any program that can edit and save .PNG files (I used MS Paint and GIMP), and then a tool for game graphics called Usenti to put them into a format the GBA can read. If you need to find and rip graphics from a ROM to edit them, GBAGE is the gold standard (and comes built-in to FEBuilder).
Maps are built from the tileset graphics using a program called Tiled.
For music, the GBA uses MIDI sequences, so any audio program with MIDI support works fine for that. (I used Anvil Studio). The MIDI file is then converted to GBA with a utility called midi2agb.
For unit data and other large data structures, I used a spreadsheet in CSV format, which can be edited with a program like Excel or LibreOffice Calc.
For map events and loading units, the GBA FE games use a scripting language called Event Assembler Language, which just gets written in a raw .txt file. A good plaintext editor like Notepad++ or SublimeText can help keep track of language syntax and keywords.
For assembly code, it is also written in a text editor, and then compiled to bytecode with devkitARM. Most of it I wrote in raw ARM assembly language (which is specific to the GBA's CPU), but in more complex cases towards the end of the project I wrote the code in the C programming language and compiled it with devkitARM.
To keep track of my source files and changes, and to make backups and version control easier, I just used GitHub because I already had an account, but you could also use GitLab or Bitbucket instead.
Finally, I used some tools made by the FE hacking community specifically for automating some tasks and formatting data - most of these are Python scripts, but some can be downloaded as compiled executables. I used "lyn", "TMX2EA", "C2EA", TextProcess and ParseFile, and AnimationAssembler. Ask on the FEU discord or check the forum's toolbox tag.
8 notes
·
View notes
Note
Hey you’re a programmer, I need to learn how C/C#/Arduino works ASAP for a project.
Are there any decent resources you know about? I’ve only worked in Java before, and am getting really confused by what is going on with Structures and just all the stuff C does
If you block the ads W3Schools is decent IMO for learning a lot of programming languages.
You should also look at the Arduino reference page to learn how that device specifically works.
Now for some vague summaries:
C is not object oriented like Java is so there is no way to have classes. Instead, C programmers store data in arrays and structures (which are pretty much just the data part of an object), and the program is split amongst a lot of functions.
Pointers are also an important C concept; they are covered in the W3Schools tutorial but basically they are just a memory address you can use to look up other things. If you want to make things like linked lists in C, you will be using these. Even arrays are technically pointers.
C#, meanwhile, is much closer to Java in terms of how you'd use it.
13 notes
·
View notes
Text
Master C Programming in 2025: Join the Ultimate C Language Bootcamp Today!

If you’ve ever wondered how the software behind operating systems, embedded systems, or gaming engines is created—C programming is your answer. Despite being decades old, C is still one of the most powerful and relevant programming languages in the tech world today. Whether you’re an aspiring software engineer, a curious student, or a career-switcher with big tech dreams, learning C is a game-changer.
And now, there’s never been a better time to start: the 2025 C Programming Bootcamp – The Complete C Language Course is here to equip you with the essential skills to code with confidence.
Why Learn C Programming in 2025?
You might ask: “Isn’t C outdated?” The truth is, C is anything but obsolete. It’s the foundation of most modern languages like C++, Java, and even Python. Understanding how C works means you understand how computers truly operate—at their core.
Here’s why learning C in 2025 still matters:
High demand in embedded systems, game development, and OS-level software
Faster execution and greater control over memory
Sets a strong programming foundation to master other languages
Used in academic and competitive programming worldwide
Whether you aim to build a career in software development or just want to strengthen your programming fundamentals, C is the perfect place to start.
What Makes This Bootcamp Different?
Plenty of tutorials claim to teach you C, but not all of them guide you step-by-step with clarity, hands-on projects, and modern examples. The 2025 C Programming Bootcamp – The Complete C Language Course stands out by delivering a complete roadmap, from beginner to advanced C programming concepts.
Here’s what makes it special:
✅ Beginner-Friendly Approach
This bootcamp assumes zero prior experience. You’ll start from the absolute basics—installing compilers, writing your first "Hello, World!" program, and then gradually build toward more complex topics like file handling, memory management, and pointers.
✅ Real-World Projects & Practice
Theory is great—but coding is better. You’ll build real mini-projects that simulate real-world applications. These hands-on tasks help solidify your learning and give you confidence in writing C code independently.
✅ Structured Curriculum
The course is thoughtfully broken into modules that cover:
Introduction to C and compiling your first program
Variables, data types, and operators
Loops and conditionals
Functions and scope
Pointers and arrays
Strings and file handling
Dynamic memory management
Debugging and error handling
By the end, you won’t just know C—you’ll be fluent in it.
Who Should Enroll in This Course?
The beauty of this bootcamp is its accessibility. It’s tailor-made for:
Absolute beginners who have never written a single line of code.
Computer science students looking to strengthen core fundamentals.
Engineering students working on embedded or hardware projects.
Aspiring developers preparing for technical interviews or coding competitions.
IT professionals looking to deepen their low-level programming skills.
Whether you’re learning for fun, for your resume, or for a job role, this course is designed to help you succeed.
Benefits You Can Expect
Let’s be honest—learning a programming language can feel intimidating. But with the right guidance, it becomes an exciting journey. Here’s what students love most about the 2025 C Programming Bootcamp – The Complete C Language Course:
Lifetime access to course materials
Self-paced learning – no pressure, learn when you want
Quizzes and challenges that reinforce your learning
Downloadable resources to code along
Dedicated Q&A support in case you get stuck
Certificate of completion to showcase on LinkedIn or your resume
You’re not just watching videos—you’re entering a guided learning experience that ensures you stay on track and make progress.
Future-Proof Your Career
C might be decades old, but employers still value it highly. Mastering C puts you in the league of serious programmers who understand how systems work under the hood. It’s also an incredible stepping stone to learning C++, Rust, Go, and even writing performance-critical applications in data science and machine learning.
In a competitive job market, being comfortable with a systems language gives you a massive edge.
Why Korshub Recommends This Bootcamp
At Korshub, we handpick only the most valuable learning resources that deliver real skills and real results. The 2025 C Programming Bootcamp – The Complete C Language Course fits our criteria perfectly—it’s practical, easy to follow, and packed with content that transforms beginners into confident C programmers.
Whether you're a student, a tech enthusiast, or someone restarting your career—this course will help you unlock your potential in programming.
Don’t Just Watch—Start Coding Today!
Learning a language like C isn't about memorizing syntax. It's about building things, solving problems, and thinking like a programmer. This bootcamp takes that philosophy to heart. Every module, every quiz, every project brings you one step closer to mastering this powerful language.
So why wait? The best time to start coding was yesterday. The next best time is now.
👉 Enroll in the 2025 C Programming Bootcamp – The Complete C Language Course and begin your journey toward becoming a skilled C programmer today.
0 notes
Text
Unlocking the Basics: A Comprehensive C Programming Language Tutorial for Beginners
Introduction
C programming language is often referred to as the backbone of modern programming. Developed in the early 1970s, C has influenced many other programming languages, including C++, Java, and Python. Its efficiency, flexibility, and powerful features make it a popular choice for system programming, embedded systems, and application development. This tutorial aims to provide beginners with a solid foundation in C programming, covering essential concepts, practical examples, and best practices to help you unlock the basics and start your programming journey.The
Why Learn C?
Before diving into the tutorial, it’s important to understand why learning C is beneficial:
Foundation for Other Languages: C serves as a stepping stone to learning other programming languages. Understanding C concepts will make it easier to grasp languages like C++, Java, and C#.
Performance and Efficiency: C is known for its speed and efficiency, making it ideal for system-level programming and applications where performance is critical.
Portability: C programs can be compiled and run on various platforms with minimal changes, making it a versatile choice for developers.
Rich Libraries: C has a vast collection of libraries that provide pre-written code for common tasks, speeding up the development process.
Strong Community Support: With decades of history, C has a large community of developers, providing ample resources, forums, and documentation for learners.
Getting Started with C Programming
1. Setting Up Your Development Environment
To start programming in C, you need to set up a development environment. Here’s how:
Choose a Compiler: Popular C compilers include GCC (GNU Compiler Collection) for Linux and MinGW for Windows. You can also use IDEs like Code::Blocks, Dev-C++, or Visual Studio.
Install the Compiler: Follow the installation instructions for your chosen compiler. Ensure that the compiler is added to your system’s PATH for easy access.
Choose a Text Editor or IDE: You can write C code in any text editor (like Notepad++ or Sublime Text) or use an Integrated Development Environment (IDE) for a more user-friendly experience.
2. Writing Your First C Program
Let’s start with a simple "Hello, World!" program to familiarize you with the syntax:#include <stdio.h> int main() { printf("Hello, World!\n"); return 0; }
Explanation:
#include <stdio.h>: This line includes the standard input-output library, allowing you to use functions like printf.
int main(): This is the main function where the program execution begins.
printf("Hello, World!\n");: This line prints "Hello, World!" to the console.
return 0;: This indicates that the program has executed successfully.
3. Understanding C Syntax and Structure
C has a specific syntax that you need to understand:
Variables and Data Types: C supports various data types, including int, float, char, and double. You must declare variables before using them.
int age = 25; float salary = 50000.50; char grade = 'A';
Operators: C provides arithmetic, relational, logical, and bitwise operators for performing operations on variables.
Control Structures: Learn about conditional statements (if, else, switch) and loops (for, while, do-while) to control the flow of your program.
4. Functions in C
Functions are essential for organizing code and promoting reusability. Here’s how to define and call a function:#include <stdio.h> void greet() { printf("Welcome to C Programming!\n"); } int main() { greet(); // Calling the function return 0; }
5. Arrays and Strings
Arrays are used to store multiple values of the same type, while strings are arrays of characters. Here’s an example:#include <stdio.h> int main() { int numbers[5] = {1, 2, 3, 4, 5}; char name[20] = "John Doe"; printf("First number: %d\n", numbers[0]); printf("Name: %s\n", name); return 0; }
6. Pointers
Pointers are a powerful feature in C that allows you to directly manipulate memory. Understanding pointers is crucial for dynamic memory allocation and data structures.#include <stdio.h> int main() { int num = 10; int *ptr = # // Pointer to num printf("Value of num: %d\n", *ptr); // Dereferencing the pointer return 0; }
7. Structures and Unions
Structures allow you to group different data types under a single name, while unions enable you to store different data types in the same memory location.#include <stdio.h> struct Student { char name[50]; int age; }; int main() { struct Student student1 = {"Alice", 20}; printf("Student Name: %s, Age: %d\n", student1.name, student1.age); return 0; }
Best Practices for C Programming
Comment Your Code: Use comments to explain complex logic and improve code readability.
Use Meaningful Variable Names: Choose descriptive names for variables and functions to make your code self-explanatory.
Keep Code Organized: Structure your code into functions and modules to enhance maintainability.
Test Your Code: Regularly test your code to catch errors early and ensure it behaves as expected.
Conclusion
Learning C programming is a rewarding journey that opens doors to various fields in software development. By following this comprehensive tutorial, you’ve unlocked the basics of C and gained the foundational knowledge needed to explore more advanced topics.
As you continue your programming journey, practice regularly, build projects, and engage with the C programming community. With dedication and persistence, you’ll become proficient in C programming and be well-equipped to tackle more complex challenges in the world of software development.
Ready to dive deeper? Explore advanced topics like memory management, file handling, and data structures to further enhance your C programming skills! Happy coding with Tpoint-Tech!
0 notes
Text
Find the Best C++ Course Online with Certification and Easy to Follow Lessons

If you want to learn computer programming from the very beginning, then doing a C++ programming course can be a really good step. C++ is one of those programming languages that has been around for a long time and is still used in many areas like making computer software, designing games, and even building robots.
In this blog, you will get to know everything in detail about the C++ course — why it is useful, what topics you will study in it, what job options are available after learning it, and how you can begin learning it using the right tools and support.
What is a C++ Programming Course?
A C++ programming course is a learning program that helps you understand how to create computer programs using the C++ language. It is specially made for those who are new to programming or those who already know a little and want to learn more.
In this course, you will be taught how to write simple codes, find solutions to programming problems, and understand the basic ideas of how object-based programming works — which is a way of building programs by using small blocks called “objects.”
Why should you learn C++ in 2025?
Choosing to learn C++ in 2025 is a really good idea for several simple reasons. C++ is still used a lot by many companies. Big companies pick C++ when they want to make software that works quickly and does not break easily. If you want a job in IT, making software, or even working with artificial intelligence, knowing C++ will help you stand out. Also, C++ is the starting point for many other programming languages. After you learn C++, it becomes much simpler to pick up other languages like Java or Python.
Who can join a C++ Programming Course?
If you like computers or want to learn about technology, you can join a C++ programming course. You do not need to be a computer expert or have any special background. Many students take a C++ course after finishing class 12 because it helps them start learning programming early. People who already have jobs but want to learn new things or change their career can also join a C++ course.
If you are a student, you can find C++ courses made just for students, so learning is easy for you. There are also many good C++ courses online in 2025 for all levels, whether you are just starting or already know some programming.
What Will You Learn in a C++ Course? (Syllabus Overview)
When you join a C++ course made for beginners, you will learn all the main things that help you start coding easily. Here’s what is usually taught in such a course:
A simple explanation of what C++ is and where it came from
How to install and start using the C++ software on your computer
Writing your first basic program in C++
Learning about variables, data types, and math symbols (operators)
How to use loops and “if-else” conditions to make decisions in code
What functions are, and how to use them in different programs
Understanding arrays, how to use strings, and what pointers do
Learning the basics of object oriented programming in C++, like how classes and objects work, and things like inheritance and polymorphism
How to work with files, and how to handle errors in programs
Doing small projects and exercises to check what you’ve learned
Most C++ courses also come with a C++ programming tutorial step by step, which means you don’t just read — you also practice. This kind of hands-on method helps you remember and understand better.
Career Opportunities After Learning C++
When you finish a C++ programming course, you will have many job options. C++ is used in lots of different fields, so you can find work in many kinds of jobs. Some common jobs you can get are:
Software Developer
Game Developer
System Programmer
Embedded Systems Engineer
Data Analyst
Robotics Programmer
Having a job in C++ programming is safe and can help you grow in your career. Many companies want people who know C++. You can also choose to work for yourself as a freelancer or even start your own software business.
C++ Course Duration and Fees
How long a C++ course takes and how much it costs depends on where you study and which course you pick. Most beginner courses are between 1 and 3 months long. If you go for a bigger or more advanced course, it might take more time. The fees are different for each course. Some websites let you learn the full C++ course in English for free, but some may ask for a small payment for a C++ certification course.
It is smart to look at different courses and see which one is best for your budget and the way you like to learn. Many places also give discounts or scholarships to students.
Best Tools and Software for Practicing C++
If you want to practice C++, you should use some good tools. Here are some well-known choices:
Code::Blocks: This tool is friendly for people who are just starting. It is not hard to use.
Dev C++: This one is simple and does not use much space on your computer.
Visual Studio: This software is strong and many experts use it for their work.
Online compilers: There are websites like Online GDB and Repl.it where you can write and check your C++ code online. You do not have to put any software on your computer to use these sites.
With these tools, you can easily learn from a C++ programming tutorial step by step and practice everything you study.
Expected Salary After Completing a C++ Course
A big reason many people pick a C++ programming course is because they can get a good salary. After you finish your course, your starting pay is often more than many other jobs. In India, if you are new, you can earn about ₹3 to ₹6 lakhs each year. If you have more experience, you can get paid even more.
If you get a job in another country, your salary can be much higher. As you keep working and learning, your pay will go up when you get bigger and better jobs. After a C++ course, you can find jobs in both private companies and government offices.
Tips and Resources to Learn C++ Easily
If you want to learn C++ in a simple way, try these tips:
- Try to write code every day, even if you only have 30 minutes. - Watch simple video lessons and do the steps shown in the videos. - Join online groups or forums where you can ask questions and talk about what you are learning. - Work on small, easy projects to use what you have learned. - Do quizzes and small tests to see how much you understand.
There are lots of helpful things online, like a C++ full course in English, video lessons, and e-books. You can also learn C++ online for free and get a certificate from good websites.
How to Join a C++ Programming Course with IID
If you want to start learning C++ and are searching for a good place, the Institute for Industrial Development (IID) is a very good option. IID has a C++ certification course that is made for beginners and teaches you all the important things you need to know. You can sign up for the course online, join live classes, and get help from expert teachers. IID gives you study materials, assignments to practice, and a certificate that is recognized when you finish the course. You can learn at your own speed with IID, and if you ever have questions or need help, support is always available. This makes learning C++ with IID easy and comfortable.
Conclusion
In 2025, taking a C++ programming course is still a great way to begin a career in technology. C++ is not hard to learn, many companies need people who know it, and it can help you get many different jobs. It does not matter if you are a student, someone working, or just interested in programming-learning C++ will give you a strong base for your future. There are lots of resources and online courses you can use, so now is the perfect time to start learning C++. Take the first step, join a course, and open up many new opportunities for yourself with C++.
#c++#c++ programming#programming languages#c language#learningc++#prgrammingcourse#career#industrialcourse#businesscourses#businesscouse#professionalcourses#entrepreneurcourse#iidcourses#onlinecourse#onlinecourses#professionalcourse
0 notes
Text

Are you ready to take your C programming skills to the next level? Join Sunbeam Institute’s highly anticipated webinar on Advanced Pointers in C and become a master in one of the most crucial aspects of C programming. Pointers in C are more than just a feature; they are a powerful tool that allows you to directly manipulate memory, optimize code performance, and handle complex data structures with ease.
In this Advanced Pointer in C webinar, our expert instructors will dive deep into the concepts that are often challenging to grasp. You’ll learn:
How to effectively manage memory and avoid common pitfalls.
Techniques for handling arrays, strings, and dynamic memory allocation with pointers.
Understanding of pointer arithmetic and how to use it to manipulate data efficiently.
Tips for using pointers with functions and multi-dimensional arrays.
Best practices for debugging pointer-related issues in your code.
This webinar is perfect for experienced C programmers who want to refine their skills and apply advanced techniques to their projects. Whether you’re working on embedded systems, software development, or high-performance applications, mastering pointers will give you an edge in the competitive programming world.
Don’t miss this opportunity to learn from the best! Register now for Sunbeam Institute’s Advanced Pointer in C webinar and become an expert in one of the most powerful features of the C language.
Seats are limited, so secure your spot today!
#Advanced Pointer in C#“C programming pointers tutorial”#“Pointers in C for beginners”#“Advanced C programming techniques”#“Mastering pointers in C”#“C pointers and memory management”
0 notes
Text
Is Python or C++ Better for Web Development?
When it comes to web development, choosing the right programming language is crucial for the success and efficiency of your project. Two prominent languages in the programming world are Python and C++. While both have their strengths, they serve different purposes and are suited for different aspects of software development. This article delves into the comparison between Python and C++ in the context of web development, highlighting their advantages, disadvantages, and suitability for building modern web applications.
Python: The Go-To Language for Web Development
Python has emerged as a popular choice for web development due to its simplicity, readability, and vast ecosystem of libraries and frameworks. Its design philosophy emphasizes code readability and developer productivity, making it an ideal language for rapid application development.
Advantages of Using Python for Web Development
Ease of Learning and Use: Python's straightforward syntax allows developers to write clean and maintainable code, reducing the learning curve for beginners and accelerating development for experienced programmers.
Rich Ecosystem: Python boasts a plethora of frameworks and libraries tailored for web development. Notably, Django and Flask are two widely-used frameworks that simplify the process of building robust web applications. Django, for instance, follows the "batteries-included" philosophy, providing built-in features like authentication, ORM, and admin interfaces, which expedite development and reduce the need for third-party tools.
Community Support: A large and active community means abundant resources, tutorials, and forums are available, facilitating problem-solving and knowledge sharing among developers.
Versatility: Python is not limited to web development; it's also extensively used in data science, machine learning, automation, and more. This versatility allows developers to integrate various functionalities into their web applications seamlessly.
Cross-Platform Compatibility: Python applications can run on various operating systems without significant modifications, ensuring broader reach and flexibility in deployment.
C++: A Powerful Language with Limited Web Development Use
C++ is renowned for its performance and control over system resources, making it a preferred choice for system programming, game development, and applications requiring high-performance computing. However, its application in web development is relatively limited.
Advantages of Using C++ for Web Development
High Performance: C++ offers unparalleled performance due to its close-to-hardware operations and efficient memory management, which can be beneficial for performance-critical components of web applications.
Fine-Grained Control: Developers have precise control over system resources, enabling optimization at a granular level, which is advantageous for specific backend services or modules requiring intensive computation.
Disadvantages of Using C++ for Web Development
Complexity: C++ has a steep learning curve with complex syntax and concepts like pointers and manual memory management, which can slow down development and increase the likelihood of bugs.
Lack of Web Frameworks: Unlike Python, C++ lacks mature and widely-adopted web development frameworks, making the development process more cumbersome and time-consuming.
Longer Development Time: The intricacies of C++ can lead to longer development cycles, which is a significant drawback in the fast-paced web development landscape where time-to-market is critical.
Limited Community Support for Web Development: While C++ has a strong community in systems programming, its web development community is relatively small, leading to fewer resources and support for web-specific challenges.
Comparative Analysis: Python vs. C++ in Web Development
FeaturePythonC++Ease of LearningHighLowDevelopment SpeedFastSlowWeb FrameworksDjango, FlaskLimitedPerformanceModerateHighCommunity SupportExtensiveLimited for web developmentSuitability for Web AppsHighly SuitableLess Suitable
From the comparison, it's evident that Python offers a more conducive environment for web development, especially for projects that require rapid development, scalability, and maintainability.
Real-World Applications and Case Studies
Many renowned platforms and services have leveraged Python for their web development needs. For instance, Django has been instrumental in building complex, database-driven websites efficiently. Its emphasis on reusability and "pluggability" of components aligns well with the dynamic requirements of modern web applications.de.wikipedia.org+4en.wikipedia.org+4wired.com+4
In regions like Uttar Pradesh, businesses seeking Custom Website Development in Uttar Pradesh can benefit from Python's capabilities. Its adaptability ensures that developers can tailor solutions to meet specific business needs, whether it's an e-commerce platform, a content management system, or a data-driven application.
Conclusion: Python Emerges as the Preferred Choice
While C++ remains a powerful language in its domain, its application in web development is limited due to its complexity and lack of specialized tools. Python, on the other hand, offers a balanced mix of simplicity, efficiency, and versatility, making it the preferred choice for web developers.
For businesses and developers aiming for efficient and scalable web solutions, especially those considering Custom Website Development in Uttar Pradesh, Python provides the tools and community support necessary to bring their visions to life effectively.
1 note
·
View note
Text
C Programming Interview Questions: Test Your Knowledge Before the Interview

Preparing for a job interview can be stressful, especially when it comes to technical roles that demand strong programming skills. If you're applying for a role that involves C programming, it's crucial to sharpen your understanding of the language. That’s where revisiting C Programming Interview Questions can help you gain an edge. Whether you’re just starting out or brushing up your knowledge, this guide will walk you through the kind of questions that often come up in interviews and help you reflect on your grasp of C.
Why Interviewers Love C
C is one of the oldest and most powerful programming languages. Its simplicity, performance, and low-level memory manipulation make it the foundation of many operating systems, embedded devices, and real-time applications. Interviewers love C because it reveals a candidate’s depth of understanding about how software interacts with hardware, how memory is managed, and how algorithms are constructed at a low level. A strong command over C shows that you’ve built your programming knowledge from the ground up.
The Importance of C Tutorial Practice
Before jumping into specific C Programming Interview Questions, it’s essential to walk through a structured C Tutorial. Reviewing basics like data types, control structures, functions, and arrays lays the groundwork. As you progress, you should also focus on pointers, memory allocation, and structures—these are often seen as “make or break” topics in technical interviews. Even if you’ve worked with C in the past, refreshing these concepts through tutorials helps bring everything back into focus.
Core Concepts Interviewers Test
Let’s explore some of the key areas interviewers typically cover when asking C programming questions:
Memory Management: Expect to be tested on how C handles memory—both stack and heap allocation. You should understand concepts like dynamic memory allocation, memory leaks, and buffer overflows.
Pointers and Arrays: One of the most common and trickiest parts of C. Interviewers often want to know if you truly understand how pointers work, how they interact with arrays, and how pointer arithmetic can be used (or misused).
Data Structures: Even though C doesn’t have built-in data structures like lists or maps, you’re expected to know how to implement them using arrays, structs, and pointers. Interviewers may ask conceptual questions or have you describe how to organize data efficiently.
Functions and Scope: Knowing how functions work in C, including parameter passing, recursion, and variable scope, is essential. You might be asked about the difference between global and local variables, or how static variables behave.
Compilation and Execution: Understanding how C code is compiled and linked can be a big plus. Interviewers may ask about header files, macros, and the difference between declarations and definitions.
Edge Cases and Problem Solving: You might get questions that aren’t strictly about C syntax, but about how to solve a problem efficiently in C. These could test your logical thinking, debugging ability, or creativity in using C’s features.
Behavioral vs. Technical Balance
While it's easy to focus entirely on technical preparation, remember that interviews are also about communication. When answering C Programming Interview Questions, try to explain your thought process clearly. Even if you don’t know the answer right away, showing how you break down a problem can leave a positive impression. Being able to explain technical concepts in simple terms shows that you truly understand them.
Preparing Strategically
Start by identifying your weak areas. Did you struggle with pointers in your last project? Are you unsure about how memory leaks occur? Use your C Tutorial sessions to focus on these gaps. Practice answering questions out loud, even if you're by yourself. Simulating interview conditions helps reduce anxiety and improves your fluency in technical discussion.
Mock interviews with peers or mentors can also be helpful. Getting feedback not only helps you improve but also builds your confidence. Remember, interviews aren’t just about technical knowledge—they’re about demonstrating your ability to think and communicate effectively.
Final Thoughts
There’s no shortcut to mastering C, but by working through C Programming Interview Questions and revisiting your C Tutorial foundations, you can walk into your interview with confidence. Preparation is more than just reviewing facts—it’s about understanding concepts deeply and being able to explain them clearly. Use every question as a chance to show not only what you know, but how you think.
So before your next interview, challenge yourself with a mix of theoretical and practical C questions. Make your understanding bulletproof, and walk into that interview room ready to impress.
0 notes
Text
Real-World C++: Simplifying Memory Management with Smart Pointers
Introduction Real-World C++: Using Smart Pointers to Simplify Memory Management is a comprehensive tutorial that focuses on the best practices for using smart pointers in C++. Smart pointers are a crucial part of modern C++ programming, and understanding how to use them effectively can greatly simplify memory management and reduce the risk of memory-related bugs. In this tutorial, we will cover…
0 notes
Text
C Programming Tutorial for Beginners: A Simple Guide

C programming is one of the most popular and powerful programming languages. It is widely used in software development, operating systems, and embedded systems. If you are new to coding, this C Programming Tutorial for Beginners will help you understand the basics in an easy way.
Why Learn C Programming?
C is a fundamental programming language that forms the base for many modern languages like C++, Java, and Python. Learning C helps you build a strong foundation in coding logic and problem-solving.
Basics of C Programming
To start with C programming, you need to understand some key concepts:
Syntax: C follows a structured syntax with simple commands.
Variables and Data Types: Variables store values, and data types define the kind of data (e.g., integers, characters).
Operators: Used for calculations and logic, like addition, subtraction, and comparisons.
Control Statements: Help in decision-making (if-else) and loops (for, while).
Functions: Blocks of code that perform specific tasks and make programming easier.
How to Start Learning C?
You can begin learning C programming by reading tutorials, practicing basic programs, and understanding coding logic. Start with simple concepts and gradually move to advanced topics like pointers and file handling.
C is an excellent choice for beginners because it helps develop strong programming skills. Start your C programming journey today!
For a detailed step-by-step guide, visit C Programming Tutorial for Beginners.
0 notes
Text
Why Developers are Choosing Rust for Mobile Development

Rust Mobile Development has rapidly emerged as a game-changer in the tech industry, offering developers a powerful and reliable solution for creating mobile applications. Its unique combination of safety, performance, and versatility makes it an ideal choice for building apps that demand high reliability and efficiency. Developers are increasingly turning to Rust Mobile Development due to its ability to deliver exceptional performance, ensure memory safety, and support cross-platform capabilities. With its growing ecosystem and strong focus on security, Rust Mobile Development is reshaping how mobile apps are designed and deployed, offering developers unmatched advantages in the competitive app market.
1. Memory Safety Without Garbage Collection
One of Rust's standout features is its ability to guarantee memory safety without the need for a garbage collector. This ensures that mobile apps built with Rust are not only safe from memory-related bugs but also perform exceptionally well. Developers appreciate how Rust’s ownership system eliminates issues like null pointer dereferencing or data races, providing a solid foundation for secure mobile apps.
2. Exceptional Performance
Rust delivers performance on par with C and C++, making it ideal for mobile applications that require speed and efficiency. With Rust, developers can create apps that are lightweight, fast, and responsive—essential qualities for a seamless mobile user experience. Its zero-cost abstractions allow developers to write high-level code without sacrificing performance.
3. Cross-Platform Development
Rust supports cross-platform development, enabling developers to write code that can run on multiple operating systems, including iOS and Android. By using tools like Rust's Foreign Function Interface (FFI) or frameworks like Tauri and Dioxus, developers can build robust mobile apps that work across different devices while maintaining consistency in performance.
4. Active Ecosystem and Community Support
The Rust community is vibrant and growing, offering extensive libraries, tools, and frameworks to simplify mobile development. Developers benefit from the shared knowledge, tutorials, and resources available within the community. Additionally, Rust’s crates (libraries) allow developers to integrate functionalities quickly and efficiently, saving time during the development process.
5. Focus on Security
Security is a top priority for mobile applications, and Rust’s design principles make it a secure choice for developers. By preventing common programming errors like buffer overflows and data corruption, Rust enables the creation of mobile apps that users can trust.
6. Long-Term Maintainability
Rust’s emphasis on clean, modular code makes it easier for developers to maintain and update their applications over time. This ensures that mobile apps built with Rust remain scalable and adaptable to evolving user needs.
Conclusion
Rust’s combination of safety, performance, and flexibility has positioned it as a game-changer in mobile development. By choosing Rust, developers can create high-quality, secure, and efficient mobile applications that stand out in today’s competitive market.
0 notes
Text
Mastering C++: The Complete Programming Guide from Beginner to Advanced

C++ isn't just another programming language. It’s the powerhouse behind many of the tools, games, apps, and operating systems we use every day. Whether you're dreaming of becoming a game developer, software engineer, or embedded systems expert, learning C++ can open doors to some of the most rewarding tech careers.
But where do you start? And how do you go from writing your first “Hello World” to building real-world applications?
Let’s walk through the journey of mastering this versatile language—and yes, you can do it even if you're a total beginner.
Why Learn C++ Programming in 2025?
If you're wondering whether C++ is still relevant in today’s tech world, the answer is a big YES. From performance-critical applications to systems-level software, C++ continues to dominate industries like:
Game Development (think Unreal Engine)
Operating Systems (Windows, parts of macOS and Linux)
Finance & Trading Platforms (where milliseconds matter)
Embedded Systems (IoT, automotive software, robotics)
Backend Programming (when speed and efficiency are vital)
Its flexibility and power give developers deep control over hardware and system resources, which is why it's still the go-to for high-performance applications.
Who Should Learn C++?
Whether you’re a college student, an aspiring developer, or someone looking to level up your programming skills, C++ is an excellent language to learn. Unlike some modern high-level languages, C++ teaches you the foundations of computing—like memory management, pointers, data structures, and algorithms.
This foundational knowledge will not only help you in C++ but also in other languages like Python, Java, or even Rust later on.
What You’ll Learn from a Quality C++ Course
The best way to learn C++ isn’t just reading textbooks or copying code snippets. You need a structured approach that starts from the basics and gradually builds up to advanced concepts—and teaches you to think like a programmer.
A great course will cover:
✅ Beginner Topics
Setting up your development environment (Windows/Mac/Linux)
Writing your first C++ program
Understanding variables, data types, and input/output
Mastering conditionals and loops
✅ Intermediate Topics
Working with functions and arrays
Diving into object-oriented programming (classes, inheritance, polymorphism)
File handling in C++
Exception handling and debugging
✅ Advanced Topics
Pointers, memory allocation, and reference variables
Templates and Standard Template Library (STL)
Data structures: linked lists, stacks, queues, trees
Advanced projects like calculators, games, and simulations
And what’s even better? You don’t need to search around the internet to find the right course. The entire learning journey is now bundled in one comprehensive online course.
Check out this must-have program: 👉 Learn C++ Programming - Beginner to Advanced !
This course not only teaches you how to code in C++ but also guides you to apply your skills in practical, real-world projects. It’s the ideal roadmap for anyone serious about programming.
How Long Does It Take to Learn C++?
Let’s be real—C++ has a steeper learning curve than some beginner languages like Python. But here’s the good news: with the right course and consistent practice, you can go from zero to job-ready in a few months.
Here’s a rough breakdown:
0–1 month: Master the basics (syntax, loops, conditionals)
2–3 months: Dive into object-oriented programming and functions
3–5 months: Tackle advanced topics like memory management, data structures, and real-world projects
Of course, your pace may vary. But the key? Stay consistent and build projects as you go. The more you code, the faster you'll learn.
What Makes This C++ Course Different?
There are tons of tutorials out there. So, why choose this one?
Because it’s designed to guide you through every stage, even if you’ve never written a line of code before. By the end of the course, you’ll not only understand how C++ works but also how to think like a software engineer.
What makes this course a favorite?
🎯 Clear, step-by-step explanations
💻 Practical coding exercises and quizzes
🧠 Real-world projects to test your skills
📜 Certification to add to your resume
🔁 Lifetime access so you can learn at your own pace
It’s more than just a video series—it’s a complete learning experience crafted for beginners and intermediate learners alike.
Ready to dive in? Start now with Learn C++ Programming - Beginner to Advanced !
Career Opportunities After Learning C++
Once you've got a solid handle on C++, the job possibilities are endless. Here are some roles where your skills will shine:
Software Developer
Game Programmer
Embedded Systems Engineer
Backend Developer
Robotics Programmer
Quantitative Analyst (Quant Developer)
Companies like Google, Microsoft, IBM, and Intel constantly look for developers with strong C++ skills. Plus, if you're planning to pursue competitive programming or crack coding interviews at FAANG companies, mastering C++ gives you a major edge.
Tips to Succeed While Learning C++
Here are some handy tips to make your C++ journey smoother:
Practice daily: Coding is a skill—you get better the more you do it.
Build small projects: Start with calculators, number games, or basic apps.
Don’t skip the hard parts: Concepts like pointers and memory management are tough but essential.
Join online forums or groups: Learning with others can help you stay motivated.
Keep revising: Going back and reviewing tricky topics can solidify your understanding.
And above all—be patient with yourself. Every programmer started where you are now.
Final Thoughts: Start Your C++ Journey Today
C++ might look intimidating at first glance, but once you get started, it’s actually fun and deeply rewarding. Whether you're coding games, controlling robots, or building applications from scratch, this language gives you the tools to create magic with code.
If you’re serious about becoming a confident, job-ready programmer, don’t miss out on this opportunity to learn C++ programming from beginner to advanced in a structured, hands-on way.
👉 Enroll today: Learn C++ Programming - Beginner to Advanced ! Take the first step towards your programming future. The journey starts with one click.
0 notes