#☆ For navigation purposes and also because it helps me keep track of uploads!
Text


⟟ TRIP album directory.
🐝 NA NA NA SUMMER NIGHT BeeAT | -Corner- | Noisy:Beep | Crazy Roulette | RISKY VENUS | Honeycomb Summer | Ariadne At My Fingertips | PARANOIA STREET | Helter-spider | Crazy Anthem | Be the Party Bee! | -Exit- | Thrill Addict | Eyes on me, Hold me tight | Petal's Resolution | Yummy・Tummy・LOVE!!
🐇 *Dream Opening* | Light Spectrum | うさぎの森の音楽会 | Parallel Maze | Love it Love it | FALLIN' LOVE=IT'S WONDERLAND | Sunny Day Sugar Wave | *Happy Closing* | Centre of the theatre | Hopping on the music notes! | SUPER SPACE STAR☆ | Sketch of Me
🎭 Nebula | Foggy Night | Sleeper Mystery Train | =EYE= | Stippling | Secret of Metropolis | Bye-Bye Buddy | No Name Yet | Handcraft | HELLO, NEW YEAR! | CROSS SHINE
🕊 Angelic Grace | Sunlight | Never-ending Stage!!! | Love is Primavera! | The Tempest Night | Ghostic Treat House | Dreaming Ocean | Gloaming | Dawning Angels | Feathers of Ark | Crystal Heart | Wandering Clown | Treasure Memories | Welcome back, dear moment
🌹 -Open the cover- | Library of Blessings | Eternal Weaving | Turn a page | Acanthe | Electronic Labyrinth | Le temps des fleurs | Beautiful Nightingale | -Close the book- | Amor Vincit Omnia | Dreaming Architecture
🃏 DiZZineSs | Black Out See Saw | Kiss of Life | Living on the edge | Distorted Heart | You're speculation | VERMILION | Hysteric Humanoid | Believe 4 leaves | UNDYING HOLY LOVE | Tsubasa Moratorium | SOLID SOUL | I LOVE "LOVE" ♡ | Raise the Velvet | Starlight of Faith
🎧 J△MMinG☆ | Twinkle Aerial Battle | Fighting Dreamer | Love×me⇄monsteR | Turbulent Storm | POLYPHONIC WORLD | Swee2wink Love Letter | ∞AB+DUCT+I→ON∞ | GO-AHEAD SIGNAL | A WAY OF LIGHT
🦇 Tsumi no Soko | Resurrection of Soul | Nightless World | Savage Love Affair | No one knows... | FORBIDDEN RAIN | Sustain Memories | Fiery Scream | SURF ON SMILE | ENGRAVE LIVES | BURNING BODY
🍁 (Yet to release) Fuuga | Ito | Akatsuki Iroha Uta | Natsudori no Uta -Summer Bird- | Gekkou Kitan | Konjiki Senya Yumebutai | Yozora, Saritote Kasasagi wa | ROCK ROAR | Unpredictable Reincarnation | Kurenai Henrei | Uta Seishin Keppuroku
Post will actively be updated...🖋 low quality of certain older uploads to be fixed in due time!
#☆ For navigation purposes and also because it helps me keep track of uploads!#I need to fix this blog's tagging system... urgh.#꒰💭꒱
209 notes
·
View notes
Text
Hello ladies and gentlemen~
I have made this blog primary for myself for both creative purpose and purposes of keeping track of ARC-V merch!both official and fanmade!
As you probably know most of ARC-V merch is limited to japane , making it sometimes hard to browse so I want to use this blog to make it easier!
Fanmade merch can also be hard to track so i will be reblogging it alongside artist name. I will use tags to make my blog easier to navigate
If you wish to help/add/change anything feel free to message me!
Also !!when it comes to official merch I will try to upload highest possible quality because i seen so many people get creative and make their own stuff with printer which i love and think is great way to decorate your room on budget!
Master list of tags you can use to navigate blog:
#yugioh yugo#yugioh yuri#yugioh yuto#yugioh yuya#yugioh rin#yugioh sora#yugioh ruri#yugioh shun#yugioh reiji#yugioh serena#yugioh yuzu#yugioh sawatari#yugioh gong#yugioh rayla#acrylic stand#pin#badge#keychain
4 notes
·
View notes
Text
How to Get Roleplay on F-List: A Guide
Hey all. So I’ve had a few people ask me how on earth to get RP over F-List, or for those that have tried, say its too confusing. While F-List is a much different format than I think a lot of people are used to, it’s a pretty reliable source of RP once you get used to it. So I’m going to walk you through, step by step, how to start from nothing and get a profile set up to start RPing. F-List is 18+ Only and is a Restricted To Adults® Verified website. You can learn more about it by clicking the RTA logo at the bottom of f-list’s main page.
F-list’s main landing page can be located at https://www.f-list.net/.
Note that my f-list may look different from yours because I’m using dark mode (which can be set in the account tab) and I’m a subscriber, so I don’t see ads.
Step One: Make a Profile
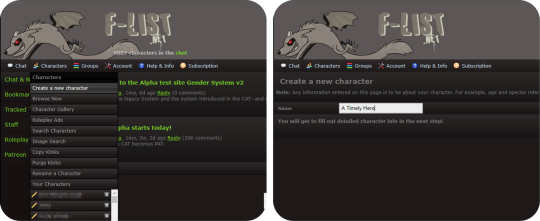
Making a profile, or as they’re known on F-List, a character, is your jumping off point for getting started. There are three main factions on F-List: Anthro Characters, Canon Characters, and Original Characters, with subcategories of each. You also have hub profiles. There is a right way to make a hub profile, but that’s not something I’ll be talking about on this post. Hub profiles are pretty universally disliked on F-List and are often seen as a mark of laziness, and I do not recommend making one to look for RP on. You should make a separate Profile for each character you want to play as. If you have a normal account, you can make up to 150 different characters. If you’re a subscriber, you can make significantly more than that depending on your tier.
Choosing a name for your character is very important! You want something attention grabbing, but since each character has to have a unique name, this can get a little tricky. Today I’m choosing to create a Link from the Legend of Zelda Ocarina of Time. As this is a popular character, it can be difficult to track down a good name. You can be clever with naming conventions, while making it obvious who you’re playing, or you can add in underscores, hyphens, numbers, etc. It’s really up to personal preference. I advise not getting too abstract with your character name. Just pick something easy to read and to the point. Once you’ve decided on a name, click the create character button to open up the character editor.
Step Two: Holy Fuck Dude That’s a Lot of Shit To Fill Out
Take a deep breath. The character editor is very intimidating to those that haven’t used F-List before. Perhaps you have used F-List for it’s old intended purpose, just to list your kinks to link people to when RPing on other sites. Your first instinct might be to scroll down there and start picking kinks willy-nilly. Stop. In the grand scheme of things, this is not as important for getting Roleplay and if you do it incorrectly you might actually hurt your chances.
Now that we’ve calmed down you’ll notice two things at the top of the page. A big white text field, and this guy:

This, more than anything on your profile, is the most important thing. If you have this on profile, you will almost never get any roleplay. This is your character icon, and it’s the first step on your journey to doing this whole thing correctly. All you need to do is find an image that’s 300x300 pixels or smaller and upload it with the Choose File button. Then scroll down to the very bottom of the page and hit save. Search on google, and if you have a hard time finding something of that size, A great site to use is https://lunapic.com/ to edit pics if you don’t have Photoshop or Gimp. Choosing or creating an image with some sort of transparency layer is recommended because it makes your icon look more polished, but you don’t really need to do that. This isn’t an image software guide so I’ll leave that to you to figure out. If all you can do is crop an image into a square, that will do perfectly. But you need to have something here. Besides your character name, it’s the first impression you’re going to give to people when using the site. I have honest to god had people message me on empty profiles that having nothing but a character name and an icon.
Sourcing your images is a bit of a grey area on f-list. It’s not really an art sharing site, but if you choose fanart that someone doesn’t want to be reposted, it can be removed by the mods if you’re reported for it. So we’ll just use some official art that already has a transparency channel and crop it using Lunapic.

Step Three: How To Set the Profile Up
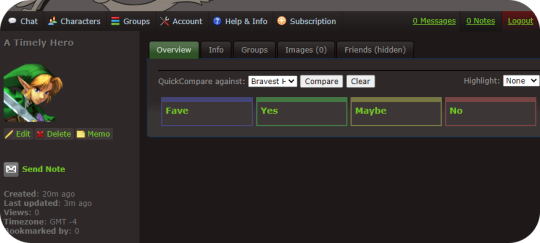
If you’re following along, you should have something like this by now. This already gives us an idea of who you’re playing, and what they look like, and while you might get a couple of weirdos messaging you already, there’s still a lot to do. So let’s go over what to do next.
Now that you’ve already created a character, it will be listed under the character tab. Further characters will be listed in alphabetical order. Navigate to your character and click the “Edit” button underneath their icon.
We’re back to the big scary page. Remember that big text field? We’re going to ignore everything else and focus on this first.
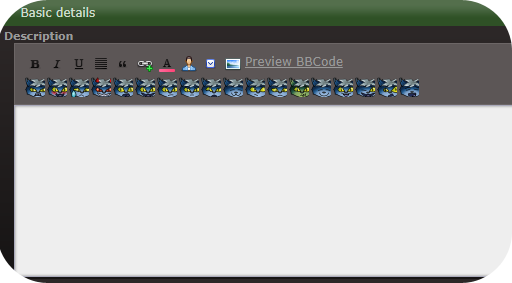
F-List uses standard BBC code tags with [square brackets.] You can find some buttons that will give you tools like bold, italics, color, hyperlinks, and quote blocks. There are many different ways to create eye-catching descriptions. I would say the three basic ways are minimalist, inline based, and heavy BBC code. We’ll go through the first option in detail but if you’re interested in the the latter, there is actually a few F-List profiles that teach coding and even have a few templates to use. User beware, though. Many F-List users use these templates and they can sometimes look a bit generic as they are overused.
Templates: https://www.f-list.net/c/profile%20templates
Coding Help: https://www.f-list.net/c/profile%20references
If you want to make an inline based profile, having access to software like Illustrator, Photoshop, GIMP, and similar content is good to have as well. You can also make a blend of the three styles of profiles. I’ll link some examples of my own profiles for reference. Some of these have text included in the inline. Some of them just have an image with the text written out underneath. Again, it’s really up to your personal preference.
https://www.f-list.net/c/Rival%20II/
https://www.f-list.net/c/Lion%20Heart/
https://www.f-list.net/c/The%20Fire%20of%20Tamaran/
Now would also be a great time to familiarize yourself with the rules. Keep an eye on these, especially if you play contentious content.
https://wiki.f-list.net/Code_of_Conduct
Some big things to look out for and not to do: Photographs and realistic images of animals are not allowed. Even Nonsexual ones. Photographs and 3D renders of minors (even nonsexual images or nonsexual profiles) are not allowed. If there is even a hint of the character being a minor, do not use photographic or 3D renders. (For example: Tom Holland’s depiction of Spiderman. Even though Tom Holland was an adult when he played the role, the character is a minor.) Sometimes these can run into a lot of grey areas, but it’s better safe than sorry!
Step Four: Creating A Minimalist Profile
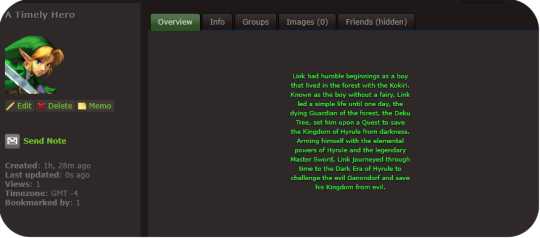
We’ll start with a short description. It’s really important to make sure your character’s name is present in your descriptio, especially if it’s not the profile name. If you’re feeling particularly lazy, you can copypaste something from a wiki or official description. Let’s start with something like this.
Link had humble beginnings as a boy that lived in the forest with the Kokiri. Known as the boy without a fairy, Link led a simple life until one day, the dying Guardian of the forest, the Deku Tree, set him upon a Quest to save the Kingdom of Hyrule from darkness. Arming himself with the elemental powers of Hyrule and the legendary Master Sword, Link journeyed through time to the Dark Era of Hyrule to challenge the evil Ganondorf and save his Kingdom from evil.
Shoving this into the Description box and hitting save will generate something like this.
You might notice that this looks like crap. And it does! however, we can very easily fix that with the power of just three simple BBC tags. Those being [center], [color], and [sub]. plus a little something extra I’ll explain in a moment. Let’s add those in like so.
[center][color=green][sub]Link had humble beginnings as a boy that lived in the forest with the Kokiri. Known as the boy without a fairy, Link led a simple life until one day, the dying Guardian of the forest, the Deku Tree, set him upon a Quest to save the Kingdom of Hyrule from darkness. Arming himself with the elemental powers of Hyrule and the legendary Master Sword, Link journeyed through time to the Dark Era of Hyrule to challenge the evil Ganondorf and save his Kingdom from evil.[/sub][/color][/center]
Instead of hitting save at the bottom of the profile this time, we’re going to click “Preview BBC Code” to get a look at what our coding has done.

Fancy.
But it could use a little work. When I’m making minimalist profiles, I like to make the lines of text a little shorter so it’s a little easier to read and looks nicer. Make sure each line of text is about the same length as the previous (minus any BBC tags)
[eicon]blank[/eicon]
[center][color=green][sub]Link had humble beginnings as a boy
that lived in the forest with the Kokiri.
Known as the boy without a fairy, Link
led a simple life until one day, the
dying Guardian of the forest, the Deku
Tree, set him upon a Quest to save
the Kingdom of Hyrule from darkness.
Arming himself with the elemental
powers of Hyrule and the legendary
Master Sword, Link journeyed through
time to the Dark Era of Hyrule to
challenge the evil Ganondorf and save
his Kingdom from evil.[/sub][/color][/center]
[eicon]blank[/eicon]
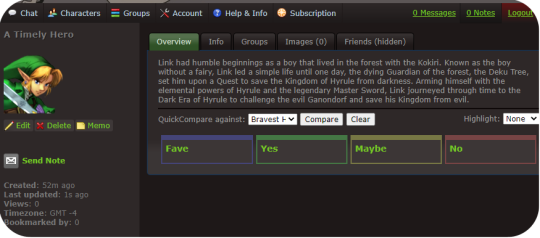
You’ll also notice that I placed an eicon tag with a “blank” body. Eicons are essentially image macros that can be used all over the site. Using the blank one here is a good way to put a block of empty space on the top and bottom so the text isn’t too crowded by the frame of the description box. Another couple to keep in mind are [eicon]under construction[/eicon] or [eicon]WIP[/eicon] if you want to save your work now and get right to chatting and exploring the site. This signifies that you’re still working on your profile and more will be added later. You can create your own eicons by going to Account > Icon gallery. Keep in mind each eicon must have a unique name across all users. Inputting this into the description and checking how it looks in the preview, we end up getting something that looks like this:
Looks like we got a bookmark while we were setting the profile up. That means someone saw us while browsing new characters and decided they want to keep an eye on our profile and are likely interested in RPing! If you like, you can disable bookmarks per character in the character editor under settings. Generally speaking though, bookmarks are your friend and it’s how people will find you to RP later.
Optionally if you want to add an inline, just upload an image of your choice in Account > Inline Images. You can then add it in the character editor using this button.

This isn’t a tutorial for creating inlines, but a general rule is to make sure it’s sized well, and transparent images tend to look better than non-transparent images.
Step Five: Character Details
Opening the Character Editor once more, a couple basic things should be filled out. We will take this section by section.
Settings: Some general tweaks to change and edit. Personally, I like to turn my timezone off, and besides that, I like to have my Guestbook and Bookmarks turned on as well, but all of these settings are up to you. A big one a I suggest turning on is “Custom Kinks Sort First.” This will come up later but it’s good to turn it on.
Character List: For now, you can ignore this part. You can use this to have certain characters grouped together and will show up in the sidebars of these characters. I haven’t run into any limits for how many character lists you can have, but keep in mind a character can only belong to one list at a time.
Images: If you have any images you want to upload, this is the place to do it. Headcanons of body types, additional art you’ve drawn or found, can be added here. You can add descriptions to each image that will appear when a user hovers over the image. Keep in mind, again, that usage of fan art is a grey area on F-List. It’s not an image posting site, but some artists do not want their art reposted at all.
Profile Info: You don’t need to fill out every single detail here. Bits that aren’t filled in will just not appear on your profile. It’s a good idea to fill out your gender, and in many cases, your orientation. Both are under General Details. Filling out RPing preferences is also a good idea. It’ll keep people from approaching you IC using first person posts if that’s not your thing.
Step Six: Kinks and Custom Kinks
This is probably one of the most overwhelming parts of the process. My first tip: Ignore the Kink section for now. Instead, skip ahead to the Custom Kink section.
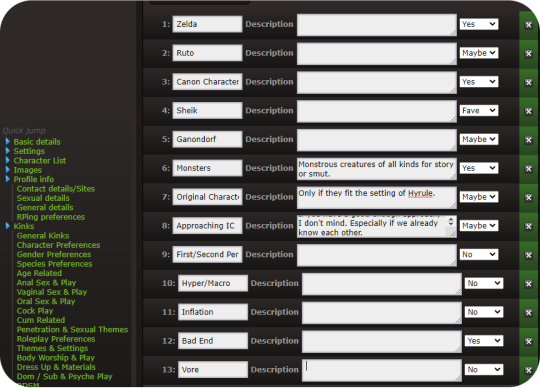
Custom Kinks are a good way to tell people what you really want. Click the Add +1 Custom Kink button to make a new custom kink. You can fill out the basic title of the kink, and a description. Or if you prefer to leave the description blank, just press the spacebar. Select what category you want the kink to appear in (Fave, Yes, Maybe, No.) Try to avoid using inflammatory language against different races, genders, identities, and don’t kinkshame. This is a site based primarily around finding rpers that have the same interests and kinks that you do. Save the profile when you’re done and we’ve got something like this.
And really, you can probably start roleplaying like this. Maybe add a couple of images, and tweak a few things. So if you like, skip to the next step. But for now, I’ll go over the kink list.
The most important think to remember is you don’t have to add every single kink to your profile. Try to select the most relevant things, and avoid redundancies.
For example, I’m not interested in Vore of any kind. So I can put the kinks Vore (Being Predator) and Vore (Being Prey) Into my No category. Or, if I want to make it even more simplified, I can add a custom Vore kink and put that in my No category. Likewise, if I don’t want to do any sex driven play, I can probably go ahead and just put sex driven there and ignore most of the kink list. Kinks that are not relevant such as Vaginal Sex (Receiving) on a cis male can also be ignored. Kinks are broken up into sections, and while it is a lot, just take your time, go through it sensibly, and take a break if you want to. Remember you don’t have to add every single one to your profile. This will ultimately be easier on you and make your profile easier to read.
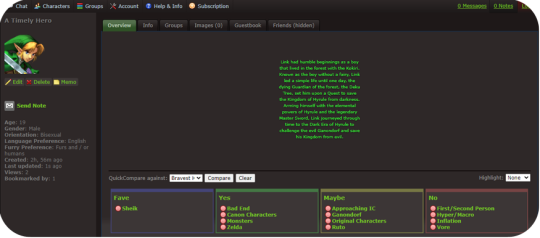
After a bit of editing, this is what my kink list ends up looking like:
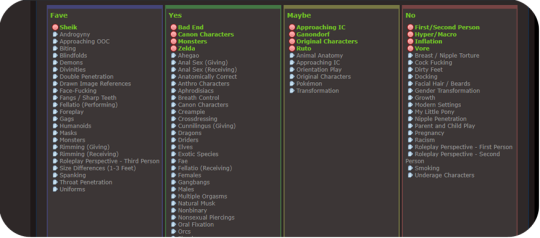
You can try exploring the Subfetish editor but it’s a little confusing to navigate and isn’t very necessary. And now, your profile is done!
Step Six: Using F-Chat
So now that we have a profile set up, it’s time to find some partners. Regardless of what way you want to connect, if you prefer script or para, the main place you’re going to find RP is through F-Chat. There is currently both a desktop and mobile client. if you select Chat you’ll see the option for both, and clicking on them will take you to instructions on how to set those up. We will however be using the Browser client in this example. Go ahead and select F-Chat 3.0.
You will be taken to a landing page with a drop down of your characters, with the first character you created selected as the default. (You can change your default character in your account settings.) You can have up to three characters online at once. Keep in mind this goes by IP address, so if you have a roommate that also uses F-List, those will count towards your total number of online characters. If this becomes a problem for you, just use a virtual machine or connect to the internet via a different method, such as with data. (F-List is not that much of a data drain.)
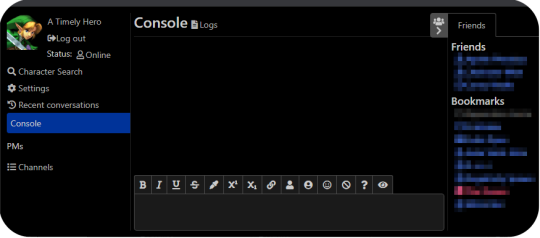
Here is what you’ll see when you open F-Chat. You’ll see I already have people in my friends list and my bookmarks (that I’ve blurred out for courtesy.) These will appear the same on all the characters you sign in as. I will be notified whenever one of my friends signs in or sets a status. You can set these notifications to show only on the console if you’d like to in the settings. Let’s set a status first.
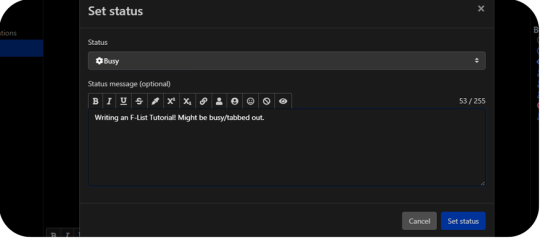
Here, you have the options of selecting from the default Online status to Looking, Away, Busy, and Do Not Disturb. These all do what you’d expect, with Do Not Disturb turning off the sound that would play when you get notifications from personal messages or pings.
The Status Message is an optional addition, and it’s great for if you’re looking for specific things or want your friends and bookmarks to know what you’re doing. Be careful not to post anything that breaks F-Lists code of conduct. F-List does have an aggregate of every status you ever posted logged on their server, so throwing a temper tantrum and posting something inappropriate and then taking it back later might still get you in trouble.
While the Character Search Option is available to you, I’ve personally never found it very effective. You can search users by kinks, but keep in mind it doesn’t search by gender or orientation, or what species or even if they’re canon or original. Instead, we’ll go right to the settings tab.
General: Just your general settings. You have a few options here to tweak and while most of it is personal preference, I’ll highlight a few to keep in mind.
Disallowed BBC Code Tag: good for if you find a particular colour particularly garish as a text colour, or if you find an eicon that you no longer want to see anymore.
Enter Sends Messages: I have this set to off so I can avoid accidentally sending a message for when I post. When this is enabled, just press the send button on screen to send messages. Otherwise, if you want to linebreak in one post, just press Shift + Enter.
Animate eicons: If you’re running a slow computer, or have a slow connection, turn this to off. Eicons are used as memes a lot in F-Chat, and some of them can get a little ridiculous. (Someone has compressed the entire Shrek movie into an eicon and uploaded to the site in very poor quality for example.) There can also be bright flashing colours or even nsfw images. In general these eicons are all 100x100 pixels in size, but some users like to tile them together to create bigger images so it can sometimes get out of hand. This is something up to personal preference, and while I have Animate eicons turned on, I can see why some people wouldn’t like it.
Idle Timer: If you are the kind of person that walks away from your computer without changing your status, or you have fallen asleep with F-Chat open, it’s good to set this to a reasonable time. If you’re in Online or Looking, after you’ve been inactive for the depicted number of seconds, your status will be set to Idle. This is so other users know that you’re not ignoring them if you don’t respond to their messages. A downside to this is if you’re tabbed out or multitasking, it’ll set you to idle when you may not intend it to and going back to the window switches you to Online again. It can be a little spammy if you’re constantly switching between Online and Idle.
Font Size: If you find F-Chat’s font too big or too small, you can edit that here.
Notifications: While this section is pretty self explanatory, I’d like to specifically go over the Custom Highlight Notify Words.
Now, because each profile has to have a unique name, you might want to select additional pings. For example I might want to add Link,Zelda,Hyrule,Hero,Hero of Time to my list. Everything is comma seperated and not case sensitive. There are a few things to keep in mind.
Common word pings: If I add Link to my list of pings, I might get pinged whenever someone talks about a url link, or a chain link, or any other common use of the word link. It therefore might be better to not use the word. If you have a profile name that is a common word, it might be better to also uncheck the option for Notify Messages Containing your name.
Similar Profiles: If there’s another Link in chat, then I will be notified everytime someone refers to him by name as well. This is less of a problem on more niche characters, but it’s something to keep in mind! You can set pings by room, so perhaps a solution to this is using Link as a highlight word in the Canon Characters room, but not using it as a highlight word in the Nintendo room. More about how to do that later.
Hidden Users: Pretty self explanatory once click over. If you keep seeing an ad you dislike, you can hide all advertisements from said user (re: character) going forward. Keep in mind this is not your block list.
Import: If you make two profiles and want to have these settings copied from one to the other, just log into the profile you want to import to, and select the profile you want to import from. Make sure to go back to change your pings if needed.
Lastly, we’ll be looking at the channel section.
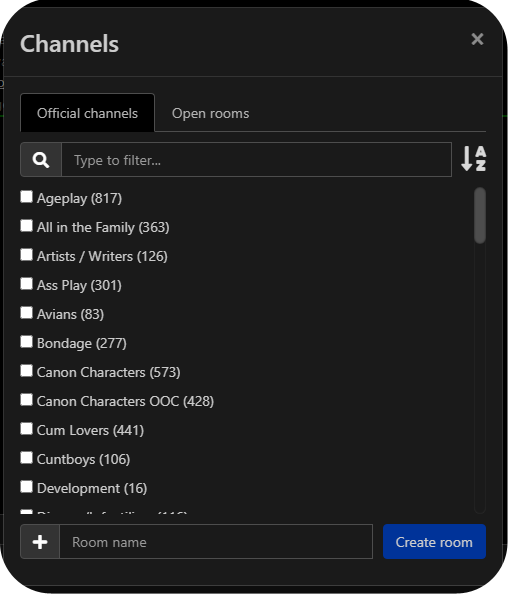
You might be starting to be overwhelmed again, and that’s okay. There are a lot of options, but most of the time, you’ll only want to select the options that are relevant to us. Check off the list of rooms you want to open a tab for. These will begin to be added to your sidebar. the number in brackets signifies the number of users thats joined that room. By default, this list is most popular to least popular, but I personally prefer alphabetical. There may be some channels that you find inappropriate, offensive, or contentious, but your best bet is to ignore those parts of the site. It’s an Adult site that is heavily moderated by a mixture of paid and volunteer staff. Every effort is made to ensure that no real people get hurt, but it is understood that as an adult, you are responsible for curating the content that you consume. This is one of the fundamental principals that F-List is built upon.
For now, I’m going to go with Canon Characters and Canon Characters OOC from this list.
You will also notice an Open Room tab. Unlike the Official Channels which are moderated by F-List staff, Open Rooms are chat rooms created by the userbase, and moderated by the userbase. While the standard F-List code of content is applicable to all areas of the site, special rules may apply in these rooms, and you’ll find things like rooms dedicated to certain kinks, species, and fandoms. I can try searching for a few things I think might be applicable to me, such as Hyrule, Zelda, Nintendo, and Elf. Some of those get hits, and some of those don’t. I can also check them off to add them to my list. (Note that search terms have to be entered one at a time. I cannot search for multiple things at once.)
Once you’ve selected the channels and rooms you want to join, you can click and drag on the tabs to reorder them on the sidebar. If you’d like to pin a chat, You can just press the little push pin symbol, which will then turn green. (You can do this for User Messages as well.) This means when you sign out, these chats will still be there when you sign back in. Note that settings and pinned chats are device by device only, and furthermore, channels and logs will not carry over between characters.
Make sure to read the description of each room you join. There are often specific rules (such as no ooc talk in the canon characters room, and no male characters in the lesbians room.) Clicking the gear will allow you to change settings on a per-room basis.
Step Seven: Actually Finding some RP
Now, after all that effort, we’re finally ready to find some RP. You have a few options on how to do this.
You could just join a few rooms and set your status to looking with a status message on what you want, but this is considered very passive. You may get some people that reach out (As you saw, someone had bookmarked my Link less than an hour after I made the profile before logging into f-chat.) But your best bet is one of three options.
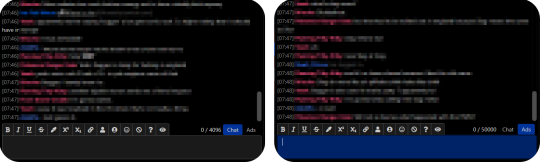
Look at the Ads: Whenever you’re in a room that allows ads, you will sometimes notice a differently coloured message fly by looking for roleplay. This is an ad. If you see one that seems to fit what you have to offer, you can right-click on their username and select “Open Conversation.” A chat window will be open under the PMs section on your sidebar. You can view this conversation like you would a channel. Keep in mind that users are not notified if you open a conversation with them, only if you send them a message.
Create an Ad: Make sure you are in a room or channel that allows ads by checking the description, you can select the ad tab in the lower right hand corner above the text input box to write an ad instead of a chat message.
Making a normal chat post saying “hey does anyone want to roleplay with me” is considered spam and could result in the mods having a word with you.
You have similar tools to what you do in the character descriptions, and clicking each one will automatically place the tags in the text box, with the eyeball being a preview and the question mark being a how to. You want your ads to stand out, but you don’t want them to be too obnoxious. Take a look at what kind of ads other people are posting to get an idea of what’s expected.
Talk to Others: And lastly, you can just play in public rooms or chat with people in ooc channels. This is a great way for others to sample what you’re like to play with and vice versa, or even just to get to know potential partners. In my general experience, you’ll have more luck finding people to play with long term in the user created Open Rooms than in the Official Channels, but ever case is different. There are a vast number of styles, methods of RP, and types of partners you can find.
That’s basically the ins and outs of F-List! The more you’ll use it, the more you’ll understand how it works and the social etiquette on the platform. Like many sites, it certainly has it’s share of dark corners and flaws, but all in all it’s a pretty good website to find people to play with! Have fun!
#cherp#mxrp#rp#tumblr rp#flist#no tea no shade for tagging other RP sites#just giving people more options and I've been asked about it a few times
60 notes
·
View notes
Text
March 23, 2021: 5:38 pm:
=================================================
Maybe someone will help to make Tumblr work the way it’s supposed to work.
I have absolutely no indication that anyone other than a few terror cells can see what I write here on Tumblr.
Here are some of the oddities that I am encountering:
The screen below shows the way Tumblr should look when I access Tumblr.
That is how Tumblr used to appear, it no longer appears like that, with those controls on top, instead, what happens, is that screen below shows up for about a split second, I was able to very quickly take a screenshot before it vanished a few moments ago (and there is someone preventing the letter M from working as I type right now, I can see that the letter M being suppressed is done manually, someone is there, live, watching what I write, and manually doing something that shuts off the letter M on my keyboard. if I am persistent, I can eventually use the letter M, however it is very taxing to have to compete with someone live to use my keyboard to report terrorism).
So that screen below is the way Tumblr is supposed to look when I access, that screen lasts only a split second before the screen changes to the one shown below that one:

This is the way the Tumblr screen looks after a split second.
What I do to see what is happening, is I type “tumblr.com” into the Firefox URL address bar, that is when the screen above shows up for a split second. Then, automatically, this screen below shows up. I don’t like the way it says “now, where were we?”, that is like I am interrupting someone, is bullshit, does not belong there.
So, that is one thing that makes me believe there is some kind of mask, or other thing that is covering up my account from view, clearly no one can see what I am writing other than terror operatives of Centurylink ISP, and others such as Google Inc, and the Tumblr website administrators. The asshole who lives accross the street was able to print out some select paragraphs from my account, but no one is paying any attention to the terrorism, the mass murders, the take over of USA, the torturing of captive people at the house next to mine, and worse, all of which I explain in detail over the past six years or so, for the purpose of getting some assistance to come help stop all of that.
no help ever comes.
no one ever sends me any mail here, no one asks any questions about what I am reporting or why I report it, the reports are being suppressed, but select people are able to cherry pick parts that suit the terror army, and use that against me.

====
This is example of a different thing that has been going on for about a month or two:
I get email from Tumblr like the one below. It says someone is following my account here.
So, I click the link in the email, and there is nothing there, a variety of different pages show up to say “There is nothing here” as that one below shows. That below is the result of clicking on the email link to see who is said to be following,
There has been about six or eight of those over the past two months or so, email from Tumblr that says someone is following, but the link leads to a dead end.
The accounts said to be following all have something in common, the way the names are long and juvenile like the one shown below.

This is where the link of news of a new follower takes me, then that changes to a artful background, then that changes to another page that offers me to search Tumblr for other interesting things.

no one can see what I am writing.
The letter M is hijacked live by some asshole who’s job is to watch my online activity 24/7, and to cause problems, make it difficult, time consuming, and to encourage that I will forget what I wanted to write about while trying to navigate past all of the glitches the asshole throws at me as I try to get help.
===========
Strange thing happened last night:
The local railroad train that uses the tracks on Russell Road nearby came through the neighborhood at about 12:30 am as per usual. What was unusual about that is the train was accompanied by a terror airforce small fixed wing airplane. Small airplanes almost never do flyovers at that hour, there are very few local airplanes that fly after dark at all, and to hear one at past midnight as the train was going by is super unusual.
Thirty minutes later, both of my legs began to itch like crazy, the desire to scratch at my wounds was overwhelming, and the Honeywell Thermostat was turning the heater on and off more than it should have been doing. (like I have said before, the Honeywell Thermostat is fitted with secret, un-advertised remote control features, please study this account to learn why and how the remote operation of a thermostat is part of the mass murder terrorism.
Is there someone who can make the Tumblr visible so I can get some help?
The people who run Tumblr have already made it clear that they are not going to contact US national security personnel or US Military on my behalf to ask them to study this account, so, Tumblr is not going to make the website work correctly, it is in the best interest of Tumblr to bury this account, delete it, make it invisible, so it seems is apparent, either Tumblr is a part of the advance of the terrorism and global mass murders, or, they are naive, and do not see the ultimate goals of the terror bastards who are taking over the world by virtue of killing and replacing the global populations.
===================
The poison injection rash is looking the same as yesterday, there is no visible improvement to show. Maybe tomorrow will be worthy of photos.
notable conditions today is my left eye is very blurry. That has been a complaint I have had for about the time that I have been poisoned with the leg rash, however the vision always clears up by late afternoon. Today, it’s late afternoon, and the blurry vision is not cleared up. I suspect that airplane last night in league with the Russell Road train, released a cocktail mixture of gasses, ones that made severe itching symptoms, and result in blurry vision. It may also be notable that the dreams I had last night and early this morning were more vivid than I can recall of my dreams lately. Very vivid, long, detailed, and story-like dreams last night.
=============
There are no signs of helpful people.
Please send help to Josephine county Oregon.
Bring your own hospital.
===================
7:00 pm:
Also: When I experience computer glitches such as those mentioned above about the letter M, the way Tumblr is not working the way it supposed to, and other problems, I notice that the pop-up window presented by Sony Vaiocare Software that came with my computer shows up first at the bottom right of my computer screen, it comes out of the application tray there, one that says: “Make Recovery Media ...”
That, and the Firefox popup window that comes out of the top right of the screen sometimes repeatedly shows up, that one says: “Download the new version of Firefox”, what is annoying about the Firefox pop-up window that advises I should get the new Firefox, is that when I do download the latest version of Firefox, sometimes just to stop the stupid pop-up window from happening so often, even then, within about 24 hours, Firefox always makes yet another new, latest version, and the fucking pop-up windows continue to show up despite having downloaded to the newest version.
That, and the norton Symantec product is not a internet security product at all, that thing only keeps the computer in a state of usefulness such the other terror cells have access into my computer, and if you are using and paying for the Symantec norton security software, then your computer is subject to the same kinds of manipulation as mine is, fitted with an array of open door access to those who do internet spy work, and manipulations of all kinds. I already know that my computer is showing to US national security personnel that I am viewing, downloading, uploading, creating, child pornography done by the terrabyte load. That is being done, made to appear as if it’s my computer on my internet connection, when the reality is that the Juseph Myers computers, phone and internet lines and wireless connections are the ones who are really doing the child pornography just two houses down the street from where I live, at 560 Jackpine Drive, and those people at the Myers terror cell are indeed some of the most frightening people on earth, they do some of the most cruel terror torturing ever done anywhere, and they are two doors away, getting away with making not just pornography of children, but they kidnap the children, and force the children to have sex with donkeys and horses ... the movies they have been making are not just child porn, they are snuff movies of kidnapped children because the farm animals kill the children as a result of making the porn movies.
The whole of Josephine County is aware of it, all of the imposter police know what has been going on there ... since 1998 I have known of this and tried to get some help when they bring the kidnapped children to the shed in the backyard at the Myers terror cell. I could see that from my dining room window for many years.
The US national security sees some kind of digital magic that makes it appear as if it’s my computer that is doing the uploads of the movies, when I am the person who has been trying to stop it since before the entire state of Oregon was hijacked, when there still were US citizens alive in the state twenty years ago and more.
Symantec norton products are part of the digital magic that is leading the US national security people astray, and it’s the Josephine county courts that are sending them to the wrong places when they seek the search warrants. The judge sends them into traps at the wrong place.
That, and the Centurylink phone lines do not go to the addresses they are mapped to go at Centurylink HQ. They have it worked out such that internet traffic on Jackpine, shows that the traffic is happening on Seclusion Loop Ave off of Lower River Road, about fifteen miles from here, and it’s all done intentionally by Centurlylink ISP, which is just a specialized extension of the Canadian/SAG terror army.
What’s more, is that complicated system of “Spaghetti Phone Lines” works so good for advancing terror, they use it as a model, where other cities duplicate what Centurylink built, a system of phone terminal access boxes where the wires inside of the boxes are attached to the wrong terminals on purpose. Entire neighborhoods of internet service are routed ten miles away or more, from where the Centurlylink map says they are attached to.
With addition of a old style PBX switchboard installed at key locations, the model system becomes dynamic, and can change on a moments notice, from one address to another, on the fly, as national security persons are watching the internet traffic. Then, with use of a Stingray Surveillance Unit, that PBX switchboard can change the land line internet traffic into digital cellular phone traffic, then to VOIP traffic, and then back to land line traffic, completely lost to anyone trying to trace the origin of the traffic.
I have explained the complete system many times on this account, it’s extremely complicated to explain, and includes use of phone lines that are said to be dormant at residences that are not occupied. Please study this account to learn how to stop 90% of all of the terrorism on earth forever, before the terror kills what few remaining US citizens there may be.
===================================
8:24 pm:
CBS news Twitter “Verified Account” changed their logo today.
Why?
Corporate logo changes are a big deal, really big.
They added a black & white circle around the logo.
Actually, they added one white circle within two black circles.
They added an “Oreo Circle”.
Oreo-eye?
Eeyore? (”Thank’s for noticing me”)
Technically, the additional white ring is said to be “reversed out of the black ring” for a “one-color print on white paper” in the printing industry, is “stripper speak” in the art layout room. That CBS logo can be printed with a single color of ink on white paper (slightly blue/grey)
CBS news on Twitter is looking for a “Pay-Per-View” is my call. They seek some kind of special access to something that going down today.
See “’Ever Given’ big ass shipping cargo boat stuck in Suez Canal” in Twitter news for more on this CBS Logo mystery, I guarantee there is some secret message in that story that will connect to the CBS Logo change and include some kind of special access to something for the CBS news Twitter terror cell.


It’s worth a mention that Tumblr added that “eye” looking thing this past couple of weeks, looks a lot like a CBS news logo. (top right on the controls)

That logo change is a huge news item.
=============================
March 24, 2021: 4:11 pm: Additional thought about the big ass boat that is said to have been wedged in the Suez Canal:
First thing, the story is old. The boat stuck in the canal happened more than 12 years ago, it’s part of the Twitter Time Warp terror towards global domination.
Beyond that are reasons why the old story is presented again as current news.
I’ve looked at the story a number of times, I could go on and on and on about small details made by both Verified Accounts and non-verified accounts that have participated in the bullshit story.
One thing that anyone could glean, is that the story has a sexual underlying theme, you can do your own decode work on that, and don’t leave the music industry promotional emailer communications out of your decode work, otherwise you will miss out on the Emily Wolfe music video ... eventually that happy trail leads to a YouTube video said to have been a performance at SWSX ... I doubt that the title about SWSX being the venue is true, what is important is the background components in the SWSX Emily Wolfe performance, especially the existence of an organ in the background, one that is not used in the song.
... and on, and on, and on, and on...
no one cares about the terrorism, so, no one is going to be concerned about how or where the communication to advance it comes from, or by whom.
What I will point out is something that might draw interest in the terrorism:
That big ass boat is said to be 400 meters in length, and that translates to almost 1,320 feet, nearly a quarter mile long ... add a diving board plank on the bow, and it’s a quarter of a mile long.
The significance is of course nitrous oxide.
That, and Meagan McCain is also Trending on Twitter today. I suspect there will be some reference to someone by the name of Fitzgerald before the big ass boat is unclogged from the Suez wedge position.
McCain and Fitzgerald share a history of nitrous oxide with the big ass boat at the Suez, the “Ever Given” of Evergreen Shipping.
(In a personal connection, the Monroe terror cell at 434 Jackpine has a history of having once been a beautiful garden property that was featured on tours that used to take place in Josephine County Oregon, where people who owned historical vehicles used to shuttle visiting horticulture enthusiasts on tours to various gardens at private residences such as 434 was at the time, thirty years ago ... the place was called “Evergreen Gardens” and the sign remains posted there. Other personal connections to Jackpine Drive are also built into the story of the “Ever Given”, the big ass boat that is stuck in the canal)
Does anyone remember that coat that Melania Trump wore? The one that said on the back “I don‘t care, do you?”
Melania should have been interviewed by national security when she wore that coat. But I don‘t care. I have other, personally life threatening issues at this time.
That plank that could be added to the length of the boat, is a representation about the plank where the mailboxes on Jackpine are mounted to. The story of the big ass boat includes orders made publically on Twitter to have the terror cell that is currently occupying 434 Jackpine, to go raid my mailbox to see what is inside, since I am unable to walk at this time to go check the mail, and this past week when I was able to possibly walk to the mailbox, the terror cells on Jackpine were preventing me from safely getting my mail from the mailbox, as a result, I have not been able to collect my mail, for a number of reasons, one is the symptoms of the poison attack is taking a toll on my body, and the other is that offensive, vulture or shark-like nature of the local terror soldiers.
The story about the Ever Given includes orders from “On-High” to steal my mail, and or, make copies, open, look at, otherwise take my mail, possibly put it all back when they are done snooping, as per usual. That is one of Clyde Baum’s duties as a terror soldier, he is in charge of taking my mail, keeping it for a few days, then putting it back into my mailbox, for the past eighteen years or so, Clyde Baum of 333 Jackpine has been regularly borrowing the contents of my postal mail box, and I have no way of knowing if he puts in all back or not.
I get to keep the bills for internet service, mortgage, US Cellular Phone, medical insurance, car insurance, terror doctor bills, and the bill for fire service (Josephine County residents have to pay extra directly to the fire service company, but they don‘t always send the bill, they only send the bill if you did not pay on the previous due date, then they will send the bill in the mail.)
0 notes
Text
Intuos And Intuos Pro
How to Make Writing a Breeze with the
Wacom Intuos
No, not handwriting, although it’s useful for that too.
This will be a guide to how to set up the Intuos — or any Wacom tablet with four buttons — as a powerful productivity aid for noveling, freelancing, coding, teaching online, or just general office work.
http://india-iws.in/Back before working for Wacom was even on my radar, I used a 2013 Intuos Pen & Touch as a full-time mouse replacement for four years. I now use a Cintiq 16 HD for art and a Logitech gaming mouse for everything else. The Cintiq is the best art tool I’ve ever used, but I recently realized I miss using the flat tablet for work. Partially because the interface was more efficient, but I think a lot of it was also psychological: What do we associate more with writing than pens? Just using it, even for ordinary articles, seemed to put me in creative mode.
Yes, holding a pen for several hours on end takes some getting used to. Your hand might be sore for the first few days. And you’ll want to practice tucking it into your thumb crease while you type to make the switch between navigating and writing faster. But once you’re fluid with it, it’s more efficient, ergonomic, and fun than a mouse. It’s very satisfying to scroll by hovering and flicking your pen, highlight text the way you would in a book, physically drag paragraphs down the page to reorder them, and cut and paste with one tap of a button.
If you’re an artist as well, it also helps you keep in practice holding and making fine movements with a tablet pen even when you’re not drawing.
I don’t have the Pen & Touch anymore; I gave it to a friend whose tablet was stolen. But I currently have a new Intuos Small, so in this article, I’ll unbox it and recreate my old setup.
In the interest of monetary honesty, this one was given to me by a manager a year ago and has been sitting in the closet neglected since then, so using one I got for free is less daunting than the idea of buying one for the purpose. But this model, a Small, retails for $95, half the price of a Medium, so if you’re interested in trying a tablet, it’s not a huge investment for both a mouse alternative and a capable drawing tool. Figuring out what size tablet you need can be tough, but the small is perfect for this purpose. It’s the size of a mouse pad but more precise than a mouse, so you have more room to move in the same area. Even with a dual-1080p-monitor setup like mine, it feels fine.
Anyway, inside the box are the tablet, the pen, a Micro USB cord, and a very thin manual.* Don’t worry, you won’t need it until you change the nib: Once you install the universal driver from our website, It’s plug-and-play, and automatically detects whatever Wacom tablet you use.
—
Note
If you look up any guide to setting up a tablet for drawing, they’ll tell you to put it in front of your keyboard so it’s also directly in front of the monitor, not to the side like a mouse pad. But for writing, feel free to do the opposite.
—
Setting preferences
I’ll walk you through the configuration process as if you’ve never used a tablet before, because maybe some people reading this won’t have. If you’re experienced with them, some of this will seem redundantly basic. But some of the other tips and shortcuts, you might not know as well. So bear with me.
Once you’ve installed the driver, open Wacom Tablet Properties. For anyone who hasn’t used it, there’s a lot more than meets the eye here.
When you install it, it automatically creates profiles for your installed image editing programs — or the big ones, at least — and everything else is covered under All Other. Any programs you add will copy this profile by default, so let’s punch in some foundational settings, starting with Mapping:
We’ll leave it on Pen Mode despite using it as a mouse. You want to get used to mentally mapping your tablet to the elements on your screen, and Pen Mode is far more precise anyway. Not to mention you’ll never lose your cursor again.
If you’re using one monitor, turn on Force Proportions to match your tablet’s aspect ratio to your screen’s. You’ll need this for drawing, anyway. If you’re using two monitors, leave it off or it’ll reduce your tablet’s active area to a tiny sliver. You’ll need it for one type of program, but we’ll get to that later.
Set the lower button to middle-click instead of its default scroll. When it’s on scroll mode, you have to drag the pen across the tablet to scroll up and down. If you set it to middle-click, you can simply click once and navigate by hovering. Middle click also lets you quickly open and close Chrome tabs, and everything else clicking the scroll wheel does in other programs.
Writing program settings
Now, Tablet: For this step, we’ll be adding a writing program and a browser. Clicking the + brings up a list of a list of all the programs you currently have open, so you can create a separate mapping profile and shortcuts for each one.
I do my fiction writing in Scrivener and my article writing in a Google Docs desktop app, with different settings for each, but for simplicity’s sake, I’ll demonstrate with MS Word.
Those four buttons, FYI, are called ExpressKeys, and any number of program or navigation functions can be assigned to them. For writing, we’ll do keyboard shortcuts. For the top left one, go to Keyboard > Keystroke, and in the popup window, hit Ctrl-X in the top field and name it Cut in the bottom one.
Keep adding basic shortcuts until you have this, or whatever alternative suits you:
Note that one key’s still on default: Since cut, copy, and paste cover my basic editing needs, I’m left with a free space. I’ll use it to create a shortcut menu for my common formatting functions. So, let’s pop over to On-Screen Controls.
As you’ll see, this lets you create infinite toolbars. They’re program-independent, so you can create one general “writing” one to use the same shortcuts across different programs.
There are two types of menu: Grids and Radials, and grids come in horizontal, vertical, or square. I’ll make a new single-column vertical grid for all my common shortcuts in order of use — Ctrl-I, Ctrl-E, Ctrl-K, Ctrl-B — and creatively call it “Writing.”
And I’ll assign it to the final ExpressKey. Menus normally disappear after you select an option, but you can use the pin icon to make it a permanent toolbar. From now on, I’ll stick mine to the margin of whatever I’m working on.
—
Important
If you’re using Windows 10, uncheck “Use Windows Ink” in the Mapping panel for all your writing programs, or else you’ll get that infuriating Handwriting popup every time you place your cursor.
If that still doesn’t work, you can turn the box alone off through Windows by searching for “Pen & Windows Ink” settings in the taskbar, and changing this one from “When the keyboard isn’t attached” to “Only in tablet mode.”
—
Browser settings
We’re going to do one thing different here. There’s one capability that’s still missing: zoom. The normal Intuos doesn’t have any equivalent to a mouse’s scroll wheel. Some other Wacom products have a touch ring that can be programmed to serve that function — The Intuos Pro, Cintiq 13HD, ExpressKey remote, and various older models — but not this one.
But don’t worry, the Intuos has a workaround. An inelegant one, I’ll admit, but it’s better than switching back to the mouse every time you need a closer look at something.
Besides image editing programs, Chrome is probably where I need to zoom in the most for things like Google Maps. Since I don’t often cut when browsing the web, and I can just use Ctrl-X when I do, I’ll set the first key to Navigation > Pan/Zoom.
While the button is held down, hovering the pen will scroll, and dragging it up or down on the tablet will zoom. You could simplify things and just program this function to the lower pen button, but then you’d lose middle click functionality for things like opening browser links in a new tab. It’s a good idea for any program where middle click doesn’t do anything, though.
—
Also important
You’ll need to turn off Windows Ink for Chrome and any other Google apps, too. It causes a pen tracking glitch. Same with Discord, for some reason. In fact, you really only need to leave it on for Photoshop.
—
Image editing settings
Of course, I’ll still use the Cintiq for any serious work, but for simple cropping and color correction, it’s sometimes more convenient to just bang it out on the flat tablet. Any artists present will already know to do this, but for Photoshop and any other drawing or image editing programs, set the active area to one monitor and turn on Force Proportions.
If you’re using two monitors, don’t worry, all you have to do is click your Windows taskbar to navigate back to the non-photoshop monitor.
Services & Saving
If you’re on Windows, occasionally your computer will fail to detect your tablet, in which case you’ll have to reset the Wacom driver through the Services window. This is something everyone should know how to do. Every problem I’ve ever had with a Wacom device has been fixable this
You can also use the stop and start icons at the top of the window. You can pin services to your taskbar once it’s open, too.
But once in a blue moon — every few months, perhaps — this might wipe your preferences. So once you’ve set them, make sure to save them through the Backup Settings panel in Wacom Desktop Center. You can either save them as a .pref file to your hard drive, or upload them to the free Wacom Cloud, then restore them with the very next button.
Impressions of the
Intuos
Zoom hitch aside, this is an even better mouse replacement than the 2013 Pen & Touch was. The P&T had a smooth plastic surface that constantly reminded you that you were using a computer peripheral. The current gens have a rubbery textured surface that genuinely make it feel like you’re somehow using a ballpoint on a notebook to control your computer. And the pen helps with that too: It’s lighter and thinner than either the P&T or the Cintiq, just 5½ inches long by 1/3 inch thick, smaller than a Bic.
But my favorite feature is the Bluetooth. Once the tablet’s charged via cable, you can connect it wirelessly and regain the use of your USB port. I didn’t see the point of this before I tried it — who uses a tablet further than a cord’s distance from the screen? — but now that I have, I never want to go back. It allows a lot more freedom of movement: I can slide it across the desk from one monitor to the other if I want to switch to another project on a different screen, without messing with the cable, or when I need the mouse for a game, I can simply turn the tablet off and set it aside. And once we can do these things again, it’ll be easy to slip into a backpack to use outside at a coffee shop, bookstore, or while traveling. It can be charged with any Micro-USB cable, so if you run it off Bluetooth, you can use a wall charger. It takes a few hours from empty to full, but it has a battery life of fifteen, meaning it’s good for two workdays or one brutal one.
Finally, in an interesting last-minute twist, I was surprised to find it compatible with the Cintiq — I could even draw into Clip Studio Paint with both at once — meaning I won’t need to switch them out. I don’t think an overabundance of Wacom tablets is a problem the average reader is likely to run into, but for example, if you ever find yourself graduating from a flat tablet to a drawing monitor, but aren’t quite ready to sell your old one, you can repurpose it as a mouse.
As for me, I’m going back to dailying the Intuos for my writing.
—
Finally
If you teach or tutor online, we’ve been putting out a lot of articles for educators lately — in fact, this article was originally intended as a guide to set up a tablet as a teaching tool, I just realized halfway through that the setup would be the same for any job that works with words. If you’d like to know more about teaching with Wacom products specifically, check out All You Need to Know to Teach with a Wacom Tablet, Recreating the Physical Classroom in a Virtual World, or the entire section of our website on using tablets for education.
Advertisements
Occasionally, some of your visitors may see an advertisement here,
as well as a Privacy & Cookies banner at the bottom of the page.
You can hide ads completely by upgrading to one of our paid plans.
0 notes
Text
How to Build a Digital Content Strategy that Delivers Results

Content marketing improves your SEO efforts in multiple ways. It helps you drive more organic traffic, increases your rankings, and earns top-notch links. Above all, it gives you the opportunity to position yourself as an industry authority and build trust with your target audience.
Now, no matter if you’re just starting out with content creation or you’ve been investing in it for quite some time now, it’s always a good idea to build a digital content strategy that will back you up.
Build Reader Personas

(Sample Reader Persona - Source)
Before you launch a blog, you need to know who you’re creating content for. Simply put, not knowing your audience, you won’t be able to choose relevant topics and set the tone of voice that resonates with them. Remember, gone are the days where you could write spam content for the sake of SEO. While SEO still matters (we’ll get back to it later), you now need to focus on creating user-centered content.
Start by collecting customer data. Your goal is to get to know your target audiences, understand their hopes, goals, problems, fears, values, habits, and so forth. This will help you write content that brings value to them, helps them solve real-life problems, and encourages them to keep coming back to your website.
That’s where you should create reader personas. Start by creating just one persona that depicts your most typical customers. Over time, as customer data keeps accumulating, you can segment your target audiences and create multiple personas for each segment.
Now, your reader persona needs to answer the who, what, why, when, where, and how. For starters, collect your customers’ demographics data that tells you more about your customers’ age, location, race, gender, family status, education, employment status, etc. Then, dive deep into their psychographics to learn more about their goals, hobbies, lifestyles, interests, fears, insecurities, and so forth.
Establish your Brand Voice

(Brand Voice Chart - Source)
Each online marketer needs to establish their brand’s tone of voice they will use consistently across all marketing channels, be it email, social networks, or blog posts. Just like brand colors, typography, or visual content, your voice is a critical part of your branding strategy. It makes you recognizable and unique. Namely, if your audiences cannot pick your voice out of all that online noise, maybe you’re not even worth listening to.
Now, when choosing your brand voice, there are several factors to consider – your target audiences, your industry, and your brand’s traits and personality. Your tone of voice could be passionate, using power words to evoke emotions. It could also be quirky, challenging the status quo. Finally, you could also choose an authoritative tone of voice that tells customers that you take them seriously and helps you position yourself as an industry leader.
Set Clear Goals for your Content

(Smart Goals)
Each type of content has a specific purpose and function. Precisely because of that, you need to set clear content marketing goals before you start blogging. According to CMI, 79% of online marketers create content to maximize brand awareness. Others use it to retain customers, generate leads, boost website traffic, increase leads, and grow industry credibility.
Your goals dictate your digital content strategy. For example, if you want to boost brand awareness, you will use informative and helpful content like whitepapers, ebooks, checklists, infographics that will grab their attention. Those customers in the evaluation stage will want to know how you can solve their specific problems. That’s where FAW pages, product webinars, and case studies can help. Finally, to maximize sales, you will need to offer live demos, free trials, free quotes, etc.
Another immensely important purpose of setting clear goals lies in the fact that they directly impact your choice of content marketing metrics. That’s why you need to resort to the famous SMART approach, meaning your goals should be:
Specific
Measurable
Achievable
Relevant
Timely
Choose the Right Content Formats

Your target audience has different preferences. While some of them prefer textual content, others are visual learners. Some people even focus on audio content they can consume on the go. Therefore, to appeal to wider audience groups and maximize your content results, you should diversify your digital content strategy and experiment with different types of content. Here are a few content types to get you started.
Blog posts
Blog posts are the most popular content format. However, to get the most out of them, you first need to publish them consistently. Never spam your articles with a bunch of keywords or promotional links. While this worked a while ago, today, both users and search engines expect you to deliver high-quality articles.
Create in-depth and data-backed articles that provide your readers with actionable tips and valuable information. It is also recommended that blog posts be somewhere 1,000 and 3,000 words in length, as longer content delivers greater value to readers and performs better on Google.
Above all, make blog articles readable. Break them up into smaller paragraphs, use headings, and insert images to make textual content easier to read.
Infographics
Visual content stays one of the key digital content trends in 2020. And, that’s where infographics dominate. Online users love them because they visualize a bunch of data in a more engaging and compelling way. Strong visuals and colors help them memorize data faster.
For you, this is a great opportunity to create a highly shareable and linkable content format everyone will love. Just like with any other content format, infographics need to be packed with valuable tips and up-to-date facts. Keep the sentences short and clear. Choose legible fonts and font sizes. Add lots of white space to make it easier to track.
Colors should be pleasant to the eye, typography legible, and sentences short and clear. Focus on key information and make sure information flows logically logical. Use lots of white space to make the content easier to follow.
Ebooks
Ebooks are one of the most powerful lead magnets – a kind of content customers can download for free in exchange for their email address. They educate readers about the latest industry trends and let you boost your industry credibility.
Ebooks should deliver value to your target audience. They need to provide relevant statistics, insights, ideas, and advice. They should also contain high-quality illustrations, photos, charts, depending on your industry. Similar to fiction works, your ebook needs to be properly formatted and easy to follow, while information needs to flow organically.
Case studies
Case studies are a form of customer testimonials, where you can tell your customers’ stories and show how they solved particular problems by working with you. Now, case studies can be in different forms, from blog posts and infographics to downloadable files in PDF. For example, you could write a research-based case study that tells a single client’s story and pack it with relevant data, charts, statistics, and customer testimonials.
Videos
Did you know that 51% of marketing professionals say video content delivers the best ROI? That’s not surprising at all, given that 72 hours of video are uploaded to YouTube every minute. Moreover, video content is highly attention-grabbing and engaging. It evokes emotions and inspires users to share it online with their friends. Above all, it helps users retain the information and memorize your brand.
Podcasts
Some of your users would rather listen to you than read your lengthy case study, whitepaper, or article. They want to consume your content on their mobile devices, wherever they are, be it a coffee shop, a gym, or a bank. Studies say that there are over 700,000 podcasts and half of the population has already listened to them. You just need to choose hot topics to discuss, invite authoritative guests, invest in quality internet connections and microphone and you’re all set.
Sure, this post is to short for me to list and explain every type of content out there. If you want to experiment with some additional forms of content, here are a few additional ideas that may serve as your sold starting point:
Comprehensive guides
Interviews
Press releases
Quizzes
Email newsletters
In-house research
Timelines
Whitepapers
Resources
Vlogs
Optimize for Search Engines

(My SEO Results in 2019)
Content marketing and SEO go hand in hand. Without SEO, your content would be invisible in search engines. However, optimizing content for Google doesn’t mean spamming it with a bunch of keywords. This would only harm user experiences and even get you penalized by Google.
For starters, research the right keywords. Those should be the phrases your readers are searching on Google. Now, there are several kinds of keywords. Exact-match ones have a greater search volume, but they are highly competitive. On the other hand, long-tail keywords have a lower search volume, but they’re less competitive, meaning you will be able to rank higher in the SERPs.
When optimizing for keywords, focus on identifying search intent – the reason why users are conducting searches. Now, there are several types of search intent. Informational one means that users are looking for certain facts and data. Users conducting navigational searches want to know exactly what site they want to visit, while those with the commercial intent are looking for products to purchase.
When choosing keywords for your blog posts, opt for conversational and natural keywords that don’t compromise user experiences. Question-based keywords are also valuable for voice searches that have been gaining momentum over the past few years. Apart from traditional keyword research tools, like SEMrush, Moz Keyword Explorer, KWFinder, you could also use tools like Google’s People Also Ask, Answer the Public, and Google Trends to identify valuable long-tail keywords.
Build a Content Calendar

(Sample Content Calendar)
To maximize your content performance, you need to increase its consistency. You should plan your content every month. That’s where a detailed content calendar will help you. It needs to emphasize what kind of content you will create, what your audiences are for each piece of content, as well as to set strict deadlines, publishing dates, and so forth. By planning your content creation and promotion strategy reasonably, you will increase your blog’s consistency, eliminate any ambiguities, and boost user experiences.
Promote your Content
Now that your piece of content is live, you need to promote it. There are numerous places where you should promote your content.
Start by promoting it organically on social networks. Sharing your posts on Facebook, Twitter, or LinkedIn will definitely increase its visibility and reach and maximize its traffic. To make the most out of social networks, you could also create a Facebook or LinkedIn group. Building and nurturing an engaged community is an amazing way to promote your content and yet, deliver value to your target audiences.
Email marketing is still one of the most powerful ways to promote content. It grabs people’s attention and encourages them to go to your blog post by building stronger relationships with them. However, the way you use email marketing has changed. Your subject line needs to be strong, while your email body should be personalized and clear, emphasizing the benefits of your content for readers. You could also segment email lists to provide them with relevant content only.
Link building lets you boost your site’s authority, market to wider audiences, and increase your website traffic. Start by publishing high-quality articles on authoritative blogs in your industry. Apart from guest blogging, there are many alternative ways of link building, such as:
broken link building
link reclamation
contributing to HARO (Help A Reporter Out)
commenting on relevant sites
registering on industry-specific business directories
Measure Outcomes
Finally, you need to track the performance of your content marketing strategy. Like I’ve mentioned above, the choice of metrics depends on the goals you’ve set. For example, if you want to increase brand awareness, you will focus on metrics like website traffic, content downloads, referral links, page views, etc. On the other hand, for measuring engagement, track your blog comments, social likes and shares, and backlinks. If your goal is to generate leads, focus on email subscription rates, conversion rates, form completions. You can measure the majority of these KPIs directly from Google Analytics.
Over to You
Content marketing is a great way to boost industry authority, engage customers, and build stronger relationships with them. However, to achieve the desired goals, you need to plan your content strategically, from targeting the right audiences to choosing content promotion channels. And, I hope these tips will help you.
How do you create online content? We’d like to hear from you!
Read the full article
from Lorenzo Gutierrez https://lorenzo-gutierrez-seo.tumblr.com/post/190058442487
0 notes
Text
How to Build a Digital Content Strategy that Delivers Results

Content marketing improves your SEO efforts in multiple ways. It helps you drive more organic traffic, increases your rankings, and earns top-notch links. Above all, it gives you the opportunity to position yourself as an industry authority and build trust with your target audience.
Now, no matter if you’re just starting out with content creation or you’ve been investing in it for quite some time now, it’s always a good idea to build a digital content strategy that will back you up.
Build Reader Personas

(Sample Reader Persona - Source)
Before you launch a blog, you need to know who you’re creating content for. Simply put, not knowing your audience, you won’t be able to choose relevant topics and set the tone of voice that resonates with them. Remember, gone are the days where you could write spam content for the sake of SEO. While SEO still matters (we’ll get back to it later), you now need to focus on creating user-centered content.
Start by collecting customer data. Your goal is to get to know your target audiences, understand their hopes, goals, problems, fears, values, habits, and so forth. This will help you write content that brings value to them, helps them solve real-life problems, and encourages them to keep coming back to your website.
That’s where you should create reader personas. Start by creating just one persona that depicts your most typical customers. Over time, as customer data keeps accumulating, you can segment your target audiences and create multiple personas for each segment.
Now, your reader persona needs to answer the who, what, why, when, where, and how. For starters, collect your customers’ demographics data that tells you more about your customers’ age, location, race, gender, family status, education, employment status, etc. Then, dive deep into their psychographics to learn more about their goals, hobbies, lifestyles, interests, fears, insecurities, and so forth.
Establish your Brand Voice

(Brand Voice Chart - Source)
Each online marketer needs to establish their brand’s tone of voice they will use consistently across all marketing channels, be it email, social networks, or blog posts. Just like brand colors, typography, or visual content, your voice is a critical part of your branding strategy. It makes you recognizable and unique. Namely, if your audiences cannot pick your voice out of all that online noise, maybe you’re not even worth listening to.
Now, when choosing your brand voice, there are several factors to consider – your target audiences, your industry, and your brand’s traits and personality. Your tone of voice could be passionate, using power words to evoke emotions. It could also be quirky, challenging the status quo. Finally, you could also choose an authoritative tone of voice that tells customers that you take them seriously and helps you position yourself as an industry leader.
Set Clear Goals for your Content

(Smart Goals)
Each type of content has a specific purpose and function. Precisely because of that, you need to set clear content marketing goals before you start blogging. According to CMI, 79% of online marketers create content to maximize brand awareness. Others use it to retain customers, generate leads, boost website traffic, increase leads, and grow industry credibility.
Your goals dictate your digital content strategy. For example, if you want to boost brand awareness, you will use informative and helpful content like whitepapers, ebooks, checklists, infographics that will grab their attention. Those customers in the evaluation stage will want to know how you can solve their specific problems. That’s where FAW pages, product webinars, and case studies can help. Finally, to maximize sales, you will need to offer live demos, free trials, free quotes, etc.
Another immensely important purpose of setting clear goals lies in the fact that they directly impact your choice of content marketing metrics. That’s why you need to resort to the famous SMART approach, meaning your goals should be:
Specific
Measurable
Achievable
Relevant
Timely
Choose the Right Content Formats

Your target audience has different preferences. While some of them prefer textual content, others are visual learners. Some people even focus on audio content they can consume on the go. Therefore, to appeal to wider audience groups and maximize your content results, you should diversify your digital content strategy and experiment with different types of content. Here are a few content types to get you started.
Blog posts
Blog posts are the most popular content format. However, to get the most out of them, you first need to publish them consistently. Never spam your articles with a bunch of keywords or promotional links. While this worked a while ago, today, both users and search engines expect you to deliver high-quality articles.
Create in-depth and data-backed articles that provide your readers with actionable tips and valuable information. It is also recommended that blog posts be somewhere 1,000 and 3,000 words in length, as longer content delivers greater value to readers and performs better on Google.
Above all, make blog articles readable. Break them up into smaller paragraphs, use headings, and insert images to make textual content easier to read.
Infographics
Visual content stays one of the key digital content trends in 2020. And, that’s where infographics dominate. Online users love them because they visualize a bunch of data in a more engaging and compelling way. Strong visuals and colors help them memorize data faster.
For you, this is a great opportunity to create a highly shareable and linkable content format everyone will love. Just like with any other content format, infographics need to be packed with valuable tips and up-to-date facts. Keep the sentences short and clear. Choose legible fonts and font sizes. Add lots of white space to make it easier to track.
Colors should be pleasant to the eye, typography legible, and sentences short and clear. Focus on key information and make sure information flows logically logical. Use lots of white space to make the content easier to follow.
Ebooks
Ebooks are one of the most powerful lead magnets – a kind of content customers can download for free in exchange for their email address. They educate readers about the latest industry trends and let you boost your industry credibility.
Ebooks should deliver value to your target audience. They need to provide relevant statistics, insights, ideas, and advice. They should also contain high-quality illustrations, photos, charts, depending on your industry. Similar to fiction works, your ebook needs to be properly formatted and easy to follow, while information needs to flow organically.
Case studies
Case studies are a form of customer testimonials, where you can tell your customers’ stories and show how they solved particular problems by working with you. Now, case studies can be in different forms, from blog posts and infographics to downloadable files in PDF. For example, you could write a research-based case study that tells a single client’s story and pack it with relevant data, charts, statistics, and customer testimonials.
Videos
Did you know that 51% of marketing professionals say video content delivers the best ROI? That’s not surprising at all, given that 72 hours of video are uploaded to YouTube every minute. Moreover, video content is highly attention-grabbing and engaging. It evokes emotions and inspires users to share it online with their friends. Above all, it helps users retain the information and memorize your brand.
Podcasts
Some of your users would rather listen to you than read your lengthy case study, whitepaper, or article. They want to consume your content on their mobile devices, wherever they are, be it a coffee shop, a gym, or a bank. Studies say that there are over 700,000 podcasts and half of the population has already listened to them. You just need to choose hot topics to discuss, invite authoritative guests, invest in quality internet connections and microphone and you’re all set.
Sure, this post is to short for me to list and explain every type of content out there. If you want to experiment with some additional forms of content, here are a few additional ideas that may serve as your sold starting point:
Comprehensive guides
Interviews
Press releases
Quizzes
Email newsletters
In-house research
Timelines
Whitepapers
Resources
Vlogs
Optimize for Search Engines

(My SEO Results in 2019)
Content marketing and SEO go hand in hand. Without SEO, your content would be invisible in search engines. However, optimizing content for Google doesn’t mean spamming it with a bunch of keywords. This would only harm user experiences and even get you penalized by Google.
For starters, research the right keywords. Those should be the phrases your readers are searching on Google. Now, there are several kinds of keywords. Exact-match ones have a greater search volume, but they are highly competitive. On the other hand, long-tail keywords have a lower search volume, but they’re less competitive, meaning you will be able to rank higher in the SERPs.
When optimizing for keywords, focus on identifying search intent – the reason why users are conducting searches. Now, there are several types of search intent. Informational one means that users are looking for certain facts and data. Users conducting navigational searches want to know exactly what site they want to visit, while those with the commercial intent are looking for products to purchase.
When choosing keywords for your blog posts, opt for conversational and natural keywords that don’t compromise user experiences. Question-based keywords are also valuable for voice searches that have been gaining momentum over the past few years. Apart from traditional keyword research tools, like SEMrush, Moz Keyword Explorer, KWFinder, you could also use tools like Google’s People Also Ask, Answer the Public, and Google Trends to identify valuable long-tail keywords.
Build a Content Calendar

(Sample Content Calendar)
To maximize your content performance, you need to increase its consistency. You should plan your content every month. That’s where a detailed content calendar will help you. It needs to emphasize what kind of content you will create, what your audiences are for each piece of content, as well as to set strict deadlines, publishing dates, and so forth. By planning your content creation and promotion strategy reasonably, you will increase your blog’s consistency, eliminate any ambiguities, and boost user experiences.
Promote your Content
Now that your piece of content is live, you need to promote it. There are numerous places where you should promote your content.
Start by promoting it organically on social networks. Sharing your posts on Facebook, Twitter, or LinkedIn will definitely increase its visibility and reach and maximize its traffic. To make the most out of social networks, you could also create a Facebook or LinkedIn group. Building and nurturing an engaged community is an amazing way to promote your content and yet, deliver value to your target audiences.
Email marketing is still one of the most powerful ways to promote content. It grabs people’s attention and encourages them to go to your blog post by building stronger relationships with them. However, the way you use email marketing has changed. Your subject line needs to be strong, while your email body should be personalized and clear, emphasizing the benefits of your content for readers. You could also segment email lists to provide them with relevant content only.
Link building lets you boost your site’s authority, market to wider audiences, and increase your website traffic. Start by publishing high-quality articles on authoritative blogs in your industry. Apart from guest blogging, there are many alternative ways of link building, such as:
broken link building
link reclamation
contributing to HARO (Help A Reporter Out)
commenting on relevant sites
registering on industry-specific business directories
Measure Outcomes
Finally, you need to track the performance of your content marketing strategy. Like I’ve mentioned above, the choice of metrics depends on the goals you’ve set. For example, if you want to increase brand awareness, you will focus on metrics like website traffic, content downloads, referral links, page views, etc. On the other hand, for measuring engagement, track your blog comments, social likes and shares, and backlinks. If your goal is to generate leads, focus on email subscription rates, conversion rates, form completions. You can measure the majority of these KPIs directly from Google Analytics.
Over to You
Content marketing is a great way to boost industry authority, engage customers, and build stronger relationships with them. However, to achieve the desired goals, you need to plan your content strategically, from targeting the right audiences to choosing content promotion channels. And, I hope these tips will help you.
How do you create online content? We’d like to hear from you!
Read the full article
0 notes
Text
Exercise # 2. Dérive toward subversive desire or following a stranger

First excursion of DADA on the 14th of April of 1921 to Saint Julien Le Pauvre
“Deserted, ulmost unknows church in totally uninteresting, positively doleful surroundings.” (Pg. 183, Hans Richter)
- Failed, no one came because it was raining and then they abandoned the idea.
However, their interests for these type of excursion came from their thinking and making around chance.
“Our feeling of freedom from rules, precepts, money and critical praise, a freedom for which we paid the price of an excessive distaste and compempt for the public, was a major stimulus. The freedom not to care a damn could have served no purpose, brought us all the closer to the source of all art, the voice within ourselves. The absence of any ulterior motive enabled us to the unknown. Thus we arrived at the central experience of Dada.” (Pg. 50. Hans Richter)
“Chance appeared to us as a magical procedure by which one could transcend the barriers of casualty and of conscious volition, and by which the inner eye and ear became more acute, so that new sequences of thoughts and experiences made their appearance. For us, chance was the ‘unconscious mind’ that Freud had discovered in the 1900” (Pg 57. Hans Richter)
Then the Surrealists also started to do déambulations (drifts) that took part of their writing, painting and collage exercises.
A generation later a group of people under the name of Situationists (1957), developed the act of walking as a form of subversion of the status quo.
Theory of the Dérive
One of the basic situationist practices is the dérive,(1) a technique of rapid passage through varied ambiences. Dérives involve playful-constructive behavior and awareness of psychogeographical effects, and are thus quite different from the classic notions of journey or stroll.
In a dérive one or more persons during a certain period drop their relations, their work and leisure activities, and all their other usual motives for movement and action, and let themselves be drawn by the attractions of the terrain and the encounters they find there.
(...)
If chance plays an important role in dérives this is because the methodology of psychogeographical observation is still in its infancy. But the action of chance is naturally conservative and in a new setting tends to reduce everything to habit or to an alternation between a limited number of variants. Progress means breaking through fields where chance holds sway by creating new conditions more favorable to our purposes. We can say, then, that the randomness of a dérive is fundamentally different from that of the stroll, but also that the first psychogeographical attractions discovered by dérivers may tend to fixate them around new habitual axes, to which they will constantly be drawn back.
(...)
the primarily urban character of the dérive, in its element in the great industrially transformed cities that are such rich centers of possibilities and meanings, could be expressed in Marx’s phrase: “Men can see nothing around them that is not their own image; everything speaks to them of themselves. Their very landscape is alive.”
Full text here: http://tbook.constantvzw.org/wp-content/derivedebord.pdf

Situationists - French theorist Guy Debord and Danish painter Asger Jorn. Taking as inspiration the novel by André Breton’s Nadja where the authors narrates his excursions of Paris to describe his love affair.
youtube
The Situationists were part of the student protests and strikes of May 1968 in France which became the largest general strike ever attempted in France. The unrest broke through initially against capitalism, consumerism, American imperialism and traditional institution.

Photographs by Gilles Caron. See a more complete photo series of May 68: http://www.schoolgallery.fr/portfolio/mai-68/
The events of May of 1968 influenced the youth around Europe
“Situationists notions of change, of outrage, of excess were a lot of what drove them to try to create Sex Pistols.”
youtube
FOLLOWING
Focus on Sophie Calle’s work.
“Although Calle’s practice mimics earlier strategies of urban navigation – from Vito Acconci’s 1969 Following Piece to the Situationist practice of the dérive and the Surrealist tactic of errance – her body of work reverses the gendered paradigm of pursuit and claims for herself its structures of power. It has the teeth of menace and the warrant of defense. As Baudrillard suggests: “To follow the other is to take charge of his itinerary; it is to watch over his life without him knowing it. … It is to relieve him of that existential burden, the responsibility for his own life.” (Following Sophie Calle, Nicole Miller, 2019, Hyperallergic article: https://hyperallergic.com/305869/following-sophie-calle/ )
Sophie Calle
Venetian Suit, 1980-1996


“Sophie Calle’s practice is characterised by performances using rule-based scenarios, which she then documents. Venetian Suite consists of black and white photographs, texts and maps that document a journey the artist made to Venice in order to follow a man, referred to only as Henri B., whom she had previously briefly met in Paris. Although Calle undertook the journey in 1979, the texts describe the actions as taking place in 1980. Venetian Suite records Calle’s attempts to track her subject over the course of his thirteen-day stay in Venice. She investigates and stalks him, enlisting the help of friends and acquaintances she makes in the city. Eventually Henri B. recognises Calle, and they share a silent walk. Even after this encounter Calle continues her project, shadowing Henri B. from a distance until his arrival back in Paris.
The work was initially produced in book form in 1983; the same year Calle also presented the work as a sound installation in a confessional booth. In 1996 she configured Venetian Suite as a gallery-based work, the appearance of which deliberately recalls a detective casebook, with texts written in a style that mimics and deconstructs the narrative tension typical of detective novels or film noir. The text begins as follows:
For months I followed strangers on the street. For the pleasure of following them, not because they particularly interested me. I photographed them without their knowledge, took note of their movements, then finally lost sight of them and forgot them. At the end of January 1980, on the streets of Paris, I followed a man whom I lost sight of a few minutes later in the crowd. That very evening, quite by chance, he was introduced to me at an opening. During the course of our conversation, he told me he was planning an imminent trip to Venice. I decided to follow him.
(Calle and Baudrillard 1988, p.2.)” (Taken from TATE, Art and Artists portfolios).
The Detective in 1980

Calle hired a private detective to follow her and noted how that day she visited all the places in Paris which held some emotional significance for her. Calle remembered her first kiss which took place at the Luxembourg gardens, so she went there, to which the detective’s response simply states, “The subject crosses the Jardin de Luxembourg”. Calle’s work addresses the conflicts, contradictions or disparities between personal and intimate experiences with the outside perceptions embedded in the public semi-public space that lead to objective realities.
Exercise Dérive:
Define a condition or a set of conditions using as inspiration the premise ‘subversive desire’* that will guide your drift in the city of Rotterdam.
You will destine one working day of the week to do your drift. THE DRIFT CAN NOT BE SHORTER THAN 4 HOURS LONG, but it can be as long as you want. Document your drift in any format necessary, that must include your travel, your pauses, reflections, attractions, repulsions, encounters, etc.
Give your own meaning and interpretation to the notion of subversive desire. By giving it your own value and meaning, you start to define your own critical position.
Add your documentation and reflections to your blog on mywdka for my revision.
Exercise Following a stranger:
Go to the public space and randomly pick a subject to follow.
DO NOT FOLLOW ANYONE THAT WILL GET UPSET OR COULD PUT YOU IN A POSITION OF VULNERABILITY OR DANGER.
Once the person enters their home or private space, change person, and continue your exercise. THE EXERCISE CAN NOT BE SHORTER THAN 4 HOURS LONG, but it can be as long as you want.
If you don´t feel comfortable doing this exercise with a person, you can also follow an animal or an object.
Document your following in any format necessary, that must include your travel, your pauses, reflections, attractions, repulsions, encounters, etc.
tips: Maintain your distance and avoid being seen, keep yourself safe. KEEP ALL THE ETHICAL AND MORAL ideas of this exercise in mind while you are doing it.
Add your documentation and reflections to your blog on mywdka for my revision.
“The idea is that you’re exploring the space but someone else dictates it to you – it neutralises your will,” (...) “The intention – or hope – is that the followed person will lead you into places you haven’t been before.” (Phil Smith quoted in https://www.theguardian.com/cities/2018/sep/21/i-follow-a-different-person-every-day-using-strangers-to-explore-the-city)
Make new work
In the framework of your own practice and expertise, use this assignment and the collection of your drift or following to make new work about it.
EXPERIMENT with new forms and formats. You can use the documentation you made, but you can also dismiss it, and make something entirely new.
Upload what you have made on your blog before the end of the week for my feedback.
0 notes
Text
One Simple Hack That’ll Boost Your Ecommerce Sales

There’s a little growth hack that every ecommerce site should be using.
It’s the easiest hack… it doesn’t require money, you don’t need a following, and it works instantly.
But you know what? No one is using it.
Can you guess what it is?
Well, I’ll give you hint… just look at the image above.
It’s not related to SEO, paid ads, or anything else you are used to reading about here on the blog.
The beautiful part about it is no one is leveraging it, which means it works roughly 100% of the time. 🙂
A simple way to get more ecommerce sales
Alright, do you want to know what it is? Well, I’ll give you one more hint before spilling the beans.
If you watched a video like this on YouTube about the best makeup products, what do you think would happen?
youtube
There’s a good chance you’ll buy one of the products recommended. And if you don’t, someone else will.
The issue is, it only works if you generate enough video views.
And I have a lot of articles breaking down how to get more YouTube traffic like:
YouTube for E-Commerce: The Art of Selling Without Selling
Is YouTube Worth It? 7.6 Million Views Later, Here’s What I Learned
How to Hack YouTube SEO – 26 Tactics for Gaining Top Results
How to Get More YouTube Views
There is one big problem… there is no guarantee that your video will rank on YouTube or get enough views.
But what if I told you that there is a channel that is highly relevant to ecommerce and you can easily get 20,000 plus views per video?
Best of all, there is no competition and you can do it every single time, without even having a following!
How to get 29,090 video views on Amazon
You already know about YouTube Live, Facebook Live, Instagram Live… and you may even know about LinkedIn Live.
But did you know about Amazon Live?

Just like all of the other live platforms, it works similarly, but the whole purpose is to show off and promote your products so you can drive more brand awareness and sales.

The video above is by Skincare by Alana. Alana presented tips in the video about how to reduce puffiness around your eyes and how to make them brighter.
Can you guess how many views that video received in the first week it aired?
Well, based on the headline above you are probably going to guess 29,090. That is correct. 😉
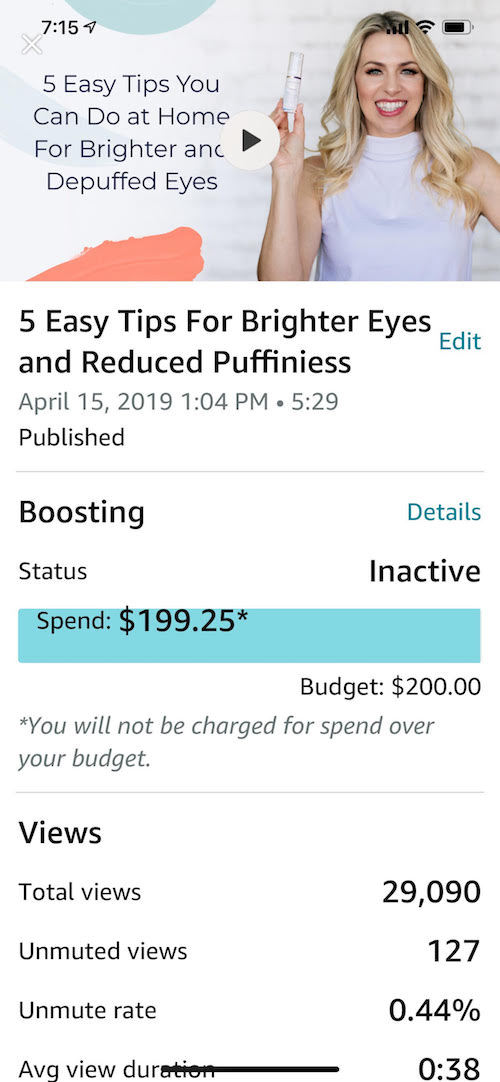
And all Alana spent was $200 to boost the video.
It’s not just Alana who is seeing massive success… I know 2 other people that are getting similar results, but they won’t let me share their stats as they are white labeling other people’s products and don’t want more competition. 🙁
So how do you get thousands of views from Amazon Live?
Well, there is a simple process… let’s break down how you can do it step by step.
Now before we get into that, I need to be transparent: You are going to find it a bit awkward at first. But after you do it a few times, you’ll find that it is easy and fast.
Step #1: Download the Amazon Live app
You probably have an iPhone or an Andriod device. Log into your app store and download the Amazon Live app.
Although you can view Amazon Live on your desktop computer, you can’t post a video unless you do it from your phone.
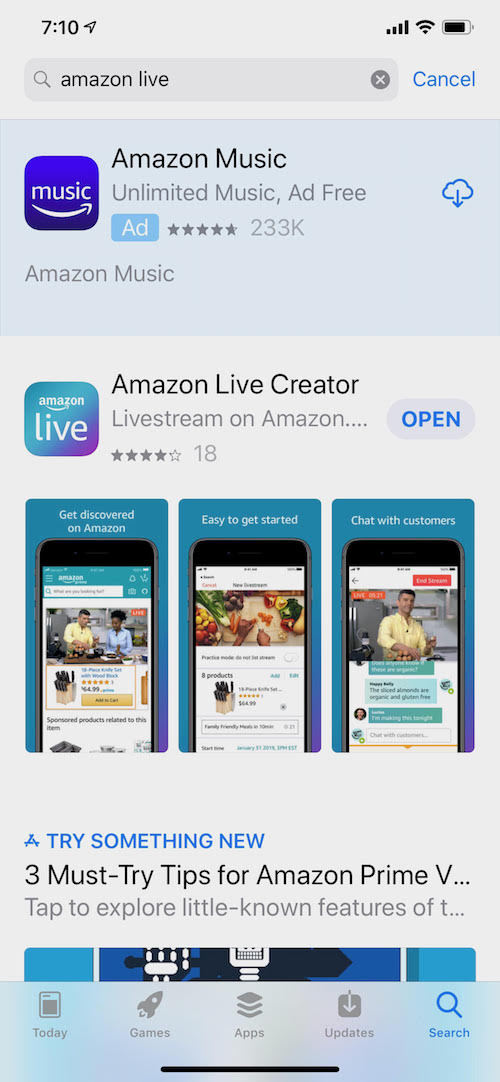
When you install the app, make sure you allow Amazon to access everything on your phone. This will come in handy later when you try to upload your slate image. I will get into what a slate image is later on…
Step #2: Open the app

Now open up the app. Once it’s opened it will look something like this other than the fact that you won’t have any videos.

On the bottom left you will see a “Streams” navigational option and that will show you all of the videos you have aired.
On the bottom right you will see a “More” navigational option that shows you all the preferences and options you have.
And to get started, you would click the “+” button at the bottom.
Step #3: Getting started
When you click the “+” button at the bottom, you’ll see a screen that looks like this:
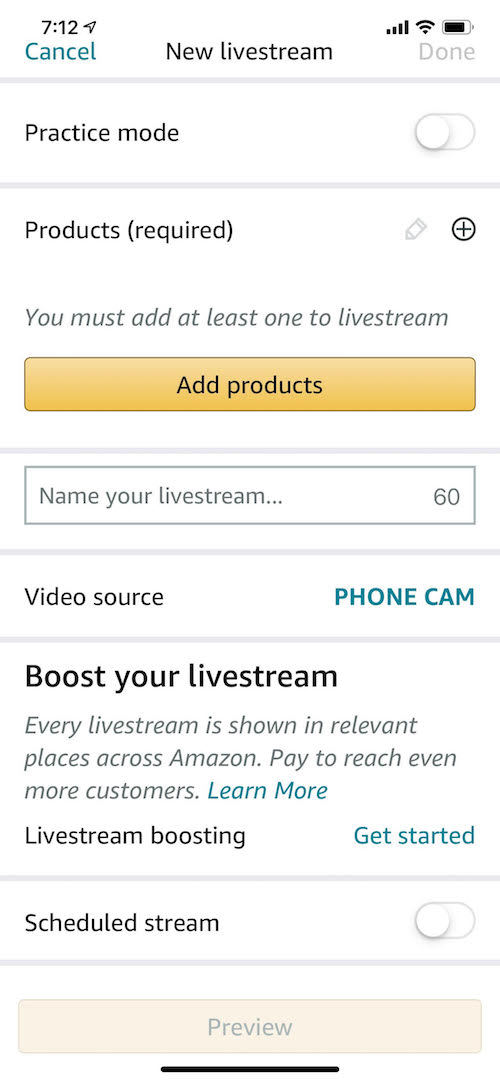
Amazon Live has a cool practice mode feature. I highly recommend you start off with a practice run or two.
Once you get the hang of it, create a real live video. But before you do you’ll want to add products that you want to promote. You can select one or multiple.

As for video source, your phone camera will be the easiest. There are other options as well such as an encoder and other things for video ninjas, but I would just use your phone camera (also known as phone cam) as it’s simple and works well.
You’ll also have to name your live stream. This is where you enter the title of the video.
This is very important because if your title sucks, you won’t get as many views. If you don’t know how to write amazing headlines, check out these posts:
The Step-by-Step Guide to Writing Powerful Headlines
How to Write Headlines People Can’t Help but Click [Formulas Inside]
The Definitive Guide to Writing a Headline that Doesn’t Suck (Tips, Tactics & Tools Included)
How to Boost Your Social Shares Through These 10 Headline Formulas
How to Fail-Proof Your Ad Campaigns with These 7 Headline Formulas
Step #4: Boost your video
It doesn’t take much money to get thousands of views. Technically, you will get thousands of views without spending a dollar. But if you want to spend a few hundred dollars it will go a very long way.

Again, this tactic works without spending any money, but a few dollars can help you get a lot more traction.
Step #5: Schedule or post your video
You’ll have 2 options when it comes to posting your video. You can go live and post right away, or you can schedule your video to go out.
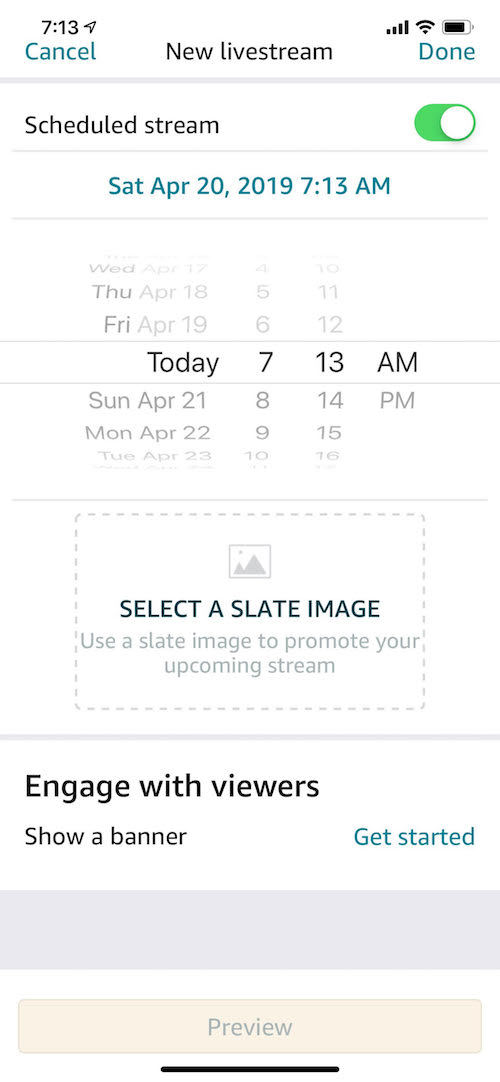
If you haven’t filmed your video during peak hours, I recommend that you schedule it. The last thing you want to do is publish a video in the middle of the night or too early in the morning.
Step #6: Add a slate image
A slate image is a cover image. This is what people see when browsing Amazon Live. Here’s an example of a slate image:
Remember how I said you’ll want to allow the app access to files on your phone? You’ll want to do that so you can upload a slate image.
Step #7: Show a banner
You need to show a banner. It will change the number of sales you generate.

You have 2 options when it comes to showing a banner. The first is to share a promotion with the views, and the second is to share a custom message.
When you select the “share a promotion” option, your promotion will be displayed as a banner at the bottom of your video. Customers can click on the banner to apply the promotion to their account.
And when you select the “share a custom message” option, your custom message will be displayed as a banner at the bottom of your video. People can hide the message at any point.
You can test both options, but I recommend that you at least “share a promotion” so it makes it easier for people to get a discount with just a click.
Step #8: Watch the sales roll in
Alana only generated one sale on her first video, but that’s because she didn’t push too hard. She already knows how to drastically improve that number and, in a bit, I will go over how to generate hundreds of sales through Amazon Live.
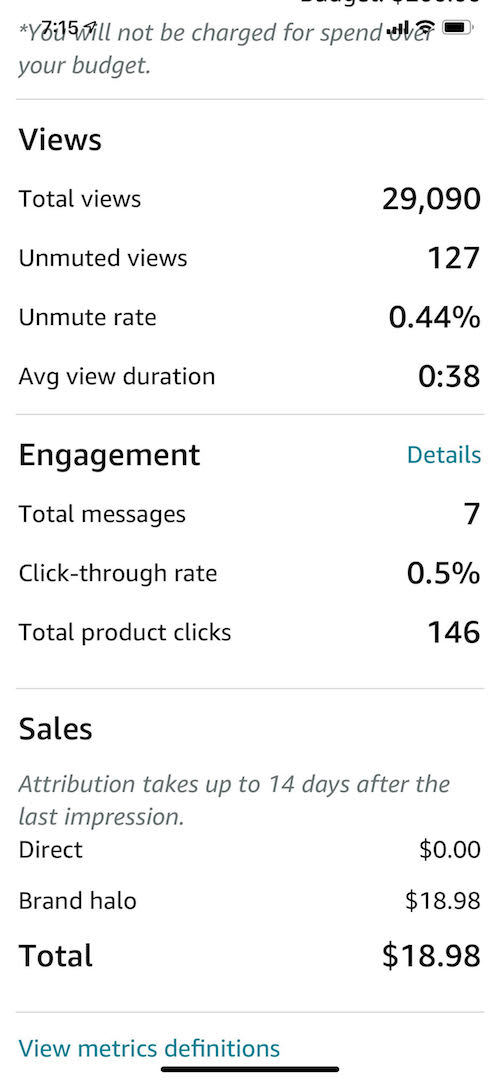
The other accounts I have access to have generated hundreds of sales through Live. One has generated 391 sales so far from 2 videos and the other has generated 328 sales from 3 videos. And I will share below why they were able to generate sales and why Alana wasn’t.
How to maximize your sales from Amazon Live
Here’s how to get more sales:
Buy equipment – if using your phone, get an awesome ring light and a vertical phone holder. It will NOT record horizontally. This will help improve the quality of your video.
Sell, sell, sell – Amazon wants this feature to sell, sell, and then sell some more. This is the big mistake Alana made and she knows it and will fix this during her next live video. If you don’t sell, don’t expect sales.
Offer a discount – Pick an awesome product, and a deep discount. If you don’t offer a discount you won’t generate over 100 dollars in sales from your live video. If you generate more sales, you’ll typically get more video views because when you sell Amazon makes more money. I know I have talked in the past about how giving discounts is a bad long-term strategy for your brand. I still stand by that. However, live videos are a much different way to sell in the short term and offering discounts will drive many sales and more awareness quickly. Because the offer is only accessible during the Live and nowhere else, this is one of the situations where not only do I think discounts are acceptable but necessary.
Be careful – if you are sending tons of traffic to a product and you don’t generate any sales, you will hurt your Amazon organic rankings. For that reason, you really have to sell. If you aren’t willing to sell hard, Amazon Live may not be for you. If you perform well, it can help with your organic rankings.
Create a sign – hold a sign at the beginning of the video that says “UNMUTE ME” or something like that. Amazon appears to track how many people actually listen to your video, and how long they listen. This should help you get more views and sales.
Hook viewers – making bold statements that are true or telling people what you are going to cover later in the video is a great way to keep people engaged longer. Poor engagement will lead to very little video views.
Build authority – although I told you to sell hard, you need to provide amazing information and tips at the same time. This will help you become an authority and it should boost your sales in the long run. Selling without providing value will make you look bad.
It really isn’t that complicated. As long as you follow the tips above, it shouldn’t be hard for you to generate dozens of sales from each Amazon Live video.
Conclusion
Just like every other video platform, the reach will eventually be limited, and it will be harder to get results. And sadly, there is nothing you can do about it.
For the time being, though, you need to jump on the Amazon Live bandwagon and create as many videos as you can. Once you get the process down right and you are seeing sales, I would create 1 video each and every day.
I can’t create videos on Amazon Live as I don’t sell ecommerce products myself, but you can. That’s a requirement that I can’t get around.
So, what do you think about Amazon Live? If you aren’t jumping to create a video after reading this, you are missing out.
The post One Simple Hack That’ll Boost Your Ecommerce Sales appeared first on Neil Patel.
from Online Marketing Tips https://neilpatel.com/blog/amazon-live/
0 notes
Text
One Simple Hack That’ll Boost Your Ecommerce Sales

There’s a little growth hack that every ecommerce site should be using.
It’s the easiest hack… it doesn’t require money, you don’t need a following, and it works instantly.
But you know what? No one is using it.
Can you guess what it is?
Well, I’ll give you hint… just look at the image above.
It’s not related to SEO, paid ads, or anything else you are used to reading about here on the blog.
The beautiful part about it is no one is leveraging it, which means it works roughly 100% of the time. 🙂
A simple way to get more ecommerce sales
Alright, do you want to know what it is? Well, I’ll give you one more hint before spilling the beans.
If you watched a video like this on YouTube about the best makeup products, what do you think would happen?
youtube
There’s a good chance you’ll buy one of the products recommended. And if you don’t, someone else will.
The issue is, it only works if you generate enough video views.
And I have a lot of articles breaking down how to get more YouTube traffic like:
YouTube for E-Commerce: The Art of Selling Without Selling
Is YouTube Worth It? 7.6 Million Views Later, Here’s What I Learned
How to Hack YouTube SEO – 26 Tactics for Gaining Top Results
How to Get More YouTube Views
There is one big problem… there is no guarantee that your video will rank on YouTube or get enough views.
But what if I told you that there is a channel that is highly relevant to ecommerce and you can easily get 20,000 plus views per video?
Best of all, there is no competition and you can do it every single time, without even having a following!
How to get 29,090 video views on Amazon
You already know about YouTube Live, Facebook Live, Instagram Live… and you may even know about LinkedIn Live.
But did you know about Amazon Live?
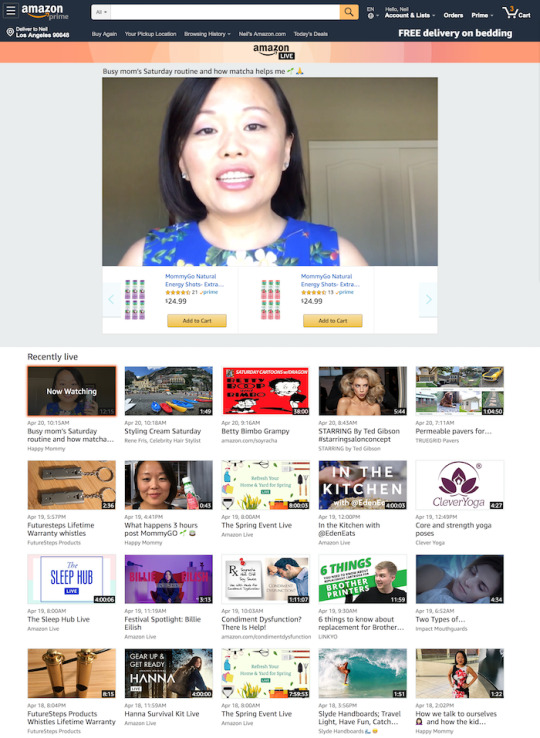
Just like all of the other live platforms, it works similarly, but the whole purpose is to show off and promote your products so you can drive more brand awareness and sales.

The video above is by Skincare by Alana. Alana presented tips in the video about how to reduce puffiness around your eyes and how to make them brighter.
Can you guess how many views that video received in the first week it aired?
Well, based on the headline above you are probably going to guess 29,090. That is correct. 😉

And all Alana spent was $200 to boost the video.
It’s not just Alana who is seeing massive success… I know 2 other people that are getting similar results, but they won’t let me share their stats as they are white labeling other people’s products and don’t want more competition. 🙁
So how do you get thousands of views from Amazon Live?
Well, there is a simple process… let’s break down how you can do it step by step.
Now before we get into that, I need to be transparent: You are going to find it a bit awkward at first. But after you do it a few times, you’ll find that it is easy and fast.
Step #1: Download the Amazon Live app
You probably have an iPhone or an Andriod device. Log into your app store and download the Amazon Live app.
Although you can view Amazon Live on your desktop computer, you can’t post a video unless you do it from your phone.

When you install the app, make sure you allow Amazon to access everything on your phone. This will come in handy later when you try to upload your slate image. I will get into what a slate image is later on…
Step #2: Open the app
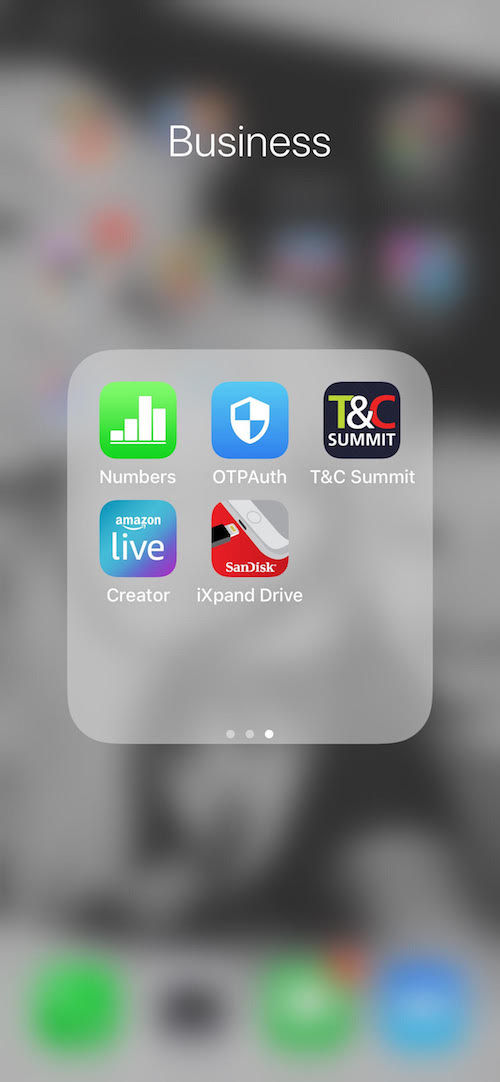
Now open up the app. Once it’s opened it will look something like this other than the fact that you won’t have any videos.
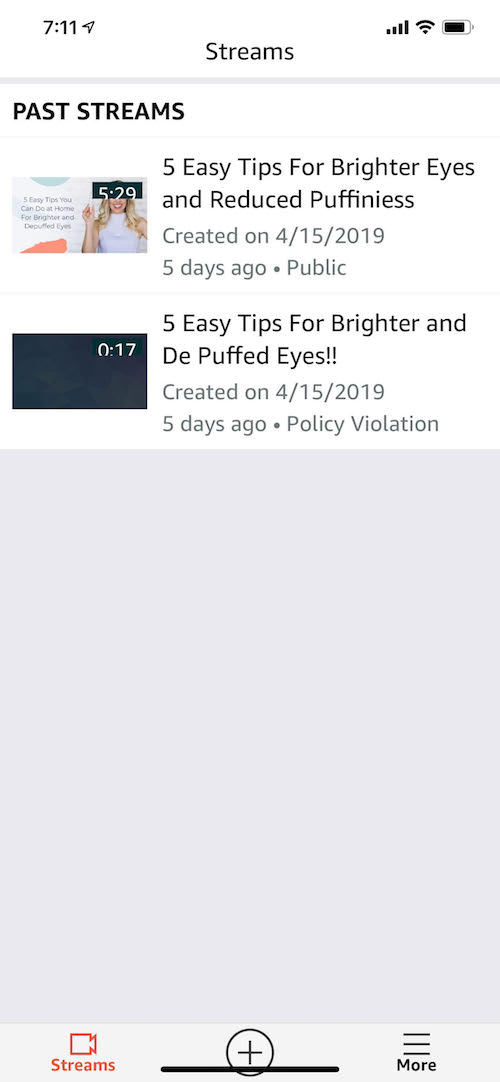
On the bottom left you will see a “Streams” navigational option and that will show you all of the videos you have aired.
On the bottom right you will see a “More” navigational option that shows you all the preferences and options you have.
And to get started, you would click the “+” button at the bottom.
Step #3: Getting started
When you click the “+” button at the bottom, you’ll see a screen that looks like this:

Amazon Live has a cool practice mode feature. I highly recommend you start off with a practice run or two.
Once you get the hang of it, create a real live video. But before you do you’ll want to add products that you want to promote. You can select one or multiple.
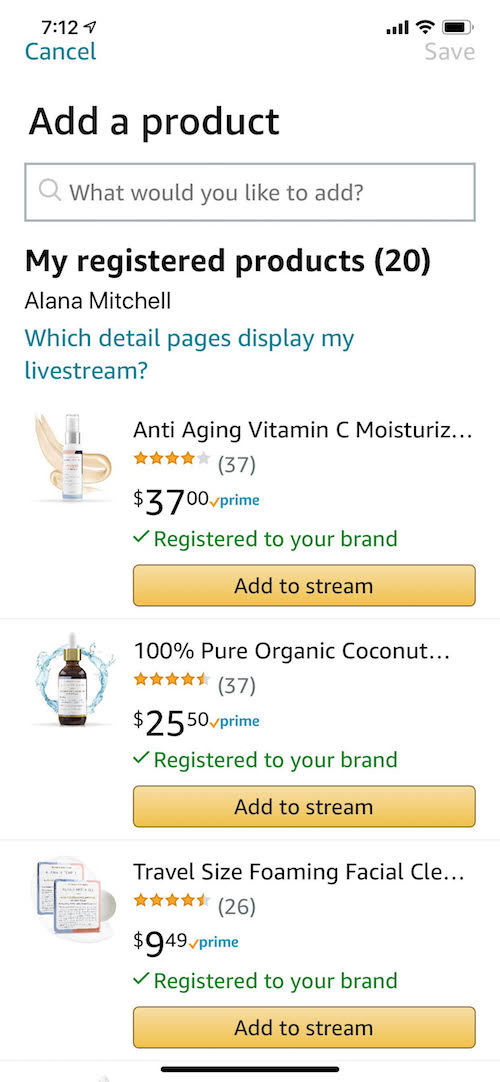
As for video source, your phone camera will be the easiest. There are other options as well such as an encoder and other things for video ninjas, but I would just use your phone camera (also known as phone cam) as it’s simple and works well.
You’ll also have to name your live stream. This is where you enter the title of the video.
This is very important because if your title sucks, you won’t get as many views. If you don’t know how to write amazing headlines, check out these posts:
The Step-by-Step Guide to Writing Powerful Headlines
How to Write Headlines People Can’t Help but Click [Formulas Inside]
The Definitive Guide to Writing a Headline that Doesn’t Suck (Tips, Tactics & Tools Included)
How to Boost Your Social Shares Through These 10 Headline Formulas
How to Fail-Proof Your Ad Campaigns with These 7 Headline Formulas
Step #4: Boost your video
It doesn’t take much money to get thousands of views. Technically, you will get thousands of views without spending a dollar. But if you want to spend a few hundred dollars it will go a very long way.
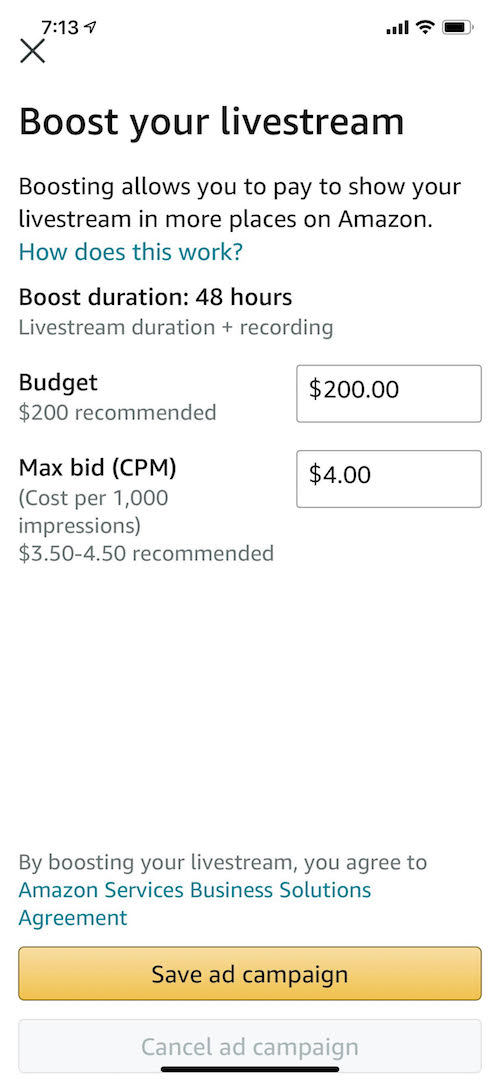
Again, this tactic works without spending any money, but a few dollars can help you get a lot more traction.
Step #5: Schedule or post your video
You’ll have 2 options when it comes to posting your video. You can go live and post right away, or you can schedule your video to go out.

If you haven’t filmed your video during peak hours, I recommend that you schedule it. The last thing you want to do is publish a video in the middle of the night or too early in the morning.
Step #6: Add a slate image
A slate image is a cover image. This is what people see when browsing Amazon Live. Here’s an example of a slate image:
Remember how I said you’ll want to allow the app access to files on your phone? You’ll want to do that so you can upload a slate image.
Step #7: Show a banner
You need to show a banner. It will change the number of sales you generate.
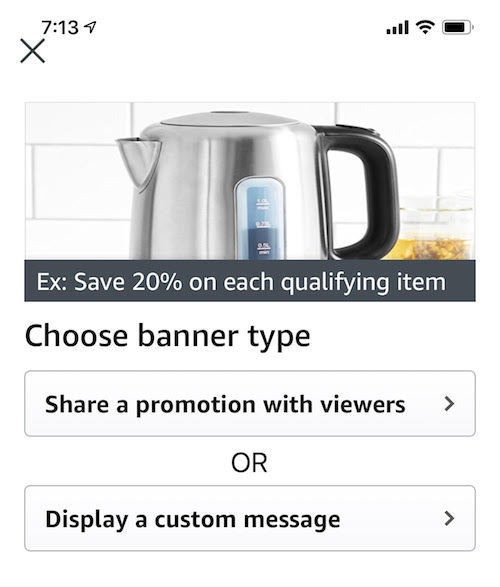
You have 2 options when it comes to showing a banner. The first is to share a promotion with the views, and the second is to share a custom message.
When you select the “share a promotion” option, your promotion will be displayed as a banner at the bottom of your video. Customers can click on the banner to apply the promotion to their account.
And when you select the “share a custom message” option, your custom message will be displayed as a banner at the bottom of your video. People can hide the message at any point.
You can test both options, but I recommend that you at least “share a promotion” so it makes it easier for people to get a discount with just a click.
Step #8: Watch the sales roll in
Alana only generated one sale on her first video, but that’s because she didn’t push too hard. She already knows how to drastically improve that number and, in a bit, I will go over how to generate hundreds of sales through Amazon Live.

The other accounts I have access to have generated hundreds of sales through Live. One has generated 391 sales so far from 2 videos and the other has generated 328 sales from 3 videos. And I will share below why they were able to generate sales and why Alana wasn’t.
How to maximize your sales from Amazon Live
Here’s how to get more sales:
Buy equipment – if using your phone, get an awesome ring light and a vertical phone holder. It will NOT record horizontally. This will help improve the quality of your video.
Sell, sell, sell – Amazon wants this feature to sell, sell, and then sell some more. This is the big mistake Alana made and she knows it and will fix this during her next live video. If you don’t sell, don’t expect sales.
Offer a discount – Pick an awesome product, and a deep discount. If you don’t offer a discount you won’t generate over 100 dollars in sales from your live video. If you generate more sales, you’ll typically get more video views because when you sell Amazon makes more money. I know I have talked in the past about how giving discounts is a bad long-term strategy for your brand. I still stand by that. However, live videos are a much different way to sell in the short term and offering discounts will drive many sales and more awareness quickly. Because the offer is only accessible during the Live and nowhere else, this is one of the situations where not only do I think discounts are acceptable but necessary.
Be careful – if you are sending tons of traffic to a product and you don’t generate any sales, you will hurt your Amazon organic rankings. For that reason, you really have to sell. If you aren’t willing to sell hard, Amazon Live may not be for you. If you perform well, it can help with your organic rankings.
Create a sign – hold a sign at the beginning of the video that says “UNMUTE ME” or something like that. Amazon appears to track how many people actually listen to your video, and how long they listen. This should help you get more views and sales.
Hook viewers – making bold statements that are true or telling people what you are going to cover later in the video is a great way to keep people engaged longer. Poor engagement will lead to very little video views.
Build authority – although I told you to sell hard, you need to provide amazing information and tips at the same time. This will help you become an authority and it should boost your sales in the long run. Selling without providing value will make you look bad.
It really isn’t that complicated. As long as you follow the tips above, it shouldn’t be hard for you to generate dozens of sales from each Amazon Live video.
Conclusion
Just like every other video platform, the reach will eventually be limited, and it will be harder to get results. And sadly, there is nothing you can do about it.
For the time being, though, you need to jump on the Amazon Live bandwagon and create as many videos as you can. Once you get the process down right and you are seeing sales, I would create 1 video each and every day.
I can’t create videos on Amazon Live as I don’t sell ecommerce products myself, but you can. That’s a requirement that I can’t get around.
So, what do you think about Amazon Live? If you aren’t jumping to create a video after reading this, you are missing out.
The post One Simple Hack That’ll Boost Your Ecommerce Sales appeared first on Neil Patel.


Read more here - http://review-and-bonuss.blogspot.com/2019/04/one-simple-hack-thatll-boost-your.html
0 notes
Quote
"Intuos And Intuos Pro
How to Make Writing a Breeze with the Wacom Intuos
No, not handwriting, although it’s useful for that too.
This will be a guide to how to set up the Intuos—or any Wacom tablet with four buttons—as a powerful productivity aid for noveling, freelancing, coding, teaching online, or just general office work.
http://india-iws.in/Back before working for Wacom was even on my radar, I used a 2013 Intuos Pen & Touch as a full-time mouse replacement for four years. I now use a Cintiq 16 HD for art and a Logitech gaming mouse for everything else. The Cintiq is the best art tool I’ve ever used, but I recently realized I miss using the flat tablet for work. Partially because the interface was more efficient, but I think a lot of it was also psychological: What do we associate more with writing than pens? Just using it, even for ordinary articles, seemed to put me in creative mode.
Yes, holding a pen for several hours on end takes some getting used to. Your hand might be sore for the first few days. And you’ll want to practice tucking it into your thumb crease while you type to make the switch between navigating and writing faster. But once you’re fluid with it, it’s more efficient, ergonomic, and fun than a mouse. It’s very satisfying to scroll by hovering and flicking your pen, highlight text the way you would in a book, physically drag paragraphs down the page to reorder them, and cut and paste with one tap of a button.
If you’re an artist as well, it also helps you keep in practice holding and making fine movements with a tablet pen even when you’re not drawing.
I don’t have the Pen & Touch anymore; I gave it to a friend whose tablet was stolen. But I currently have a new Intuos Small, so in this article, I’ll unbox it and recreate my old setup.
In the interest of monetary honesty, this one was given to me by a manager a year ago and has been sitting in the closet neglected since then, so using one I got for free is less daunting than the idea of buying one for the purpose. But this model, a Small, retails for $95, half the price of a Medium, so if you’re interested in trying a tablet, it’s not a huge investment for both a mouse alternative and a capable drawing tool. Figuring out what size tablet you need can be tough, but the small is perfect for this purpose. It’s the size of a mouse pad but more precise than a mouse, so you have more room to move in the same area. Even with a dual-1080p-monitor setup like mine, it feels fine.
Anyway, inside the box are the tablet, the pen, a Micro USB cord, and a very thin manual.* Don’t worry, you won’t need it until you change the nib: Once you install the universal driver from our website, It’s plug-and-play, and automatically detects whatever Wacom tablet you use.
—
Note
If you look up any guide to setting up a tablet for drawing, they’ll tell you to put it in front of your keyboard so it’s also directly in front of the monitor, not to the side like a mouse pad. But for writing, feel free to do the opposite.
—
Setting preferences
I’ll walk you through the configuration process as if you’ve never used a tablet before, because maybe some people reading this won’t have. If you’re experienced with them, some of this will seem redundantly basic. But some of the other tips and shortcuts, you might not know as well. So bear with me.
Once you’ve installed the driver, open Wacom Tablet Properties. For anyone who hasn’t used it, there’s a lot more than meets the eye here.
When you install it, it automatically creates profiles for your installed image editing programs—or the big ones, at least—and everything else is covered under All Other. Any programs you add will copy this profile by default, so let’s punch in some foundational settings, starting with Mapping:
We’ll leave it on Pen Mode despite using it as a mouse. You want to get used to mentally mapping your tablet to the elements on your screen, and Pen Mode is far more precise anyway. Not to mention you’ll never lose your cursor again.
If you’re using one monitor, turn on Force Proportions to match your tablet’s aspect ratio to your screen’s. You’ll need this for drawing, anyway. If you’re using two monitors, leave it off or it’ll reduce your tablet’s active area to a tiny sliver. You’ll need it for one type of program, but we’ll get to that later.
Set the lower button to middle-click instead of its default scroll. When it’s on scroll mode, you have to drag the pen across the tablet to scroll up and down. If you set it to middle-click, you can simply click once and navigate by hovering. Middle click also lets you quickly open and close Chrome tabs, and everything else clicking the scroll wheel does in other programs.
Writing program settings
Now, Tablet: For this step, we’ll be adding a writing program and a browser. Clicking the + brings up a list of a list of all the programs you currently have open, so you can create a separate mapping profile and shortcuts for each one.
I do my fiction writing in Scrivener and my article writing in a Google Docs desktop app, with different settings for each, but for simplicity’s sake, I’ll demonstrate with MS Word.
Those four buttons, FYI, are called ExpressKeys, and any number of program or navigation functions can be assigned to them. For writing, we’ll do keyboard shortcuts. For the top left one, go to Keyboard > Keystroke, and in the popup window, hit Ctrl-X in the top field and name it Cut in the bottom one.
Keep adding basic shortcuts until you have this, or whatever alternative suits you:
Note that one key’s still on default: Since cut, copy, and paste cover my basic editing needs, I’m left with a free space. I’ll use it to create a shortcut menu for my common formatting functions. So, let’s pop over to On-Screen Controls.
As you’ll see, this lets you create infinite toolbars. They’re program-independent, so you can create one general “writing” one to use the same shortcuts across different programs.
There are two types of menu: Grids and Radials, and grids come in horizontal, vertical, or square. I’ll make a new single-column vertical grid for all my common shortcuts in order of use—Ctrl-I, Ctrl-E, Ctrl-K, Ctrl-B—and creatively call it “Writing.”
And I’ll assign it to the final ExpressKey. Menus normally disappear after you select an option, but you can use the pin icon to make it a permanent toolbar. From now on, I’ll stick mine to the margin of whatever I’m working on.
—
Important
If you’re using Windows 10, uncheck “Use Windows Ink” in the Mapping panel for all your writing programs, or else you’ll get that infuriating Handwriting popup every time you place your cursor.
If that still doesn’t work, you can turn the box alone off through Windows by searching for “Pen & Windows Ink” settings in the taskbar, and changing this one from “When the keyboard isn’t attached” to “Only in tablet mode.”
—
Browser settings
We’re going to do one thing different here. There’s one capability that’s still missing: zoom. The normal Intuos doesn’t have any equivalent to a mouse’s scroll wheel. Some other Wacom products have a touch ring that can be programmed to serve that function—The Intuos Pro, Cintiq 13HD, ExpressKey remote, and various older models—but not this one.
But don’t worry, the Intuos has a workaround. An inelegant one, I’ll admit, but it’s better than switching back to the mouse every time you need a closer look at something.
Besides image editing programs, Chrome is probably where I need to zoom in the most for things like Google Maps. Since I don’t often cut when browsing the web, and I can just use Ctrl-X when I do, I’ll set the first key to Navigation > Pan/Zoom.
While the button is held down, hovering the pen will scroll, and dragging it up or down on the tablet will zoom. You could simplify things and just program this function to the lower pen button, but then you’d lose middle click functionality for things like opening browser links in a new tab. It’s a good idea for any program where middle click doesn’t do anything, though.
—
Also important
You’ll need to turn off Windows Ink for Chrome and any other Google apps, too. It causes a pen tracking glitch. Same with Discord, for some reason. In fact, you really only need to leave it on for Photoshop.
—
Image editing settings
Of course, I’ll still use the Cintiq for any serious work, but for simple cropping and color correction, it’s sometimes more convenient to just bang it out on the flat tablet. Any artists present will already know to do this, but for Photoshop and any other drawing or image editing programs, set the active area to one monitor and turn on Force Proportions.
If you’re using two monitors, don’t worry, all you have to do is click your Windows taskbar to navigate back to the non-photoshop monitor.
Services & Saving
If you’re on Windows, occasionally your computer will fail to detect your tablet, in which case you’ll have to reset the Wacom driver through the Services window. This is something everyone should know how to do. Every problem I’ve ever had with a Wacom device has been fixable this
You can also use the stop and start icons at the top of the window. You can pin services to your taskbar once it’s open, too.
But once in a blue moon—every few months, perhaps—this might wipe your preferences. So once you’ve set them, make sure to save them through the Backup Settings panel in Wacom Desktop Center. You can either save them as a .pref file to your hard drive, or upload them to the free Wacom Cloud, then restore them with the very next button.
Impressions of the Intuos
Zoom hitch aside, this is an even better mouse replacement than the 2013 Pen & Touch was. The P&T had a smooth plastic surface that constantly reminded you that you were using a computer peripheral. The current gens have a rubbery textured surface that genuinely make it feel like you’re somehow using a ballpoint on a notebook to control your computer. And the pen helps with that too: It’s lighter and thinner than either the P&T or the Cintiq, just 5½ inches long by 1/3 inch thick, smaller than a Bic.
But my favorite feature is the Bluetooth. Once the tablet’s charged via cable, you can connect it wirelessly and regain the use of your USB port. I didn’t see the point of this before I tried it—who uses a tablet further than a cord’s distance from the screen?—but now that I have, I never want to go back. It allows a lot more freedom of movement: I can slide it across the desk from one monitor to the other if I want to switch to another project on a different screen, without messing with the cable, or when I need the mouse for a game, I can simply turn the tablet off and set it aside. And once we can do these things again, it’ll be easy to slip into a backpack to use outside at a coffee shop, bookstore, or while traveling. It can be charged with any Micro-USB cable, so if you run it off Bluetooth, you can use a wall charger. It takes a few hours from empty to full, but it has a battery life of fifteen, meaning it’s good for two workdays or one brutal one.
Finally, in an interesting last-minute twist, I was surprised to find it compatible with the Cintiq—I could even draw into Clip Studio Paint with both at once—meaning I won’t need to switch them out. I don’t think an overabundance of Wacom tablets is a problem the average reader is likely to run into, but for example, if you ever find yourself graduating from a flat tablet to a drawing monitor, but aren’t quite ready to sell your old one, you can repurpose it as a mouse.
As for me, I’m going back to dailying the Intuos for my writing.
—
Finally
If you teach or tutor online, we’ve been putting out a lot of articles for educators lately—in fact, this article was originally intended as a guide to set up a tablet as a teaching tool, I just realized halfway through that the setup would be the same for any job that works with words. If you’d like to know more about teaching with Wacom products specifically, check out All You Need to Know to Teach with a Wacom Tablet, Recreating the Physical Classroom in a Virtual World, or the entire section of our website on using tablets for education.
Advertisements
Occasionally, some of your visitors may see an advertisement here,
as well as a Privacy & Cookies banner at the bottom of the page.
You can hide ads completely by upgrading to one of our paid plans.
0 notes
Text
How to Build a Digital Content Strategy that Delivers Results

Content marketing improves your SEO efforts in multiple ways. It helps you drive more organic traffic, increases your rankings, and earns top-notch links. Above all, it gives you the opportunity to position yourself as an industry authority and build trust with your target audience.
Now, no matter if you’re just starting out with content creation or you’ve been investing in it for quite some time now, it’s always a good idea to build a digital content strategy that will back you up.
Build Reader Personas

(Sample Reader Persona - Source)
Before you launch a blog, you need to know who you’re creating content for. Simply put, not knowing your audience, you won’t be able to choose relevant topics and set the tone of voice that resonates with them. Remember, gone are the days where you could write spam content for the sake of SEO. While SEO still matters (we’ll get back to it later), you now need to focus on creating user-centered content.
Start by collecting customer data. Your goal is to get to know your target audiences, understand their hopes, goals, problems, fears, values, habits, and so forth. This will help you write content that brings value to them, helps them solve real-life problems, and encourages them to keep coming back to your website.
That’s where you should create reader personas. Start by creating just one persona that depicts your most typical customers. Over time, as customer data keeps accumulating, you can segment your target audiences and create multiple personas for each segment.
Now, your reader persona needs to answer the who, what, why, when, where, and how. For starters, collect your customers’ demographics data that tells you more about your customers’ age, location, race, gender, family status, education, employment status, etc. Then, dive deep into their psychographics to learn more about their goals, hobbies, lifestyles, interests, fears, insecurities, and so forth.
Establish your Brand Voice

(Brand Voice Chart - Source)
Each online marketer needs to establish their brand’s tone of voice they will use consistently across all marketing channels, be it email, social networks, or blog posts. Just like brand colors, typography, or visual content, your voice is a critical part of your branding strategy. It makes you recognizable and unique. Namely, if your audiences cannot pick your voice out of all that online noise, maybe you’re not even worth listening to.
Now, when choosing your brand voice, there are several factors to consider – your target audiences, your industry, and your brand’s traits and personality. Your tone of voice could be passionate, using power words to evoke emotions. It could also be quirky, challenging the status quo. Finally, you could also choose an authoritative tone of voice that tells customers that you take them seriously and helps you position yourself as an industry leader.
Set Clear Goals for your Content

(Smart Goals)
Each type of content has a specific purpose and function. Precisely because of that, you need to set clear content marketing goals before you start blogging. According to CMI, 79% of online marketers create content to maximize brand awareness. Others use it to retain customers, generate leads, boost website traffic, increase leads, and grow industry credibility.
Your goals dictate your digital content strategy. For example, if you want to boost brand awareness, you will use informative and helpful content like whitepapers, ebooks, checklists, infographics that will grab their attention. Those customers in the evaluation stage will want to know how you can solve their specific problems. That’s where FAW pages, product webinars, and case studies can help. Finally, to maximize sales, you will need to offer live demos, free trials, free quotes, etc.
Another immensely important purpose of setting clear goals lies in the fact that they directly impact your choice of content marketing metrics. That’s why you need to resort to the famous SMART approach, meaning your goals should be:
Specific
Measurable
Achievable
Relevant
Timely
Choose the Right Content Formats

Your target audience has different preferences. While some of them prefer textual content, others are visual learners. Some people even focus on audio content they can consume on the go. Therefore, to appeal to wider audience groups and maximize your content results, you should diversify your digital content strategy and experiment with different types of content. Here are a few content types to get you started.
Blog posts
Blog posts are the most popular content format. However, to get the most out of them, you first need to publish them consistently. Never spam your articles with a bunch of keywords or promotional links. While this worked a while ago, today, both users and search engines expect you to deliver high-quality articles.
Create in-depth and data-backed articles that provide your readers with actionable tips and valuable information. It is also recommended that blog posts be somewhere 1,000 and 3,000 words in length, as longer content delivers greater value to readers and performs better on Google.
Above all, make blog articles readable. Break them up into smaller paragraphs, use headings, and insert images to make textual content easier to read.
Infographics
Visual content stays one of the key digital content trends in 2020. And, that’s where infographics dominate. Online users love them because they visualize a bunch of data in a more engaging and compelling way. Strong visuals and colors help them memorize data faster.
For you, this is a great opportunity to create a highly shareable and linkable content format everyone will love. Just like with any other content format, infographics need to be packed with valuable tips and up-to-date facts. Keep the sentences short and clear. Choose legible fonts and font sizes. Add lots of white space to make it easier to track.
Colors should be pleasant to the eye, typography legible, and sentences short and clear. Focus on key information and make sure information flows logically logical. Use lots of white space to make the content easier to follow.
Ebooks
Ebooks are one of the most powerful lead magnets – a kind of content customers can download for free in exchange for their email address. They educate readers about the latest industry trends and let you boost your industry credibility.
Ebooks should deliver value to your target audience. They need to provide relevant statistics, insights, ideas, and advice. They should also contain high-quality illustrations, photos, charts, depending on your industry. Similar to fiction works, your ebook needs to be properly formatted and easy to follow, while information needs to flow organically.
Case studies
Case studies are a form of customer testimonials, where you can tell your customers’ stories and show how they solved particular problems by working with you. Now, case studies can be in different forms, from blog posts and infographics to downloadable files in PDF. For example, you could write a research-based case study that tells a single client’s story and pack it with relevant data, charts, statistics, and customer testimonials.
Videos
Did you know that 51% of marketing professionals say video content delivers the best ROI? That’s not surprising at all, given that 72 hours of video are uploaded to YouTube every minute. Moreover, video content is highly attention-grabbing and engaging. It evokes emotions and inspires users to share it online with their friends. Above all, it helps users retain the information and memorize your brand.
Podcasts
Some of your users would rather listen to you than read your lengthy case study, whitepaper, or article. They want to consume your content on their mobile devices, wherever they are, be it a coffee shop, a gym, or a bank. Studies say that there are over 700,000 podcasts and half of the population has already listened to them. You just need to choose hot topics to discuss, invite authoritative guests, invest in quality internet connections and microphone and you’re all set.
Sure, this post is to short for me to list and explain every type of content out there. If you want to experiment with some additional forms of content, here are a few additional ideas that may serve as your sold starting point:
Comprehensive guides
Interviews
Press releases
Quizzes
Email newsletters
In-house research
Timelines
Whitepapers
Resources
Vlogs
Optimize for Search Engines

(My SEO Results in 2019)
Content marketing and SEO go hand in hand. Without SEO, your content would be invisible in search engines. However, optimizing content for Google doesn’t mean spamming it with a bunch of keywords. This would only harm user experiences and even get you penalized by Google.
For starters, research the right keywords. Those should be the phrases your readers are searching on Google. Now, there are several kinds of keywords. Exact-match ones have a greater search volume, but they are highly competitive. On the other hand, long-tail keywords have a lower search volume, but they’re less competitive, meaning you will be able to rank higher in the SERPs.
When optimizing for keywords, focus on identifying search intent – the reason why users are conducting searches. Now, there are several types of search intent. Informational one means that users are looking for certain facts and data. Users conducting navigational searches want to know exactly what site they want to visit, while those with the commercial intent are looking for products to purchase.
When choosing keywords for your blog posts, opt for conversational and natural keywords that don’t compromise user experiences. Question-based keywords are also valuable for voice searches that have been gaining momentum over the past few years. Apart from traditional keyword research tools, like SEMrush, Moz Keyword Explorer, KWFinder, you could also use tools like Google’s People Also Ask, Answer the Public, and Google Trends to identify valuable long-tail keywords.
Build a Content Calendar

(Sample Content Calendar)
To maximize your content performance, you need to increase its consistency. You should plan your content every month. That’s where a detailed content calendar will help you. It needs to emphasize what kind of content you will create, what your audiences are for each piece of content, as well as to set strict deadlines, publishing dates, and so forth. By planning your content creation and promotion strategy reasonably, you will increase your blog’s consistency, eliminate any ambiguities, and boost user experiences.
Promote your Content
Now that your piece of content is live, you need to promote it. There are numerous places where you should promote your content.
Start by promoting it organically on social networks. Sharing your posts on Facebook, Twitter, or LinkedIn will definitely increase its visibility and reach and maximize its traffic. To make the most out of social networks, you could also create a Facebook or LinkedIn group. Building and nurturing an engaged community is an amazing way to promote your content and yet, deliver value to your target audiences.
Email marketing is still one of the most powerful ways to promote content. It grabs people’s attention and encourages them to go to your blog post by building stronger relationships with them. However, the way you use email marketing has changed. Your subject line needs to be strong, while your email body should be personalized and clear, emphasizing the benefits of your content for readers. You could also segment email lists to provide them with relevant content only.
Link building lets you boost your site’s authority, market to wider audiences, and increase your website traffic. Start by publishing high-quality articles on authoritative blogs in your industry. Apart from guest blogging, there are many alternative ways of link building, such as:
broken link building
link reclamation
contributing to HARO (Help A Reporter Out)
commenting on relevant sites
registering on industry-specific business directories
Measure Outcomes
Finally, you need to track the performance of your content marketing strategy. Like I’ve mentioned above, the choice of metrics depends on the goals you’ve set. For example, if you want to increase brand awareness, you will focus on metrics like website traffic, content downloads, referral links, page views, etc. On the other hand, for measuring engagement, track your blog comments, social likes and shares, and backlinks. If your goal is to generate leads, focus on email subscription rates, conversion rates, form completions. You can measure the majority of these KPIs directly from Google Analytics.
Over to You
Content marketing is a great way to boost industry authority, engage customers, and build stronger relationships with them. However, to achieve the desired goals, you need to plan your content strategically, from targeting the right audiences to choosing content promotion channels. And, I hope these tips will help you.
How do you create online content? We’d like to hear from you!
Read the full article
from Lorenzo Gutierrez https://lorenzo-gutierrez-seo.tumblr.com/post/190058429037
0 notes
Text
How to Build a Digital Content Strategy that Delivers Results

Content marketing improves your SEO efforts in multiple ways. It helps you drive more organic traffic, increases your rankings, and earns top-notch links. Above all, it gives you the opportunity to position yourself as an industry authority and build trust with your target audience.
Now, no matter if you’re just starting out with content creation or you’ve been investing in it for quite some time now, it’s always a good idea to build a digital content strategy that will back you up.
Build Reader Personas

(Sample Reader Persona - Source)
Before you launch a blog, you need to know who you’re creating content for. Simply put, not knowing your audience, you won’t be able to choose relevant topics and set the tone of voice that resonates with them. Remember, gone are the days where you could write spam content for the sake of SEO. While SEO still matters (we’ll get back to it later), you now need to focus on creating user-centered content.
Start by collecting customer data. Your goal is to get to know your target audiences, understand their hopes, goals, problems, fears, values, habits, and so forth. This will help you write content that brings value to them, helps them solve real-life problems, and encourages them to keep coming back to your website.
That’s where you should create reader personas. Start by creating just one persona that depicts your most typical customers. Over time, as customer data keeps accumulating, you can segment your target audiences and create multiple personas for each segment.
Now, your reader persona needs to answer the who, what, why, when, where, and how. For starters, collect your customers’ demographics data that tells you more about your customers’ age, location, race, gender, family status, education, employment status, etc. Then, dive deep into their psychographics to learn more about their goals, hobbies, lifestyles, interests, fears, insecurities, and so forth.
Establish your Brand Voice

(Brand Voice Chart - Source)
Each online marketer needs to establish their brand’s tone of voice they will use consistently across all marketing channels, be it email, social networks, or blog posts. Just like brand colors, typography, or visual content, your voice is a critical part of your branding strategy. It makes you recognizable and unique. Namely, if your audiences cannot pick your voice out of all that online noise, maybe you’re not even worth listening to.
Now, when choosing your brand voice, there are several factors to consider – your target audiences, your industry, and your brand’s traits and personality. Your tone of voice could be passionate, using power words to evoke emotions. It could also be quirky, challenging the status quo. Finally, you could also choose an authoritative tone of voice that tells customers that you take them seriously and helps you position yourself as an industry leader.
Set Clear Goals for your Content

(Smart Goals)
Each type of content has a specific purpose and function. Precisely because of that, you need to set clear content marketing goals before you start blogging. According to CMI, 79% of online marketers create content to maximize brand awareness. Others use it to retain customers, generate leads, boost website traffic, increase leads, and grow industry credibility.
Your goals dictate your digital content strategy. For example, if you want to boost brand awareness, you will use informative and helpful content like whitepapers, ebooks, checklists, infographics that will grab their attention. Those customers in the evaluation stage will want to know how you can solve their specific problems. That’s where FAW pages, product webinars, and case studies can help. Finally, to maximize sales, you will need to offer live demos, free trials, free quotes, etc.
Another immensely important purpose of setting clear goals lies in the fact that they directly impact your choice of content marketing metrics. That’s why you need to resort to the famous SMART approach, meaning your goals should be:
Specific
Measurable
Achievable
Relevant
Timely
Choose the Right Content Formats

Your target audience has different preferences. While some of them prefer textual content, others are visual learners. Some people even focus on audio content they can consume on the go. Therefore, to appeal to wider audience groups and maximize your content results, you should diversify your digital content strategy and experiment with different types of content. Here are a few content types to get you started.
Blog posts
Blog posts are the most popular content format. However, to get the most out of them, you first need to publish them consistently. Never spam your articles with a bunch of keywords or promotional links. While this worked a while ago, today, both users and search engines expect you to deliver high-quality articles.
Create in-depth and data-backed articles that provide your readers with actionable tips and valuable information. It is also recommended that blog posts be somewhere 1,000 and 3,000 words in length, as longer content delivers greater value to readers and performs better on Google.
Above all, make blog articles readable. Break them up into smaller paragraphs, use headings, and insert images to make textual content easier to read.
Infographics
Visual content stays one of the key digital content trends in 2020. And, that’s where infographics dominate. Online users love them because they visualize a bunch of data in a more engaging and compelling way. Strong visuals and colors help them memorize data faster.
For you, this is a great opportunity to create a highly shareable and linkable content format everyone will love. Just like with any other content format, infographics need to be packed with valuable tips and up-to-date facts. Keep the sentences short and clear. Choose legible fonts and font sizes. Add lots of white space to make it easier to track.
Colors should be pleasant to the eye, typography legible, and sentences short and clear. Focus on key information and make sure information flows logically logical. Use lots of white space to make the content easier to follow.
Ebooks
Ebooks are one of the most powerful lead magnets – a kind of content customers can download for free in exchange for their email address. They educate readers about the latest industry trends and let you boost your industry credibility.
Ebooks should deliver value to your target audience. They need to provide relevant statistics, insights, ideas, and advice. They should also contain high-quality illustrations, photos, charts, depending on your industry. Similar to fiction works, your ebook needs to be properly formatted and easy to follow, while information needs to flow organically.
Case studies
Case studies are a form of customer testimonials, where you can tell your customers’ stories and show how they solved particular problems by working with you. Now, case studies can be in different forms, from blog posts and infographics to downloadable files in PDF. For example, you could write a research-based case study that tells a single client’s story and pack it with relevant data, charts, statistics, and customer testimonials.
Videos
Did you know that 51% of marketing professionals say video content delivers the best ROI? That’s not surprising at all, given that 72 hours of video are uploaded to YouTube every minute. Moreover, video content is highly attention-grabbing and engaging. It evokes emotions and inspires users to share it online with their friends. Above all, it helps users retain the information and memorize your brand.
Podcasts
Some of your users would rather listen to you than read your lengthy case study, whitepaper, or article. They want to consume your content on their mobile devices, wherever they are, be it a coffee shop, a gym, or a bank. Studies say that there are over 700,000 podcasts and half of the population has already listened to them. You just need to choose hot topics to discuss, invite authoritative guests, invest in quality internet connections and microphone and you’re all set.
Sure, this post is to short for me to list and explain every type of content out there. If you want to experiment with some additional forms of content, here are a few additional ideas that may serve as your sold starting point:
Comprehensive guides
Interviews
Press releases
Quizzes
Email newsletters
In-house research
Timelines
Whitepapers
Resources
Vlogs
Optimize for Search Engines

(My SEO Results in 2019)
Content marketing and SEO go hand in hand. Without SEO, your content would be invisible in search engines. However, optimizing content for Google doesn’t mean spamming it with a bunch of keywords. This would only harm user experiences and even get you penalized by Google.
For starters, research the right keywords. Those should be the phrases your readers are searching on Google. Now, there are several kinds of keywords. Exact-match ones have a greater search volume, but they are highly competitive. On the other hand, long-tail keywords have a lower search volume, but they’re less competitive, meaning you will be able to rank higher in the SERPs.
When optimizing for keywords, focus on identifying search intent – the reason why users are conducting searches. Now, there are several types of search intent. Informational one means that users are looking for certain facts and data. Users conducting navigational searches want to know exactly what site they want to visit, while those with the commercial intent are looking for products to purchase.
When choosing keywords for your blog posts, opt for conversational and natural keywords that don’t compromise user experiences. Question-based keywords are also valuable for voice searches that have been gaining momentum over the past few years. Apart from traditional keyword research tools, like SEMrush, Moz Keyword Explorer, KWFinder, you could also use tools like Google’s People Also Ask, Answer the Public, and Google Trends to identify valuable long-tail keywords.
Build a Content Calendar

(Sample Content Calendar)
To maximize your content performance, you need to increase its consistency. You should plan your content every month. That’s where a detailed content calendar will help you. It needs to emphasize what kind of content you will create, what your audiences are for each piece of content, as well as to set strict deadlines, publishing dates, and so forth. By planning your content creation and promotion strategy reasonably, you will increase your blog’s consistency, eliminate any ambiguities, and boost user experiences.
Promote your Content
Now that your piece of content is live, you need to promote it. There are numerous places where you should promote your content.
Start by promoting it organically on social networks. Sharing your posts on Facebook, Twitter, or LinkedIn will definitely increase its visibility and reach and maximize its traffic. To make the most out of social networks, you could also create a Facebook or LinkedIn group. Building and nurturing an engaged community is an amazing way to promote your content and yet, deliver value to your target audiences.
Email marketing is still one of the most powerful ways to promote content. It grabs people’s attention and encourages them to go to your blog post by building stronger relationships with them. However, the way you use email marketing has changed. Your subject line needs to be strong, while your email body should be personalized and clear, emphasizing the benefits of your content for readers. You could also segment email lists to provide them with relevant content only.
Link building lets you boost your site’s authority, market to wider audiences, and increase your website traffic. Start by publishing high-quality articles on authoritative blogs in your industry. Apart from guest blogging, there are many alternative ways of link building, such as:
broken link building
link reclamation
contributing to HARO (Help A Reporter Out)
commenting on relevant sites
registering on industry-specific business directories
Measure Outcomes
Finally, you need to track the performance of your content marketing strategy. Like I’ve mentioned above, the choice of metrics depends on the goals you’ve set. For example, if you want to increase brand awareness, you will focus on metrics like website traffic, content downloads, referral links, page views, etc. On the other hand, for measuring engagement, track your blog comments, social likes and shares, and backlinks. If your goal is to generate leads, focus on email subscription rates, conversion rates, form completions. You can measure the majority of these KPIs directly from Google Analytics.
Over to You
Content marketing is a great way to boost industry authority, engage customers, and build stronger relationships with them. However, to achieve the desired goals, you need to plan your content strategically, from targeting the right audiences to choosing content promotion channels. And, I hope these tips will help you.
How do you create online content? We’d like to hear from you!
Read the full article
0 notes
Text
10 Tips For Creating A Great Small Business Website
Nowadays having a comprehensive, professional website is essential for any new or even existing business. But getting started can often be overwhelming and even intimidating. As a professional Web development company that has built 100’s of websites for businesses we know what it takes to build effective, engaging, and purpose driven websites.
Whether you looking to start from scratch or improve on your existing site, here are 10 key tips to help you get the ball rolling.
Setting a Clear Goal
Every business site is different, simply being because every business has different goals in terms of there digital presence and what there setting out to achieve through it. For example if you want your website to be a portal to sell tangible products, then it should be designed to drive results for that specific purpose, or if your website is to be used to generate leads and inquiry’s, you have to build it to drive those specific actions.
Display Purposeful Content
Before you get started building your website, you as the business owner should at least create, at least in basic terms, their own content. Even if your planning on hiring a professional copywriter to polish your content its important you get the right message out there to your customers.
Ensure your content is not to long winded, users don’t often spend a lot of time reading through pages, utilising point form and subheadings is extremely effective. Ensure the problems your solving the needs your business meets are clearly displayed.
To many business owners focus on what they do, instead of what benefit they provide the client, always remember your customers are only concerned with “what’s in it for me”.
Utilise Call to Actions
A (CTA) call to actions is a prompt on a website that instructs the visitor to take a further specific action. Some typical call to action phrases are, “Find out more”, “Contact us today!”, “Sign Up”, or “Buy now”, and usually will take the form of a button or link.
A call to action will make it clear to your customers on what to do next and removes any friction in moving them down the sales funnel. A common overlooked place for CTA’s is your blog posts, if there is no clear action or step to take at the end of reading your post, your customers are likely to leave without completing any further tasks on your website.
In a nutshell all your site content should be a stepping stone to lead the customer to the next step in the buying process, so insure your implementing a call to action at each stage to direct your users forward.
Purchase Reliable and Scalable hosting and management.
A website hosting provider is a company that offers the services and technology necessary to be viewed live on the internet. Hosting costs can be anywhere from $5 – $200 plus depending on what size and support you need for your website.
Many companies, our team included offer hosting along with additional support, such as monthly content changes and more in depth management of your website, allowing you to free up your time to focus on the key aspects of your business.
Ensure that the hosting company you choose to go with has efficient server security and allows for scaling and upgrading of the hosting plan, in the case you need extra support or a larger server space.
Avoid free themes
When creating your first site, it may seem viable and easy to choose a free theme for your website, but in the long game it can be potentially quite detrimental.
Free themes are usually free as they offer the user very little support to no support, no updates, and in many cases security issues along with SEO related issues. Additionally, having a mobile responsive website is essential, and many free themes inhibit that ability.
Making money online requires investment, and even a small investment into a quality theme with good and plentiful review will save a lot of pain and stress down the track. Websites like Envato, offer a huge selection of themes, along with reviews, download rates, and the ability to check how often they are being update.
Use the best Content Management System For Your Needs
A content management system (CMS) is a program that allows users to manage all there digital content (your website) in one place. A good CMS will be user friendly and allow you to easily navigate and maintain your site as needed.
When choosing a CMS its important you go with one that is best suited to you and your needs, consider user friendliness, budget, and pliancy.
Below are some Popular options each with there own benefits.
WordPress “Our top choice”
Joomla
Wix
Squarespace
Magneto
Be Personable
Ideally you want customers to feel as connected to your business as possible, and your website is the ultimate platform to tell your story. Many small business owners want to project the image of the company being big, but that is not necessarily always the most effective strategy.
It’s a great idea to add your company’s story to your site, information about your team, your journey so far and even success stories with past clients. Another great tip is to add an image of the founder or the whole team, its good to show customers that there are real people ready to work with them and for them.
Make Contact a Breeze.
Being Easily contactable and have a great communication and support system in place may be one of the most crucial aspects of your website. Your contact information should be displayed and be easily accessible to your customers.
Contact Forms are essential if you wish to present the best support to your clients, many people may not have access to their email or phone at the time, so offering them a way to still be able to message you is ideal, this will help you avoid people navigating away from the site without contacting you.
Having a live chat feature on your site is also a great way to provide quick feedback and support to your site’s users, we have listed 5 below:
Crisp
Drift
Olark
Hubspot live chat
Clickdesk
Ensure your site is Mobile Friendly
Ensuring your website is mobile friendly is a must, it shows your potential customers that you’re a relevant and credible business. 52% of all website traffic is generated from mobile devices, and 60% of consumers say that they are more likely to purchase of a mobile friendly website.
Having a mobile friendly site plays a major role in your SEO, google for example prioritises sites displayed in the search that are mobile friendly.
When designing your site for mobile, ensure your buttons are large enough to be clicked on a mobile device, and that site navigation and layout are seamless.
Regularly Create And Publish New And creative Content
Keeping your sites content fresh and of quality will pay a major part in your search engine optimisation (SEO), making it important for your to create a plan or at minimum a set schedule for uploading and creating new content on your website.
If you want to not only rank highly on search engines, but also keep customers coming back again and again, taking your sites content seriously is a must. Things like regular weekly blog posts are a good place to get started, and insure they are linked across other sites that drive traffic to yours. Another great option is customer testimonials as they create trust and engagement with your users.
Conclusion.
Creating and managing a website can be challenging, and in many cases it is a learn as you go process, and we hope the above tips get you on your way to running a profitable and effective site.
Our team at Calibre Digital have created hundreds of websites for our clients and can offer ongoing support and management for your site. So if you have questions or would like a free quote, feel free to contact us anytime.
0 notes
Text
5 Simple Steps to Set Up Your TikTok Ads
If you haven’t taken up TikTok during quarantine, power to you. I was a doubter for some time, but let me tell you: This platform is addictive in all the right ways. Not only is there something for everyone (dance Tiktok, activist TikTok, beauty TikTok, beans TikTok), you will inevitably learn new skills and songs. Oh, the songs! It’s also basically a free comedy show for as long as you can swipe—or until you get a Netflix-like warning that tells you to be responsible and stop scrolling. Guilty.
My point? If you’re not on TikTok, you should be. And your business should be, too. The platform is quickly surpassing Instagram for youth engagement metrics and if your audience is there, that’s where you should be speaking their language. In this guide, I’m going through how to get started with TikTok advertising in five simple steps. Plus, I’ll share how to report on your ads.
But first, let’s talk about why you should be advertising on TikTok.
Why TikTok ads?
TikTok is the fastest growing social media platform with more than 2 billion downloads to date. Particularly in this pandemic-world, TikTok can be a whiff of fresh air for people looking for new and funny ways to connect with each other by creating their own content.
TikTok was downloaded 87 million times just last month.
While TikTok doesn’t release audience data, reports confirm that their user base is expanding from Gen Z to Millennials; however, 67% of users are under the age of 29. They have about 800 million MAU (monthly active users), and 65 million of those are in the US.
5 steps to set up your TikTok ads
TikTok advertising is structured in three layers: ad campaigns, ad groups, and ads. In this section, I’m going to walk you through the steps to create each of these to get your TikTok ads up and running.
Step #1: Create a business account
Even if you already have a personal TikTok account, you’ll need to create an account specifically for your business—I would recommend using your business email here. In the past, you had to get your business approved to advertise on the platform, but now anyone can get in and start launching campaigns.
Step #2: Create an ad campaign
Once you log in, TikTok will take you straight to the campaign creation. Lucky you. If you’d like to poke around before getting started, you can easily navigate back via the “Campaign” tab. Truly, this platform is very simple (almost barebones), so you cannot get lost.
Remember to name your campaign and set your budget in the settings! A nice feature on TikTok: You can easily start a creative split test at the campaign level.
Once you’ve named your campaign and set your budget, the time has come. You need to choose an advertising objective for your campaign. Like most ad platforms, TikTok breaks it down for you. Let’s run through the options.
Advertising objectives
Your first and most top-of-funnel option is awareness: launch a reach campaign. This type of campaign is purely for branding purposes and will not include a call-to-action and simply aims to show your advertisement to as many users as possible.
A bit more down-funnel, consideration objectives are fairly clear-cut. Use your advertising spend on TikTok to drive users to your site, download your mobile app, or increase the views on your branded video on TikTok. This type of ad would look a bit like the one below.
Last but not least: conversion. This is the choose-your-own-adventure campaign, where you get to pick the end goal, whether it is opting into an email newsletter, registering for an account, or making a purchase on your e-commerce site.
Step #3: Select an ad group
This is where things get operational. Here you’ll choose the ad placements, details, budgeting and billing, and third-party tracking. Ad details will vary based on your campaign objective, but should be pretty straight-forward. For example, if you chose “traffic” as your objective, the ad details will need to identify if you’re driving users to your website or an app and exactly where you want them to land.
Reminder: If you are driving deeper-funnel actions, you’ll need to place a TikTok pixel on your site to capture those users. This is just like placing a pixel for Facebook or Twitter; feel free to pop it into your Google Tag Manager and go.
Placement
TikTok gives you a few options when choosing your ad placement, but only for certain campaign objectives. TikTok, like Facebook, has a “family of apps” that you can advertise on—like BuzzVideo, Pangle, News Republic—but these are mostly useful if you’re advertising outside the US. You can choose to have your ads automatically placed across these apps according to TikTok’s algorithm, or you can specify where you want your ads to appear. Get more details from TikTok here.
Targeting
There’s been some complaints about TikTok’s audience targeting, or lack thereof, which I don’t totally disagree with. Like the ad manager, the targeting options are pretty basic. The only demographics you can target are based on gender, age, location, and language.
The most in-depth targeting is under “interests,” which includes a variety of topics people follow on TikTok, from apparel and appliances down to tech and travel. These interest categories are pretty broad (and who is following appliances on TikTok?!), so where you get the most bang for your buck will be through creating a custom or lookalike audience from your existing database.
Finally, you can target by device type and connection type—which is pretty interesting, I’ve never heard of targeting people who only have 2G ...
Budget and bidding
Fill in your daily budget, and if you selected a split test in the previous step, select the dates that you want it to run. You can then choose your bid per click, or conversion, or view (whatever goal you set for the campaign), the delivery type, and input any third party tracking links you might want to include for your analytics. Here is a full list of third-party measurement platforms that TikTok supports.
Keep in mind, your daily budget needs to be $20 and up. You can choose dayparting and frequency caps in this section if you know what times your target audience is most active on TikTok.
Step #4: Create your TikTok ads
If your business doesn’t have an in-house creative team or a creative agency or a videographer on the team, fear not. TikTok truly is the platform for user-generated content, and they will hold your hand through the ad creation process.
Check out the screenshot below for specs. The best (BEST!) part of creating TikTok ads is that the platform will help you create a video with a matching background track from uploaded imagery. Typically, I wouldn’t recommend creating a video out of stock images, but TikTok videos are short and casual. The less polished it looks, the more engaging it could be.
If you select “Create a Video” and then “Video Generator,” you’ll see the option for “Smart Video.”
According to TikTok, the smart video generator will cut your added video transitions to the music you’ve selected, according to the number of images you uploaded. They recommend uploading multiple images or videos in order to make it work properly. Check out the interface with options below.
For TikTok ads, they’ll appear on a user’s For You page in the feed. After the video ad ends, it’ll freeze on the last frame and give the user a call to action—which is why they ask for the final frame above.
You can also create a video from imagery on your website’s landing page. This is mostly for ecommerce sites with product pages or mobile apps, but TikTok will grab images straight from your landing page, match them up with music appropriately, and make them into lovely ads.
As always, test, test, test. Try out different imagery and music for the same message. Focus on one simple message and test different calls to action. Show people using your product. Leverage hashtags, because TIkTok users absolutely use them for search for content.
Step #5: Set up billing and payment
You’re almost home free. Just input your billing info and payment and you’ll be good to start running TikTok ads!
Reporting on your TikTok ads
TikTok has a dashboard that displays all the data from your ads within the timeframe you’ve selected. The dashboard can be filtered according to your goal (e.g., CPM or CPC), and any of the settings you selected when setting up your ad group. Best of all, TikTok lets you export your reports! This feature is so handy when you need to show your CMO that your TikTok ads are killing it among users interested in cars and sports.
You can also create custom reports to ease your weekly reporting. These can be created from templates that TikTok provides or crafted from scratch. Here is a taste of the metrics and dimensions at your disposal.
Schedule these reports to run at a specific frequency, and ta-da! Your team will have a handy-dandy email with the attached report daily, weekly, or on specific days of the month. Just remember, anyone who gets the email will need to have access to your TikTok Ads Manager.
Remember, if managed ads aren’t your cup of tea, there are tons of influencers on the platform (seriously, TikTok has been paying influencers to join), so see what could make an impact based on your budget. Micro-influencers can make a big splash in a local market. TikTok even has their own platform for partnering with these influencers, making it much easier on you to find a good match.
Now you’re ready to crush TikTok ads!
Drumroll, please … you’re ready for TikTok advertising! Good luck out there. And if you’ve launched a particularly successful campaign, we want to see it!
5 Simple Steps to Set Up Your TikTok Ads published first on https://wabusinessapi.tumblr.com/
0 notes
Text
The Social Media Content Calendar Template Every Marketer Needs [Free Template]
“We have a 9 a.m. meeting? Hold on — let me just click around the internet like a maniac to find something for the morning tweet.”
Sound familiar? Scrambling for social content is nothing new. We have meetings. We run late. Things come up. And it’s really hard to get any meaningful amount of work done when you have the next social media update looming over your head every 30, 60, or 90 minutes. It all moves so fast that you might periodically feel a case of the vapors coming on, which is why pre-scheduled social media content should be your new best friend.
To make social media content easier for companies to plan and schedule across the accounts they manage, we created a social media content calendar template. And recently, we updated to be better, faster, stronger, and just generally prettier.
You can fill it in at the same day and time every single week to prep for the following week’s social media content. That means when you burst through the office doors at 9 a.m., you won’t be in panic mode looking for something to push out to your Facebook fans — you already took care of that last week.
This blog post will walk you through exactly how to use the template to stay on top of your social media content planning for Facebook, Twitter, LinkedIn, Instagram, Pinterest, and Google+.
Note: HubSpot customers can also schedule content through Social Inbox, or use this spreadsheet to organize their content and subsequently upload it to Social Inbox. Detailed instructions for doing this exist in the cover sheet of the template.
How to Use the Social Media Calendar Template to Plan Your Content Schedule
When you open up the social media content calendar template, you’ll notice the bottom of the Excel spreadsheet has several different tabs, most of which are dedicated to a specific social network.
The reason you’ll want a different worksheet for every social network is simply that every social network is a little bit different. You can’t just craft one, single social media update and use it across LinkedIn, Facebook, Twitter, Instagram, Pinterest, and Google+. You can certainly promote the same piece of content across all six of those networks, but that doesn’t mean you’ll craft your update in the same way for every single one of them. (In fact, you may even want to add additional tabs if you’re active on other networks, like Quora or YouTube.)
This following sub-sections will walk you through how to fill out each of the four tabs you see in this template — the updates for Twitter, Facebook, LinkedIn, Instagram, Pinterest, and Google+. But before we get to that, let’s just walk through the “Monthly Planning Calendar” so you know what that’s for.
Monthly Social Media Schedule
The tab “Monthly Planning Calendar” provides an overall snapshot of your monthly social media campaigns. It’ll help you coordinate better with other stakeholders, not to mention keep all the moving parts straight in your own mind. Here’s what it looks like:
There are three sections to take note of when you edit this template for your own purposes. First, the color-coding key: These are the types of content or campaigns around which you might coordinate, like ebooks, webinars, blog posts, product launches, and so on. Though only some of these might be relevant to you, they’re there to indicate what you may want to put in there — so be sure to edit these categories to align with your own campaigns.
The other two sections you’ll need to edit are the Month and Year at the top of the calendar (duh), as well as the cells below each day of the week. In those cells, you should enter the type of content you’ll be promoting that day and color-code it to align with the campaign it’s supporting.
Instead of deleting all the content in this spreadsheet each month, I recommend copying this worksheet twelve times over, and creating a separate sheet for each month. (If that gets to be too overwhelming, you can always save those tabs as a separate file.)
Planning Your Twitter Content Calendar
Alright, now let’s get to the social media content. This section will be the lengthiest, because all subsequent sections will draw on the instructions we go through here. So if you read one section in this whole post, make it this one.
Let’s say you want to add some tweets to your scheduling template. Skip over to the “Twitter Updates” tab, where you’ll see this:
The first four columns, “Day,” “Date,” “Time,” and “Date & Time” are there for your convenience, and if you choose to use a third-party app for pre-scheduling your tweets (like HubSpot’s Social Inbox), then these columns will be useful. For now, just fill in the date on which you’d like your updates to publish to Twitter, and the time at which you’d like them to go out. The “Date & Time” column will automatically change based on what you input in the previous two columns.
Now, let’s move over to the “Message” column. Here, input the copy you’d like to appear in your tweet, bearing in mind you should cap it at 116 characters to allow enough room for a link, and at 115 characters to allow room for an image. (Read this blog post for a full character count guide.) This spreadsheet will auto-calculate the number of characters you’ve entered to keep you on-point, turning yellow when you’ve reached 95 characters, and red when you’ve reached 116 characters.
After you’ve composed your tweet, paste the URL you’d like to include in your tweet in the “Link” column. Be sure to include UTM parameters so you’ll know whether all of these tweets are actually driving traffic, leads, and customers. This is an important step to remember if you’d like to be able to demonstrate ROI from social. You can also use the “Campaign” column to add an associated campaign, which helps which more robust tracking and reporting.
Finally, in the “Image” column, attach the tweet’s image (if you have one). For Twitter, we recommend images that are 1024 x 512 pixels. (Click here for a full cheat sheet of social media image sizes.) If you’re having trouble attaching your image to the spreadsheet, follow these steps:
Step 1: Right-click the cell in which you’d like your image.
Step 2: Click “Hyperlink,” then click the “Document” button, and finally, click “Select” to choose your image.
Step 3: In the “Choose a File” window, select the image from your computer and click “Open.”
Step 4: You’ll now see the image attached to the “Insert Hyperlink” screen. Feel free to edit the “Display” text to change the file name, then click “OK.”
Note: This process is simply for organizational purposes. If you decide to upload the spreadsheet to your social media publishing software, it will not attach — you’ll have to do that with your marketing software. If you’re a HubSpot customer, details for how to bulk upload your Twitter content to Social Inbox can be found within the downloaded template.
Planning Your Facebook Content Calendar
Now, let’s talk about how to plan your Facebook marketing in advance with the template. Navigate on over to the tab in your template labeled “Facebook Updates.”
Facebook updates work similarly to Twitter updates, with the exception being bulk uploading your content is not possible in Social Inbox.
The first three columns, “Day,” “Date,” and “Time” are there for your convenience. Head on over to the column labeled “Message” and input the copy you’d like to appear in your status update, corresponding to the days and times you’d like those updates to run. Then, move to the “Link” column and input the link you’ll be, you know, linking to in the update. (Don’t forget that tracking token.) If you’d like the update to be tagged to a certain campaign, include this in the “Campaigns” column. Finally, attach an image just like you did with your Twitter updates — if you’re using one, we suggest you edit it to be 1200 x 900 pixels. (Click here for a full cheat sheet of social media image sizes.)
Planning Your LinkedIn Content Calendar
LinkedIn updates are the most unique, because you have both Company Pages and Groups to consider. To demonstrate the difference between Company Page updates and Group updates, let’s navigate over to the column labeled “Title (For Group Discussions Only).”
LinkedIn Groups let you post a few kinds of updates, one of which is called a “Discussion.” You will only fill out the “Title (For Group Discussions Only)” column if you’re looking to post a Discussion to your LinkedIn Group — because Discussions are the only update you’ll be posting that requires a title. If you’re not posting a Discussion to a LinkedIn Group, you don’t need to fill out this field, because your update will not have a title.
You’ll fill out the next column, “Message,” for every type of update you post, whether it’s for a Company Page or a Group. Simply input your copy into this column, and then navigate to the next two columns, “Link” and “Campaign” to input the URL to which you’re directing readers with the tracking token you’ll use to track activity, and the associated campaign if one exists. If you’d like to use an image for an update, attach it per the instructions laid out in the “Twitter” section. We recommend editing the image to 700 x 520 pixels.
Planning Your Instagram Posting Calendar
Now, let’s move on to how to set up your Instagram photos and videos in advance with the template. Navigate on over to the tab in your template labeled “Instagram Updates.”
Instagram updates work similarly to Facebook updates, in that content can’t be uploaded in bulk to Social Inbox like it can with Twitter.
The first three columns, “Day,” “Date,” and “Time” are there for your convenience. Head on over to the column labeled “Message,” and input the copy you’d like to appear in your post’s caption, corresponding to the days and times you’d like those updates to run. Keep in mind that although Instagram captions can be up to 2,200 characters long, they cut off in users’ feeds after three lines of text. The exact length of these three lines depends on the length of your Instagram handle. (Read this blog post for a full character count guide.)
Next, move to the “Link for Bio” column and input whichever link you plan to put in the bio when you publish the accompanying Instagram post. (The reason you’d put a link in your bio and not the photo caption itself is because clickable URLs aren’t allowed anywhere except the single “website” box in your bio. See #13 in this blog post for more on how that works.) Oh, and don’t forget that tracking token.
If you’d like the update to be tagged to a certain campaign, include this in the “Campaigns” column. Finally, attach an image just like you did with your other social media updates — we suggest you edit it to be 1080 pixels x 1080 pixels. (Click here for a full cheat sheet of social media image sizes.)
Planning Your Pinterest Content Calendar
Alright, now let’s go over how to set up your Pinterest pins in advance with the template. Navigate on over to the tab in your template labeled “Pinterest Updates.”
Pinterest updates work similarly to Facebook and Instagram updates, in that content can’t be uploaded in bulk to Social Inbox like it can with Twitter.
The first three columns, “Day,” “Date,” and “Time” are there for your convenience. Go to the column labeled “Message,” and input the copy you’d like to appear in your pin’s description, corresponding to the days and times you’d like those updates to run. Then, move to the “Link” column and input the link you’ll be, you know, linking to in the update. (Don’t forget that tracking token.)
If you’d like the update to be tagged to a certain campaign, include this in the “Campaigns” column. Finally, attach an image like you did with your other social media updates — we suggest you edit it to be 735 pixels x 1102 pixels.
Planning Your Google+ Posting Calendar
Finally, we come to Google+.
Update: Google recently announced it is shutting down its Google+ platform. Please consider using the template and instructions below for any potential social networking platform Google launches in the future, and check back with us for an updated template that reflects this rollout.
Start in the “Message” column, and input your status update. Then move over to “Link” column, where you’ll input the link to which you’re directing readers. If you’d like the update to be tagged to a certain campaign, include this in the “Campaigns” column. If you’re attaching an image, you could use multiple different sizes, but 960 pixels x 960 pixels works best. (Click here for a full cheat sheet of social media image sizes.)
Content Repository (Or, Where to Source Social Media Content)
This template also provides you with a tab called “Content Repository,” which should help you keep track of all your content and maintain a healthy backlog of fodder to make sourcing social media content easier.
As you create more assets, you’ll likely want to resurface and re-promote those pieces down the line, too. To ensure you don’t lose track of all of that content, record it on this tab so you’re never at a loss for what to publish on social. If the content you’re promoting isn’t evergreen, be sure to include an expiration date in the column marked “Expiration” so you don’t promote it when it’s jumped the shark.
This tab will also help you maintain a healthy balance of content: A mix of your own content and others’, a mix of content formats and types, and mix of lead generation content vs. MQL-generating content vs. traffic-friendly content.
Don’t Forget to Interact With Your Followers
Whether you use this spreadsheet to plan your content out in advance or upload to a third-party app, you’ll still need to supplement these updates with one the fly content. Breaking news hits? Whip up a quick update to share it with your network. Someone in your network tweets something interesting? Give it a retweet with some commentary. Got a fascinating comment on one of your updates? Respond with a “thank you” for their interaction or an additional follow-up comment.
Coming up with and scheduling your social media content in advance is a huge time-saver, but it should go without saying that you still need to monitor and add to your social presence throughout the day.
Finally, we encourage you to experiment with your social media publishing. This template provides publishing dates and times for each social network, but you may find those are way too many updates for you to fill, or perhaps too infrequent for your booming social presence. You should adjust your social media publishing frequency as needed.
Source link
source https://www.kadobeclothing.store/the-social-media-content-calendar-template-every-marketer-needs-free-template/
0 notes
Last Seen Blogs

orabasesolution
Untitled

paracosmic-gt
wandering along

sissydaniela1
Untitled

simranjeet-singh-sidhu-blog
Advocate Simranjeet Singh Sidhu

rozowy-bez
Need more friends...