#✰ 【 ps answers 】
Explore tagged Tumblr posts
Visit Tumblr Blog
Explore Tumblr blogs with no restrictions, modern design and the best experience.
Last Seen Tumblr Blogs


Fun Fact
Premium Tumblr themes are available from anywhere between $9 to $49.
Text
so what r u guys into these days
281 notes
·
View notes
Note
Wait…
Do the boys fluster easy? Like if y/n ever grew a backbone and said literally anything-
Like the smallest thing or like, taped a flower to suns rays or moons headdress (does it have a specific name please tell me if it does) how would the boys react?


I get a break because of the storm so I’m digging into my inbox! >:D
Great question! I would say yes to the boys flustering easy but they fluster differently if that makes sense.
Moon: Moon I would say flusters the easiest. Though he handles “flirts” from guests with ease, (giving a witty/charming one-liner to keep it professional and lighthearted) he knows it’s part of the job and nothing is serious, but if y/n did or said anything flirtatious to Moon he would freeze up XD
With guests this usually happens during luau’s between when he’s performing or working the bar. Moon realizes guests are just enjoying themselves and mean nothing inappropriate when they’re having fun with flirtatious banter, it’s part of his job to be engaging and pleasant so he doesn’t really mind. That’s why y/n showing any affectionate interest in him would come as such a shock, he never thought about someone being genuinely interested in him that way. Poor guy needs some time to adjust.
Sun: Now Sun is an oddball to me, I’m still trying to understand him and his emotions myself haha. Sun REALLY blurs the lines between platonic and romantic affection, he is in general a very loving guy. With guests personal space is a foreign concept to him, of course he is still very professional and can judge an appropriate situation/person, but he just has a talent for being able to connect with guests so their comfortable with his playful antics. With Y/N however his actions areeeeee a mixed bag I guess, (think of it like a magic fruit basket, Sun is giving you a variety of fruits in one package, if you choose to only take out oranges then it’s an orange basket, if you want to take out apples and oranges then it’s an apple and oranges basket, pick out whichever you like it’s all there but you don’t have to accept anything you don’t like, he’s letting you decide what you want your basket to be made up of) weird analogy I know but it’s what I thought of
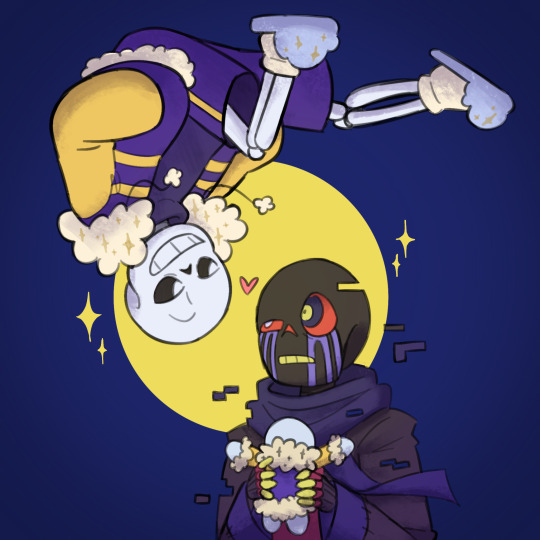
Anywhoo for Sun to catch on that an act is flirtatious it has to be clear or at least catch him off guard! Little note here, Suns pupils disappear when he’s flustered from y/n. It’s a lil scary at first, in the illustrated instance this is the first time of this happening and it may be mistaken as Sun freezing but he was very much there and would have returned the gesture if not for the pool noodle -whack- lol
#(ps moons headpiece is a fin)#similar to a squid head fin#sorry if I didn’t answer your question exactly but I had a lot of fun working on this#love my bois and I love questions about them the obsession is real#even when I take forever answering a question I like to look at them in my inbox ha!#anywhooo it’s late so now tags!#waterpark au#Waterspark bay#Waterspark bay au#dca au#crunch art#dca community#beloved moots#WP asks
422 notes
·
View notes
Text
Maybe it's just me, but I find it really interesting that Ianthe doesn't lie here:

Since, you know, she could literally tell Harrow anything and she wouldn't be able to check it. (Okay, it shouldn't be anything TOO big, because Harrow has her letter to herself, but still.)
This is the perfect opportunity to lie. And Ianthe says she doesn't want to do it. Why?
(Is she actually a better person than she wants us to believe? Is it because of her affection to Harrow? Does she still fear it could come out? WHY???)
#I mean. She KNOWS that Harrow doesn't know it. Otherwise she wouldn't ask her and Ianthe wouldn't react that way#(PS: She even sensitizes Harrow for the fact that she could be unreliable regarding answers to questions.)#ianthe tridentarius#harrowhark nonagesimus#harrow the ninth#the locked tomb#tlt spoilers
156 notes
·
View notes
Text

So I will answer three question of yours ( @flowrpeachfrida142657dg ) in a three parted comic. So let's gooooo ....
Part 1 | Part 2 | Part 3
7 VS 7 Hellish 6 VS Heavenly 6


They all do not like Mammon. At all. Nu uh. Freak did to much in the past ...
Yeah sooo let's start with Michael. He doesn't like them, but he doesn't hate them ... soo aslong as they don't interfer in Gods plan everything is fine. And of course aslong as Lucifer won't take any harm.
Gabriel would be good with Satan the most. They both share similar interests and character traits. And the others, well it is similar to Mike. Aslong as they don't interfer, everything is fine.
Raphael and Belle would get along ... Belle is most of the time annoyed of Raphs happy and friendly attitude, but she respects him for his insane knowledge. And Raph is the type of guy who gets along with everyone. He would survive 24 hours with Mam, but then even his patience is gone.
Azrael and the sins are knowing each other for a long time. They're no real friends, but actually good with each other. Az can survive a week with Mam.
Ariel would be terrified by them all and since Ozzie seems to be the most caring and "softest" guys out of the seven, they would get along pretty well. Ariel would teach Mam some manners after a long time and when innocent creatures got involved. @thornwolfy235 your idea of the Fluttershy vibes kicked hard. I'm going full in with it. Thanks.
Joph. Yeah well. DiSGustINg. Ewww. And ew.
As always thanks for asking! ✨️
#hazbin hotel#hellaverse#fluffzart#hazbin hotel headcanon#hazbin hotel lucifer#hazbin lucifer#lucifer morningstar#helluva boss#hazbin hotel comic#hazbin hotel fanart#helluva boss fanart#helluva boss comic#helluva boss sins#helluva boss mammon#helluva boss asmodeus#helluva boss satan#answered#hazbin hotel ariel#hazbin hotel jophiel#hazbin hotel gabriel#hazbin hotel archangel#shushh and for all the people who are lookung beneath the tags#its all a dream#that is not real#thanks for looking down here#ps wait for part 2#you will lo- eh fear it!!!
293 notes
·
View notes
Text
COMMISSIONS!!! KIND OF?
i need money, and haven't drawn anything outside of QL for a hot minute, so i'm deciding to combine those into a... uh, special offer

yeaaaah here's how this works
-if you're interested, send in an ask or DM me on discord (#zhukzubast)
-tell me your request!
-if i accept it i'll send you the PayPal email
-after i get your crunchy 5$ i will work on the commission and post it when finished
the style is going to be a COMPLETE GRAB BAG, SORRY! I WANT TO EXPERIMENT WITH THEM AGAIN, IT'S BEEN TOO LONG
i do promise that i'll put a good amount of effort in regardless
(btw i'm only planning to do this until the end of October. After that i might have a more respectable commission offer ready)
#to archive later#commisions open#art commisions#will anyone even go for this?#no clue#is this a mistake?#most likely#but whatever#if i don't get any requests i'll just go for some artober challenge probably#PS sorry if i don't answer immediately - i work and sleep at strange hours
148 notes
·
View notes
Note
Not sure if you're still doing requests or not, but if you are how about Error x Outer? (If you haven't already)
I rarely ever see it lol.
Yeah sure! I rarely draw Outer anyways so this is good practice
#art#utmv#me answers#sanshipping#outer sans#error sans#outer x error#what’s their ship name?#OuterError#have you guys played PS!Outertale yet?#I haven’t finished it but it’s great so far
183 notes
·
View notes
Note
Genuinely are you human
Why are you always online
It’s freakish


This is literally me
Are you Insulting me on MY blog 😔😔😔
74 notes
·
View notes
Note
Do you sell your brushes that you use?
Nah, they're not mine to begin with except the customized default ones (and honestly they're easy to do).
Check featured tag: messyr's brushes
#messyr#messyr's brushes#the more i see 'whats ur brush' in my inbox the more i wont answer bc it's featured in my blogggg + tumblr siteeeee just check it out pls#and if youre looking for how it's textured that way- it's just set to NO ANTI-ALIASING. it makes it pixelated asf#AND THEY HAVE DEFAULT BRUSH TIP (DOT)#for markers- get a noise texture (from default assets or somewhere else) and slap it in there#PS. I USE CSP. However in any programs- I tend to use pencils and other rough textured brushes available as default.
113 notes
·
View notes
Note
Do Taka and Mondo have a favourite Pokemon?
i dont watch much pokemon now but i think dog type pokemons will suit mondo, n taka will be birds ig


whoop
85 notes
·
View notes
Note
for the pornstar charles, would it be pornstar reader too? Or would it be depending on request?
I still don't have everything planned out but at the very start it's only pornstar!charles and reader watches but in following parts reader starts joining in on his streams so it will also be pornstar reader just not at the very start.
I'm open for both request for only pornstar!charles or both charles and the reader because both are a thing at some point.
#ps!charles#f1 x reader#f1 x you#formula 1 x reader#f1 x female reader#formula 1 x you#charles leclerc smut#charles leclerc x reader#charles leclerc x you#cl16 x reader#dia answers
55 notes
·
View notes
Note
Hello!
I absolutely love your edits and gifs. I was thinking about making edits/gifs too but I'm not sure where to start : ( Would you be able to share some resources? Or any tips you have for someone that's just starting out? I'm not even sure where to download the videos from :/
Thank you in advance!
hello!! omg thank you so much for liking my gifs 🥹🫶🫶
Of course! In this post I'll share some tips that I think are helpful when making gifs, specially from asian dramas (mostly chinese and korean)!
Where to download k/cdrama videos?
dramaday (korean media only)
mkvdrama (korean, chinese, japanese, thai etc)
avistaz.to (they have the most complete catalog of asian dramas but you can only have access to the files if you register and they open for registration only every now and then so if you want to join, you have to have a invite or wait till they open)
2. Where to make gifs?
Mostly, the gifs on this website are done using Adobe Photoshop but I think for the past few years there is a lot of users who use Photopea which is an online (and free) version of photoshop.
3. How to make gifs?
Well, I think there's a some ways of making gifs but the 2 most common are through screencapping and using vapoursynth. Before I knew how to use and install vapoursynth I used the screencap method a LOT so I totally recommend you to begin giffing using the screencap method before you try other ways of giffing. Also, with this method, you can use on both Photoshop and Photopea.
In this gif tutorial made by @kylos you can learn how to install the program mpv to take screencaps and how to make gifs using the captures.
There's this complete guide on how to gif made by @cillianmurphy that is very helpful.
Also, this comprehensive giffing tutorial by @redbelles is great!
But if you want to know how to gif using vapoursynth (if you are an MAC user), i totally recommend this how to install post and COMPREHENSIVE GIFFING TUTORIAL (vapoursynth + ps cc 2018) post, both from my beloved @dingyuxi 🫶
If you don't have Photoshop and want to make gifs using Photopea, I think this and this tutorials will be great for you.
4. How to color?
Coloring gifs is something very personal to each gifmaker but if you want to know how to start doing it, i recommend you these tutorials:
becca’s mega coloring tutorial by @nataliescatorccio
coloring tutorial by @magnusedom
simple gif colouring for beginners by @kinnbig (specially focused on east & south east asian skin tones)
Finally, I recommend you looking at the resource directory from @usergif because they have a collection of tutorials and resources that are very handy when making gifs!
If you have any particular question from how I gif, I will gladly answer!
210 notes
·
View notes
Note
prompt: gaz and ghost on overwatch, watching soap talk to their contact on the ground, and roasting him alive on comms. just stepping on his neck nonstop. soap can hear them but can't react because the contact spooks easy -391780
@391780 i LOVED this prompt. nothing makes me happier than Ghost and Gaz banter (there's so much of it in the drafts for misery and festivals). hopefully this little blurb satisfies the prompt!
-- “Permission to speak freely, sir?”
Soap’s earpiece crackles as Gaz opens the comms, distracting him for a second from the twitchy man in front of him.
“Go ahead, sergeant.” Ghost rumbles.
“You ever realise that Soap stands with his hip cocked?” Soap can hear the shit eating grin in Gaz’s voice. The sleekit wee bastard.
“Hm. Looks like a teapot.”
“A teapot, sir?”
“Like the nursery rhyme.”
The comm crackles again as it cuts off Garrick’s stifled chuckle.
Soap shifts his stance, subtly redistributing his weight to rest evenly and bringing his hands up to loop his thumbs into the shoulder straps of his vest. There, now he can’t be called a fuckin’ teapot. The informant flicks his eyes over Soap warily.
The comm clicks on again.
“Think he heard us, sergeant?” Ghost asks, amusement lacing his tone.
“Can’t be sure sir, it appears Cap has taken Soap’s place temporarily.” Gaz’s voice wobbles with repressed laughter.
“Can’t see it myself, Garrick.”
“Why’s that, sir?”
“Doubt Price would dare show ‘is face if he had a mop like that on his head.” Ghost deadpans. Soap feels his eye twitch as Gaz chokes back another burst of laughter. Cheeky fuckin’ cunts.
“Looks -” Gaz cuts off the comm before flicking it back on, “looks like he lost a fight with a pair of clippers -” the comm cuts off again and Soap swears he can hear Gaz wheezing somewhere above him.
Soap moves one of his hands to scratch at the back of his helmet with his middle finger, aware of the way the informant tracks his movements. If those pair of wallopers blow this op, Soap swears to himself that he’ll dye every single one of Ghost’s balaclavas pink and sew a Saltire on the front of Gaz’s cap in place of the Union Jack.
Abruptly the tone on the comms change.
“Garrick.” Ghost snaps, the teasing lilt to the banter is gone and in its place is the hard tone Soap’s heard before when things are about to get dicey.
“I see ‘em.”
“Keep them in your sights, I don’t like the look of -” whatever Ghost doesn’t like the look of gets cut off as an explosion sends a shockwave of sound and dust over Soap, forcing him to cover his head from flying debris.
-
Much later when the three of them are getting chewed out by Price for “missing a whole fucking truckload of insurgents because you three were too busy dicking around on the bloody comms” Soap decides that his little sewing project isn’t nearly enough in the way of payback.
#pfh answers#pfh prompts#jm#sr#kg#jp#gaz and ghost are such shits i love them#ps everyone is fine except they're on shit shifting duties for the foreseeable#ooh i surprised myself by writing a brief allusion to action there#edit to add (because it was too good to leave in my DMs):#lmao i just have this vision of price talking to laswell afterwards going '... do i stand weird kate?'#and she's thinking that finally someone told him about the fucking air thrusts at last
205 notes
·
View notes
Note
hii, how's it going? happy wipw ☀️
you know i love Angel Neil, Mafia Front and Arsonist Neil equally but i am HOOKED on the recent events of Mafia (devastating but really good), so could i ask for that? i will be more than happy with either of the others if they're flowing better though : )
thank you!! wishing you have a lovely week <33
WIP Wednesday (3/5) | Arsonist Neil / Firefighter Andrew AU (Part 286)
"Yeah, yeah. The Kev picture. That was from you, this is from us. Besides, this is a reason for you two to meet up again." Jeremy says with a wink that would've reduced Andrew into a puddle if he were anyone else. (Or at least, a younger version of himself.)
"Feeling devious today are we?"
"A little." Jeremy grins. But Kevin is unmoved.
"I already did my part," he says, passing the card back to Jeremy who sticks his bottom lip out at him. After a couple minutes of prodding, he folds like a lawn chair and slaps his signature— eight letters, no more and no less— right under Jeremy's with a huff. "Fine, there."
"What have they done to ruffle you this time, mon tresor?" Jean says when he enters to find Kevin pouting. He pushes his hand into Kevin's hair while Jeremy explains this new plan. By the time he's through, Kevin is almost melted into the couch under Jean's hand and Jean looks amused. "You are making us sign this card to get Andrew laid."
"No! Well, I mean. Maybe, I don't know. But Andrew is our friend and he likes this hot guy and that's a good enough reason, now sign." Jeremy says, thrusting the pen into Jean's hand. Instead of using the table like a civilized person, Jean signs it against Andrew's back.
"Moreau."
"I am nearly done, hold still." Jean chides. Then the pen is clicking and the card is right in front of Andrew's face. "There you are. Go forth and get laid, on us."
"Merci, I guess." Andrew glances down to see Jean's addition and it's... gibberish. It also has his name mixed up in it.
"Joyeux Noël. Soyez gentils avec Andrew, Jean Moreau #29"
"What did you write?" Andrew demands.
"None of your business. It is not meant for you," Jean brushes him off.
"Kevin, translate," Andrew says, putting it in front of Kevin. His green eyes cross the page and a smile crosses his face. Then Jeremy feels it's his duty to do the same, the same sappy smile on his lips.
"If Monsieur Flame needs help, he can use the Google." Jean tells him. Andrew throws a glare his way but Jean does not catch it, so Andrew merely tucks the card into his jacket, exchanges another round of goodbyes, and leaves.
#bestie i love you so much but mafia front is being a BITCH! (worry not there are 4 asks for it so we'll still get plany of them) <3333#(if i can get the dollies to do what i want TWT)#ps: the french (according to deepl) says 'merry christmas. be good to andrew'#aftg#WIP Wednesday#Arsonist Neil / Firefighter Andrew#🕊️#answered#tessasilverswan
36 notes
·
View notes
Note
Hii !
I'm curious about the last ask you answered– what exactly is Wallace and Wally's relationship like? How do they interact? Does Wally take control over Wallace's mind and body or...?
It's something I still don't fully understand, sorry 😅
In the beginning of production, Wally was Wallace’s most prized project. Have you ever created and oc and grew immediate attachment? Yeah something like that. Wallace loved Wally, as anyone would love their creation.
Wasn’t till later that their relationship got a bit strange.
Wally started becoming a huge comfort to Wallace after his grandmother passed away in 1971. To the point he started bringing Wally almost everywhere with him, coffee shops, interviews, answering work calls, letters, faxes, sometimes even during hangouts with the gang. He was always there somewhere in the room. I imagine Wally was a constant reminder to continue working on the show, a distraction. Wallace had already put so much work into the show, and he was still very much a workaholic so Wally was just easy to have around.
Wally would use Wallace’s most vulnerable moments to spill more false comfort into his ears, making sure Wallace wouldn’t leave him anywhere else too long. Wallace would finally accept Wally’s full “help” around the beginning of last year of the shows productions. In the end he has major influence over Wallace’s mind, which in turn would have control over his body as well at times.

I like their facial expression here lol
#ask answered#welcome home#wally darling#welcome home puppet show#clownillustrations#puppeteer wally#my art#fanart#digital art#sketch#human wally darling#hope that answer he;ps#also dropped huge lore there
113 notes
·
View notes
Note
your gifs are absolutely gorgeous! would you ever be willing to share your coloring or one similar? or even any tips and tricks you have? i would appreciate it soooo much because no matter what i do, i cannot get my b&w to look nearly half as good as yours.
hii thank you!! i don't really save my colorings because every show/scene is different so i usually just do it from scratch
i already answered here with my process for b&w gifs but i'm gonna try to explain it better with a gif from my latest bridgerton set. more details under the cut :)
so this is what it looks like just sharpened (and with a small amount of noise to reduce the bad quality of that youtube trailer)
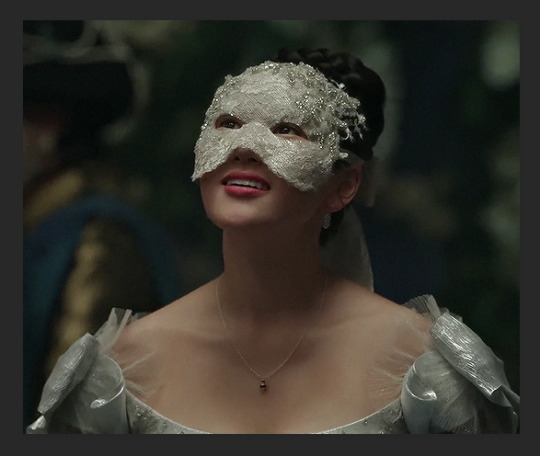
at this point you can try adding a vibrance layer or gradient map and you'd have something like this


still pretty dull, right? so the first thing i do is adding a curve layer and this is where you can get the biggest change of the overall look of the scene. the most important thing for me is brightness and contrast, so even if the colors are weird or too saturated it won't matter because we're gonna cover it up with the b&w at the end.
in the curve layer i select the eyedropper with white liquid to add brightness and that means you have to try and find the whitest point of the scene (in this case i clicked right on her mask, between her eyes) and then with the eydropper with black liquid selected you need to click on the darkest point (her hair or something in the background) and you should have something like this
this is what my curve layer looks like

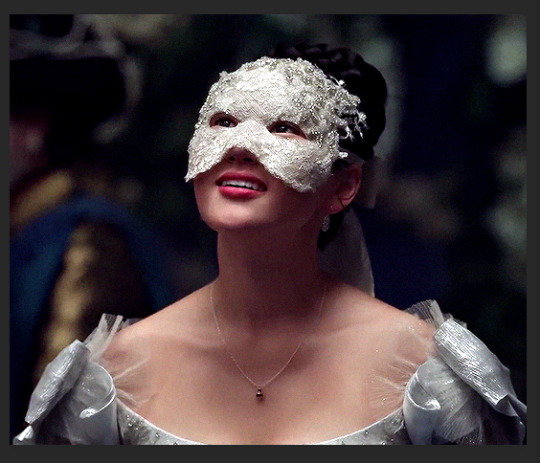
now the scene already looks so much better! so i try to add the gradient map (i prefer this one to the vibrance layer because it gives more depth and contrast) and you could even leave it like this tbh
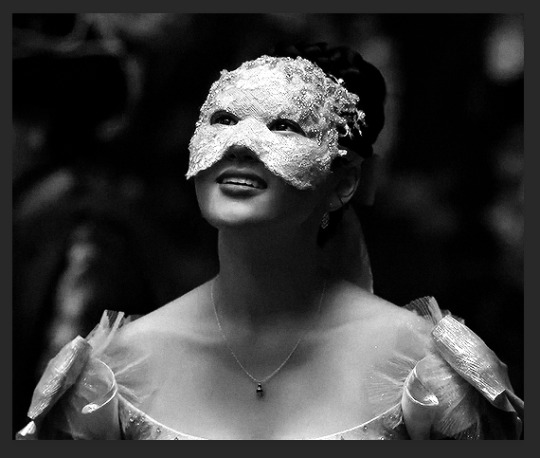
but for my gifset i decided to add another curve layer, i just moved the curve up a little bit, like this

and a brightness/contrast layer with +30 contrast

and that's done!!
so we went from this to this with a total of four editing layers, but as i said you can just use one curve and one b&w layer, it really depends on your preference!
again, remember that every scene is different and one coloring won't look the same even in that same scene! for example for this bridgerton set i had to make a different curve layer for the shots of benedict and even add a +10 brightness and +50 contrast because the lightning was just slightly different lol
hope this was helpful! <3
#answered#anon#ps#ps help#coloring tutorial#usergif#allresources#completeresources#dailyresources#tutorials
20 notes
·
View notes
Note
I hope this isn’t too annoying to ask, but may I ask where you usually gif movie trailers from? My quality from youtube sucks so much 😭
hi – and don't worry, not an annoying question at all :)
i haven't giffed trailers in a while but iirc, i usually go to hd-trailers, thedigitaltheater, or digital-digest for high quality (1080/2160p) footage.
hope that helps ❤️
19 notes
·
View notes