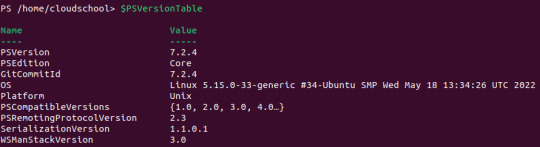
#.net framework install linux ubuntu
Explore tagged Tumblr posts
Visit Tumblr Blog
Explore Tumblr blogs with no restrictions, modern design and the best experience.
Last Seen Tumblr Blogs


Fun Fact
The KCSC sent more than 20K requests to delete posts related to prostitution and porn to Tumblr from January to June 2017.
Note
tell us the linux story. 🎤
OKAY this is going to get a lot of technobabble probably but I'll try to simplify and explain everything. Also some of the explainations may not be technically correct, im a Casual hobbyist. Long post warning.
So, this started when I was checking my windows error logs, because my computer had started to randomly blue screen (again) (it stopped for a while but I suspect it was just happening in sleep mode). So I check the logs, and it's. It's bad. There's SO many errors. Windows has apparently been throwing up under the hood. I showed a computer adept friend and his response was "Oh God" followed up by "i think you need to reinstall your OS" so that was great.
First I'm directed to do what I'll call a soft reinstall, which is basically windows redownloads the OS and applies it as an update. You get to keep your stuff. I back up Everything to my external hard drive anyways because I know better. Do the install, check the logs the next day, windows is still throwing up. I'm told I will likely have to do a fresh install of windows.
I decide, fuck it, let's take a look at linux. I was planning on swotching to linux next time i get a computer anyways. How installing linux works, is you basically download an ISO file of the linux version you want, and use a program to put it on a USB or DVD, and stick it in your computer for it to boot off of. So, you're running linux completely separate from the rest of your computer, just using the hardware. Whatever you do in this environment isn't saved, so it's supposed to be a safe way to test out an OS. I imagine for people who aren't me, it is.
I try Ubunto, decide i want to try linux mint instead for petty reasons (Ubunto doesn't have shortcuts built in, mint does, i didn't feel like going to the command prompt every time I wanted to make a shortcut).
To do this, I have to restart my computer back into windows, so i can download and make the mint USB. I have not installed linux yet.
I promptly learn windows has decided to murder me for booting Anything off a USB. It's aggressively encrypted both of my hard drives. (The external drive is fine, it wasn't plugged in.) This is a security measure it must have activated in case I was a Hacker trying to bypass my login password. I cannot use my password to fix it.
Luckily, if I install Ubuntu to a drive, it'll format that drive and basically rescue it from the grips of windows. This is why I backed everything up, because windows is a piece of shit. I do that. I pick the one with windows to fucking eradicate windows.
My original plan was dual-booting windows and linux, simply because I wanted to make sure I could still run games that might not work on linux. Oh well, I decide. I'll just do mint.
I use Ubuntu to make the mint USB, wipe the other drive with mint, and then reformat the Ubunto drive. This is fine! It's great. Linux is responsive and my steam games are happy, because somehow valve made a thing that just Makes Games Work On Linux.
Now, I have a Legally Obtained Copy of ac3. There's specific ways to install windows games onto Linux like this, using a thing called WINE, and a program called lutris. Wine just sort of... translates windows stuff into Linux??? You can install windows drivers with it. Lutris is a game hub that manages all that using WINE for video games.
(I successfully installed the .Net framework with wine. Which if you're like me and have ever had a fucking nightmare trying and failing to install it on windows for Gaming, you will know this feels like stepping into the twilight zone to see.)
Anyways, for reasons unknown to me still, it has some kind of problem getting the installer to run. Okay, I say, I'll go back to my dual boot plan. I make a windows 11 install ISO on mint, boot off it, encounter thirty problems I don't understand and have to remake the ISO like three times, and then get windows installed. I also learned how to set the default drive to boot from using the BIOS, aka the super scary thing you shouldn't touch unless you're doing insane computer sjit like this. Turns out the windows USB installer needs to be the default boot while installing.
Note here: don't be me. Always install windows first, and THEN linux. They both have dual booting managers, and the second install overrides the first, and you NEED the linux boot manager.
NEW exciting windows problems! It cannot percieve my wifi card. Or, as I later learn, act like a fucking gaming laptop. It also fucks Linux again so I have to reinstall mint. I take the time to politely partition the drives (split it up into chunks, basically, so the windows-storage doesn't interact with the linux-storage), and disable the security thing windows freaked out and triggered earlier to encrypt my drives. Yay! My OS's are now installed and linux is in charge of booting, which is good because the windows booter can't tell the computer to boot into linux.
I use rose's computer to download and install a bunch of drivers that my windows install lacks in an attempt to fix the wifi, no dice. Currently I am waiting for a wifi USB adapter to see if that will get around it.
At this point, I decide to install AC3. Install goes okay! It's giving me a weird error with the launcher, but it worked on the second install, so okay. Except there's a problem: once it gets past the safety warnings and stuff, it decides to drop to 1fps. Messing with the game settings doesn't change this. Reinstalling doesn't fix this. I complain to rose. I install every driver related to my laptop I can think of. 1fps. No wifi. Audio works fine though!
I then remember a random thing a redditor mentioned while I was working with lutris: installing the game on windows, and using external storage to copy that install to limux.
So... I do that. I add it to lutris. I open the game.
It Just Works. No lag. Fully working. What the fuck. I installed the make on WINDOWS and fucking LINUX was running it better.
At this point, I had been working on this for three days, and it was 4am. I felt insane! I still feel insane! It just works!
Now, it's basically just messing with windows again tomorrow when the wifi adapter arrives, and finishing transferring everything to linux. And other small things that are basically just quality of life for me.
Windows is just going to be my non-steam windows games installer, basically. I don't think I'll need all 400gb i partitioned off for windows, I'll probably reduce it to 250gb or 300gb, so linux can have Even More. I literally just need it for edge cases and running game installers.
So, that's what I spent my weekend doing!!!!! Do more research than me if you change to linux, kids.
#ramblings#long post#it really was an experience#to be clear wifi and everything DOES work on linux. i didnt have to do anything special for linux. idk whats up with windows#if you want any more details on any onr part of this Let Me Know#curtis does hobbies
2 notes
·
View notes
Text
Install .NET 8.0 on Ubuntu 24.04
This article explains how to install .NET 8 on Ubuntu 24.04. .NET 8 is a cross-platform, high-performance framework developed by Microsoft. It allows developers to create a variety of applications, including web, mobile, desktop, and cloud, deploying them on Windows, macOS, and Linux with a single codebase. With .NET 8, developers can build applications for both Windows and Linux, which is…
0 notes
Text
Navigating the Installation of .NET 3.5 on Windows Server 2023: A Comprehensive Guide
In today's rapidly evolving digital landscape, compatibility and versatility remain crucial for businesses and individuals. With technology constantly advancing, ensuring seamless integration across different platforms and environments is essential. In this guide, we'll delve into the step-by-step process of installing .NET 3.5 on Windows Server 2023, bridging the gap between Windows environments and Linux-based systems like Ubuntu Server, all while leveraging the convenience of Windows RDP.

Understanding the Landscape
Before diving into the installation process, it's essential to grasp the significance of .NET 3.5 framework and its role in the Windows ecosystem. .NET 3.5 provides a comprehensive programming model for building applications and services that can seamlessly integrate with existing Windows-based systems. This framework serves as a cornerstone for numerous applications, ensuring compatibility and functionality across various Windows platforms.
Preparation and Prerequisites
To embark on our journey, we first need to ensure that our Windows Server 2023 environment is adequately prepared for the installation of .NET 3.5. This involves accessing the server, typically through Windows Remote Desktop Protocol (RDP), a convenient means of remotely managing Windows-based systems. For those seeking to buy RDP services, numerous providers offer reliable solutions tailored to specific needs.
Initiating the Installation Process
Once securely logged into the Windows Server 2023 environment via RDP, we can commence the installation process for .NET 3.5. Windows Server features a built-in utility known as Server Manager, which simplifies the installation of various components and features. To access Server Manager, simply navigate to the Start menu and select the appropriate option.

Enabling .NET 3.5 Feature
Within Server Manager, locate the "Add Roles and Features" option and proceed to initiate the installation wizard. Throughout the process, ensure to select the ".NET Framework 3.5 Features" option, which will prompt the system to include the necessary components for .NET 3.5 functionality. This step lays the foundation for seamless integration with existing Windows applications and services.
Navigating Ubuntu Server Compatibility
While Windows Server remains a stalwart in numerous enterprise environments, the compatibility with Linux-based systems such as Ubuntu Server is increasingly pertinent. Fortunately, through the versatility of Windows RDP, users can effortlessly bridge the gap between Windows and Linux environments, facilitating interoperability and collaboration across diverse platforms.
Optimizing Linux Integration
For organizations seeking to leverage the benefits of Ubuntu Server within a Windows-centric infrastructure, installing Ubuntu on RDP provides a streamlined solution. By harnessing the power of RDP, users can remotely access Ubuntu Server instances, enabling seamless management and integration within existing workflows. This approach underscores the flexibility and compatibility inherent in modern computing environments.
Streamlining Operations with .NET 3.5
Upon successful installation of .NET 3.5 on Windows Server 2023, users gain access to a robust framework that facilitates the development and deployment of diverse applications and services. Whether interfacing with Windows-based systems or collaborating with Ubuntu Server instances via RDP, .NET 3.5 serves as a unifying force, ensuring consistency and efficiency across disparate environments.
Conclusion
In conclusion, the installation of .NET 3.5 on Windows Server 2023 represents a pivotal step in fostering compatibility and interoperability within modern computing environments. By leveraging the convenience of Windows RDP, users can seamlessly bridge the gap between Windows and Linux systems, facilitating streamlined operations and enhanced productivity. Whether navigating Ubuntu Server compatibility or harnessing the power of the .NET 3.5 framework, this comprehensive guide empowers users to navigate the complexities of modern IT landscapes with confidence and ease.
0 notes
Link
#dot net#asp.net#.net development#.net framework install linux ubuntu#.net framework linux debian#.net framework install linux fedora#software#web application firewall#php web application#web application#web application design#web application services
0 notes
Text
The Elastic stack (ELK) is made up of 3 open source components that work together to realize logs collection, analysis, and visualization. The 3 main components are: Elasticsearch – which is the core of the Elastic software. This is a search and analytics engine. Its task in the Elastic stack is to store incoming logs from Logstash and offer the ability to search the logs in real-time Logstash – It is used to collect data, transform logs incoming from multiple sources simultaneously, and sends them to storage. Kibana – This is a graphical tool that offers data visualization. In the Elastic stack, it is used to generate charts and graphs to make sense of the raw data in your database. The Elastic stack can as well be used with Beats. These are lightweight data shippers that allow multiple data sources/indices, and send them to Elasticsearch or Logstash. There are several Beats, each with a distinct role. Filebeat – Its purpose is to forward files and centralize logs usually in either .log or .json format. Metricbeat – It collects metrics from systems and services including CPU, memory usage, and load, as well as other data statistics from network data and process data, before being shipped to either Logstash or Elasticsearch directly. Packetbeat – It supports a collection of network protocols from the application and lower-level protocols, databases, and key-value stores, including HTTP, DNS, Flows, DHCPv4, MySQL, and TLS. It helps identify suspicious network activities. Auditbeat – It is used to collect Linux audit framework data and monitor file integrity, before being shipped to either Logstash or Elasticsearch directly. Heartbeat – It is used for active probing to determine whether services are available. This guide offers a deep illustration of how to run the Elastic stack (ELK) on Docker Containers using Docker Compose. Setup Requirements. For this guide, you need the following. Memory – 1.5 GB and above Docker Engine – version 18.06.0 or newer Docker Compose – version 1.26.0 or newer Install the required packages below: ## On Debian/Ubuntu sudo apt update && sudo apt upgrade sudo apt install curl vim git ## On RHEL/CentOS/RockyLinux 8 sudo yum -y update sudo yum -y install curl vim git ## On Fedora sudo dnf update sudo dnf -y install curl vim git Step 1 – Install Docker and Docker Compose Use the dedicated guide below to install the Docker Engine on your system. How To Install Docker CE on Linux Systems Add your system user to the docker group. sudo usermod -aG docker $USER newgrp docker Start and enable the Docker service. sudo systemctl start docker && sudo systemctl enable docker Now proceed and install Docker Compose with the aid of the below guide: How To Install Docker Compose on Linux Step 2 – Provision the Elastic stack (ELK) Containers. We will begin by cloning the file from Github as below git clone https://github.com/deviantony/docker-elk.git cd docker-elk Open the deployment file for editing: vim docker-compose.yml The Elastic stack deployment file consists of 3 main parts. Elasticsearch – with ports: 9200: Elasticsearch HTTP 9300: Elasticsearch TCP transport Logstash – with ports: 5044: Logstash Beats input 5000: Logstash TCP input 9600: Logstash monitoring API Kibana – with port 5601 In the opened file, you can make the below adjustments: Configure Elasticsearch The configuration file for Elasticsearch is stored in the elasticsearch/config/elasticsearch.yml file. So you can configure the environment by setting the cluster name, network host, and licensing as below elasticsearch: environment: cluster.name: my-cluster xpack.license.self_generated.type: basic To disable paid features, you need to change the xpack.license.self_generated.type setting from trial(the self-generated license gives access only to all the features of an x-pack for 30 days) to basic.
Configure Kibana The configuration file is stored in the kibana/config/kibana.yml file. Here you can specify the environment variables as below. kibana: environment: SERVER_NAME: kibana.example.com JVM tuning Normally, both Elasticsearch and Logstash start with 1/4 of the total host memory allocated to the JVM Heap Size. You can adjust the memory by setting the below options. For Logstash(An example with increased memory to 1GB) logstash: environment: LS_JAVA_OPTS: -Xm1g -Xms1g For Elasticsearch(An example with increased memory to 1GB) elasticsearch: environment: ES_JAVA_OPTS: -Xm1g -Xms1g Configure the Usernames and Passwords. To configure the usernames, passwords, and version, edit the .env file. vim .env Make desired changes for the version, usernames, and passwords. ELASTIC_VERSION= ## Passwords for stack users # # User 'elastic' (built-in) # # Superuser role, full access to cluster management and data indices. # https://www.elastic.co/guide/en/elasticsearch/reference/current/built-in-users.html ELASTIC_PASSWORD='StrongPassw0rd1' # User 'logstash_internal' (custom) # # The user Logstash uses to connect and send data to Elasticsearch. # https://www.elastic.co/guide/en/logstash/current/ls-security.html LOGSTASH_INTERNAL_PASSWORD='StrongPassw0rd1' # User 'kibana_system' (built-in) # # The user Kibana uses to connect and communicate with Elasticsearch. # https://www.elastic.co/guide/en/elasticsearch/reference/current/built-in-users.html KIBANA_SYSTEM_PASSWORD='StrongPassw0rd1' Source environment: source .env Step 3 – Configure Persistent Volumes. For the Elastic stack to persist data, we need to map the volumes correctly. In the YAML file, we have several volumes to be mapped. In this guide, I will configure a secondary disk attached to my device. Identify the disk. $ lsblk NAME MAJ:MIN RM SIZE RO TYPE MOUNTPOINT sda 8:0 0 40G 0 disk ├─sda1 8:1 0 1G 0 part /boot └─sda2 8:2 0 39G 0 part ├─rl-root 253:0 0 35G 0 lvm / └─rl-swap 253:1 0 4G 0 lvm [SWAP] sdb 8:16 0 10G 0 disk └─sdb1 8:17 0 10G 0 part Format the disk and create an XFS file system to it. sudo parted --script /dev/sdb "mklabel gpt" sudo parted --script /dev/sdb "mkpart primary 0% 100%" sudo mkfs.xfs /dev/sdb1 Mount the disk to your desired path. sudo mkdir /mnt/datastore sudo mount /dev/sdb1 /mnt/datastore Verify if the disk has been mounted. $ sudo mount | grep /dev/sdb1 /dev/sdb1 on /mnt/datastore type xfs (rw,relatime,seclabel,attr2,inode64,logbufs=8,logbsize=32k,noquota) Create the persistent volumes in the disk. sudo mkdir /mnt/datastore/setup sudo mkdir /mnt/datastore/elasticsearch Set the right permissions. sudo chmod 775 -R /mnt/datastore sudo chown -R $USER:docker /mnt/datastore On Rhel-based systems, configure SELinux as below. sudo setenforce 0 sudo sed -i 's/^SELINUX=.*/SELINUX=permissive/g' /etc/selinux/config Create the external volumes: For Elasticsearch docker volume create --driver local \ --opt type=none \ --opt device=/mnt/datastore/elasticsearch \ --opt o=bind elasticsearch For setup docker volume create --driver local \ --opt type=none \ --opt device=/mnt/datastore/setup \ --opt o=bind setup Verify if the volumes have been created. $ docker volume list DRIVER VOLUME NAME local elasticsearch local setup View more details about the volume. $ docker volume inspect setup [ "CreatedAt": "2022-05-06T13:19:33Z", "Driver": "local", "Labels": , "Mountpoint": "/var/lib/docker/volumes/setup/_data", "Name": "setup", "Options": "device": "/mnt/datastore/setup", "o": "bind", "type": "none" , "Scope": "local" ] Go back to the YAML file and add these lines at the end of the file.
$ vim docker-compose.yml ....... volumes: setup: external: true elasticsearch: external: true Now you should have the YAML file with changes made in the below areas: Step 4 – Bringing up the Elastic stack After the desired changes have been made, bring up the Elastic stack with the command: docker-compose up -d Execution output: [+] Building 6.4s (12/17) => [docker-elk_setup internal] load build definition from Dockerfile 0.3s => => transferring dockerfile: 389B 0.0s => [docker-elk_setup internal] load .dockerignore 0.5s => => transferring context: 250B 0.0s => [docker-elk_logstash internal] load build definition from Dockerfile 0.6s => => transferring dockerfile: 312B 0.0s => [docker-elk_elasticsearch internal] load build definition from Dockerfile 0.6s => => transferring dockerfile: 324B 0.0s => [docker-elk_logstash internal] load .dockerignore 0.7s => => transferring context: 188B ........ Once complete, check if the containers are running: $ docker ps CONTAINER ID IMAGE COMMAND CREATED STATUS PORTS NAMES 096ddc76c6b9 docker-elk_logstash "/usr/local/bin/dock…" 9 seconds ago Up 5 seconds 0.0.0.0:5000->5000/tcp, :::5000->5000/tcp, 0.0.0.0:5044->5044/tcp, :::5044->5044/tcp, 0.0.0.0:9600->9600/tcp, 0.0.0.0:5000->5000/udp, :::9600->9600/tcp, :::5000->5000/udp docker-elk-logstash-1 ec3aab33a213 docker-elk_kibana "/bin/tini -- /usr/l…" 9 seconds ago Up 5 seconds 0.0.0.0:5601->5601/tcp, :::5601->5601/tcp docker-elk-kibana-1 b365f809d9f8 docker-elk_setup "/entrypoint.sh" 10 seconds ago Up 7 seconds 9200/tcp, 9300/tcp docker-elk-setup-1 45f6ba48a89f docker-elk_elasticsearch "/bin/tini -- /usr/l…" 10 seconds ago Up 7 seconds 0.0.0.0:9200->9200/tcp, :::9200->9200/tcp, 0.0.0.0:9300->9300/tcp, :::9300->9300/tcp docker-elk-elasticsearch-1 Verify if Elastic search is running: $ curl http://localhost:9200 -u elastic:StrongPassw0rd1 "name" : "45f6ba48a89f", "cluster_name" : "my-cluster", "cluster_uuid" : "hGyChEAVQD682yVAx--iEQ", "version" : "number" : "8.1.3", "build_flavor" : "default", "build_type" : "docker", "build_hash" : "39afaa3c0fe7db4869a161985e240bd7182d7a07", "build_date" : "2022-04-19T08:13:25.444693396Z", "build_snapshot" : false, "lucene_version" : "9.0.0", "minimum_wire_compatibility_version" : "7.17.0", "minimum_index_compatibility_version" : "7.0.0" , "tagline" : "You Know, for Search"
Step 5 – Access the Kibana Dashboard. At this point, you can proceed and access the Kibana dashboard running on port 5601. But first, allow the required ports through the firewall. ##For Firewalld sudo firewall-cmd --add-port=5601/tcp --permanent sudo firewall-cmd --add-port=5044/tcp --permanent sudo firewall-cmd --reload ##For UFW sudo ufw allow 5601/tcp sudo ufw allow 5044/tcp Now proceed and access the Kibana dashboard with the URL http://IP_Address:5601 or http://Domain_name:5601. Login using the credentials set for the Elasticsearch user: Username: elastic Password: StrongPassw0rd1 On successful authentication, you should see the dashboard. Now to prove that the ELK stack is running as desired. We will inject some data/log entries. Logstash here allows us to send content via TCP as below. # Using BSD netcat (Debian, Ubuntu, MacOS system, ...) cat /path/to/logfile.log | nc -q0 localhost 5000 For example: cat /var/log/syslog | nc -q0 localhost 5000 Once the logs have been loaded, proceed and view them under the Observability tab. That is it! You have your Elastic stack (ELK) running perfectly. Step 6 – Cleanup In case you completely want to remove the Elastic stack (ELK) and all the persistent data, use the command: $ docker-compose down -v [+] Running 5/4 ⠿ Container docker-elk-kibana-1 Removed 10.5s ⠿ Container docker-elk-setup-1 Removed 0.1s ⠿ Container docker-elk-logstash-1 Removed 9.9s ⠿ Container docker-elk-elasticsearch-1 Removed 3.0s ⠿ Network docker-elk_elk Removed 0.1s Closing Thoughts. We have successfully walked through how to run Elastic stack (ELK) on Docker Containers using Docker Compose. Futhermore, we have learned how to create an external persistent volume for Docker containers. I hope this was significant.
0 notes
Text
How to deploy Microsoft .NET in Ubuntu Linux
Case
You need to deploy Microsoft .NET on your Linux machine. In this how-to article, we will show you to the .NET framework 6 on Ubuntu Linux LTS 22.04.
Solution
Go through the following steps: - Run the following commands in your Linux Ubuntu Powershell core terminal.
wget https://packages.microsoft.com/config/ubuntu/22.04/packages-microsoft-prod.deb -O packages-microsoft-prod.deb sudo dpkg -i packages-microsoft-prod.deb rm packages-microsoft-prod.deb

- Install the .NET SDK (instead of the runtime only) by running the following commands sudo apt-get update sudo apt-get install -y apt-transport-https && sudo apt-get update && sudo apt-get install -y dotnet-sdk-6.0 - To verify the .NET installation on your Ubuntu machine, run the following commands: dotnet --list-sdks dotnet --list-runtimes dotnet --info


References
https://docs.microsoft.com/en-us/dotnet/core/install/linux-ubuntu Read the full article
0 notes
Text
How to Install and Use Mono on Ubuntu 22.04
How to Install and Use Mono on Ubuntu 22.04
Mono is a Microsoft .NET framework that is easy to use and also open source so every user can access it and download it. It is used for the development and maintenance of many applications which are written in the C sharp or any other programming language. Ubuntu Jammy Jellyfish has been released recently which is a Linux-based operating system and widely used by the developers. The Mono can be…

View On WordPress
0 notes
Link
#asp.net#.net development#.net framework install linux ubuntu#.net framework linux debian#.net framework install linux fedora#c sharp#web application#web app#web application firewall#web developers#webdesign#web develpment#web#fiver#gigs
0 notes
Text
B Series Intranet Search Add Settings Descargar
Download Agent DVR v3.0.8.0
Laptops and netbooks:: lenovo b series laptops:: lenovo b50 70 notebook - Lenovo Support US. View and Download Samsung SCX-3200 Series user manual online. Multi-Functional Mono Printer. SCX-3200 Series all in one printer pdf manual download. Also for: Scx-3205, Scx-3205w, Scx-3205w(k) series. 30 Series Graphics Cards. G-SYNC MONITORS. Displays with SHIELD TV. Advanced Driver Search. Results will be presented directly from the GSA by using customized front ends for different data stores. In the case of searching SharePoint, the Search Box for SharePoint will be deployed and used. Consider utilizing the Google Search Appliance Connector for File Systems to index file shares.
Agent DVR is a new advanced video surveillance platform for Windows, Mac OS, Linux and Docker. Agent has a unified user interface that runs on all modern computers, mobile devices and even Virtual Reality. Agent DVR supports remote access from anywhere with no port forwarding required.* Available languages include: English, Nederlands, Deutsch, Español, Française, Italiano, 中文, 繁体中文, Português, Русский, Čeština and Polskie
To install run the setup utility which will check the dependencies, download the application and install the service and a tray helper app that discovers and monitors Agent DVR network connections.
Agent for Windows runs on Windows 7 SP1+. Requires the .net framework v4.7+.
To run on Windows Server you will need to enable Windows Media Foundation. For server 2012, install that from here.
If you need to install Agent on a PC without an internet connection you can download the application files manually here: 32 bit, 64 bit
Download and install the dotnet core runtime for Mac OS
Install homebrew: https://brew.sh/
Open a terminal and run: brew install ffmpeg
Run dotnet Agent.dll in a terminal window in the Agent folder.
Open a web browser at http://localhost:8090 to start configuring Agent. If port 8090 isn't working check the terminal output for the port Agent is running on.
Agent for Linux has been tested on Ubuntu 18.04, 19.10, Debian 10 and Linux Mint 19.3. Other distributions may require additional dependencies. Use the docker option if you have problems installing.

Dependencies:
Agent currently uses the .Net core 3.1 runtime which can be installed by running: sudo apt-get update; sudo apt-get install -y apt-transport-https && sudo apt-get update && sudo apt-get install -y aspnetcore-runtime-3.1
More information (you may need to add package references): https://dotnet.microsoft.com/download/dotnet-core/3.1
You also need to install FFmpeg v4.x - one way of getting this via the terminal in Linux is:
sudo apt-get update
sudo add-apt-repository ppa:jonathonf/ffmpeg-4ORsudo add-apt-repository ppa:savoury1/ffmpeg4 for Xenial and Focal
sudo apt-get update
sudo apt-get install -y ffmpeg
Important: Don't use the default ffmpeg package for your distro as it doesn't include specific libraries that Agent needs
Other libraries Agent may need depending on your Linux distro:
sudo apt-get install -y libtbb-dev libc6-dev gss-ntlmssp
Cooling tech digi microscope driver. For Debian 10 (and possibly other distros):
sudo wget http://security.ubuntu.com/ubuntu/pool/main/libj/libjpeg-turbo/libjpeg-turbo8_1.5.2-0ubuntu5.18.04.4_amd64.deb
sudo wget http://fr.archive.ubuntu.com/ubuntu/pool/main/libj/libjpeg8-empty/libjpeg8_8c-2ubuntu8_amd64.deb
sudo apt install multiarch-support
sudo dpkg -i libjpeg-turbo8_1.5.2-0ubuntu5.18.04.4_amd64.deb
sudo dpkg -i libjpeg8_8c-2ubuntu8_amd64.deb
For VLC support (optional):
sudo apt-get install -y libvlc-dev vlc libx11-dev
Download Agent:
Unzip the Agent DVR files, open a terminal and run: dotnet Agent.dll in the Agent folder.
Open a web browser at http://localhost:8090 to start configuring Agent. If port 8090 isn't working check the terminal output for the port Agent is running on.
A Docker image of Agent DVR will install Agent DVR on a virtual Linux image on any supported operating system. Please see the docker file for options.
Age of empires 2 definitive edition civilizations list. Age of Empires II: Definitive Edition – Lords of the West is now available for pre-order on the Microsoft Store and Steam! Coming January 26th! 👑 Coming January 26th! 👑 Age of Empires: Definitive Edition. Age of Empires II: Definitive Edition is a real-time strategy video game developed by Forgotten Empires and published by Xbox Game Studios. It is a remaster of the original game Age of Empires II: The Age of Kings, celebrating the 20th anniversary of the original.It features significantly improved visuals, supports 4K resolution, and 'The Last Khans', an expansion that adds four new. Special Civilisation Bonuses: Villagers carry capacity +5. All Military Units. Age of Empires II: Definitive Edition – Lords of the West is now available for pre-order on the Microsoft Store and Steam! Coming January 26th! Civilizations Victory Rate Popularity; Top 20 Maps.
Important: The docker version of Agent includes a TURN server to work around port access limitations on Docker. If Docker isn't running in Host mode (which is only available on linux hosts) then you will need to access the UI of Agent by http://IPADDRESS:8090 instead of http://localhost:8090 (where IPADDRESS is the LAN IP address of your host computer).
To install Agent under docker you can call (for example): docker run -it -p 8090:8090 -p 3478:3478/udp -p 50000-50010:50000-50010/udp --name agentdvr doitandbedone/ispyagentdvr:latest
To run Agent if it's already installed: docker start agentdvr
If you have downloaded Agent DVR to a VPS or a PC with no graphical UI you can setup Agent for remote access by calling 'Agent register' on Windows or 'dotnet Agent.dll register' on OSX or Linux. This will give you a claim code you can use to access Agent remotely.
or. Download iSpy v7.2.1.0

iSpy is our original open source video surveillance project for Windows. iSpy runs on Windows 7 SP1 and above. iSpy requires the .net framework v4.5+. To run on windows server 2012 you will need to install media foundation.
Descargar Gratis B Series Intranet Search Add Settings
Click to download the Windows iSpy installer. We recommend Agent DVR for new installations.
B Series Intranet Search Add Settings Descargar Windows 10
*Remote access and some cloud based features are a subscription service (pricing) . This funds hosting, support and development.
B Series Intranet Search Add Settings Descargar Google Chrome
Whilst our software downloads would you do us a quick favor and let other people know about it? It'd be greatly appreciated!
0 notes
Text
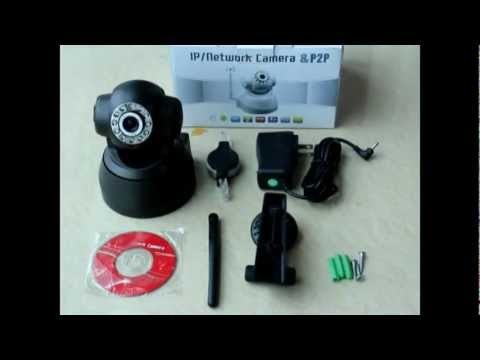
P2p Ip Camera Software Mac

ApplicationDownloadAgent DVR v2.8.3.0 Userguide Change log Screenshots
Agent DVR is an advanced video surveillance application for Windows, Mac OS and Linux. Agent has a unified web user interface that runs on all modern computers and mobile devices. The UI scales seamlessly from mobile phones to multiple monitor setups and Virtual Reality. To install run the setup utility which will check the dependencies, download the application and install the service and tray helpers.
Agent for Windows runs on Windows 7 SP1+. Requires the .net framework v4.7+. Agent DVR is free for local use.
To run on Windows Server you will need to enable Windows Media Foundation. For server 2012, install that from here.
Available translations include: English, Nederlands, Deutsch, Español, Française, Italiano, 中文, 繁体中文, Português, Русский, Čeština and Polskie
If you have downloaded Agent DVR to a VPS or a PC with no graphical UI you can setup Agent for remote access by calling 'Agent.exe register' from a command prompt. This will give you a claim code you can use to access Agent from another PC.
If you need to install Agent on a PC without an internet connection you can download the application files manually here: 32 bit, 64 bit
iSpy v7.2.1.0 Userguide Plugins Source Change log iSpy is our open source video surveillance project for Windows. Works on Windows 7 SP1+. Requires the .net framework v4.5+
To run on windows server 2012 you will need to install media foundation.
P2p Ip Camera Software For Mac
P2p Camera App
P2p Camera Software Windows 10
ApplicationDownloadAgent DVR v2.8.3.0 Userguide Change log Screenshots
Agent DVR is an advanced video surveillance application for Windows, Mac OS and Linux. Agent has a unified web user interface that runs on all modern computers and mobile devices.
Agent for Mac OS runs on OSX 10.2+
Available translations include: English, Nederlands, Deutsch, Español, Française, Italiano, 中文, 繁体中文, Português, Русский, Čeština and Polskie
Setup instructions:
Download and install the dotnet core runtime for Mac OS
Install homebrew: https://brew.sh/
Open a terminal and run: brew install ffmpeg
Start Agent:
Unzip the Agent DVR files, open a terminal and run: dotnet Agent.dll
Open a web browser at http://localhost:8090 to start configuring Agent. If port 8090 isn't working check the terminal output for the port Agent is running on.
If you have downloaded Agent DVR to a VPS or a PC with no graphical UI you can setup Agent for remote access by calling 'dotnet Agent.dll register'. This will give you a claim code you can use to access Agent from another PC.
▼ 64 bit
ApplicationDownloadAgent DVR v2.8.3.0 Userguide Change log Screenshots
Agent DVR is an advanced video surveillance application for Windows, Mac OS and Linux. Agent has a unified web user interface that runs on all modern computers and mobile devices.
Agent for Linux has been tested on Ubuntu 18.04, 19.10 and Linux Mint 19.3
Available translations include: English, Nederlands, Deutsch, Español, Française, Italiano, 中文, 繁体中文, Português, Русский, Čeština and Polskie
Setup instructions:
Download and install the dotnet core runtime for your Linux distro
You also need to install FFmpeg v4.x - one way of getting this via the terminal in Linux is:
sudo apt-get update
sudo add-apt-repository ppa:jonathonf/ffmpeg-4
sudo apt-get update
sudo apt-get install ffmpeg
sudo apt-get install libtbb-dev
sudo apt-get install libc6-dev
Start Agent:
Unzip the Agent DVR files, open a terminal and run: dotnet Agent.dll
Open a web browser at http://localhost:8090 to start configuring Agent. If port 8090 isn't working check the terminal output for the port Agent is running on.
If you have downloaded Agent DVR to a VPS or a PC with no graphical UI you can setup Agent for remote access by calling 'dotnet Agent.dll register'. This will give you a claim code you can use to access Agent from another PC.
▼ 64 bit
*Remote access and some cloud based features are a subscription service (pricing) . This funds hosting and development.
Whilst our software downloads would you do us a quick favor and let other people know about it? It'd be greatly appreciated!
Agent DVR is our new video surveillance solution for the Internet Of Things. Available on Windows, Mac and Linux.
P2p Ip Camera Software For Mac
Free Software
Enter to Search. Wireless IP Camera P2P for Windows 10 10.15.14. Alternative Software System Utilities. MiniTool Partition Wizard Free Edition. P2P IP Camera Software - PC Version. Date:2012-12-18 15:47, Views:435743. SYSM Monitor.exe. Home About Us Products Professional Service Download News Contact Us.
Our free platform supports an unlimited number of devices. Features include Home Assistant integration, IFTTT, PTZ, Onvif, Live streaming, Scheduling, Raw recording, AI powered detectors, Chrome cast support, Virtual Reality viewers and much much more!
P2p Camera App
Remote Access
Use our SSL secured platform for remote access without any router or port forwarding setup required. Works over all connections including mobile. Unlock advanced options like IFTTT, cloud uploads and HD streaming with a subscription.
See pricing
Intelligent Features
P2P WIFI IP CAM is an application that has build-in WIFI camera control functions and image files management functions. P2p ip camera free download - IP Camera Recorder, IP Camera Cloud, TrackView, and many more programs.
P2p Camera Software Windows 10
AI powered features include object tracking, speed estimation, trip wires, face detection, people detection, YOLO object recognition, heat maps and Google vision integration. Combine Agent with IFTTT and Home Assistant to secure your home and office.
0 notes
Text
Scite Scintilla

Scite Scintilla Text Editor
Scite Scintilla
This Open Source and cross-platform application provides a free source code editor
What's new in SciTE 4.3.0:
Scintilla is a free, open source library that provides a text editing component function, with an emphasis on advanced features for source code editing. Labels: scite - scite, scintilla, performance, selection, rectangular; status: open - open-fixed; assignedto: Neil Hodgson Neil Hodgson - 2019-11-02 Performance improved by reusing surface with. For a 100 MB file containing repeated copies of SciTEBase.cxx, selecting first 80 pixels of each of the first 1,000,000 lines took 64 seconds. Built both Scintilla and SciTE. Grumbled and cursed. What am I doing wrong, except maybe step 12? Lexer scintilla scite umn-mapserver. Improve this question. Follow edited Jul 21 '10 at 8:50. 30.3k 14 14 gold badges 98 98 silver badges 129 129 bronze badges.
Lexers made available as Lexilla library. TestLexers program with tests for Lexilla and lexers added in lexilla/test.
SCI_SETILEXER implemented to use lexers from Lexilla or other sources.
ILexer5 interface defined provisionally to support use of Lexilla. The details of this interface may change before being stabilised in Scintilla 5.0.
SCI_LOADLEXERLIBRARY implemented on Cocoa.
Read the full changelog
SciTE is an open source, cross-platform and freely distributed graphical software based on the ScIntilla project, implemented in C++ and GTK+, designed from the offset to act as a source code editor application for tailored specifically for programmers and developers.
The application proved to be very useful for writing and running various applications during the last several years. https://hunteratwork958.tumblr.com/post/653727911297351680/argumentative-research-paper-outline. Among its key features, we can mention syntax styling, folding, call tips, error indicators and code completion.
It supports a wide range of programming languages, including C, C++, C#, CSS, Fortran, PHP, Shell, Ruby, Python, Batch, Assembler, Ada, D, Plain Text, Makefile, Matlab, VB, Perl, YAML, TeX, Hypertext, Difference, Lua, Lisp, Errorlist, VBScript, XML, TCL, SQL, Pascal, JavaScript, Java, as well as Properties.
Getting started with SciTE
Unfortunately, SciTE is distributed only as a gzipped source archive in the TGZ file format and installing it is not the easiest of tasks. Therefore, if it isn’t already installed on your GNU/Linux operating system (various distributions come pre-loaded with SciTE), we strongly recommend to open your package manager, search for the scite package and install it.
After installation, you can open the program from the main menu of your desktop environment, just like you would open any other install application on your system. It will be called SciTE Text Editor.
The software presents itself with an empty document and a very clean and simple graphical user interface designed with the cross-platform GTK+ GUI toolkit. Only a small menu bar is available, so you can quickly access the built-in tools, various settings, change, buffers, and other useful options.

Supported operating systems
SciTE (SCIntilla based Text Editor) is a multiplatform software that runs well on Linux (Ubuntu, Fedora, etc.), FreeBSD and Microsoft Windows (Windows 95, NT 4.0, Windows 2000, Windows 7, etc.) operating systems.
Filed under
SciTE was reviewed by Marius Nestor
5.0/5
This enables Disqus, Inc. to process some of your data. Disqus privacy policy
SciTE 4.3.0
add to watchlistsend us an update
runs on:
Linux
main category:
Text Editing&Processing
developer:
visit homepage
Scintilla
Screenshot of SciTE, which uses the Scintilla component
Developer(s)Neil Hodgson, et al.(1)Initial releaseMay 17, 1999; 21 years agoStable release5.0.1 (9 April 2021; 20 days ago) (±)RepositoryWritten inC++Operating systemWindows NT and later, Mac OS 10.6 and later, Unix-like with GTK+, MorphOSTypeText editorLicenseHistorical Permission Notice and Disclaimer(2)Websitescintilla.org
Scintilla is a free, open sourcelibrary that provides a text editing component function, with an emphasis on advanced features for source code editing.
Features(edit)
Scintilla supports many features to make code editing easier in addition to syntax highlighting. The highlighting method allows the use of different fonts, colors, styles and background colors, and is not limited to fixed-width fonts. The control supports error indicators, line numbering in the margin, as well as line markers such as code breakpoints. Other features such as code folding and autocompletion can be added. The basic regular expression search implementation is rudimentary, but if compiled with C++11 support Scintilla can support the runtime's regular expression engine. Scintilla's regular expression library can also be replaced or avoided with direct buffer access.
Currently, Scintilla has experimental support for right-to-left languages, and no support for boustrophedon languages.(3)
Php echo array value. Apr 26, 2020 Use vardump Function to Echo or Print an Array in PHP The vardump function is used to print the details of any variable or expression. It prints the array with its index value, the data type of each element, and length of each element. It provides the structured information of the variable or array.
Scinterm is a version of Scintilla for the cursestext user interface. It is written by the developer of the Textadept editor. Scinterm uses Unicode characters to support some of Scintilla's graphically oriented features, but some Scintilla features are missing because of the terminal environment's constraints.(4)
Other versions(edit)
ScintillaNET(5) – a wrapper for use on the .NET Framework
QScintilla(6) – Qt port of Scintilla
wxScintilla(7) – wxWidgets-wrapper for Scintilla
Delphi wrappers:
TScintEdit(8) – part of Inno Setup.
TDScintilla(9) – simple wrapper for all methods of Scintilla.
TScintilla(10) – Delphi Scintilla Interface Component (as of 2009-09-02, this project is no longer under active development).
Software based on Scintilla(edit)
Notable software based on Scintilla includes:(11)
Plex web access. From the people who brought you Free Live TV. Plex has free movies too! Stream over 14,000 free on-demand movies and shows from Warner Brothers, Crackle, Lionsgate, MGM, and more. Plex brings together all the media that matters to you. Your personal collection will look beautiful alongside stellar streaming content. Enjoy Live TV & DVR, a growing catalog of great web shows, news, and podcasts. It's finally possible to enjoy all the media you love in a single app, on any device, no matter where you are. Feb 28, 2019 You can access the Plex Web App via two main methods: Hosted from the plex.tv website Locally through your Plex Media Server Both methods can provide you with the same basic web app.
Aegisub(12)
Altova XMLSpy(13)
Ch(14)
ConTEXT(15)
Inno Setup Compiler IDE (as of 5.4(16))
PureBasic(17)
TextAdept(18)
Uniface(19)
Scite Scintilla Text Editor
References(edit)
^'Scintilla and SciTE'. Scintilla. Retrieved 2013-08-12.
^'License.txt'. Scintilla. Retrieved 29 May 2015.
^'Scintilla Documentation'.
^'Scinterm'.
^'ScintillaNET – Home'. Scintillanet.github.com. Retrieved 2017-05-18.
^'Riverbank | Software | QScintilla | What is QScintilla?'. Riverbankcomputing.com. Retrieved 2013-08-12.
^'wxScintilla – Scintilla wrapper for wxWidgets – Sourceforge'. Nuklear Zelph. Retrieved 2015-04-20.
^'Inno Setup Downloads'. Jrsoftware.org. Retrieved 2013-08-12.
^'dscintilla – Scintilla wrapper for Delphi – Google Project Hosting'. Dscintilla.googlecode.com. 2013-04-11. Retrieved 2013-08-12.
^'Delphi Scintilla Interface Components | Free Development software downloads at'. Sourceforge.net. Retrieved 2013-08-12.
^'Scintilla and SciTE Related Sites'. Scintilla.org. Retrieved 2013-08-12.
^'#1095 (Option to switch the subs edit box to a standard text edit) – Aegisub'. Devel.aegisub.org. Archived from the original on 2014-07-10. Retrieved 2013-08-12.
^http://www.altova.com/legal_3rdparty.html
^'ChIDE'. Softintegration.com. Retrieved 2013-08-12.
^'uSynAttribs.pas'.
^'Inno Setup 5 Revision History'. Jrsoftware.org. Retrieved 2013-08-12.
^A little PureBasic review
^'Technology'. Textadept uses Scintilla as its core editing component
^'Technology'. Uniface 10 uses Scintilla as its core code editor
External links(edit)
Scite Scintilla
Retrieved from 'https://en.wikipedia.org/w/index.php?title=Scintilla_(software)&oldid=1011984059'
0 notes
Text
How To Download Free Software For Mac

Looking to download safe free versions of the latest software for Mac, freeware, shareware and demo programs from a reputable download site? Visit FileHippo today. Audiobook Binder. While you can listen to books in MP3 format, I like the M4B format more. Filmora Video Editor (Mac and Windows) Why settle for a simple and limited video editor. MAC Software is composed in one or more programming dialects. There are numerous programming dialects in presence. Every ha no less than one execution. Every one of which comprises of its own arrangement of programming apparatuses. Keygens, MAC. Download anything you want with simple, tweakable, and Mac-like BitTorrent client.
Free Apple Programs Download
download free, software For Macbook Air
Free Software For Mac
Traditionally, bootable images have been stored in floppy and CD disks. However, we have experienced tremendous progress in technology, and there have been a lot of improvement. Presently, the majority of the devices available do not have slots for such media, and thus it is important to match up to the technology. To be able to install a bootable software, you will need to have a USB bootable software and here are some of the best.
Related:
Rufus
Rufus is a USB bootable software that presents the users with an easy way of creating bootable USB drives and it is free to use and distribute. The software supports multiple languages and can run on all versions of Windows starting from XP. This is both in the 32 and 64 bit systems.
Win Setup From USB
WinSetupFromUSB is a great Windows application that allows users to create bootable USB drives. The software is designed to work on the Windows OS though it has the ability to make bootable images for the others platforms and program. The software is easy to use and greatly convenience.
Other Platforms
With the majority of the software in this category, you can be able to create bootable drives for various applications and even for different operating systems. However, it is important to make a consideration on the platform that the software will be riding on.
Xboot – Multiboot ISO USB Creator
Windows USB/DVD Download Tool is the ultimate software for creating USB bootable drives on the Windows platform. To be able to use the software, your PC will need to have an installed the .NET framework which is also free and easy to install.
USB/DVD Download Tool for Windows
Windows USB/DVD Download Tool is the ultimate software for creating USB bootable drives on the Windows platform. To be able to use the software, your PC will need to have an installed the .NET framework which is also free and easy to install.
UNetbootin for Mac
UNetbootin is an App that will let you create a bootable USB drive for Ubuntu and other Linux variations on your Mac machine. With this, the process of creating live USB is easy and by convenient from the graphics based interface and a step by step approach.
Universal USB Installer for Linux
Universal USB Installer is abbreviated as UUI and is a simple and easy to use application that is used in creating different Linux live USB drives. The software deeply relies on its simplicity and the interactive interface to ensure that virtually anyone can be able to run the application.
Most Population Software for 2016 – Zotac WinUSB
Zotac WinUSB is a leading USB bootable software. The software is the free and open source and is extremely lightweight at under 1 MB. With this, you enjoy, fastest file copy from directory or file using a dedicated memory stream allocation, Drag, and Drop based for all the functions that need to user data. It is compatible with all DPI scales (100% +). You can also see USB Security Software
What is USB Bootable Software?
A USB bootable software is a computer program that enables the users to create bootable or live USB drives. Essentially, the role of the software in this category is to load the OS in the USB drive and in a manner that can be deployed directly by the BIOS. They offer great functionalities as they eliminate the need to have disk drives deployed most of which are smaller than most recent OS. You can also see USB Port Lock Software
At the same time, a considerable number of the modern computers don’t come with a disk drive and thus greatly depend on them.USB drives are highly preferred due to their small size and the fact that they can be reused for different applications. When it comes to creating bootable drives, they are the ultimate choice and the software that we have discussed above could be of great help.
Related Posts
iMovie is no longer free for Mac users to edit videos. So you need to look for other free video editing software for Mac (macOS 10.14 Mojave included) as alternative solution. No need to search around the internet, here you can get top 9 free video editors for Mac listed below that are sure to accomplish all your video editing needs. Edit a wide variety of video file formats to make them your own customized movie experience. Add effects, subtitles, music...you name it. When it comes to video editing, your creativity is the limit.
Top 9 Best Mac Video Editing Software You Should Know
#1. Filmora Video Editor (Mac and Windows)
Why settle for a simple and limited video editor when you can have it all? Filmora Video Editor brings all tools into one amazing program that enables video editing, and is also a video converter. Edit video and convert video at will, for virtually all formats available and a huge array of devices.
Whatever you need, Filmora Video Editor for Mac has it! Or, if you're absolutely just looking for a dedicated video editor, we also have the best solution. Try our Filmora Video Editor for Mac! The best video editor for Mac (macOS High Sierra included) in the market.
Supports almost all video, audio and image formats.
Makes amazing movies with 300+ new eye-catching effects.
Allows you to add music to video or crop/trim/merge videos.
Full compatible with macOS 10.6 or later including macOS 10.13 High Sierra, and Windows 10/8/7/XP/Vista.
Step-by-Step Guide on How to Edit Videos on Mac using Filmora Video Editor for Mac
Step 1. Import Video
Open Filmora Video Editor for Mac and click on “Import” button on the home screen. Choose “Import Media Files” and select the video file on your Mac that you want to upload. Alternatively, you can drag and drop the video from your local storage to the program window.
Step 2. Edit Video
To edit the video, you need to drag the video to the timeline on the screen.
To cut the video place the pointers on the position that you want to cut the video and click on Scissor button. Alternatively, you can right-click on the video and click on cut or split the video. You can also delete the part that you have cut.
Free Apple Programs Download
When you click on “Edit” once you right click on the video, you will get basic editing options appear on a window such as brightness, contrast, saturation as well as audio editing options like volume, pitch and noise removal.

For effects click, on the desired effects like overlay. Choose an overlay and drag it to the video. It will appear on the video once you play it.
Step 3. Save the Edited Video
After editing the video, click on “Export” button and select “Output” format. You can also opt to burn video to DVD, export online or save to a device. For Output option, just choose the output format and then select the destination on your folder and export file.
Editing videos on Mac with Filmora Video Editor for Mac is quite simple and fast. Moreover, this video editor for Mac allows you save and share files in different ways.
#2. Avidemux
Avidemux is an open source video editor for Mac that will make encoding, filtering, and cutting a breeze. In comparison to other video editors for Mac, this video editor for Mac is compatible with different video formats such as DVD, MPEG, AVI, and many more. It also supports some audio formats including WAV, AAC, MP3,among others. If you are a beginner in video editing, there is no need to worry because it's very easy to use and will allow you to edit your video files without experiencing any inconvenience. Like all video editing programs, this tool is easy to install. It can also be downloaded easily. For first time users, there is a detailed tutorial provided. It also comes with advanced features that will provide total convenience for all users. However, for non-tech savvy people, you might find some of its functions confusing. But, with its user-friendly interface, you won't need to study numerous tutorials.
#3. Blender
download free, software For Macbook Air
Blender is a free video editing software for Mac and free 3D rendering program, which features the best list of animation essentials such as modeling, rigging, interface, animation, shading, UV unwrapping, real time 3D game creation, and so on. This also has a pack of high-end interface that is loaded with intrinsic and useful tools. But, like most video editors, this has also pros and cons. When compared to some video editors, this video editor for Mac is a video editor that provides professional 3D quality that is available for free. It has a lot of features and ideals for every 3D enthusiasts, graphic artists, and designers. It is also versatile and lightweight. Unfortunately, beginners might experience difficulties when using this software. But, luckily, there is a manual that can help you make the most of it. Blender is also compatible with various versions of Windows.
Free Software For Mac
#4. Kdenlive
Kdenlive or KDE Non-Linear Video Editor is an open source Mac video editing application. Its package is based on MLT Framework that focuses on easy to use features and flexibility. When compared to other video editors, this supports all formats, which are supported by the FFmpeg including AVI, QuickTime, FlashVideo, WMV, and MPEG. This video editor for Mac also supports 16:9 and 4:3 aspect ratios for NTSC, PAL, and some HD standards including AVCHD and HDV. The videos created with this software can be exported to a Device. Users can also write it on a DVD using its simple menu. Kdenlive is also compatible with Linux. But, make sure to check the compatibility of your system to avoid any issues. Most users like this Mac video editing software. However, others have experienced difficulties in using it because of the complexity of its interface. Nevertheless, the manual is of certain help for any doubts.
#5. JahShaka
JahShaka is one of the Mac video editing tools that aim to become an open source, cross-platform, and free video editing tool. At present, it is in its alpha stage and supports real time effects rendering. It is best for every user who has not yet enough experience using video editors. But, professionals can also rely on this video editing tool. Unfortunately, JahShaka is still lacking some helpful implementations of numerous features including the non-linear editing system. This video editing tool was written with the use of Qt by Troll tech, but the user interface of this software is using the library of OpenGL to make the GUIs. This video editor for Mac is also compatible with Linux and Windows. Nevertheless, this video editing software has some issues. So, before you consider it, see to it that your system is compatible with the program's features to avoid any inconvenience and for you to use it properly.
#6. VideoLan Movie Creator
VideoLan Movie Creator is a video editor for Mac, which is different from VLC Media Player, but they are both developed by VideoLan Organization. The project was developed for playing videos and some media formats. This movie creator is perfect for everyone who wants a program that will provide convenience whenever they are creating movies and videos of high quality. The software is compatible with other operating systems as well. However, there are some issues that were experienced by many users. These issues include sudden crashes of the program. But, overall, VideoLan Movie Creator is a video editor mac that you must try, most particularly if you are just starting to explore movie creation or video editing. The interface of the movie creator is easy to use and simple. So, this just means that there is no need for you to learn more about it as it won't require special skills in order for you to use it.
#7. iMovie
Mac video editing tool that was developed by Apple for iOS devices (including iPod touch, iPad Mini, iPad, and iPhone) and Mac. Originally released in 1999 as an application for Mac OS 8. The third version of iMovie was only released for OS-X, but there are modified versions so users can use it properly. iMovie is best at importing video footage to Mac using the interface of FireWire or through USB. This video editor for Mac also imports photos and video files from hard drives. With this video editing tool, you can edit video clips, add effects or music. There is also included a basic color correction option as well as other video enhancement tools. Transitions like slides and fades are also possible. However, even if iMovie is rich in various features, the effects options are not really very comprehensive, when compared to other editors.
#8. Adobe Premiere Pro
Well, many people heard about Adobe Premiere Pro. This video editor for Mac is a professional Mac video editing software program, which also has Windows version. It is a part of the Adobe Creative Suite for designers and developers. It has both standard and professional features, but you will need some experience to learn working with it. People from all around the work use it because it allows them to perform a lot of actions.
#9. HyperEngine-AV
Our last proposition for you is HyperEngine-AV, another free video editing software for Mac. You can capture, edit, and export audio and video files, and even to create quality DVDs with your movies. It offers you twelve studio quality effects, and you can also add info and credits, titles, or karaoke lyrics. We like it a lot because it comes with editable fonts, colors, styles, and many more.
Related Articles & Tips
0 notes