#100dayscssChallenge
Explore tagged Tumblr posts
Visit Tumblr Blog
Explore Tumblr blogs with no restrictions, modern design and the best experience.
Last Seen Tumblr Blogs


Fun Fact
Tumblr was created by web developers David Karp and Marco Arment.
Text

Day 2 - 100 Days CSS Challenge
Welcome to day 2 of 100 days of css challenge, where we will be together getting a given image result into reality by code.
We already know the drill since we did the first challenge, now let's get right into the different steps:
First step : Screenshot the image and get its color palette

No crazy color palette here, we only have two colors
White
This shade of green: #3FAF82
To make things more organized and get used to coding in an organized way, even if not doing it here wouldn't make any difference because we only have two colors, in more complex projects we would have a lot, we will define our colors at the beginning of our CSS code (well, only the green in this case):
:root { --main-green: #3FAF82; }
And this is how we'll use it whenever we want:
color: var(--main-green);
Second step : Identify the image elements
What elements do I have?
Three lines: line1, line 2, and line 3. I'll add them to my HTML starter template, again I'll leave the frame and center there:
<div class="frame"> <div class="center"> <div class="line-1 line"></div> <div class="line-2 line"></div> <div class="line-3 line"></div> </div> </div>
Third step : Bring them to life with CSS
Applying the background color
Only one line should be changed in the CSS code already added to .frame class:
background: var(--main-green);
So this is what we have going on for now :

Creating the lines
Now let's create our lines; if you noticed I gave each one two classes line-number and then line. I'll use the line class to give them all the common properties they have such as the color, height, width, position, border-radius, and shadow. And then I'll use the line-number to move them wherever I want using the left, top, right, bottom properties of an absolutely positioned element in CSS.
Let's start by creating all of them:
.line { left: -45px; position: absolute; height: 9px; width: 100px; background: white; border-radius: 10px; box-shadow: 2px 2px 5px rgba(0, 0, 0, 0.2); }
And just like this you'll see this in the browser:

You only see one line because the three are overlapping each other, and that's why we'll move each one of them exactly where we want using this:
.line-3 { top: 22px; } .line-1 { top: -22px; }
Now our static menu is ready:

Creating and analyzing the animations
As of observing, we can see that:
Line one goes down to line 2
Line three goes up to line 2
THEN line 2 disappears
THEN lines 1 and rotate to create the X
line-one-goes-down animation
This is my line-one code in the static version:
.line-1 { top: -22px; }
What I'm trying to do here is simply a movement translated by changing top from -22px to it becoming 0px:
@keyframes line-one-goes-down { 0% { top: -22px; } 100% { top: 0px; } }
line-three-goes-up animation
Again, I'm trying to go from top being 22px to it being 0px:
@keyframes line-three-goes-up { 0% { top: 22px; } 100% { top: 0px; } }
line-two-disappear animation
Making disappear simply means turning its opacity and width to 0:
@keyframes line-two-disappear { 0% { opacity: 1; width: 100px; } 100% { opacity: 0; width: 0px; } }
I'm gonna apply these animations and see what happens , before I create the rotation animations
.center.active .line-1 { animation: line-one-goes-down 0.5s forwards; } .center.active .line-2 { animation: line-two-disappear 0.5s forwards; } .center.active .line-3 { animation: line-three-goes-up 0.5s forwards; }
forwards means that the element will stay in the final state after the animation and not return to its original state.
This is what applying those three animations looks like:
Last but not least : let's Create the X
We only have to animations left for this: rotate-line-1 and rotate-line-2. Let's create them:
@keyframes rotate-line-1 { 0% { transform: rotate(0deg); } 100% { transform: rotate(45deg); } } @keyframes rotate-line-2 { 0% { transform: rotate(0deg); } 100% { transform: rotate(-45deg); } }
And that is my friends how we finished this challenge!
Happy coding, and see you tomorrow for Day 3!
#100dayscssChallenge#codeblr#code#css#html#javascript#java development company#python#studyblr#progblr#programming#comp sci#web design#web developers#web development#website design#webdev#website#tech#html css#learn to code
18 notes
·
View notes
Text

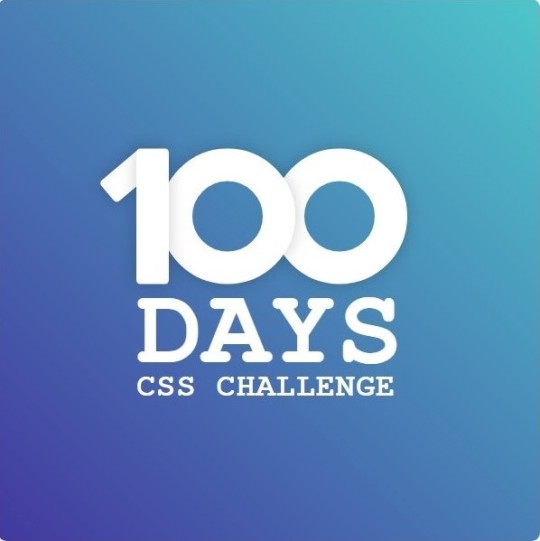
Day 1 - 100 Days CSS Challenge
Welcome to day 1 of the 100 Days CSS Challenge! In this challenge, we'll bring a design to life using only CSS. Our goal is to recreate the image we're provided with on the challenge page using HTML and CSS.
On the challenge page, we see:

A small preview of the design we need to replicate.
A starter HTML template.
A submission form to showcase our work alongside others who have taken on the same challenge.
Let's dive into the process step by step.
Step 1: Screenshot the Image
The first thing I always do is take a screenshot of the target design. Even if the design includes animation, having a static reference helps me focus on the basic structure and colors. Here’s the screenshot of the design we’re aiming for:
Step 2: Extract the Color Palette
Next, I identify the color palette that we'll need. This helps ensure that we maintain consistency with the original design. Here’s the color palette I’ve created:

Step 3: Identify and Create the Image Elements in HTML
Now that we know the colors, I break down the elements in the image:
Background: This is a linear gradient.
The 100 number: This is the main challenge, and it will require some work.
Text: “days css challenge,” which we’ll place to the left of the number.
Here’s the HTML structure for these elements:
<div class="frame"> <div class="center"> <div class="number"> <div class="one-one"></div> <div class="one-two"></div> <div class="zero-one"></div> <div class="zero-two"></div> </div> <p class="sentence1">days</p> <p class="sentence2">css challenge</p> </div> </div>
Now that the elements are in place, CSS will bring them to life.
Step 4: Bringing the Elements to Life with CSS
Linear Gradient
To create the background, we’ll use a linear gradient. Here’s a basic syntax:
background: linear-gradient(to <direction>, <color-stop1>, <color-stop2>, ...);
Parameter 1: Direction/Angle
This defines the starting point of the gradient. You can either specify a direction (e.g., to top, to bottom) or an angle (e.g., 90deg, 180deg).
Direction options:
to top
to bottom
to left
to right
If you want more precision, you can specify angles:
0deg: Gradient starts from the top.
90deg: From the right.
180deg: From the bottom.
270deg: From the left.
You can also combine two directions, specifying both horizontal and vertical movements, like to left top or to right bottom. This means:
The first keyword (left or right) controls the horizontal movement.
The second keyword (top or bottom) controls the vertical movement.
For example:
background: linear-gradient(to left top, red, blue);
This gradient starts at the bottom-right corner and transitions toward the top-left.
Parameter 2: Color Stops
Color stops define how the gradient transitions between colors. Each color stop specifies a point where a color starts or ends. Here's an example:
background: linear-gradient(to right, red 10%, blue 90%);
This means:
The element starts at 0% fully red.
By 10%, the transition from red begins.
Between 10% and 90%, there is a smooth blend from red to blue.
At 90%, the transition to blue is complete, and the remaining part is fully blue.

Once we understand the concept, we can apply the background we need. In our case, the gradient flows from the bottom left to the top right, so the code will look like this:
background: linear-gradient(to right top, #443DA1, #4EC3C9);
Bonus: Stacking Multiple Linear Gradients
You can also apply multiple gradients on top of each other:
background: linear-gradient(180deg, #f00, #0f0), linear-gradient(90deg, #ff0, #f0f);
Step 5: Making the "100" Number
Creating the Zeros
We start with the zeros. These are simply circles created using CSS. To make a full circle, we use border-radius set to 50%.
The white border gives it the appearance of the number zero.
.zero-one, .zero-two { position: absolute; height: 100px; width: 100px; border-radius: 50%; border: 24px solid #fff; box-shadow: 0 0 13px 0 rgba(0,0,0,0.2); }
This gives us a nice circular zero. We adjust their positions using properties like left and top, and manage the z-index to make sure the zeros stack correctly.
.zero-one { z-index: 8; left: 17px; } .zero-two { z-index: 6; left: 100px; }

Now both zeros are positioned, and they overlap in the way we want.
Creating the "1" Number
The number "1" is made of two div elements:
One-One: This part represents the slanted part of the "1".
One-Two: This is the straight vertical part of the "1".
What make the one-one element slightly slanted is
transform: rotate(50deg);)
the one-two is created simply with a little height and width nothing too particular then it is placed directly on top of the slanted part, giving us the full "1". Its z-index tho has to have a higher value than the slanted part of our 1 to ensure it stays above the slanted one.
Step 6: Adding the Text
For the two sentences “days” and “css challenge,” the styling is basic CSS. You can achieve the look with just a few font changes, some padding, and adjustments to font size. It’s as simple as:
.sentence1,.sentence2{ text-transform: uppercase; margin:0; padding:0; } .sentence1{ font-size:82px; font-weight:700; } .sentence2{ font-size:25px; font-weight:700; margin-top:-20px; }
And just like that, we’ve completed day 1 of the 100 Days CSS Challenge! Each part of the design is carefully crafted using CSS, giving us the final result.
Happy coding, and see you tomorrow for Day 2!
#100dayscssChallenge#codeblr#code#css#html#javascript#java development company#python#studyblr#progblr#programming#comp sci#web design#web developers#web development#website design#webdev#website#tech#html css#learn to code
16 notes
·
View notes
Text

Hey guys! 👩🏻💻 I’m excited to announce that I’m officially starting the 100 Days CSS Challenge! Over the next few months, I’ll tackle a new CSS challenge each day to finally check it off my to-do list (it’s been there for a while, but I never had the chance to dive in, even though it’s something I find fun and easy). And of course, I’ll be sharing every step of the journey with you!
What is the 100 Days CSS Challenge?
The 100 Days CSS Challenge offers a fresh CSS task daily, ranging from creating simple buttons to designing complex animations.
What to Expect: For each challenge, I’ll be posting a detailed blog entry where I’ll:
Walk you through the steps I took to complete the task.
Highlight the key CSS features and concepts you can pick up along the way.
Stay Tuned: Whether you're learning CSS alongside me or just curious about front-end development, I hope these posts spark your interest! Let’s make these 100 days count. 💻✨
Catch me every day at 8 p.m. CEST (GMT+2)!
#100dayscssChallenge#codeblr#code#css#html#javascript#java development company#python#studyblr#progblr#programming#comp sci#web design#web developers#web development#website design#webdev#website#tech#html css#learn to code
7 notes
·
View notes
Text

Day 3 - 100 Days CSS Challenge
Hey guys, I’m back with Day 3 of the challenge! I know, I said "see you tomorrow at 8 PM", and here I am an eternity later 🙂. But listen, life has been BUSY. So much going on, barely found time to continue.
But does that stop us? NO. We MAKE time for things we said we'd do. So let’s get right into Challenge 3 of the 100 Days CSS Challenge.
Step 1: Screenshot the image & Get its color palette
Yes, the image is animated, but before we even think about animations, we need a static version to work from. Same mindset for coding: start with a static layout, then animate it.
Here’s my image with its color palette:

You can define these colors as variables in :root (like we did in Challenge 1), but I won’t bother this time.
Step 2: Identify the image elements
What is this image made of? Break it down:
A floor
A pyramid made of two triangles (created using clip-path)
A sun
The sky (just a background color)
The pyramid’s shadow (if you noticed it)
That last one is important. Shadows can’t be "animated into existence", so we need to create an actual element for it and then animate it separately.
So here’s what I’ll be working with:
<div class="frame"> <div class="center"> <div class="floor"></div> <div class="pyramide"> <div class="tri1"></div> <div class="tri2"></div> <div class="shadow"></div> </div> <div class="sun"></div> </div> </div>
Step 3: Bringing these elements to life with CSS
I’m not gonna go into crazy detail because we’ve already covered basic shapes in Challenge 1. But here’s how I would build this step by step:
Frame (.frame) → Set up the main background color.
Sky (.center) → Make it a blue circle (border-radius: 50%).
Floor (.floor) → A simple rectangle, with the bottom part hidden under .center.
Sun (.sun) → Super obvious.
Pyramid (.pyramide) : It’s two triangles facing each other . And each one is created using clip-path.
Here’s a visual representation for how clip-path works:

Step 4: Creating the animations
🎥 Video Explanation: 🔗 Watch here
Animation 1: Sun Movement
@keyframes sun-goes-down { 0% { transform: translateY(0) rotate(-70deg); } 30% { transform: translateY(50px) rotate(-28deg); } 100% { transform: translateY(100px) rotate(70deg); } }
Animation 2: Pyramid’s Shading
@keyframes pyramide-shading { 0% { background: #272C34; } 30% { background: #F4F4F4; } 70% { background: #DDDADA; } 100% { background: #272C34; } }
Animation 3: Shadow on the Floor
@keyframes shadow-on-the-floor { 0% { transform: scaleY(0); clip-path: polygon(115px 0%, 231px 0%, 100% 100%); } 30% { transform: scaleY(1); clip-path: polygon(115px 0%, 231px 0%, 80% 100%); } 55% { transform: scaleY(0.4); } 75% { transform: scaleY(1); } 100% { transform: scaleY(0); clip-path: polygon(115px 0%, 231px 0%, 0% 100%); } }
Animation 4: Floor Darkening
Even the floor darkens as the sky turns black:
@keyframes fading-sand { 0% { background: #272C34; } 30% { background: #F0DE75; } 70% { background: #F0DE75; } 100% { background: #272C34; } }
Step 5: Applying the animations
To apply an animation, we use:
.element { animation: nameOfAnimation 4s cubic-bezier(.4, 0, .49, 1) infinite reverse; }
Cubic Bézier: What even is it & Why do we use It?
You might be thinking: "Why use cubic-bezier() instead of just ease-in or ease-out?" . Well , cubic-bezier() is a function that lets you customize animation speed. Instead of using basic options (ease-in, ease-out), you can fine-tune how your animation behaves.
A cubic Bézier curve is defined like this:
cubic-bezier(x1, y1, x2, y2);
These four values control how the animation progresses over time.
AND JUST LIKE THAT—DAY 3 DONE!
See you on Day 4—hopefully sooner than another eternity! 😅
#100dayscssChallenge#codeblr#code#css#html#javascript#java development company#python#studyblr#progblr#programming#comp sci#web design#web developers#web development#website design#webdev#website#tech#html css#learn to code
2 notes
·
View notes
Text

Day 4 - 100 Days CSS Challenge
CSS ANIMATIONS
Hey everyone!
Today, we’re working with three circles and our goal is to create a smooth animation where the circles scale up and down in a staggered sequence.
Step 1: The Basics
First, let’s talk about the structure. The design is made up of three circles:
Circle 1: The largest circle.
Circle 2: Medium-sized, nested inside Circle 1.
Circle 3: The smallest, nested inside Circle 2.
All three circles are white, and they animate against that reddish background. The animation involves scaling the circles up and down in a staggered sequence.
Step 2: The Animation Struggle
The main challenge here was getting the circles to animate one after the other instead of all at the same time. At first, I thought, "Easy, just add some delays!" But it wasn’t that straightforward. Here’s what I learned:
animation-delay
To create the staggered effect, I used the animation-delay property. This property allows you to delay the start of an animation for a specific amount of time. For example:
Circle 1: No delay (0s).
Circle 2: Delayed by 0.2s.
Circle 3: Delayed by 0.4s.
This way, each circle starts its animation slightly after the previous one, creating that beautiful cascading effect.
Step 3: Understanding animation-fill-mode
One of the biggest "aha!" moments for me was understanding the animation-fill-mode property. This property determines how an element is styled before and after the animation runs.
animation-fill-mode: both: ensures that the element retains the styles defined in the first and last keyframes of the animation. Without this, the circles would snap back to their default state (scale 0) after the animation ends, which would ruin the smooth transition.
What happens if we don’t use it? Without animation-fill-mode: both, the circles would abruptly disappear or reset at the end of the animation, making the whole thing look janky.
Step 4: The Magic of alternate
The alternate value in the animation property is what makes the animation reverse direction after each cycle. Here’s how it works:
Without alternate, the animation would play forward and then jump back to the start.
With alternate, the animation plays forward, then reverses, creating a smooth back-and-forth effect.
This is perfect for our circles because it makes them scale up and then scale down seamlessly, without any awkward jumps.
Step 5: reverse vs. alternate
You might be wondering, "What’s the difference between reverse and alternate?" Great question!
reverse: The animation plays backwards from 100% to 0%. It doesn’t alternate; it just runs in reverse.
alternate: The animation plays forward (0% to 100%) and then backwards (100% to 0%) in a continuous loop.
So alternate is NOT reverse + infinite
For our circles, alternate is the way to go because we want them to scale up and down repeatedly.
What I Learned :
animation-delay is your best friend when you want staggered animations.
animation-fill-mode: both is crucial for smooth transitions.
alternate creates a seamless back-and-forth effect.
cubic-bezier gives you fine control over the animation’s timing.
I’m so excited to keep going with this challenge, and I can’t wait to see what Day 5 has in store.
Keep coding and keep learning.
#100dayscssChallenge#codeblr#code#css#html#javascript#java development company#python#studyblr#progblr#programming#comp sci#web design#web developers#web development#website design#webdev#website#tech#html css#learn to code
1 note
·
View note