#3D data import/export
Explore tagged Tumblr posts
Visit Tumblr Blog
Explore Tumblr blogs with no restrictions, modern design and the best experience.
Last Seen Tumblr Blogs


Fun Fact
The average Tumblr user visits about 67 pages every month.
Note
hi goat! do you have any tips/ideas on making 4t2 items look less plasticky? would new textures work or is it maybe something with the shading? or maybe it's the rounded edges on everything....
hi anon! I know you sent this a while ago. Thanks for waiting. I do indeed sometimes retexture TS4 converted objects.
I am no expert! But! Here's what I usually do:

For this tutorial, I will be using @janika31's 4t2 conversion of the Siten-Ze Reclaimed Wood Sofa.
It has the rounded edges you speak of (typical of TS4 objects) and a texture that could be considered 'plasticky' too.

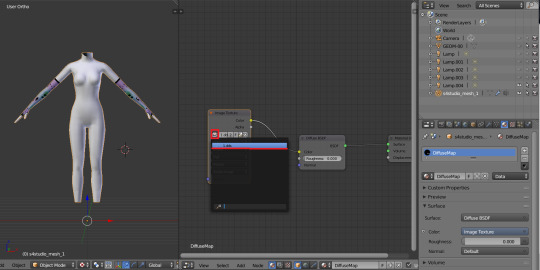
What you will need to do first is open SimPE. We need to be able to look at this mesh nice and close!
When the mesh is opened in SimPE, go to the 1. Geometric Data Container and click on it 2. find the main object in the Models list (sofa) and make sure it's checked 3. Export the object.

You'll need to load said object into a 3D Modeling program in order to look at it.
I like UVMapper, because it's free (well the free version is anyway lol) and it's very easy to use.


While you're in SimPE, extract a texture or two from the original object. You will need them. Light or white recolors will be useful.

With the object loaded into UVMapper, this is what it looks like!
UV map of the object on the left, object (with no texture) on the right.

Add the texture in.
UVMapper is going to be our main working area. Other than an image editing program like Photoshop or Gimp. You'll need that too.


Let's get a good look at this base texture - we can see it has the wood parts of the couch, the main couch texture and some pillows.
If you find UV maps helpful (I do!) you can extract one from your 3D program.
With UVMapper, I needed to make sure that I've specified the size of the image so the UV map will match. This texture is 512 x 1024.

Now for the fun part! You should be able to copy in the base texture as a new layer, and then delete everything that is not the wood part on the UV map.
I've actually missed the foot of the couch here, but I will fix it.

If you're not already working with a white texture, make one. I like to use @pooklet's Primer and Time Bomb for this.
This white texture is very important as it will serve as the shadow and highlight that the new wood texture will be sandwiched in between.

With the new white texture created, when loaded into UVMapper and displayed on our couch, it looks like this. ^

This rounded edge here, this is a problem area!
With retexturing clay hairs, we want a rounded or 'bumped out' part of the mesh to be highlighted, to give the illusion of shine on hair.
But in objects, especially wood ones that we'd prefer to not look like plastic, we want the opposite effect; this shine should be reduced.
This is pretty easy to remedy in your image editor! But first:

Remember how I talked about how the white base texture was going to sandwich the wood texture? Here's what that means (layers):
1 The white base texture, Normal, 100% opacity
2 Our wood texture. This is something lifted from a Maxis endtable?
3 The white base texture, Multiply, 100% opacity
4 The white base texture, Overlay, 22% opacity
5 The white base texture, Soft Light, 22% opacity*
Optional layers: 1) another white base texture, Multiply, 100% opacity if this is a dark recolor, as it will add more depth 2) the base texture, but in an orange or yellowy color Multiply, 100% opacity (when this is added, it will help when a warm recolor looks too ashy)
*these percentages of how opaque the layer is are arbitrary. They work for me, do what works for you.
Okay! Back to the 'problem area'

This highlight here ^ on the rounded arm of the couch; if you don't want it, here is what I would do:


Locate where that highlight is in the texture. Found it!

Here's how to REDUCE that shine:
1 Locate your base white wood texture layer, Normal opacity.
Notice how the whiter part of this texture, when layered as I've described (Multiply 100%, Overlay 22%, Soft Light 22%) translates as shiny when it's laid on an object.
The way to make that appear less shiny is to make it less white. Less white means less of that shine that can read as artificial aka plasticky. When you make that more grey than white, more of the background wood can show through the semi-transparent layers.
2 Take that noticeably white part of the base texture and make it grey! Copy a chunk of the greyer texture, paste it on, blend in or erase the edges to make it look smooth. Merge the layer.
3 Change your Normal white base layer (now edited to be greyer in that one specific spot) and copy that as 3 new layers: Multiply 100%, Overlay 22%, Soft Light 22%. With the wood texture underneath all of them. Base, wood, Multiply, Overlay, Soft Light, in that order.

Before...

...after! it's subtle okay

The same kind of sandwiching method with image layers can apply to the cushions too.

There! A method for retexturing TS4 conversions that helps them not be as plastic looking. 😊
One last tip before you go off and try retexturing conversions yourself: @pforestsims's Easy Shine Removal kit for SimPe. A must if you're looking maintain that matte look.
Let me know if you have any questions!
136 notes
·
View notes
Text
Tutorial: How to adjust joint position (in TS2 object skeleton)
This tut is NOT meant for beginners because I don't explain how to use SimPe or Milkshape. But actual process is very basic: you change joint coordinates and do GMDC model rebuild. The tricky part is to get coordinates right.
If you don't know much about joint assignments, start with this tutorial: "Retaining object animations in your new package" by Bluetexasbonnie @ MTS2, which explains how to add joint assignments to custom stuff cloned from functional objects (to make parts of the mesh move when Sims interact with it).
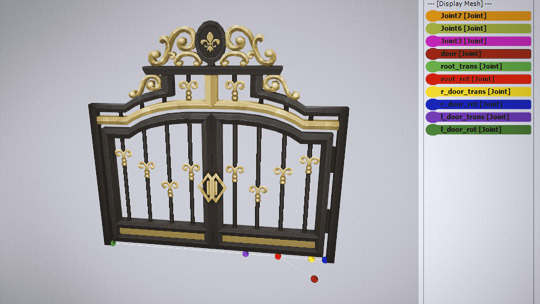
The pic above: SimPe GMDC skeleton preview. You can click on each joint name to see which part is assigned to it. Gate is here.
This will work for simple object skeletons without IK Bones.
There are no plugins that would allow us to properly import TS2 CRES skeleton data with IK bones - like sims, pets and more - to any 3D program
If object has IK Bones - you'll find out when importing CRES to Milkshape. If it displays a notification "joints with rotation values found...", IK Bones are present and there's a high risk that skeleton: A. will not be imported. B. if it's imported, it will get mangled. C. will be mangled after using model rebuild option.
I've experimented with car skeletons (those have IK Bones), managed to edit car door joints but it required removing wheel bone assignments - because wheel movement becomes wonky after doing model rebuild
/FYI: steps 1 - 5 are optional, you can edit CRES joint coordinates right away if you know the right values - which is usually not the case/.
Export GMDC with your custom mesh
Export CRES (if you wish to preview entire skeleton and/or joint names)
Import GMDC to Milkshape
Import CRES (if you need it. Plugin is called: Sims2 AniMesh CRES Skeleton Import. Click 'yes' to 'replace all bones?'). You should be able to see entire skeleton imported. Note that Milkshape won't let you export a GMDC after you imported CRES skeleton unless you change joint comments (point 7.)
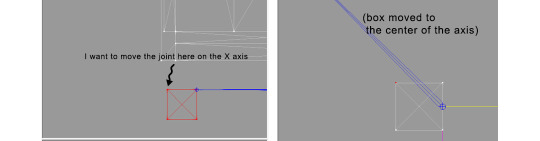
Measure how much you need to move the joint. You can create a box as ruler substitute, then check the distance with extended manual edit plugin. If you're not sure where to place your joint, you can move it and test if object animations look alright (import CRES again to reset joint position).
tip: when working on GMDC in Milkshape you can rename the model parts in model list (door right, door left etc). Only names inside the model comments actually get exported.
6. Go back to SimPe, open CRES resource. Remember TS2 is using flipped coordinates: X = -X, -X = X, Y = Z, Z = Y. Edit joint Translation data, commit, save.
Optional: you can export CRES skeleton again and import to Milkshape to test if joint has moved to the right position.
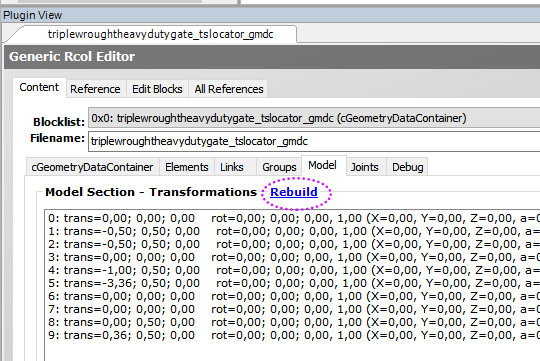
7. Go to GMDC, Model tab - hit rebuild, commit, save.
if you have the edited object placed on a lot, it's gonna look weird when you load the game. You need to re-buy it from catalogue to see results.
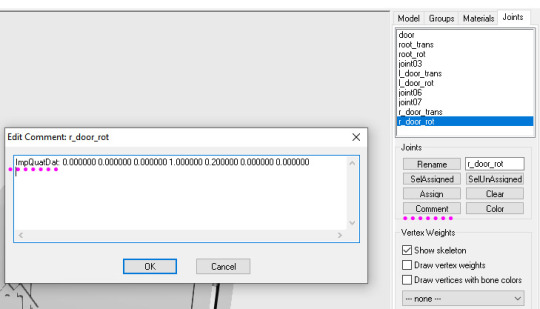
If for some reason you'd like to export entire GMDC with your imported CRES skeleton, Milkshape won't let you do that. You'll get "ERR: No quaternion values stored" error. You need to go to Joints tab and edit each Joint comment to ImpQuatDat: (that's imp, with capital i )
Notes:
if you go to GMDC Joints tab, there's also a rebuild option to update single joint - but I've tried it on car door joints and it didn't work.
If you edit joint coordinates in CRES, for example- move the car door forward, and preview skeleton in GMDC viewer, your model is gonna look fine. But in the game every vertex assigned to that joint will also be moved forward. That's why you need to use model rebuild option. In theory, if you'd like to skip rebuild, you could import GMDC to milkshape and move the door backwards to compensate for joint adjustments? I haven't tried that (yet).
81 notes
·
View notes
Text
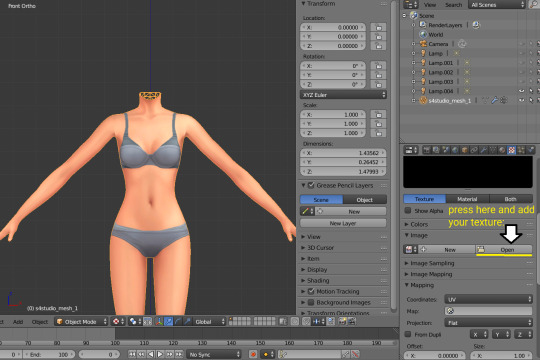
How to Add 3D Models to TS4
Required Applications:
S4Studio - https://sims4studio.com/
Blender - https://www.blender.org/download/releases/4-3/
Note: Make sure the blender path is set up in your S4Studio settings
*This tutorial assumes you know your way around blender*
Step 1: Open S4Studio
Step 2: Under Object, select Create 3D Mesh
Step 3: Check 'Show Debug Items', change 'Mesh Groups' to 1 and search for arch. Choose the following object:
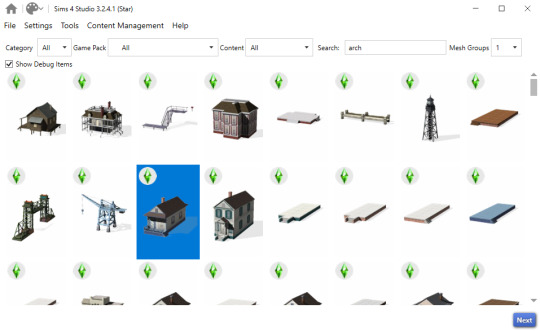
Step 3: Click next, name your package and hit save.
Step 4: Name your object. I suggest adding your creator name or initials in the front so that you can search for it in the catalog faster (ex. creatorname_objectname)
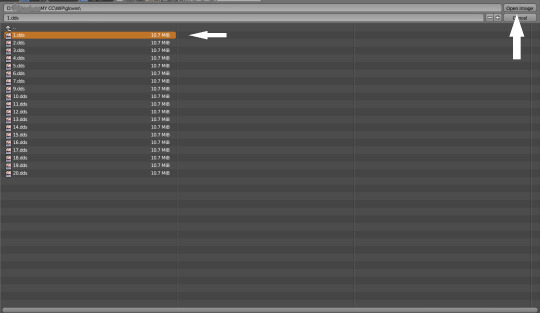
Step 5: Import your textures. The diffuse will be the main texture and the material_lighttex will be what will be illuminated on the mesh. If you don't want an illumination map, just import a plain black image or choose a different object to clone that doesn't have one (eg. the wooden slab/pole??) Ex:
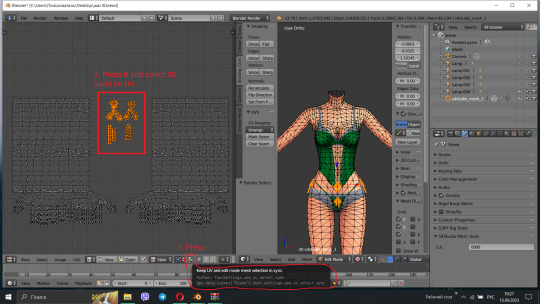
Step 6: Go to the meshes tab and export LOD 0.
Step 7: Open the LODs .blend file.
Step 8: Tab into edit mode and delete the object. Do not delete it in object mode or else you'll lose all the mesh data and S4Studio will throw you an error. Tab out of edit mode.
Step 9: Import your object.
Step 10: Under the object's scene properties, you will see a tab that reads 'S4Studio Mesh Tools'. Add the number 0 to the blank space beside 'Cut'.

Step 11: Go to the data properties and change the UVMap's name to uv_0
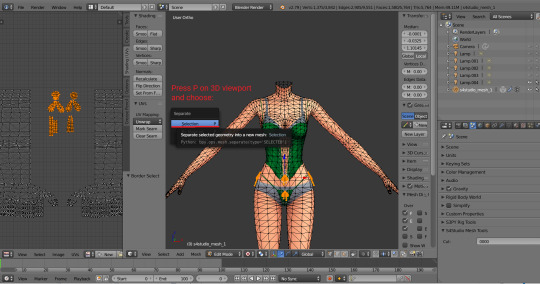
Step 12: In the side panel where it displays the name of the objects in your scene, click on the object and then ctrl click on 's4studio_mesh_0'. Make sure your mouse is hovering over the 3D viewport window and hold ctrl+j to join the objects together. The name of your object should now be s4studio_mesh_0.
Step 13: In the modifiers tab add the 'Edge Split' modifier and then apply it. Before I do this, I tend to go into edit mode, select all vertices, click m and merge by distance just to make sure there are no double vertices. Note: If you do not add the modifier, the object will look weird in game, trust me.
Step 14: Save your blend file as 'objectname'_mesh
Step 15: Once you have saved it, go to the data properties again and change the UV from uv_0 to uv_1, this will be the shadow mesh.
Step 16: Save file as 'objectname'_shadowmesh. Choose save as and not save because it will overwrite your main mesh blend file.
Step 17: Back in S4Studio import your main mesh into LOD 0. Once that has loaded in, click on the dropdown and choose the Shadow LOD 0. Import your shadow mesh.
Step 18: Under the tags tab you can change where you'd like your object to show up in the catalog. If you leave it as is, your object will show up in the debug menu, which will have to have the debug/live edit cheat to be able to see. If you'd like it to show up as a decor object instead, uncheck world object, scroll down until you see the 'Decorative' drop down menu and choose where you'd like it to show up. I suggest the Decoration (misc) option.
Step 19: Save your package and test in game
I use this same process for all world/decor objects I make/convert. Let me know if you have any questions.
23 notes
·
View notes
Text
Written version of @thornowl's baking texture-based items for 4t3 conversion tutorial. (Part 1)
Yes, the original video is very useful and I think it's worth checking out for everyone who plans to do 4t3 conversions, especially in MM style. But, in my opinion, the realization is too messy, it took me a long time to understand what actually to do. So I made written tutorial, because many people prefer this format (and because my amazing mutual @nectar-cellar was interested in it). Hope you will find it useful. I had to split this tutorial into 2 parts because of the picture limit.
What You Will Need:
Knowing the basics of converting process: how to extract ts4 meshes and textures, how to make your own multiplier/mask/specular, how to import stuff to TSRW, etc. (@nightospheresims has a good tutorial for beginners: here or here, also don't forget about @sims3tutorialhub!).
Knowledge of basics blender controls and navigation: how to move and rotate the camera, basic shortcuts, how to change mode, editor type, viewport shading, rendering type, etc. (check Grennie's tutorial here, and "Helpful guides when you're a noob" from there too).
Required programs and resources: - Sims 4 Studio. - TS4 body mesh & texture(s), that you want to convert, I use @atomiclight's mix gloves for this tutorial. Also there will be some tip that I learned from converting Sentate's Audrey Corset Set. - Blender (I use version 2.79). - Photoshop (or any other 2D editor, that supports masks and .dds format). - TS3 Bodies template & UV map templates. - Plain normal & specular map, if you don't want to make your own. - TSRW.

STEP 1: ADDING MESHES AND TEXTURES IN BLENDER, PREPARING MESH FOR BAKING.
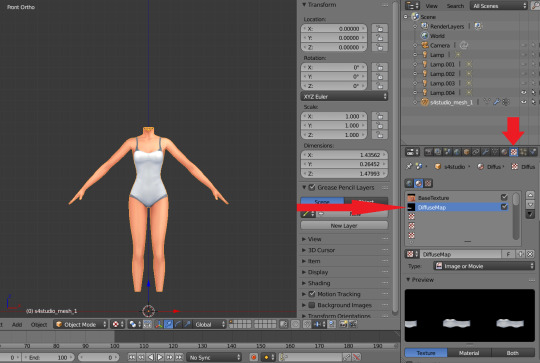
I already exported all the gloves presets that I want from S4S. And because they don`t have their own mesh, I exported base game swimsuit (you can also export mesh from any other stuff, that 100% is painted on body) I exported it like this: Open S4S → Create 3D mesh → Find it with filters→ Next → Save the package wherever you're want→ go to Meshes tab and press Export.
Open .blend file with ts4 swimsuit, delete the "rig" (you don't need it) and merge all other groups - Shift + click on them and press Ctrl+J on 3D viewport.
You need to export our gloves texture and remove swimsuit texture, go to Textures tab and in small window select "DiffuseMap": If you don't see DiffuseMap texture, switch type of texture data to "Show material textures" (brown-ish circle).
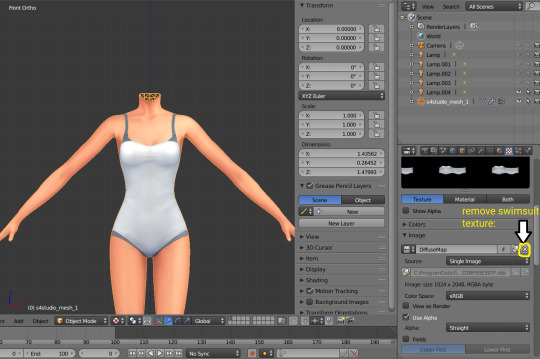

6. In the same way you need to remove skin texture, because you don't need it, only select BaseTexture instead of Diffuse:

7. Import your Sims 3 body, also I merged the top and bottom, because TS4 mesh is full body too:

Tip: if your stuff have 3D parts, separate them in their own group(s) and hide them from baking (you can bake them separately and/or tweak them in Photoshop):

STEP 2: SHRINKWRAPPING THE TS4 MESH.
In this case it would be really easy to adapt TS4 body mesh to TS3, because they are very similar, for stuff that partially 3D (like dresses) or in case with non-standard bodies (like Venus Curves by Venusprincess) it would be harder, so I don`t cover this in this tutorial.
Select TS4 body, go to Modifiers tab, usually there are already applied modifier "geom_skin", just ignore it and in the "Add Modifier" window select Shrinkwrap modifier.
2. In the Target tab select TS3 body group:
This is how TS4 mesh is supposed to look with this modifier, you may also apply modifier, but it's not necessary:

3. After that you need to hide TS3 Body mesh and now we're going to baking.
STEP 3: ASSIGNING MATERIALS.
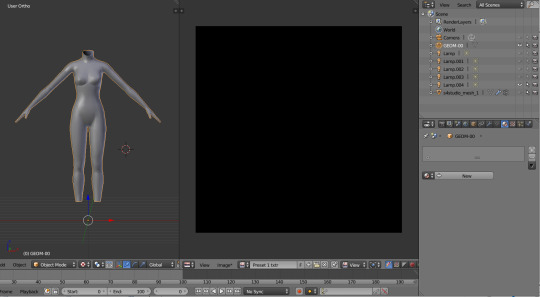
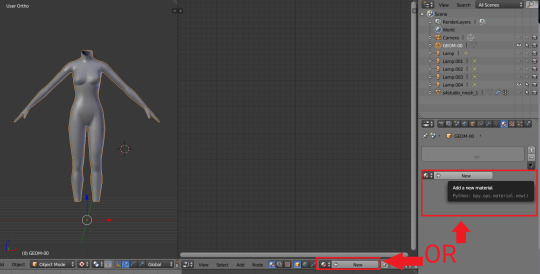
First of all, you need 2 windows — with your 3D viewport and with Node Editor, also you need to switch rendering type to Cycles Render. After you set it, select TS4 mesh, open Materials tab and press Use Nodes button:

2. After that two small boxes should appear on the Node editor tab. Then press Shift+A and select Texture → Image texture:

3. Connect node that you already added with Diffuse BSDF node, by connecting yellow dot (socket) named Color of Image texture to the same socket of Diffuse BSDF node. After that click on the image icon and find your texture:

Don't worry about the black spots, we will fix that later.
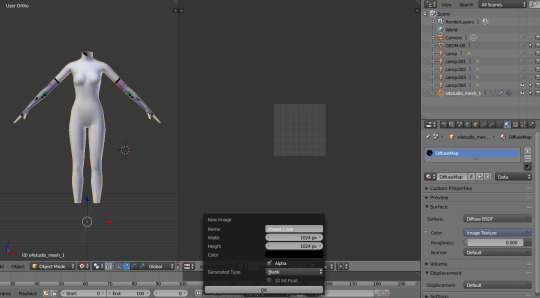
4. Go to UV/Image editor and create new image for your bake, it must be 1024x1024 size or, if you want HQ texture - 2048x2048 or 4096x4096, but today I use non-HQ. After that, hide TS4 body and unhide TS3 body:
5. Go to Node Editor, create new material and assign our newly created image to ts3 body the same way, that we did with ts4 mesh and original texture:
6. Press Shift + Click on the TS4 body firstly, and TS3 body lastly. It`s an really important step, because without it baking wasn't work right way.
STEP 4: BAKING THE TEXTURE.
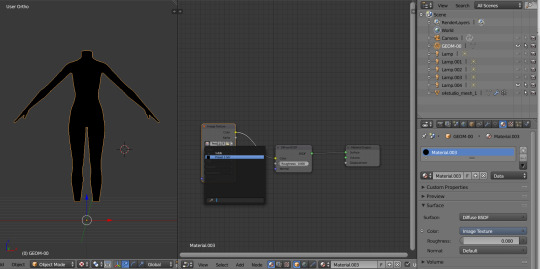
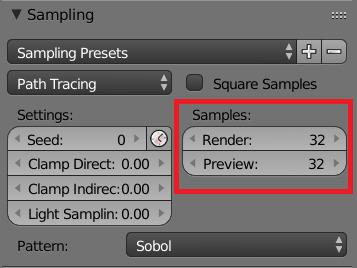
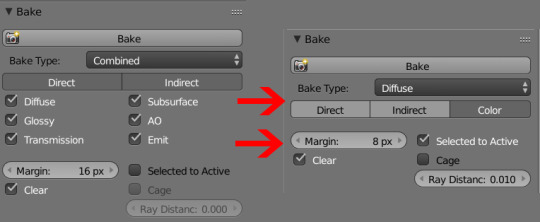
7. First of all, go to the Render tab and change default settings to the following:
Sampling Tab:
Bake Tab:
8.After that press Bake button and wait for it.
9. Look at the result, great, doesn't it?:

10. Save this texture as .png... But wait, that's not all! we need to bake alpha, so we can remove that black body texture in Photoshop later.
But that will come in part 2...
119 notes
·
View notes
Text
actually maybe i'll make a whole post about it on here too in case it's helpful to anyone
HOW TO SWITCH YOUR FANTASY LIFE SAVE DATA BETWEEN CONSOLES
as you may know, fantasy life does not store its data on the cartridge, it saves to the sd card. specifically in the extdata folder. this can make it difficult to retrieve your data for whatever reason (switching to a new console, exporting it to use in a save editor, whatever reason you might have)
so!!! here's how to switch your save data!! when i got my 3ds xl, i really wanted to have my main save on that console instead of my smaller 3ds, so this is what i (eventually) figured out how to do
edit: its come to my attention that checkpoint can in fact access extdata which makes this process simpler, but maybe this more involved process will still be helpful to somebody!! its what i did and it worked for me (since i didnt realize checkpoint could access extdata)
important: both 3ds consoles will need to be modded as you will need modded software in order to do this. you can learn how to mod your 3ds on 3ds.hacks.guide!! it's very easy to do and the guides are very comprehensive! i've done this multiple times and have had no issues!!
you will also need access to a computer with an sd card slot since this requires going into the files. (though if you've modded your console yourself i assume you have one)
i should also say that you should have a fantasy life save on both consoles! you're gonna need access to the save folder for fl on both consoles, so make sure you have a save on both!! (though you do NOT need a save in the slot you intend to save to. i was transferring my save from the 2nd slot, and my 3ds xl did not have a save in the 2nd slot. it still worked!! you only need one save in any slot)
for this you're going to need to download SAVeFL on both consoles. this software allows you to access the files on your sd card and then export them so that you can view them on your computer.
from here on i am going to refer to the two different consoles as A and B. A refers to the console you are taking the save data off of, and B refers to the console you want to transfer your save data to.
on A, go to the "ext" tab on SAVeFL, and then look for the file ending in "1132" that's where fantasy life is stored. press the y button to export the save to your sd card. do this on B as well.
place the sd card for A in your computer, and navigate to filer > ExtData, and then the folder inside of there. the folder will probably start with today's date, since mine starts with "20230324"
go into the folder "00001132" where you'll find some files. they'll be labeled from "fl_ext0" up to "fl_ext2" these correlate to the save slots in fantasy life, so make sure to copy the right files!! if you want the save in the 1st slot, go for ext0. 2nd slot is ext1, and 3rd slot is ext2. copy the correct files to your desktop. (i have 6 files in mine though i don't know if that's how many you'll have. in any case, copy all the files that have the same title, just to be safe.)
navigate to the same folder from above on B's sd card, and swap the files. if you copied fl_ext0, then replace the fl_ext0 files on B with the ones from A. put this sd card back in your 3ds.
go back into SAVeFL and go to the "SD" tab. the contents of the tab should match the folder you saw on your computer. for example, mine says "ext: 20230324222934: 00001132". press the x button to import your save data
and you're done! your save should now be on a different console!
hope this is helpful to anyone out there, i wanted to spare people from having to go down reddit rabbit holes like i had to
#fantasy life#fantasy life 3ds#also please let me know if i missed anything!! it's been a while since i last did this#i was essentially retracing my steps here so i could've missed something
15 notes
·
View notes
Text
tbh thinking maybe I should try to take the time to overhaul most if not all of the various tweaks and mashups I've made for XIV once the Forbidden Magicks become fully available once more.
The problem outside of fatigue lmao is that neither 3ds Max nor Blender can really do everything I need them to - the former consistently breaks both shapes/morphtargets and vertex colour information, while the latter refuses to let you directly work with and modify custom vertex normals, among other things.
I'm really tempted to try to look into just fixing at least some of these issues myself since both 3ds Max and Blender support having extensions written for them, but neither is a particularly small endeavour and Blender's plugin documentation is ... not great - for one it keeps referencing a C++ API that was apparently deprecated years ago?? At least the API it does have uses Python which is familiar, but it doesn't really offer a lot of examples for how and where to get started beyond the extremely basics, making it difficult to figure out where to look to accomplish the things I would need it to do.
Also honestly the fact that 3ds Max is the one that fails to properly import/export data from .fbx files when the .fbx file format is Autodesk's own proprietary interop file format is just utterly pathetic?? Like Blender had to actively reverse-engineer the format themselves without any information on how it works and still did a better job at it?? Seriously autodesk how are you consistently failing this hard
9 notes
·
View notes
Text
「viRtua canm0m」 Project :: 002 - driving a vtuber
That about wraps up my series on the technical details on uploading my brain. Get a good clean scan and you won't need to do much work. As for the rest, well, you know, everyone's been talking about uploads since the MMAcevedo experiment, but honestly so much is still a black box right now it's hard to say anything definitive. Nobody wants to hear more upload qualia discourse, do they?
On the other hand, vtubing is a lot easier to get to grips with! And more importantly, actually real. So let's talk details!
Vtubing is, at the most abstract level, a kind of puppetry using video tracking software and livestreaming. Alternatively, you could compare it to realtime mocap animation. Someone at Polygon did a surprisingly decent overview of the scene if you're unfamiliar.
Generally speaking: you need a model, and you need tracking of some sort, and a program that takes the tracking data and applies it to a skeleton to render a skinned mesh in real time.
Remarkably, there are a lot of quite high-quality vtubing tools available as open source. And I'm lucky enough to know a vtuber who is very generous in pointing me in the right direction (shoutout to Yuri Heart, she's about to embark on something very special for her end of year streams so I highly encourage you to tune in tonight!).
For anime-style vtubing, there are two main types, termed '2D' and 3D'. 2D vtubing involves taking a static illustration and cutting it up to pieces which can be animated through warping and replacement - the results can look pretty '3D', but they're not using 3D graphics techniques, it's closer to the kind of cutout animation used in gacha games. The main tool used is Live2D, which is proprietary with a limited free version. Other alternatives with free/paid models include PrPrLive and VTube studio. FaceRig (no longer available) and Animaze (proprietary) also support Live2D models. I have a very cute 2D vtuber avatar created by @xrafstar for use in PrPrLive, and I definitely want to include some aspects of her design in the new 3D character I'm working on.

For 3D anime-style vtubing, the most commonly used software is probably VSeeFace, which is built on Unity and renders the VRM format. VRM is an open standard that extends the GLTF file format for 3D models, adding support for a cel shading material and defining a specific skeleton format.
It's incredibly easy to get a pretty decent looking VRM model using the software VRoid Studio, essentially a videogame character creator whose anime-styled models can be customised using lots of sliders, hair pieces, etc., which appears to be owned by Pixiv. The program includes basic texture-painting tools, and the facility to load in new models, but ultimately the way to go for a more custom model is to use the VRM import/export plugin in Blender.
But first, let's have a look at the software which will display our model.
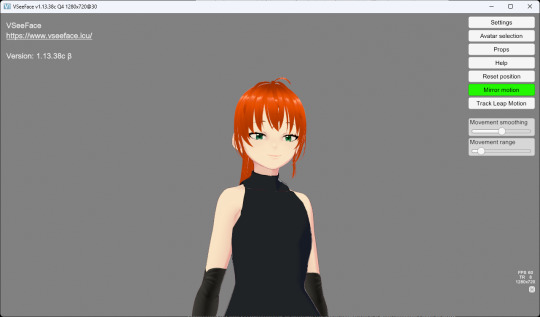
meet viRtua canm0m v0.0.5, a very basic design. her clothes don't match very well at all.
VSeeFace offers a decent set of parameters and honestly got quite nice tracking out of the box. You can also receive face tracking data from the ARKit protocol from a connected iPhone, get hand tracking data from a Leap Motion, or disable its internal tracking and pipe in another application using the VMC protocol.
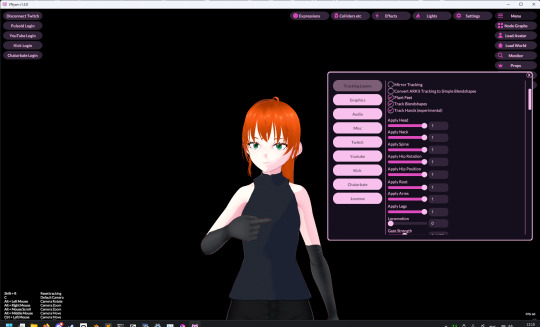
If you want more control, another Unity-based program called VNyan offers more fine-grained adjustment, as well as a kind of node-graph based programming system for doing things like spawning physics objects or modifying the model when triggered by Twitch etc. They've also implemented experimental hand tracking for webcams, although it doesn't work very well so far. This pointing shot took forever to get:
<kayfabe>Obviously I'll be hooking it up to use the output of the simulated brain upload rather than a webcam.</kayfabe>
To get good hand tracking you basically need some kit - most likely a Leap Motion (1 or 2), which costs about £120 new. It's essentially a small pair of IR cameras designed to measure depth, which can be placed on a necklace, on your desk or on your monitor. I assume from there they use some kind of neural network to estimate your hand positions. I got to have a go on one of these recently and the tracking was generally very clean - better than what the Quest 2/3 can do. So I'm planning to get one of those, more on that when I have one.
Essentially, the tracker feeds a bunch of floating point numbers in to the display software at every tick, and the display software is responsible for blending all these different influences and applying it to the skinned mesh. For example, a parameter might be something like eyeLookInLeft. VNyan uses the Apple ARKit parameters internally, and you can see the full list of ARKit blendshapes here.
To apply tracking data, the software needs a model whose rig it can understand. This is defined in the VRM spec, which tells you exactly which bones must be present in the rig and how they should be oriented in a T-pose. The skeleton is generally speaking pretty simple: you have shoulder bones but no roll bones in the arm; individual finger joint bones; 2-3 chest bones; no separate toes; 5 head bones (including neck). Except for the hands, it's on the low end of game rig complexity.
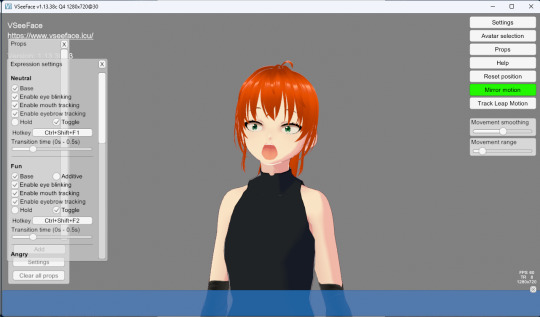
Expressions are handled using GLTF morph targets, also known as blend shapes or (in Blender) shape keys. Each one essentially a set of displacement values for the mesh vertices. The spec defines five default expressions (happy, angry, sad, relaxed, surprised), five vowel mouth shapes for lip sync, blinks, and shapes for pointing the eyes in different directions (if you wanna do it this way rather than with bones). You can also define custom expressions.
This viRtua canm0m's teeth are clipping through her jaw...
By default, the face-tracking generally tries to estimate whether you qualify as meeting one of these expressions. For example, if I open my mouth wide it triggers the 'surprised' expression where the character opens her mouth super wide and her pupils get tiny.
You can calibrate the expressions that trigger this effect in VSeeFace by pulling funny faces at the computer to demonstrate each expression (it's kinda black-box); in VNyan, you can set it to trigger the expressions based on certain combinations of ARKit inputs.
For more complex expressions in VNyan, you need to sculpt blendshapes for the various ARKit blendshapes. These are not generated by default in VRoid Studio so that will be a bit of work.
You can apply various kinds of post-processing to the tracking data, e.g. adjusting blending weights based on input values or applying moving-average smoothing (though this noticeably increases the lag between your movements and the model), restricting the model's range of movement in various ways, applying IK to plant the feet, and similar.
On top of the skeleton bones, you can add any number of 'spring bones' which are given a physics simulation. These are used to, for example, have hair swing naturally when you move, or, yes, make your boobs jiggle. Spring bones give you a natural overshoot and settle, and they're going to be quite important to creating a model that feels alive, I think.
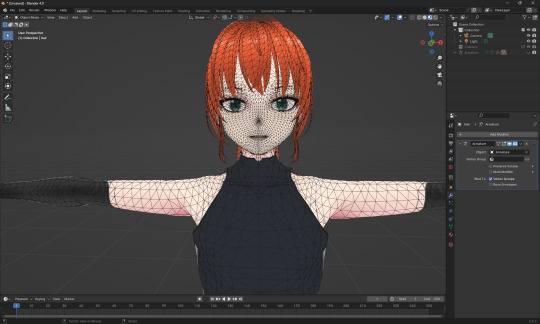
Next up we are gonna crack open the VRoid Studio model in Blender and look into its topology, weight painting, and shaders. GLTF defines standard PBR metallicity-roughness-normals shaders in its spec, but leaves the actual shader up to the application. VRM adds a custom toon shader, which blends between two colour maps based on the Lambertian shading, and this is going to be quite interesting to take apart.
The MToon shader is pretty solid, but ultimately I think I want to create custom shaders for my character. Shaders are something I specialise in at work, and I think it would be a great way to give her more of a unique identity. This will mean going beyond the VRM format, and I'll be looking into using the VNyan SDK to build on top of that.
More soon, watch this space!
9 notes
·
View notes
Text
Okay so. Project Special K and how I found myself stuck on a project once again.
As I've said earlier, I need something to import model data. I was thinking glTF but this requires JSON and the only glTF importing library I could find specifically uses RapidJSON. I can't get patch support for RapidJSON to work, be it 6902 Patch or 7396 Merge Patch, so that's a deal breaker.
I see three options.
Use the next best format, something binary perhaps that doesn't require a separate parser library, but still supports what I need and can be exported to/from in Blender. I've done Wavefront OBJ before but that doesn't support jack.
Use lazy-glTF + RapidJSON specifically and only for model loading, use SimpleJSON + my patch extension for everything else.
Forget about 3D, switch to using only sprites. But that brings a host of other issues that using 3D would cover in the first place.
Thoughts? Format suggestions? Anything?
6 notes
·
View notes
Text
Been having a right time of it with the 3D art.
Looking into exporting work from blender into a game engine. (Looking at godot.)
But my animations use multiple UV maps for texture animation, right? And it's just not showing up in godot. I am using dot glb files as that is what the godot documention recommends.
I spent a few days reading through the godot documentation and fiddling with the import advanced settings before I finally plugged my glbs into a generic 3D object program and realised that it's not that godot isn't importing my UVs, it's that blender isn't exporting them in the first place.
So now I'm reading through the blender manual and combing through all of the blender gltf export settings. And it looks like there isn't actually a way to do this? It might just not be possible at all?
The blender manual recommends using one UV map and using a UV offset to move that map around a single texture image containing everything you want to have in your animation.
I try looking up online forum posts where people had the same problem or video tutorials or anything like that, and again I see people recommending using UV offset and not UV maps.
The thing is, UV offset and UV maps are two different tools for texture animation. They each have different trade offs.
UV offset allows you to use only one UV map, but you have to have a larger texture image. Multiple UV maps allows you to make a smaller texture image.
Like texture animation of the face of a character. Like you would see in games like Animal Crossing. With the UV offset method, your texture image has to contain every single face you want your character to be able to make, each distinct and separate. The UV offset allows you to move the single UV Map along to each of those faces in the texture image.
But if you're using the UV maps method, then you only need to have each left eye and each right eye and each mouth in your texture image. And then you only move the specific UVs corresponding to those facial features. Depending on the art style, you can get away with only having left eyes and no right eyes, and then simply laying the UVs over that in reverse to have a mirrored left eye (a right eye) on the right side of the face.
My preference is for the UV maps method. For two reasons.
One is that I enjoy the art challenge aspect of low poly art, and I do actually want to try making more articulated detailed characters with fewer tris and smaller texture images.
Second is that the UV maps method simply allows for more control. You can, for example, change how wide or narrow your character's smile is on their face without any change at all in the mesh or texture. Say if you want to animate a character with a big smug grin, you can use the texture of a normal smile but change the UV map so that it stretches across the full face of the mesh.
Technically, you could also achieve the big smug grin look by stretching the mesh. But with a lowpoly character, what happens when the part of the mesh with the smile on is only 2 tris? You want to have 2 piddling little tris stretching around the entire character's head? That's just not going to look right! The UV map method allows for greater control, as the area of the mesh assigned to the face on the texture image could be 2 tris in one UV map and it could be every tri across the face on another UV map.
But all of this is a moot point. The blender manual says that glb exports can only store animation data for transform and rotate and scale and bones and shape keys. Every other animated property is simply removed from the export.
And coming back to godot again, apparently mesh materials only have a maximum of 2 UV maps in godot? At least that's what it shows in the mesh instance node. UV map animation might just be dead in the water.
I'm going to experiment around with exporting different file types before I commit to rethinking how I animate characters. lol
Either way, I don't see this as time wasted. I have gained familiarity and experience with how these softwares work and why they behave the ways that they do.
8 notes
·
View notes
Text

this is probably one of the funniest fuck ups I've ever done while modding, and I'm surprised it hasn't happened to me yet until today.
you see, mass effect is built on unreal engine 3, which uses .psk model files. the blender scripts that import these files tend to have a "scale down" option, so that when you import it, it isn't huge in comparison to other 3D model formats, like .fbx, .obj, etc.
so what happened here was I didn't scale down the .psk on import for whatever reason when I was initially working on the model, and outer worlds is also an unreal engine game and uses that file format.
if I had exported the model as a .psk, chances are there would have been no scaling issues in game. but since I exported it as a .fbx and it stored the scale data... this is how the outfit appeared in game lol.
also every time I try to import a .psk made from blender into UDK it crashes the damn program so I'm kinda stuck using .fbx
moral of the story, when working with psk and knowing you're going to export to another file format, scale the damn things down when you import, or else shepard becomes a giant.
12 notes
·
View notes
Text
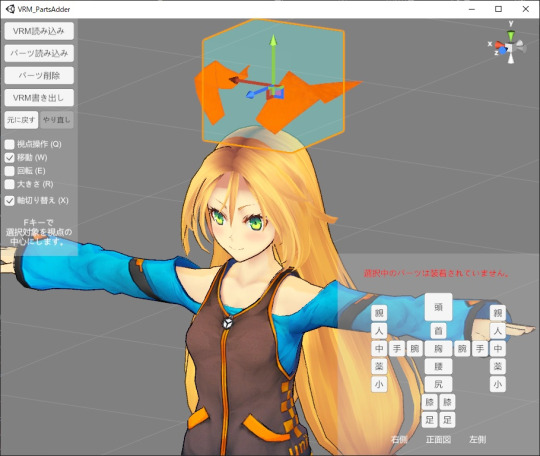
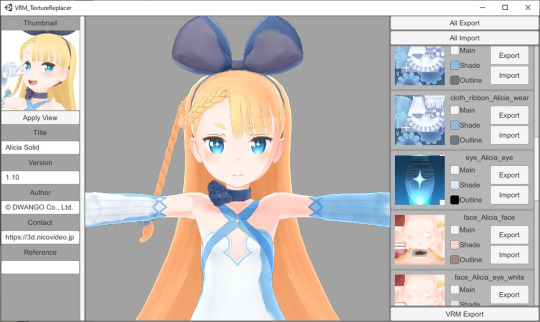
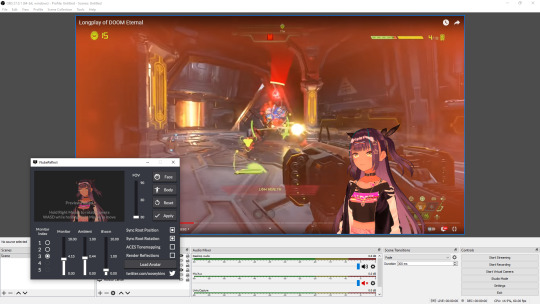
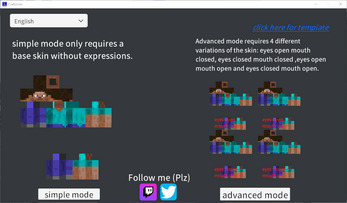
VTUBER SOFTWARES
XR Animator DL
Full body tracking via webcam.
Able to use props.
Able to import motion data files.
Able to import videos to render motion data.
Able to pose.
Able to export the data via VMC to VSeeFace or any other applications.
VRM Part Adder DL
Able to attach props to VRM file without using Unity.
Texture Replacer DL
Able to fix textures of the said props if they are missing.
Hana App DL
Able to add 52 blendshapes for PerfectSync without using Unity.

VNyan DL
VNyan is an 3D animating software.

VtubeReflect DL
VtubeReflect captures your desktop and projects light onto your vtuber avatar.
Craft2VRM DL
Use Minecraft skin as a vtuber model.
Dollplayer DL
Able to pose VRM.

ThreeDPoseTracker DL
Able to generate motion data based on video.
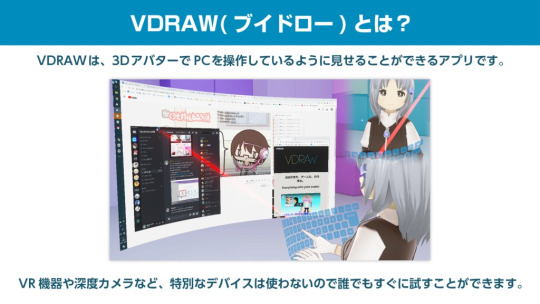
VDraw DL
Able to show drawing and using keyboard animation through VRM.
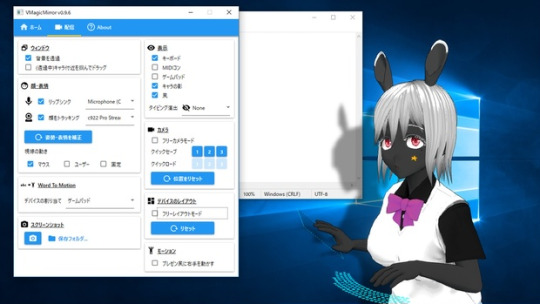
VMagicMirror DL
Able to show drawing and using keyboard animation through VRM.
Virtual Motion Capture DL
Track avatar movement through VR.

Mechvibes DL
One of the only free applications that'll let you to change the sound of your keyboard into anything!

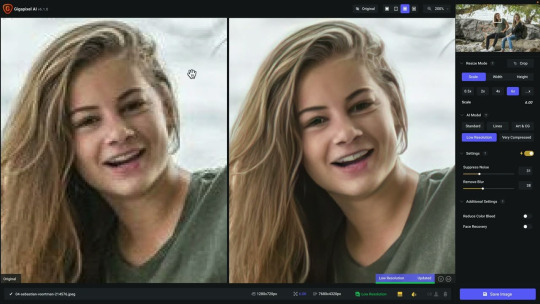
Gigapixel DL
Picture upscaler.
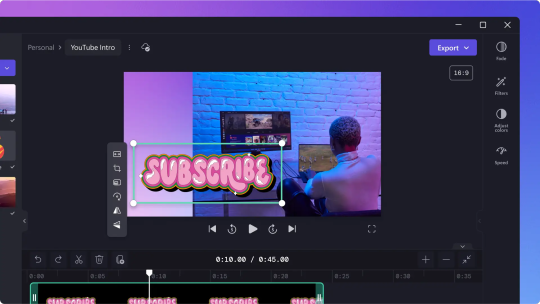
Clipchamp DL
Free text-to-speech tools.
Rekonise LINK
Content creator tools.

VRoom LINK
Places your VRM in a world.
VRM games LINK
List of games/applications that allow the import of VRM.
4 notes
·
View notes
Text
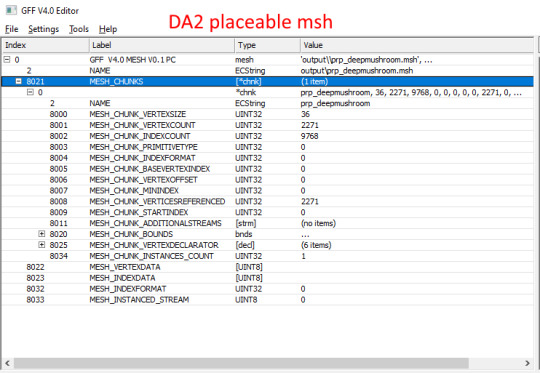
Porting Models from Dragon Age: Inquisition to Dragon Age: Origins or Dragon Age 2
Part 2c - Static Meshes
Blender 2.49b Blender ImportExport Script, v011 version (under 'older files') DA2 Blender Import script (only if porting for DA2, do a 'find in page' for "import_dragon_age_2.zip") ERFv3 Packer (only if porting for DA2) GDApp The DAO Toolset OR pyGFF and TlkEdit
DA2 static meshes use the same file structure as DAO static meshes, which is pretty convenient. You'll need to take a couple extra steps for DA2 meshes, but otherwise the process for porting is basically the same. If you don't already have it, go back to the first part of this tutorial series get the DAI model you want as an OBJ.
If you're porting for DA2, and don't already have the DA2 import script saved as a .py, do it now: Open up import-dragon-age-2.blend in Blender, and then in the text window that has the import script showing, click Text, Save. Now you can open the import script from any .blend file.
Open up IOTools_v011.blend (if you just had the DA2 import script open, you may need to close Blender entirely first, depending on your install).
If porting for DA2, in one of the text windows on the right, click Text, Open, and open your new import-dragon-age-2 python script.
Execute the import script by right-clicking on the text window, and hitting 'Execute script' (for DAO: if it's not already open, the script you want to run is called "MSHTool_v011")
Import a static mesh similar to the one you're porting (greatsword, staff, chest, table, etc). DA2 meshes don't quite import in correctly; you'll need to rotate it 90 deg on the Z-axis (R, Z, 90, Enter).
Orient your DAI model to match up with the vanilla one. You may also need to scale it.
If doing your scaling/rotating in Object Mode, make sure to apply the changes once you're done, with Ctrl+A, 'Scale and Rotation to ObData'.
Once you're pleased with your efforts, it's time to export. Copy a vanilla DAO msh, mmh, & phy into a new folder. (you'll be overwriting them with object data from the ported DAI mesh. Don't want to overwrite the originals)
You do need files from DAO, even if you're porting to DA2, since the DAO import script won't open DA2 msh files.
If you have the DA2 import script open, switch the window back to the DAO script (MSHTool_v011).
Browse to your copied DAO msh, and load it.
Make sure your ported model is selected in the 3D window, and click "Replace" in the export script.
Minimize Blender, and go to the copied msh, mmh, & phy. If not making replacers, rename the files to something unique.
It's a good idea to follow Bioware's naming conventions, especially for DAO. weapons: w_(type abbreviation)_(unique identifier)_0. placeables: plc_(unique identifier) or prp_(unique identifier). DAO usually uses "plc_", while DA2 usually uses "prp_". examples: w_stf_st01a_0 (DAO staff), w_gsw_003a (DA2 greatsword), plc_chestiron_01_0 (DAO chest), prp_chesta (DA2 chest)
Using pyGFF or the Toolset, open up all three files. Replace all instances of the vanilla file name with your new file name.
If porting for DA2, you'll need to put in the filepath before the mmh & msh names inside the mmh and phy, using the vanilla DA2 files as a guide. In the msh, put 'output/' before the mesh name inside the msh. For weapons, it'll be 'art/characters/weapons/[weapontype]'. For placeables, it'll be 'art/levels/races/[category]'.
If editing with pyGFF, make sure to hit 'save' in the bottom left after each edit, else they'll revert.
Save your files.
You'll also need textures and a mao.
You can find my tutorial for converting DAI textures with Paint.NET here. If you use GIMP or Photoshop, I recommend these tutorials: magpie's for GIMP sapphim's for Photoshop If all you want is quick and dirty placeholder textures, simply extract the DAI textures as .dds files. Use a text editor (DAO) or pyGFF (DA2) to open up a vanilla .mao of the same type and replace the vanilla texture names with those from DAI. Make sure not to delete the filepath(s) in the DA2 mao. Save the new mao with a name matching your model.
If porting to DAO, put all the files into your DAO override folder.
If porting to DA2, you'll first need to pack them into an ERF.
Make a series of nested folders using the filepath as a guide, and put the msh, mmh, phy, and mao in the bottom folder. (e.g. "MyAwesomePort/art/characters/weapons/greatswords"). The top folder will be what your ERF is named. Make a textures folder next to the files, and put the textures in it. Navigate back up to the top, and in another window, navigate to wherever your ERFv3 Packer is. Drag & drop your nested folders onto the ERF packer. You should get a pop-up; click 'Create PAK', which will generate an ERF next to your nested folders. Put the ERF into your DA2 override folder.
If you're making a replacer, you can test your port by just booting up your game; it should take effect immediately.
If you're adding a new model, you'll have to tell the game how to find it. You'll do this by making a GDA extension. Extract the type of GDA matching your model.
For DAO weapons, you need [weapontype]_variation.gda. For DAO placeables, placeable_types.gda. For DA2 weapons, item_variations.gda. For DA2 placeables, plc_base.gda.
Open up the GDA, and delete all but one line that's similar to your ported model (don't choose line 0 or another blank line).
Replace the vanilla mmh name with your new mmh name.
For DA2 models (column "model"), and DAO placeables (column "ModelName"), that'll be pretty simple.
For DAO weapons, you'll need to split the mmh name into 3 columns:
[modeltype]_[modelsubtype][modelvariation] (ignore the final 0) If you've followed the Bioware's naming convention, this shouldn't be too tricky. If not, it should still work fine as long as you can split the mmh name into those three columns (keeping in mind the "_" between the first two)
Also enter a new unique ID number (first column). For DAO weapons, that number must be less than 256. For DAO placeables and for DA2, it can be any number (larger is better to avoid random conflicts).
Since DAO has a limited number of available IDs for weapons, you may want to check the Item Variation ID spreadsheet (NexusMods, Google Sheets) to prevent conflicts, especially if you already have some mods that add new weapon models.
Save your new GDA, adding a unique suffix to the original file name (so, something like "placeable_base_newsword.gda"). For DAO (and possibly DA2, I'm not sure), the maximum name length for the GDA is 32 characters, including the ".gda".
Put the GDA in your game's override folder.
We now have the new model, set up so the game can see it. Next step is to actually put it on an item, and see how it looks in-game.
An item's appearance isn't actually baked into a save the way a character's inventory is, so we can easily change a vanilla object for testing and then delete the edited uti or utp later without issues.
For DAO, if using the toolset, open a local copy of an item you already have, or a placeable that you know a vanilla location of.
For placeables, you should be able to find your new model in the 'Appearance' drop-down menu. For weapons, your new model should be under 'Item Variation'. If your model doesn't show on the list, your GDA probably missing, or the name is too long.
If not using the toolset, open the UTI or UTP you're using for testing with TlkEdit.
Change the Appearance (placeables) or ModelVariation (weapons) to the ID for your new model.
Save to your override folder, boot up your game, and check it out. :D
If the model doesn't quite look right, go back to Blender and make adjustments. If you do, you should only have to re-export the msh (and then repack it into an ERF for DA2).
Next time, I'll be (finally) going over how to convert DAI textures to DAO and DA2 using Paint.NET.
4 notes
·
View notes
Text
Reflections on Tableturf
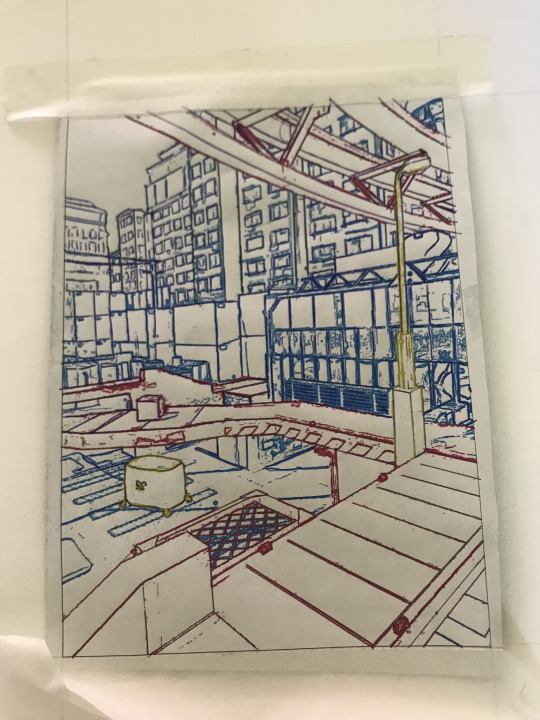
This blog post goes through a few of my Tableturf inspired artworks from 2023, ending with a quick timelapse of this painting:
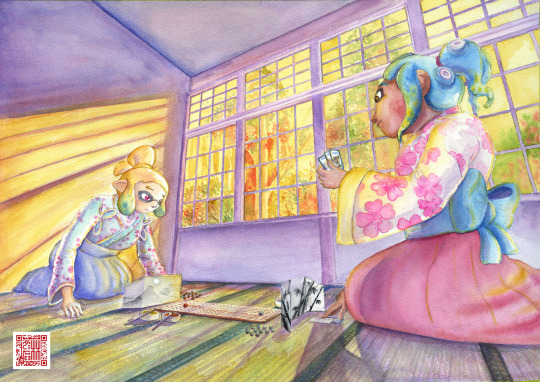
With the launch of Splatoon 3 came a new game mode, Tableturf! I got quite into the idea of Tableturf, even being a part of coordinating an art collab project – Arty Siege – which paid homage to the in-game cards. I did lots of work for that – creating various design elements, having fun data merging artwork in InDesign, thinking about how the physical game would really play out, coordinating artists and creating artwork!
The art that I worked on included assets for the card backgrounds, and I illustrated one of the cards.
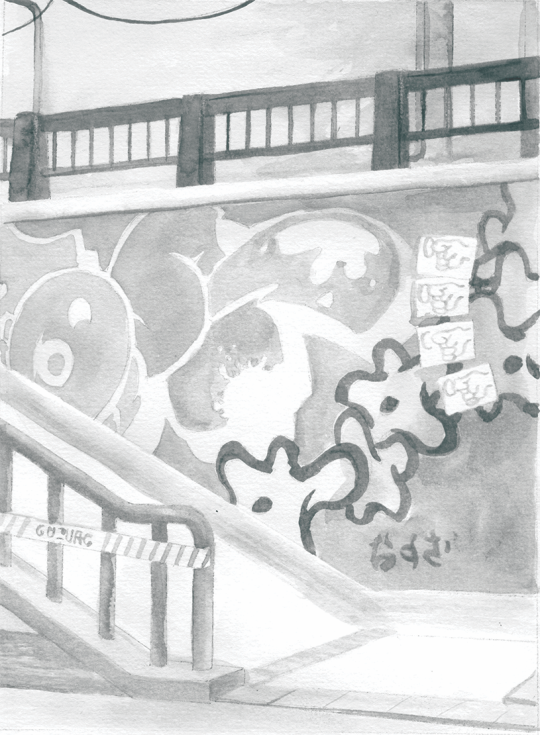

These background images were ink paintings traced from game screenshots. After doing a little photography tour in the game I exported the screenshots and used the Find Edges filter in Photoshop. I printed these reference lines to carbon paper and transferred them to watercolour paper.

After scanning the ink paintings, I applied some gradient map adjustments to them to adapt them into the card background.
I chose to illustrate the Splattershot Jr. as my designated card for the project. I’ve drawn the newbie squid before and as a Junior player (I became a Junior main because of having to unlock kits on many, many systems) I just feel a certain connection to the default loadout.
During initial project advertising, I used this artwork. The pose is taken directly from the pose of the original Tableturf card. With this version of the artwork, I mocked up the first version of how the cards would appear, including tweaks to the card UI and creating a 3D view of the card.


My motivations for changing the UI were to make the Arty Siege cards distinct from the in-game works, but also to think about what would make sense for a real card game. The original cards put all their important information at their base, but I wanted to make all the pertinent information visible easily from a fanned out hand of cards. So I moved the grid and special costs to the left side.
I also straightened the alignment of the block grid. The angled grid was cool, and saved a little space, but I felt that when looking down at the game board and determining how to make a move, it was easier to visualise the move you wanted to play by having an aligned grid. Maybe that was just me, it’s not like things in the real world would be completely squared anyway.
Anyhow, relatively late into the project I started feeling a bit insecure about that version of the Junior being my entry into the project. I was surrounded by an incredibly talented pool of artists and felt like I needed to step up to the standards of my peers! I still like my original artwork but I also felt inspired by the work I’d done on the backgrounds to do a piece in ink and use gradient mapping to add colour.
This time, I based the pose on some promotional artwork from Splatoon 2 – I wanted to show off the square ink tank because while the flat ink pack of Splatoon 3 features in some of the cards, many of the other ones seem to take cues from Splatoon 2’s fashion options.

Here’s the final version of the Splattershot Jr. card. Please do check out the Arty Siege website for all of the other works!

One of the things I did at the end of this project was to print out all the cards, which was a lot of fun! I felt like I built a new connection with each of the artists and their artwork in the process of printing, cutting and sleeving the cards.
While wrapping up Arty Siege I had a vague idea of running a promotional Tableturf tournament – maybe something in a casual vein, or with a bit of a team gimmick to allow a mix of player skills among drafted teams. The team angle was influenced by my favourite anime – Chihayafuru – a show that features a competitive karuta game based on the Ogura hyakunin isshu.
Chihayafuru is beautiful, and the way it depicts friendly competition really hits home. And there’s just something so great about the earnest enthusiasm of the players – they’re engaging in a pretty niche hobby so having the opportunity to play is something they’re truly grateful for. Coming from a grassroots Splatoon scene, I feel the parallels between the competition depicted in the show and some of my favourite times being a member of the Australian (and broader) Splatoon community.
Although I didn’t end up running a Tableturf tournament, the imagery and the idea for an art piece stuck with me.
As much as I adore Chihayafuru, I’ve never felt brave enough to try to tackle fan art for it. The gorgeous scenes, the sense of movement, the game that I only have the most superficial understanding of… it all felt quite intimidating.
But Splatoon, I feel comfortable in that universe…
(A universe which coincidentally seems to have a version of karuta already!)
However, my painting is not an attempt to retcon that karuta into Tableturf. In my headcanon, the two coexist. I just wanted to borrow the aesthetics of karuta for my Tableturf scene. I was inspired by the glowing sunset scenes of karuta which I associated with the characters practicing in the school clubroom, but also by the tournament games played while wearing kimono.
Before starting this painting I did two “mood studies” – just getting a feel for whether I could tame the contrast of yellows, oranges and purples before I started. Watercolour can be a tricky medium, and it’d be hubris to walk into this kind of endeavour without a plan.

That first image is sort of a Chihayafuru fanart, I guess – the scene is most likely Arata sitting alone with his cards – but that wasn’t the purpose of the sketch. I wanted to get a feel for how I’d depict the trees in the windows, and the light entering the room. The second sketch really sets up the composition that I’d ultimately use for the final piece.
After deciding on that sketch, I made simple 3D version of the scene in Blender.

A digital sketch then filled in the character details
Which was then printed out and transferred to stretched watercolour paper, then painted over the span of a few weeks.

I also wrote a poem to go with this painting. It’s based on poem 77 of the Ogura hyakunin isshu. Here’s one blogger’s translation and writeup about the poem (I chose to highlight this blogger because they also have a post about the Karuta that appears in Splatoon 2!)
The translation included in that post is credited to Joshua Mostow,
Because the current is swift, even though the rapids, blocked by a boulder, are divided, like them, in the end, we will surely meet, I know
Other translations summarise the scene as
Swift waters parted by the jagged rocks are joined at river's end.
The overall mood that I get from this poem, having only experienced it through translations, is a mix of urgency and yet steadfast certainty that comes from love. Apparently, the “swift currents” were not in the original poem, and were a later edit, but I think the imagery is certainly much stronger with the idea of rapid waters.
I felt the scenario could be mapped quite closely to the energy and movement of Turf War, and by extension, Tableturf. The rapid currents can be whirls of paint instead, and the boulder standing in the way of the lovers could well be a grey block, created in Tableturf when both players play their cards over the same squares.
I chose to write my poem following the rough syllabic rules of the original poetry, the lines having 5-7-5-7-7 syllables. But I put a western poetic spin on them as well, making use of rhyme throughout.
Our rapid advance, Blocked by chance or wit wherefore. Must we halt our dance? No - surge forth in this turf war! We'll unite our ink once more.
The rapid advance describes that rush to claim turf, as well as for the rivals/lovers to meet at the middle of the map. “Chance or wit wherefore” refers to how the grey block ended up in their way. Was it coincidence that they played in the same tile, or was it cunning strategising from one of the players? With this obstacle in place, the shape of their relationship (whether it be a rivalry or a romance) is affected.
The ending couplet describes the characters choosing to rise above (or work around) adversity – in-game the boulders would not be passable at all, so they must certainly have some grit! Like the swift waters in the original poem, they’ll be sure to meet again.
I love how this artwork and poem came together. Reflecting upon them I feel all those warm fuzzy feels from all the ways that Splatoon – and more recently Tableturf – have made their impact on me. I’m grateful to have had another great year of art, friends and community and I’m looking forward to more good times in the future.
"Reflections on Tableturf" was originally published on Proairesis
2 notes
·
View notes
Text
did you guys know that the model for the club penguin player character was made (by a man named chris hendricks aka screenhog) and rendered in a 3d modeling software named swift3d that was archaic and shitty but was cheap and they were all poor college students. and they didnt change it until after they were bought by disney because the software was SO archaic and shitty that it could only export the pure mesh data so when they eventually swapped over to maya (a better but insanely expensive 3d program bc its for professionals) chris had to, after importing the mesh, manually type every angle, scale, light brightness and angle and position. like even without good software (bc that software DID suck) or a lot of money or amazing computers.
5 notes
·
View notes
Text
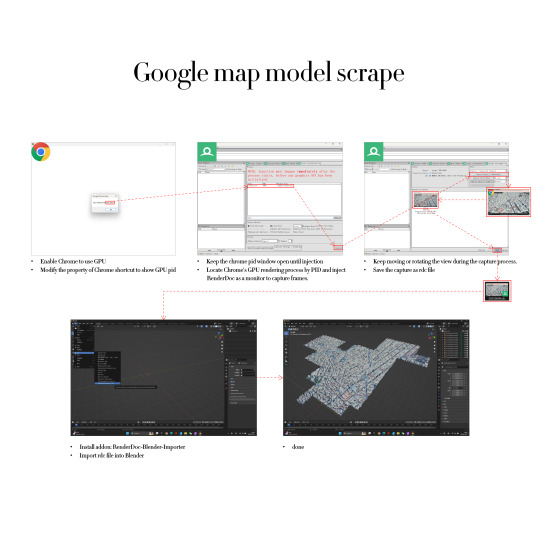
Step 1: Modify the Chrome shortcut's target path and launch the browser using the modified shortcut. Record the PID (Process ID) shown in the pop-up window.
Step 2: In RenderDoc, locate the Chrome GPU rendering process using the PID and inject RenderDoc as a monitor into this process.
Step 3: Open Google Earth in the browser and navigate to the area you want to capture. After the model has fully loaded, click the Capture button in RenderDoc. During the capture, keep moving or rotating the view to ensure the GPU is actively rendering, allowing RenderDoc to successfully intercept the data. Once finished, export the .rdc file.
Step 4: Install the corresponding RenderDoc import plugin in Blender, and load the .rdc file to retrieve the captured 3D model.
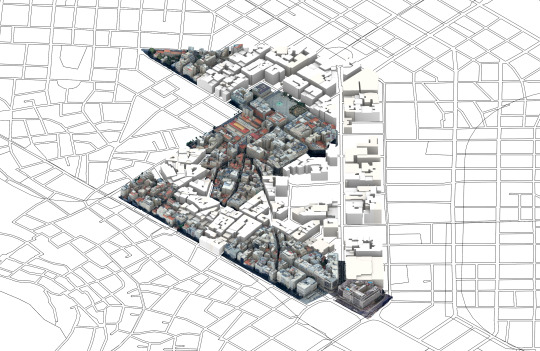
The final model is combined with the basic model we had without detail to highlight the groups of buildings that will make up the resort's sites.
0 notes
Text
Securing Tomorrow: Fasteners and the Power of Connection - Caliber Enterprise

Fasteners: The Building Blocks of Industrial Strength
Fasteners are the core of every structure, machine, and component that demands reliability and stability. At Caliber Enterprise, we specialize in delivering high-performance fastening solutions designed for diverse industries and demanding environments. As one of the leading Fasteners Manufacturers in India, we take pride in our commitment to quality, precision, and on-time delivery, offering an unmatched range of industrial fasteners trusted by engineers and manufacturers worldwide.
Fasteners may be small in size, but their role in mechanical and structural integrity is enormous. These essential components are used across virtually every industry—construction, automotive, aerospace, energy, electronics, and more. Without fasteners, assembling parts into functioning systems would be nearly impossible. As industries continue to evolve, so does the demand for high-performance fasteners designed for strength, durability, and ease of use.
What Are Fasteners?
Fasteners are hardware devices used to mechanically join two or more objects. Unlike welding or adhesive bonding, fasteners typically allow for disassembly without damaging the components involved. They are used for both permanent and temporary connections depending on the application.
The most commonly used fasteners include:
Bolts – Threaded fasteners used with nuts to form a secure joint. Common in structural and automotive applications.
Nuts – Mated with bolts to clamp parts together.
Screws – Threaded fasteners that can create their own mating thread in materials like wood, metal, or plastic.
Washers – Used with bolts and nuts to distribute load and prevent surface damage or loosening.
Each fastener type is manufactured in a variety of sizes, thread types, materials, and coatings, enabling engineers and builders to choose the right product for specific needs.
Global Presence and Regional Excellence
India has emerged as a global hub for fastener production, offering cost-effective and high-quality solutions. Reputed Fasteners Supplier supplies products not only to local markets but also to demanding international industries such as oil & gas, construction, shipbuilding, and energy.
For clients in South India, Fasteners manufacturers in Chennai offer quick access to premium-grade products with custom dimensions and finishes. These manufacturers cater to regional infrastructure projects and OEMs requiring precise and consistent quality. Meanwhile, the presence of Fasteners manufacturers in Australia highlights the global reach of Indian suppliers, who export vast quantities of nuts, bolts, and screws to industrial markets across the southern hemisphere.
Sourcing Made Simple with Weight Charts and Product Guides
For engineers and procurement managers, calculating weights and selecting the right fasteners can be complex without the proper data. That’s where a nut bolt weight chart in kg pdf becomes essential. These charts help users estimate total shipment weight, understand load-bearing capacity, and ensure the correct fastener is chosen for the application. The availability of downloadable weight charts enhances transparency, simplified logistics, and improves decision-making across industries.
A leading Fasteners Supplier in India will typically offer detailed catalogs, technical specifications, and weight charts for various products like hex bolts, socket screws, flange nuts, and structural washers. Some even provide 3D CAD drawings, torque guides, and installation instructions to support engineers in design and assembly.
Conclusion:
Fasteners are really important parts, like screws, bolts, and nuts. They hold things together, from small phones to huge buildings. They make sure everything stays strong and safe.We help people find the best Fasteners Manufacturer in India. India makes great fasteners and sends them all over the world, even to places like Australia. They also give useful tools like nut bolt weight charts to help people choose the right fasteners. So, with good fasteners, we can build strong and safe things for the future.
0 notes