#AWSIntegration
Explore tagged Tumblr posts
Visit Tumblr Blog
Explore Tumblr blogs with no restrictions, modern design and the best experience.
Last Seen Tumblr Blogs


Fun Fact
Tumblr.com is the 103rd most visited website in the world.
Text
Is AWS Elasticsearch Developer’s True Hero?

Elasticsearch is a free open source search engine, which is used for log analytics, full-text search, application monitoring and more. It makes easy to deploy, operate and scale Elasticsearch clusters in the AWS Cloud. We can get direct access to the Elasticsearch APIs. It provides Scalability, Availability and Security for the workload process run.
Elasticsearch architecture
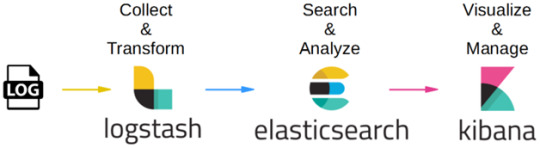
The AWS Elasticsearch Service Architecture is very dynamically to allow create instances, remove instances, change instance sizes, change storage configuration and customize to make other changes. This Elasticsearch allows to search and analyse the data log. It consists of three components.
Logstash – is used to collect and transferred to the Elasticsearch.
Elasticsearch –facilitates search and analyze with the logs stored in it. It acts as a database.
Kibana –Kibana enables the data visualization on the dashboard that uses ELK stack. This tool provides a quick insight of the documents using visualization Kibana’s dashboard contains interactive diagrams, geospatial data, and graphs to visualize complex queries that let you search, view, or interact with the stored data. Kibana helps you to perform advanced data analysis and visualize your data in a variety of tables, charts, and maps.
Get started with an Elastic Cluster with AWS
First, create an AWS account and follow the following steps to claim your domain.

Tap on to “Create a new domain”
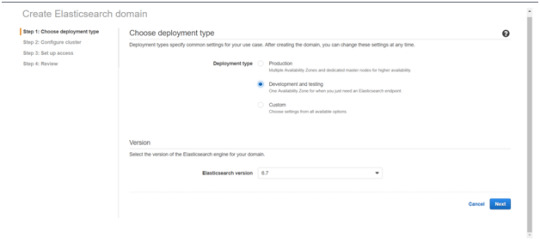
Select on the appropriated Deployment type and select the Elasticsearch version. Click Next.
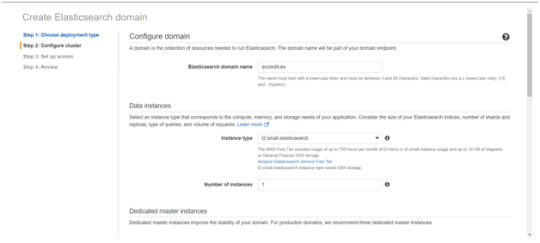
Enter a domain name and choose the Instance type in the prompt page and Click Next.
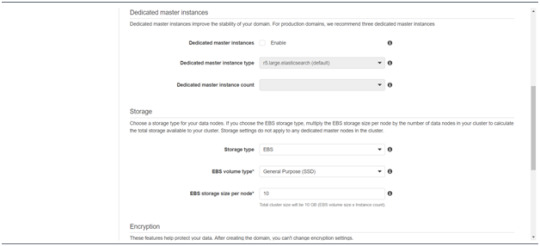
Follow to enter the “Dedicated master instances”
Click Next.
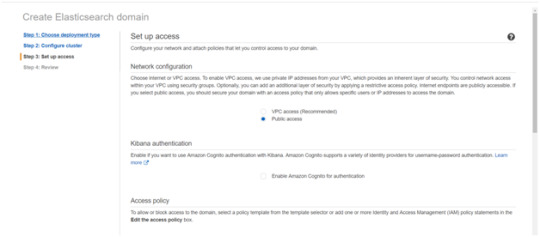
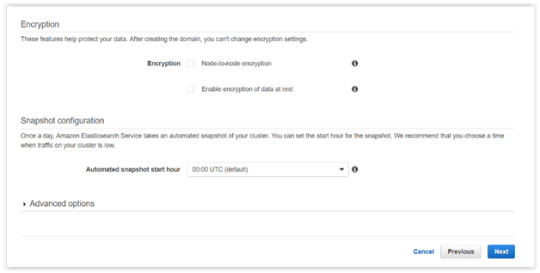
After the Cluster Configuration, you will be taken to the Set up access part. In the Setup access part, enable the specific set of users who can access your ElasticSearch cluster. There are two options — VPC access and Public access. Once you select one of the options and confirm your entries your new cluster is created.
Things to consider
1. Expandable
Amazon Elasticsearch Service provides to monitor your cluster through Amazon CloudWatch metrics.
We can change the cluster in various size from top or bottom within single clicks in the AWS management console or via a single API call.
There is a customizable setting available based on the range of instance types and storage options including SSD-powered EBS volumes.
2.Integrations
Many integrations available in the AWS Elasticsearch such as Kibana for data visualization, Amazon CloudTrail is used to audit API calls configure in AWS ES domains and integrate with Amazon Amazon S3, Amazon Kinesis, and Amazon DynamoDB for loading streaming data into Amazon ES.
3.Guarantee
It guarantees to provide a secure environment and easy integration with Amazon VPC and VPC security groups. There is an availability to access the Identity and Access Management (IAM) control. It provides authentication for Kibana and Data encryption with node-to-node encryption.
4.Availability
Amazon ES supports the different zones in two geographical locations and various node allocations with a large number of zones in the same region itself. It manages the cluster and notifies the damaged nodes automatically.
Conclusion
This article has covered what AWS Elastic Search means, its benefits, what happens between and how you can use it.
#AWS#Elasticsearch#LogAnalytics#SearchEngine#CloudComputing#DataVisualization#Kibana#Scalability#Security#CloudWatch#AWSIntegration#DataEncryption#VPC#ElasticCluster#API#CloudInfrastructure#TechSolutions#BigData#AWSElasticsearch#ElasticSearchService#DataAnalysis#CloudServices
0 notes
Text
The Importance of Secure AWS Integration in Document Storage
In the digital age, secure document storage is crucial for organizations managing sensitive information. Imagility offers a unique approach to document storage by integrating with Amazon Web Services (AWS), providing unparalleled security, reliability, and efficiency. Understanding why secure AWS integration matters can help organizations make informed decisions about their data storage solutions.
Why Secure AWS Integration Matters
1. Robust Security Features: AWS is renowned for its comprehensive security features, including encryption, access controls, and continuous monitoring. By leveraging these capabilities, Imagility ensures that all stored documents are protected against unauthorized access and potential breaches.
2. Enhanced Data Reliability: AWS offers a reliable and resilient infrastructure, ensuring that data is consistently available and protected from loss. This reliability is crucial for organizations that need uninterrupted access to important documents and information.
3. Scalability and Flexibility: As organizations grow, their document storage needs change. AWS provides scalable storage solutions that can easily adapt to increasing data volumes, ensuring that organizations can efficiently manage their information over time.
4. Cost-Effective Solutions: AWS's pay-as-you-go model allows organizations to manage costs effectively by only paying for the storage they use. This flexibility helps businesses optimize their budgets while benefiting from high-quality storage solutions.
5. Seamless Integration: Imagility’s integration with AWS allows for seamless document storage and retrieval, ensuring that users can access the information they need quickly and easily. This integration enhances productivity and streamlines operations.
Imagility’s Unique Approach
Imagility’s approach to document storage prioritizes security, efficiency, and user experience. By integrating with AWS, Imagility provides organizations with a robust and secure platform for managing sensitive documents. This integration ensures that all data is stored safely and can be accessed whenever needed, supporting the diverse needs of modern businesses.
For organizations looking to enhance their document storage capabilities, understanding the importance of secure AWS integration is crucial. By choosing solutions that prioritize security and reliability, businesses can safeguard their data and improve operational efficiency.
Conclusion
Secure AWS integration is a vital component of modern document storage solutions, offering unmatched security, reliability, and scalability. Imagility’s approach ensures that organizations can manage their documents with confidence, knowing that their data is protected and accessible. Embrace the future of document storage with secure AWS integration and discover the benefits it can bring to your organization.
#SecureAWSIntegration#DocumentStorage#DataSecurity#CloudStorage#AWSIntegration#DataReliability#ScalableSolutions#CostEffectiveStorage#InformationManagement#BusinessSecurity
0 notes
Text
🚀 DevOps with AWS Training 🔗 Register Now: https://shorturl.at/n8gI6
🧑🏫 Trainer: Mr. Ram 📅 Date: 23rd April 2025 🕢 Time: 7:30 PM IST
DevOps with AWS @ 6:00 PM (IST) by Mr.Reyaz From 28th April 🔗 Register Now: https://shorturl.at/3GJg5
💻 Mode: Online & Classroom Training 📍 Location: KPHB (Beside Metro Station)
📲 More Details: https://linktr.ee/clickone2
📌 What You'll Learn:
DevOps Fundamentals ,AWS Integration,CI/CD Pipelines , Infrastructure as Code (IaC) ,Real-world Projects
🎯 Ideal for aspiring DevOps Engineers and IT professionals aiming to upskill.
DevOpsWithAWS #NareshIT #AWSCloud #DevOpsTraining #LearnDevOps #AWSIntegration #TechCareerGrowth #CloudComputing #WebexTraining #DevOpsEngineer #KPHBTraining
0 notes
Text
🚀 DevOps with AWS Training 🔗 Register Now: https://shorturl.at/n8gI6
🧑🏫 Trainer: Mr. Ram 📅 Date: 23rd April 2025 🕢 Time: 7:30 PM IST
💻 Mode: Online & Classroom Training 📍 Location: KPHB (Beside Metro Station)
📲 More Details: https://linktr.ee/clickone2
📌 What You'll Learn:
DevOps Fundamentals ,AWS Integration,CI/CD Pipelines ,Infrastructure as Code (IaC) ,Real-world Projects
🎯 Ideal for aspiring DevOps Engineers and IT professionals aiming to upskill.
DevOpsWithAWS #NareshIT #AWSCloud #DevOpsTraining #LearnDevOps #AWSIntegration #TechCareerGrowth #CloudComputing #WebexTraining #DevOpsEngineer #KPHBTraining

0 notes
Text
#Salesforce-AWSIntegrationwithDataArchiva#Salesforce-AWSIntegration#SalesforceCustomers#ExternalArchivingUsingAWSCloud#DataArchivaExternalArchivingUsingAWSCloud#DataArchivaExternalArchiving#DataArchiva#AWSCloud#ArchiveSalesforceDataToAWS
0 notes
Text
Deployment to AWS (single container)
I tried CI/CD using Travis & AWS today.
Adding a .travis.yml file to your codebase. (These are the steps used by travis to build your project)
Go to travis dashboard and connect your Github account to Travis. Once done you will be able to use your Github repo as project in travis
Go to AWS and create a Elastic Beanstalk (EB) application. Use `Docker` as platform while creating this. Also create a user and give required roles/permissions (deploy to s3 bucket and EB environment) to it.
FYI: EB provides auto-scaling and load balancer out of the box.
Once you create user at step 3, you get access_key_id and secret_access_key which can be stored in Travis environment variables. Not these will be used by Travis while initiating deploying on AWS.
`deploy:` section can be used in travis file to instruct Travis to try and deploy to AWS. This is the code I used: deploy: provider: elasticbeanstalk access_key_id: ${key_id} secret_access_key: ${access_key} region: "ap-south-1" app: "aws-integration" env: "AwsIntegration-env" bucket_name: "${s3_bucket}"
Provider will be hard-coded. `app` and `env` are from step 3 when you created a new EB application.
Note: In Dockerfile, having aliases don’t work. So you might want to change that.
You can also check environment logs.
0 notes
Link

I've known for a while that API Gateway can integrate directly with other AWS services without needing Lambda to play traffic cop. But how does that work and can we leverage this to build small stack applications? Let's find out!
tl;dr
Just want to see how I did it? Okay, here's my repo.
Table of Contents
AWS CDK
DynamoDB
Table of Kittens
API Gateway
IAM
AWS Service Integration
Methods
Security
Next Steps
AWS CDK
I wrote a fair amount about how to set this up and have a nice linting and testing experience in this post. No need to repeat myself. I'm loosely basing this project on this sample project. This one is a good primer on using API Gateway and Lambda together with CDK. My goal was to more or less build the same application, but without Lambda.
DynamoDB
I couldn't possibly do DynamoDB justice in this post and in fact am a bit of a novice. There are lots of great resources out there. I'm just going to create a simple table that will allow CRUD operations. Readers who haven't experienced DynamoDB yet but know either RDBMS or something like MongoDB will not too lost, however the really special thing about DynamoDB is that it is a fully managed service in every sense. With a more traditional cloud-hosted database, I might be able to provision the database using a tool or some variety of infrastructure-as-code, but then I would need to manage credentials, users, connection strings, schemas, etc. With DynamoDB, I don't need to do any of that. I will use IAM Roles to connect to my table and only need to provide a few basic parameters about it to get started.
Table of Kittens
The first thing we'll do is create a table. The example code we're working from named the table Items, which is not just generic and boring, but is also a little confusing since a "row" in a DynamoDB table is called an item. If you prefer Puppies or AardvarkCubs, feel free to make the substitution.
import { AwsIntegration, Cors, RestApi } from '@aws-cdk/aws-apigateway'; import { AttributeType, Table, BillingMode } from '@aws-cdk/aws-dynamodb'; import { Effect, Policy, PolicyStatement, Role, ServicePrincipal } from '@aws-cdk/aws-iam'; import { Construct, RemovalPolicy, Stack, StackProps } from '@aws-cdk/core'; export class ApigCrudStack extends Stack { constructor(scope: Construct, id: string, props?: StackProps) { super(scope, id, props); const modelName = 'Kitten'; const dynamoTable = new Table(this, modelName, { billingMode: BillingMode.PAY_PER_REQUEST, partitionKey: { name: `${modelName}Id`, type: AttributeType.STRING, }, removalPolicy: RemovalPolicy.DESTROY, tableName: modelName, }); } }
Here we've imported the constructs we'll need (spoiler - not using them all yet). We're creating a new DynamoDB table. When we describe our table, we only need to give a partition key. A real use case would probably include a sort key and possibly additional indices (again, this article is not your one-stop tutorial for DynamoDB). If we run this, we'll get a table we can immediately start using via AWS CLI.
$ aws dynamodb put-item --table-name Kitten --item \ "{\"KittenId\":{\"S\":\"abc-123\"},\"Name\":{\"S\":\"Fluffy\"},\"Color\":{\"S\":\"white\"}}"
When we run that, it creates a new Kitten item. We can read our table by executing
$ aws dynamodb scan --table-name Kitten { "Items": [ { "KittenId": { "S": "abc-123" }, "Name": { "S": "Fluffy" }, "Color": { "S": "white" } } ], "Count": 1, "ScannedCount": 1, "ConsumedCapacity": null }
We can do all of our normal table operations this way. Want Fluffy to turn blue? Want her to express musical taste? No problem.
$ aws dynamodb put-item --table-name Kitten --item \ "{\"KittenId\":{\"S\":\"abc-123\"},\"Name\":{\"S\":\"Fluffy\"},\"Color\":{\"S\":\"blue\"},\"FavoriteBand\":{\"S\":\"Bad Brains\"}}" $ aws dynamodb scan --table-name Kitten { "Items": [ { "Color": { "S": "blue" }, "FavoriteBand": { "S": "Bad Brains" }, "KittenId": { "S": "abc-123" }, "Name": { "S": "Fluffy" } } ], "Count": 1, "ScannedCount": 1, "ConsumedCapacity": null }
We'll also want to give delete-item, get-item and query a look when exploring the aws cli for dynamodb. If you don't mind escaping your JSON and doing everything at the command line, you are now done and your app has shipped. Congrats, knock off early today!
API Gateway
API Gateway will let us create our own public endpoint that will allow http traffic to our service. A lot of the time we think about using API Gateway to invoke Lambda functions, but as we shall see, there are plenty of other things we can do. We've already installed the required component libraries, @aws-cdk/aws-apigateway and @aws-cdk/aws-iam. We'll start by creating a basic RestApi. API Gateway supports HTTP protocols in two main flavors: RestApi and HttpApi. HttpApi is a stripped down, leaner specification that offers substantial cost savings for many use cases, but unfortunately not ours. HttpApi doesn't support AWS Service Integrations, so we won't be using it.
const api = new RestApi(this, `${modelName}Api`, { defaultCorsPreflightOptions: { allowOrigins: Cors.ALL_ORIGINS, }, restApiName: `${modelName} Service`, });
I'm naming my API "Kitten Service". Yours might be "AardvarkPup Service" or even "Pizza Service" if you like to keep those as pets. The CORS bit there is very cool and shows some real CDK value. This will automatically set up OPTIONS responses (using the MOCK type - meaning nothing else gets called) for all your endpoints. Of course you can specify your own domain or anything else that is legal for CORS. This is a fairly recent feature of CDK and in fact in the example I'm working from, they had to do it the long way. The next thing we'll do is add a couple of resources. This is super easy to do!
const allResources = api.root.addResource(modelName.toLocaleLowerCase()); const oneResource = allResources.addResource('{id}');
Unfortunately this doesn't actually do very much by itself. In order for these resources to have any meaning, we will need to attach methods (HTTP verbs), integrations and responses to the resources. However, we can understand the resource creation mechanism here. We will add a route named kitten which will refer to the entire collection and optionally allow an id to specify a specific kitten that we want to take some action on.
IAM
IAM is the AWS service that establishes a roles and permissions framework for all the other AWS offerings. Services communicate via publicly-available APIs but by default most actions are not allowed - we cannot query our DynamoDB table without credentials and a role that allows us to take that action. In order for our API Gateway to call into DynamoDB, we will need to give it roles that allow it to do that. In fact, each individual integration can have its own role. That would mean our POST HTTP verb might only be able to invoke put-item while our GET HTTP verb can scan, query or get-item. This is known as the principle of least privilege. To me, it's debatable whether it's really necessary for each endpoint to have its own role vs. one shared (and slightly more permissive) role for all the endpoints pointing to my table, but this is an experiment in the possible so we will exercise the tightest possible permissions by creating several roles. Roles by themselves do nothing. They must have policies attached that specify actions the role allows and the resources they may be exercised by.
const getPolicy = new Policy(this, 'getPolicy', { statements: [ new PolicyStatement({ actions: ['dynamodb:GetItem'], effect: Effect.ALLOW, resources: [dynamoTable.tableArn], }), ], });
This policy allows the GetItem action to be taken against the table we just created. We could get lazy and write actions: ['dynamodb:*'] and resources: ['*'], but we might get dinged in a security review or worse, provide a hacker an onramp to our resources. Notice that our policy can be made up of multiple policy statements and each statement can comprise multiple actions and resources. Like I said, the rules can get pretty fine-grained here. Let's create the role that will use this policy.
const getRole = new Role(this, 'getRole', { assumedBy: new ServicePrincipal('apigateway.amazonaws.com'), }); getRole.attachInlinePolicy(getPolicy);
The role specifies a ServicePrincipal, which means that the role will be used by an AWS service, not a human user or a specific application. A "principal" is a human or machine that wants to take some action. We attach the policy as an inline policy, meaning a policy we just defined as opposed to a policy that already exists in our AWS account. This makes sense as the policy only applies to resources we're defining here and has no reason to exist outside of this stack. We can go ahead and define additional roles to provide the other CRUD operations for our API.
AWS Service Integration
To create integrations to AWS services we will use the AwsIntegration construct. This construct requires that we define request templates (what will we send to our service) and integration responses (how we handle various HTTP responses). I defined a couple of error responses and a standard response like this:
const errorResponses = [ { selectionPattern: '400', statusCode: '400', responseTemplates: { 'application/json': `{ "error": "Bad input!" }`, }, }, { selectionPattern: '5\\d{2}', statusCode: '500', responseTemplates: { 'application/json': `{ "error": "Internal Service Error!" }`, }, }, ]; const integrationResponses = [ { statusCode: '200', }, ...errorResponses, ];
We'd probably want to add some additional responses and maybe some more information for a production application. The selectionPattern property is a regular expression on the HTTP status code the service returns. In order to understand how the AwsIntegration works, let's go back to our CLI commands. To fetch the record for Fluffy we created earlier, we can use aws dynamodb query --table-name Kitten --key-condition-expression "KittenId = :1" --expression-attribute-values "{\":1\":{\"S\":\"abc-123\"}}". We know that we're going to provide the service name (dynamodb), an action (query) and then give a payload (the name of the table and the key for our item). From that, AwsIntegration will be able to perform the get-item operation on the named table.
const getIntegration = new AwsIntegration({ action: 'GetItem', options: { credentialsRole: getRole, integrationResponses, requestTemplates: { 'application/json': `{ "Key": { "${modelName}Id": { "S": "$method.request.path.id" } }, "TableName": "${modelName}" }`, }, }, service: 'dynamodb', });
We're referencing the standard integration responses object we previously defined. Then we're defining a requestTemplate inline. This template uses The Apache Velocity Engine and Velocity Template Language (VTL), a java-based open source project that will let us introduce some logical and templating capabilities to API Gateway. There's obviously a fair amount of complexity we could get into with VTL and at a certain point it's probably just a lot better to write a Lambda function than try to handle extremely complex transformations or decision trees in VTL. Here it's not too bad. In case it's not obvious, our request templates are written using template literals. The ${modelName} substitutions happen when my CloudFormation template is created by CDK (when I build), while $method.request.path.id is provided during the request at runtime. Many of the common property mappings can be found in the API Gateway documentation. My template will grab the id from the request path and pass it to DynamoDB. We can also pull properties from the request body. Let's look at the integration for creating a new Kitten.
const createIntegration = new AwsIntegration({ action: 'PutItem', options: { credentialsRole: putRole, integrationResponses: [ { statusCode: '200', responseTemplates: { 'application/json': `{ "requestId": "$context.requestId" }`, }, }, ...errorResponses, ], requestTemplates: { 'application/json': `{ "Item": { "${modelName}Id": { "S": "$context.requestId" }, "Name": { "S": "$input.path('$.name')" }, "Color": { "S": "$input.path('$.color')" } }, "TableName": "${modelName}" }`, }, }, service: 'dynamodb', });
The request body is mapped to $ and can be accessed via $input.path and dot-property access. We're also taking the requestId and using that as a unique identifier in my table. Depending on our use case, that might be a worthwhile thing to do or maybe it would be better to just key off the kitten's name. We have mapped a custom response template into this integration so that we return the requestId - which is now the partition key for the item we just created. We don't want to have to scan our table to get that, so it's convenient to return it in the same request. The rest of our integrations follow the same pattern and use the same techniques. Rather than repeat myself here, you can just go and check it out in my repo. I wrote some tests as well.
Methods
Ready to go? Not quite. We still have to tie an integration to a resource with an HTTP verb. This is quite easy and our code could look like this:
const methodOptions = { methodResponses: [{ statusCode: '200' }, { statusCode: '400' }, { statusCode: '500' }] }; allResources.addMethod('GET', getAllIntegration, methodOptions); allResources.addMethod('POST', createIntegration, methodOptions); oneResource.addMethod('DELETE', deleteIntegration, methodOptions); oneResource.addMethod('GET', getIntegration, methodOptions); oneResource.addMethod('PUT', updateIntegration, methodOptions);
I think that is pretty intuitive if you know much about REST or HTTP. We've mapped several HTTP verbs to our resources If we wanted to return a 404 response on the other ones, we'd need to do a little bit of extra work. By default any request that can't be handled by RestApi returns a 403 with the message "Missing Authentication Token". This is probably to keep malicious users from snooping endpoints and while it may seem confusing to us the first time we see that error, it's probably fine, especially for a demo project. We've got all the pieces in place at last! How does it work? Just fine.
$ curl -i -X POST \ -H "Content-Type:application/json" \ -d \ '{"name": "Claws", "color": "black"}' \ 'https://my-url.execute-api.us-east-1.amazonaws.com/prod/kitten' { "requestId": "e10c6c16-7c84-4035-9d6b-8663c37f62a7" }
$ curl -i -X GET \ 'https://my-url.execute-api.us-east-1.amazonaws.com/prod/kitten/0a9b49c8-b8d2-4c42-9500-571a5b4a79ae' {"Item":{"KittenId":{"S":"0a9b49c8-b8d2-4c42-9500-571a5b4a79ae"},"Name":{"S":"Claws"},"Color":{"S":"black"}}}
Security
Most of the APIs we build will require some kind of security, so how do protect this one? Out of the box we can support Cognito User Pools or IAM roles. We can also provide a custom Lambda authorizer.
Next Steps
So now that we know we can do this, the question is is it a good idea? My CDK code doesn't look too different from the Lambda code in the AWS example. I think as long as the code is simple enough, this is a viable option. If things get more complicated, we'll probably want a Lambda function to handle our request. This approach gives us the option of switching any of our AWS Integrations to Lambda Integrations if we hit that complexity threshold. Another consideration will often be cost. To understand the price difference, we need to do some math. If we built our API using HttpApi and Lambda and got 100 million requests per month, the cost for API Gateway would be $100 and the cost for Lambda (assuming 100ms requests and 256MB memory) would be $429.80. The AWS Integration + RestApi approach would do 100 million requests for $350, a savings of $179.80 monthly. If our Lambda functions could operate at 128MB, then that method would only cost $321.47 and now the AWS Integration is slightly more expensive. If the Lambda functions were significantly slower or required more memory, then we might start seeing real savings. I probably wouldn't do this just for cost, but we also have to consider the effort of writing, maintaining and updating our Lambda functions. Yes, they are small, but every code footprint costs something and it's nice to have the option to just skip simple boilerplate. Lastly, now that we can do this with DynamoDB, what about other services? Does your Lambda function do nothing but pass a message to SNS? Does it just drop a file on S3? It might be better to consider a Service Integration. Keep this pattern in mind for Step Functions as well. You can basically do the same thing.
0 notes
Text

Imagility’s Innovative Document Storage: The Importance of Secure AWS Integration
Explore Imagility’s unique approach to document storage and discover why secure AWS integration matters for protecting your data. 🛡️🔒
0 notes
Text
#AdditionalDataStorageCostsinSalesforce#additionalstoragecosts#appexchange#archivingSalesforcedataintoAWS#ArchivingSalesforcedatawithAWS#cost effective#dataanalytics#DataArchiving#data governance#datamanagement#dataretention#Datastorage#SalesforcedataarchivingusingAWS cloud#Salesforcedatagrowth#Salesforce-AWSIntegration#Salesforce-AWS archivingsetup#StandardReports&Dashboards
1 note
·
View note