#Arduino Web Editor Tutorial Step By Step | Arduino
Explore tagged Tumblr posts
Visit Tumblr Blog
Explore Tumblr blogs with no restrictions, modern design and the best experience.
Last Seen Tumblr Blogs


Fun Fact
There were a total of 171.5 billion posts on Tumblr in 2019.
Text
Power of Python for Arduino Nano RP2040 Connect and Nano 33 BLE
Python support for three of the hottest Arduino boards out there is now yours. Through our partnership with OpenMV, the Nano RP2040 Connect, Nano 33 BLE and Nano 33 BLE Sense can now be programmed with the popular MicroPython language. Which means you get OpenMV’s powerful computer vision and machine learning capabilities thrown in.
OpenMV IDE and MicroPython Editor
While you can’t use Python directly with the Arduino IDE, you can use the OpenMV editor, and its version of MicroPython. From the editor, you can install MicroPython and load your scripts directly to the supported Arduino boards.
MicroPython is a great implementation of the full Python programming language, designed to run on microcontrollers. There’s extensive documentation all across the web, which is another huge advantage of learning and using Python for your Arduino projects.
There are so many reasons to get excited about MicroPython for these new Arduino boards. To name a few…
OpenMV’s machine learning and computer vision tools.
Great for computer science education.
Easy for web developers and coders to switch from other platforms to Arduino.
Huge number of MicroPython libraries, tutorials, guides and support online.
Simple to upgrade hardware as project demands increase (eg, upgrade from a Nano RP2040 Connect to a Portenta H7).
There are also lots of Arduino + Python projects that have been posted over the years. Now you can add the Nano devices to those projects and expand on them with their new MicroPython capabilities.
Get Started with Python on Arduino
To help you get cracking, we’ve put together a few guides for each of the supported Arduino boards. The Portanta H7 already supports MicroPython, but we’ve included it below for the sake of completion.
Firstly you’ll need to install the OpenMV IDE on your computer. You can grab that from the OpenMV download page right here.
If it’s the first time you’ve used Python on your Arduino board, you’ll need to follow a few steps to get everything working together. Depending on which board you’re using, you might need to update the bootloader to make it compatible with OpenMV. Then you can connect to the board to upload the latest firmware and make it compatible with the editor.
There are guides to take you through the process for each board, and it’s not a complex task. Once completed, your boards will be ready to program them using MicroPython.
These simple tutorials will get you moving quickly.
Nano 33 BLE
Nano 33 BLE Sense
Nano RP2040 Connect
Portenta H7
Furthermore, you can find a few examples of MicroPython scripts you can upload and run on the various boards, too. It’s a great way to test the Python waters with your Arduino boards, and pick up a couple of hints and tips on using the language.
If you’ve got any resources, hints or tips of your own when it comes to learning or using Python, please do share them with the community! We want to hear all about your experiences, and any projects you build using Arduino and Python together.
We’ll keep you updated as we add more documentation and tutorials for MicroPython over on Arduino Docs, so keep an eye out for those.
The post Power of Python for Arduino Nano RP2040 Connect and Nano 33 BLE appeared first on Arduino Blog.
Power of Python for Arduino Nano RP2040 Connect and Nano 33 BLE was originally published on PlanetArduino
0 notes
Text
Temp and Humidity Alert Using AWS and ESP32

In this tutorial, we will measure different temperature and humidity data using Temp and humidity sensor. You will also learn how to send this data to AWS.
Hardware
ESP-32: The ESP32 makes it easy to use the Arduino IDE and the Arduino Wire Language for IoT applications. This ESp32 IoT Module combines Wi-Fi, Bluetooth, and Bluetooth BLE for a variety of diverse applications. This module comes fully-equipped with 2 CPU cores that can be controlled and powered individually, and with an adjustable clock frequency of 80 MHz to 240 MHz. This ESP32 IoT WiFi BLE Module with Integrated USB is designed to fit in all ncd.io IoT products. Monitor sensors and control relays, FETs, PWM controllers, solenoids, valves, motors and much more from anywhere in the world using a web page or a dedicated server. We manufactured our version of the ESP32 to fit into NCD IoT devices, offering more expansion options than any other device in the world! An integrated USB port allows easy programming of the ESP32. The ESP32 IoT WiFi BLE Module is an incredible platform for IoT application development. This ESP32 IoT WiFi BLE Module can be programmed using the Arduino IDE.
IoT Long Range Wireless Temperature and Humidity Sensor: Industrial Long Range Wireless Temperature Humidity Sensor. Grade with a Sensor Resolution of ±1.7%RH ±0.5°C. Up to 500, 000 Transmissions from 2 AA Batteries. Measures -40°C to 125°C with Batteries that Survive these Ratings.Superior 2-Mile LOS Range & 28 miles with High-Gain Antennas.Interface to Raspberry Pi, Microsoft Azure, Arduino and More
Software Used
Arduino IDE
AWS IoT
Library Used
PubSubClient Library
Wire.h
AWS_IOT.h
Uploading the Code to ESP32 using Arduino IDE
Download and include the PubSubClient Library and Wire.h Library.
Download the Zip file of AWS_IoT, from the given link and after extracting, paste the library in your Arduino library folder.
You can get the Arduino code here.
You must assign your unique AWS MQTT_TOPIC, AWS_HOST, SSID (WiFi Name) and Password of the available network.
MQTT topic and AWS HOST can get inside Things-Interact at AWS-IoT console.


Compile and upload the ESP32_AWS.ino code.
Before uploading the code add a certificate inside the AWS_IOT folder to aws_iot_certficates.c, which is done in further steps.
To verify the connectivity of the device and the data sent, open the serial monitor. If no response is seen, try unplugging your ESP32 and then plugging it again. Make sure the baud rate of the Serial monitor is set to the same one specified in your code 115200.
Serial Monitor Output

Making the AWS Work
youtube
Create Thing and Certificate
THING: It is a virtual representation od your device.
CERTIFICATE: Authenticates the identity of a THING.
Open AWS-IoT
Click on manage -THING -Register THING.
Click on create a single thing.
Give the Thing name and type.
Click on next.
Now your certificate page will open, click on Create Certificate.
Download these Certificates, mainly private key, a certificate for this thing and root_ca and keep them in a separate folder.
Inside root_ca certificate click on Amazon root CA1-Copy it-Paste it to notepad and save it as a root_ca.txt file in your certificate folder.
Create Policy
youtube
It defines which operation a device or user can access.
Go to the AWS-IoT interface, Click on Secure-Policies.
Click on Create.
Fill all the necessary details such as policy name, Click Create.
Now go back to the AWS-IoT interface, Click on Secure-Certificates and attach the policy created just now to it.
Add Private key, Certificate and root_CA to Code
Open your downloaded certificate in your text editor(Notepad++), mainly private key, root_CA and certificate of thing and edit them as the format of aws_iot_certficates.c inside AWS_IOT folder.
Now open your AWS_IoT folder in your Arduino library -My Document. Go to C:\Users \xyz\Documents\Arduino\libraries\AWS_IOT\src, click on aws_iot_certficates.c, open it on an editor and paste all the edited certificate their at the required place, save it.


Getting Output
youtube
Go to test in the AWS_IoT console.

Fill your MQTT topic to Subscription topic in your test credentials.

Now you can view your temp and humidity data.
Output

Steps to Make Mail Alerts
youtube
You set up Amazon Simple Notification Service (Amazon SNS) for creating mail alert to receivers address for different temperature and humidity readings.
Go to AWS IoT console -Click on Act.
Don't have any rule -Click on create a rule.
On this page Name the rule i.e AlertTempEsp32, also provide the description(Creating mail alert of Temp and Humidity sensors data).
Now create Rule Query Statement(SQL statement for processing data from source).In this the statement used is
SELECT*FROM'$aws/things/Temp_Humidity_esp32/shadow/update'
$aws/things/Temp_Humidity_esp32/shadow/update, Go to AWS IoT Console -Manage-Thing-Click on your created Thing -Interact.
To choose an action Click on ADD Action.
Select send a message as an SNS push notification.
Now Configure Action selected. for SNS target-choose Create. Enter a name for the SNS topic, such as Temp_Humidity_Esp32Topic.Message Format -Raw. Create role -Temp_Humidity_Esp32TopicRole.
Add Action.
Create a rule.
Create Amazon SNS to send the messages through your Amazon SNS topic to your email inbox. Click on Services.
youtube
Search SNS. Click on SNS.
In Amazon SNS -Click on Subscription. Select the topic ARN.Protocol-Email -Give your email Address on which alert to be sent.
Now click on Create Subscription.
After clicking the Create Subscription. You have to confirm Subscription by clicking on the mail, that is sent to your registered mail ID.

Confirm Subscription link.

OUTPUT

0 notes
Video
youtube
Arduino Web Editor Tutorial Step By Step | Arduino Online Code Upload - Online Programming Programming Arduino Online | Arduino Web Editor Tutorial - Step By Step Explained | Uploading Codes from Browser Hey guys welcome back to Rootsaid. Today I will talk about Arduino Web IDE and how to program Arduino online using Arduino Web Editor / Arduino Online Editor. You can use Arduino Online Editor to write your sketches, save them to the cloud and access them from anywhere around the world. The best thing is you can upload the code to your board directly from the browser. First thing you need to do is go to the Arduino website which is arduino.cc and if you're not already signed up you should sign up. After that, go to this page - create.arduino.cc and you're going to need to sign and sign in with the same credentials that you used for arduino.cc.
0 notes
Text
ESP32 Arduino Tutorial: HTTP POST Requests to Bottle application
The objective of this ESP32 Arduino Tutorial is to explain how to develop a simple system where an ESP32 sends HTTP POST requests to a Python Bottle application. The tests were performed on a DFRobot’s ESP32 module, integrated in a ESP32 development board.
Introduction
The objective of this post is to explain how to develop a simple system where an ESP32 sends HTTP POST requests to a Python Bottle application.
Bottle is a light lightweight micro web-framework for Python [1]. Developing a Bottle application is based on the concept of defining routes and functions that are executed when HTTP requests are received on those routes.It is a pretty minimalist framework that allows us to get started without the need of complicated configurations, needed for more complex web frameworks. This makes it perfect for developing simple proof of concept applications. Nevertheless, there are lots of modules that can be used on top of Bottle and allow to extend its functionality.The easiest way to install Bottle is by using
pip, a Python package installer. To do so, with pip installed on our computer, we just need to send the following command on the command line:
pip install bottle
Note that this application we are going to develop will be relatively simple, but it has all the basics needed to start developing a more complex IoT application where the device sends data to a backend server.The tests were performed on a DFRobot’s ESP32 module, integrated in a ESP32 development board. This hardware is a very easy to use ESP32 development platform. We will use the ESP32 Arduino support to program the board.
The Python Bottle code
We start our code by importing the functionality needed from the bottle module. The functionalities we are going to import will allow us to run our server, defining that a given route receives POST requests and accessing the body of the request.
from bottle import run, request, post
Then we will define the route where we will receive our HTTP POST requests. To do so, we will use the post decorator. You can read more about Python decorators here. Note that we are going to define an index route, which corresponds to the “/” path.
@post('/')
Alternatively, we could have used the route decorator, specifying the method as POST.
@route('/', method='POST')
Next, we are going to implement the actual function that will run when an HTTP POST request is performed to our route. We will call this function index, since it is serving the index route.There we will simply access the body of the request and print its content. To do so, we will access to the request object, which is available on our route handling function. On that object, we access the body property and call its read method to get the body content as a string. Then, we will print it, as can be seen bellow.
def index(): data = request.body.read() print(data)
Finally, to run our bottle server, we simply need to call the run function, specifying as parameters the host and the port. As the host, we should pass the value ‘0.0.0.0‘, so the server will be listening on all the available IPs of the machin.Note that this value or the specific IP of the machine where we want to be reached needs to be specified in order for the ESP32 to be able to contact the bottle server. You can check here an explanation about the 0.0.0.0 IP and its difference regarding the localhost IP.Additionally, we will set the debug mode to true in our app by passing an additional parameter to the run function. This way, the outputs printed on the Python console will be more verbose and some information about the incoming requests is available.
run(host='0.0.0.0', port=8090, debug=True)
The final Python code can be seen bellow and is all that we need to start running our server.
from bottle import run, request, post @post('/') def index(): data = request.body.read() print(data) run(host='0.0.0.0', port=8090, debug=True)
Testing the bottle code
When developing a system with this kind of complexity, it is a good ideia to test each part in separate and only at the end perform whole system tests. This way it becomes much easier to debug.With this in mind, we will start by debugging the previously created Bottle code. To do so, we will run the server and make a HTTP request from a tool that we know that works well. So, if some problem arises at this step, we know for sure that it is in our backend and we will not complicate our debug by having to look to the ESP32 code.So, the tool we are going to use is called Postman and you can download it from here. You have desktop versions and you can also use it as a google chrome extension. Postman is a very powerful and easy to use tool that allow us to do HTTP requests without the need to be writing code for a client application.First of all, run the Bottle program on your Python environment. If you are on IDLE, the IDE that comes with the Python installation, you can run the code from the file editor by pressing F5 or by going to run -> run module. The python interpreter should appear.Then, after installing Postman, run it. On the interface that appears, select POST from the dropdown to specify the HTTP POST method. On the address bar, put the following address, changing {yourLocalIP} by your machine’s local IP.
http://{yourLocalIp}:8090/
If you are on Windows, you can confirm your local IP by opening the command line and typing the ipconfig command. It is usually an IP with the 192.168.XX.XX format. You can also check this guide from Microsoft.Then, on the body tab, select the raw radio button. On the rightmost dropdown, select Text. Then, in the editor, write a message that will be sent to the Bottle server on the body of the request. Finally, click send. All those areas are highlighted in figure 1.
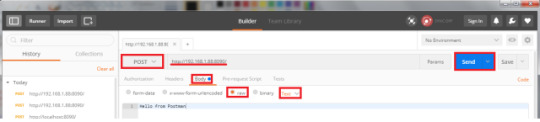
Figure 1– Sending the request to Bottle application from Postman.
In the Python shell where the Bottle application is running, you should get the message sent from Postman, as shown in figure 2.
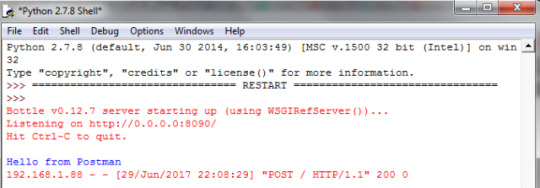
Figure 2– Body of the requested printed in the Python shell.
The Arduino ESP32 code
Now we will specify the ESP32 code. It will be very simple and it is very similar to the one we have covered in some previous ESP32 tutorials. Naturally, we will start by importing some libraries, to access both the WiFi connection functions and the HTTP functions. These are the WiFi.h and the HTTPClient.h libraries.We are also going to store the credentials needed to connect to the WiFi network on two global variables. The credentials needed are the name and the password of the network. You should put the values of the network to which you want to connect to.
#include <WiFi.h> #include <HTTPClient.h> const char* ssid = "yourNetworkName"; const char* password = "yourNetworkPassword";
In the setup function, we will handle the connection to the WiFi network. You can check in full detail how to connect to a WiFi network in this previous post.To sum up, we will call the begin method of the WiFi extern variable defined in the WiFi.h library and pass as input the previously defined credentials needed to connect to the network. Then, we will wait for the connection to be establish in a loop.We will also print the local IP assigned to the ESP32 upon connecting to the network, so we can later check if it is the same received by the Bottle application. Again, we call a method from the WiFi variable, named localIP. Check bellow the full setup function, with these calls and some additional debugging prints to the serial port.
#include <WiFi.h>
#include <HTTPClient.h> const char* ssid = "yourNetworkName"; const char* password = "yourNetworkPassword"; void setup() { Serial.begin(115200); delay(4000); WiFi.begin(ssid, password); while (WiFi.status() != WL_CONNECTED) { //Check for the connection delay(500); Serial.println("Connecting.."); } Serial.print("Connected to the WiFi network with IP: "); Serial.println(WiFi.localIP()); }
We will perform the actual HTTP requests on the Arduino main loop function. You can check in greater detail how to send HTTP POST requests on this
previous tutorial. It will be very simple since the HTTPClient.h library exposes an easy to use API.First, we create an object of class HTTPClient, which we will use to call the methods needed. The first one is the begin method, which receives as input the URL of the server that we want to reach. In our case, it will be the same one used in the previous section to test the Bottle app with Postman.Next, since we are doing a POST request, we should specify the
Content-type HTTP header. This way, we specify what type of data is going to be sent, so the server knows it. To do so, we call the addHeader method of the HTTPClient object, which receives as input the name of the header field and the value for that header field. Since we are going to send a simple “Hello World” message, we specify the Content-type a as text/plain
.
HTTPClient http; http.begin("http://192.168.1.88:8090/"); //Specify destination for HTTP request http.addHeader("Content-Type", "text/plain"); //Specify content-type header
Then we will call the POST method, passing a input the actual content of the body of our request, which will be received by the Bottle application. We will send a very simple “Hello World” message. This method will perform the actual request, and return the HTTP status code, which we will store in a variable, for error checking.
int httpResponseCode = http.POST("Hello Bottle, from ESP32"); //Send the actual POST request
Since we didn’t specify any return message in our Bottle application, we only need to confirm the status code. It should be 200 on a successful execution of the request. Note that in the ESP32 HTTPClient API, a value lesser than 0 is not a standard HTTP code but rather an internal error while performing the request.After performing the request, we should call the end method to free the ESP32 resources.
http.end(); //Free resources
The final full Arduino ESP32 code can be seen bellow, for an easy copy and paste. Note that we added the HTTP status code checking and a delay between each HTTP request. We also added a validation before performing the request to confirm that we are still connected to the WiFi network.
#include <WiFi.h> #include <HTTPClient.h> const char* ssid = "yourNetworkName"; const char* password = "yourNetworkPassword"; void setup() { Serial.begin(115200); delay(4000); WiFi.begin(ssid, password); while (WiFi.status() != WL_CONNECTED) { //Check for the connection delay(500); Serial.println("Connecting.."); } Serial.print("Connected to the WiFi network with IP: "); Serial.println(WiFi.localIP()); } void loop() { if(WiFi.status()== WL_CONNECTED){ //Check WiFi connection status HTTPClient http; http.begin("http://192.168.1.88:8090/"); //Specify destination for HTTP request http.addHeader("Content-Type", "text/plain"); //Specify content-type header int httpResponseCode = http.POST("Hello Bottle, from ESP32"); //Send the actual POST request if(httpResponseCode>0){ Serial.println(httpResponseCode); //Print return code }else{ Serial.print("Error on sending request: "); Serial.println(httpResponseCode); } http.end(); //Free resources }else{ Serial.println("Error in WiFi connection"); } delay(5000); //Send a request every 5 seconds }
Testing the application
To test the full application, start the Bottle server on your machine and then compile and upload the ESP32 code with the Arduino IDE. Then, open the serial console.If everything is working well, you should get an output similar to figure 3. Upon connecting to the WiFi network, we start sending the POST requests and receiving as an answer the 200 HTTP response code.

Figure 3– Output of running the code on the ESP32.
Now if you go to the Python shell, as shown in figure 4, you should get the prints of the body of the request sent by the ESP32. Note that, in my case, the IP shown matches the one printed in the serial console, on figure 3.

Figure 4 – Output of the Bottle application, upon receiving the requests from the ESP32. Finally, just to exemplify, we can shut down the bottle server and go back to the Arduino IDE serial monitor. In this case, an error message starts getting printed. This happens because the server is no longer available and now the ESP32 cannot connect anymore.
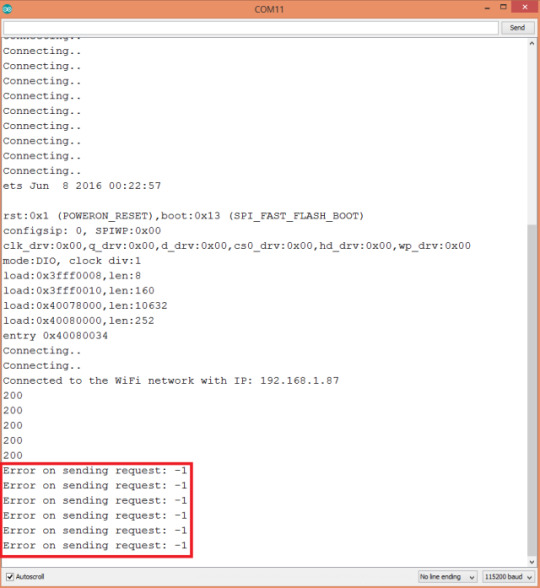
Figure 5– Output of the ESP32 program when is no longer possible to connect to the Bottle server.
DFRobot supply lots of esp32 arduino tutorials and esp32 projects for makers to learn.
0 notes
Text
Get started with machine learning on Arduino
This post was originally published by Sandeep Mistry and Dominic Pajak on the TensorFlow blog.
Arduino is on a mission to make machine learning simple enough for anyone to use. We’ve been working with the TensorFlow Lite team over the past few months and are excited to show you what we’ve been up to together: bringing TensorFlow Lite Micro to the Arduino Nano 33 BLE Sense. In this article, we’ll show you how to install and run several new TensorFlow Lite Micro examples that are now available in the Arduino Library Manager.
The first tutorial below shows you how to install a neural network on your Arduino board to recognize simple voice commands.

Example 1: Running the pre-trained micro_speech inference example.
Next, we’ll introduce a more in-depth tutorial you can use to train your own custom gesture recognition model for Arduino using TensorFlow in Colab. This material is based on a practical workshop held by Sandeep Mistry and Dan Coleman, an updated version of which is now online.
If you have previous experience with Arduino, you may be able to get these tutorials working within a couple of hours. If you’re entirely new to microcontrollers, it may take a bit longer.

Example 2: Training your own gesture classification model.
We’re excited to share some of the first examples and tutorials, and to see what you will build from here. Let’s get started!
youtube
Note: The following projects are based on TensorFlow Lite for Microcontrollers which is currently experimental within the TensorFlow repo. This is still a new and emerging field!
Microcontrollers and TinyML
Microcontrollers, such as those used on Arduino boards, are low-cost, single chip, self-contained computer systems. They’re the invisible computers embedded inside billions of everyday gadgets like wearables, drones, 3D printers, toys, rice cookers, smart plugs, e-scooters, washing machines. The trend to connect these devices is part of what is referred to as the Internet of Things.
Arduino is an open-source platform and community focused on making microcontroller application development accessible to everyone. The board we’re using here has an Arm Cortex-M4 microcontroller running at 64 MHz with 1MB Flash memory and 256 KB of RAM. This is tiny in comparison to Cloud, PC, or mobile but reasonable by microcontroller standards.

Arduino Nano 33 BLE Sense board is smaller than a stick of gum.
There are practical reasons you might want to squeeze ML on microcontrollers, including:
Function – wanting a smart device to act quickly and locally (independent of the Internet).
Cost – accomplishing this with simple, lower cost hardware.
Privacy – not wanting to share all sensor data externally.
Efficiency – smaller device form-factor, energy-harvesting or longer battery life.
There’s a final goal which we’re building towards that is very important:
Machine learning can make microcontrollers accessible to developers who don’t have a background in embedded development
On the machine learning side, there are techniques you can use to fit neural network models into memory constrained devices like microcontrollers. One of the key steps is the quantization of the weights from floating point to 8-bit integers. This also has the effect of making inference quicker to calculate and more applicable to lower clock-rate devices.
TinyML is an emerging field and there is still work to do – but what’s exciting is there’s a vast unexplored application space out there. Billions of microcontrollers combined with all sorts of sensors in all sorts of places which can lead to some seriously creative and valuable TinyML applications in the future.
What you need to get started
An Arduino Nano 33 BLE Sense board
A Micro USB cable to connect the Arduino board to your desktop machine
To program your board, you can use the Arduino Web Editor or install the Arduino IDE. We’ll give you more details on how to set these up in the following sections
The Arduino Nano 33 BLE Sense has a variety of onboard sensors meaning potential for some cool TinyML applications:
Voice – digital microphone
Motion – 9-axis IMU (accelerometer, gyroscope, magnetometer)
Environmental – temperature, humidity and pressure
Light – brightness, color and object proximity
Unlike classic Arduino Uno, the board combines a microcontroller with onboard sensors which means you can address many use cases without additional hardware or wiring. The board is also small enough to be used in end applications like wearables. As the name suggests it has Bluetooth LE connectivity so you can send data (or inference results) to a laptop, mobile app or other BLE boards and peripherals.
Tip: Sensors on a USB stick – Connecting the BLE Sense board over USB is an easy way to capture data and add multiple sensors to single board computers without the need for additional wiring or hardware – a nice addition to a Raspberry Pi, for example.
TensorFlow Lite for Microcontrollers examples
The inference examples for TensorFlow Lite for Microcontrollers are now packaged and available through the Arduino Library manager making it possible to include and run them on Arduino in a few clicks. In this section we’ll show you how to run them. The examples are:
micro_speech – speech recognition using the onboard microphone
magic_wand – gesture recognition using the onboard IMU
person_detection – person detection using an external ArduCam camera
For more background on the examples you can take a look at the source in the TensorFlow repository. The models in these examples were previously trained. The tutorials below show you how to deploy and run them on an Arduino. In the next section, we’ll discuss training.
How to run the examples using Arduino Create web editor
Once you connect your Arduino Nano 33 BLE Sense to your desktop machine with a USB cable you will be able to compile and run the following TensorFlow examples on the board by using the Arduino Create web editor:

Compiling an example from the Arduino_TensorFlowLite library.
Focus on the speech recognition example: micro_speech
One of the first steps with an Arduino board is getting the LED to flash. Here, we’ll do it with a twist by using TensorFlow Lite Micro to recognise voice keywords. It has a simple vocabulary of “yes” and “no”. Remember this model is running locally on a microcontroller with only 256KB of RAM, so don’t expect commercial ‘voice assistant’ level accuracy – it has no Internet connection and on the order of 2000x less local RAM available.
Note the board can be battery powered as well. As the Arduino can be connected to motors, actuators and more this offers the potential for voice-controlled projects.
Running the micro_speech example.
How to run the examples using the Arduino IDE
Alternatively you can use try the same inference examples using Arduino IDE application.
First, follow the instructions in the next section Setting up the Arduino IDE. In the Arduino IDE, you will see the examples available via the File > Examples > Arduino_TensorFlowLite menu in the ArduinoIDE.
Select an example and the sketch will open. To compile, upload and run the examples on the board, and click the arrow icon:

For advanced users who prefer a command line, there is also the arduino-cli.
Training a TensorFlow Lite Micro model for Arduino

Gesture classification on Arduino BLE 33 Nano Sense, output as emojis.
Next we will use ML to enable the Arduino board to recognise gestures. We’ll capture motion data from the Arduino Nano 33 BLE Sense board, import it into TensorFlow to train a model, and deploy the resulting classifier onto the board.
The idea for this tutorial was based on Charlie Gerard’s awesome Play Street Fighter with body movements using Arduino and Tensorflow.js. In Charlie’s example, the board is streaming all sensor data from the Arduino to another machine which performs the gesture classification in Tensorflow.js. We take this further and “TinyML-ifiy” it by performing gesture classification on the Arduino board itself. This is made easier in our case as the Arduino Nano 33 BLE Sense board we’re using has a more powerful Arm Cortex-M4 processor, and an on-board IMU.
We’ve adapted the tutorial below, so no additional hardware is needed – the sampling starts on detecting movement of the board. The original version of the tutorial adds a breadboard and a hardware button to press to trigger sampling. If you want to get into a little hardware, you can follow that version instead.
Setting up the Arduino IDE
Following the steps below sets up the Arduino IDE application used to both upload inference models to your board and download training data from it in the next section. There are a few more steps involved than using Arduino Create web editor because we will need to download and install the specific board and libraries in the Arduino IDE.

Download and install the Arduino IDE from: https://arduino.cc/downloads
Open the Arduino application you just installed
In the Arduino IDE menu select Tools > Board > Boards Manager…
Search for “Nano BLE” and press install on the board
It will take several minutes to install
When it’s done close the Boards Manager window

Now go to the Library Manager Tools > Manage Libraries…
Search for and install the Arduino_TensorFlowLite library
Next search for and install the Arduino_LSM9DS1 library:

Finally, plug the micro USB cable into the board and your computer
Choose the board Tools > Board > Arduino Nano 33 BLE
Choose the port Tools > Port > COM5 (Arduino Nano 33 BLE)
Note that the actual port name may be different on your computer
There are more detailed Getting Started and Troubleshooting guides on the Arduino site if you need help.
Streaming sensor data from the Arduino board
First, we need to capture some training data. You can capture sensor data logs from the Arduino board over the same USB cable you use to program the board with your laptop or PC.
Arduino boards run small applications (also called sketches) which are compiled from .ino format Arduino source code, and programmed onto the board using the Arduino IDE or Arduino Create.
We’ll be using a pre-made sketch IMU_Capture.ino which does the following:
Monitor the board’s accelerometer and gyroscope
Trigger a sample window on detecting significant linear acceleration of the board
Sample for one second at 119Hz, outputting CSV format data over USB
Loop back and monitor for the next gesture
The sensors we choose to read from the board, the sample rate, the trigger threshold, and whether we stream data output as CSV, JSON, binary or some other format are all customizable in the sketch running on the Arduino. There is also scope to perform signal preprocessing and filtering on the device before the data is output to the log – this we can cover in another blog. For now, you can just upload the sketch and get sampling.
To program the board with this sketch in the Arduino IDE:
Download IMU_Capture.ino and open it in the Arduino IDE
Compile and upload it to the board with Sketch > Upload
Visualizing live sensor data log from the Arduino board
With that done we can now visualize the data coming off the board. We’re not capturing data yet this is just to give you a feel for how the sensor data capture is triggered and how long a sample window is. This will help when it comes to collecting training samples.
In the Arduino IDE, open the Serial Plotter Tools > Serial Plotter
If you get an error that the board is not available, reselect the port:
Tools > Port > portname (Arduino Nano 33 BLE)
Pick up the board and practice your punch and flex gestures
You’ll see it only sample for a one second window, then wait for the next gesture
You should see a live graph of the sensor data capture (see GIF below)

Arduino IDE Serial Plotter will show a live graph of CSV data output from your board.
When you’re done be sure to close the Serial Plotter window – this is important as the next step won’t work otherwise.
Capturing gesture training data
To capture data as a CSV log to upload to TensorFlow, you can use Arduino IDE > Tools > Serial Monitor to view the data and export it to your desktop machine:
Reset the board by pressing the small white button on the top
Pick up the board in one hand (picking it up later will trigger sampling)
In the Arduino IDE, open the Serial Monitor Tools > Serial Monitor
If you get an error that the board is not available, reselect the port:
Tools > Port > portname (Arduino Nano 33 BLE)
Make a punch gesture with the board in your hand (Be careful whilst doing this!)
Make the outward punch quickly enough to trigger the capture
Return to a neutral position slowly so as not to trigger the capture again
Repeat the gesture capture step 10 or more times to gather more data
Copy and paste the data from the Serial Console to new text file called punch.csv
Clear the console window output and repeat all the steps above, this time with a flex gesture in a file called flex.csv
Make the inward flex fast enough to trigger capture returning slowly each time
Note the first line of your two csv files should contain the fields aX,aY,aZ,gX,gY,gZ.

Linux tip: If you prefer you can redirect the sensor log output from the Arduino straight to a .csv file on the command line. With the Serial Plotter / Serial Monitor windows closed use:
$ cat /dev/cu.usbmodem[nnnnn] > sensorlog.csv
Training in TensorFlow
We’re going to use Google Colab to train our machine learning model using the data we collected from the Arduino board in the previous section. Colab provides a Jupyter notebook that allows us to run our TensorFlow training in a web browser.

Arduino gesture recognition training colab.
The colab will step you through the following:
Set up Python environment
Upload the punch.csv and flex.csv data
Parse and prepare the data
Build and train the model
Convert the trained model to TensorFlow Lite
Encode the model in an Arduino header file
The final step of the colab is generates the model.h file to download and include in our Arduino IDE gesture classifier project in the next section:

Let’s open the notebook in Colab and run through the steps in the cells – arduino_tinyml_workshop.ipynb
Classifying IMU Data
Next we will use model.h file we just trained and downloaded from Colab in the previous section in our Arduino IDE project:
Open IMU_Classifier.ino in the Arduino IDE.
Create a new tab in the IDE. When asked name it model.h
Open the model.h tab and paste in the version you downloaded from Colab

Upload the sketch: Sketch > Upload
Open the Serial Monitor: Tools > Serial Monitor
Perform some gestures
The confidence of each gesture will be printed to the Serial Monitor (0 = low confidence, 1 = high confidence)
Congratulations you’ve just trained your first ML application for Arduino!

For added fun the Emoji_Button.ino example shows how to create a USB keyboard that prints an emoji character in Linux and macOS. Try combining the Emoji_Button.ino example with the IMU_Classifier.ino sketch to create a gesture controlled emoji keyboard ?.
Conclusion
It’s an exciting time with a lot to learn and explore in TinyML. We hope this blog has given you some idea of the potential and a starting point to start applying it in your own projects. Be sure to let us know what you build and share it with the Arduino community.
For a comprehensive background on TinyML and the example applications in this article, we recommend Pete Warden and Daniel Situnayake’s new O’Reilly book “TinyML: Machine Learning with TensorFlow on Arduino and Ultra-Low Power Microcontrollers.”
Get started with machine learning on Arduino was originally published on PlanetArduino
0 notes
Text
Temp/Humidity Data Analysis Using Ubidots and Google-Sheets
Story

In this tutorial, we will measure different temperature and humidity data using temperature and humidity sensor. You will also learn how to send this data to Ubidots. So that you can analyze it from anywhere for different applications. Also by sending this data to google sheets, predictive analysis can be achieved.
Hardware
ESP-32: The ESP32 makes it easy to use the Arduino IDE and the Arduino Wire Language for IoT applications. This ESp32 IoT Module combines Wi-Fi, Bluetooth, and Bluetooth BLE for a variety of diverse applications. This module comes fully-equipped with 2 CPU cores that can be controlled and powered individually, and with an adjustable clock frequency of 80 MHz to 240 MHz. This ESP32 IoT WiFi BLE Module with Integrated USB is designed to fit in all ncd.io IoT products. Monitor sensors and control relays, FETs, PWM controllers, solenoids, valves, motors and much more from anywhere in the world using a web page or a dedicated server. We manufactured our own version of the ESP32 to fit into NCD IoT devices, offering more expansion options than any other device in the world! The integrated USB port allows easy programming of the ESP32. The ESP32 IoT WiFi BLE Module is an incredible platform for IoT application development. This ESP32 IoT WiFi BLE Module can be programmed using the Arduino IDE.
IoT Long Range Wireless Temperature and Humidity Sensor: Industrial Long Range Wireless Temperature Humidity Sensor. Grade with a Sensor Resolution of ±1.7%RH ±0.5°C. Up to 500, 000 Transmissions from 2 AA Batteries. Measures -40°C to 125°C with Batteries that Survive these Ratings.Superior 2-Mile LOS Range & 28 miles with High-Gain Antennas. Interface to Raspberry Pi, Microsoft Azure, Arduino and more.
Software Used
Arduino IDE
Ubidots
Library Used
PubSubClient Library
Wire.h
Arduino Client for MQTT
This library provides a client for doing simple publish/subscribe messaging with a server that supports MQTT.
For more information about MQTT, visit mqtt.org.
Download
The latest version of the library can be downloaded from GitHub
Documentation
The library comes with a number of example sketches. See File > Examples > PubSubClient within the Arduino application. Full API Documentation.
Compatible Hardware
The library uses the Arduino Ethernet Client API for interacting with the underlying network hardware. This means it Just Works with a growing number of boards and shields, including:
Arduino Ethernet
Arduino Ethernet Shield
Arduino YUN – use the included YunClient in place of EthernetClient, and be sure to do a Bridge.begin() first
Arduino WiFi Shield - if you want to send packets greater than 90 bytes with this shield, enable the MQTT_MAX_TRANSFER_SIZE option in PubSubClient.h.
Sparkfun WiFly Shield – when used with this library
Intel Galileo/Edison
ESP8266
ESP32The library cannot currently be used with hardware based on the ENC28J60 chip – such as the Nanode or the Nuelectronics Ethernet Shield. For those, there is an alternative library available.
Wire Library
The Wire library allows you to communicate with I2C devices, often also called "2 wire" or "TWI" (Two Wire Interface), can download from Wire.h
Basic Usage
Wire.begin()Begin using Wire in master mode, where you will initiate and control data transfers. This is the most common use when interfacing with most I2C peripheral chips.
Wire.begin(address)Begin using Wire in slave mode, where you will respond at "address" when other I2C masters chips initiate communication.
Transmitting
Wire.beginTransmission(address)Start a new transmission to a device at "address". Master mode is used.
Wire.write(data)Send data. In master mode, beginTransmission must be called first.
Wire.endTransmission()In master mode, this ends the transmission and causes all buffered data to be sent.
Receiving
Wire.requestFrom(address, count)Read "count" bytes from a device at "address". Master mode is used.
Wire.available()Returns the number of bytes available by calling receive.
Wire.read()Receive 1 byte.
Uploading the Code to ESP32 Using Arduino IDE
Before uploading the code you can view the working of this sensor at a given link.
Download and include the PubSubClient Library and Wire.h Library.
You must assign your unique Ubidots TOKEN, MQTTCLIENTNAME, SSID (WiFi Name) and Password of the available network.
Compile and upload the temp_humidity.ino code.
To verify the connectivity of the device and the data sent, open the serial monitor. If no response is seen, try unplugging your ESP32 and then plugging it again. Make sure the baud rate of the Serial monitor is set to the same one specified in your code 115200.
Serial Monitor Output

Making the Ubidots Work
Create the account on Ubidots
Go to my profile and note down the token key which is a unique key for every account and paste it to your ESP32 code before uploading.
Add a new device to your Ubidots dashboard name ESP32.

Click on devices and select devices in ubidot.

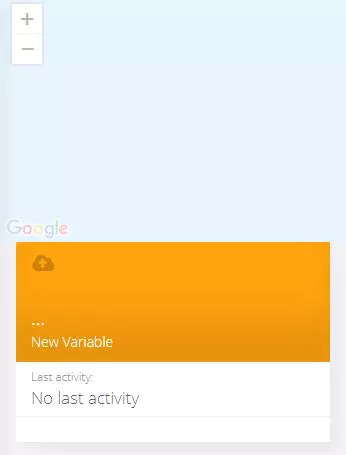
Now you should see the published data in your Ubidots account, inside the device called "ESP32".
Inside the device create a new variable name sensor in which your temperature reading will be shown.

Now you are able to view the Temperature and other sensors data which was previously viewed in serial monitor .This happened because the value of different sensor readings is passed as a string and store in variable and publish to variable inside device esp32.
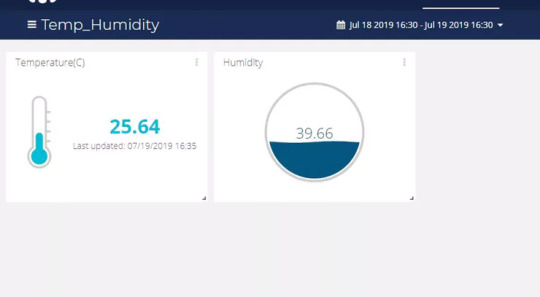
Create a Dashboard in Ubidots
Click on add a new dashboard.

Name your dashboard.


Now select Widget.

Now select all required option and your widget will create. On which you can view your temp and humidity data.

Output
Export Your Ubidots Data to Google Sheets
In this, we can extract the data stored in the Ubidots cloud for further analysis. The possibilities are enormous; for instance, you could create an automatic report generator and send them to your customers every week.
Another application would be device provisioning; if you have thousands of devices to deploy, and their information is in a Google Sheet, you could create a script to read the sheet and create a Ubidots data source for every line on the file.
Steps to do this:
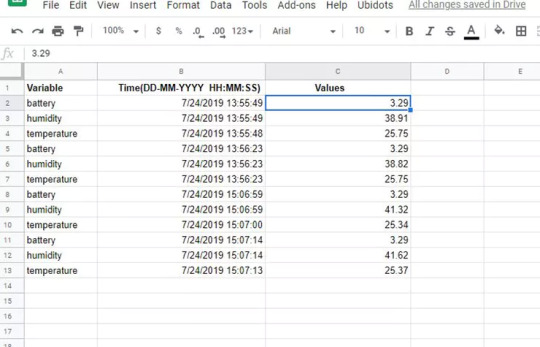
Create a Google Sheet and add two sheets to it with these names:
Variables
Values
From your Google Sheet, click on "Tools" then "Script Editor...", then "Blank Project":
Open the Script Editor:

Add the code below (in the code section) to the script Script.
Also add the Token Id, device Id taken from your Ubidots account to the following code.

Done! now open your Google Sheet again and you'll see a new menu to trigger the functions.

Result
0 notes