#ArduinoShield
Explore tagged Tumblr posts
Visit Tumblr Blog
Explore Tumblr blogs with no restrictions, modern design and the best experience.
Last Seen Tumblr Blogs


Fun Fact
There were a total of 171.5 billion posts on Tumblr in 2019.
Text
Arduino Joystick Shield Basics: Programmierung leicht gemacht für Anfänger
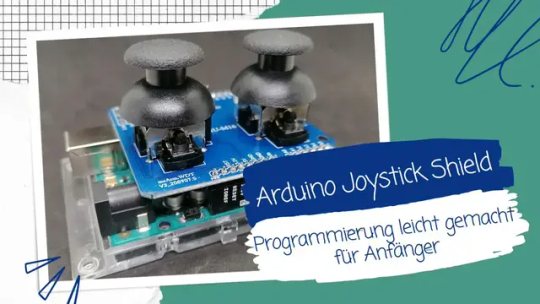
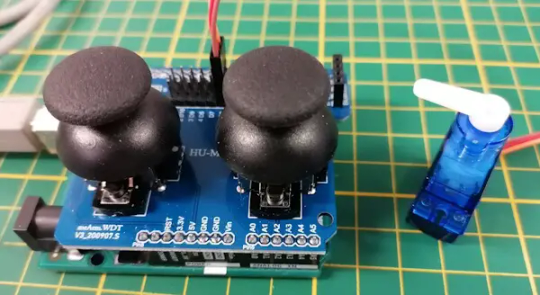
In diesem Beitrag möchte ich dir das Arduino Joystick Shield vorstellen und zeigen, wie dieses in der Arduino IDE programmiert wird. Du kannst mit diesem einfachen Shield einen Roboterarm oder auch ein kleines Fahrzeug über Bluetooth steuern. https://youtu.be/n9Yng6M20iE Das Joystick Shield verfügt über zwei analoge Joysticks, eine separate Schnittstelle für ein Bluetoothmodul sowie eine Stiftleiste für freie digitale Pins vom Mikrocontroller. Der aktive Betrieb des Moduls wird dir über eine 5 mm LED angezeigt.
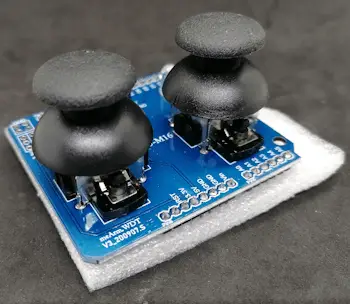
Joystick Shield für den Arduino UNO R3
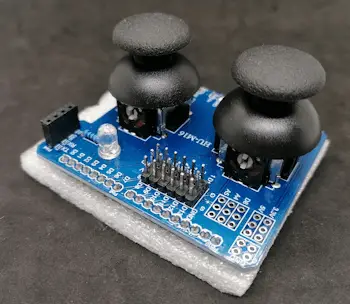
Schnittstellen am Arduino Joystick Shield
Bezug des Arduino Joystick Shield
Das hier vorgestellte Shield bekommst du besonders günstig bei aliexpress.com. Auf ebay.de bekommst du andere Shields welche über einen Joystick und ein Tastenkreuz verfügen und ähnlich funktionieren.
Aufbau des Joystick Shields
Das Joystick Shield verfügt wie bereits erwähnt über: - zwei analoge Joysticks, - eine rote, 5 mm LED, - eine separate Schnittstelle für Bluetoothmodule vom Typ HC-05 & HC-06, sowie - eine Stiftleiste für Servomotoren
Buchsenleiste für Bluetoothmodule
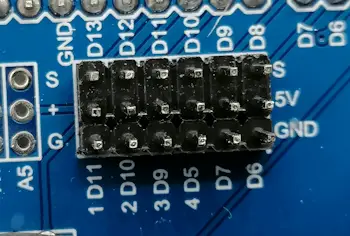
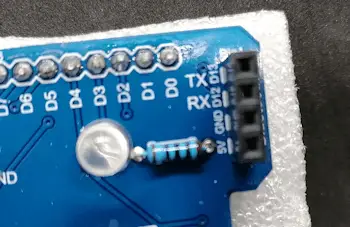
Stiftleiste für den Anschluss von Servomotoren Das Shield lässt sich auf die bestehenden Buchsenleisten der Arduinos stecken (ausgenommen natürlich dem Nano V3 und den Minis). Beim Arduino Mega 2560 R3 musst du auf die Buchsenbeschriftungen achten, denn dieser hat deutlich mehr Pins zur Verfügung.
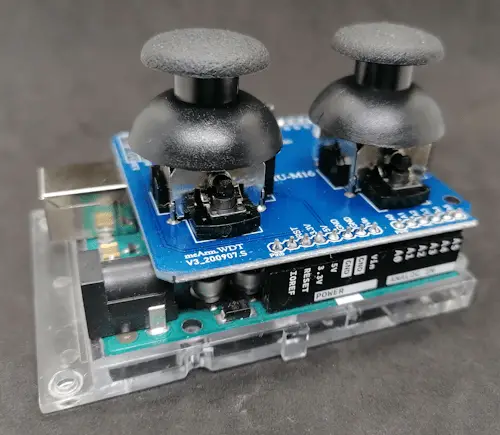
Arduino UNO R3 mit Joystick Shield
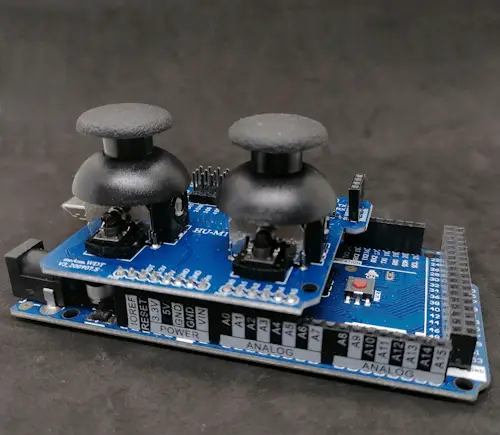
Arduino Mega 2560 R3 mit Joystick Shield Pinout des Shields Das Joystick Shield ist wie in der Grafik zu sehen aufgebaut.
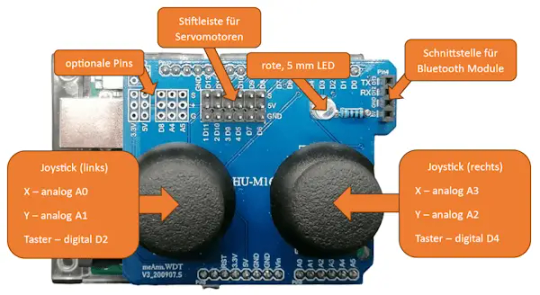
Aufbau des Joystick Shields für den Arduino KomponentePin am ArduinoLEDdigitaler Pin D3Joystick 1 (links)Xanalog A0Yanalog A1Tasterdigitaler Pin D2Joystick 2 (rechts)Xanalog A3Yanalog A2Tasterdigitaler Pin D4 Auf meinem Shield ist der Taster vom linken Joystick nicht mit dem Shield verbunden.
Anschluss von Servomotoren an das Joystick Shield
Das Shield hat, wie du in der Grafik siehst, 6 paar Stiftenleisten für Servomotoren. An diese kannst du theoretisch den Servomotor direkt anschließen, denn diese sind korrekt dafür ausgelegt.

Joystick Shield mit Servomotoren Für die kleinen Servomotoren ist dieses auch voll okay. Jedoch haben die großen Servomotoren deutlich mehr Kraft und ziehen dadurch auch mehr Leistung, das kann dieses Shield nicht leisten und dein Mikrocontroller würde einen Schaden nehmen! Für den großen Servomotor vom Typ MG996R benötigst du eine zusätzliche Stromversorgung mit min. 2A bei 5V. Also bevor du deinen Servomotor an dieses Shield anschließt, prüfe zunächst in den technischen Daten des Servomotors wie viel Last / Strom dieser zieht.
Programmieren in der Arduino IDE
Einen Mikrocontroller der Arduino-Familie kannst du am einfachsten in der Arduino IDE programmieren. Diese bringt die meisten Features gleich mit und wenn dir doch eins fehlt, kannst du dieses über die internen Board- /Bibliotheksverwalter nachinstallieren. Bevor wir jedoch mit der Programmierung beginnen und das Shield auf den Mikrocontroller stecken, spielen wir ein leeres Programm auf den Mikrocontroller auf. Mit diesem leeren Programm stellen wir sicher, dass keine Pins auf HIGH gesetzt werden, welche ggf. das Modul beschädigen kann. Auslesen der Werte der analogen Joysticks Bevor wir etwas steuern können, müssen wir erst einmal die Joysticks auslesen und die Werte speichern. Das nachfolgende kleine Programm dient uns auch später als Grundgerüst. //Koordinaten des linken Joysticks #define joystick1X_Pin A0 //X #define joystick1Y_Pin A1 //Y #define joystick1Button_Pin 4 //Taster //Koordinaten des rechten Joysticks #define joystick2X_Pin A3 //X #define joystick2Y_Pin A2 //Y #define joystick2Button_Pin 2 //Taster //rote, 5mm LED am digitalen Pin D3 //angeschlossen #define led 3 //Felder zum speichern der letzten Werte //linker Joystick int lastJ1X = -1; //X int lastJ1Y = -1; //Y //rechter Joystick int lastJ2X = -1; //X int lastJ2Y = -1; //Y void setup() { //begin der seriellen Kommunikation mit 9600 baud Serial.begin(9600); //Pins der Taster an den Joysticks //als Ausgang definieren, zusätzlich //werden diese Pins über den internen 10 kOhm //Widerstand umgeleitet. pinMode(joystick1Button_Pin, INPUT_PULLUP); pinMode(joystick2Button_Pin, INPUT_PULLUP); //Pin der LED als Ausgang definieren pinMode(led, OUTPUT); } //Funktion um die Werte eines Joysticks auszugeben. void printJoyStickValues(String joystick, int valueX, int valueY) { Serial.print("Joystick :" + joystick); //lesen der X-Position und umwandeln in ein String Serial.print(" X: " + String(valueX, DEC)); Serial.print(", "); //lesen der Y-Position und umwandeln in ein String Serial.println("Y: " + String(valueY, DEC)); } void loop() { //lesen der aktuellen Position des linken Joysticks int joyStick1X = analogRead(joystick1X_Pin); int joyStick1Y = analogRead(joystick1Y_Pin); //Wenn die gelesenen Werte sich von den zuvor gespeicherten //Werten unterscheiden, dann... if (joyStick1X != lastJ1X || joyStick1Y != lastJ1Y) { lastJ1X = joyStick1X; lastJ1Y = joyStick1Y; printJoyStickValues("links", joyStick1X, joyStick1Y); } //lesen der aktuellen Position des rechten Joysticks int joyStick2X = analogRead(joystick2X_Pin); int joyStick2Y = analogRead(joystick2Y_Pin); //Wenn die gelesenen Werte sich von den zuvor gespeicherten //Werten unterscheiden, dann... if (joyStick2X != lastJ2X || joyStick2Y != lastJ2Y) { lastJ2X = joyStick2X; lastJ2Y = joyStick2Y; printJoyStickValues("rechts", joyStick2X, joyStick2Y); } //Wenn der Taster am linken Joystick gedrückt wird, dann... if (digitalRead(joystick1Button_Pin) == LOW) { Serial.println("Taster Joystick links gedrückt!"); } //Wenn der Taster am rechten Joystick gedrückt wird, dann... if (digitalRead(joystick2Button_Pin) == LOW) { Serial.println("Taster Joystick rechts gedrückt!"); } //kleine Pause von 450 ms. //Diese wird lediglich benötigt um die Ausgaben im seriellen Monitor //der Arduino IDE zu lesen. Im Live betrieb sollte dieser entfernt werden! delay(450); } Der Code bewirkt, dass die Daten auf der seriellen Schnittstelle ausgegeben werden, jedoch, nur wenn diese sich ändern.
Steuern eines Servomotors mit dem Joystick Shield
Über die bereits gezeigten Stiftleisten kannst du wie erwähnt kleine, einfache Servomotoren anschließen und mit recht wenig Code steuern.
Arduino Joystick Shield mit Servomotor Typ SG90 Dabei musst du beachten, dass der Joystick sich in der Mittelposition befindet und somit einen ungefähren Wert von 511 liefert. //Einbinden der Bibliothek //zum steuern eines Servomotors. #include //Der Servomotor ist am //digitalen Pin D6 angeschlossen. #define servoPin 6 //Die X Koordinate des linken Joysticks //ist am analogen Pin A0 angeschlossen. #define joystickXPin A0 //initialisieren eines Servoobjektes Servo servo; void setup() { //verbinden des Pins vom Servo zum Objekt servo.attach(servoPin); } void loop() { //auslesen der aktuellen Position der X Koordinate //des Joysticks int joystickXPos = analogRead(joystickXPin); //anlegen einer Variable für den berechneten Wert //des Servos int servoValue = -1; //Der Joystick befindet sich in der Mittelposition, //das bedeutet das wir ca. 511 als analogen Wert empfangen. if (joystickXPos > 511) { //Den Wert der Variable joystickXPos mit dem Gültigkeitsbereich // 511 bis 1023 auf die Winkel 90 bis 0 mappen. servoValue = map(joystickXPos, 511, 1023, 90, 0); } else { //Den Wert der Variable joystickXPos mit dem Gültigkeitsbereich // 511 bis 0 auf die Winkel 90 bis 180 mappen. servoValue = map(joystickXPos, 511, 0, 90, 180); } //Zuweisen der neuen Position am Servoobjekt servo.write(servoValue); } Damit du den Code nicht abtippen oder kopieren musst, kannst du dir diesen hier als ZIP-Datei herunterladen. Code - steuern eines Servomotors vom Typ SG90 am Arduino Joystick ShieldHerunterladen Im nachfolgenden kleinen Video siehst du, dass wenn der linke Joystick nach links bewegt wird, sich das Ruderhorn des Servos ebenso in diese Richtung bewegt und andersherum. Wenn wir nun diesen Code etwas erweitern, dann können wir einen kleinen Pan-Tilt Bausatz steuern. Dieser Bausatz verfügt über zwei Servomotoren und eine kleine Adapterplatte, wo wir eine Kamera montieren können. Hier im Bild zusehen der Pan-Tilt Bausatz mit der M5Stack Kamera welche ich dir bereits im Beitrag Kleine Kamera, große Leistung: Vorstellung der ESP32 S3 CAM von M5Stack vorgestellt habe.
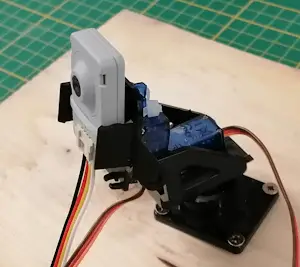
Dieser Bausatz hat wie erwähnt zwei Servomotoren, welche wir ebenso an das Joystick Shield anschließen können und mit den beiden Joysticks lässt dieses dich dann super einfach in fast alle Richtungen bewegen. Code - steuern eines Pan-Tilt Bausatzes mit M5Stack CAM mit dem Arduino Joystick ShieldHerunterladen
Fazit und Ausblick
Ich habe dir nun den Aufbau des Shields gezeigt sowie ein erstes kleines Programm, mit welchen die X/Y Position der Joysticks ausgelesen werden können. Im nächsten Beitrag werde ich dir dann zeigen, wie du mit diesem Shield einen 3DOF Roboterarm steuern kannst.
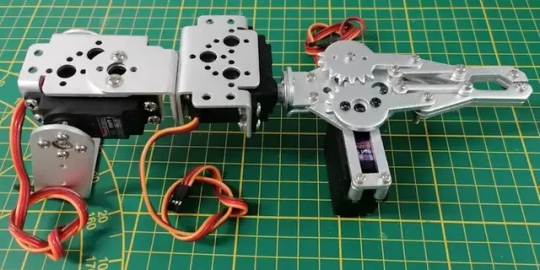
3DOF Roboterarm / Claw Ein weiterer Beitrag wird darum gehen, wie du mit diesem Shield ein kleines Fahrzeug mit dem Calliope Mini 3 steuern kannst.

Tinysuperlab MotionKit2 für den Calliope Mini 3 Bleib also dran und erfahre, wie du mit diesem Shield coole Projekte umsetzen kannst. Read the full article
0 notes
Photo

National Geographic Weather Station. Indicates heat stress danger Monitors how the air "feels" Humidex calculates values based on outdoor temperature and humidity Outdoor relative humidity Max/Min memory Celsius/Fahrenheit switchable #weatherstation #pcb #weather #printedcircuitboards #arduinoshield #atmega #embedded #system #u #battery #knowyourtone #bme #wordclock #hackadayprize #dprint #retrocomputing #makers #vintagesynth #electronicsolvers #pcbs #robotics #guitarfx #theatmosphere #diwo #integratedcircuit #beaglebone #electricalengineering #electrical #minidrone https://www.instagram.com/p/CS9fPmzLL68/?utm_medium=tumblr
#weatherstation#pcb#weather#printedcircuitboards#arduinoshield#atmega#embedded#system#u#battery#knowyourtone#bme#wordclock#hackadayprize#dprint#retrocomputing#makers#vintagesynth#electronicsolvers#pcbs#robotics#guitarfx#theatmosphere#diwo#integratedcircuit#beaglebone#electricalengineering#electrical#minidrone
0 notes
Photo

Did you know Crabbie: Development Board for Kids is compatible with Arduino and all sorts of sensors? Here we test the ICSP (in-circuit serial programming ) header. The left claw features a #protospace for your favorite components and the right claw features a 2 x 4 header for #esp8266wifi Oh the possibilities!!! Alpha testing goodness 🤓 #arduinoproject #arduino #arduinoshield #electronics #makerspace #makerfaireorlando #crabbiedevelopmentboard #stemeducation #steamlearning #elementaryteacher #elementaryart #steamkidschallenge #kidswhocode (at Tampa, Florida) https://www.instagram.com/p/B0eCrYsJZ4V/?igshid=18vvtl6rjugtw
#protospace#esp8266wifi#arduinoproject#arduino#arduinoshield#electronics#makerspace#makerfaireorlando#crabbiedevelopmentboard#stemeducation#steamlearning#elementaryteacher#elementaryart#steamkidschallenge#kidswhocode
0 notes
Photo

📸 Photo of the day: USB host shield for Arduino. #Enewground #arduino #arduinoshield #arduinouno #arduinomega #usb #usbhost #maker https://www.instagram.com/p/B0Kij4DHtTt/?igshid=gunlhn5mj0gv
0 notes
Photo

ALAT BANTU TUNA NETRA BERBASIS ARDUINO NANO Designer : @SURFAN_DESIGN3D ====================================== SURFAN DESIGN ~ LAYANAN DESAIN 3D BERKUALITAS DENGAN HARGA KOMPETITIF ====================================== SURFAN DESIGN melayani : ✅ Jasa ️Desain Produk ✅ Jasa Desain mesin ✅ Jasa Desain booth ✅ Jasa Desain furniture ✅ Jasa Render & visualisasi ✅ Jasa Drafter (gambar teknik 2d) ✅ Jasa Animasi desain ✅ Jasa Reverse Engineering ✅ Jasa desain menggunakan software berbasis : ▶️ Jasa desain Autocad ▶️ Jasa desain SolidWorks ▶️ Jasa desain Autodesk Inventor ▶️ Jasa desain Fusion360 ▶ ️Jasa desain SketchUP ▶️ Jasa desain 3dsMAX ▶️ Jasa desain Rhinoceros 3d ====================================== 👉Pemesanan via DM/WA (fast respon) : 📱 0858-7992-7791 ====================================== 📌LINE : [at] ved0052n (use @) 📌Instagram : @surfan_design3d 📌Facebook : [at] SurfanDesign3D 📌Email : [email protected] ====================================== #arduinonano #arduinojogja #arduinolove #arduinomega2560 #arduinos #arduinoprojects #arduinorobot #victoriaarduino #arduino_uno #arduinoday #arduinoshield #arduinocnc #arduinod16 #arduinoindonesia #arduinoleonardo #arduinod17 #arduinolover #arduino #jasaarduino #arduinobasics #arduinomega #arduinoboard #arduinouno #arduinofun #arduinounor3 #arduinoprogramming #jualarduino #arduinotutorial #arduinoproject #arduinomurah https://www.instagram.com/p/BtnwvxLhryK/?utm_source=ig_tumblr_share&igshid=tkq0ji23msiv
#arduinonano#arduinojogja#arduinolove#arduinomega2560#arduinos#arduinoprojects#arduinorobot#victoriaarduino#arduino_uno#arduinoday#arduinoshield#arduinocnc#arduinod16#arduinoindonesia#arduinoleonardo#arduinod17#arduinolover#arduino#jasaarduino#arduinobasics#arduinomega#arduinoboard#arduinouno#arduinofun#arduinounor3#arduinoprogramming#jualarduino#arduinotutorial#arduinoproject#arduinomurah
0 notes
Video
instagram
The #manufacturing A few days ago I had a flash back to when I first started in manufacturing. I was so out of place and distant from what would now become the norm to me. There is a gray noise in a semiconductor clean room that is like nothing I have ever heard. It's a low roar like a ship traveling across a distance of space or water. This noise triggered me back to my very first days of falling over myself and trying to figure out what have I got myself into. This is important to understand because. The job I was currently doing required total concentration to not mess up 9 months of work. Lol no pressure right?. After I completed the task no one talked to me or actknowledged what I just did. It was just like my first few days when I started in the industry. The difference is that 3 years now it will be future technology and back then it was "hey you get over here and finish this.." I guess what I'm saying is this. The world is full of opportunities sometime when I watch people drop everything and become someone who lives day to day without a "corporate life" I sort of envy them. But I know without the commitments, trusts and hard work I wouldn't be who I am today. So, as a #maker I realize we all have dreams we want to follow. Sometimes you need also to be the persons other can count on. As #makers you will find the dream is just over the horizon but the the real truth is it's only a guide that lets you see where you are going to be in the future. Once your are there you might slow down and look at your past. #inspire your friends to be makers. #motivate your family to follow your path and #innovate and #create your future. #ethernet #arduinoshield #iot #networking #data #bigdata #datalog #arduinoproject #sd #microSD #logging #dajavu #semiconductors #hightech #technology #tech #siliconvalley #silicon #wafers #reflect https://www.instagram.com/p/BNnW1BVB8oU/?igshid=w8t937gt6400
#manufacturing#maker#makers#inspire#motivate#innovate#create#ethernet#arduinoshield#iot#networking#data#bigdata#datalog#arduinoproject#sd#microsd#logging#dajavu#semiconductors#hightech#technology#tech#siliconvalley#silicon#wafers#reflect
0 notes
Photo

https://proyectoarduino.com/arduino-shield-extension-de-hardware/ . . . #proyectoarduino #arduino #arduinoshield #shield #arduinotutorial https://www.instagram.com/p/BoAX5xJnOmg/?utm_source=ig_tumblr_share&igshid=1iis64v7kehp
0 notes
Video
instagram
#ledlamp is finally done The @arghuino #code and instructions were spot on! A little #copypaste goes a long way... . @andystechgarage #andystechgarage #atg #atgstem #andystem #stemandy #stematg #stemlearning #stemproject #stemlearning #stemed #stemedu #stemeducation #education #arduinouno #arduinoproject #microcontroller #podpi #programming #hatarduino #arduinohat #hat #uno #arduinouno @c4labsinc #johnnyfive #arduinoshield #maker #makers #makersgonnamake #coding
#coding#education#stemlearning#makersgonnamake#andystechgarage#programming#hat#stemedu#podpi#arduinoshield#arduinohat#atgstem#microcontroller#maker#makers#code#ledlamp#atg#arduinouno#arduinoproject#stemandy#stemed#stemproject#copypaste#uno#stematg#andystem#stemeducation#hatarduino#johnnyfive
0 notes
Text
UDEMY Make Your Own Arduino Shield for FREE
New Post has been published on https://netsmp.com/2020/09/28/udemy-make-your-own-arduino-shield-for-free/
UDEMY Make Your Own Arduino Shield for FREE
https://www.udemy.com/course/arduino-shield-make-your-own-arduino-pcb-shield-arduinoshield/?couponCode=STAYHOME092020 https://www.udemy.com/course/ultimate-php-css-and-sass-enhance-your-javascript-skills/?couponCode=UDEMYSEP95 https://www.udemy.com/course/ultimate-php-css-and-sass-enhance-your-javascript-skills/?couponCode=UDEMYSEP95 https://www.udemy.com/course/ultimate-php-css-and-sass-enhance-your-javascript-skills/?couponCode=UDEMYSEP95 https://www.udemy.com/course/digital-marketing-courses/?couponCode=21SEPT999 https://www.udemy.com/course/digital-marketing-courses/?couponCode=21SEPT999 https://www.udemy.com/course/digital-marketing-courses/?couponCode=21SEPT999 https://www.udemy.com/user/claydesk/ https://www.udemy.com/user/claydesk/ https://www.udemy.com/user/claydesk/ https://www.udemy.com/course/arduino-shield-make-your-own-arduino-pcb-shield-arduinoshield/?couponCode=STAYHOME092020
0 notes
Photo

Meet Crabbie | My 1st Development Board. New boards just printed! Bright red and smiling bright. We’re excited about our cool crab 🦀 shaped crustacean. Built around the Atmega328 (like Arduino Uno) to inspire young future engineers 🙇🏽♀️ K-5th 🙇🏼♂️around the globe. Save and share! https://www.kickstarter.com/projects/bits4botsllc/1552980522?ref=b2mi87&token=fae5ea97 This project will be available on #Kickstarter Summer 2019 so please follow our page & stay tuned for updates. #makerfaireorlando #electronics #makerfaire #pcb #pcbdesign #stemgirls #stemeducation #makerfairetampa #stemforkids #makersgonnamake #arduinoshield @bits4bots #makemagazine (at Tampa, Florida) https://www.instagram.com/p/BzMaCa4HII5/?igshid=16wkdnexhyr7
#kickstarter#makerfaireorlando#electronics#makerfaire#pcb#pcbdesign#stemgirls#stemeducation#makerfairetampa#stemforkids#makersgonnamake#arduinoshield#makemagazine
0 notes
Video
instagram
The #manufacturing A few days ago I had a flash back to when I first started in manufacturing. I was so out of place and distant from what would now become the norm to me. There is a gray noise in a semiconductor clean room that is like nothing I have ever heard. It's a low roar like a ship traveling across a distance of space or water. This noise triggered me back to my very first days of falling over myself and trying to figure out what have I got myself into. This is important to understand because. The job I was currently doing required total concentration to not mess up 9 months of work. Lol no pressure right?. After I completed the task no one talked to me or actknowledged what I just did. It was just like my first few days when I started in the industry. The difference is that 3 years now it will be future technology and back then it was "hey you get over here and finish this.." I guess what I'm saying is this. The world is full of opportunities sometime when I watch people drop everything and become someone who lives day to day without a "corporate life" I sort of envy them. But I know without the commitments, trusts and hard work I wouldn't be who I am today. So, as a #maker I realize we all have dreams we want to follow. Sometimes you need also to be the persons other can count on. As #makers you will find the dream is just over the horizon but the the real truth is it's only a guide that lets you see where you are going to be in the future. Once your are there you might slow down and look at your past. #inspire your friends to be makers. #motivate your family to follow your path and #innovate and #create your future. #ethernet #arduinoshield #iot #networking #data #bigdata #datalog #arduinoproject #sd #microSD #logging #dajavu #semiconductors #hightech #technology #tech #siliconvalley #silicon #wafers #reflect
#inspire#semiconductors#arduinoshield#arduinoproject#technology#makers#dajavu#siliconvalley#networking#data#create#motivate#bigdata#microsd#iot#innovate#reflect#manufacturing#hightech#logging#datalog#silicon#tech#ethernet#maker#wafers#sd
0 notes
Video
instagram
#ledlamp @arghuino #style - so cool!!
Simply downloaded the #code for this one…
Thank goodness for #copypaste
.
@andystechgarage #andystechgarage #atg #atgstem #andystem #stemandy #stematg #stemlearning #stemproject #stemlearning #stemed #stemedu #stemeducation #education #arduinouno #arduinoproject #microcontroller #microcontrollers #podpi #programming #hatarduino #arduinohat #hat #uno #arduinouno
@c4labsinc #c4labs #johnnyfive #arduinoshield #rgb #rgbled #maker #makers #makersgonnamake
#uno#style#copypaste#atg#stemlearning#rgbled#maker#podpi#johnnyfive#arduinohat#stemproject#hat#c4labs#makers#arduinoproject#stemeducation#arduinouno#andystem#stemedu#makersgonnamake#ledlamp#stemandy#arduinoshield#andystechgarage#rgb#atgstem#programming#hatarduino#education#code
1 note
·
View note