#AudioInterface
Explore tagged Tumblr posts
Visit Tumblr Blog
Explore Tumblr blogs with no restrictions, modern design and the best experience.
Last Seen Tumblr Blogs


Fun Fact
In 2020, Tumblr had 29.4 million users in the US.
Text
Step-by-Step Guide to Connecting Studio Monitors to an Audio Interface for Optimal Sound
Setting up your home studio with studio monitors is a game-changer for improving sound accuracy. Unlike regular speakers, studio monitors offer a flat frequency response, giving you a more accurate representation of your recordings. Connecting your studio monitors to an audio interface correctly is essential to achieving the best sound quality and ensuring that your mixes translate well on any playback system.
In this guide, we’ll walk you through the step-by-step process of connecting studio monitors to an audio interface, while covering key considerations for optimal sound.
Why Use Studio Monitors with an Audio Interface?
An audio interface serves as the bridge between your computer and the monitors, providing high-quality audio output. It ensures that the audio signal from your computer is converted into a format that can be played through your monitors, giving you clear, accurate sound during production.
Studio monitors, when connected properly to your audio interface, provide a true representation of your music without exaggerated bass or treble. This ensures you can make informed decisions during the mixing and mastering process.
Step-by-Step Guide to Connecting Studio Monitors to an Audio Interface
Step 1: Gather the Necessary Equipment
Before connecting your studio monitors to the audio interface, make sure you have the right equipment. Here’s what you’ll need:
- **Studio monitors**: A pair of active (powered) monitors.
- **Audio interface**: Ensure it has balanced outputs.
- **Balanced cables**: XLR or TRS cables are ideal for optimal sound quality.
- **Power source**: Both the interface and monitors will need power.
Step 2: Position Your Studio Monitors Correctly
The placement of your studio monitors is crucial for accurate sound. Follow these guidelines for optimal positioning:
- **Create an equilateral triangle**: Position your monitors and listening position in the shape of an equilateral triangle. The distance between the two monitors should be the same as the distance from each monitor to your ears.
- **Height and angle**: The tweeters (high-frequency drivers) of your monitors should be at ear level, and the monitors should be angled slightly inward, aiming directly at your listening position.
- **Avoid corners**: Avoid placing your monitors in the corners of the room, as this can cause an uneven bass response due to sound reflections.
Step 3: Connect the Audio Interface to Your Computer
Before connecting the monitors, start by connecting your audio interface to your computer:
- **USB/Thunderbolt**: Most audio interfaces use a USB or Thunderbolt connection. Plug the appropriate cable into your interface and connect it to your computer.
- **Install drivers**: If your interface requires specific drivers, make sure to download and install them from the manufacturer’s website to ensure the interface functions properly.
Step 4: Use Balanced Cables for Connecting Monitors to the Interface
Balanced cables, such as XLR or TRS (1/4-inch) cables, are recommended for connecting studio monitors to the audio interface. They reduce noise and interference, ensuring a cleaner sound.
- **XLR to XLR**: If your audio interface and monitors have XLR inputs and outputs, use an XLR cable for the connection. Plug one end into the *balanced output* of the interface and the other end into the *balanced input* of the monitor.
- **TRS to TRS**: If your monitors have TRS inputs and your interface has TRS outputs, use TRS cables (1/4-inch) to connect the interface to the monitors. TRS cables are also balanced and help prevent signal interference.
> **Note:** Avoid using unbalanced cables (like RCA or TS), as they are more prone to interference and can result in a noisier signal.
Step 5: Power on Your Monitors and Interface
Once everything is connected, it’s time to power on your equipment:
- **Power on the audio interface first**: Turn on the interface before your studio monitors. This helps prevent any loud pops or noises from damaging your speakers when the system is powered on.
- **Power on the monitors**: After the interface is on, power up the studio monitors.
Step 6: Adjust Volume Settings
With everything connected and powered up, the next step is to set appropriate volume levels:
- **Monitor volume**: Start by setting your studio monitors’ volume to around 70-80% of their maximum output. This ensures they operate at an optimal level without distortion.
- **Interface volume**: Use the volume controls on your audio interface to adjust the overall output. Begin at a lower level and gradually increase to find a comfortable listening volume.
- **DAW output levels**: In your DAW (digital audio workstation), keep the master output level at unity (0 dB). Avoid excessive boosting in the software, as this can lead to clipping or distortion in your mix.
Step 7: Test the Setup
Once your monitors are connected and volumes adjusted, test the setup with an audio track you’re familiar with. Listen closely to ensure that:
- The left and right channels are properly balanced.
- There is no hum, hiss, or interference in the signal.
- The monitors are delivering a clear, accurate sound across all frequencies.
Step 8: Optimize the Room’s Acoustics
Even with properly connected monitors, your room’s acoustics play a major role in how the sound is perceived. Here are a few tips to optimize your room for better sound:
- **Acoustic treatment**: Add acoustic panels and bass traps to your room to reduce sound reflections and enhance accuracy.
- **Monitor isolation pads**: Use monitor stands or isolation pads to decouple your monitors from your desk and reduce vibrations that can color the sound.
Common Mistakes to Avoid
- **Using unbalanced cables**: Unbalanced cables can introduce noise and interfere with the signal. Always use balanced XLR or TRS cables for the best sound quality.
- **Incorrect monitor placement**: Poor placement can lead to inaccurate sound. Follow the equilateral triangle method for ideal positioning.
- **Volume mismatch**: Avoid setting your monitors’ volume too high or your interface’s output too low. Find a balanced setting for both to ensure optimal performance.
Conclusion
Connecting your studio monitors to your audio interface correctly is essential for producing high-quality, professional sound in your home studio. By following this step-by-step guide and using the right equipment, you’ll be able to enjoy accurate sound that reflects the true nature of your recordings. Proper positioning, balanced cables, and careful volume adjustments will make all the difference in achieving the best possible audio experience.
With this setup in place, you’ll be ready to create and mix music with confidence, knowing that what you hear is an honest representation of your production.
#MusicProduction#HomeStudio#SoundEngineering#MusicGear#SoundQuality#RecordingStudio#AudioSetup#StudioMonitors#AudioInterface#MonitorConnection
0 notes
Text
In our review, we talk about Arturia MiniFuse Recording Pack. The Arturia MiniFuse Recording Pack is a fantastic entry-level to mid-range recording solution for musicians, streamers, and bloggers who need a reliable and easy-to-use setup.
#audio#music#recording#studio#musicians#microphone#arturia#mic#synth#audiointerface#audio gear#vocalist#recording studio#musicindustry#mastering#audioengineer
1 note
·
View note
Text
What is the best Audio Interface for a Neumann Microphone?
Diving into audio recording! 🎧 Looking for the perfect interface for my #Neumann mic—thinking UA Volt, Audient Evo 16, or Focusrite. What’s your favorite? 🎶✨ #AudioGear #MusicProduction #HomeStudio #SoundEngineering #AudioInterface #MusicLovers
I’m shopping for a new microphone, a Neumann, and hoping to pair it with an audio interface. Curious, I asked the YouTube audio interface experts the following questions. What is the best Audio Interface for a Neumann Microphone? To discover the answer to the question above, I asked the experts on YouTube the following questions. What is a good audio interface for that microphone 107 or 103 on…
#AudioGear#AudioInterface#HomeStudio#Microphone#MusicLovers#MusicProduction#Neumann#RecordingStudio#SoundEngineering
0 notes
Text
The Importance of an Audio Interface

An audio interface is essential for converting analog signals to digital. This device connects microphones and instruments to your computer. It plays a key role in achieving professional sound quality. Look for interfaces with low latency and high sample rates. Features like multiple inputs can enhance your setup. A reliable audio interface improves recording and playback experiences. Consider brands known for their durability and performance. For more information, visit our internal link: Top Audio Interfaces Reviewed. Explore options at Guitar Center for a variety of audio interfaces.
1 note
·
View note
Text
Is A Soundcard An Audio Interface?
Stamp Sound @StampSound
youtube
Is An Audio Interface A Soundcard?
SadowickProduction @SadowickProduction
youtube
Audio Interface
Sound Card, Audio Card
04/06/2024, tuesday 4 june 2024, 10:41 a.m, indore, madhya pradesh, india.
0 notes
Text
https://www.youtube.com/watch?v=Pi6Fmi... https://kettnercreative.com/audio-interface/focusrite-scarlett-solo-vs-vocaster-one-audio-interface-which-is-best-for-you/
0 notes
Text
DIGIMIC DCen32: A 32-Channel Central Unit with Dante Audio Interface
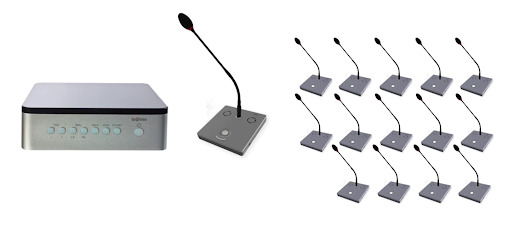
Welcome to the world of advanced audio integration with the DIGIMIC DCen32! This cutting-edge central unit boasts 32 channels and comes equipped with a state-of-the-art Dante audio interface, taking your audio experience to new heights. Whether you're in a professional studio setting, a live event, or any audio-intensive environment, the DCen32 ensures seamless transmission and top-notch audio quality. With TMS Online compatibility, managing and controlling your audio setup has never been easier. Embrace the future of audio technology and unlock the full potential of your sound system with DIGIMIC DCen32!
0 notes
Text
Einblicke in den Studioalltag eines Musikproduzenten
[vc_row][vc_column][vc_column_text]In der Musikbranche gibt es viele Facetten, die für das Publikum unsichtbar bleiben. Der kreative Prozess, der zu einem fertigen Song oder Album führt, ist oft genauso faszinierend wie das Endprodukt selbst. Besonders der Studioalltag eines Musikproduzenten bietet zahlreiche spannende Einblicke in eine Welt, die vor allem von Technik, Kreativität und hartem…
#2024#Audiointerfaces#BEATZEKATZE records#DAW#Kreativität#Mastering#Mixing#Musikproduktion#Musikproduzent#Musikstudio#Songwriting#Sounds#Studioalltag#Studioarbeit#Teamarbeit#Technik
0 notes
Text
*✍︎ Computer music [DTM] に必要なもの
・Computer (コンピュータ): これがないと始まらない。ラップトップでOK。 (例) MacBook pro 16 ▶︎ 『 PCの必要なスペック 』
・DAW (ダウ / ディーエーダブリュー): Digital Audio Workstation の略。 PC上で音楽制作を実行するためのソフトウェア。 (例) Logic pro (Macのみ対応)
・Audiointerface (オーディオインターフェース): マイク、楽器の音をPCに取り込むための機器。 PCからスピーカー等に出力するためにも使用する。 𖤐 PCのサウンドよりも高音質な音の出入力が可能。 (例) Steinberg UR22C
・MIDIキーボード/ PAD: DAWの音源をコントロールする機器。 ( 私の場合、打ち込みはKORGキーボードのみ使用。)
・入力(録音)機材: (例) コンデンサーマイク:AT4040 [ マイクガード、コード ]
・出力機材: (例) ヘッドフォン:ATH - M50x 𖤐 モニタースピーカーがあると◎
- - - 単 語 - - - - Software (ソフトウェア) =コンピュータを動かすプログラム、データ集合体の総称。
0 notes
Text
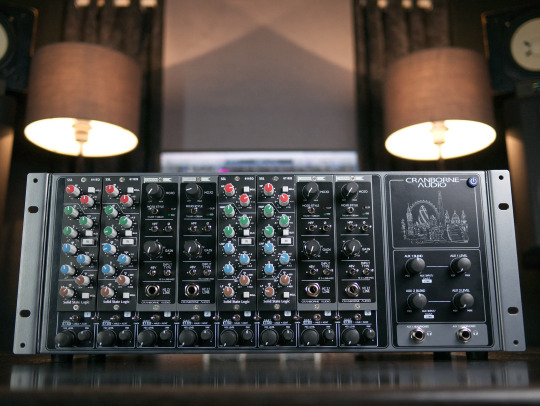
🎛️ Cranborne Audio 500ADAT – Expand Your Studio Horizons! 🎶
The Cranborne Audio 500ADAT is an 8-slot 500 Series rack that seamlessly integrates with your ADAT-equipped audio interface, adding analog warmth and flexibility to your digital setup. Purchased from The Pro Audio in India – exceptional service and swift delivery! 🚀🇮🇳
Featuring high-performance A/D and D/A conversion with a dynamic range of 121dB, the 500ADAT ensures pristine audio quality. Its built-in analog summing mixer and zero-latency artist mixer, complete with two reference-quality headphone outputs, make it a versatile centerpiece for any studio.
Elevate your recording and mixing capabilities with the 500ADAT's seamless blend of analog character and digital convenience. A game-changer for producers and engineers seeking top-tier sound and workflow efficiency! 🎵🔥
#CranborneAudio #500ADAT #StudioGear #AnalogSumming #MusicProduction #TheProAudioIndia #ProAudio #AudioInterface #MixingConsole


0 notes
Text
audiointerface nys & alfred snapcube comparison question mark?
0 notes
Video
youtube
#onlineshopping #usb #focusritescarlett2i2 #audiointerface
As an Amazon Associate I earn from qualifying purchase #CommissionsEarned #ad
0 notes
Text

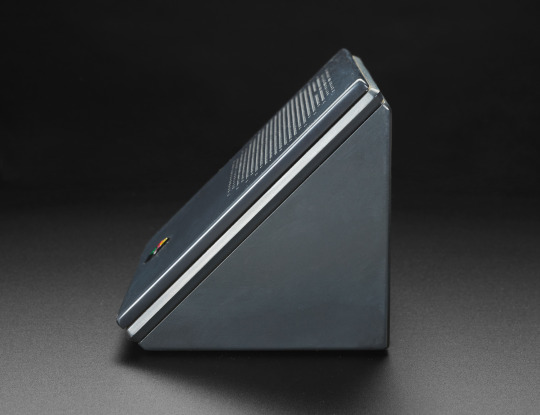


NeXT Sound Box (1991) 🎵🚀🎸🖱️⌨️⚙️🖤🎚️🔊
NeXT Sound Box, an audio interface and a hub for connecting peripherals like keyboards and mice to NeXT Computers / NeXTstations. High-quality audio capabilities, could sample sounds at a CD-quality rate of 44.1 KHz, using a 56001 DSP for the sound system, featured multiple ports, including two RCA jacks for stereo sound output, and 3.5mm jacks for headphones and microphone.
#NeXTSoundBox#VintageTech#90sComputing#AudioInterface#HighQualitySound#CDQuality#DSP56001#StereoOutput#NeXTComputer#NeXTstation#ComputerHistory#NeXTInc#RetroTech#ComputerPeripherals#ComputerAudio#Retro#apple
9 notes
·
View notes
Photo

Shoutout to the fine folks at @uaudio for sending over this Volt 476P, now our exclusive interface for demos moving forward. Simple to set up, easy to dial in great tones quickly, amazing plugins, etc…this unit is just incredible. Be sure to check out demos featuring the *CRISP* sounds provided by #universalaudio over on our YouTube channel, cheers!! 🎛🎥🖥💻 #pedaloftheday #uaudio #volt #volt476 #volt476p #interface #audiointerface #daw https://www.instagram.com/p/CjF06XJAPbr/?igshid=NGJjMDIxMWI=
2 notes
·
View notes
Video
I decided to turn my old laptop and Makie Mixer into a homemade audio interface! -----------------Follow------------------ @psycho_buni @psycho_buni @psycho_buni . . . . . . . . . . #producerlifestyle #producer #audioengineer #audiointerface #homestudio #homemade #fl #flstudio #guitar #guitarist #bassmusic #mic #mixing #futurebassmusic #futurebassproducer #audiogear #producergear #productiongear #gear #iboughtabletonthenextday https://www.instagram.com/p/CShJ36oAfQX/?utm_medium=tumblr
#producerlifestyle#producer#audioengineer#audiointerface#homestudio#homemade#fl#flstudio#guitar#guitarist#bassmusic#mic#mixing#futurebassmusic#futurebassproducer#audiogear#producergear#productiongear#gear#iboughtabletonthenextday
3 notes
·
View notes
Text
The Volt 276 has 55dB of gain. Depend... https://kettnercreative.com/audio-interface/volt-275-gain/
7 notes
·
View notes