#Built-in Wi-Fi for Raspberry Pi Pico
Explore tagged Tumblr posts
Visit Tumblr Blog
Explore Tumblr blogs with no restrictions, modern design and the best experience.
Last Seen Tumblr Blogs


Fun Fact
Users from the US are the majority of Tumblr visitors.
Text
#Built-in Wi-Fi for Raspberry Pi Pico#IoT development board#Raspberry Pi for IoT projects#Wi-Fi-enabled microcontroller#DIY electronics with Raspberry Pi#Robotics with Raspberry Pi Pico#Home automation with Raspberry Pi
3 notes
·
View notes
Text
Raspberry Pi announces a $7 Pico 2 with built-in Wi-Fi
The Raspberry Pi Pico 2 now comes with Wi-Fi and Bluetooth. | Image: Raspberry Pi Raspberry Pi has announced an updated version of the Pico 2 microcontroller board with an onboard Wi-Fi chip. Called the Pico 2 W, it’s powered by RP2350 microcontroller, which you can find in all manner of nerdy DIY gadgets and fun devices like the minuscule Thumby Color GBA clone. Best of all, it costs $7, up just…
0 notes
Text
Raspberry Pi announces a $7 Pico 2 with built-in Wi-Fi
http://i.securitythinkingcap.com/TGNSsK
0 notes
Text
Comparing Raspberry Pi Pico and Zero👇
While the Raspberry Pi Pico and Zero models may appear similar at first glance, they possess distinct characteristics that determine their suitability for specific projects.
Within the array of Raspberry Pi models varying in size and form, the Pico and Zero stand out as some of the smallest options. Despite initial appearances, these two boards are fundamentally disparate, each harboring unique attributes and intended applications.
A comprehensive examination of these disparities will elucidate their divergent functionalities and potential use scenarios.
Raspberry Pi Pico:
The Raspberry Pi Pico emerges as the most budget-friendly Raspberry Pi board, obtainable for as little as $4 for the basic version devoid of wireless capabilities. Contrary to other Raspberry Pi models, the Pico is classified as a microcontroller board, diverging from the realm of single-board computers. In essence, it embodies the essence of an Arduino rather than mirroring the traits of a conventional desktop computer.
Its capacity does not extend to hosting an operating system or facilitating video display connections (unless augmented by third-party supplementary boards). However, it boasts significantly diminished power consumption, rendering it an impeccable choice for uncomplicated embedded projects. An additional distinctive feature, labeled Programmable I/O (PIO), empowers users to forge bespoke hardware interfaces for extensions while alleviating the primary processor's workload.
Beyond the initial standard release, the Raspberry Pi Pico encompasses three other iterations: the Pico W, integrating wireless connectivity; the Pico H, equipped with pre-soldered headers; and the Pico WH, integrating both Wi-Fi and headers.
Raspberry Pi Zero:
Unveiled in November 2015, the Raspberry Pi Zero stands as a compact, economical single-board computer. The original version, still accessible, is priced at a mere $5, a mere dollar more than the Pico. A variant known as the Raspberry Pi Zero W encompasses built-in Wi-Fi and Bluetooth capabilities, rendering it particularly suitable for Raspberry Pi-based IoT endeavors.
In 2021, a more potent iteration, the Raspberry Pi Zero 2 W, was launched at a cost of $15. Significantly outpacing its predecessor, it attains speeds up to five times faster while also embracing 64-bit compatibility.
Diverging from the Pico, the Raspberry Pi Zero is proficient in running the Raspberry Pi OS, a Debian-based Linux distribution optimized for Raspberry Pi devices, alongside a spectrum of alternative Raspberry Pi operating systems. For a more comprehensive exploration of this board, refer to our comprehensive assessment of the Pi Zero 2 W.
0 notes
Text
Awesome Arduino UNO Projects to Try in 2022!
1.Farmaid: Plant Disease Detection Robot
In this Arduino Project, the author is inspired by the work of Plantvillage.psu.edu and iita.org, and we want to use the DonkeyCar platform to build an autonomous robot that can move around a farm environment without damaging existing plants or soil, and we want to use objects Detection to find and mark diseased crops with eco-friendly colors.
What do you need:
Arduino UNO
Raspberry Pi 3 Model B
ibt-2 H Bridge
Raspberry Pi Camera Module
2.Intelligent Door Lock
In today's world, security and accessibility are major concerns. We are constantly striving to keep our home secure while making our home devices easily accessible even remotely. This Arduino project will show you how to convert an Arduino UNO into a door lock using a Raspberry Pi camera.
What do you need:
Arduino UNO

Raspberry Pi 3 / 4 / Zero / 2 / 1
Raspberry Pi Camera Module
Servos (Tower Pro MG996R)
Speaker: 0.25W, 8 ohms
Mono Audio Amp Breakout – TPA2005D1
Pushbutton switch 12mm
3.Arduino Nano BLE 33 Sense Game Controller
PRABEEN built this game controller with an Arduino Nano BLE 33 Sense, which includes a proximity sensor. As you can see, this is a simple and enjoyable Arduino project!
What do you need
Arduino Nano BLE 33 Sense / XIAO BLE Sense
USB Cable Assembly, USB Type A Plug to Micro USB Type B Plug
4.Arduino Radar
It detects stationary and moving objects with the help of an ultrasonic sensor and an Arduino. And this is a simple Arduino project for beginners!
What do you need?
Arduino UNO
Ultrasonic Sensor
Breadboard
SG90 Micro-servo motor
5. Arduino Weather Station
A powerful Arduino weather station can assist you in more efficiently watering plants and lawns. Use the daily report to determine whether you can skip an irrigation day. Smart Weather will even communicate with connected irrigation systems automatically. You can learn how to use an arduino uno to connect other sensors to monitor the temperature and humidity of your garden in this cool arduino project.
What do you need?
UNO

16X2 LCD RGB Backlight – Full Color Display
Temperature & Humidity Sensor (DHT11)
Female/Female Jumper Wires
Male/Female Jumper Wires
6. Arduino 3D Axonometric Projection
Any method of mapping three-dimensional points to a two-dimensional plane is referred to as 3D projection. Because the majority of current methods for displaying graphical data are based on planar two-dimensional media, this type of projection is widely used, particularly in computer graphics and engineering. In addition, this project Although Arduino is difficult, it is still a fun arduino project.
What do you need?
Arduino Pico
TFT Touch Shield V1.0
ESP-32
7. Making Famous Magic Wand 33x Faster
Do you want to be a wizard for a day? This project will show you how to use a small PCB board to transform a stick in your hand into a magic wand. And this is a really enjoyable Arduino project!
What do you need?
Arduino Nano 33 BLE Sense or XIAO BLE Sense
Wooden Magic Wand ( wooden stick )
8. Arduino Distance sensor and OLED
You can find this blog here. In this blog, you will learn how to use an Arduino UNO and an Ultrasonic Sensor to detect the distance between two objects and how to use a Graphic OLED to display the distance. This project is ideal for Arduino beginners.
What do you need?
Arduino UNO
Grove – Ultrasonic Distance Sensor
Graphic OLED / Graphic LCD
Jumper Wires
9. IoT Weather Data Logger Using Blues Wireless
This project will walk you through the process of building an IoT-based weather data logger using Blues Wireless hardware modules; no SD card, Wi-Fi, or BLE is required. To track your weather data, simply connect your Blues Notecard and Note carrier to the controller.
What do you need?
Arduino Nano 33 BLE Sense
DHT11 Temperature Sensor
Air Quality Sensor
Light Sensor
Source- Seed Studio
2 notes
·
View notes
Text
Raspberry Pi Pico W launched - build your Internet of Things projects much easier!
Raspberry Pi Pico W launched – build your Internet of Things projects much easier!
Image from Raspberry Pi Raspberry Pi has today launched the Raspberry Pi Pico W (see the official announcement here). This uses the same RP2040 chip as the regular Pico but has wi-fi built into it! This is going to get eaten up by the Internet of Things crowd and, at $6 (£6 ish), it is incredibly good value for money! You can buy a Pico W from Pimoroni and of course from The Pi Hut and there are…
View On WordPress
1 note
·
View note
Note
If you check DigiKey, you'll see this. They stock some 2000 variants of STM32 chips, which span a dozen different perform and feature classes. They only have FORTY of these in stock, and they're all like, 10 units here, 45 units there.


Meanwhile there's only 150 different variants of the ESP32, but 75 of those are in stock and they're in stock of thousands.


The other good option for home projects if you want something very cheap with good but basic capabilities is the Raspberry Pi Pico, which is bespoke silicon that almost no one is using commercially, yet.
The ESP's are still good, they have built in ADC's and or course wi-fi, but the RP2040 is cheap as dirt and a very fast system as long as you don't DSP-level floating point or analogue input.
Are µC prices fucky rn? I'm looking for arduino micro/nano clones (to do pwm for a noctua desk fan) on amazon and they're no cheaper than an ESP32 WROOM. both are 3 for £20 ish.
STM's Cortex chips (ARM M0/M4/M7 etc.) in particular are super out of stock, and those are the basis of a lot of the nano/micro size parts like the Bluepill or the Pro Micro. A few engineers I know have had to switch entire designs from Cortex to ESP32 just for supply reasons. The stock is recovering in the past few months but it's still not enough to meet demand. ESP is doing better, and Atmel/Microchip seem to be doing okay.
The ESP32's are a really good choice for home projects, several decent toolchains (ESP-RTOS is extremely handy) and if you don't mind limiting yourself to only one core you can program them in Arduino. Built-in WiFi is one of those things you think you don't need but once you have it you use it for everything, it's a great configuration and control interface.
21 notes
·
View notes
Text
A Peek at the Pico, Raspberry Pi's Newest Petite Powerhouse
Raspberry Pi Pico
8.80 / 10
Read Reviews
Read More Reviews
Read More Reviews
Read More Reviews
Read More Reviews
Read More Reviews


Shop Now
Meet the new Raspberry Pi Pico; a tiny microcontroller filled with big possibilities.
Specifications
Brand: Raspberry Pi
CPU: Dual-core 133Mhz ARM
Memory: 264Kb
Ports: microUSB
Pros
Powerful ARM Processor
Micro-USB Connectivity
Breadboard Mountable
Easy-To-Use Interface
Absolutely Adorable
Inexpensive
Cons
No Wi-Fi or Bluetooth connectivity
No Header Pins
I/O Port Labelling on One Side Only
No USB-C Connectivity
Buy This Product
Raspberry Pi Pico other
Shop
// Bottom var galleryThumbs1 = new Swiper('.gallery-thumbs-1', { spaceBetween: 10, slidesPerView: 10, freeMode: true, watchSlidesVisibility: true, watchSlidesProgress: true, centerInsufficientSlides: true, allowTouchMove: false, preventClicks: false, breakpoints: { 1024: { slidesPerView: 6, } }, }); // Top var galleryTop1 = new Swiper('.gallery-top-1', { spaceBetween: 10, allowTouchMove: false, loop: true, preventClicks: false, breakpoints: { 1024: { allowTouchMove: true, } }, navigation: { nextEl: '.swiper-button-next', prevEl: '.swiper-button-prev', }, thumbs: { swiper: galleryThumbs1 } });
We’ve managed to get our hands on the coveted Raspberry Pi Pico. Today, we’re going to be looking at some of the most important features and putting it toe-to-toe with some of the biggest names in small electronics.
We’ll be showing you what the Pico can do, and we’ll get you started with MicroPython, one of Pico’s supported programming languages. We’ll even offer up some code to try in case you decide to buy a Pico of your own.
What Is a Raspberry Pi Pico?
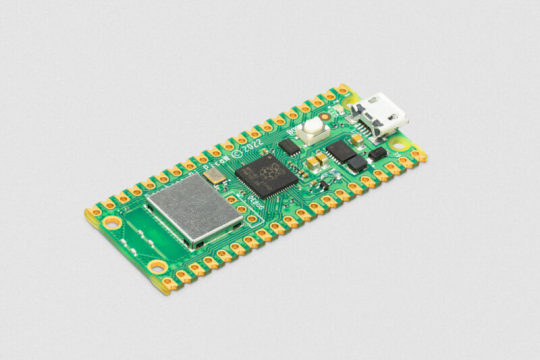
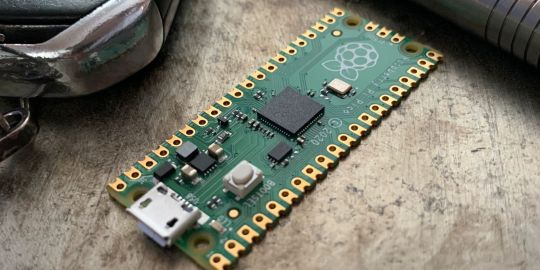
Raspberry Pi Pico is a new budget microcontroller designed by Raspberry Pi. It’s a tiny computer built around a single chip, with onboard memory, and programmable in/out ports. Historically, microcontrollers are used in a variety of devices from medical implants to power tools. If you have an electronic device sitting in your vicinity, there’s a good chance that there’s a microcontroller inside of it.
Key Features of the Pico

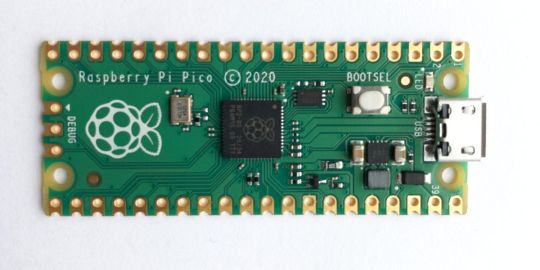
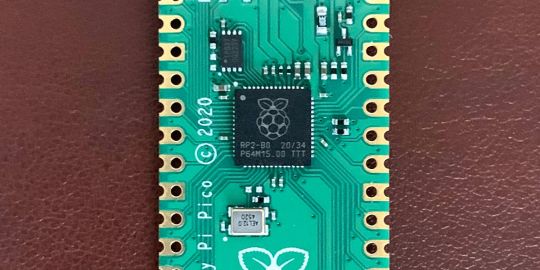
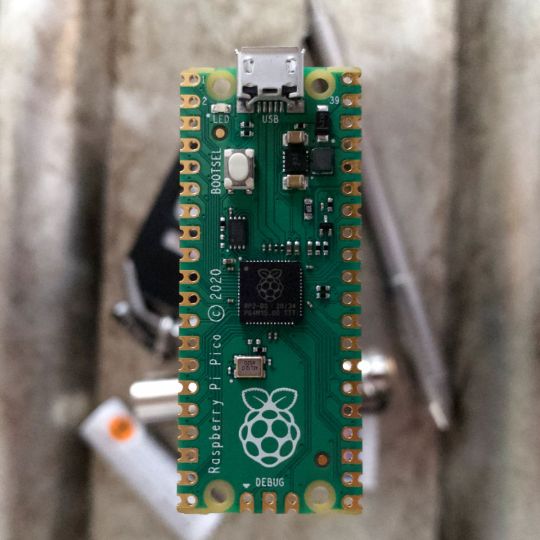
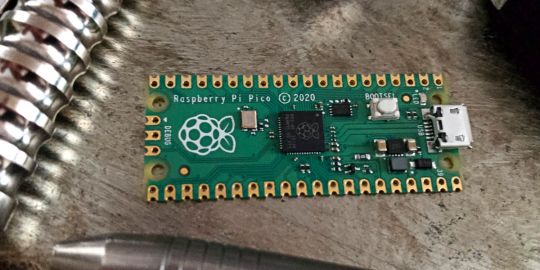
The Pico is built around the RP2040 microcontroller chip, which was designed by Raspberry Pi UK. It’s a Dual-Core ARM processor with a flexible clock that can run up to 133 MHz. The Pico also supports 1.8-5.5 DC input voltage, has a micro-USB input port, and an onboard temperature sensor.
Flanking the chip on all sides are a series of castellations that allow easy soldering to a Veroboard or breadboard. This dual in-line package (DIP) style form factor is stackable, and can also be used in carrier board applications.
Technical Specifications
21 mm x 51 mm
264kb on-chip RAM
2 MB on-board QSPI flash
2 UART
26 GPIO
2 SPI controllers
2 ISC controllers
16 PWM channels
Accelerated integer and floating-point libraries
3-pin ARM Serial Wire Debug (SWD) port
What’s So Special About the Pi Pico?
The Pi Pico is a different kind of microcontroller. It’s Raspberry Pi’s first, and it features ARM technology in its RP2040 silicon chip. Many technology companies are embracing silicon ARM chips, with major manufacturers like Apple leading the charge.
The punchy little Pico packs a staggering 26 multifunction general purpose input/output (GPIO) ports, including 3 that are analog. Alongside these ports are 8 programmable input/output (PIO) ports. Compare this to other microcontrollers like the Arduino Nano, and the Pico packs roughly 18% more GPIO capability.
The most considerable difference between the Pico and its competitors, however, is the $4 price tag. Low cost is the main selling point of this unique offering.
At launch, many online retailers sold out of the device due to the interest and Raspberry Pi’s favorable reputation. By setting the price so low, the Pico opens the door for a new class of high-powered, budget microcontrollers.
There are many potential applications for the new Pico. With its onboard temperature sensor, the device is an obvious choice for IoT projects.
One talented retro gaming enthusiast even used a Pico to build a gaming console with full VGA video support.
youtube
This means that makers who have been curious about Raspberry Pi, or microcontrollers in general, now have the ability to experiment for less than the price of a fancy cup of coffee.
Related: The Raspberry Pi Comes of Age With the Pi 400 Desktop
The Raspberry Pi Pico Processor
The RP2040 ARM chip is an interesting choice for the Pico. At 133MHz, the chip is capable of leaving more expensive boards, like the Arduino Uno, in the dust.
Using ARM processors seems to be an emerging trend in the world of microcontrollers. In addition to Raspberry Pi, both Sparkfun and Adafruit also offer boards with similar ARM technology.
The industry-wide switch was made for a single reason—speed. ARM processors give a considerable boost over standard Atmel chips. In a board this size, using an ARM processor is like dropping a fully kitted Porsche engine into a Volkswagen. On the other hand, many microcontrollers don’t require that much processing speed. Yet.
Ramping up performance means that makers who want to push the limits of the Pico will have an abundance of power to do so.
The I/O Ports
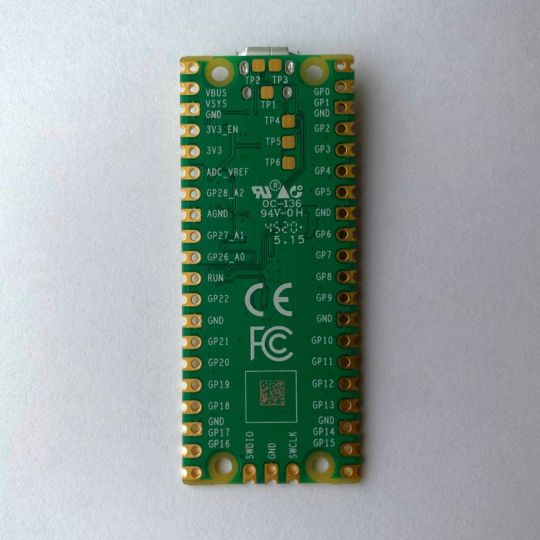
The GPIO ports on the Pi Pico feature several interesting functions for common uses such as operating a screen, running lighting, or incorporating servos/relays. Some functions of the GPIO are available on all ports, and some only work for specific uses. GPIO 25, for example, controls the Pico’s onboard LED, and GPIO 23 controls the onboard SMPS Power Save feature.
The Pico also has both VSYS (1.8V — 5.5V) and VBUS (5V when connected to USB) ports, which are designed to deliver current to the RP2040 and its GPIO. This means that powering the Pico can be done with or without the use of the onboard micro-USB.
A full list of the I/O ports is available on Raspberry Pi’s website in its complete Pico documentation.
Pico vs. Arduino vs. Others
One question on the minds of many makers is whether or not the Raspberry Pi Pico is better than Arduino?
That depends. Pound-for-pound, higher-end Arduino boards like the Portenta H7 make the Pico look like a toy. However, the steep cost for a board of that caliber might be a tough pill for the microcontroller hobbyist to swallow. That's why the smaller price tag on the Pico makes it a win for makers who enjoy low-risk experimentation.
Along with minimal cost, the Raspberry Pi jams an extensive feature set into the Pico, comparable to boards like the Teensy LC, and the ESP32. But neither of these competitors manage to challenge the budget-friendly Pico on price.
That's what makes the Pico such a fantastic value, and a great choice for hobbyists and power users alike.
The Pi Pico: What’s Not To Love?
Unfortunately, to drive the price of the Pico down, Raspberry Pi had to make a few compromises. The most notable of which is the lack of an onboard radio module. Neither Bluetooth nor Wi-Fi is supported without add-ons.
The Wi-Fi limitation can be eliminated by adding a module like the ESP-01. Bluetooth support may prove a bit more challenging. If you need an all-in-one solution for your products, you’re better off skipping the Pico, and spending a little extra for something like the Pi Zero W, or ESP32.
Additionally, many early adopters are complaining about the lack of GPIO labeling on the top of the board. Raspberry Pi provides an extensive amount of documentation on its website to address this, but pointing-and-clicking, or thumbing through paperwork when you have a hot soldering iron in your hands isn’t often desirable.
Lastly, the lack of I/O pin headers is something of an issue for some, as it means less convenience when swapping I/O components. This minor annoyance can be solved via the use of leads, soldering the component wiring directly to the Pico, or using a breadboard.
If you’ve been using microcontrollers or small electronics for any period of time, then an unpopulated board is most likely a non-issue. Of course, you could also add your own pin headers if you plan on regular experimentation with different external components.
The final rub with the Pico is the micro-USB port. With many other microcontrollers like the Portenta H7 moving toward USB-C, Raspberry Pi's micro-USB port seems dated.
Logically however, the decision to use micro-USB makes sense. It was done by Raspberry Pi to keep costs as low as possible, and to keep interface capability almost universal. Everyone we know has at least a few micro-USB cables tucked away somewhere in their homes.
However, with future versions, a USB-C interface would be a nice addition to an already spectacular package.
Related: A Beginners Guide To Breadboarding With Raspberry Pi
Programming the Raspberry Pi Pico
Interfacing with the Pi Pico can be done via C/C++, or via MicroPython in the Read-Eval-Print-Loop or REPL (pronounced “Reh-pul”). The REPL is essentially a command line interface that runs line-by-line code in a loop.
In order to access the REPL, you’ll need to install MicroPython onto the Pico. This process is simple and only involves four steps.
Installing MicroPython
Download MicroPython for Raspberry Pi Pico from the Raspberry Pi Website
Connect the Pico to your computer via micro-USB while holding the BOOTSEL button
Wait for the Pico to appear as an external drive
Copy the MicroPython file to the Pi Pico, and it will automatically reboot
You can access the REPL in a number of ways. We used the screen command in a macOS terminal window to access the serial bus connected to the Pico. To accomplish this with Terminal, you’ll first open a new terminal window, then type ls /dev/tty*
From there, find the port where the Pico is connected. It should be labeled something like /dev/tty.usbmodem0000000000001. Then run the command:
screen /dev/tty.usbmodem0000000000001
Your cursor should change. Hit Return and the cursor will change again to >>>.
In the image below we've included the classic Hello World (Hello, Pico) command-line program in the REPL, along with a few lines of code that will turn the Pico's LED on and off. Feel free to try them yourself.
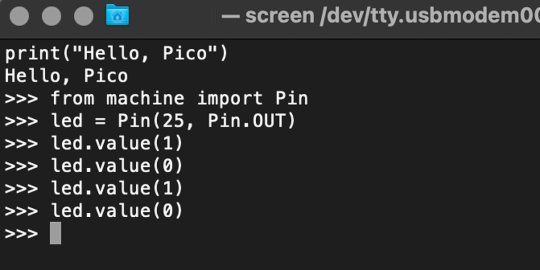
For more information, we recommend you invest in the official starter guide to MicroPython that Raspberry Pi has published on their website.
Download: MicroPython for Raspberry Pi Pico (free)
Using the Raspberry Pi Pico With Thonny
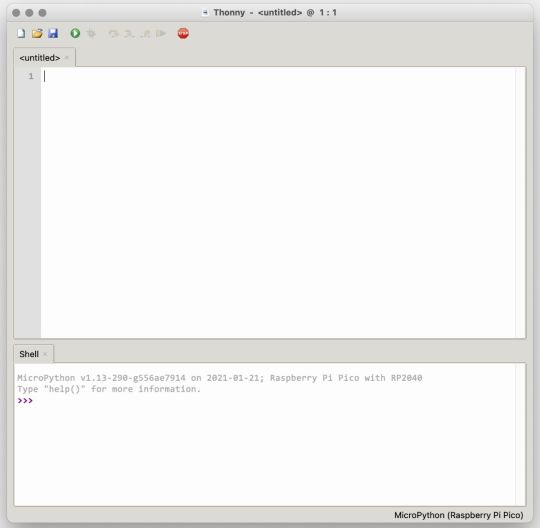
If you’re looking for a more proper coding environment, the Raspberry Pi Pico will also allow access to the REPL with Thonny. To enable this feature, first download and install Thonny. Once installed, connect your Pi Pico. Open Thonny and you'll see information indicating your Pico is connected in the Shell.
At the bottom right of the screen, you should see a version of Python. Click this version and select MicroPython (Raspberry Pi Pico) from the drop-down menu.
Now you can type commands into the Shell, or you can use Thonny’s editor to write or import multiple lines of code.
The abundance of interface possibilities make the Raspberry Pi Pico easy to program. For those who are familiar with MicroPython, this should be nothing new. For beginners, however, Thonny provides a powerful interface and debugger to get started with programming.
Download: Thonny (Free) Windows | Mac
Should I Buy the Raspberry Pi Pico?
The Raspberry Pi Pico is a powerful budget board that is perfect for hobbyists, or makers just starting out with microcontrollers. The documentation, low cost, and wide range of possibilities for the Pico also make it a great choice for seasoned small electronics wizards. If you’re a DIYer who loves to tinker, or you just want to challenge yourself to a weekend project, then you’ll love playing with the Pico.
On the other hand, if you don't have one or more projects in mind that need a microcontroller, then this board is probably not for you. Also, if your project needs Wi-Fi connectivity or Bluetooth, then the Pico won’t scratch that itch. And finally, for users who aren’t comfortable learning MicroPython, or exploring C/C++, the Pico isn't ideal. And remember: this Raspberry Pi is not like the others. It will not run a full Linux operating system.
But, if you dream in Python, or if you love the smell of solder, then you won't regret grabbing this tiny powerhouse. Most of all, if the sight of the sports-car-sleek RP2040 gets your creative gears turning, then we think you’ll really benefit from picking up the Pico.
Serving up Several Sweet Possibilities
While it isn’t perfect, the Raspberry Pi Pico is a strong entry into the world of microcontrollers. The reputation that Raspberry Pi has built for quality electronic components at a relatively low price extends to the Pico.
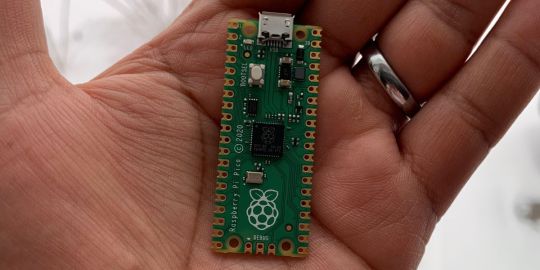
It’s everything a Raspberry Pi should be: small, sweet, and superb. It’s beautifully designed, and extremely inexpensive. But the best part isn’t the looks or the low cost.
The best part about this small wonder is picking it up, and holding it in your hands. It's feeling the tug of electronic inspiration. It's realizing just how powerful the Pico is, and what it means for microcontrollers going forward.
And truthfully, we think it's amazing that something as small as the Pico can offer so many unique possibilities.
A Peek at the Pico, Raspberry Pi's Newest Petite Powerhouse published first on http://droneseco.tumblr.com/
0 notes
Text
Build Your Own Retro Gaming Handheld With ClockworkPi GameShell
Our verdict of the ClockworkPI GameShell: GameShell is a retro gaming tribute that lets you fulfil that dream of programming your own 8-bit or 16-bit game. While it has some minor issues, no other dedicated device promises so much, which makes the GameShell that bit more special.710
Want to game on the go, but unsure about squeezing your favorite single-board computer into that old Nintendo Gameboy? What you need is a portable games console that has all the retro gaming in it you can handle, right?
The GameShell portable console from Clockwork looks and feels like a Nintendo Gameboy and comes with retro gaming software preinstalled. Better still, it’s a DIY kit, which means you still get the satisfaction of building the GameShell yourself, with some customization options. It’s currently retailing for $159, though the price may go up after the initial launch period.
Prepare for retro gaming awesomeness.
youtube
It’s a Gameboy-style DIY Handheld Games Console
The explosion of retro gaming over the past few years has resulted in countless DIY projects aiming for mobile gaming.
You’ve probably seen Raspberry Pi computers squeezed into portable DVD players and even old Nintendo Gameboys. The Clockwork GameShell takes this idea of portable retro gaming and runs with it. You basically have the chance to play your favorite games on the go, on a device you’ve built and customized.
Highly Hackable and Open Source
A successful Kickstarter campaign that raised over $290,000 in 2017, the GameShell features a custom-built board, ClockworkPi v3.1.
This open source design is a modular, portable gaming system, visually reminiscent of the Gameboy, that ships in kit form, ready to be snapped together.
Thanks to a dedicated operating system and retro emulation software, you can enjoy thousands of classic games.
But it’s not all about playing retro games.
The GameShell also features support for programming languages including:
C
Python
Lua
LISP
Games can be created on the device, or existing projects modified.
There’s more, however: the GameShell’s outward appearance can be customized. Ultimately, you end up with a programmable, portable game console that looks how you want, and plays the games you love.
What’s in the Box?
This is a true kit-based experience, and in the box you’ll find a collection of labels for customization, along with a guide, the case components, and the electronics.
The GameShell’s hardware is logically sorted into boxes; one holds the front of the case, another the power components, etc. Five boxes are included in all and building the handheld console means working through these components in turn.
No soldering is required. All you need to do is follow the five-stage guide and be reasonably confident that you can plug things in.
Similarly, no screws are included, as they’re also not required. Mounting the hardware components relies on the design of the case, making this a surprisingly simple build.
This Is a Modular Portable System
Inside the case, you might expect to get direct access to the components.
However, it doesn’t quite work like that.
The GameShell is a modular system, meaning that the five key components are housed in their own plastic case. So, there’s a case for the 320×240 px display, a case for the mainboard, and a case for the battery. The D-Pad controls also sit in their own case, as does the speaker.
Each module is connected by pluggable wires. Most importantly, perhaps, the modules can theoretically be replaced. For example, if a powerful new CPI mainboard was released, that could be purchased and used to easily replace the current version.
CPI Mainboard System Spec
All of this is made possible thanks to the CPI Mainboard (v3.1) which features a 1GHz quad-core Cortex-A7 CPU, Mali GPU, 1GB DDR memory, and onboard Wi-Fi and Bluetooth. There’s also a micro HDMI port and micro USB connector, audio out, and GPIOs.
This hardware is more than adequate to play most retro games, but you’ll find the GameShell is capable of more.
Note that the 1050mAh battery is pretty small and as such as a low capacity. You can expect to get around 90-120 minutes of play time out of a single charge.
Building the Clockwork GameShell Console
The GameShell console is surprisingly straightforward to put together. Following the steps in the guide I was able to build a working portable game console inside 30 minutes.
Now, although the turnaround was surprisingly short, it wasn’t plain sailing all the way.
For example, while snapping the modules into their cases is easy enough, hooking up the display to the CPI mainboard was a pain. I had to remove the CPI from its modular casing to complete the connection and secure the cable, which seems like a flaw in the design.
Then there’s the general mess that the console appears to be once the modules are connected. Until they’re clicked into place within the main case, the GameShell resembles an electronic octopus.
Finally snapping the case together and securing it with the plastic “wheel locks” is satisfying.
However, if you forget to insert the microSD card as I did, things can get a bit messy. The microSD card slot is on the back of the mainboard module, so this means removing the front of the case, then the display, and then the mainboard module to gain access.
This would have been avoided if I’d inserted the microSD card earlier!
Boot Up With a Pre-Installed microSD Card
On the SD card, the Clockwork OS is preinstalled. This is based on Debian 9 ARMhf, and the Linux Kernel 4.1x. Various software can be run on this, including PICO 8, LOVE2D, PyGame, Phaser.io, Libretro, and other game engines.
The GameShell user interface is based on a 320×240 pixel resolution and controlled using the D-Pad control.
This monochrome-style UI lets you easily navigate the GameShell’s features. You can adjust settings, launch software, play music, and access the ClockworkPI tiny cloud using the standard controls.
It’s easy, comfortable, and generally pleasing to use.
Retro Gaming With the GameShell
The key draw for the GameShell is retro gaming, so how is it?
Well, it’s pretty good. Various retro emulators have been adapted for it, with MAME, Pcsx, MGBA, and NESTOPIA all pre-installed.
There’s even RetroArch for other retro options, along with some on-board games such as FreeDOOM and CaveStory.
Meanwhile, retro gaming ROMs can be added via the Tiny Cloud, a portion of the GameShell’s storage that is available via your local network.
It sounds great, and it is, but the GameShell isn’t perfect. For example, there’s currently no OTG support, which means plugging in a keyboard for some games isn’t possible.
Customizing the GameShell Console
Various labels are included with the GameShell for decorating the console with some retro iconography. But if this isn’t your cup of tea, you can stick to the basic white, amber, or red design.
Not enough? Well, Clockwork has made the STL files available to buy for a nominal sum. If you fancy 3D printing your own customized module housings or a new case, that’s ideal.
And then there’s the Lightkey controller, which can be mounted on the back of your GameShell. This brings additional controls to your retro gaming, in case the D-Pad is short of buttons for your favorite games.
Open Source, Hackable… So What Else Does It Do?
One of the key features of the GameShell is the inclusion of the PICO-8 software. This is D-Pad controlled software that enables the creation of new games.
Except, it’s not actually included.
A shortcut in the main UI menu just freezes the GameShell when selected, with restarting the console the only solution.
The reason for this seems to be that PICO-8 is software that you need to buy separately (just $15). Once this is done, the shortcut then works. Fortunately, smart Clockwork Forum members have worked out how to install the PICO-8 software.
Wi-Fi set up is remarkably simple, meanwhile, which is vital if you need to use the Tiny Cloud or access the device via SSH.
In addition to the GameShell’s basic portability, you can also plug it into a monitor using the micro HDMI port. From here, you can use the D-Pad controls, or connect a Bluetooth controller to play a game. Note that the resolution barely changes.
Instead, the output from the GameShell is centered on your HDTV display, surrounded by images from the GameShell instruction manual.
GameShell Issues and Community Support Online
The GameShell is nice to use, but it isn’t without its problems.
For instance, an update applied during testing for our review resulted in the UI failing to boot. Stranded at the command line, and with no keyboard input, I had to connect to the device via SSH, and even then, the usual Linux commands for launching a desktop environment failed.
Eventually, I had to seek help on the Clockwork support forum. Now, this was not an unpleasant experience, with support delivered to me promptly, and the issue resolved within an hour. The same update (or the solution) resulted in the UI button commands to be incorrectly labeled on screen. Sure, it’s fixable, but it feels as though some oversight is required to avoid basic problems that shouldn’t be happening.
If you’re not familiar with SSH, Linux, or editing files in the command line, the GameShell isn’t for you. Unless you’re happy to learn, that is!
Fan of Retro Gaming? You Need the GameShell
Perhaps the most surprising thing aboutThe same update (or the solution) resulted in the UI button commands to be incorrectly labeled on screen. Sure, it’s fixable, but it feels as though some oversight is required to avoid basic problems that shouldn’t be happening. is how straightforward it is to build. It’s easy to make comparisons with Lego, but this device really does just click together. Within 30 minutes, I was using a brand-new portable games console, one that I had essentially just built.
You don’t get that anywhere else.
Customization options are good, the device is lightweight and small enough for pockets, and battery life is good. GameShell’s simplicity hides a greater complexity beneath and the GameShell UI design clearly takes cues from the Nintendo Gameboy.
The ClockworkOS user interface is useful, and the range of emulation impressive. Compared to its nearest competitor, the Raspberry Pi, there isn’t too much difference in emulation. The difference, of course, is that this is all ready for you to build and use anywhere.
Enter the Competition!
ClockworkPi GameShell Giveaway
Read the full article: Build Your Own Retro Gaming Handheld With ClockworkPi GameShell
Build Your Own Retro Gaming Handheld With ClockworkPi GameShell posted first on grassroutespage.blogspot.com
0 notes
Text
A Peek at the Pico, Raspberry Pi's Newest Petite Powerhouse
Raspberry Pi Pico
8.80 / 10
Read Reviews
Read More Reviews
Read More Reviews
Read More Reviews
Read More Reviews
Read More Reviews

Shop Now
Meet the new Raspberry Pi Pico; a tiny microcontroller filled with big possibilities.
Specifications
Brand: Raspberry Pi
CPU: Dual-core 133Mhz ARM
Memory: 264Kb
Ports: microUSB
Pros
Powerful ARM Processor
Micro-USB Connectivity
Breadboard Mountable
Easy-To-Use Interface
Absolutely Adorable
Inexpensive
Cons
No Wi-Fi or Bluetooth connectivity
No Header Pins
I/O Port Labelling on One Side Only
No USB-C Connectivity
Buy This Product
Raspberry Pi Pico other
Shop
// Bottom var galleryThumbs1 = new Swiper('.gallery-thumbs-1', { spaceBetween: 10, slidesPerView: 10, freeMode: true, watchSlidesVisibility: true, watchSlidesProgress: true, centerInsufficientSlides: true, allowTouchMove: false, preventClicks: false, breakpoints: { 1024: { slidesPerView: 6, } }, }); // Top var galleryTop1 = new Swiper('.gallery-top-1', { spaceBetween: 10, allowTouchMove: false, loop: true, preventClicks: false, breakpoints: { 1024: { allowTouchMove: true, } }, navigation: { nextEl: '.swiper-button-next', prevEl: '.swiper-button-prev', }, thumbs: { swiper: galleryThumbs1 } });
We’ve managed to get our hands on the coveted Raspberry Pi Pico. Today, we’re going to be looking at some of the most important features and putting it toe-to-toe with some of the biggest names in small electronics.
We’ll be showing you what the Pico can do, and we’ll get you started with MicroPython, one of Pico’s supported programming languages. We’ll even offer up some code to try in case you decide to buy a Pico of your own.
What Is a Raspberry Pi Pico?
Raspberry Pi Pico is a new budget microcontroller designed by Raspberry Pi. It’s a tiny computer built around a single chip, with onboard memory, and programmable in/out ports. Historically, microcontrollers are used in a variety of devices from medical implants to power tools. If you have an electronic device sitting in your vicinity, there’s a good chance that there’s a microcontroller inside of it.
Key Features of the Pico
The Pico is built around the RP2040 microcontroller chip, which was designed by Raspberry Pi UK. It’s a Dual-Core ARM processor with a flexible clock that can run up to 133 MHz. The Pico also supports 1.8-5.5 DC input voltage, has a micro-USB input port, and an onboard temperature sensor.
Flanking the chip on all sides are a series of castellations that allow easy soldering to a Veroboard or breadboard. This dual in-line package (DIP) style form factor is stackable, and can also be used in carrier board applications.
Technical Specifications
21 mm x 51 mm
264kb on-chip RAM
2 MB on-board QSPI flash
2 UART
26 GPIO
2 SPI controllers
2 ISC controllers
16 PWM channels
Accelerated integer and floating-point libraries
3-pin ARM Serial Wire Debug (SWD) port
What’s So Special About the Pi Pico?
The Pi Pico is a different kind of microcontroller. It’s Raspberry Pi’s first, and it features ARM technology in its RP2040 silicon chip. Many technology companies are embracing silicon ARM chips, with major manufacturers like Apple leading the charge.
The punchy little Pico packs a staggering 26 multifunction general purpose input/output (GPIO) ports, including 3 that are analog. Alongside these ports are 8 programmable input/output (PIO) ports. Compare this to other microcontrollers like the Arduino Nano, and the Pico packs roughly 18% more GPIO capability.
The most considerable difference between the Pico and its competitors, however, is the $4 price tag. Low cost is the main selling point of this unique offering.
At launch, many online retailers sold out of the device due to the interest and Raspberry Pi’s favorable reputation. By setting the price so low, the Pico opens the door for a new class of high-powered, budget microcontrollers.
There are many potential applications for the new Pico. With its onboard temperature sensor, the device is an obvious choice for IoT projects.
One talented retro gaming enthusiast even used a Pico to build a gaming console with full VGA video support.
youtube
This means that makers who have been curious about Raspberry Pi, or microcontrollers in general, now have the ability to experiment for less than the price of a fancy cup of coffee.
Related: The Raspberry Pi Comes of Age With the Pi 400 Desktop
The Raspberry Pi Pico Processor
The RP2040 ARM chip is an interesting choice for the Pico. At 133MHz, the chip is capable of leaving more expensive boards, like the Arduino Uno, in the dust.
Using ARM processors seems to be an emerging trend in the world of microcontrollers. In addition to Raspberry Pi, both Sparkfun and Adafruit also offer boards with similar ARM technology.
The industry-wide switch was made for a single reason—speed. ARM processors give a considerable boost over standard Atmel chips. In a board this size, using an ARM processor is like dropping a fully kitted Porsche engine into a Volkswagen. On the other hand, many microcontrollers don’t require that much processing speed. Yet.
Ramping up performance means that makers who want to push the limits of the Pico will have an abundance of power to do so.
The I/O Ports
The GPIO ports on the Pi Pico feature several interesting functions for common uses such as operating a screen, running lighting, or incorporating servos/relays. Some functions of the GPIO are available on all ports, and some only work for specific uses. GPIO 25, for example, controls the Pico’s onboard LED, and GPIO 23 controls the onboard SMPS Power Save feature.
The Pico also has both VSYS (1.8V — 5.5V) and VBUS (5V when connected to USB) ports, which are designed to deliver current to the RP2040 and its GPIO. This means that powering the Pico can be done with or without the use of the onboard micro-USB.
A full list of the I/O ports is available on Raspberry Pi’s website in its complete Pico documentation.
Pico vs. Arduino vs. Others

One question on the minds of many makers is whether or not the Raspberry Pi Pico is better than Arduino?
That depends. Pound-for-pound, higher-end Arduino boards like the Portenta H7 make the Pico look like a toy. However, the steep cost for a board of that caliber might be a tough pill for the microcontroller hobbyist to swallow. That's why the smaller price tag on the Pico makes it a win for makers who enjoy low-risk experimentation.
Along with minimal cost, the Raspberry Pi jams an extensive feature set into the Pico, comparable to boards like the Teensy LC, and the ESP32. But neither of these competitors manage to challenge the budget-friendly Pico on price.
That's what makes the Pico such a fantastic value, and a great choice for hobbyists and power users alike.
The Pi Pico: What’s Not To Love?
Unfortunately, to drive the price of the Pico down, Raspberry Pi had to make a few compromises. The most notable of which is the lack of an onboard radio module. Neither Bluetooth nor Wi-Fi is supported without add-ons.
The Wi-Fi limitation can be eliminated by adding a module like the ESP-01. Bluetooth support may prove a bit more challenging. If you need an all-in-one solution for your products, you’re better off skipping the Pico, and spending a little extra for something like the Pi Zero W, or ESP32.
Additionally, many early adopters are complaining about the lack of GPIO labeling on the top of the board. Raspberry Pi provides an extensive amount of documentation on its website to address this, but pointing-and-clicking, or thumbing through paperwork when you have a hot soldering iron in your hands isn’t often desirable.
Lastly, the lack of I/O pin headers is something of an issue for some, as it means less convenience when swapping I/O components. This minor annoyance can be solved via the use of leads, soldering the component wiring directly to the Pico, or using a breadboard.
If you’ve been using microcontrollers or small electronics for any period of time, then an unpopulated board is most likely a non-issue. Of course, you could also add your own pin headers if you plan on regular experimentation with different external components.
The final rub with the Pico is the micro-USB port. With many other microcontrollers like the Portenta H7 moving toward USB-C, Raspberry Pi's micro-USB port seems dated.
Logically however, the decision to use micro-USB makes sense. It was done by Raspberry Pi to keep costs as low as possible, and to keep interface capability almost universal. Everyone we know has at least a few micro-USB cables tucked away somewhere in their homes.
However, with future versions, a USB-C interface would be a nice addition to an already spectacular package.
Related: A Beginners Guide To Breadboarding With Raspberry Pi
Programming the Raspberry Pi Pico
Interfacing with the Pi Pico can be done via C/C++, or via MicroPython in the Read-Eval-Print-Loop or REPL (pronounced “Reh-pul”). The REPL is essentially a command line interface that runs line-by-line code in a loop.
In order to access the REPL, you’ll need to install MicroPython onto the Pico. This process is simple and only involves four steps.
Installing MicroPython
Download MicroPython for Raspberry Pi Pico from the Raspberry Pi Website
Connect the Pico to your computer via micro-USB while holding the BOOTSEL button
Wait for the Pico to appear as an external drive
Copy the MicroPython file to the Pi Pico, and it will automatically reboot
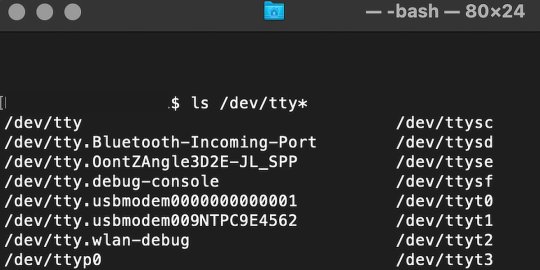
You can access the REPL in a number of ways. We used the screen command in a macOS terminal window to access the serial bus connected to the Pico. To accomplish this with Terminal, you’ll first open a new terminal window, then type ls /dev/tty*

From there, find the port where the Pico is connected. It should be labeled something like /dev/tty.usbmodem0000000000001. Then run the command:
screen /dev/tty.usbmodem0000000000001
Your cursor should change. Hit Return and the cursor will change again to >>>.
In the image below we've included the classic Hello World (Hello, Pico) command-line program in the REPL, along with a few lines of code that will turn the Pico's LED on and off. Feel free to try them yourself.

For more information, we recommend you invest in the official starter guide to MicroPython that Raspberry Pi has published on their website.
Download: MicroPython for Raspberry Pi Pico (free)
Using the Raspberry Pi Pico With Thonny

If you’re looking for a more proper coding environment, the Raspberry Pi Pico will also allow access to the REPL with Thonny. To enable this feature, first download and install Thonny. Once installed, connect your Pi Pico. Open Thonny and you'll see information indicating your Pico is connected in the Shell.
At the bottom right of the screen, you should see a version of Python. Click this version and select MicroPython (Raspberry Pi Pico) from the drop-down menu.
Now you can type commands into the Shell, or you can use Thonny’s editor to write or import multiple lines of code.
The abundance of interface possibilities make the Raspberry Pi Pico easy to program. For those who are familiar with MicroPython, this should be nothing new. For beginners, however, Thonny provides a powerful interface and debugger to get started with programming.
Download: Thonny (Free) Windows | Mac
Should I Buy the Raspberry Pi Pico?
The Raspberry Pi Pico is a powerful budget board that is perfect for hobbyists, or makers just starting out with microcontrollers. The documentation, low cost, and wide range of possibilities for the Pico also make it a great choice for seasoned small electronics wizards. If you’re a DIYer who loves to tinker, or you just want to challenge yourself to a weekend project, then you’ll love playing with the Pico.
On the other hand, if you don't have one or more projects in mind that need a microcontroller, then this board is probably not for you. Also, if your project needs Wi-Fi connectivity or Bluetooth, then the Pico won’t scratch that itch. And finally, for users who aren’t comfortable learning MicroPython, or exploring C/C++, the Pico isn't ideal. And remember: this Raspberry Pi is not like the others. It will not run a full Linux operating system.
But, if you dream in Python, or if you love the smell of solder, then you won't regret grabbing this tiny powerhouse. Most of all, if the sight of the sports-car-sleek RP2040 gets your creative gears turning, then we think you’ll really benefit from picking up the Pico.
Serving up Several Sweet Possibilities
While it isn’t perfect, the Raspberry Pi Pico is a strong entry into the world of microcontrollers. The reputation that Raspberry Pi has built for quality electronic components at a relatively low price extends to the Pico.
It’s everything a Raspberry Pi should be: small, sweet, and superb. It’s beautifully designed, and extremely inexpensive. But the best part isn’t the looks or the low cost.
The best part about this small wonder is picking it up, and holding it in your hands. It's feeling the tug of electronic inspiration. It's realizing just how powerful the Pico is, and what it means for microcontrollers going forward.
And truthfully, we think it's amazing that something as small as the Pico can offer so many unique possibilities.
A Peek at the Pico, Raspberry Pi's Newest Petite Powerhouse published first on http://droneseco.tumblr.com/
0 notes
Text
Build Your Own Retro Gaming Handheld With ClockworkPi GameShell
Our verdict of the ClockworkPI GameShell: GameShell is a retro gaming tribute that lets you fulfil that dream of programming your own 8-bit or 16-bit game. While it has some minor issues, no other dedicated device promises so much, which makes the GameShell that bit more special.710
Want to game on the go, but unsure about squeezing your favorite single-board computer into that old Nintendo Gameboy? What you need is a portable games console that has all the retro gaming in it you can handle, right?
The GameShell portable console from Clockwork looks and feels like a Nintendo Gameboy and comes with retro gaming software preinstalled. Better still, it’s a DIY kit, which means you still get the satisfaction of building the GameShell yourself, with some customization options. It’s currently retailing for $159, though the price may go up after the initial launch period.
Prepare for retro gaming awesomeness.
youtube
It’s a Gameboy-style DIY Handheld Games Console
The explosion of retro gaming over the past few years has resulted in countless DIY projects aiming for mobile gaming.
You’ve probably seen Raspberry Pi computers squeezed into portable DVD players and even old Nintendo Gameboys. The Clockwork GameShell takes this idea of portable retro gaming and runs with it. You basically have the chance to play your favorite games on the go, on a device you’ve built and customized.
Highly Hackable and Open Source
A successful Kickstarter campaign that raised over $290,000 in 2017, the GameShell features a custom-built board, ClockworkPi v3.1.
This open source design is a modular, portable gaming system, visually reminiscent of the Gameboy, that ships in kit form, ready to be snapped together.
Thanks to a dedicated operating system and retro emulation software, you can enjoy thousands of classic games.
But it’s not all about playing retro games.
The GameShell also features support for programming languages including:
C
Python
Lua
LISP
Games can be created on the device, or existing projects modified.
There’s more, however: the GameShell’s outward appearance can be customized. Ultimately, you end up with a programmable, portable game console that looks how you want, and plays the games you love.
What’s in the Box?
This is a true kit-based experience, and in the box you’ll find a collection of labels for customization, along with a guide, the case components, and the electronics.
The GameShell’s hardware is logically sorted into boxes; one holds the front of the case, another the power components, etc. Five boxes are included in all and building the handheld console means working through these components in turn.
No soldering is required. All you need to do is follow the five-stage guide and be reasonably confident that you can plug things in.
Similarly, no screws are included, as they’re also not required. Mounting the hardware components relies on the design of the case, making this a surprisingly simple build.
This Is a Modular Portable System
Inside the case, you might expect to get direct access to the components.
However, it doesn’t quite work like that.
The GameShell is a modular system, meaning that the five key components are housed in their own plastic case. So, there’s a case for the 320×240 px display, a case for the mainboard, and a case for the battery. The D-Pad controls also sit in their own case, as does the speaker.
Each module is connected by pluggable wires. Most importantly, perhaps, the modules can theoretically be replaced. For example, if a powerful new CPI mainboard was released, that could be purchased and used to easily replace the current version.
CPI Mainboard System Spec
All of this is made possible thanks to the CPI Mainboard (v3.1) which features a 1GHz quad-core Cortex-A7 CPU, Mali GPU, 1GB DDR memory, and onboard Wi-Fi and Bluetooth. There’s also a micro HDMI port and micro USB connector, audio out, and GPIOs.
This hardware is more than adequate to play most retro games, but you’ll find the GameShell is capable of more.
Note that the 1050mAh battery is pretty small and as such as a low capacity. You can expect to get around 90-120 minutes of play time out of a single charge.
Building the Clockwork GameShell Console
The GameShell console is surprisingly straightforward to put together. Following the steps in the guide I was able to build a working portable game console inside 30 minutes.
Now, although the turnaround was surprisingly short, it wasn’t plain sailing all the way.
For example, while snapping the modules into their cases is easy enough, hooking up the display to the CPI mainboard was a pain. I had to remove the CPI from its modular casing to complete the connection and secure the cable, which seems like a flaw in the design.
Then there’s the general mess that the console appears to be once the modules are connected. Until they’re clicked into place within the main case, the GameShell resembles an electronic octopus.
Finally snapping the case together and securing it with the plastic “wheel locks” is satisfying.
However, if you forget to insert the microSD card as I did, things can get a bit messy. The microSD card slot is on the back of the mainboard module, so this means removing the front of the case, then the display, and then the mainboard module to gain access.
This would have been avoided if I’d inserted the microSD card earlier!
Boot Up With a Pre-Installed microSD Card
On the SD card, the Clockwork OS is preinstalled. This is based on Debian 9 ARMhf, and the Linux Kernel 4.1x. Various software can be run on this, including PICO 8, LOVE2D, PyGame, Phaser.io, Libretro, and other game engines.
The GameShell user interface is based on a 320×240 pixel resolution and controlled using the D-Pad control.
This monochrome-style UI lets you easily navigate the GameShell’s features. You can adjust settings, launch software, play music, and access the ClockworkPI tiny cloud using the standard controls.
It’s easy, comfortable, and generally pleasing to use.
Retro Gaming With the GameShell
The key draw for the GameShell is retro gaming, so how is it?
Well, it’s pretty good. Various retro emulators have been adapted for it, with MAME, Pcsx, MGBA, and NESTOPIA all pre-installed.
There’s even RetroArch for other retro options, along with some on-board games such as FreeDOOM and CaveStory.
Meanwhile, retro gaming ROMs can be added via the Tiny Cloud, a portion of the GameShell’s storage that is available via your local network.
It sounds great, and it is, but the GameShell isn’t perfect. For example, there’s currently no OTG support, which means plugging in a keyboard for some games isn’t possible.
Customizing the GameShell Console
Various labels are included with the GameShell for decorating the console with some retro iconography. But if this isn’t your cup of tea, you can stick to the basic white, amber, or red design.
Not enough? Well, Clockwork has made the STL files available to buy for a nominal sum. If you fancy 3D printing your own customized module housings or a new case, that’s ideal.
And then there’s the Lightkey controller, which can be mounted on the back of your GameShell. This brings additional controls to your retro gaming, in case the D-Pad is short of buttons for your favorite games.
Open Source, Hackable… So What Else Does It Do?
One of the key features of the GameShell is the inclusion of the PICO-8 software. This is D-Pad controlled software that enables the creation of new games.
Except, it’s not actually included.
A shortcut in the main UI menu just freezes the GameShell when selected, with restarting the console the only solution.
The reason for this seems to be that PICO-8 is software that you need to buy separately (just $15). Once this is done, the shortcut then works. Fortunately, smart Clockwork Forum members have worked out how to install the PICO-8 software.
Wi-Fi set up is remarkably simple, meanwhile, which is vital if you need to use the Tiny Cloud or access the device via SSH.
In addition to the GameShell’s basic portability, you can also plug it into a monitor using the micro HDMI port. From here, you can use the D-Pad controls, or connect a Bluetooth controller to play a game. Note that the resolution barely changes.
Instead, the output from the GameShell is centered on your HDTV display, surrounded by images from the GameShell instruction manual.
GameShell Issues and Community Support Online
The GameShell is nice to use, but it isn’t without its problems.
For instance, an update applied during testing for our review resulted in the UI failing to boot. Stranded at the command line, and with no keyboard input, I had to connect to the device via SSH, and even then, the usual Linux commands for launching a desktop environment failed.
Eventually, I had to seek help on the Clockwork support forum. Now, this was not an unpleasant experience, with support delivered to me promptly, and the issue resolved within an hour. The same update (or the solution) resulted in the UI button commands to be incorrectly labeled on screen. Sure, it’s fixable, but it feels as though some oversight is required to avoid basic problems that shouldn’t be happening.
If you’re not familiar with SSH, Linux, or editing files in the command line, the GameShell isn’t for you. Unless you’re happy to learn, that is!
Fan of Retro Gaming? You Need the GameShell
Perhaps the most surprising thing aboutThe same update (or the solution) resulted in the UI button commands to be incorrectly labeled on screen. Sure, it’s fixable, but it feels as though some oversight is required to avoid basic problems that shouldn’t be happening. is how straightforward it is to build. It’s easy to make comparisons with Lego, but this device really does just click together. Within 30 minutes, I was using a brand-new portable games console, one that I had essentially just built.
You don’t get that anywhere else.
Customization options are good, the device is lightweight and small enough for pockets, and battery life is good. GameShell’s simplicity hides a greater complexity beneath and the GameShell UI design clearly takes cues from the Nintendo Gameboy.
The ClockworkOS user interface is useful, and the range of emulation impressive. Compared to its nearest competitor, the Raspberry Pi, there isn’t too much difference in emulation. The difference, of course, is that this is all ready for you to build and use anywhere.
Enter the Competition!
ClockworkPi GameShell Giveaway
Read the full article: Build Your Own Retro Gaming Handheld With ClockworkPi GameShell
Build Your Own Retro Gaming Handheld With ClockworkPi GameShell published first on http://droneseco.tumblr.com/
0 notes