#Raspberry Pi for IoT projects
Explore tagged Tumblr posts
Visit Tumblr Blog
Explore Tumblr blogs with no restrictions, modern design and the best experience.
Last Seen Tumblr Blogs


Fun Fact
Users from the US are the majority of Tumblr visitors.
Text
#Built-in Wi-Fi for Raspberry Pi Pico#IoT development board#Raspberry Pi for IoT projects#Wi-Fi-enabled microcontroller#DIY electronics with Raspberry Pi#Robotics with Raspberry Pi Pico#Home automation with Raspberry Pi
3 notes
·
View notes
Text

Discover the Basics of the Raspberry Pi Along with Multiple Projects
The Raspberry Pi has become incredibly popular among computer hobbyists and businesses for a variety of reasons. It consumes very little power, is portable, has solid-state storage, makes no noise, and offers extension capabilities, all at a very low price.
5 notes
·
View notes
Text
#lidar#lidar technology#lidar ld06 module#innovation#iot#technology#raspberry pi#time of flight technology#tof#Autonomous Vehicles#robotics#drone mapping#industrial automation#360 degree scanning#iot applications#projects#agriculture drone#agriculture products
0 notes
Text
Ad | Some Humble Bundle Goodies
One for the audio engineers - The Audio Arcade bundle gives you a whole bunch of royalty-free music and SFX as well as plugins to insert in all the major game engines. Ambient tracks, environmental sounds, explosions, you name it.
Money raised goes towards Children's Miracle Network Hospitals.
For those who dabble in Virtual Reality, the Upload VR Showcase with Devolver Digital has a bunch of Serious Sam VR games as well as the Talos Principle, a really solid puzzle game.
Money raised goes to Special Effect which helps people with disabilities enjoy games via accessible controllers. I've seen the stuff they do and it's honestly great.
Want to get into programming but don't know where to start? The Learn to Program bundle has a tonne of resources covering everything from HTML and CSS through to Python, C# and Ruby.
Money raised goes towards Code.org which seeks to expand participation in computing science by helping women and students of colour.
The Future Tech Innovators Toolkit is a software bundle with courses on Robotics, Electronics and programming with Raspberry Pi and Arduino.
Money raised goes towards Alzheimers Research UK.
The Home How-To Guides bundle offers a complete set of books for home improvements and projects. Want to know more about plumbing, home repair, bathrooms, wiring or carpentry? This bundle has you covered.
Money raised goes to It Gets Better, a charity that supports LGBT Youth.
Want to pick up the latest Elden Ring DLC? It's also available on the Humble Store with the key being redeemable on Steam.
105 notes
·
View notes
Text

It did just occur to me while I was checking the presentation slides for my Awful IoT Project From Hell, that despite the many people cheering me on with this project (and I appreciate you all so so so much), none of you have any idea what we were building.
A Raspberry Pi infrared sensor that detects when my cat is too close to my figurines and shoots her in the face with water.
#sg.txt#for the record we never got it working#so no cats were soaked in the making of this project#but this is literally our opening slide lmaooooo
23 notes
·
View notes
Text
Essential Skills Every Electronics Engineer Should Master
Electronics engineering is an exciting and constantly evolving field. With new technologies emerging every day, the need for skilled professionals has never been greater. If you're pursuing a B Tech in Electrical and Electronics Engineering or exploring options at B Tech colleges for Electrical and Electronics, it's crucial to know which skills can set you apart in this competitive domain.
Let’s dive into the essential skills every aspiring electronics engineer should master.
Strong Foundation in Circuit Design
Circuit design is at the heart of electronics engineering. Understanding how to create, analyze, and optimize circuits is a must-have skill. Whether you’re designing a simple resistor network or a complex integrated circuit, mastering tools like SPICE and PCB design software can make your designs efficient and innovative.
Programming Proficiency
Electronics and programming often go hand in hand. Languages like Python, C, and MATLAB are widely used to simulate electronic systems, automate processes, and even build firmware for devices. Engineers proficient in programming can troubleshoot problems effectively and add versatility to their skill set.
Knowledge of Embedded Systems
Embedded systems are everywhere—from your smartphone to your washing machine. As an electronics engineer, understanding microcontrollers, sensors, and actuators is crucial for creating devices that work seamlessly in our daily lives. Hands-on experience with platforms like Arduino and Raspberry Pi can be a great way to start.
Problem-Solving and Analytical Thinking
Electronics engineers often face unique challenges, such as debugging faulty circuits or improving system performance. Strong problem-solving and analytical thinking skills help them identify issues quickly and find effective solutions. To cultivate these skills, tackle real-world projects during your coursework or internships.
Familiarity with Power Systems
As the world moves toward renewable energy and smart grids, knowledge of power systems is becoming increasingly important. Engineers in this field should understand how electrical power is generated, transmitted, and distributed and how to design energy-efficient systems.
Effective Communication Skills
Electronics engineering often involves working in teams with other engineers, designers, or clients. Communicating your ideas clearly—whether through reports, presentations, or technical drawings—is just as important as your technical skills. Strong communication ensures that your brilliant ideas come to life effectively.
Adaptability to New Technologies
Technology evolves rapidly, and staying updated is essential for electronics engineers. Whether you’re learning about IoT (Internet of Things), AI integration, or 5G communication, an adaptable mindset will ensure you remain relevant and capable of tackling emerging challenges.
Hands-On Experience
While theoretical knowledge is important, nothing beats practical experience. Participating in labs, internships, or personal projects gives you the opportunity to apply what you’ve learned and develop confidence in your skills. Employers often value hands-on experience as much as your academic achievements.
Preparing for Success in Electronics Engineering
Pursuing a B Tech in Electrical and Electronics Engineering is the first step toward mastering these skills. The best B Tech colleges for Electrical and Electronics not only provide a strong academic foundation but also opportunities for practical learning and industry exposure. By focusing on the skills mentioned above, you can position yourself as a competent and innovative engineer ready to tackle real-world challenges.
4 notes
·
View notes
Text
Top 10 Projects for BE Electrical Engineering Students
Embarking on a Bachelor of Engineering (BE) in Electrical Engineering opens up a world of innovation and creativity. One of the best ways to apply theoretical knowledge is through practical projects that not only enhance your skills but also boost your resume. Here are the top 10 projects for BE Electrical Engineering students, designed to challenge you and showcase your talents.
1. Smart Home Automation System
Overview: Develop a system that allows users to control home appliances remotely using a smartphone app or voice commands.
Key Components:
Microcontroller (Arduino or Raspberry Pi)
Wi-Fi or Bluetooth module
Sensors (temperature, motion, light)
Learning Outcome: Understand IoT concepts and the integration of hardware and software.
2. Solar Power Generation System
Overview: Create a solar panel system that converts sunlight into electricity, suitable for powering small devices or homes.
Key Components:
Solar panels
Charge controller
Inverter
Battery storage
Learning Outcome: Gain insights into renewable energy sources and energy conversion.
3. Automated Irrigation System
Overview: Design a system that automates the watering of plants based on soil moisture levels.
Key Components:
Soil moisture sensor
Water pump
Microcontroller
Relay module
Learning Outcome: Learn about sensor integration and automation in agriculture.
4. Electric Vehicle Charging Station
Overview: Build a prototype for an electric vehicle (EV) charging station that monitors and controls charging processes.
Key Components:
Power electronics (rectifier, inverter)
Microcontroller
LCD display
Safety features (fuses, circuit breakers)
Learning Outcome: Explore the fundamentals of electric vehicles and charging technologies.
5. Gesture-Controlled Robot
Overview: Develop a robot that can be controlled using hand gestures via sensors or cameras.
Key Components:
Microcontroller (Arduino)
Motors and wheels
Ultrasonic or infrared sensors
Gesture recognition module
Learning Outcome: Understand robotics, programming, and sensor technologies.
6. Power Factor Correction System
Overview: Create a system that improves the power factor in electrical circuits to enhance efficiency.
Key Components:
Capacitors
Microcontroller
Current and voltage sensors
Relay for switching
Learning Outcome: Learn about power quality and its importance in electrical systems.
7. Wireless Power Transmission
Overview: Experiment with transmitting power wirelessly over short distances.
Key Components:
Resonant inductive coupling setup
Power source
Load (LED, small motor)
Learning Outcome: Explore concepts of electromagnetic fields and energy transfer.
8. Voice-Controlled Home Assistant
Overview: Build a home assistant that can respond to voice commands to control devices or provide information.
Key Components:
Microcontroller (Raspberry Pi preferred)
Voice recognition module
Wi-Fi module
Connected devices (lights, speakers)
Learning Outcome: Gain experience in natural language processing and AI integration.
9. Traffic Light Control System Using Microcontroller
Overview: Design a smart traffic light system that optimizes traffic flow based on real-time data.
Key Components:
Microcontroller (Arduino)
LED lights
Sensors (for vehicle detection)
Timer module
Learning Outcome: Understand traffic management systems and embedded programming.
10. Data Acquisition System
Overview: Develop a system that collects and analyzes data from various sensors (temperature, humidity, etc.).
Key Components:
Microcontroller (Arduino or Raspberry Pi)
Multiple sensors
Data logging software
Display (LCD or web interface)
Learning Outcome: Learn about data collection, processing, and analysis.
Conclusion
Engaging in these projects not only enhances your practical skills but also reinforces your theoretical knowledge. Whether you aim to develop sustainable technologies, innovate in robotics, or contribute to smart cities, these projects can serve as stepping stones in your journey as an electrical engineer. Choose a project that aligns with your interests, and don’t hesitate to seek guidance from your professors and peers. Happy engineering!
5 notes
·
View notes
Text
Essential Electronic Items for IoT and Electronics Enthusiasts
Are you diving into the world of Internet of Things (IoT) and electronics? Whether you are a seasoned engineer or simply beginning out, having a stable list of essential components is key to bringing your initiatives to existence. Here’s a curated list of electronic objects that each maker and tech enthusiast ought to have of their toolkit:
1. Microcontrollers
Arduino Uno: Great for novices and versatile for diverse projects.
Raspberry Pi: Ideal for more complex duties and going for walks complete operating structures.
ESP8266/ESP32: Perfect for wireless communication and IoT projects.
2. Sensors
DHT22: For temperature and humidity readings.
PIR Sensor: Useful for movement detection.
Ultrasonic Distance Sensor: Measures distances with high accuracy.
3. Actuators
Servo Motors: For unique manage in robotics and mechanical structures.
Stepper Motors: Ideal for applications requiring particular movement.
Solenoids: Good for growing mechanical actions and locks.
4. Displays
LCD Display: Useful for showing records and debugging.
OLED Display: Compact and clean for exact photographs and texts.
5. Connectivity Modules
Bluetooth Module (HC-05/HC-06): For short-range wi-fi communication.
Wi-Fi Module (ESP8266): Connects gadgets to the internet.
GSM Module: Enables verbal exchange over mobile networks.
6. Power Supplies
Battery Packs: Various types for transportable electricity.
Voltage Regulators: Ensure solid voltage ranges in your circuits.
Power Banks: Handy for charging and powering devices on the move.
7. Prototyping Tools
Breadboards: Essential for prototyping with out soldering.
Jumper Wires: For making connections on breadboards.
Soldering Kit: For everlasting connections and circuit meeting.
eight. Additional Components
Resistors, Capacitors, and Diodes: Fundamental for circuit design and stability.
Transistors: Key for switching and amplification tasks.
Connectors and Switches: For interfacing and controlling circuits.
By preserving these objects handy, you'll be nicely-prepared to address a huge range of IoT and electronics projects. Whether you're constructing smart domestic devices, wearable tech, or computerized structures, having the right additives can make all the difference.
#IoT#Electronics#Arduino#RaspberryPi#ESP32#Sensors#Actuators#Displays#ConnectivityModules#PowerSupplies#Prototyping#Tech#DIY#Makers#Engineering#ElectronicComponents#TechProjects
2 notes
·
View notes
Text
Raspberry Pi Board: Revolutionizing Computing and Education
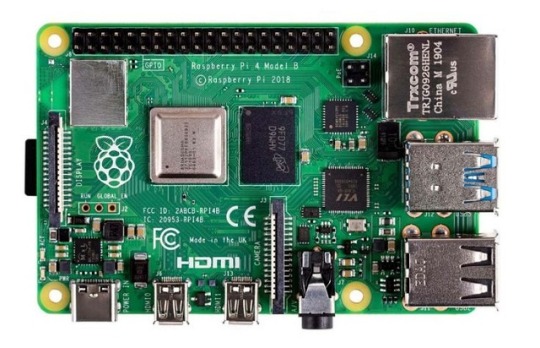
The Raspberry Pi board is a series of small, affordable single-board computers developed by the Raspberry Pi Foundation, a UK-based charity focused on promoting computer science education and digital literacy. Since its launch in 2012, the Raspberry Pi has transformed from a niche educational tool into a versatile platform used in a wide range of applications, from DIY electronics projects to industrial automation.
A Brief History
The first Raspberry Pi, the Model B, was released in February 2012. Designed to promote basic computer science in schools and developing countries, it featured a 700 MHz ARM11 processor, 256 MB of RAM, and basic connectivity options. The success of the Model B led to a rapid expansion of the Raspberry Pi lineup, with various models offering improved performance, more memory, and enhanced connectivity.
Key Features and Models
Raspberry Pi 1 Model B (2012):
Processor: 700 MHz ARM11
Memory: 256 MB RAM
Ports: 2 USB 2.0 ports, HDMI, Composite video, 3.5mm audio jack, Ethernet
Storage: SD card slot
Raspberry Pi 2 Model B (2015):
Processor: 900 MHz quad-core ARM Cortex-A7
Memory: 1 GB RAM
Ports: 4 USB 2.0 ports, HDMI, Composite video, 3.5mm audio jack, Ethernet
Storage: MicroSD card slot
Raspberry Pi 3 Model B (2016):
Processor: 1.2 GHz quad-core ARM Cortex-A53
Memory: 1 GB RAM
Ports: 4 USB 2.0 ports, HDMI, Composite video, 3.5mm audio jack, Ethernet
Wireless: Wi-Fi and Bluetooth
Raspberry Pi 4 Model B (2019):
Processor: 1.5 GHz quad-core ARM Cortex-A72
Memory: Options of 2 GB, 4 GB, and 8 GB RAM
Ports: 2 USB 3.0 ports, 2 USB 2.0 ports, 2 Micro HDMI ports, Ethernet, USB-C for power
Wireless: Wi-Fi and Bluetooth
Raspberry Pi Zero (2015) and Zero W (2017):
Processor: 1 GHz single-core ARM11
Memory: 512 MB RAM
Ports: Mini HDMI, Micro USB OTG, Micro USB for power, GPIO pins
Wireless (Zero W): Wi-Fi and Bluetooth
Applications and Uses
The versatility of the Raspberry Pi has led to its adoption in numerous fields:
Education:
Coding and Programming: Used in schools and educational programs to teach students programming languages such as Python, Scratch, and Java.
Computer Science Concepts: Introduces concepts like hardware, software, and networking.
DIY Projects and Maker Community:
Home Automation: Controls smart home devices, including lights, thermostats, and security systems.
Media Centers: Powers home media centers using software like Kodi.
Retro Gaming: Emulates classic gaming consoles using software like RetroPie.
Industrial and Commercial Applications:
IoT Devices: Serves as a hub for Internet of Things (IoT) devices, enabling data collection and remote control.
Automation and Control Systems: Used in factories and labs for monitoring and controlling equipment.
Research and Development:
Prototyping: Facilitates rapid prototyping of electronic devices and systems.
Data Collection: Gathers data from various sensors in environmental and scientific research.
Community and Ecosystem
The Raspberry Pi has cultivated a vibrant global community of developers, hobbyists, educators, and students. Online forums, tutorials, and community projects provide extensive support and resources for users at all skill levels. The Raspberry Pi Foundation also offers official accessories, including cases, cameras, and expansion boards, further enhancing the functionality of the Raspberry Pi.
Conclusion
The Raspberry Pi board has revolutionized the way people learn about and interact with technology. Its affordability, versatility, and extensive support network have made it an indispensable tool in education, DIY projects, and professional applications. As technology continues to evolve, the Raspberry Pi Foundation remains committed to expanding the capabilities and accessibility of this remarkable platform, ensuring that computing remains within reach for everyone.
3 notes
·
View notes
Text
Rotary Encoder - LED Array & Touch LCD for ESP32/Pico/HAT @raspberrypi @EspressifSystems @kickstarter @SBComponentsLtd
Open-Source, Easily glide through menus, adjust settings, and control parameters with unmatched precision

Introducing Rotary Encoder build with 32 RGB LED Array and amazing 1.28" Round Touch LCD and how can we forget GPIO’s breakout to explore its features and also an intuitive user interface and stunning visual effects. Compatible with LVGL (https://lvgl.io/), the most popular free and open-source embedded graphics library, Rotary empowers users to create beautiful and customized UIs for any MCU, MPU, and display type. This compatibility allows for limitless design possibilities and enables users to tailor the user interface of their Rotary to their specific needs.
The best part is Rotary is built for every electronic community from Espressif (ESP) to Raspberry Pi Pico to Raspberry Pi Boards. so whether you are ESP fan, Pico Fan or using Raspberry Pi Board, Rotary build for you. With the Rotary Encoder, you can easily navigate menus, adjust settings, and control parameters with precision. The 32 RGB LED Array adds a vibrant and customizable circular display, allowing you to create captivating visual effects and animations. The 1.28" Round Touch LCD provides a user-friendly interface, enabling seamless interaction and real-time feedback.
youtube
The GPIO breakout expands the capabilities of the device, allowing you to connect additional sensors, actuators, and peripherals. This opens up a world of possibilities for your projects, from home automation and IoT applications to interactive installations and creative displays. Join us today and be among the first to experience the Rotary Encoder Touch LCD. Pledge now and secure your spot in this revolutionary journey. Thank you for your support!
Visit Official Page �� https://www.kickstarter.com/projects/arushi/rotary-vibrant-visuals-and-seamless-interaction/
2 notes
·
View notes
Text
Pi Power Revealed: What Your Raspberry Pi Really Costs to Run in 2025 In the ever-expanding universe of DIY computing and IoT projects, the Raspberry Pi remains a versatile cornerstone for creators, developers, and hobbyists alike. Whether you're building a weather station that runs on batteries, setting up a 24/7 home server, or creating an edge computing device, understanding your Pi's power consumption is crucial for success. With the diverse range of Raspberry Pi models available in 2025, power requirements vary significantly – and knowing these differences can make or break your project. This comprehensive guide delves into the real-world power consumption of various Raspberry Pi models, explores the factors that influence energy usage, and provides practical tips for maximizing power efficiency. Whether you're concerned about energy costs, battery life, or selecting the right power supply, we've got you covered. Understanding Raspberry Pi Power Basics Before diving into specific models, let's clarify how power consumption is measured. Power is typically expressed in Watts (W), which is calculated by multiplying voltage (V) by current (A) using the formula P = V × I. Raspberry Pi devices generally operate at 5V DC, with current draw varying based on activity level and connected peripherals. This means power consumption is dynamic – a Pi sitting idle might draw minimal power, while the same device running intensive computations with multiple peripherals could consume significantly more. Power Consumption of Different Raspberry Pi Models Raspberry Pi 5 The flagship Raspberry Pi 5, with its powerful processor and expanded capabilities, draws more power than its predecessors: Idle: Approximately 3.0-3.5W (600-700mA at 5V) Under load: 7.0-9.0W (1.4-1.8A at 5V) Notable features: The Pi 5 implements improved power efficiency per computation compared to the Pi 4, but its higher performance ceiling means maximum power draw is greater. The onboard power management IC offers better regulation than previous generations. Raspberry Pi 4 B The workhorse Raspberry Pi 4 remains popular for many applications: Idle: 2.5-3.0W (500-600mA at 5V) Under load: 5.0-7.5W (1.0-1.5A at 5V) Notable features: Power consumption varies significantly based on RAM configuration (2GB vs 4GB vs 8GB models) and active interfaces. Raspberry Pi 400 This integrated keyboard model based on the Pi 4 architecture shows similar consumption patterns: Idle: 2.7-3.2W (540-640mA at 5V) Under load: 5.5-7.5W (1.1-1.5A at 5V) Notable features: The larger form factor provides better thermal management, which can slightly reduce power spikes during sustained workloads. Raspberry Pi 3 B+ This older but still useful model offers moderate power requirements: Idle: 1.9-2.3W (380-460mA at 5V) Under load: 3.5-5.5W (700-1100mA at 5V) Notable features: More power-efficient than the Pi 4 series, but offers significantly less computing power. Raspberry Pi Zero 2 W This compact powerhouse strikes an excellent balance between capability and efficiency: Idle: 0.5-0.7W (100-140mA at 5V) Under load: 1.5-2.2W (300-440mA at 5V) Notable features: Remarkable power efficiency makes it ideal for battery-powered projects. Raspberry Pi Zero W The original ultra-compact Pi remains the most power-efficient standard model: Idle: 0.4-0.5W (80-100mA at 5V) Under load: 0.8-1.5W (160-300mA at 5V) Notable features: Perfect for ultra-low-power applications where computing requirements are modest. Factors Influencing Raspberry Pi Power Consumption Several key factors dramatically affect how much electricity your Raspberry Pi uses: CPU and GPU Load The single biggest variable in power consumption is processor utilization. Running intensive tasks like video encoding, machine learning algorithms, or complex calculations can double or even triple power consumption compared to idle states.
Connected Peripherals Each device connected to your Pi adds to the overall power budget: USB devices (particularly power-hungry ones like hard drives): 0.5-2.5W each HDMI displays: 0.5-1.0W per active connection Camera modules: 0.2-0.5W when active HATs and add-on boards: Varies widely from 0.1W to several watts Network Connectivity Active network interfaces contribute to power draw: Wi-Fi: 0.3-0.5W when active Ethernet: 0.2-0.4W when connected Bluetooth: 0.1-0.2W during active communication Overclocking Pushing your Pi beyond stock frequencies significantly increases power consumption and heat generation. Overclocked Pi 5 models can see power draw increase by 20-40% over standard settings. Operating System and Software Different operating systems and background services impact power usage: Lightweight distributions like Raspberry Pi OS Lite consume less power than full desktop environments Background services, automatic updates, and constant logging increase power draw Power management settings can significantly affect consumption patterns External Storage Storage devices can be surprising power consumers: USB flash drives: 0.2-0.5W Powered external HDDs: 2.0-5.0W SSDs: 1.0-3.0W depending on activity Real-World Power Consumption Examples To put these numbers in context, here are some typical usage scenarios: Headless server (Pi 4, no display, running web services): ~3.5W average Desktop replacement (Pi 5 with display, keyboard, mouse, running desktop environment): ~7.5W average Media player (Pi 4 streaming video to HDMI display): ~6.0W average Weather station (Pi Zero 2 W with sensors, running on batteries): ~1.0W average Home automation hub (Pi 4 with various USB devices): ~5.0W average Choosing the Right Power Supply Selecting an appropriate power supply is critical for stable operation: Raspberry Pi 5: Official recommendation is 5V/5A (25W) USB-C power supply Raspberry Pi 4: Requires 5V/3A (15W) USB-C power supply Raspberry Pi 3 B+: Works well with 5V/2.5A (12.5W) micro-USB supply Pi Zero models: Can operate reliably with 5V/1.2A (6W) micro-USB supply Using underpowered supplies often leads to subtle but frustrating issues: Random reboots and crashes SD card corruption The dreaded "rainbow square" power warning Peripherals failing unpredictably Tips for Optimizing Raspberry Pi Power Efficiency When every milliwatt matters, consider these optimization strategies: Underclock the CPU when maximum performance isn't needed Disable unused interfaces with commands like: sudo rfkill block wifi # Disable Wi-Fi sudo rfkill block bluetooth # Disable Bluetooth tvservice -o # Disable HDMI output Use lightweight operating systems like Raspberry Pi OS Lite or DietPi Optimize software by removing unnecessary services and scheduling resource-intensive tasks Implement power management tools like PowerTOP or TLP where available Choose power-efficient peripherals and disconnect unused devices Consider a lower-power Pi model for tasks that don't require maximum performance Conclusion Understanding your Raspberry Pi's power consumption is essential for designing reliable and efficient projects. From the ultra-efficient Pi Zero W at under 1W to the powerful Pi 5 that can draw up to 9W under load, each model offers a different balance of performance and power efficiency. By selecting the appropriate model for your needs, pairing it with the right power supply, and implementing proper power optimization techniques, you can ensure your Raspberry Pi projects run reliably whether they're powered from the wall or operating on batteries in the field. Remember that real-world power consumption varies based on your specific configuration and workload, so consider measuring the actual draw of your completed project using a USB power meter for the most accurate assessment.
0 notes
Text
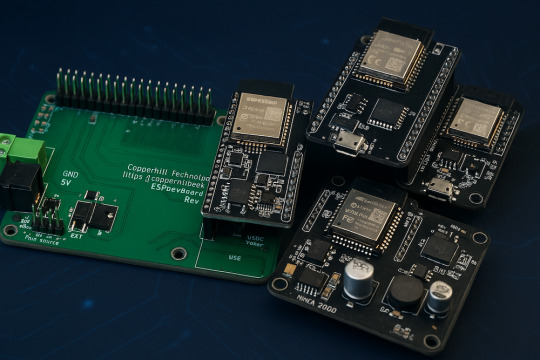
ESP32 Boards for CAN Bus, NMEA 2000, and Raspberry Pi HATs – Ideal for Automotive, Marine, and IoT Projects
Explore advanced ESP32 development boards from Copperhill Technologies featuring CAN FD, NMEA 2000, dual isolated CAN, and Raspberry Pi GPIO compatibility—ideal for automotive, marine, and IoT applications.
#esp32#espberry#can bus#nmea 2000#n2k#sae j1939#marine application#industrial control#iot#iot projects#HAT#raspberry pi
0 notes
Text
UHF Reader Based on Pico W & ESP32 with 50 Tags/Second Reading within 1.5 Meter Range

A UHF Reader (Ultra High Frequency Reader) is a device that is used to read and write data from UHF RFID tags within the 860MHz-960MHz frequency range. It is a multi tags 50 tags/second reading/writing device within 1-1.5 meter range designed with cutting edge UHF technology. It is a compact, portable and easy to use device.
The UHF reader has 2 variants: one is UHF Reader by Pico W and another is UHF Reader by ESP32. The Pico W variant comes with RP2040 microcontroller with Wi-Fi and BLE support. It is compatible with MicroPython, CircuitPython and Arduino for programming. ESP32 variant comes with ESP32 S3 series microcontroller and has 2.4GHz & Bluetooth 5 (LE) support. It is compatible with Arduino and Espressif IDE for programming.
Key Features and Specifications:
UHF Reader Pico Variant:

Powered by Raspberry Pi Pico W
RP2040 microcontroller dual-core Arm Cortex M0+ microprocessor with 264kB RAM
Supports Wi-Fi and BLE
1.14” TFT display for better visualization
Multi-tone buzzer for audio alerts
Micro USB Support for programming & Type C support for power
3 programmable buttons and Reset button
SD card slot for data storage/transfer
LED Status for power and battery charging
Multipurpose GPIOs breakout for interfacing external peripherals
SWD pins breakout for serial debugging
Supports MicroPython, CircuitPython, and Arduino for programming
UHF Reader ESP32 Variant:

Powered by ESP32 S3 WROOM-1
Dual-core 32 bit LX7 microprocessor with Up to 8 MB PSRAM and up to 16 MB flash memory
Supports 2.4GHz (802.11b/g/n) Wi-Fi and Bluetooth 5 (LE)
1.14” TFT display with ST7789 display driver
Comes with a Read and Write UHF module.
Frequency range of 865.1MHz-867.9MHz (for EU/UK) and 902.25MHz-927.75MHz (for US)
Can Identify 50 tags/second up to the 1.5-meter range.
TTL UART communication interface and communication baud rates 115200bps-38400bps
output power 18-26dBm and output power accuracy +/- 1dB
operation current 180mA at 3.5V (26 dBm Output), 110mA at 3.5V (18 dBm Output)
Multi-tone buzzer for audio alerts
2 user programmable buttons, Boot and Reset buttons
For power and programming support, the Type C Interface
SD Card slot for data transfer/storage
LED status for power and charging
Multipurpose GPIOs breakout for interfacing external peripherals
Supports Arduino and Espressif IDE for programming
By using ESP32 and RP2040, you can build a UHF RFID reader for scan tags and data tracking. This UHF Reader with ESP32 and Pico by SB Components is suitable for applications like warehouses, retail stores, and many other applications where you want to track your inventory data accurately.
#technology#innovation#tech#iot#rfid#uhf#uhf reader#arduino#espressif#iot applications#raspberry pi#rp2040#esp32#projects#programming#ultra high frequency reader#rfid tags#data tracking#electronics
1 note
·
View note
Text
Cisco practical exam DONE. Breezed through it without an issue (it was just radius and eigrp lmao).
Next step, the damn IoT project that is only worth 15% but I'm the only one with a raspberry pi so I have to carry the project regardless. It's due tomorrow at 7pm, then we present, report's due at midnight, we'll be done by then.
Then it's just law final on Monday (which I don't care about really, I'm making Edgeworth do it), Cisco theoretical final on Wednesday (which I'm sorta worried about), and IoT final next Thursday.
Cisco theoretical's the problem, because it's worth 20%, but I have an 84 atm plus the definite 100 I just got on the practical (worth either 20% or 5%, conflicting info), so I have both actual time to study and I pass with a decent grade regardless.
Really, if I survive to 7pm tomorrow and my IoT project is even semi-functional, I'm fuckin golden, and I get to graduate.
Phew. Can't believe I'm almost done. I really, truly can't. ;O;
#sg.txt#and it's spring cleaning on sunday and I booked off work for it#so I really get to leave university behind feeling like I might actually be able to handle this#it'll be fuckin weird not having assignments to do that's for sure
9 notes
·
View notes
Text
Beyond the Books: Real-World Coding Projects for Aspiring Developers
One of the best colleges in Jaipur, which is Arya College of Engineering & I.T. They transitioning from theoretical learning to hands-on coding is a crucial step in a computer science education. Real-world projects bridge this gap, enabling students to apply classroom concepts, build portfolios, and develop industry-ready skills. Here are impactful project ideas across various domains that every computer science student should consider:
Web Development
Personal Portfolio Website: Design and deploy a website to showcase your skills, projects, and resume. This project teaches HTML, CSS, JavaScript, and optionally frameworks like React or Bootstrap, and helps you understand web hosting and deployment.
E-Commerce Platform: Build a basic online store with product listings, shopping carts, and payment integration. This project introduces backend development, database management, and user authentication.
Mobile App Development
Recipe Finder App: Develop a mobile app that lets users search for recipes based on ingredients they have. This project covers UI/UX design, API integration, and mobile programming languages like Java (Android) or Swift (iOS).
Personal Finance Tracker: Create an app to help users manage expenses, budgets, and savings, integrating features like OCR for receipt scanning.
Data Science and Analytics
Social Media Trends Analysis Tool: Analyze data from platforms like Twitter or Instagram to identify trends and visualize user behavior. This project involves data scraping, natural language processing, and data visualization.
Stock Market Prediction Tool: Use historical stock data and machine learning algorithms to predict future trends, applying regression, classification, and data visualization techniques.
Artificial Intelligence and Machine Learning
Face Detection System: Implement a system that recognizes faces in images or video streams using OpenCV and Python. This project explores computer vision and deep learning.
Spam Filtering: Build a model to classify messages as spam or not using natural language processing and machine learning.
Cybersecurity
Virtual Private Network (VPN): Develop a simple VPN to understand network protocols and encryption. This project enhances your knowledge of cybersecurity fundamentals and system administration.
Intrusion Detection System (IDS): Create a tool to monitor network traffic and detect suspicious activities, requiring network programming and data analysis skills.
Collaborative and Cloud-Based Applications
Real-Time Collaborative Code Editor: Build a web-based editor where multiple users can code together in real time, using technologies like WebSocket, React, Node.js, and MongoDB. This project demonstrates real-time synchronization and operational transformation.
IoT and Automation
Smart Home Automation System: Design a system to control home devices (lights, thermostats, cameras) remotely, integrating hardware, software, and cloud services.
Attendance System with Facial Recognition: Automate attendance tracking using facial recognition and deploy it with hardware like Raspberry Pi.
Other Noteworthy Projects
Chatbots: Develop conversational agents for customer support or entertainment, leveraging natural language processing and AI.
Weather Forecasting App: Create a user-friendly app displaying real-time weather data and forecasts, using APIs and data visualization.
Game Development: Build a simple 2D or 3D game using Unity or Unreal Engine to combine programming with creativity.
Tips for Maximizing Project Impact
Align With Interests: Choose projects that resonate with your career goals or personal passions for sustained motivation.
Emphasize Teamwork: Collaborate with peers to enhance communication and project management skills.
Focus on Real-World Problems: Address genuine challenges to make your projects more relevant and impressive to employers.
Document and Present: Maintain clear documentation and present your work effectively to demonstrate professionalism and technical depth.
Conclusion
Engaging in real-world projects is the cornerstone of a robust computer science education. These experiences not only reinforce theoretical knowledge but also cultivate practical abilities, creativity, and confidence, preparing students for the demands of the tech industry.
0 notes
Text
How to Setup Robotics Lab in School – A Complete Guide to Establishing a Robotics Lab
In today’s technology-driven world, robotics education acts as an important asset in equipping students with 21st-century Robotics & AI skills such as critical thinking, problem-solving, and creativity. Robotics lab offers a dedicated space for students to engage in hands-on learning, exploring engineering, machine learning, and artificial intelligence (AI). By providing a well-structured Robotics & AI lab, schools generate our young learner’s interest in the field of STEM (Science, Technology, Engineering, and Mathematics), and make them ready for future careers in further Robotics & AI embedded technology. This will guide our learners in a direct approach to setting up a Robotics lab, and also ensure that students gain maximum educational benefits from this modern learning environment.
Defining Objectives and Goals
At the foundational stage of setting up Robotics & AI labs in schools, it is essential to clearly define the lab’s objectives and purpose. This helps schools determine whether the focus will be on basic robotics education, competition-driven learning, or innovation through patent-worthy projects. The primary goals include introducing our young learners to Robotics and AI, upgrading with programming and engineering skills, and preparing students for national and international tech. Competitions, and encourage them to become future innovators by learning the combination of innovative projects that combine balanced learning. These objectives will guide schools in planning the necessary resources such as designed curriculum and selecting appropriate equipment while learning the concept in Robotics & AI labs.
Securing Budget and Funding
Setting up robotics labs in schools involves a significant financial investment, and schools must plan their budgets accordingly. Several funding options are available in the authority, including school budget administration, government permits, corporate partnerships and sponsorship, and community fundraising initiatives. STEM education companies collaborate with the government for support with the education part and the material requirements according to the school for opening robotics & AI Labs in the school. At the same time, STEM education companies also offer sponsorship under several projects, provide teachers training programs by the STEM education companies, and Atal tinkering Labs handled by the robotics lab. CSR approach and alumni contributions can also give financial assistance.
Selecting the Right Space
Whenever a lab is established in a school, it is essential to carefully select a suitable space. Choosing the right location for the Robotics and AI lab is crucial to ensuring a practical, engaging, and productive learning environment. The lab should be spacious enough to have workstations, practical testing areas, robotics kits, and tool storage. It must also have proper ventilation, lighting, electrical connection, and internet connectivity. A well-setup layout with designated areas for programming, assembly, and testing enhances productivity and safety.
Procuring Robotics Kits and Equipment
Robotics Lab Selecting the right robotics kits and equipment is fundamental for creating an effective robotics lab. The selection of kits should be based on the learners’ age groups and their initial skill levels. For beginners, kits such as mechanical construction kits and block-based power screw kits are ideal. In terms of coding, platforms like Scratch and Code Blocks provide a built-in introduction to robotics and programming. Intermediate classes from 6th to 8th can benefit from Arduino, Raspberry Pi, and other robotics kits, which provide hands-on experience in coding and electronics technology. Students at the senior level can explore AI-powered coding platforms like AI Connect, Drone technology, and IoT-based machine learning projects. With all of this, the Robotics & AI lab will support various robotics innovations going to happen in the future.
Developing a Robotics Curriculum
A well-organized robotics curriculum ensures progressive growth in learning and development of new advanced skills. Schools should design the curriculum in such a way that it will cover all concepts from beginner to advanced levels, hands-on projects, and advanced robotics applications. In the beginner level from class 3rd to 5th class, learners will focus on basic robotics, easy-to-understand programming concepts, and understandable mechanical design. Then at the intermediate level for 6th to 8th class learners should focus on microcontrollers, robotics, and Machine learning robot programming. Later on at the advanced level, it should include AI, machine learning, IoT embedded, and participation in robotics competitions which motivates the students to do more innovation in the future.
Hiring Skilled Educators and Mentors
After setting up the lab, the most crucial person is the one who will run it – the ideal role model and mentor. This individual will guide our future learners towards a bright future, equipped with up-to-date knowledge in advanced technology and artificial intelligence. Our STEM companies provide STEM-certified educators, who are the best mentors to help students grasp the concepts of robotics and AI in an engaging and enjoyable way. They are essential for guiding students in this specific direction of gaining knowledge in robotics and AI. As per our advice, schools should recruit STEM-certified educators with expertise in all directions where they should be experts in their fields of Science, Technology, Engineering & Mathematics.
Robotics Lab in School Following that, it is important to establish collaborations with university researchers, industry professionals, and robotics organizations to provide students with valuable insights, real-world exposure, and expert mentorship. If some schools want to train their teachers for this subject, then our STEM education companies provide teachers training programs and organize workshops for the teachers to ensure that instructors remain updated with the latest technology in robotics technology. This also encourages students to a learning approach, where senior students can also mentor in the class and it also enhances engagement and knowledge-sharing skills.
Implementing Safety Measures
In the Robotics & AI lab, we need to ensure that we have proper safety for the students in the robotics lab. It is essential to establish clear guidelines on the Circular Board for handling electronic components and computer systems provided in the lab. Additionally, students must be trained in basic first aid procedures to ensure they are prepared to respond effectively in case of any mishap, emphasizing the importance of safety and preparedness in a lab environment. The essential safety measures include protective gear such as gloves and safety goggles, building fire safety protocols, and training students for first aid. These properly structured lab sessions with instructor supervision help to maintain a safe environment in the lab.
Conclusion
In conclusion, establishing Robotics & AI labs in schools marks a progressive leap in advancing STEM education and preparing students for a tech-driven future. A well-designed and thoughtfully planned lab—with clear objectives, suitable equipment, expert mentorship, and a structured curriculum for all grades—creates an engaging, future-ready learning environment. Getting educated about Robotics & AI education develops technical skills and also enhances creativity, teamwork, and critical thinking approach toward the problem and its solution. By continuously approaching & upgrading resources such as curriculum and student participation in the competition, schools can work hard to motivate the upcoming generation of young innovators and engineers who are ready to lead the vision of future innovators.
0 notes