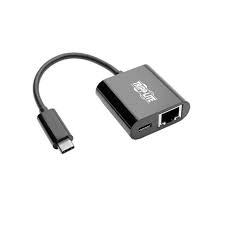
#Wi-Fi-enabled microcontroller
Explore tagged Tumblr posts
Visit Tumblr Blog
Explore Tumblr blogs with no restrictions, modern design and the best experience.
Last Seen Tumblr Blogs


Fun Fact
If you dial 1-866-584-6757, you can leave an audio post for your followers.
Text
#Built-in Wi-Fi for Raspberry Pi Pico#IoT development board#Raspberry Pi for IoT projects#Wi-Fi-enabled microcontroller#DIY electronics with Raspberry Pi#Robotics with Raspberry Pi Pico#Home automation with Raspberry Pi
3 notes
·
View notes
Text
How the Internet of Things Works
Introduction
WikiGlitz
The Internet of Things (IoT) has revolutionized the way we interact with the world around us. It's a network of interconnected devices, each equipped with sensors, actuators, and software that allows them to communicate and exchange data. Let's delve into the building blocks of the Internet of Things (IoT) and understand how it works.

Table Of Contents:
Introduction
The Building Blocks of IoT
How IoT Devices Communicate
The Role of Data in IoT
Real-World Applications of IoT
The Future of IoT
In which industries or sectors is IoT having the greatest impact?
Advantages of IoT Devices
conclusion
The Building Blocks of IoT
At the core of IoT are IoT devices. These devices can range from simple sensors to complex machines. They are equipped with sensors that collect data from their surroundings, such as temperature, humidity, or motion. This data is then processed by embedded systems or microcontrollers within the device.
How IoT Devices Communicate
IoT devices communicate with each other and with the internet using various protocols. Wireless communication protocols like Wi-Fi, Bluetooth, Zigbee, and LoRaWAN are commonly used. These protocols enable devices to transmit data over short or long distances.
The Role of Data in IoT
Data is the lifeblood of the Internet of Things (IoT). The collected data is transmitted to a cloud platform or a local server for storage, analysis, and visualization. This data analytics enables organizations to gain valuable insights and make data-driven decisions.
Real-World Applications of IoT
IoT has found applications in various industries. In healthcare, IoT devices monitor patient vitals and detect anomalies. In agriculture, IoT sensors optimize crop management and irrigation. In smart cities, IoT infrastructure enables efficient traffic management and waste collection.
The Future of IoT
The future of IoT is promising. As technology advances, we can expect to see even more interconnected devices and innovative applications. The integration of IoT with artificial intelligence (AI) and machine learning will further enhance its capabilities.
In which industries or sectors is IoT having the greatest impact?
Manufacturing: Smart factories, predictive maintenance
Healthcare: Remote patient monitoring, medical device connectivity
Transportation: Connected vehicles, smart cities
Agriculture: Precision agriculture, smart farming
Retail: Smart stores, supply chain optimization
Energy: Smart grids, renewable energy integration
Home automation: Smart homes
Advantages of IoT Devices
Improved efficiency and productivity
Enhanced decision-making
Increased safety and security
Improved customer experience
Cost savings
conclusion
The Internet of Things is a rapidly growing field with immense potential. By understanding its building blocks, communication protocols, and data management, we can harness its power to improve our lives and drive innovation across various industries.
If you like to know more about it, please check our in-depth article on Top 10 IoT Devices for a Smarter Home in 2024 Stay tuned to WikiGlitz for more insights and updates on the latest technology trends.
Our Official Blog Site: https://wikiglitz.co/
#how iot works#introduction to iot#internet of things course#internet of things introduction#how internet of things works#iot how it works#how the iot works#introduction to internet of things iot#iot intro
2 notes
·
View notes
Text
Essential Electronic Items for IoT and Electronics Enthusiasts
Are you diving into the world of Internet of Things (IoT) and electronics? Whether you are a seasoned engineer or simply beginning out, having a stable list of essential components is key to bringing your initiatives to existence. Here’s a curated list of electronic objects that each maker and tech enthusiast ought to have of their toolkit:
1. Microcontrollers
Arduino Uno: Great for novices and versatile for diverse projects.
Raspberry Pi: Ideal for more complex duties and going for walks complete operating structures.
ESP8266/ESP32: Perfect for wireless communication and IoT projects.
2. Sensors
DHT22: For temperature and humidity readings.
PIR Sensor: Useful for movement detection.
Ultrasonic Distance Sensor: Measures distances with high accuracy.
3. Actuators
Servo Motors: For unique manage in robotics and mechanical structures.
Stepper Motors: Ideal for applications requiring particular movement.
Solenoids: Good for growing mechanical actions and locks.
4. Displays
LCD Display: Useful for showing records and debugging.
OLED Display: Compact and clean for exact photographs and texts.
5. Connectivity Modules
Bluetooth Module (HC-05/HC-06): For short-range wi-fi communication.
Wi-Fi Module (ESP8266): Connects gadgets to the internet.
GSM Module: Enables verbal exchange over mobile networks.
6. Power Supplies
Battery Packs: Various types for transportable electricity.
Voltage Regulators: Ensure solid voltage ranges in your circuits.
Power Banks: Handy for charging and powering devices on the move.
7. Prototyping Tools
Breadboards: Essential for prototyping with out soldering.
Jumper Wires: For making connections on breadboards.
Soldering Kit: For everlasting connections and circuit meeting.
eight. Additional Components
Resistors, Capacitors, and Diodes: Fundamental for circuit design and stability.
Transistors: Key for switching and amplification tasks.
Connectors and Switches: For interfacing and controlling circuits.
By preserving these objects handy, you'll be nicely-prepared to address a huge range of IoT and electronics projects. Whether you're constructing smart domestic devices, wearable tech, or computerized structures, having the right additives can make all the difference.
#IoT#Electronics#Arduino#RaspberryPi#ESP32#Sensors#Actuators#Displays#ConnectivityModules#PowerSupplies#Prototyping#Tech#DIY#Makers#Engineering#ElectronicComponents#TechProjects
2 notes
·
View notes
Text
What Is an Ethernet Adapter and Why Do You Need One?

Understanding the Role of an Ethernet Adapter
An Ethernet Adapter serves as a bridge between your computer or other digital device and a wired network connection. While many modern devices support wireless connectivity, Ethernet adapters ensure a stable, high-speed connection that is crucial for data-intensive tasks such as video conferencing, gaming, file transfers, and industrial automation. These adapters are especially vital for Laptops and Microcontrollers that lack built-in Ethernet ports.
Today’s Ethernet adapters support USB, PCIe, and even Thunderbolt interfaces, making them highly versatile and widely compatible across numerous applications—from everyday office setups to complex industrial systems involving controllers, Capacitor banks, or even thermal sensors.
Types of Ethernet Adapters Available
When selecting an Ethernet adapter, it’s important to choose one that matches your device's interface and networking requirements. Common types include:
USB Ethernet Adapters
PCI and PCIe Ethernet Cards
Thunderbolt Ethernet Adapters
Ethernet to Fiber Media Converters
Embedded Ethernet Modules for Microprocessors and Controllers
Each type serves a specific function in connecting various electronics, whether consumer or industrial-grade.
Key Features to Look For in Ethernet Adapters
Transitioning to a wired connection with an Ethernet adapter offers consistent speed and security. However, it’s essential to evaluate features such as:
Compatibility with different operating systems and hardware platforms
Support for various Ethernet speeds (10/100/1000 Mbps or even 10 Gbps)
Plug-and-play capabilities for easy installation
Built-in surge protection and shielding
Compact and lightweight designs for portable use
These features make them suitable for systems involving Laptops, Sensors, tools, switches, and more.
Why Ethernet Adapters Are Crucial in Industrial and Office Environments
Ethernet adapters are far more than just internet accessories—they're essential tools in environments requiring stable, secure, and high-bandwidth communication. In settings involving thermal cameras, LEDs, Contactors, and other critical automation components, wireless connections can be unreliable or unsafe.
Furthermore, fuses, thermal pads, grips, and safety modules used in conjunction with high-speed data logging systems often rely on wired connections for minimal latency. Ethernet adapters provide the necessary interface in such setups, maintaining system integrity and accuracy.
Applications of Ethernet Adapters in Real-World Scenarios
Ethernet adapters find applications across various sectors, including:
Office and Home Networks
Ideal for Laptops with no Ethernet port
Ensures secure, high-speed access for video conferencing and cloud services
Enhances streaming quality for 4K content
Industrial Automation
Connects controllers, Microcontrollers, and industrial PCs to central systems
Facilitates communication with devices like Sensors, fuses, and Contactors
Provides robust connectivity for real-time data transfer
Embedded and IoT Systems
Offers stable networking to Microprocessors, Raspberry Pi, and Arduino boards
Enables reliable communication with cloud-based applications
Often paired with tools, switches, and smart modules
Retail and Point-of-Sale Systems
Keeps POS terminals, thermal printers, and inventory systems reliably online
Integrates with scanners and monitoring electronics
Benefits of Using Ethernet Adapters
Using an Ethernet adapter offers multiple benefits that significantly enhance network reliability:
Stable and fast data transmission compared to Wi-Fi
Reduced latency for mission-critical operations
Easy plug-and-play configuration with minimal setup
Better network security for sensitive data
Compatible with a wide range of modern and legacy devices
Such benefits make them ideal in working environments where communication reliability is as important as using quality cables, oils, or connectors.
Choosing the Right Ethernet Adapter
When choosing the right Ethernet adapter, you should consider the following:
Type of port required: USB-A, USB-C, Thunderbolt, or PCIe
Network speed support: Standard Gigabit or Multi-Gigabit Ethernet
Compatibility with operating systems such as Windows, Linux, or macOS
Quality of the housing, such as aluminum shells or heat-dissipating materials
Additional features like thermal management and LED indicators
If you’re connecting to industrial equipment such as Capacitor modules, grips, or legacy automation systems, ensure compatibility with the voltage and signal standards used.
How Ethernet Adapters Improve Connectivity in Tech Workspaces
In environments that rely heavily on connected devices—ranging from controllers to switches and even sensors—an Ethernet adapter ensures that each component stays in sync and online. This is particularly useful when updating firmware, accessing control systems remotely, or gathering telemetry data from distributed machines.
Moreover, Ethernet adapters can be used alongside:
Diagnostic tools
Data loggers and analyzers
Embedded computing systems
Communication hubs and fuses
Incorporating these adapters can also help maintain a clutter-free environment, especially with newer compact adapters that are barely larger than a USB flash drive.
Compatibility With Modern Accessories and Protocols
Today’s Ethernet adapters also support advanced features, including:
Wake-on-LAN for remote activation
VLAN tagging for network segmentation
Power over Ethernet (PoE) compatibility
LED indicators for diagnostics
They’re designed to complement other accessories such as thermal sensors, microcontrollers, switches, and contactors, supporting a seamless interaction across your entire digital and physical system.
Final Thoughts on Ethernet Adapters
To sum it up, Ethernet adapters play a pivotal role in modern computing and networking. Whether you're a home user looking to boost your internet stability, an engineer connecting to high-performance machines, or a technician managing a lab filled with electronics, connectors, grips, and tools, a good Ethernet adapter is indispensable.
0 notes
Text
CPU Embedded Wireless LAN Market: Demand Forecast and Regional Outlook 2025–2032
Global CPU Embedded Wireless LAN Market Research Report 2025(Status and Outlook)
CPU Embedded Wireless LAN Market was valued at US$ 2.16 billion in 2024 and is projected to reach US$ 4.73 billion by 2032, at a CAGR of 10.27% during the forecast period 2025-2032
Our comprehensive Market report is ready with the latest trends, growth opportunities, and strategic analysis https://semiconductorinsight.com/download-sample-report/?product_id=95866
MARKET INSIGHTS
The global CPU Embedded Wireless LAN Market was valued at US$ 2.16 billion in 2024 and is projected to reach US$ 4.73 billion by 2032, at a CAGR of 10.27% during the forecast period 2025-2032. The Asia-Pacific region accounted for over 42% of global market share in 2023, driven by rapid IoT adoption in manufacturing and smart city projects.
CPU Embedded Wireless LAN refers to wireless networking capabilities integrated directly into central processing units (CPUs) or associated chipsets. This technology eliminates the need for separate Wi-Fi modules by embedding IEEE 802.11 standards-compliant connectivity within microcontrollers and microprocessors. Key applications include industrial IoT deployments, smart home appliances, voice-over-IP systems, and automotive telematics where space and power constraints make integrated solutions preferable.
The market growth is fueled by increasing demand for connected devices across industries, with over 29 billion IoT devices expected to be deployed globally by 2030. While embedded Wi-Fi solutions offer advantages in energy efficiency and miniaturization, challenges remain in maintaining signal integrity and thermal management in compact designs. Recent technological advancements such as Wi-Fi 6/6E integration in embedded systems and collaborations between semiconductor manufacturers like Broadcom and Texas Instruments are accelerating market expansion.
List of Leading CPU Embedded Wireless LAN Providers
Broadcom Inc. (U.S.)
Texas Instruments (U.S.)
Murata Manufacturing (Japan)
Microchip Technology (U.S.)
Panasonic Corporation (Japan)
TAIYO YUDEN (Japan)
SystemBase (China)
Embedded Wireless (Germany)
Segment Analysis:
By Type
Microcontroller Segment Leads with Higher Adoption in Compact IoT Devices
The market is segmented based on type into:
Microcontroller
Microprocessor
Subtypes: ARM-based, x86-based, and others
System-on-Chip (SoC)
Others
By Application
Industrial IoT Holds Largest Share Driven by Industry 4.0 Adoption
The market is segmented based on application into:
Industrial IoT
Smart Appliances
VoIP Devices
Consumer Electronics
Others
By Connectivity Protocol
Wi-Fi 6 Segment Growing Rapidly Due to High-Speed Requirements
The market is segmented based on connectivity protocol:
Wi-Fi 4 (802.11n)
Wi-Fi 5 (802.11ac)
Wi-Fi 6 (802.11ax)
Bluetooth
Dual Band (Wi-Fi + Bluetooth)
Others
By End-User Industry
Automotive Sector Shows Promising Growth with Connected Vehicle Trends
The market is segmented based on end-user industry:
Automotive
Healthcare
Industrial
Consumer Electronics
Telecommunications
Others
Regional Analysis: Global CPU Embedded Wireless LAN Market
North America North America remains a dominant force in the CPU embedded Wireless LAN market, driven by advanced technological adoption and robust demand from IoT, smart appliances, and VoIP applications. The U.S. accounts for over 60% of the regional market share, fueled by strong R&D investments in embedded systems and 5G infrastructure deployment. Key players like Broadcom and Texas Instruments are expanding their microcontroller-based wireless LAN solutions for industrial automation and smart homes. However, stringent FCC regulatory compliance and higher product costs present adoption challenges for smaller enterprises. The region is witnessing a shift toward energy-efficient Wi-Fi 6/6E enabled embedded solutions, particularly for edge computing applications in manufacturing and healthcare sectors.
Europe Europe’s market growth is propelled by the EU’s focus on Industry 4.0 and standardized wireless protocols under RED (Radio Equipment Directive). Germany leads in industrial IoT adoption, with embedded WLAN solutions increasingly integrated into automated production lines. The region shows strong preference for secure, low-latency microprocessor-based solutions from suppliers like Panasonic and Murata Manufacturing. However, complex GDPR and cybersecurity requirements for connected devices have slowed some implementations. Emerging smart city projects across the UK, France, and Nordic countries are creating new opportunities, though market fragmentation across different wireless standards remains a challenge for manufacturers.
Asia-Pacific Asia-Pacific is the fastest-growing region, projected to expand at ~12% CAGR through 2028, driven by massive IoT deployment in China and manufacturing automation in Japan/South Korea. China accounts for nearly 40% of regional demand, with domestic players like TAIYO YUDEN competing strongly in cost-sensitive microcontroller segments. India shows increasing adoption in smart meter and VoIP applications, though price sensitivity limits premium solution uptake. The region benefits from expanding semiconductor fabrication capabilities and government Digital India/Industry 4.0 initiatives. However, market fragmentation persists due to varying wireless spectrum regulations across countries and competition from alternative connectivity solutions like 5G NR-Light.
South America While still a developing market, South America shows gradual adoption of embedded WLAN solutions in Brazil’s industrial sector and Argentina’s emerging smart appliance market. Local manufacturers primarily focus on cost-effective microcontroller implementations for basic connectivity needs. Market growth is constrained by economic instability, limited local technical expertise, and infrastructure gaps in rural areas. Recent trade agreements facilitating semiconductor imports and Brazil’s IoT national plan show promise, but adoption remains concentrated in urban industrial clusters and premium consumer electronics segments.
Middle East & Africa The MEA market is in early growth stages, with UAE and Saudi Arabia leading in smart city and industrial automation projects requiring embedded connectivity. High dependence on imports for semiconductor components creates supply chain vulnerabilities. While oil-rich nations invest in advanced manufacturing with embedded systems, price sensitivity in other markets limits adoption to basic wireless LAN implementations. Africa shows potential through mobile payment infrastructure development, but unreliable power infrastructure and limited technical support networks hinder widespread CPU embedded WLAN implementation across most countries.
MARKET DYNAMICS
The rapid adoption of wireless technologies across industries has outpaced the availability of qualified engineers with expertise in both wireless systems and industrial applications. Many organizations struggle to find personnel capable of properly designing, implementing, and maintaining wireless industrial networks. This skills gap is particularly pronounced in emerging markets, where technical training programs have not kept pace with technological advances.
While embedded wireless LAN solutions have made significant progress in power efficiency, many industrial IoT applications require years of battery life from field devices. Maintaining continuous wireless connectivity while meeting these stringent power budgets remains a significant technical challenge. The need to periodically replace batteries in hundreds or thousands of deployed sensors can quickly erase the cost savings promised by wireless solutions.
The proliferation of wireless devices in industrial settings leads to increasingly congested radio environments. Many facilities must support multiple wireless systems (Wi-Fi, Bluetooth, cellular, proprietary protocols) simultaneously, creating potential for interference and degraded performance. This is particularly problematic for time-sensitive applications where even milliseconds of latency can disrupt critical processes. Effective spectrum management remains a persistent challenge in complex industrial deployments.
Global smart city initiatives represent one of the most significant growth opportunities for CPU embedded wireless LAN solutions. Municipalities worldwide are investing heavily in smart infrastructure projects that rely on wireless connectivity for applications ranging from traffic management to environmental monitoring. These large-scale deployments create substantial demand for robust, energy-efficient wireless modules designed for long-term outdoor operation.
The development of private wireless networks based on technologies like 5G and Wi-Fi 6 creates new opportunities for industrial-grade embedded solutions. These dedicated networks offer the reliability and performance required for mission-critical applications while providing enhanced security and control compared to public networks. The private wireless market is projected to grow at over 35% annually through 2030, representing a significant revenue opportunity for embedded solutions providers.
The integration of edge computing capabilities with embedded wireless modules enables new classes of intelligent, connected devices. By processing data locally before transmission, these solutions can reduce network congestion and improve response times for time-sensitive applications. This convergence of connectivity and computing presents opportunities for higher-value solutions that command premium pricing while addressing critical industry pain points.
The market is highly fragmented, with a mix of global and regional players competing for market share. To Learn More About the Global Trends Impacting the Future of Top 10 Companies https://semiconductorinsight.com/download-sample-report/?product_id=95866
FREQUENTLY ASKED QUESTIONS:
What is the current market size of Global CPU Embedded Wireless LAN Market?
Which key companies operate in this market?
What are the primary growth drivers?
Which region shows strongest growth?
What emerging technologies impact this market?
Related Report:
https://semiconductorblogs21.blogspot.com/2025/07/fingerprint-sensor-assembly-market.htmlhttps://semiconductorblogs21.blogspot.com/2025/07/capacitors-for-medical-electronics.htmlhttps://semiconductorblogs21.blogspot.com/2025/07/non-linear-resistors-market-end-use.htmlhttps://semiconductorblogs21.blogspot.com/2025/07/72k-rpm-hard-disk-drive-hdd-market.htmlhttps://semiconductorblogs21.blogspot.com/2025/07/adas-camera-modules-market-share-size.htmlhttps://semiconductorblogs21.blogspot.com/2025/07/uhf-rfid-tags-market-policy-impact-and.htmlhttps://semiconductorblogs21.blogspot.com/2025/07/coarse-sun-sensor-css-market-emerging.htmlhttps://semiconductorblogs21.blogspot.com/2025/07/direct-diode-lasers-ddl-market.htmlhttps://semiconductorblogs21.blogspot.com/2025/07/cw-laser-diodes-market-demand-forecast.htmlhttps://semiconductorblogs21.blogspot.com/2025/07/throttle-position-sensors-tps-market.htmlhttps://semiconductorblogs21.blogspot.com/2025/07/pulsed-laser-diodes-pld-market.htmlhttps://semiconductorblogs21.blogspot.com/2025/07/waveplates-market-opportunities.htmlhttps://semiconductorblogs21.blogspot.com/2025/07/uv-polarizers-market-competitive.htmlhttps://semiconductorblogs21.blogspot.com/2025/07/global-optical-add-drop-multiplexer.htmlhttps://semiconductorblogs21.blogspot.com/2025/07/global-fiber-bragg-grating-fbg.html
CONTACT US: City vista, 203A, Fountain Road, Ashoka Nagar, Kharadi, Pune, Maharashtra 411014 [+91 8087992013] [email protected]
0 notes
Text
Enhancing Motion Control with Rotary Torque Sensors – A Star EMBSYS Perspective
In modern engineering and industrial systems, precision and control are not just desirable—they're essential. One critical component that enables this level of performance in rotating machinery is the rotary torque sensor. Whether in automotive testing, robotics, or industrial automation, rotary torque sensors provide vital data on torque transmission, enabling more accurate control and diagnostics. At the forefront of sensor integration and embedded technology is Star EMBSYS, a company committed to delivering intelligent, sensor-driven solutions.
What is a Rotary Torque Sensor?
A rotary torque sensor measures the torque—i.e., the twisting force—applied to a rotating shaft. It is typically mounted between the drive and load components of a rotating system. Unlike static torque sensors, rotary versions are designed to operate while the shaft is spinning, making them ideal for real-time monitoring of dynamic torque in motors, gearboxes, and engine systems.
These sensors work using strain gauges, magnetic, or optical technologies to detect minute twists in the shaft and convert them into electrical signals. The data captured helps engineers assess system efficiency, monitor wear, and optimize performance in real time.
Key Applications of Rotary Torque Sensors
Rotary torque sensors are used in a broad range of industries:
Automotive Testing: To evaluate engine and drivetrain efficiency under load.
Electric Motors and Drives: For monitoring torque in high-speed, high-performance motors.
Robotics and Automation: To provide feedback for force control and safety systems.
Aerospace and Defense: In actuators and propulsion systems for performance validation.
Industrial Machinery: To detect overloads, torque variations, and inefficiencies.
Star EMBSYS – Custom Solutions for Torque Measurement
At Star EMBSYS, rotary torque sensor solutions go beyond simple data collection. The company offers customized embedded systems that not only read torque sensor data but also process, transmit, and log it for actionable insights. Whether you're designing a new system or retrofitting existing machinery, Star EMBSYS provides the tools and expertise to integrate torque measurement seamlessly.
Key capabilities include:
Sensor Signal Conditioning: Custom-designed electronics to amplify and filter sensor outputs for accuracy.
Wireless Data Transmission: Bluetooth, Wi-Fi, or proprietary RF modules to transmit torque data in real-time.
Embedded Processing: Microcontroller-based systems for onboard analytics, control feedback, and safety logic.
Custom Displays and Interfaces: User-friendly interfaces to view and interpret torque readings instantly.
Why Choose Star EMBSYS?
Star EMBSYS stands out in the industry due to its:
Deep Sensor Knowledge: From torque sensors to load cells and beyond, the team understands the science behind each signal.
End-to-End Integration: From hardware to firmware and software, Star EMBSYS handles every layer of product development.
Industry Experience: Serving clients in automotive, aerospace, medical devices, and industrial automation.
Conclusion
Rotary torque sensors are indispensable in today’s motion control and diagnostics landscape. They provide crucial insights into mechanical systems, enabling engineers to design smarter, safer, and more efficient machines. With Star EMBSYS as your development partner, you can harness the full power of torque sensing—integrated with cutting-edge embedded technology tailored to your unique application.
Visit:- https://www.starembsys.com/rotary-torque-sensor.html
#torque sensor#rotary torque sensor#servo#spring testing machine#torque wrench calibration machine#load cell
0 notes
Text
Why Microcontrollers are Essential in IoT Development?
Microcontrollers play a crucial role in the development of IoT (Internet of Things) solutions. These compact, energy-efficient computing devices are designed to perform dedicated tasks, making them ideal for controlling and interacting with sensors, actuators, and other hardware components in IoT systems. Unlike general-purpose processors, microcontrollers are built with embedded memory, timers, and input/output ports, enabling seamless integration into smart devices.
In an IoT setup, microcontrollers act as the "brains" of the device. They collect data from sensors (like temperature, humidity, motion, etc.), process that data locally or transmit it to the cloud for further analysis. Their low power consumption and cost-effectiveness make them perfect for battery-powered or resource-constrained applications, such as smart home gadgets, industrial automation, and wearable technology.
Popular microcontrollers like Arduino, ESP32, and STM32 provide built-in communication protocols (e.g., I2C, SPI, UART) and wireless capabilities (e.g., Wi-Fi, Bluetooth), allowing them to connect and share data efficiently. Their ability to operate in real-time is vital for time-sensitive applications.
Understanding how microcontrollers work is fundamental for anyone entering the IoT field. To explore more, check out this Internet of Things Course.
#IoT#Microcontrollers#EmbeddedSystems#SmartDevices#TechInnovation#Electronics#InternetOfThings#IoTDevelopment#Automation
0 notes
Text
South America IOT Market Size to Hit USD 3352.97 Billion by 2030

South America is emerging as a critical growth hub and ranks as the third largest region in the global Internet of Things (IoT) market. The region’s diverse geography and economic sectors ranging from agriculture and energy to urban development are creating fertile ground for connected technologies. The South America IoT market size is expected to rise from USD 544.38 billion in 2022 to USD 3,352.97 billion by 2030, at a projected CAGR of 24.3%.
Top Regional & Global Participants: • Telefónica Brasil (Vivo) • Claro (América Móvil) • Intelbras • Embratel • Microsoft Corporation • Cisco Systems, Inc. • Huawei Technologies Co., Ltd. • Siemens AG • Oracle Corporation • IBM Corporation
Get Free Sample PDF Here: https://www.fortunebusinessinsights.com/enquiry/request-sample-pdf/south-america-internet-of-things-iot-market-107393
Strategic Market Trends: • IoT combined with Artificial Intelligence (AI) is enabling real-time decision-making in agriculture and mining. • Local governments are investing in “Digital Twin” technologies for smart city planning. • Environmental sustainability is driving IoT-based reforestation, water conservation, and emissions tracking programs. • Startups and research institutions are increasingly collaborating on cost-efficient IoT systems tailored to rural regions.
Key Market Drivers: • Government-led digitalization programs, particularly in Brazil, Chile, and Colombia. • Expanding smart farming initiatives to optimize resource usage and yield. • Increased demand for connected logistics and fleet management in cross-border trade. • Growing investment by telecom companies in 5G and LPWAN infrastructure.
Emerging Opportunities: • Integration of AI and IoT in agro-industrial systems for predictive analytics. • IoT adoption in renewable energy monitoring, including wind and solar farms. • Deployment of IoT-enabled urban safety and surveillance systems in smart city projects. • Development of cross-border supply chain tracking solutions across MERCOSUR nations.
Accelerators of Regional Growth: • Expanding adoption of smart farming tools for livestock tracking and crop health monitoring in Brazil and Argentina. • National digital transformation strategies, including Colombia’s and Chile’s government-backed IoT deployments. • Increased adoption of connected logistics for regional trade, port management, and real-time asset tracking. • Surge in urban infrastructure projects incorporating smart lighting, traffic monitoring, and waste management systems.
Speak to Analyst: https://www.fortunebusinessinsights.com/enquiry/speak-to-analyst/south-america-internet-of-things-iot-market-107393
Core Market Segments: • By Components: IoT sensors, actuators, microcontrollers, IoT platforms, and data analytics. • By Connectivity: 5G, NB-IoT, LoRaWAN, Wi-Fi, and mesh networking. • By Deployment: Edge, cloud-native, and on-premises deployments tailored to local infrastructure capabilities. • By Applications: Smart agriculture, public safety, utilities, automotive, industrial automation, and environment monitoring.
Notable Developments: June 2022 – Embratel partnered with local governments across Brazil to deploy low-power wide-area networks (LPWAN) for municipal IoT initiatives, including remote water level and air quality monitoring.
October 2022 – Telefónica and Microsoft launched a regional IoT innovation lab in São Paulo to accelerate digital transformation in logistics and energy through joint development of cloud-based IoT services.
About Us At Fortune Business Insights, we deliver cutting-edge market intelligence designed to unlock growth opportunities and mitigate risk. Our team combines deep sector knowledge with robust methodologies to produce data-driven insights that empower strategic decisions. From syndicated research to tailored consulting, we’re committed to helping you shape a smarter, connected future.
Contact Us: US: +1 833 909 2966 UK: +44 808 502 0280 APAC: +91 744 740 1245 Email: [email protected]
#South America Internet of Things Market Share#South America Internet of Things Market Size#South America Internet of Things Market Industry#South America Internet of Things Market Driver#South America Internet of Things Market Growth#South America Internet of Things Market Analysis#South America Internet of Things Market Trends
0 notes
Text
Development Board and Kits Market 2025-2032
MARKET INSIGHTS
The global Development Board and Kits Market size was valued at US$ 3,780 million in 2024 and is projected to reach US$ 7,230 million by 2032, at a CAGR of 9.69% during the forecast period 2025-2032. The U.S. market accounted for 35% of global revenue in 2024, while China’s market is anticipated to grow at a faster pace with an estimated CAGR of 9.2% through 2032.
Development boards and kits are essential tools for prototyping and testing electronic systems across various industries. These platforms typically include microcontroller units (MCUs), field-programmable gate arrays (FPGAs), or digital signal processors (DSPs) along with necessary peripherals and software tools. Key product categories include MCU development boards, which currently dominate the market with over 40% revenue share, followed by FPGA and ARM-based solutions. The growing complexity of embedded systems and rising demand for IoT applications are driving innovation in this sector.
Market expansion is being fueled by increasing R&D investments in automotive electronics, where development boards enable advanced driver-assistance systems (ADAS) testing. The consumer electronics segment, particularly smart home devices, is another major growth driver with a projected 8.5% CAGR. Leading manufacturers like STMicroelectronics and Texas Instruments are expanding their development kit portfolios to support emerging technologies such as machine learning at the edge. In March 2024, Raspberry Pi launched its first FPGA development board targeting industrial automation, signaling the market’s shift toward more specialized solutions.
Download Your Free Copy of the Sample Report-https://semiconductorinsight.com/download-sample-report/?product_id=97557
Key Industry Players
Innovation and Strategic Partnerships Drive Market Leadership
The global development board and kits market features a dynamic competitive landscape dominated by semiconductor giants and emerging innovators. STMicroelectronics and Texas Instruments currently lead the market, holding a combined revenue share of over 25% in 2024. Their dominance stems from extensive microcontroller (MCU) portfolios and strong partnerships across automotive and IoT sectors, which collectively account for nearly 45% of development board applications.
Meanwhile, Raspberry Pi maintains significant influence in the education and maker communities through its cost-effective single-board computers, with shipments exceeding 5 million units annually. The company’s open-source approach has enabled widespread adoption among DIY enthusiasts and prototyping professionals alike.
What’s particularly notable is how NXP Semiconductors and Infineon Technologies are gaining traction through specialized solutions for Industry 4.0 applications. Their focus on secure connectivity and edge computing capabilities positions them favorably as industrial automation demand grows at 12% CAGR through 2030.
New entrants like Espressif Systems are disrupting the market with competitively priced Wi-Fi/Bluetooth development kits, capturing nearly 8% of the IoT segment. Established players are responding through acquisitions—a trend exemplified by Analog Devices’ 2023 purchase of Maxim Integrated to strengthen its analog computing solutions.
List of Key Development Board and Kits Manufacturers
STMicroelectronics (Switzerland)
Texas Instruments (U.S.)
NXP Semiconductors (Netherlands)
Infineon Technologies (Germany)
Renesas Electronics (Japan)
Analog Devices (U.S.)
Raspberry Pi (U.K.)
Intel Corporation (U.S.)
Silicon Labs (U.S.)
Microchip Technology (U.S.)
ESP32 (China)
Nordic Semiconductor (Norway)
Segment Analysis:
By Type
MCU Development Boards Lead the Market Owing to Widespread Adoption in IoT and Embedded Systems
The market is segmented based on type into:
MCU Development Board
CPLD/FPGA Development Board
DSP Development Board
ARM Development Board
MIPS Development Board
PPC Development Board
By Application
IoT Segment Emerges as Dominant Due to Rapid Technological Advancements in Connected Devices
The market is segmented based on application into:
3C Products
Automotive
IoT
Medical Equipment
Defense & Aerospace
Other
By Architecture
ARM-based Boards Gain Prominence Across Multiple Industries for Their Power Efficiency
The market is segmented based on architecture into:
8-bit
16-bit
32-bit
64-bit
By Connectivity
Wireless Connectivity Solutions Drive Market Growth With Expanding IoT Ecosystem
The market is segmented based on connectivity into:
Wired
Wireless
Request Your Free Sample Report-https://semiconductorinsight.com/download-sample-report/?product_id=97557
FREQUENTLY ASKED QUESTIONS:
What is the current market size of Global Development Board and Kits Market?
-> Development Board and Kits Market size was valued at US$ 3,780 million in 2024 and is projected to reach US$ 7,230 million by 2032, at a CAGR of 9.69% during the forecast period 2025-2032.
Which key companies dominate this market?
-> Top players include STMicroelectronics, Texas Instruments, Raspberry Pi, NXP Semiconductors, and Infineon Technologies, collectively holding 45% market share.
What are the primary growth drivers?
-> Key drivers include IoT proliferation (26% of applications), maker movement expansion, and increasing adoption in educational institutions.
Which product segment leads the market?
-> MCU development boards dominate with 38% share, while FPGA boards show fastest growth at 15.8% CAGR.
What are the emerging technology trends?
-> Emerging trends include AI-enabled boards, RISC-V architecture adoption, and cloud-integrated development kits.
About Semiconductor Insight:
Established in 2016, Semiconductor Insight specializes in providing comprehensive semiconductor industry research and analysis to support businesses in making well-informed decisions within this dynamic and fast-paced sector. From the beginning, we have been committed to delivering in-depth semiconductor market research, identifying key trends, opportunities, and challenges shaping the global semiconductor industry.
CONTACT US:
City vista, 203A, Fountain Road, Ashoka Nagar, Kharadi, Pune, Maharashtra 411014
[+91 8087992013]
0 notes
Text
The Secret to Powerful Cleaning Robots? Smart Electronics Design
Table of Contents
Why Electronics Design Matters for Cleaning Robots
Core Electronics Components in Industrial Cleaning Robots 2.1 Microcontrollers and Processors 2.2 Motor Drivers and Controllers 2.3 Sensor Systems 2.4 Power Systems 2.5 Communication Modules
How Smart Electronics Enhance Cleaning Robot Performance 3.1 Autonomous Navigation 3.2 Adaptive Cleaning Modes 3.3 Self-Diagnostics and Maintenance Alerts 3.4 Ruggedness and Reliability
Real-World Example: Industrial Floor Cleaning Robots
Future Trends in Electronics for Cleaning Robots
Conclusion

The Secret Behind Powerful, Efficient Cleaning Robots? Advanced Electronics Design
The secret behind powerful, efficient cleaning robots lies in advanced electronics design — enabling precise control, durable operation, and intelligent automation. Whether it’s industrial cleaning robots scrubbing factory floors or autonomous vacuum bots in offices, smart electronics are the brains and nervous system that allow these machines to clean thoroughly, adapt to complex environments, and operate reliably over long hours.
If you want to understand how modern cleaning robots deliver outstanding performance and why electronics design is the key differentiator, keep reading. This article breaks down the essential role of electronics in powering industrial cleaning robots and how innovation is driving the future of automated cleaning.
Why Electronics Design Matters for Cleaning Robots
Cleaning robots operate in tough environments, often facing dirt, moisture, and heavy use. Their ability to navigate complex spaces, detect obstacles, and perform cleaning tasks autonomously depends largely on their electronic systems.
A well-engineered electronics design ensures:
Efficient motor control: For precise movement and cleaning action
Sensor integration: To map spaces, detect dirt, and avoid obstacles
Robust power management: For long battery life and safe operation
Durability: Protection against dust, water, and impacts
Without sophisticated electronics, cleaning robots wouldn’t be able to maintain the reliability or effectiveness expected in industrial environments.
Core Electronics Components in Industrial Cleaning Robots
1. Microcontrollers and Processors These act as the robot’s brain, running the software that controls everything from movement to cleaning cycles. Powerful microcontrollers enable real-time decision-making and sensor fusion.
2. Motor Drivers and Controllers Precise motor control is essential for navigating and adjusting cleaning patterns. Electronics regulate speed, torque, and direction of wheels and brushes, ensuring consistent cleaning quality.
3. Sensor Systems Cleaning robots rely on sensors such as:
LIDAR and ultrasonic sensors for distance measurement and obstacle detection
Optical sensors for dirt detection
Gyroscopes and accelerometers for navigation stability
Electronics design ensures seamless data flow from these sensors to the processor for real-time analysis.
4. Power Systems Battery management electronics monitor charge levels, optimize power usage, and protect against overcharging or overheating, which is crucial for safety and longer operational cycles.
5. Communication Modules Wireless connectivity modules (Wi-Fi, Bluetooth) enable remote monitoring, software updates, and integration with other smart systems.
How Smart Electronics Enhance Cleaning Robot Performance
Autonomous Navigation Advanced electronics enable cleaning robots to build detailed maps of their environment and plan efficient cleaning paths. Sensors provide real-time feedback, while the processor adjusts motion and cleaning functions dynamically.
Adaptive Cleaning Modes Robots can switch cleaning intensity based on detected floor types or dirt levels. Electronics control motors and brushes accordingly, optimizing battery life and cleaning results.
Self-Diagnostics and Maintenance Alerts Electronics monitor system health and notify operators about maintenance needs, preventing downtime and extending robot lifespan.
Ruggedness and Reliability Designing electronics with protective coatings and sealed enclosures ensures robots withstand industrial conditions like dust, moisture, and mechanical shocks.
Real-World Example: Industrial Floor Cleaning Robots
Consider an industrial floor cleaning robot deployed in a large warehouse:
It uses LIDAR sensors and a high-performance microcontroller to navigate aisles
Its electronics manage brush motors with variable speed depending on floor surface
Power electronics optimize battery use to cover large areas without recharge
The system sends performance data to a cloud dashboard via Wi-Fi, enabling real-time monitoring

Such capabilities are only possible through thoughtful electronics design tailored to the demands of industrial cleaning.
Future Trends in Electronics for Cleaning Robots
AI-Driven Cleaning Optimization Integrating AI with electronics allows robots to learn the most efficient cleaning paths and adapt schedules based on usage patterns.
Enhanced Sensor Fusion Combining data from multiple sensor types improves navigation accuracy and cleaning precision.
Modular Electronics for Easy Upgrades Future designs focus on modular PCBs and plug-and-play components to simplify repairs and upgrades.
Energy Harvesting Technologies Innovations in electronics may enable robots to recharge partially via kinetic or solar energy, increasing uptime.
Conclusion
The power and efficiency of cleaning robots — especially in demanding industrial settings — depend heavily on advanced electronics design. From controlling motors and processing sensor data to managing power and communication, smart electronics enable these robots to clean smarter, longer, and more reliably than ever before.
For companies seeking to automate cleaning processes and improve operational efficiency, investing in cutting-edge electronics design is the real secret to unlocking the full potential of industrial cleaning robots.
Every great cleaning robot starts with great electronics. If you’re planning your next product or upgrading an existing one, our design services are built to help you go further — faster. See how we can help
#CleaningRobots#ElectronicsDesign#RoboticsEngineering#SmartAutomation#EmbeddedSystems#IndustrialAutomation#RobotDesign#AutomationTechnology#AdvancedElectronics
0 notes
Text
How Do Power, Motor & Robotics Development Tools Drive Innovation in Automation?

Introduction to Modern Development Ecosystems
As the era of intelligent machines, automation, and smart manufacturing continues to advance, Power, Motor & Robotics Development Tools have emerged as essential components in transforming ideas into functioning prototypes and commercial solutions. These tools serve as the backbone for developing precise and reliable control systems used in a wide variety of sectors—from industrial robotics to electric mobility.
With the increasing integration of microcontrollers, sensors, thermal management components, and electronic controllers, development tools offer a modular and practical approach to building sophisticated electronic and electromechanical systems.
What Are Power, Motor & Robotics Development Tools?
Power, Motor & Robotics Development Tools consist of hardware kits, interface boards, and control modules designed to help developers and engineers test, prototype, and deploy automated systems with precision and speed. These tools make it possible to manage current, voltage, mechanical motion, and real-time decision-making in a structured and scalable manner.
By combining essential components such as capacitors, fuses, grips, cables, connectors, and switches, these kits simplify complex engineering challenges, allowing smooth integration with controllers, microprocessors, and sensors.
Exploring the Primary Toolsets in the Field
Power Management Development Tools
Efficient energy management is crucial for ensuring stability and performance in any robotic or motor-driven system.
Development boards supporting AC/DC and DC/DC conversion
Voltage regulators and surge protection circuits for safe energy flow
Thermal sensors and oils to maintain system temperature
Battery management ICs to control charge-discharge cycles
High-efficiency transformers and current monitors
Motor Control Development Tools
Motor control kits are built to manage torque, direction, and speed across a range of motor types.
H-bridge motor drivers for bidirectional motor control
Stepper motor controllers with high-precision movement
Brushless DC motor driver modules with thermal protection
Feedback systems using encoders and optical sensors
PWM-based modules for real-time torque adjustment
Robotics Development Tools
Robotics kits merge both mechanical and electronic domains to simulate and deploy automation.
Preassembled robotic arm platforms with programmable joints
Sensor integration boards for object detection, motion sensing, and environmental monitoring
Wireless modules for IoT connectivity using BLE, Wi-Fi, or RF
Microcontroller development platforms for logic execution
Mounting hardware and cable grips for secure installations
Benefits of Using Professional Development Tools
Advanced development kits offer more than just experimentation—they serve as stepping stones to commercial production. These tools minimize development time and maximize productivity.
Enhance system performance with modular plug-and-play designs
Enable easy integration with laptops, diagnostic tools, and controllers
Reduce design errors through pre-tested circuitry and embedded protection
Facilitate rapid software and firmware updates with compatible microcontrollers
Support debugging with LED indicators, thermal pads, and status feedback
Key Applications Across Industries
The adaptability of Power, Motor & Robotics Development Tools makes them suitable for countless industries and applications where intelligent movement and power efficiency are essential.
Industrial robotics and pick-and-place systems for manufacturing automation
Smart agriculture solutions including automated irrigation and drone control
Automotive design for electric vehicle propulsion and battery systems
Aerospace applications for lightweight, compact control mechanisms
Educational platforms promoting STEM learning with hands-on robotics kits
Essential Components that Enhance Development Kits
While the kits come equipped with core tools, several other components are often required to expand capabilities or tailor the kits to specific use cases.
Sensors: From temperature and light to current and magnetic field detection
Connectors and plugs: For flexible integration of external modules
Switches and contactors: For manual or automatic control
Thermal pads and heatsinks: For preventing overheating during operation
Fuses and circuit protection devices: For safeguarding sensitive electronics
LED displays and character LCD modules: For real-time data visualization
How to Choose the Right Tool for Your Project
With a vast array of kits and tools on the market, selecting the right one depends on your application and environment.
Identify whether your project focuses more on power management, motor control, or full robotic systems
Consider compatibility with popular development environments such as Arduino, STM32, or Raspberry Pi
Check the current and voltage ratings to match your load and motor specifications
Evaluate add-on support for wireless communication and real-time data processing
Ensure the tool includes comprehensive documentation and driver libraries for smooth integration
Why Development Tools Are Crucial for Innovation
At the heart of every advanced automation solution is a well-structured foundation built with accurate control and reliable hardware. Development tools help bridge the gap between conceptualization and realization, giving engineers and makers the freedom to innovate and iterate.
Encourage experimentation with minimal risk
Shorten product development cycles significantly
Simplify complex circuit designs through preconfigured modules
Offer scalability for both low-power and high-power applications
Future Scope and Emerging Trends
The future of development tools is headed toward more AI-integrated, real-time adaptive systems capable of learning and adjusting to their environment. Tools that support machine vision, edge computing, and predictive analytics are gaining traction.
AI-powered motion control for robotics
Integration with cloud platforms for remote diagnostics
Advanced motor drivers with feedback-based optimization
Miniaturized power modules for wearable and mobile robotics
Conclusion: Is It Time to Upgrade Your Engineering Toolkit?
If you're aiming to build smarter, faster, and more energy-efficient systems, Power, Motor & Robotics Development Tools are not optional—they’re essential. These kits support you from idea to implementation, offering the flexibility and performance needed in modern-day innovation.
Whether you're developing a prototype for a high-speed robotic arm or integrating power regulation into a smart grid solution, the right development tools empower you to transform challenges into achievements. Take the leap into next-gen automation and electronics by investing in the tools that make engineering smarter, safer, and more efficient.
#Power Motor & Robotics Development Tools#electronic components#technology#electricalparts#halltronics
0 notes
Text
Embedded Systems Industry: Driving Innovation Across Digital Ecosystems
The Embedded Systems Industry is a critical enabler of modern technology, supporting automation, connectivity, and intelligent computing across a wide range of sectors. From controlling basic electronic devices to powering advanced robotics and real-time automotive systems, embedded systems are the invisible backbone of the digital world. The global industry was valued at USD 90.6 billion in 2023 and is expected to grow to over USD 149.3 billion by 2030, advancing at a compound annual growth rate of 7.5.
Emerging Trends in the Embedded Systems Industry
The industry is rapidly evolving with new applications and technologies that expand its reach and functionality. Key trends include:
The rise of AI-powered embedded systems at the edge
Demand for ultra-low power consumption in mobile and wearable devices
Integration of wireless connectivity (Wi-Fi, Bluetooth, Zigbee) into embedded platforms
The adoption of real-time operating systems (RTOS) for time-sensitive applications
Increase in security and cryptographic modules to protect connected devices
These trends are pushing the embedded systems industry into the forefront of innovation in both hardware and software domains.
Segment Insights
By Component
Hardware remains the largest segment, including microcontrollers, digital signal processors, and system-on-chips.
Software is growing as embedded applications demand increasingly complex, secure, and user-friendly interfaces.
By Application
Real-time systems dominate in applications such as autonomous vehicles and industrial robots.
Standalone and networked systems are widely used in consumer electronics and smart appliances.
Industry Applications
Automotive
The automotive industry is a major consumer of embedded systems, using them in advanced driver-assistance systems, infotainment units, powertrain management, and electric vehicle battery systems.
Industrial Automation
Factories and logistics environments depend on embedded systems to drive machine control, process monitoring, and predictive maintenance, enabling Industry 4.0 capabilities.
Consumer Electronics
Embedded systems are integral to devices like smart TVs, mobile phones, gaming consoles, and home appliances, offering intuitive control and energy-efficient operation.
Healthcare
Medical devices from pacemakers to digital diagnostics rely on embedded systems for accuracy, reliability, and real-time patient monitoring.
Aerospace and Defense
Embedded control systems provide stability, responsiveness, and secure communication in military drones, navigation tools, and satellite communication systems.
Regional Outlook
Asia-Pacific is the largest industrial hub for embedded systems, benefiting from strong manufacturing and electronics development.
North America leads in embedded software innovation, particularly in defense, aerospace, and healthcare.
Europe is expanding with investments in automotive and industrial automation.
Latin America, Middle East, and Africa are emerging with increased demand in telecom and consumer technology.
Leading Industry Players
Several companies dominate the global embedded systems industry with diversified portfolios, robust innovation, and strong regional presence:
Intel Corporation
STMicroelectronics
Microchip Technology
Texas Instruments
Renesas Electronics
Arm Holdings
NXP Semiconductors
Cypress Semiconductor
Infineon Technologies
Qualcomm Incorporated
These players continue to develop scalable, secure, and energy-efficient embedded systems for modern applications.
Conclusion
The embedded systems industry is essential to powering the next generation of intelligent and connected technologies. With applications spanning from industrial automation to digital health, embedded systems are becoming more efficient, secure, and adaptive. The industry is poised for sustained growth, fueled by continuous innovation and the rising complexity of digital devices.
Trending Report Highlights
Explore complementary markets helping shape the digital and embedded future:
Barcode Scanner Market
United States Managed Services Market
SEA Robotic Process Automation Market
SEA Led Lighting Market
Hand Tools Market
0 notes
Text
Substation Monitoring System Market Top Players - MoviTHERM, CAS, Pyrumas Software Pvt. Ltd., CAHORS, Advanced Energy, and Nortech Management Ltd.
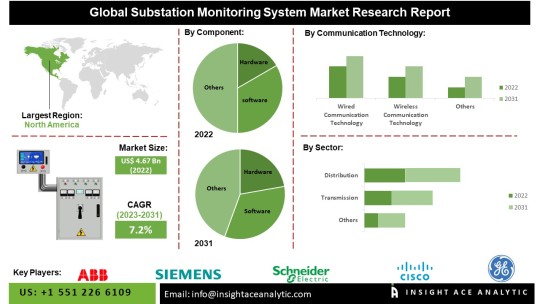
InsightAce Analytic Pvt. Ltd. announces the release of a market assessment report on the "Global Substation Monitoring System Market- (By Component (Hardware (Intelligent Electric Devices (Transformer(Voltage Instrument Transformer, Current Instrument Transformer), Relay Devices, Recloser Controllers, Circuit Breakers, Switches), Distribution Network Feeders, Others (Smart Sensors, Microcontrollers, Cameras)), Software (Asset Management, Production Management, Performance Management)), By Communication Technology (Wired (Fiber Optic, Ethernet, PROFIBUS, Others), Fieldbus, HART, Modbus), Wireless (Wireless LAN (Wi-Fi), ZigBee, Cellular Technology)), By Sector (Transmission, Distribution), By Industry (Transportation, Mining, Steel, Oil and Gas, Utilities (Non-Renewable, Renewable))), Trends, Industry Competition Analysis, Revenue and Forecast To 2031."
According to the latest research by InsightAce Analytic, the Global Substation Monitoring System Market is valued at US$ 4.67 Bn in 2022, and it is expected to reach US$ 8.61 Bn by 2031, with a CAGR of 7.2% during a forecast period of 2023-2031.
Get Free Access to Demo Report, Excel Pivot and ToC: https://www.insightaceanalytic.com/request-sample/2019
A Substation Monitoring System (SMS) is a vital tool for utilities to maintain the safe, reliable, and efficient operation of electrical substations. It provides operators with real-time data and control capabilities, enabling the reduction of downtime and optimization of power distribution across the electrical grid. The global demand for substation monitoring systems has seen substantial growth and is expected to continue expanding throughout the forecast period. This increase in demand is driven by the rising investment by power system operators in automation, monitoring, and control systems. Substation monitoring systems are integral to local, regional, and international infrastructure, and their failure can have significant economic and national security repercussions. Consequently, growing awareness of the system's benefits is expected to drive further market growth in the coming years.
The SMS ensures the safe and efficient functioning of substations by continuously monitoring critical parameters such as temperature, pressure, and voltage levels. The global substation monitoring system market spans the power generation, distribution, and transmission sectors, where SMS technology is used to oversee and manage substation operations. The market offers a wide range of products and services, including hardware, software, and consulting solutions. The hardware components, such as sensors, communication devices, and other equipment, facilitate the monitoring of substation assets, providing comprehensive insights into system performance.
List of Prominent Players in the Substation Monitoring System Market:
ABB Ltd.
Sentient Energy
Schweitzer Engineering Laboratories
Viper Imaging, LLC
Allis Electric Co., Ltd.
FLIR Systems
MoviTHERM
CAS
Pyrumas Software Pvt. Ltd.
CAHORS
Advanced Energy
Nortech Management Ltd.
Crompton Greaves
Eaton
Emerson Electric
Honeywell
Cisco
Schneider Electric SE
General Eectric
Siemens
Expert Knowledge, Just a Click Away: https://calendly.com/insightaceanalytic/30min?month=2025-02
Market Dynamics:
Drivers:
The substation monitoring system market is expanding due to the implementation of cost-effective solutions aimed at addressing aging and deteriorating infrastructure while enhancing IoT-based communication networks in the power generation sector. Increased government investments in modernizing power plants and developing IoT-based communication networks are further driving the market's growth. Additionally, the adoption of monitoring systems that efficiently analyze and automate facility data is gaining momentum. The communication network plays a pivotal role in power plants, as monitoring equipment and Intelligent Electronic Devices (IEDs) at substations must transmit data to remote utility data centers. Technological advancements, including innovative communication systems and SCADA (Supervisory Control and Data Acquisition) systems, are expected to propel the growth of the substation monitoring system market.
Challenges:
The affordability of substation monitoring systems is hindered by the high costs and challenges associated with installing wireless sensor networks. The significant initial capital investment required for the deployment of sensor networks, along with the rising costs of installing IEDs in substations, is expected to constrain market growth. Furthermore, a lack of awareness regarding the benefits of substation monitoring systems and the slower adoption rates in developing countries represent major obstacles for the market during the forecast period.
Regional Trends:
The North American substation monitoring system market is poised to capture a significant revenue share. Growth in this region is fueled by factors such as the increasing number of product launches and expansions by key industry players. For example, NV5 Geospatial recently introduced the ARIS II Rover, an advanced robotic substation monitoring device. After five years of field testing and implementation, the rover meets the industry’s highest standards for durability and reliability. Capable of operating in harsh weather conditions and on diverse terrains, it is designed for use in distribution and transmission substations. NV5 Geospatial, a leading provider of geospatial scientific data in North America, is at the forefront of such innovations.
Unlock Your GTM Strategy: https://www.insightaceanalytic.com/customisation/2019
Recent Developments:
In August 2023, Siemens came out with a new line of line monitoring switches. The SIRIUS 3UG5 line tracking relays took the technology that had been used before and added new functions and uses.The new SIRIUS 3UG5 line monitoring relays made sure that mobile tools and equipment were as safe as possible, especially if the grid was not stable. This made sure that grid and power problems could be found and reported quickly before they caused a lot of damage.
In Nov 2021, General Electric (GE) and ISA CTEEP successfully implemented the initial operation of the inaugural digital substation within the National Interconnected System in Brazil. The facility was constructed via fibre optic cables and incorporated a control room that was 30% less in size compared to traditional substations. This design modification resulted in a reduction of environmental effects.
Segmentation of Substation Monitoring System Market-
Substation Monitoring System Market By Component-
Substation Monitoring System Market By Communication Technology-
Substation Monitoring System Market By Sector
Substation Monitoring System Market By Industry-
By Region-
North America-
The US
Canada
Mexico
Europe-
Germany
The UK
France
Italy
Spain
Rest of Europe
Asia-Pacific-
China
Japan
India
South Korea
South East Asia
Rest of Asia Pacific
Latin America-
Brazil
Argentina
Rest of Latin America
Middle East & Africa-
GCC Countries
South Africa
Rest of Middle East and Africa
Read Overview Report- https://www.insightaceanalytic.com/report/substation-monitoring-system-market/2019
About Us:
InsightAce Analytic is a market research and consulting firm that enables clients to make strategic decisions. Our qualitative and quantitative market intelligence solutions inform the need for market and competitive intelligence to expand businesses. We help clients gain competitive advantage by identifying untapped markets, exploring new and competing technologies, segmenting potential markets and repositioning products. Our expertise is in providing syndicated and custom market intelligence reports with an in-depth analysis with key market insights in a timely and cost-effective manner.
0 notes
Text
How Do IoT Data Loggers Enhance Data Collection?
In the age of digital transformation, collecting and analyzing data has become the backbone of efficient operations across industries. Whether monitoring temperature in a cold storage facility, analyzing vibrations in machinery, or measuring electrical signals in research labs, data loggers play a vital role in recording and preserving data. Among the most commonly used tools in this field are the IoT data logger, digital data logger, and DAQ data acquisition systems.
What is a Data Logger?
A data logger is an electronic instrument designed to record various types of data over time. It typically includes sensors, microcontrollers, memory storage, and software to collect and store information for later use. Data loggers are used in diverse applications—from environmental monitoring and industrial control to logistics and scientific research.
The key benefit of a data logger is its ability to operate autonomously once configured. Users can deploy these devices in remote or hard-to-reach locations where constant human supervision is impractical. They are engineered to log everything from temperature, humidity, and pressure to voltage, current, and vibration.
Understanding the IoT Data Logger
One of the most innovative developments in the world of data logging is the IoT data logger. These devices leverage the power of the Internet of Things to transmit real-time data to cloud-based platforms. Unlike traditional loggers that require manual data retrieval, IoT data loggers provide instant remote access to critical metrics.
This functionality is particularly useful in industries like agriculture, manufacturing, smart cities, and utilities. For example, a smart farm may use IoT data loggers to monitor soil moisture, temperature, and rainfall—enabling automated irrigation systems and real-time alerts. Similarly, in industrial plants, these loggers help monitor equipment conditions and detect anomalies before they lead to costly breakdowns.
IoT data loggers often come with wireless communication features like Wi-Fi, cellular (4G/5G), or LoRaWAN. They are integrated with GPS for location tracking and equipped with dashboards or mobile apps for easy data visualization.
Digital Data Logger: A Reliable Workhorse
A digital data logger is one of the most widely used types of data loggers. These compact devices are designed to measure and store data in digital form, ensuring high accuracy and ease of integration with computers and management systems. Unlike analog data recorders, digital data loggers minimize the chances of human error and offer improved precision.
They are commonly employed in industries where continuous monitoring is crucial—such as pharmaceuticals, food processing, and transportation. For example, in cold chain logistics, digital data loggers are used to monitor the temperature of perishable goods during transit. If the temperature deviates from the allowed range, the logger stores the event and alerts the operator.
Modern digital data loggers come with LCD screens, USB or Bluetooth connectivity, long battery life, and configurable sampling intervals. Their plug-and-play functionality makes them ideal for non-technical users who still require dependable data.
DAQ Data Acquisition Systems: For Complex Data Needs
While digital and IoT data loggers are great for general-purpose monitoring, DAQ data acquisition systems are used for more advanced and high-speed data recording applications. These systems consist of sensors, signal conditioning hardware, analog-to-digital converters, and specialized software that works in tandem to gather, process, and analyze large volumes of data in real time.
DAQ data acquisition systems are frequently used in laboratories, engineering research, aerospace, automotive testing, and energy sectors. For instance, during crash tests in the automotive industry, DAQ systems capture a wide range of sensor data—force, acceleration, pressure, and more—at extremely high speeds.
What sets DAQ systems apart is their ability to handle multiple input channels simultaneously and offer highly customizable configurations. They are typically connected to a PC or an industrial controller, allowing users to visualize and manipulate data through sophisticated software tools like LabVIEW or MATLAB.
Choosing the Right Tool
Choosing between an IoT data logger, digital data logger, and DAQ data acquisition system depends on your specific application needs:
IoT data logger: Best for remote, real-time monitoring where wireless communication is key.
Digital data logger: Ideal for routine environmental or process monitoring with accuracy and ease of use.
DAQ data acquisition: Suited for research and engineering environments where complex, high-speed, multi-signal data is required.
Conclusion
Data logging technologies have evolved to match the ever-growing demand for precision, efficiency, and real-time access. Whether it’s the connectivity of an IoT data logger, the reliability of a digital data logger, or the power and complexity of DAQ data acquisition systems, these tools empower industries to make smarter, faster, and more informed decisions. As technology continues to advance, the future of data logging promises even greater integration, automation, and intelligence.
0 notes
Text
Introduction to Internet of Things (IoT) Programming

The Internet of Things (IoT) is revolutionizing the way we interact with devices, allowing everyday objects to connect to the internet and share data. From smart homes and wearables to industrial automation, IoT is reshaping the world. In this post, we'll dive into the basics of IoT programming and how you can start creating your own smart applications.
What is IoT?
IoT refers to a network of physical devices embedded with sensors, software, and other technologies to connect and exchange data with other devices and systems over the internet.
Key Components of IoT Systems
Devices/Sensors: Physical components that collect data (e.g., temperature sensors, motion detectors).
Connectivity: Wi-Fi, Bluetooth, Zigbee, LoRa, or cellular networks to transmit data.
Data Processing: Microcontrollers or cloud services process the incoming data.
User Interface: Web/mobile applications to monitor and control devices.
Popular IoT Hardware Platforms
Arduino: An open-source electronics platform based on simple microcontrollers.
Raspberry Pi: A small, affordable computer ideal for more powerful IoT applications.
ESP8266/ESP32: Low-cost Wi-Fi-enabled microchips widely used in IoT projects.
Languages Used in IoT Programming
C/C++: Commonly used for low-level programming on microcontrollers like Arduino.
Python: Popular for Raspberry Pi and edge computing due to its simplicity.
JavaScript (Node.js): Useful for IoT dashboards and server-side applications.
MicroPython: A lightweight version of Python optimized for microcontrollers.
Example: Blinking an LED with Arduino
void setup() { pinMode(13, OUTPUT); // Set digital pin 13 as output } void loop() { digitalWrite(13, HIGH); // Turn the LED on delay(1000); // Wait for 1 second digitalWrite(13, LOW); // Turn the LED off delay(1000); // Wait for 1 second }
IoT Data Handling and Cloud Integration
Once your devices are collecting data, you'll need to store and analyze it. Here are some common platforms:
ThingSpeak: A simple platform for IoT data logging and visualization.
Firebase: Real-time database ideal for mobile IoT applications.
AWS IoT Core: Scalable cloud service for managing IoT devices.
MQTT Protocol: Lightweight messaging protocol used for IoT device communication.
Popular IoT Projects to Try
Smart door lock controlled by a mobile app
Home temperature monitor with alerts
Motion detection security camera
Plant watering system based on soil moisture levels
Fitness tracker using accelerometers
Best Practices for IoT Programming
Use lightweight protocols and efficient code to conserve resources.
Secure your devices with strong authentication and encryption.
Plan for over-the-air (OTA) updates to patch software bugs.
Reduce power consumption for battery-powered devices.
Test in real-world conditions to ensure reliability.
Conclusion
IoT programming opens the door to endless possibilities for innovation and automation. Whether you're just blinking LEDs or building a smart home system, learning IoT programming will give you the skills to bring physical objects to life through code. Start simple, keep exploring, and gradually build smarter and more connected projects.
0 notes