#Bulk Texting Software
Explore tagged Tumblr posts
Visit Tumblr Blog
Explore Tumblr blogs with no restrictions, modern design and the best experience.
Last Seen Tumblr Blogs


Fun Fact
The Tumblr office adopted Tommy, an 11-year-old Pomeranian.
Text
#SMS Marketing#SMS Marketing Platforms#Automated Texting#Text Message Marketing#Bulk Texting Software#MMS Marketing#Textdrip
0 notes
Text
Creating a personal fanfic archive using Calibre, various Calibre plugins, Firefox Reader View, and an e-Reader / BookFusion / Calibre-Web
A few years ago I started getting serious about saving my favorite fic (or just any fic I enjoyed), since the Internet is sadly not actually always forever when it comes to fanfiction. Plus, I wanted a way to access fanfic offline when wifi wasn't available. Enter a personal fanfic archive!
There are lots of ways you can do this, but I thought I'd share my particular workflow in case it helps others get started. Often it's easier to build off someone else's workflow than to create your own!
Please note that this is for building an archive for private use -- always remember that it's bad form to publicly archive someone else's work without their explicit permission.
This is going to be long, so let's add a read more!
How to Build Your Own Personal Fanfic Archive
Step One: Install Calibre
Calibre is an incredibly powerful ebook management software that allows you to do a whole lot of stuff having to do with ebooks, such as convert almost any text-based file into an ebook and (often) vice-versa. It also allows you to easily side-load ebooks onto your personal e-reader of choice and manage the collection of ebooks on the device.
And because it's open source, developers have created a bunch of incredibly useful plugins to use with Calibre (including several we're going to talk about in the next step), which make saving and reading fanfiction super easy and fun.
But before we can do that, you need to download and install it. It's available for Windows, MacOS, Linux, and in a portable version.
Step Two: Download These Plugins
This guide would be about 100 pages long if I went into all of the plugins I love and use with Calibre, so we're just going to focus on the ones I use for saving and reading fanfiction. And since I'm trying to keep this from becoming a novel (lolsob), I'll just link to the documentation for most of these plugins, but if you run into trouble using them, just tag me in the notes or a comment and I'll be happy to write up some steps for using them.
Anyway, now that you've downloaded and installed Calibre, it's time to get some plugins! To do that, go to Preferences > Get plugins to enhance Calibre.
You'll see a pop-up with a table of a huge number of plugins. You can use the Filter by name: field in the upper right to search for the plugins below, one at a time.
Click on each plugin, then click Install. You'll be asked which toolbars to add the plugins to; for these, I keep the suggested locations (in the main toolbar & when a device is connected).
FanFicFare (here's also a great tutorial for using this plugin) EpubMerge (for creating anthologies from fic series) EbubSplit (for if you ever need to break up fic anthologies) Generate Cover (for creating simple artwork for downloaded fic) Manage Series (for managing fic series)
You'll have to restart Calibre for the plugins to run, so I usually wait to restart until I've installed the last plugin I want.
Take some time here to configure these plugins, especially FanFicFare. In the next step, I'll demonstrate a few of its features, but you might be confused if you haven't set it up yet! (Again, highly recommend that linked tutorial!)
Step Three: Get to Know FanFicFare (and to a lesser extent, Generate Cover)
FanFicFare is a free Calibre plugin that allows you to download fic in bulk, including all stories in a series as one work, adding them directly to Calibre so that that you can convert them to other formats or transfer them to your e-reader.
As with Calibre, FanFicFare has a lot of really cool features, but we're just going to focus on a few, since the docs above will show you most of them.
The features I use most often are: Download from URLs, Get Story URLs from Email, and Get Story URLs from Web Page.
Download from URLs let's you add a running list of URLs that you'd like FanFicFare to download and turn into ebooks for you. So, say, you have a bunch of fic from fanfic.net that you want to download. You can do that!
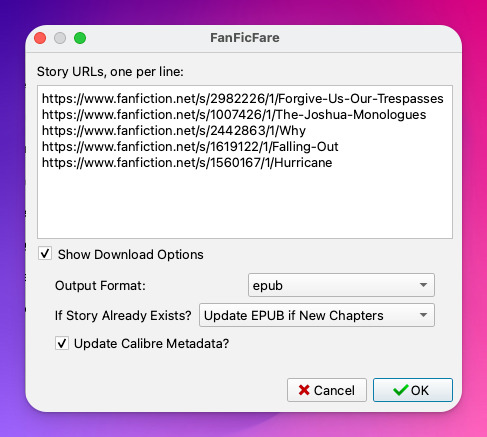
Now, in this case, I've already downloaded these (which FanFicFare detected), so I didn't update my library with the fic.
But I do have some updates to do from email, so let's try getting story URLs from email!
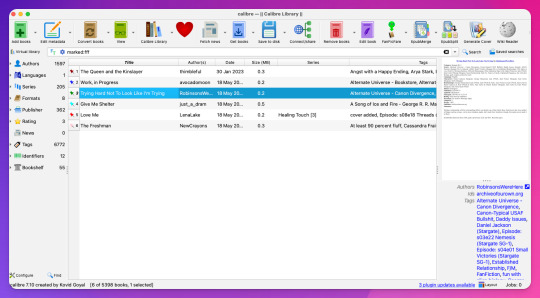
Woohoo, new fic! Calibre will detect when cover art is included in the downloaded file and use that, but at least one of these fic doesn't have cover art (which is the case for most of the fic I download). This is where Generate Cover comes in.
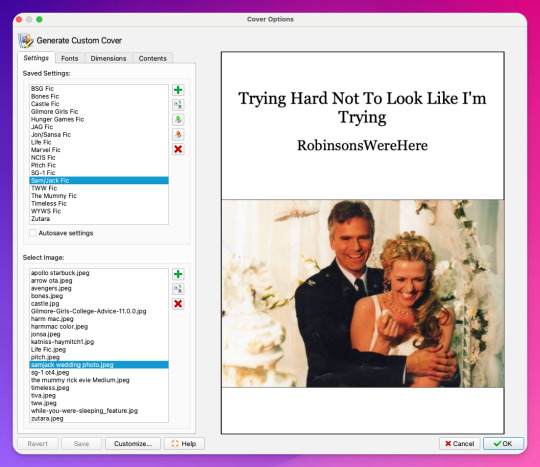
With Generate Cover, I can set the art, font, dimensions, and info content of the covers so that when I'm looking at the fic on my Kindle, I know right away what fic it is, what fandom it's from, and whether or not it's part of a series.
Okay, last thing from FanFicFare -- say I want to download all of the fic on a page, like in an author's profile on fanfic.net or all of the stories in a series. I can do that too with Get Story URLs from Web Page:
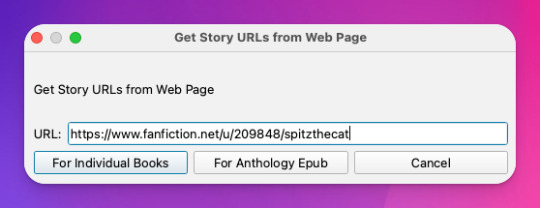
The thing I want to call out here is that I can specify whether the fic at this link are individual works or all part of an anthology, meaning if they're all works in the same series, I can download all stories as a single ebook by choosing For Anthology Epub.
Step Four: Using FireFox Reader View to Download Fic Outside of Archives
This is less common now thanks to AO3, but the elders among us may want to save fanfic that exists outside of archives on personal websites that either still exist or that exist only on the Internet Wayback Machine. FanFicFare is awesome and powerful, but it's not able to download fic from these kinds of sources, so we have to get creative.
I've done this in a couple of ways, none of which are entirely perfect, but the easiest way I've found thus far is by using Firefox's Reader View. Also, I don't think I discovered this -- I think I read about this on Tumblr, actually, although I can longer find the source (if you know it, please tell me so I can credit them!).
At any rate, open the fic in Firefox and then toggle on Reader View:
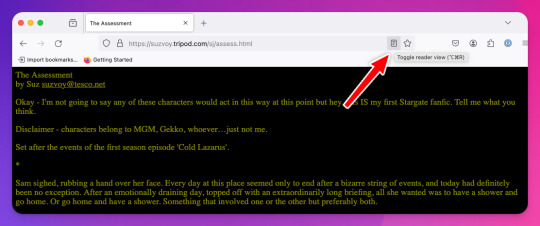
Toggling on Reader View strips all the HTML formatting from the page and presents the fic in the clean way you see in the preview below, which is more ideal for ebook formats.
To save this, go to the hamburger menu in the upper right of the browser and select Print, then switch to Print to PDF. You'll see the URL and some other stuff at the top and bottom of the pages; to remove that, scroll down until you see something like More settings... and uncheck Print headers and footers.
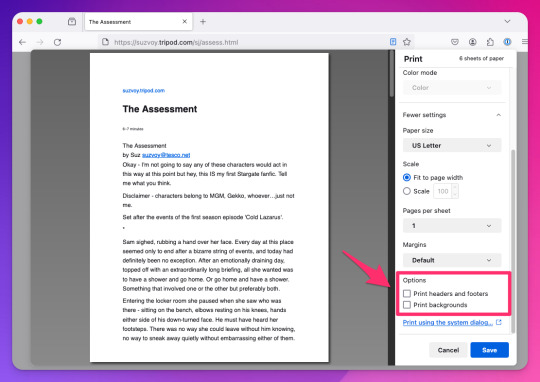
Click Save to download the resulting PDF, which you can then add to Calibre and convert to whichever format works best for your e-reader or archive method.
Step Five: Archiving (Choose Your Own Adventure)
Here's the really fun part: now that you know how to download your fave fanfics in bulk and hopefully have a nice little cache going, it's time to choose how you want to (privately) archive them!
I'm going to go through each option I've used in order of how easy it is to implement (and whether it costs additional money to use). I won't go too in depth about any of them, but I'm happy to do so in a separate post if anyone is interested.
Option 1: On Your Computer
If you're using Calibre to convert fanfic, then you're basically using your computer as your primary archive. This is a great option, because it carries no additional costs outside the original cost of acquiring your computer. It's also the simplest option, as it really doesn't require any advanced technical knowledge, just a willingness to tinker with Calibre and its plugins or to read how-to docs.
Calibre comes with a built-in e-book viewer that you can use to read the saved fic on your computer (just double-click on the fic in Calibre). You can also import it into your ebook app of choice (in most cases; this can get a little complicated just depending on how many fic you're working with and what OS you're on/app you're using).
If you choose this option, you may want to consider backing the fic up to a secondary location like an external hard drive or cloud storage. This may incur additional expense, but is likely still one of the more affordable options, since storage space is cheap and only getting cheaper, and text files tend to not be that big to begin with, even when there are a lot of them.
Option 2: On Your e-Reader
This is another great option, since this is what Calibre was built for! There are some really great, afforable e-readers out there nowadays, and Calibre supports most of them. Of course, this is a more expensive option because you have to acquire an e-reader in addition to a computer to run Calibre on, but if you already have an e-reader and haven't considered using it to read fanfic, boy are you in for a treat!
Option 3: In BookFusion
This is a really cool option that I discovered while tinkering with Calibre and used for about a year before I moved to a self-hosted option (see Option 4).
BookFusion is a web platform and an app (available on iOS and Android) that allows you to build your own ebook library and access it from anywhere, even when you're offline (it's the offline bit that really sold me). It has a Calibre plugin through which you can manage your ebook library very easily, including sorting your fanfic into easy-to-access bookshelves. You may or may not be able to share ebooks depending on your subscription, but only with family members.
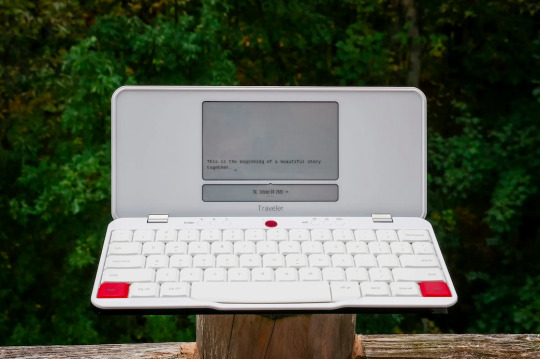
Here's what the iOS app looks like:
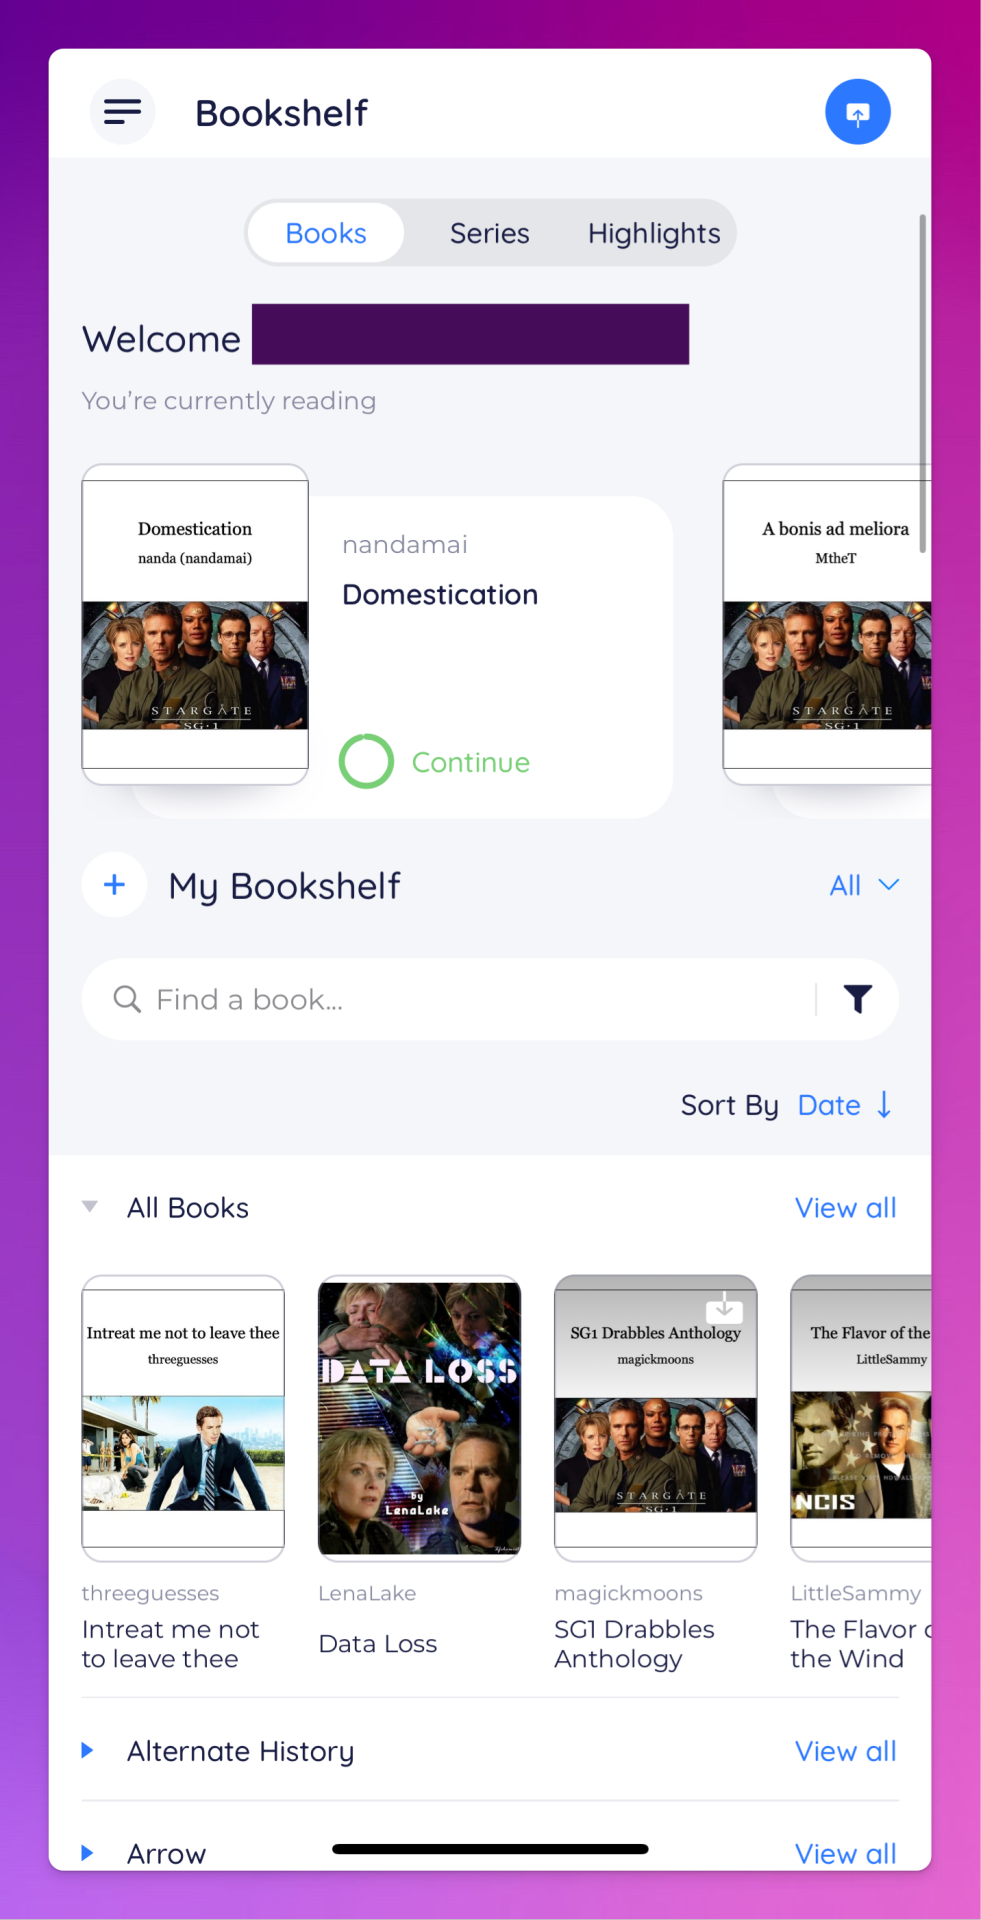
The downside to BookFusion is that you'll need a subscription if you want to upload more than 10 ebooks. It's affordable(ish), ranging from $1.99 per month for a decent 5GB storage all the way to $9.99 for 100GB for power users. Yearly subs range from $18.99 to $95.99. (They say this is temporary, early bird pricing, but subscribing now locks you into this pricing forever.)
I would recommend this option if you have some cash to spare and you're really comfortable using Calibre or you're a nerd for making apps like BookFusion work. It works really well and is incredibly convenient once you get it set up (especially when you want to read on your phone or tablet offline), but even I, someone who works in tech support for a living, had some trouble with the initial sync and ended up duplicating every ebook in my BookFusion library, making for a very tedious cleanup session.
Option 4: On a Self-Hosted Server Using Calibre-Web
Do you enjoy unending confusion and frustration? Are you okay with throwing fistfuls of money down a well? Do you like putting in an incredible amount of work for something only you and maybe a few other people will ever actually use? If so, self-hosting Calibre-Web on your own personal server might be a good fit for you!
To be fair, this is likely an experience unique to me, because I am just technical enough to be a danger to myself. I can give a brief summary of how I did this, but I don't know nearly enough to explain to you how to do it.
Calibre-Web is a web app that works on top of Calibre, offering "a clean and intuitive interface for browsing, reading, and downloading eBooks."
I have a network-attached storage (NAS) server on which I run an instance of Calibre and Calibre-Web (through the miracle that is Docker). After the initial work of downloading all the fic I wanted to save and transferring it to the server, I'm now able to download all new fic pretty much via email thanks to FanFicFare, so updating my fic archive is mostly automated at this point.
If you're curious, this is what it looks like:
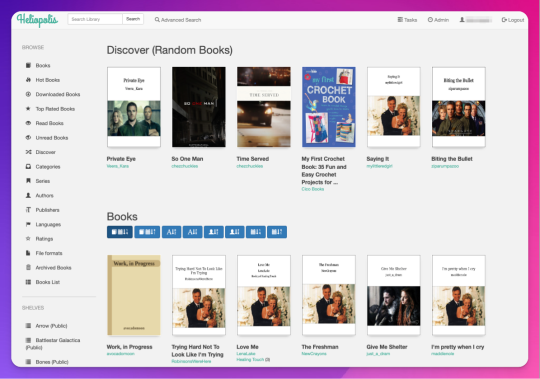
Pros: The interface is clean and intuitive, the ebook reader is fantastic. The Discover feature, in which you are given random books / fic to read, has turned out to be one feature worth all the irritation of setting up Calibre-Web. I can access, read, and download ebooks on any device, and I can even convert ebooks into another format using this interface. As I mentioned above, updating it with fic (and keeping the Docker container itself up to date) is relatively automated and easy now.
Cons: The server, in whichever form you choose, costs money. It is not cheap. If you're not extremely careful (and sometimes even if you are, like me) and a hard drive goes bad, you could lose data (and then you have to spend more money to replace said hard drive and time replacing said data). It is not easy to set up. You may, at various points in this journey, wish you could launch the server into the sun, Calibre-Web into the sun, or yourself into the sun.
Step Six: Profit!
That's it! I hope this was enough to get you moving towards archiving your favorite fanfic. Again, if there's anything here you'd like me to expand on, let me know! Obviously I'm a huge nerd about this stuff, and love talking about it.
#genie's stuff#calibre#calibre-web#bookfusion#personal fanfic archive#archiving fanfic#saving fanfic
103 notes
·
View notes
Text
12 Tips for Drafting Forward During NaNoWriMo (And Beyond!)
To accomplish your big writing goals, you have to focus on drafting forward. The team over at Freewrite knows how to do that better than most! Freewrite, a 2023 NaNoWriMo sponsor, is a dedicated distraction-free drafting device designed just for writers to separate the drafting from the editing process and get words on the page. Today, the Freewrite team is here to share their top 12 tips for doing just that:
Here at Freewrite, we love when NaNoWriMo comes around, because we’re all about helping writers set their stories free. We’re big proponents of the “write now, edit later” method of writing to help writers reach writing flow and increase productivity. The goal of drafting forward (and NaNoWriMo!) is to get a first draft recorded and translate your thoughts into writing on the page.
We’re going to share the top tips we recommend to writers who want to try this method but don’t know where to start. Try these out during your next writing session to see how they help you ditch the distractions and make serious progress!
1. Save research for later. (Or start with it!)
Yes, research is important. But it can also quickly turn into a form of procrastination. Complete the bulk of your research before you start writing, or, if it’s a topic you know well, commit to doing any research after. When you’re drafting and come to a place where you need to fact-check or gather information, simply leave a note to yourself right there in the text and continue drafting.
2. Plan well.
With a timed challenge like NaNoWriMo, it helps to plan out your daily benchmarks in order to finish on time. Consider setting a daily word count goal or making a schedule for the month so you know exactly where you stand each day. Make an outline if you’re a plotter, or if you’re a pantser, spend some time getting into the world of your story.
3. Decide you’re going to write a messy first draft.
We recommend stating it outright to yourself, or maybe writing it down on a Post-It where you can see it each day: My goal is to write a messy first draft. Embrace that imperfection so that you can write more freely!
4. Silence your inner critic.
As you write, revisit your messy first draft goal and resist the urge to critique or edit your work as you go along. Instead, concentrate on getting your thoughts down without judgment. This means not overanalyzing each sentence. Did that last sentence sound ridiculous? Who cares?! Anything goes in a messy first draft. You’ll refine and revise later!
5. Turn off your inner spell-check.
Freewrite devices have no spell-check or grammar checker for a reason. Every squiggly line is a distraction, a moment that your writing flow is broken and you have to resist going back to fix typos. Even if your eyes recognize a typo, train your brain to fix it later! Remember: we’re focusing on getting out thoughts and ideas in the first draft, not grammar.
6. Eliminate external distractions.
We’ve done the hard work for you by creating Freewrite. 😉 Now, put your phone in the other room, turn off the TV, and start writing.
7. Write quickly.
This is just another way to trick your brain into writing from that deep, creative place that can’t be reached when you’re overthinking. Strive for a flow state where you’re typing at the speed that your thoughts come to you.
8. Use placeholders.
If you can’t think of the right word or need to look up a source, just insert a placeholder and keep writing. Our favorite placeholder is “xx” because that can easily be searched in editing software later. Other people like the more straightforward “[INSERT SOMETHING FUNNY]” or “[CHECK SOURCE]”. You can fill in those gaps during the editing phase.
9. Keep moving forward.
If you encounter writer’s block or a difficult section, resist the temptation to stop and dwell on it. Skip to another part in your story and return to the challenging section later. We like to add a note to ourselves right there in the draft to remind us to come back to that spot when editing.
10. No back-tracking.
Often while drafting, a brilliant sentence will come to us. But it’s describing something we just described. What to do? Do not go back, delete the first sentence, and replace it. Simply keep writing the new sentence! These redundancies are easy to correct later.
11. Experiment.
Try different styles and approaches without judgement. You can compare and contrast and pick the best one later, during the editing stage.
12. Write!
Relish in the creative flow and the freedom of having one job to do: writing. Don’t worry about grammar or story structure. Focus on the joy of creating.
With a few tweaks in how you draft, we hope you’ll be surprised by how much you write, the creative ideas your imagination comes up with, and how much fun you have while writing.
And if you try the above rules of forward drafting, we’d love to hear your experience!
Reminder: NaNoWriMo 2023 participants are eligible for a special Freewrite offer. Find all the details here.
132 notes
·
View notes
Text
Amy looked at the website with confused apprehension. "ApeFist.net" it was called, the design looking straight out of the early 2000s; a simple gif of a starry night sky repeated ad nauseum forms the whole of the background page. "I thought Geocities died?" she thought.
At the fore of the webpage there was a small box for text input with the words "Make your Wish" sitting above it.
At first Amy laughed at it. The link had been spammed by some raider on her favorite trans support discord; it was stupid to even click on it, but she was compelled to check what it was in hopes that it was some kind of NFT scam - she loved making fun of NFT bros and so did most of the server.
She didn't really believe in wishes either, certainly not those given out by a webpage less modern than Craigslist. However that does not mean she had nothing to wish for. Amy's transition was a lifesaver, but her personal results are much less than she was hoping for. She started at age 19 and now at age 24 she's worried that the bulk of her transition is over. Her tiny mosquito bite tits can barely fit an A cup and her hips are practically non-existant - this combined with a general lack of confidence keeps her from being very confidant in her personal style.
After a couple minutes of consideration, she shrugs her shoulders and types into the box.
> I wish I had the body of a thick goth girl with big boobs.
She hit enter and immediately felt silly, she basically just fell for an equivalent of chain mail.
That was before the burning started.
A fire erupted in Amy's chest as she keeled over into the fetal position. Her chest began inflating outwards, settling at two jiggly mounds that were about the size of basketballs. Her stomach grew outwards with a healthy layer of fat as her hips and ass ballooned, giving her that super thick hourglass figure. Her skin prickled as it slowly lightened to a near pale white, her hair itched as it turned into a stylish black bob, and her clothes melted into a simple all black outfit.

When the pain subsided, she took stock of her body; grabbing at her curves and pawing at her crotch to realize her little e-dick had even turned into a pussy. She looked back to the computer to see not the wishing website but... a webcam software? Why was that...
She immediately became drowsy, the late golden hours of the sun shining through the window as it fades ever closer to nightfall. She passes out onto the couch.
---
Amy awoke to the sound of... Moaning? She was sitting up now in what felt like a desk chair. When she opened her eyes she could see through the groggy glaze a computer screen with... herself on it. Her new, goth self at least.
She was squeezing her tits and moaning provacatively into the camera - Amy could see the name at the bottom of the stream: "bigtiddygothgf".
As she came more and more to her senses she expected to feel what her body was doing on the stream, but as she became more intune with her body she became aware of a different stimulation. A hand wrapped around her cock.
She looked down, the messy contents of the desk flashing by her view before it settles on her body. A hairy man's body with a much bigger cock than she'd ever had before. She wanted to freak out, to scream, but all she could let out was a loud grunt as her hand continued to mercilessly jack off her huge, hard, manly cock.
She saw the username next to the chat input textbox: "FatBalls88". 88? Was she a 35 year old man now? The thought died as the stroke of her hand passed the head of her cock once more, matched by the perfect bouncing of the goth girl's tits on the screen.
"Fuck... So hot..."
She didn't say that! Or... did he? She was slowly losing context for why she was here, memories of her life as Amy, her job, the struggles of her transition, the events just preceding these, all began to be replaced with "Adam". Adam is a 35 year old self proclaimed "deadbeat"; in truth he's not doing that bad, he's got a fine apartment, a good job, and he keeps in reasonable shape. What he does not have is a girlfriend, explaining his semi-excessive spending on cam girls.
Amy fought back against these thoughs. "I could use a beer, that would help." She thought before realizing that was more of Adam consuming her. Amy was being deleted from all sides and shlacked over with Adam as s-s-- he came ever closer to cumming.
*click*
"Oh! Thanks for another donation FB! You're my favorite viewer." the girl smooched out at the camera while jiggling her massive tits with her hands.
Adam exploded, his eyes rolled back into his head as white hot cum splattered the bottom of his desk. His chair creaks with strain as his limp body leans further and further backwards. The absolute destruction of whatever remained of Amy and the sudden influx of everything that was Adam left the man dazed for quite awhile only to gain awareness of a ticking sound from the stream.
A spinning wheel full of the names of everyone who donated this stream stuck in front of the visage of "bigtiddygothgf". Adam grunted primally, angry that he could no longer ogle the tits, until...
"Omg FB congrats! Y'know you're my best supporter I think you deserve it the most. DM me and we'll see where we can meet up!"
Adam shook off his lusthaze and remembered: the promise of this stream was that each $1 donated gave you a chance to meet up with the goth cam girl and fuck her live on her next show.
Knocking trash and old beer bottles to the floor he rushed to attention at his keyboard and slid into her dms to set a date.
"Finally," he thought "I'll have that body all for myself..."
104 notes
·
View notes
Text
Basic JDownloader 2 Tutorial
With the world realizing that media on the internet can be lost with a snap, I thought it would be a good idea to show you how to download media, either music, videos, pictures, and text in bulk. (LONG POST WARNING)
I. Downloading the Program
Behold, the download page, is this safe? There is a pretty high chance that the software is safe, as it is open-source, meaning anyone can look at the programs code and/or modify it. However if you still don't feel safe installing the file, that's okay! I don't have any alternatives however TmT.
I will be downloading the windows version since that's the OS I run, however I'm sure the other downloads work just as fine.

You should get either the top one or the bottom one, if one doesn't work then try the other, the other versions on the website I believe are for older computers.
Double click on the file it downloaded and wait for the installer to load.
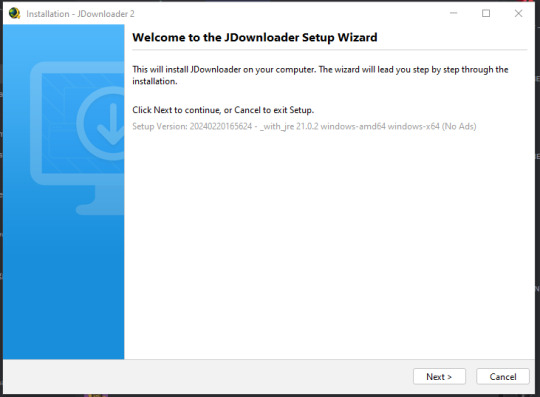
Go though the installation and wait for it to install. Once it's done downloading click finish and JDownloader 2 should open automatically (or if you disabled that int he installation, you can just open it there.)
II. What the Heck am I Doing?
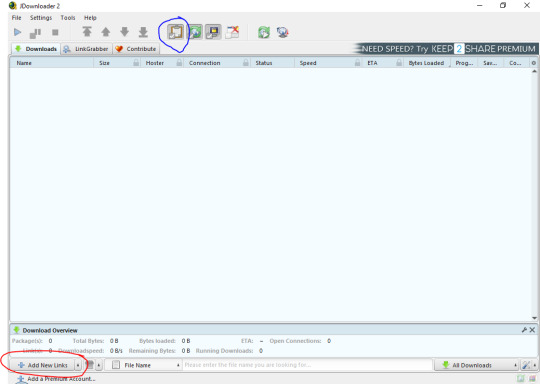
What do you do? The program is a bit confusing at first, however it's rather simple to understand. See that button circled in red? That's how to add items to download, click it. However, if you look at the top of the image and locate the clipboard circled in blue, that makes is so anything you copy, links, images, etc, will automatically be added to the program, if you think this will be annoying then disable it.
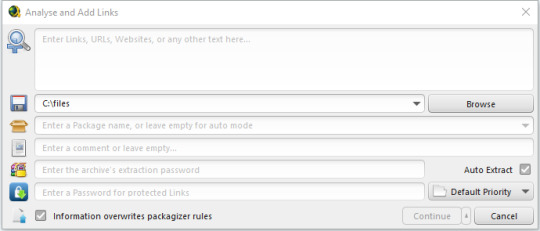
Once you click the "Add New Links" button, this window should appear. Everything here looks pretty scary, however you only need the two that are circled, the rest is for more advanced searching. Simply copy and paste a link that has any content supported by JDownloader 2. (NOTE: Youtube is fully supported by JDownload 2).
(Just if your looking for the continuation!)
7 notes
·
View notes
Text
I'm having a citation crisis and could use some advice.
I have the choice to use my department's stylesheet (designed for medieval studies but primarily for historians; requires manual citations and is also a huge pain), MHRA (not designed for medieval studies; can use Zotero), or MLA (I think this is in-text citations and thus not suitable for my needs; can use Zotero).
Whatever I choose, I will be doing the bulk of my footnotes manually, because I have a lot of abbreviated textual references that look like this

and this is, frankly, not something that referencing software can handle, and writing all of these out in full would double my wordcount and be completely unreadable.
Nevertheless, I would ideally like to use Zotero for my initial footnotes, if only because it'll make creating a bibliography a lot easier, and encourage me to ensure everything's been added to my library for later reference so I don't have to spend hours tracking things down later on. True, I have a large number of non-digital materials that have to be manually inputted, so this is not wildly convenient, but doing that now will make it easier than trying to find the publication info for a library book that's out on loan to somebody else at the last minute.
However. While this is fine for secondary material/articles etc, I have no idea how to go about setting up all my primary texts in Zotero. I need to distinguish between those which are only edited, and those which are edited and translated, in order to make it clear which translations are my own. But while it's easy enough to say (ed.) or (ed. and trans.) when manually citing, I ... don't know how to do that using Zotero?
Because the only way I can figure out how to list both roles is to list the person twice:

But obviously this is unsatisfactory since your footnote ends up reading ed. O'Rahilly, C., trans. O'Rahilly, C., and then you have to manually adjust them all anyway.
There seems to be no way to create a single role of 'editor and translator', and if I don't include that information, it's going to be a pain later. It essentially doesn't distinguish between a modern edited book and an edited medieval text, but those are in fact very different things.
UGH. I don't know what to do. The only stylesheet I have access to that actually provides information on how to handle medieval sources is the department one, but it's a) the worst, and b) genuinely just such a bad experience to interact with, like, it's essentially an essay about references with examples rather than a proper stylesheet.

Go away, this is not the time, I don't care, just tell me how to format this!
#gradblr#medieval studies#celtic studies#finn is not doing a phd#this is going to take longer than writing this entire portfolio did
22 notes
·
View notes
Text
Help me, writing/design Tumblr!
Microsoft Word sucks, there has to be a better way.
Edit: Word has this feature. It's called Linked Text Boxes. It's still word with Word's jank though, Microsoft Publisher has it, but it seems like Adobe Indesign has it with a better user interface.
I have been doing a lot of document layout work for my degree lately, and Microsoft Word continues to be just horrible. As a famous post once said, nothing about it works. So my question is, there has to be a better way, right? If anyone knows about writing software, is there anything that does the thing I want? (I do the bulk of my writing in Google Docs but the layout tools aren't good enough for the kind of design I need to do.)
My dream word processor (This may be hard to describe):
I want to be able to define specific boxes where body text is allowed to be. When one fills up, it overflows into the next.
Instead of word where you have the body text in the background, and it moves out of the way from the images, I would like text boxes that contain the body text. Like you lay out your images and static text boxes on a page, then you can fill the rest out with dynamic text boxes that contain the body text. I am sure you could do something like this with text boxes in ms word, but you couldn't do the layout as you write the body.
In my dream word processor, you could define blocks as Body Text 1, Body Text 2, and so on. If you added more text into Body Text 1, anything that is pushed out automatically goes into body text 2. If you delete text, excess text comes back into body text 1. Just like how text moving to the next page works in MS Word and Google Drive. Body text can only go into defined boxes, but it is dynamic. I feel like this could prevent the problem in word where moving one image destroys the formatting for your entire document because the body text tries to move out of the way.
Am I making sense? I am not even sure what to google to find something like this, but it has to exist, right? Magazines exist with very clean and nice layouts, they must be using something like this, but Microsoft Word doesn't do it that I know of. If it can, please tell me!
13 notes
·
View notes
Note
hi!! i was wondering if you have any general advice for someone who wants to start posting their work on ao3? or i guess if you would advice me to do that at all lol! i saw your recent post about it in relation to the ai stuff and found it so useful since i don't usually see people talk about that, thank you for sharing <33
Hi love! Please don't let the current AI situation on AO3 dissuade you from joining the platform. In all honesty, I think the scrape was a cheap attempt at obtaining credentials for identity theft using the illegitimate DMCA forms, rather than something done for software training purposes. I'm pretty sure Cloudflare, its hosting platform, has taken action against it.
My humble advice is contained below the cut, because it's quite long, but there's a bit of a learning curve with the posting page and a couple of unspoken customs:
The bulk of everything you need to know about posting on AO3 is contained in the ToS, which hopefully will help you navigate the "post" menu. If you're unsure whether a warning applies, select "Creator Chose Not to Use Archive Warnings" just in case.
There's no algorithm, so all that readers have to go by is the (excellent) tagging system and the summary you provide.
If you struggle with summaries - most of us do - then a snippet of the work is perfectly sufficient. Ultimately, the summary is a preview of your writing, and if you opt for the excerpt approach, your style, which is your only chance to attract readers.
Tagging is a little bit intimidating the first few times as a writer, but you'll get the hang of it soon enough! Asides from central characters and pairings, this is the place to disclose the genre of the work, any key/polarising themes and/or triggers. You're not obligated by ToS to disclose these, but it's a gesture of goodwill if you know it might upset someone. If there is a disturbing theme present, include the tag "Dead Dove Do Not Eat" - this is the colloquial indicator for the reader to very carefully reread the tags, because they're to be taken literally.
When you begin to type a tag, you'll be given suggestions of the most widely used tags that match what you've typed. If the shoe fits, use these. It makes the site easier to navigate for readers. If you're spawning a tag into existence though, it will begin to appear in that little drop down after there are three works on the archive containing the tag. I know this because I was the first (and second, third and fourth lmao send help) person to upload "Soma (Assassin's Creed)/Reader" to AO3 :)
You have the option of uploading your work in the designated editor as Rich Text or HTML. The only significant difference between them is how page and paragraph breaks are formatted. If you're copy-pasting from a word processor, slap it in Rich Text, and then if you want to do anything fancy after that outside of the scope of the Rich Text editor, you'll be able to make adjustments in HTML.
While you can save a draft, the text editor is not designed to be a substitute for word processing software. There is no editing history or backup feature, so it's ill-advised to develop your work directly on the platform.
Finally, with all the technical stuff put to one side, try not to fret over metrics like hits and kudos. It's lovely to receive kudos and comments, but smaller numbers aren't indicative of your work in any way, shape or form. There are so many factors at play there, and sometimes just the time of publication can have a huge impact on reader engagement, precisely because there's no algorithm to bolster or suppress.
Take pride in your work, and keep the dopamine as isolated as possible from the thought of big numbers. I promise you, it will keep the passion alive for longer :)
join us
join us
join us
#and i can only apologise if what you want to upload isn't fanfiction because in hindsight this is very much catered towards fic#lovely anons#ao3
5 notes
·
View notes
Text
Pseudo-historical project about 1912 unit record equipment computation aka the "Symbolic Analyst Processor" full stack!
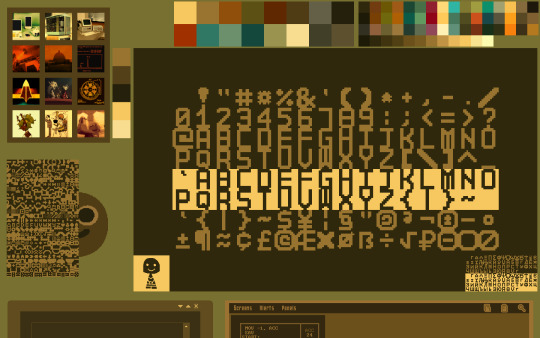
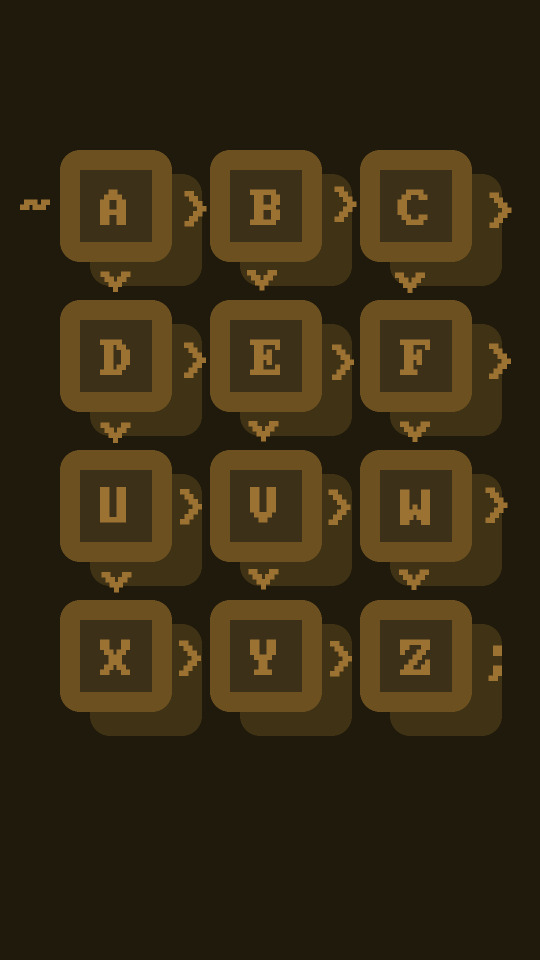
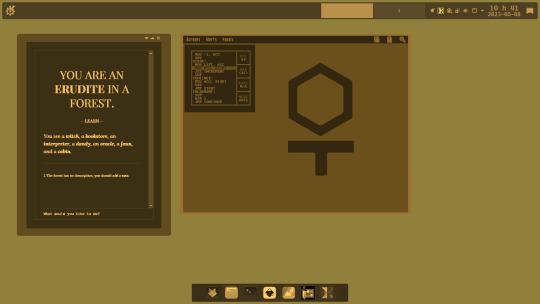
(above pictures emulate the looks of what this tech stack documentation and actual use may look like, still very early in the process though)
It is still coming together by my head as I write infodump notes and research various aspects of the whole time, (including the WIMP & MERN/MEAN stack) but yk, things are coming together nicely to give some milestone project mid-way between my current phase in life and the next where I go develop a fully alternative INTJ lively stack of tools. Explanations, history dives, lively reaction studies and a couple more content suggestions related to it are on the way.
Behold, the infodumps
"Top-bottom and back up workflow" 1910 / 1912 Unit Record Equipment Tabulator Computation "Bundle" Project (Pflaumen & Utalics' SymbolicAnalystProcessor)
Information Processing Language / LISP 1.5 / Bel, A-BASIC / DIBOL, Spreadsheets, Cellular Automaton, COS-310, magnetic tape storage too, TECO / VIM, Assembly, Wirebox, Tabulator, Alphanumeric Interpreter, Printer, RTTY device, Data Recording, Bulk Data Processing Indexed Cards, 60-64 entries Deque, 4K Direct-use RAM, 12K * 24 storage devices, Phonebook, Timeclock, DateTime Calendar, Programmable, Statistics, Demographics, Voting, Ledger, Journal, Logging, Rolodex, 12 Generic-use Registers & 4 Special Registers, Catalog, ~16 Keys Pad, Customized Hexadecimal Numeric Representation for "MachineCode" Hexdumps, 4*12 bits per page of data, Macros, Paracosm, may be useful for Military & Civilian Uses, Electrical Energy (and possibly incorporates some mechanical energy too), Nouns & Verbs, "Vector" XY plotter, Lambda Calculus / Panini Grammar / Universal Turing Machine Thesis, Rotors, Ural TriodeVaccumTube "Mainframe", Interactive-Use, Hypertext Interactive Video Terminal, Memex, Modem, Electric + Radio Telegraphy, Document-processing, Word-processing, Orange Plasma Touchscreen Terminal, Time-sharing, Cash Register, Bank, Automatic Teller Machine, Vending Machine, Oracle, Typewriter / Selectric, IBM 701, IBM 1440, IBM 403, IBM System/360, OpenPOWER, F#, IBM Tellum, MUD, TextWorld, solo text-adventures, Email, AIX, z/OS, Linux for IBM mainframes, Symbolic Processing System, Autocoder, modular, IBM Lotus Suite, interface with KDE or CDE, paper handling equipment, Addventure, 12-bit basic data unit as designated word, Distributed Interactive System, VeneraFS (cladogram Parade+DolDoc), GNU Hurd / MINIX3-style Microkernel, either permissive FLOSS license or public domain waiver, extensive documentation, printed illustrated booklets, music-playback, emulator / compiler / bytecode / interpreter, analog media-friendly, mostly for didactic tinkering educational uses, multilingual reconfigurable programming, HTML+CSS, Markdown, Argdown, DMA, hardware-friendly, software development environment for direct-access programmers and aesthetic designers, sub-version control system like Git, various hardware & software implementations, museum / observatory Toymaker story, constructed languages / imaginative paracosm influences around the immersive in-world lore of the "16^12" pseudo-historical setting…
Back to the point
The list is far from exhaustive or finished, as life is so much more than meets the eye. But this should be a good start to remind myself what I am working towards, a full revamp of the last ~120 years of history with much attention and care put into making it as satisfying to me as possible, despite the very probable scenario where people take the ideas and incorporate only some of such "modules" in their own workflows. Which is fine but not taking the whole package (and only specific modules) is eventually gonna be a major learning experience for me considering the reason I revamp it all beyond control freak stuff is literally to provide less exclusive / less invasive tools that anyone can learn and customize despite being very... idiosyncratic yk.
Still welcoming suggestions and constructive criticism for such big time, I hope those textual infodumps I do every so often don't bother you too much... Cya soon!
5 notes
·
View notes
Text
What is GSM modem and how it works?
A GSM modem is a device that allows electronic devices to communicate with each other over the GSM network. GSM stands for Global System for Mobile Communications, and it is the most widely used cellular network standard in the world.

GSM modem work by connecting to the GSM network using a SIM card. A SIM card is a small, removable card that contains your mobile phone number and other subscriber information. Once the SIM card is inserted, the GSM modem can start sending and receiving SMS messages and data.
GSM modem use a variety of protocols to communicate with the GSM network, including:
SMS (Short Message Service): SMS is used to send and receive text messages.
GPRS (General Packet Radio Service): GPRS is used to send and receive data packets.
EDGE (Enhanced Data Rates for GSM Evolution): EDGE is a faster version of GPRS that can be used to send and receive data at speeds of up to 384 kbps.
GSM modem can be used in a variety of applications, including:
Home automation: GSM modems can be used to control home automation devices, such as thermostats, lights, and security systems, using SMS messages.
Machine-to-machine (M2M) communication: GSM modems can be used to send and receive SMS messages between machines. For example, an SMS modem could be used to send an SMS message from a vending machine to its owner to alert them that it is running low on stock.
Business messaging: GSM modems can be used to send and receive bulk SMS messages to customers. For example, a business could use an SMS modem to send SMS messages to customers about sales and promotions.
Emergency alerts: GSM modems can be used to send emergency alerts to people in a specific area. For example, a government agency could use an SMS modem to send SMS messages to people in a hurricane evacuation zone to warn them about the storm.
GSM modem are a versatile and affordable way to communicate. They are used in a variety of applications, from home automation to business messaging to emergency alerts.
Here is a simplified explanation of how a GSM modem works:
The GSM modem connects to the GSM network using a SIM card.
The GSM modem sends and receives data and SMS messages using a variety of protocols, including SMS, GPRS, and EDGE.
The GSM modem communicates with other electronic devices using a variety of interfaces, such as USB and serial.
To use a GSM modem, you will need to:
Insert a SIM card from a mobile phone carrier.
Connect the GSM modem to your computer or other electronic device.
Install and configure the necessary software.
Once the GSM modem is set up, you can start sending and receiving SMS messages and data.
2 notes
·
View notes
Note
hi, i was just browsing your magnetic tape tag and found that you were trying to store txt files on tape. in your last update i saw on that, you said that it Came Back Wrong, have you found any way to improve it? im also wondering how much text could be stored this way. love your magnetic tape posting btw, might play around with it once i get my hands on a tape recorder (soon probably!)
Unfortunately I've made no progress, other than becoming more certain that the bulk of the work shouldn't be done by a software emulation. I'm going to need to get some custom hardware to handle it instead, namely a very, very old microcomputer (either a commodore, or something low end from 1980s Europe)
thank you for your interest :D
3 notes
·
View notes
Text
Week One
This week I started my first project in ARTS-245. My initial assignment was to xerox a picture of a celebrity and then print it out as a 4” x 4” image. I immediately knew that I wanted to find a picture of Katherine Hepburn, so I searched the Thomas Cooper library for any biographies of her. When I found a good picture of Hepburn, I had to ask a library employee to help me work the photocopier.
Once the image was scanned, I put it into Adobe InDesign, used the inch measurements to scale my image to size, then printed it. It took a lot of tries to get the measurements exact due to the printer adding its own margins to the paper, but I eventually figured it out and was able to print what I needed.
One thing I noticed in InDesign was the use of picas and points as units of measurement, both of which are discussed in the assigned reading for the week. Of course it makes sense for a print-oriented software to use units made specifically for text, but I still find it interesting that those fundamentals created for physical block printing then are still relevant and used today. I also was interested in the book’s explanation of the relative size of points and picas— like how one point equals 1/72 of an inch, and 12 points equals one pica. It’s just interesting taking units I’ve only ever seen on a computer screen and trying to envision their real-life size.
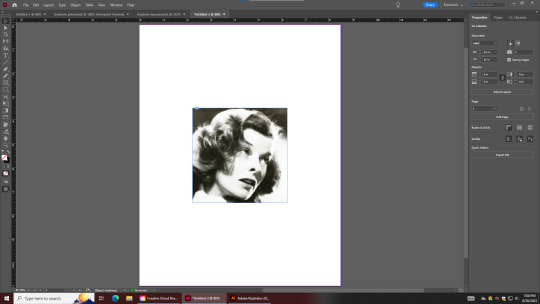
— my InDesign document —
After finding my image, I went to class the next day and started on drawing my guidelines for the project. The incorrect/inconsistent measurements of the cardstock we were using definitely set us back, but I was still able to measure out just about everything I needed. All I have to do now is use a straight edge to sketch out a few more lines.
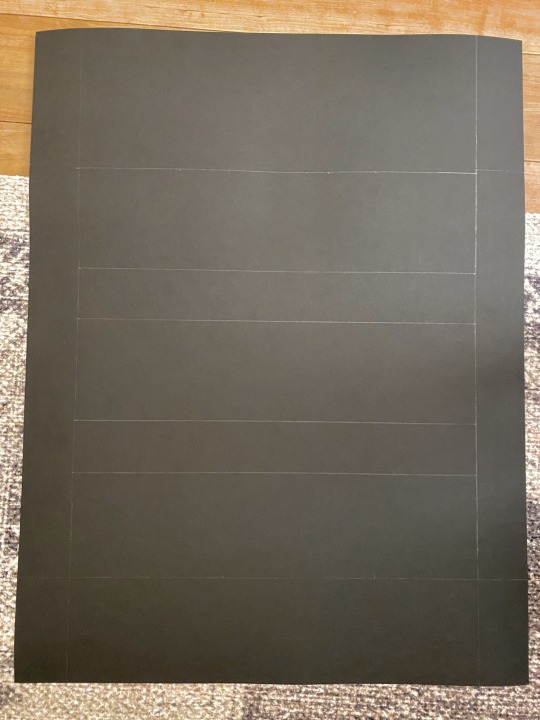
— my cardstock grid —
I am excited to continue working on this project and to get to the bulk of the assignment (actually designing the various squares.)
2 notes
·
View notes
Text
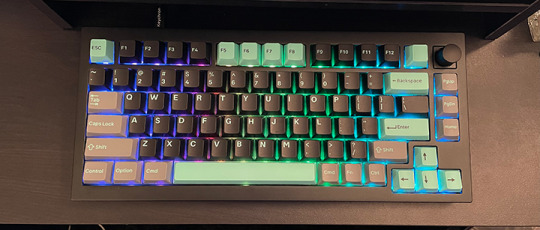
all right friends! 😁
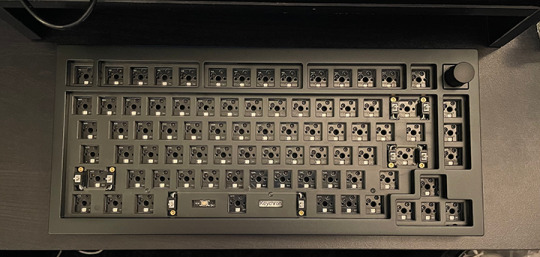
my keyboard is complete! words cannot express how much i love this keyboard. i spent so much time thinking about what kind of pcb (body) i wanted, what switches i wanted, and what keycaps i wanted. i even asked for your help! i knew i wanted the body of my keyboard to be aluminum... and it is heavy... and i keep forgetting just HOW heavy it is. i now understand why changbin was lifting felix's keyboard now lol.
anyway, below i will have some pictures and some explanations about the keyboard and how i built it. it's okay if you don't care about any of the details and just look at the pictures lol
onto the build! i'll link everything i used in case you're interested!
for my pcb i have the Keychron Q1 Pro, in black. you can also get this pcb in white or silver. i spent a lot of time looking for a keyboard that would be mac friendly. the GMMK Pro that i was originally looking at, some of the reviews said that the mac settings didn't work that well, even with the proper software. so i went with Keychron, bc i know their keyboards are formatted to play nice with macs. i should also mention that my keyboard is hot-swappable. which means that the switches are not soldered into my pcb. if you want to get a mechanical keyboard and make changes to it, make sure it says, "hot-swappable." also my keyboard has a knob! bc why not, knobs are fun and my knob controls the volume! there is a program that you can use with Keychron to program the knob to do whatever you want it to do. but i like that it controls the volume, there's a satisfying "click" for each turn.
the keycaps are also Keychron. it took me a while to even get to the keycaps. there are too many options for keycaps out there, so be careful! you could end up with too many options like i did 😅 so, i know that in my poll, the dark keys with cmyk text won, but they are out of stock and i wasn't able to find them in the Keychron amazon storefront. i was going to go with the winner between the Akko keycaps... but they tied. so i asked GBF to pick and he chose the cyan and black. but when i was looking at the Keychron amazon storefront, i found an option that was slightly cheaper than the Akkos. but i also chose the Keychron ones bc like i said, Keychron plays nice with macs and had the "command" and "option" keys i would need.

next, switches! in a mechanical keyboard, switches are what make the keys work. in a regular keyboard (or a membrane keyboard), there's a membrane (sometimes it's silicone) that sits between the keys and the board and sends a signal when you press a key. same thing in a mechanical keyboard, except each switch operates on its own. so if a key stops working, you can simply pull the switch out and replace it with a new one! anyway, my switches happen to be mint. did i buy them bc they were mint? no. am i kind of happy that they're mint? yes. i bought them bc they're quite tactile switches. tactile means there's a little bump when the key is fully pressed to let you know that you've hit the key. i've had trouble with linear switches being too sensitive in the past. i ended up getting Durock shrimps! what a cute name lol and i might buy more to put them into my work keyboard...
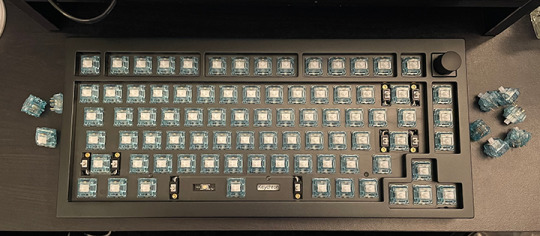
onto placing keycaps! originally i was going to put o-rings on my keycaps to prevent any more noise, but my switches are already so quiet that it wasn't really necessary. but i also did a typing test and the o-rings actually added too much bulk and didn't allow the switch to fully descend when the key was pressed. so i took them out.
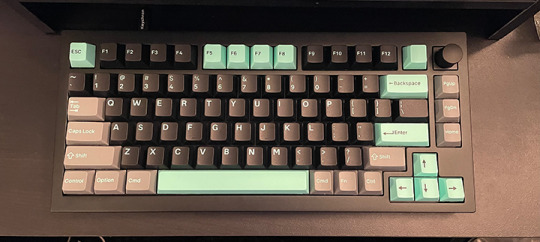
but here is my keyboard fully assembled! the rgb is so pretty too. even though i can't see it through my keycaps, it's still lovely. and the beauty of my keyboard is that i can change the keycaps whenever i want. so if i ever get bored of this lovely, black, mint, and gray combo or those dark keycaps with cmyk text come back in stock, i can always change them!
okay, i know that was a lot and again, it's totally okay if you didn't read any of it and just looked at the pictures 😂 also, my monitor stand came as well, i mentioned that earlier. but it looks so good! my desk looks so organized now! and the only thing missing from my setup is my imac now!
i hope you're doing well, stay safe out there, and stay hydrated my friends! 💖
6 notes
·
View notes
Text
I want to firstly say I'm by no means an "ai bro" nor am I even pro-GenAI. However I think education on topics like this is important because I believe being uneducated about it means you can't properly fight it. I'm not trying to directly state that OP is uneducated, but I will say that this take feels uneducated.
While yes, most corporate AI models like OpenAI do charge users for prompts and such. Many AI users run local software on their own hardware. They're using open source, or otherwise free models on their own computers; and it's important to understand this for two reasons.
Firstly, it means that no matter what happens with OpenAI they're not going to be effected. While these large companies are the bulk of the problem with AI since they're the ones buying data from companies and generally stealing art/writing/voices/etc. It's very difficult to actually fight these companies as an individual given the sheer amount of funding they have for legal battles. That being said companies are trying to fight these AI giants and while some are failing, others are succeeding. I don't like any companies but if my enemies are fighting I hope they both die. More often than not, the fights being won in court are against individual end users and not companies as a larger whole. However a win is a win, and it's a step in the right direction. While I don't unfortunately see prompting getting that expensive any time soon, such a rise in prices could drive traffic off these sites and it's likely that while most users will simply not seek other options. I know for a fact that many individuals out there are already taking strides to make Locally Run AI more accessible to the masses, even without extremely beefy PC setups.
This brings me to my second point. Anyone running a local LLM (Large Language Model) or GenAI Model like Stable Diffusion can easily generate text, images, or videos from their own hardware. However, to do this you need a few things. One of the biggest things they require is a "Checkpoint" essentially this is the brain of the AI, it's what is actually trained to create the images or text. For example if you took thousands of screenshots from a Ghibli movie you could use them to train an AI "Checkpoint" for stable diffusion, then when you load that checkpoint into the AI it will know what you want when you use specific prompt terminology. Why does this matter? Because many of these checkpoints are passed around online, and many of them target specific internet artists, or specific styles. If you could prove that a checkpoint was being trained on your art or writing without your written allowance you could take legal action via copyright claims. While this wouldn't necessarily retroactively remove the checkpoint from users who already downloaded it, you might be able to get it removed from websites that are hosting the download in the first place. Doing so means that if users attempt to abandon OpenAI and related websites in search of running local models, they won't be able to find a wellspring of checkpoints readily available. Which means they'll either be forced back to generation sites that in this example have become too expensive or they'll be forced to drop AI.
Now I've covered GenAI for images, but LLMs are a little trickier and yet are taking care of themselves, because most of the big ones are available for download like Ollama (Meta/Facebook's LLM from what I understand.) The thing about this is that you don't need to worry so much about this one since even the newer versions of Ollama running locally can't hold a candle to what ChatGPT is capable of, and this kind of goes back to "if my enemies are fighting, I hope they both die." If Ollama can't compete, and ChatGPT is overpriced; people will be forced to fork over the money which isn't sustainable; or simply stop using GenAI LLMs. As profits drop so will the interest in AI funding in general. Without the profits/funding they'll have less money to handle the court cases they're dealing with and thus we'll see a collapse in GenAI like ChatGPT.
What I'm saying with all of this is that if you're an artist who posts your art online I IMPLORE you to do some research on where AI Checkpoints (also sometimes called Models) are being hosted, check the sites you find. Search for various artists you may be in contact with, search for styles you draw; and if you find anything that you can prove was trained without proper copyright agreements, get in contact with the hosting site about copyright claims and see if you can't get those checkpoints/models pulled from the site.
I understand that the fight against AI is something where a lot of people want to take a nuclear option, I've seen my fair share of "we should firebomb the walmart" type posts, and yet when I try to tell people how to do their part or at least a way they might be able to help, I am often accused of being an AI Bro or being Pro-AI. I am not, but I've taken the time to educate myself and I continue to learn because AI is improving by the day and we need to keep up. I understand that GenAI will do far more harm than it will ever do good; and while I feel we've already reached the point of it being harmful enough that we shouldn't have let it get this far, I don't simply want to sit back and wait for it to die when I could have a hand in helping it not get worse and hopefully die faster.
i can’t wait for when chatGPT and ai image generation also crashes and each prompt cost $50 an attempt. oh you can’t get your stolen big tiddy anime ghibli art for free anymore? you want to buy real big boy art from real artists now? beg for it. beg for it like a dog.
89K notes
·
View notes
Text
Book Printers in Delhi: Discover Excellence with Gupta Printers
When it comes to finding reliable book printers in Delhi, Gupta Printers is a name synonymous with quality, precision, and affordability. Serving authors, publishers, and businesses, Gupta Printers offers top-notch book printing services tailored to diverse needs. Located in Naraina, Delhi, they are a trusted choice for anyone seeking professional printing solutions. Here’s why Gupta Printers ranks among the best book printers in Delhi.

Why Gupta Printers Stands Out as a Top Book Printer in Delhi
Gupta Printers combines advanced technology, skilled craftsmanship, and a customer-first approach to deliver exceptional printing services. Below are the key reasons why they are a leading book printer in Delhi:
1. State-of-the-Art Printing Technology
Gupta Printers uses modern book printing machines equipped with high-quality inks and advanced software. This ensures sharp, vibrant prints with professional-grade finishes, making their books ideal for novels, textbooks, and magazines alike.
2. Premium-Quality Materials
The company sources high-grade paper and binding materials from reputed vendors, ensuring durability and a premium look. Whether you need paperback, hardcover, or custom-bound books, Gupta Printers delivers products that meet global standards.
3. Wide Range of Printing Services
Gupta Printers caters to a variety of book printing needs, including:
Fiction and Non-Fiction: High-quality prints for self-published authors and publishers.
Educational Materials: Textbooks and study guides with clear text and robust binding.
Magazines and Journals: Vibrant layouts for periodic publications.
Custom Projects: Unique sizes, designs, and binding options for specialized requirements.
4. Tailored Customization Options
Every book project is unique, and Gupta Printers offers flexible customization to match your vision. Clients can select from various paper types, binding styles (perfect binding, saddle-stitch, or hardcover), and design layouts to create books that stand out.
5. Cost-Effective Pricing
Gupta Printers provides competitive pricing without compromising on quality. Their affordable rates make them accessible to independent authors, small publishers, and large businesses. With efficient processes, they ensure value for money and quick delivery.
6. Fast and Reliable Delivery
With years of experience and streamlined operations, Gupta Printers guarantees timely project completion. Their ability to handle both small and bulk orders with precision makes them a dependable partner for book printing in Delhi.
Additional Offerings by Gupta Printers
Beyond book printing, Gupta Printers provides a range of services, including:
Offset Printing: For brochures, flyers, and catalogues.
Tag and Label Printing: For garments and products, including FSC-certified tags.
Screen Printing: For promotional items and custom designs.
Stationery Printing: For bill books, stickers, and business essentials.
Their FSC-certified printing practices highlight their commitment, using eco-friendly materials to support sustainable printing.
Benefits of Choosing Gupta Printers for Book Printing
Exceptional Quality: Crisp prints, durable binding, and professional finishes.
Custom Solutions: Tailored designs to meet specific project requirements.
Eco-Conscious Printing: Sustainable practices with FSC-certified materials.
Versatility: Suitable for small runs, large orders, or niche projects.
Trusted Reputation: High client satisfaction and industry recognition.
Tips for Choosing the Best Book Printers in Delhi
When selecting a book printer, consider these factors:
Technology and Equipment: Ensure modern machinery for high-quality output.
Material Quality: Opt for printers using premium paper and inks.
Customization Flexibility: Look for tailored design and binding options.
Client Reviews: Check feedback to verify reliability and service quality.
Turnaround Time: Choose printers with efficient delivery schedules.
Gupta Printers excels in all these aspects, making them a top pick for book printing in Delhi.
How to Connect with Gupta Printers
Ready to print your book? Visit Gupta Printers to explore their services or contact them at +91-9891225416 to discuss your project. You can also visit their office at C-108/A, Industrial Area Phase-1, Naraina, Delhi, for a personalized consultation. Their team is dedicated to bringing your book to life with quality and precision.
Conclusion For authors, publishers, and businesses searching for exceptional book printers in Delhi, Gupta Printers offers the perfect blend of advanced technology, customization, and affordability. Their commitment to quality, timely delivery, and sustainable practices ensures your books make a lasting impression. Whether you’re printing a novel, textbook, or custom publication, Gupta Printers is your trusted partner. Visit Gupta Printers or call +91-9891225416 today to start your printing journey with Delhi’s leading book printer!
0 notes
Text
Looking for mass emailing software? Or trying to find an affordable bulk email service? We have compiled a list of the best bulk email programs that can help you easily send bulk emails. These bulk email sending software will help you save thousands of dollars that are spent with email marketing services. Nowadays, email communication has relegated snail mail to oblivion. With the emergence of the age of marketing, it became necessary to send bulk emails about product promotions, campaigns, and related offers to customers, and prospective clients. Email marketing is still in vogue and is a very effective and cheap way to market your products and services on a mass scale to clients. It’s definitely a no-no to send unsolicited emails. Yet, bulk email software can be used for a number of other tasks such as double opt-in, sending important communication from doctors and insurance agents to clients, sending newsletters, and the like. We have created a list of the 10 best free email application software to send an instant email to an unlimited number of clients. Let us examine the best free email blast software to send mass emails. Many of the software listed in this article are for almost 5+ years, however not much has changed. As I validate the list, I realize that even now in 2021 this list holds good. Pabbly Email Marketing Pabbly Email Marketing is a powerful bulk emailing tool that offers an industry best deliverability rate of 99%. This is the only software that provides unlimited access to all the advanced features like autoresponders, subscription forms, advanced email tracking, automatic follow-up, etc in the basic plan itself. Also, it is one of the very few emailing services that comes with an in-built delivery engine. Further, it offers a special feature named SMTP routing that comes in handy for bulk emailing. It allows you to distribute your campaign in smaller slots of subscribers and send the same email to them using multiple SMTPs. This results in reduced spamming lowered bounce rate and also improves the deliverability of your emails. Generally, marketing automation is a feature that bulk emailing services offer in their higher plans, but with this application, you can use the automation in the basic plan itself. The other valuable features offered by this tool are numerous integrations, list segmentation, easy list management, and MX cleaner to clean your mailing list. SendPulse Email Marketing SendPulse is a communication platform that brings together email, SMS, web push, Viber, and Facebook. It lets you take a holistic approach to digital marketing, send automated campaigns, segment subscribers, personalize emails, hold A/B tests, and monitor the results all in one place. Creating adaptive and responsive email templates is easier than ever thanks to a user-friendly Drag and Drop Editor. All you need to do is to choose an element you want to appear in your template — text, image, video, button, or social media — and drag it to the working area. There’s an HTML editor available in case you need it. SendPulse also provides its customers with a unique feature for building trigger email flows based on user actions or inactions — Automation 360. The service offers a free plan with extensive functionality; it is available in 5 languages and supports integrations with various eCommerce, CRM, and CMS tools. SendinBlue SendinBlue is the best all-in-one marketing dashboard for businesses to manage their email marketing and SMS campaigns. Their tools make it easy to design mobile-friendly emails, manage large contact lists, track results, and optimize campaigns. With SendinBlue, powerful features like unlimited contacts and contact details, customizable sign-up forms, inbox testing, and automated campaigns come standard. A free plan is available, and their pricing is only based on the volume of emails sent, so you’re never penalized for growing your contact list.
SendinBlue is available in 6 languages and integrates with the top e-commerce and CMS tools. SendBlaster One of the best bulk email software that is available is SendBlaster. With this software, it is possible to manage your mailing lists as well as email marketing campaigns. This software app combines the reasonableness of mass email software along with the flexibility of a bulk email web service. It gives you the flexibility of creating newsletters and managing lists directly on your desktop while getting a cloud email tracking service. This can vastly improve email campaigns as well as handle reporting. The latest version SendBlaster 3 is available both as a free email sender software download along with a professional edition. No subscription is needed and one needs to pay just once for a lifetime license. Bulk Mailer The Bulk Mailer accepts mailer lists that are generated in a variety of programs such as Access, Excel, DBF, Word, that are prepared in ASCII text files (.txt, .lst). It is also possible to enter an unlimited number of email addresses. The software also provides you with an extremely flexible sending engine. It is also possible to create personalized HTML messages. It comes featured with flash, image, as well as attachment capabilities. The program is multi-functional and provides options such as mail merge, personalization, bounce manager, scheduler, as well as custom opt-in forms Free Bulk Email Software 32Bit provides a free email blast software that is amongst the best on the Internet. It consists of a wide variety of features that help make life easier. Some of the features include a private contact list, HTML editor, bounce processing, and synergy with Google Analytics. The 32bit bulk email software program has the ability to process around 20,000 messages in one hour. It offers one of the best ways to simplify email marketing campaigns. Thunder Mailer Thundermailer is a comprehensive email program that incorporates all the tools that businesses need to manage their email campaigns. It consists of powerful tools that are user-friendly so that businesses, organizations, companies, and others can easily create emails, newsletters, promotional emails, notifications, invitations, and greetings. You can easily email subscribers as well as manage subscriber lists easily, besides tracking your email campaign performance. Thunder Mailer allows businesses to remain in constant communication with clients and other concerned parties, so that they are able to save costs too, compared to other forms of ads. MailChimp MailChimp is an email program that is around since 2001 and is used by more than 7 million people around the world. The features, as well as integrations within MailChimp, allow people to send marketing emails, automated messages, targeted campaigns, and others around the world. With detailed reports, you can improve your campaigns over time. DNB Mass Mailing Solution The DNB Mass mailing Solution (DMMS) makes it easy for individuals and businesses both large as well as small to send FREE and professional-looking emails to subscribers. You can easily send emails to thousands of subscribers in a jiffy. With its inbuilt function, you can also remove duplicate as well as invalid emails within your campaign. You can also know whether your emails are being opened or not, which links are being clicked on, and how many emails are being bounced. MailList Controller Free MailList Controller Free is a free tool that is used for generating mass emailing. The process of doing this is very simple helps you set up your SMTP server and set up your first mailing list. You can also create additional lists afterward. The free version allows a single list with up to 100 recipients. However, the professional version which is paid allows for up to 10,000 recipients, while the extreme edition is unlimited. The basics of mass mailing are covered with this software.
You can import list members or add members manually. You can also use the rich interface for composing messages while keeping track of outgoing messages as well as messages that have been sent previously. GroupMail Free Edition This is a free tool for sending bulk e-mail messages. With all the basics covered, it also has some fine extra points about it. This software can use its own internal database, but can also connect to an existing external database. It can also pull recipients directly from your address book. A schedule is included, but you can use it only in the paid version. Pro Tip: Even the best emailing software can only go so far if your bulk emails don’t reach your subscriber’s inbox. Fortunately, free spam checker tools like MailGenius help make sure your bulk emails get delivered (and opened) instead of getting lost in the recipient’s spam folder. Bulk Email Software Free Download The Express auto mailer software from Mobilink is a very powerful and fast, yet simple program to use email software that is designed for bulk email applications. The software is particularly useful for retailers, physicians, newsletter publishers, corporate, insurance agents, and others. The software accepts a list of recipients from an Excel sheet and supports the attachment of any format. It supports multi-attachments of both - text as well as HTML formats. This auto mailer has a professional user interface and is very easy to use. It requires only a few minutes to be set up and can be mastered in just a few minutes. The trial version is free 1and1Mail 1and1mail offers award-winning email marketing software for small and medium businesses to send personalized mass emails. It comes along with features such as open and clicks reports, mimics manual sending, automatic IP switcher, and others. 1and1mail is comprehensive, lightweight, as well as and efficient email marketing software for corporate businesses. Article Updates Article Updated on August 2021. Some HTTP links are updated to HTTPS. Updated broken links with the latest URLs. Some minor text updates are done. Content validated and updated for relevance in 2021. Updated on June 2020 - Fixed minor text and Added new resources. Updated on August 2019 - Fixed minor text and update broken links. Updated on Feb 2018 - Fixed minor text and updated links. . This is Ella Bell, working with IT Company Fusion Informatics since the last 3 years. She enjoys writing articles as a hobby on topics related to software, mobile app, tutorial etc.
0 notes