#CAD Plugin Development
Explore tagged Tumblr posts
Visit Tumblr Blog
Explore Tumblr blogs with no restrictions, modern design and the best experience.
Last Seen Tumblr Blogs


Fun Fact
28.6 is the average number of monthly visits per US mobile user.
Text
Seamlessly Export Your SolidWorks Models to GLTF Format
Are you having difficulty showcasing your SolidWorks model in 3D design to impress your clients with polished and professional 3D presentations? Don't worry, ProtoTech Solutions is here to help you. 🚀
🌐 Presenting your SolidWorks creations in 3D has never been easier. ProtoTech's GLTF Exporter is the key to unlocking a world of possibilities for your designs.
💡 Why ProtoTech's GLTF Exporter? ✅ Seamlessly export your SolidWorks models to GLTF format ✅ Preserve intricate details and textures ✅ Showcase your designs in immersive 3D environments ✅ Impress your clients, colleagues, and friends with professional presentations ✅ Elevate your presentations and WOW your audience
Ready to revolutionize your design presentations? 🚀 Elevate your creations with ProtoTech's GLTF Exporter for SolidWorks.
Get a FREE Trial Today - https://prototechsolutions.com/3d-products/solidworks/gltf-exporter/
#ProtoTech#ProtoTech Solutions#ProtoTech GLTF Exporter#Free Trial#SolidWorks#GLTF Exporter#3D CAD Design#3D Modeling#Design Revolution#Design In 3D#SolidWorks Magic#CAD Plugin Development
0 notes
Note
If you are going to make a game here’s some things that might be helpful!
Game engines:
Godot: very new dev friendly and it’s free. Has its own programming language (GDscript) but also supports C#. It’s best for 2D games but it can do 3D also.
Unity: I don’t even know if I should be recommending Unity. It has caused me much pain and the suffering. But Unity has an incredible amount of guides and tutorials. And once you get the hang of something it’s hard to get caught on the same thing again. It also has a great Visual Studio integration and uses C#. I will warn you the unity animator is where all dreams go to die. It’s a tedious process but you can probably get some plugins to help with that.
Unreal: Don’t use it unless you’re building a very large or very detailed 3D game. It also uses C++ which is hell.
Renpy: Made for visual novels but has support for small mini games. It only supports Python iirc. Basically if you’re making a VN it’s renpy all the way otherwise you should look elsewhere.
What to learn: Game design and how to act as your own game designer. As a designer you need to know if a part of your game isn’t meshing with the rest of it and be willing to give up that part if needed. Also sound design is very important as well. If you want to make your own sounds audacity is perfect for recording and cutting up your clips. If you want to find sound effects I recommend freesound.org and the YouTube royalty free music database.
Sadly I can’t recommend a lot of places to learn this stuff because I’m taking Game Development in Uni. So most of my info comes from my lectures and stuff. One of my game design textbooks is pretty good but it’s around $40 CAD. It’s called the game designers playbook by Samantha Stahlke and Pejman Mirza-Babaei if you’re interested (fun fact there’s a photo of Toriel in there)
Anyway sorry for dumping this large ask on you I’m just really passionate about game design and I like to see other people get into it.
please do not apologize I'd never heard half of this stuff so this is super useful!! I've seen some godot tutorials on YouTube although so far I've played around with RPG maker MV (it was on sale. very very fiddly interface, i had trouble getting around it) and gamemaker, which recently became free for non-commercial use (a lot more approachable on first impact but like i said, haven't really done anything substantial in either yet).
mostly, I'm still in the super vague stage. I've got an idea for the main story conflict, the protagonist and their foil, the general aesthetic i want to go for (likely 2D graphics, but it would be cool to make like. small cutscenes in low-poly 3D) but not much else. haven't exactly decided on the gameplay either! it's gonna necessarily be rpg-esque, but I'm not much of a fan of classic turn-based combat so. I'm gonna check out other games and see if i can frankenstein anything cooler :P
#like for example. if i were ever to make a daemo game (knock on wood) i was thinking that it would work out quite well#if i made it a PUZZLE rpg kind if game. since the player character is no longer frisk/chara/connected to the player#and daemo doesn't really have any reason to 1) be possessed or 2) go on murderous rampages#so with a base game like undertale where those ARE crucial parts of player-world interaction I'd have to redirect it elsewhere#it being player input in the story#but I'm not sure puzzles are quite the solutions for this other story....... we'll see#answered asks#SAVE point#thank you so much!
84 notes
·
View notes
Text
How to Integrate 3D Map Illustration into Site Analysis for Architectural Projects

Integrate 3D Map Illustration into Site Analysis
In the world of architecture and urban planning, understanding the terrain, infrastructure, and environment is critical before laying the first brick. Traditional site analysis methods have served us well, but as technology advances, so do our tools. One of the most innovative advancements in this space is the use of 3D Map Illustration and 3D Vector Maps in architectural planning.
Combining artistic clarity with technical depth, 3D map illustrations offer more than just visual appeal—they provide actionable insights. Let’s explore how integrating these advanced tools into your Architecture Illustration process can streamline site analysis and improve project outcomes.
What Is a 3D Map Illustration?
Unlike standard 2D maps, these illustrations display terrain, buildings, infrastructure, vegetation, and other features in a three-dimensional space. They give architects, engineers, and planners a much deeper understanding of the site conditions.
Often created using GIS data, CAD software, and digital illustration tools, 3D map illustrations are ideal for both technical analysis and presentation purposes. They are more than just artistic renderings—they’re functional, data-driven visual tools.
Why Use 3D Map Illustrations in Site Analysis?
It includes examining a location’s topography, climate, vegetation, zoning, infrastructure, and accessibility. Here’s why 3D Vector Maps and 3D map illustrations are revolutionizing this process:
1. Enhanced Spatial Understanding
While 2D drawings give flat representations, 3D Map Illustrationprovides a volumetric perspective.
2. Data Integration
Modern 3D vector maps can incorporate real-time data such as topography, utilities, and environmental factors. This integration helps identify potential challenges, like flood zones or unstable terrain, early in the design process.
3. Improved Client Communication
With Architecture Illustration in 3D, clients and community members can easily understand and visualize the proposed development within its context.
4. Better Decision-Making
Using 3D maps during site analysis supports better decision-making. Whether it’s choosing optimal building orientation, identifying natural shade zones, or evaluating how structures impact sightlines, the 3D visualization simplifies complex evaluations.
Step-by-Step: Integrating 3D Map Illustration into Site Analysis
Let’s break down how to incorporate 3D map illustration and 3D Vector Maps into your architectural site analysis workflow.
Step 1: Gather Site Data
Topographical surveys
GIS layers
Aerial imagery
Zoning regulations
Infrastructure maps (roads, utilities, drainage)
Environmental reports
Step 2: Choose the Right Tools and Software
There are many tools available for creating 3D Vector Maps and architectural illustrations. Some of the popular ones include:
SketchUp – Great for quick, interactive 3D models.
Blender or Cinema 4D – For highly stylized 3D illustrations.
Adobe Illustrator (with plugins) – To enhance vector-based output.
Choose a combination that fits both your technical needs and aesthetic style.
Step 3: Create the Base Terrain Model
This forms the physical base upon which other features—roads, buildings, vegetation—will be layered. Many software platforms can convert contour lines and elevation points into 3D surfaces automatically.
Step 4: Add Site Features Using Vector Layers
Now incorporate other elements such as:
Roads and transportation networks
Water bodies and drainage systems
Green zones and vegetation
Existing structures or utilities
These layers, typically drawn as 3D Vector Maps, provide an accurate spatial layout of all critical site components.
Step 5: Apply Architecture Illustration Techniques
This is where artistry meets data. Use Architecture Illustration principles to render the map with aesthetic enhancements:
Textures for terrain (grass, sand, water, urban)
Stylized representations of trees, buildings, and shadows
Labeling of key zones and infrastructure
Lighting effects for better depth perception
Step 6: Use for Analysis and Reporting
Once the map is complete, use it to conduct site analysis:
Determine view corridors and sightlines
Analyze sun paths and shading
Evaluate accessibility and circulation
Review spatial relationships and setbacks
These insights can then be documented in your architectural site report, with visuals that clearly back up your recommendations.
Use Cases: Where 3D Map Illustration Excels
Here are a few examples of how 3D Vector Maps are applied in real architectural projects:
Urban Master Planning
City planners use 3D maps to visualize entire neighborhoods, analyze density, and simulate transportation flows before construction begins.
Resort and Campus Design
When designing large areas like resorts or educational campuses, 3D illustrations help stakeholders understand zoning, amenities, and pedestrian routes.
Landscape Architecture
Landscape architects use 3D map illustration to study the interaction between built environments and nature—perfect for planning gardens, parks, and open spaces.
Infrastructure Projects
Infrastructure projects, like bridges, tunnels, and roads, benefit from 3D visuals to navigate complex terrain and urban constraints.
Integrating 3D Vector Maps in Projects
Here are a few additional benefits of incorporating 3D Vector Maps at the start of your architectural workflow:
Reduces design errors by visualizing constraints early
Accelerates approvals with more convincing presentations
Encourages collaboration across disciplines (engineering, landscaping, urban planning)
Saves cost and time by identifying site issues before they become expensive problems
The Future of Architecture, Illustration and Mapping
We’re heading toward a future where maps aren’t just flat diagrams—they’re immersive, interactive environments.
From drone-based site scans to AR-compatible 3D maps, architectural site analysis is becoming more data-rich and user-friendly. It’s no longer about lines and elevations—it’s about experiences and environments.
Final Thoughts
Incorporating 3D Map Illustration and 3D Vector Maps into your site analysis isn’t just a trend—it’s a game-changer. These tools enhance your technical accuracy, improve communication, and ultimately lead to more successful architectural outcomes.
Whether you’re designing a single home or planning an entire urban district, using modern Architecture Illustration tools helps you see the full picture—literally and figuratively.
So, as you gear up for your next architectural project, make sure your toolkit includes more than just rulers and blueprints.
2 notes
·
View notes
Text
Last Monday of the Week 2025-03-03
Accidentally really only did one thing this past week
Listening: I've been assembling a bunch of music videos so that I can have them on the TV when I just want some visual noise, which has involved watching a lot of music videos. I should really just make this playlist public but: Virtual Insanity by Jamiroquai
youtube
Also this very cute music video for a cover of How Will I Know by Zee Machine who previously features on Tuesday Again.
youtube
Reading: Bad, mostly nothing. Picking at things and putting them down.
Watching: Also very little, half-watched Flow at canmom's animation night but it was both late and I was locked in on some CAD, so I really need to rewatch it sometime.
Making: Lots! Sewing and hemming then ripping and resewing the pillowcase, because I did a fucked bad job. It's going better now.
Also the ongoing saga of the lapboard which is now in a "ready for use, with caveats" state, which is to say that the ergonomics are not perfect and it needs a few tweaks, but it can be used as is. See that at #lapboard on the blog. It has been fun and has really pushed me to learn OnShape better than even the server case project, I'm much faster at it and much more comfortable with the interface now. Picking up some of the shortcuts more seriously and also learning where I can lean on the more advanced features like promoting entities into a sketch and making more convoluted references.
Playing: Literally nothing it's crazy.
Tools and Equipment: I have been using fish shell at work, which I don't think I've pitched it before. It's a very easy to use shell that comes with a lot of features very reliably out of the box, but I want to pitch specifically the fzf plugins for fish
These integrate some very fast fuzzy searchers on top of fish to make it very easy to, say, directly open a file that contains a specific line even in a huge codebase, or to locate a particular commit in a git repo, or just search your enormous command history for the right command without having to tab up and down all day. Well okay that last one is now built into fish but it used to.
Fish is really worth trying if you haven't, it isn't anything like any of the bourne compatible shells but it improves on them in a number of ways in the process.
5 notes
·
View notes
Text
Behind the Pixels How Game Studios Plan Their 3D Game Assets Pipelines
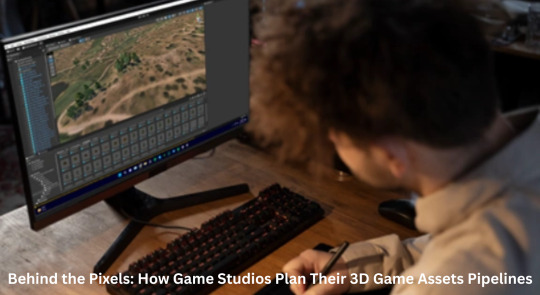
In the ever-evolving world of game development, creating immersive, believable worlds goes far beyond just great storytelling or compelling gameplay mechanics. From sprawling 3D game environments to detailed car 3D models, the process of bringing a digital universe to life is a feat of technical artistry and production precision. Let’s delve into how game studios plan and manage their 3D game assets pipelines, breaking down each stage and the importance of effective asset creation.
What is a 3D Game Assets Pipeline?
A 3D asset pipeline is a structured workflow used by game studios to design, model, texture, rig, animate, and implement digital assets into a game engine. These assets can include characters, vehicles, props, buildings, terrain, and more. For 3D modeling games, a well-organized pipeline is crucial to meet deadlines, maintain consistent visual quality, and ensure technical compatibility across teams.
Phase 1: Conceptualization and Planning
Before artists dive into 3D hard surface modeling or character rigging, the team needs to agree on the aesthetic direction, design constraints, and technical specifications of the asset.
Art directors and designers collaborate on:
Visual style guides
Asset lists and categorization (e.g., props 3D model, characters, car 3D model)
Level of detail (LOD) expectations
Optimization needs for platforms (console, PC, mobile)
Once the vision is locked in, assets are categorized based on priority and complexity, such as 3D game assets for core gameplay versus decorative props 3D model items.
Phase 2: Blocking and Whiteboxing
Whiteboxing, or blocking, is the process of placing simple geometry into the game world to test layout, scale, and gameplay flow. This is critical in 3D game environment as it ensures a smooth player experience before artists commit to final visuals.
Establishing visual hierarchy
Player movement and navigation
Gameplay testing with temporary placeholders
This phase also identifies any performance bottlenecks early, which is essential for large-scale 3D game environments like cities or open-world terrain.
Phase 3: High-Poly Sculpting
Once the base layout is approved, artists begin sculpting high-resolution versions of each asset.
For mechanical objects such as weapons, buildings, or 3D vehicle modeling, artists employ Hard Surface Modeling techniques. This includes precise edges, surface paneling, and realism-focused geometry — ideal for assets like a car 3D model or sci-fi spacecraft.
Key tools used:
ZBrush for organic sculpting
CAD references for technical accuracy
High-poly models are not used in-game directly but serve as the source for texture baking and normal map creation.
Phase 4: Retopology and Low-Poly Modeling
Games cannot run high-poly assets in real time, so the next step is creating an optimized version of each asset, often called a low-poly model. This step is vital in making sure 3D modeling games maintain good performance on various hardware.
Tasks include:
Retopologizing the high-poly mesh
UV unwrapping for efficient texture application
Creating multiple LODs to improve rendering performance
Game studios often use procedural tools and plugins to speed up repetitive tasks, especially for large amounts of 3D game assets.
Phase 5: Texturing and Materials
With low-poly models ready, it’s time to apply colors, materials, and textures. This phase brings life and realism to assets.
For 3D game environment and props 3D model creation, artists use:
Substance Painter and Designer for PBR texturing
Decals for adding surface imperfections
Smart materials for faster iteration
Phase 6: Rigging and Animation (If Needed)
While many 3D game assets are static (e.g., crates, barrels, buildings), some require rigging and animation, especially characters and interactive props.
For example:
A car 3D model may have animations for doors, steering, and wheels.
Sci-fi turrets or drones need rigging for movement and aiming.
Proper naming conventions and hierarchy setup are critical for seamless integration into game engines like Unreal or Unity.
Phase 7: Integration into Game Engine
With the completed asset ready, it's time to bring it into the game engine. Technical artists handle this stage, ensuring all assets meet the game’s performance and visual benchmarks.
This step involves:
Setting up materials and shaders
Adding collision meshes
Testing lighting and shadows
Confirming performance (frame rate, LOD switching)
For complex 3D game environments, modularity plays a huge role. Instead of creating a whole city block as one mesh, artists use modular pieces (walls, windows, fences) that can be reused and rearranged, keeping memory usage low while allowing for flexibility.
Optimization and QA
Even beautifully crafted assets can bog down performance if not optimized. QA teams and technical artists check each asset for:
Polycount thresholds
Texture resolution compliance
Collision accuracy
LOD functionality
3D environment modeling especially demands stringent optimization due to its scale. For instance, trees, buildings, and terrain must load dynamically as players move, requiring robust culling and streaming systems.
Collaboration & Asset Management
A modern game studio uses version control systems (like Perforce or Git LFS) and Digital Asset Management (DAM) systems to organize, store, and track assets. With dozens of people working on interconnected assets, managing dependencies is vital.
Common strategies:
Asset tagging and categorization (e.g., props 3D model, vehicles, characters)
Versioned file storage
Dependency tracking for assets shared across levels
Challenges in Asset Pipeline Management
Despite best efforts, game studios often face challenges like:
Scope creep is causing last-minute asset requests
Miscommunication between the art and dev teams
Inconsistent naming conventions
Cross-platform compatibility issues
The complexity increases exponentially when creating live-service games, where new 3D game assets and 3D game environments are continuously added post-launch.
The Future of 3D Game Assets Pipelines
As technology advances, AI-assisted modeling and procedural generation are helping studios scale asset production. Tools like Houdini allow for rule-based generation of cities, forests, or entire planets, making 3D environment modeling faster and more flexible.
Additionally, the rise of real-time engines like Unreal Engine 5 with Nanite and Lumen is shifting the traditional low-poly optimization paradigm. Artists can now use higher-quality assets without severe performance costs.
Conclusion
Creating engaging digital worlds requires far more than artistic flair. From the earliest sketches to the final textured car 3D model roaring through a neon-lit city, the 3D asset pipeline is a finely tuned system of collaboration, creativity, and technology.
Whether it's detailed 3D hard surface modeling or expansive 3D game environments, behind every pixel lies months of planning, iteration, and teamwork. As tools evolve and demands grow, understanding and refining the asset pipeline remains one of the most crucial elements of success in modern 3D modeling games.
#3d game environments#game assets#3d game assets#props 3d model#hard surface modeling#3d modeling games#3d vehicle modeling
0 notes
Text
WebAssembly Explained: Boosting Performance in Modern Web Development

In the fast-evolving world of web development, performance and efficiency are paramount. Developers constantly seek technologies that can improve speed, responsiveness, and overall user experience. One such breakthrough technology gaining momentum is WebAssembly. This powerful tool is transforming the way web applications run by enabling near-native performance on browsers. In this blog, we will explore what WebAssembly is, how it works, and why it is revolutionizing modern web development.
What is WebAssembly?
WebAssembly (Wasm) is a binary instruction format designed as a portable target for compiling high-level languages like C, C++, and Rust, enabling them to run on the web at near-native speed. Unlike traditional JavaScript, which is an interpreted language, WebAssembly is compiled, allowing browsers to execute code faster and more efficiently.
It was developed as a collaborative project by major browser vendors including Google, Mozilla, Microsoft, and Apple, to address the limitations of JavaScript performance and enable more complex applications to run smoothly in browsers.
How Does WebAssembly Work?
WebAssembly works by compiling code written in languages like C or Rust into a compact binary format. This format is then loaded and executed directly by the browser’s virtual machine, bypassing the need for JavaScript interpretation and Just-In-Time (JIT) compilation.
The process typically follows these steps:
Writing Code: Developers write code in languages such as C, C++, or Rust.
Compiling to Wasm: This code is compiled into WebAssembly bytecode using specialized compilers like Emscripten or Rust’s wasm-pack.
Loading in Browser: The WebAssembly module is loaded into the browser via JavaScript.
Execution: The browser executes the WebAssembly code at near-native speed, enabling high-performance web applications.
Because of its compact size and efficient execution, WebAssembly modules download faster and run more efficiently than equivalent JavaScript implementations.
Why WebAssembly is a Game-Changer in Web Development
1. Improved Performance
The primary advantage of WebAssembly is its ability to deliver near-native performance within web browsers. Applications that require intensive computations — such as gaming, video editing, and CAD — benefit tremendously from WebAssembly’s speed improvements.
JavaScript engines have come a long way, but WebAssembly pushes the boundaries further by offering a binary format optimized for fast decoding and execution. This results in smoother and faster applications, even for complex tasks.
2. Language Flexibility
WebAssembly opens web development to languages beyond JavaScript. Developers can leverage their expertise in C, C++, Rust, and other languages to build web applications, broadening the pool of web developers and allowing code reuse from existing native applications.
3. Enhanced Security
WebAssembly runs in a secure, sandboxed environment, similar to JavaScript. This isolation helps protect users by restricting access to the underlying system, reducing vulnerabilities while still allowing powerful features.
4. Interoperability with JavaScript
WebAssembly is designed to complement JavaScript, not replace it. Developers can call WebAssembly functions from JavaScript and vice versa, creating a seamless integration for complex applications where performance-critical modules run in Wasm and the UI and less intensive logic remain in JavaScript.
5. Cross-Browser Compatibility
Supported by all major browsers — Chrome, Firefox, Safari, and Edge — WebAssembly ensures consistent behavior across platforms, helping developers build applications that work everywhere without compatibility concerns.
Real-World Applications of WebAssembly
Gaming: WebAssembly allows complex games to run smoothly in browsers without plugins, supporting rich graphics and real-time interactions.
Video and Image Editing: High-performance tools like photo editors and video processors are leveraging Wasm to handle intensive computations in-browser.
Scientific Simulations: Researchers use WebAssembly for browser-based simulations, providing accessibility without sacrificing performance.
Cryptocurrency Wallets and Blockchain: WebAssembly helps optimize cryptographic calculations, speeding up blockchain-related web apps.
External Source for More Info
For a detailed technical dive and latest updates on WebAssembly, the official WebAssembly.org site is an excellent resource maintained by the working group behind the technology.
Internal Link Suggestion
If you're interested in exploring related cutting-edge web technologies, check out our blog on “The Future of Web Development with Rust and WebAssembly” for an in-depth guide.
How to Get Started with WebAssembly
To start experimenting with WebAssembly, developers can use tools like:
Emscripten: A compiler toolchain for compiling C/C++ code to Wasm.
Rust’s wasm-pack: Helps package Rust code for WebAssembly easily.
AssemblyScript: Allows writing WebAssembly modules using a TypeScript-like language.
These tools streamline the process of creating, compiling, and deploying WebAssembly modules in web projects.
Conclusion
WebAssembly is reshaping the landscape of web development by enabling high-performance applications directly within the browser. Its speed, language flexibility, and compatibility make it a valuable tool for developers aiming to push the boundaries of what’s possible on the web.
As the web continues to evolve, WebAssembly promises to empower developers to build faster, more powerful, and more secure applications, ultimately enhancing user experience across the globe.
0 notes
Text
Blender for Dental Download: A Comprehensive Guide
What is Blender?
Blender for Dental download Blender is a free and open-source 3D creation suite that supports the entirety of the 3D pipeline, including modeling, rigging, animation, simulation, rendering, compositing, and motion tracking. It is widely used by artists, designers, and engineers across multiple industries.
In the context of dentistry, Blender is being adopted by dental technicians, orthodontists, prosthodontists, and dental laboratories for tasks such as:
Designing crowns, bridges, and dentures
Creating orthodontic appliances
Performing digital wax-ups
Surgical guide planning
Model editing and preparation for 3D printing
Why Use Blender for Dental Applications?
1. Cost-Effective
Traditional dental CAD software can be prohibitively expensive. Blender, being free and open-source, eliminates the financial barrier for small practices and individual technicians.
2. Customizable
Blender’s open-source nature means it can be tailored to specific needs. Plugins and add-ons like "Blender for Dental" streamline and adapt Blender for dental workflows, adding custom tools, workflows, and interface layouts specifically designed for dental modeling and applications.
3. High-Quality Output
With Blender, users can produce detailed, high-resolution 3D models that are ready for 3D printing or digital storage. The software supports STL, OBJ, and other common 3D file formats used in dentistry.
4. Versatile Integration
Blender can be integrated with other digital tools and workflows. For example, it can work in conjunction with intraoral scanners, 3D printers, and slicer software such as CHITUBOX download, offering a complete ecosystem for digital dentistry.
Blender for Dental: Specialized Add-Ons
The standard Blender software is incredibly powerful, but when tailored for dentistry, its capabilities grow exponentially. Several add-ons and plugins have been developed to convert Blender into a specialized dental tool.
Notable Add-ons Include:
Blender for Dental: A commercial add-on that transforms Blender into a full-fledged dental CAD system. It includes features for crown and bridge design, aligners, splints, and model editing.
OrthoFlow: Focuses on orthodontic applications. Offers tools for bracket placement, arch wire simulation, and more.
Dental Shaper: Helps with morphing and sculpting tools for precise anatomical shaping.
Tips for Success with Blender for Dental
Start with Tutorials: Blender has a steeper learning curve, but there are plenty of dental-specific tutorials available.
Practice Regularly: The more time you spend, the more intuitive it becomes.
Join Communities: Facebook groups, Reddit forums, and Discord servers focused on digital dentistry can be very helpful.
Back-Up Work Regularly: Ensure your work is saved frequently, especially when handling complex cases.
Use Cases and Real-World Applications
Dental Labs: Design restorations digitally and reduce turnaround times.
Orthodontic Clinics: Create aligners and retainer designs in-house.
Academic Institutions: Teach dental students digital workflows without expensive software.
Research and Innovation: Use for bio-modelling, simulations, and custom appliance prototyping.
Final Thoughts
Blender for Dental represents a democratization of dental CAD tools. By using open-source software and cost-effective add-ons, dental professionals can now access powerful digital tools that were once restricted to large practices with significant budgets.
Whether you are a dental technician, clinician, or educator, exploring the Blender for Dental download could be a transformative step for your digital dentistry capabilities. Coupled with slicer software like CHITUBOX download, it opens the door to a complete digital workflow from scan to print.
0 notes
Text
What Is the Best AutoCAD Plugin for Solar PV Design?

Solar PV design has become a crucial part of modern renewable energy projects, and AutoCAD Solar PV Design plays a vital role in streamlining the process. Whether you’re a solar engineer, designer, or installer, using AutoCAD plugins can significantly enhance accuracy, speed, and efficiency in designing solar panel layouts. However, with multiple tools available, choosing the right plugin can be overwhelming.
This blog explores the best AutoCAD plugins for solar PV design, key features to look for, and how to get started with a CAD free trial for hands-on experience.
What Are the Key Features of a Good AutoCAD Plugin for Solar PV Design?
When selecting an AutoCAD Solar PV Design plugin, consider the following essential features:
Automated Solar Panel Layouts: Reduces manual work by automatically arranging solar panels based on site conditions.
Shading Analysis: Helps optimize panel placement for maximum efficiency.
Electrical Schematics: Auto-generates wiring diagrams and one-line schematics.
Structural & Wind Load Calculations: Ensures designs meet safety and compliance standards.
Compatibility with PV Software: Seamless integration with tools like Virto.CAD for accurate system modeling.
A powerful AutoCAD plugin should simplify the design process, reduce errors, and improve efficiency, making it easier to create optimized PV layouts.
Which AutoCAD Plugin Is Best for Solar PV Design?
One of the leading tools for AutoCAD Solar PV Design is Virto.CAD, which is specifically developed for solar professionals. Here’s why:
Speed & Automation: Virto.CAD automates complex tasks like panel layout, electrical configuration, and shading analysis.
Advanced 3D Modeling: Provides accurate terrain modeling to visualize solar installations.
Compliance Checks: Ensures designs adhere to industry regulations and local codes.
Seamless AutoCAD Integration: Works directly within AutoCAD, reducing learning time.
For a hands-on experience, you can explore the CAD free trial of Virto.CAD to test its features before committing to a purchase.
How Does a CAD Plugin Improve Solar PV Design Efficiency?
Using a solar PV design plugin for AutoCAD improves efficiency in multiple ways:
Reduces Manual Work: Automated layout generation speeds up the design process.
Enhances Accuracy: Eliminates calculation errors, ensuring precision.
Saves Time & Costs: Faster designs mean quicker project completion and reduced labor costs.
Facilitates Collaboration: Enables teams to work together seamlessly with shared CAD files.
By integrating a dedicated AutoCAD Solar PV Design plugin, solar engineers and designers can significantly streamline workflows and improve project outcomes.
Can You Get a Free Trial of a Solar PV AutoCAD Plugin?
Yes! Many solar PV AutoCAD plugins offer free trials, allowing users to explore features before making a purchase.
For example, Virto.CAD provides a CAD free trial, enabling users to:
Test automated panel layout features.
Run shading and energy simulations.
Experiment with electrical schematics.
Evaluate terrain and structure modeling tools.
Trying out a free trial helps users determine whether the software fits their design needs before investing in a full version.
How to Use an AutoCAD Plugin for Solar PV Design?
Getting started with an AutoCAD Solar PV Design plugin involves these steps:
Install the Plugin: Download and install the plugin, ensuring compatibility with your AutoCAD version.
Load the Plugin in AutoCAD: Activate the tool and configure the workspace.
Import Site Data: Use satellite imagery, drone surveys, or architectural plans to import site conditions.
Generate Panel Layouts: Utilize automation features to arrange solar panels efficiently.
Run Shading & Performance Simulations: Analyze potential energy generation and minimize shading losses.
Create Electrical Diagrams: Auto-generate wiring schematics for inverters, batteries, and grid connections.
Export Final Design: Save and share the design in CAD, PDF, or other required formats.
By following these steps, users can fully leverage AutoCAD plugins for designing optimized solar PV systems.
What Are the Benefits of Using Virto.CAD for Solar Design?
Virto.CAD stands out as a top-tier AutoCAD plugin for solar PV design due to its:
Ease of Use: Intuitive interface with quick learning curves.
Time-Saving Features: Automates solar panel placement and electrical schematics.
High Precision: Reduces human errors and enhances design accuracy.
Scalability: Works for small rooftop projects to large utility-scale solar farms.
For professionals seeking a reliable AutoCAD Solar PV Design solution, Virto.CAD offers the perfect balance of automation and customization.
FAQs
1. What is the best AutoCAD plugin for solar PV design?
Virto.CAD is one of the top AutoCAD plugins for solar PV design, offering automation, shading analysis, and compliance features.
2. Can I get a free trial of a solar AutoCAD plugin?
Yes! You can try Virto.CAD with its CAD free trial before purchasing.
3. Is Virto.CAD compatible with all AutoCAD versions?
Virto.CAD is designed to integrate smoothly with most modern AutoCAD versions. Check the official site for system requirements.
4. How does Virto.CAD improve solar PV system design?
It automates panel layouts, shading analysis, and electrical schematics, reducing errors and saving time.
5. Do I need prior AutoCAD experience to use a solar plugin?
Basic AutoCAD knowledge helps, but plugins like Virto.CAD are user-friendly and include guided workflows.
Conclusion: Why Use an AutoCAD Plugin for Solar PV Design?
Investing in the right AutoCAD Solar PV Design plugin can drastically improve efficiency, accuracy, and project outcomes. Whether you’re a beginner or an expert, using a tool like Virto.CAD simplifies complex tasks, automates layouts, and ensures compliance with industry standards.
To explore its capabilities firsthand, take advantage of the CAD free trial and see how it can transform your solar design workflow.
Start designing smarter, faster, and more efficiently today!
0 notes
Text
10 Best Free CAD Software Options for Designers and Engineers
For designers and engineers seeking powerful yet cost-effective tools,free CAD software offers an excellent solution. These software options provide robust features for 2D and 3D modeling, drafting, and simulation, making them ideal for professionals and hobbyists alike. Whether you're working on architectural blueprints, product designs, or mechanical engineering projects, these free tools deliver a high level of functionality without the financial burden of expensive licenses. In this guide, we’ll explore the 10 best free CAD options, each catering to different needs and offering unique capabilities to help you bring your designs to life.
Introduction to Free CAD Software Unlocking Design Potential
Free CAD software opens up new possibilities for designers and engineers by providing powerful tools without the financial commitment. Whether you're a student, hobbyist, or professional looking to explore CAD design, these free options offer versatile solutions. Many free CAD tools provide essential features like 2D drafting, 3D modeling, and parametric design, catering to a wide range of needs. These software programs not only enable cost-effective design but also offer a learning curve that can help users grow their skills and experiment with different design techniques.
FreeCAD A Versatile Open-Source CAD Tool for Engineers
FreeCAD is a popular open-source CAD software that stands out for its modular architecture and ability to support a wide range of applications. From mechanical engineering to product design, FreeCAD’s parametric design features make it a highly flexible tool for engineers. It allows users to create complex 3D models, automate repetitive tasks with macros, and even use Python scripts for custom functionalities. With a vibrant community and numerous plugins, FreeCAD is a solid choice for anyone looking for an adaptable, free design solution.
TinkerCAD A Simple Yet Powerful Tool for Beginners
TinkerCAD is a beginner-friendly CAD tool developed by Autodesk, ideal for users who are just starting with 3D design. Its intuitive drag-and-drop interface allows users to create basic 3D models easily, making it perfect for students, hobbyists, or educators. Although simple, TinkerCAD supports a variety of file formats for 3D printing, laser cutting, and more. Users can create designs quickly and efficiently, with access to a robust library of pre-made shapes, making it an excellent entry-level CAD software for those looking to dive into 3D design.
LibreCAD Ideal for 2D Drafting and Technical Drawings
For engineers and designers who primarily need 2D drafting, LibreCAD is an excellent open-source option. This lightweight software focuses on precision and simplicity, making it ideal for creating technical drawings and architectural plans. LibreCAD offers features like layer management, advanced snapping tools, and DXF file support, which allows for easy integration with other CAD software. Its straightforward interface makes it easy to get started, and its open-source nature means users can tailor it to their needs, ensuring an adaptable solution for 2D design work.
SketchUp Free User-Friendly 3D Design for Architects and Designers
SketchUp Free is an online version of the popular SketchUp software, offering a simple and accessible platform for creating 3D models. It’s especially favored by architects, interior designers, and hobbyists due to its user-friendly interface and easy-to-learn tools. While the free version lacks some of the advanced features of the paid plans, it still includes powerful modeling capabilities like real-time 3D viewing, easy-to-use drawing tools, and an extensive library of pre-designed models. SketchUp Free is perfect for anyone looking to quickly bring ideas to life in 3D without a steep learning curve.
Fusion 360 for Personal Use A Comprehensive CAD Solution
Autodesk’s Fusion 360 is a feature-rich CAD software that is free for personal use and startups with certain limitations. It combines 3D modeling, simulation, and rendering in one platform, making it suitable for mechanical engineers, product designers, and anyone working with complex designs. Fusion 360’s cloud-based capabilities enable seamless collaboration, while its integrated CAM (Computer-Aided Manufacturing) tools provide a complete workflow from design to production. Although the free version has restrictions on commercial use, it is an excellent choice for non-commercial projects and hobbyists looking for an all-in-one CAD tool.
Onshape Free Cloud-Based Collaboration for Designers and Engineers
Onshape offers a unique advantage with its entirely cloud-based CAD platform. The free version is designed for non-commercial use and provides access to powerful 3D modeling and parametric design tools. With Onshape, designers and engineers can create, store, and collaborate on projects entirely online, making it perfect for teams and remote collaboration. Its cloud-based nature also ensures that users can access their designs from any device with an internet connection, making it a convenient option for those working on the go or in collaborative environments.
Conclusion
The 10 best free CAD software options for designers and engineers offer powerful tools that cater to various needs, from 2D drafting to 3D modeling and simulation. Whether you're a beginner looking for an intuitive interface or a professional seeking advanced features, these software solutions provide excellent flexibility and functionality without the cost. They enable designers and engineers to bring their ideas to life, fostering creativity and innovation in projects of all scales. With continuous updates and community support, these free CAD programs are a valuable resource for both personal and professional development in the field of design and engineering.
0 notes
Text
Exploring the Benefits of Open-Source CAD Customization for Small and Medium Enterprises
Today, Computer-Aided Design, as a tool for modern design and manufacturing, is an inevitable factor in the competitive business world. It improves productivity while giving way to innovation across different industries. For small and medium enterprises, open-source CAD customisation is a cost-effective option to streamline operations and develop products.
Benefits of CAD in Business
CAD allows businesses to create intricate designs with accuracy, therefore increasing efficiency. CAD shortens the time to draft and make changes because it automates complex design processes. CAD saves SMEs money in other ways, such as requiring fewer physical prototypes. CAD helps teams collaborate better by providing an integrated platform, allowing them to communicate without any issues and iterate easily on designs.
Why CAD Is Important in Business and Industry Today
CAD is essential for accuracy, precision, and adaptability in manufacturing, automotive, and architecture. Its ability to produce quality outputs makes it indispensable. Further, CAD allows businesses to test various designs and change them quickly to respond to market changes. This flexibility and speed are important to SMEs that must be competitive without incurring high costs.
Impact of CAD on Business Technology and Production
CAD, short for Computer-Aided Design, has revolutionised business technology by automating design and drafting processes. Its integration with other systems like Computer-Aided Manufacturing (CAM) and Enterprise Resource Planning (ERP) streamlines production. CAD accelerates manufacturing workflows by reducing manual errors and enabling scalability, helping SMEs optimise production and reduce operational bottlenecks.
How CAD Boosts Productivity
One of the benefits of CAD is that it is a tool that can make design work easier. Automated tools available in CAD software development eliminate repetitive work, allowing engineers to work on innovation. For instance, dimensioning and rendering are automatically done, thus reducing manual labour and increasing speed. CAD also allows virtual prototyping, where designs are tested and perfected before being produced physically. This saves time and resources, especially for SMEs with limited budgets.
Advantages of CAD in the Product Development Cycle
The speed of creating 3D models in CAD allows companies to conceptualise and prototype ideas with a very low possibility of errors. It eliminates the waste that occurs through the material, saving time lost in production and hence saving costs during the development process. Thirdly, flexibility helps make customised products so that firms can respond to small markets or specific customers. This is multiplied by the availability of free, open-source CAD customisation in which small businesses can configure the software according to their needs.
Open-source CAD Customization for SME
Open-source CAD is extremely effective for small and medium-sized businesses because it eliminates high license fees. These tools provide scope for feature customisation and will lead to a software environment based on the specific requirements of business operation. For instance, a furniture manufacturing SME may personalise CAD with modular design templates, saving time and ensuring uniformity at a higher level. An open-source community will also offer a wealth of plugins, resources, and support to facilitate customisation.
SMEs have become equipped with open-source CAD software development, which allows them to use such cutting-edge technologies without straining their purse strings. CAD in present-day businesses has become essential. In such ways, SMEs get better design capabilities. From optimising work to enhancing growth, every one of these roles that open-source CAD has performed helps to enhance their status within society. Embrace open-source CAD tools and unlock the enormous potential for customisation to create an even more efficient, innovative future for your business.
0 notes
Text
Top 3 Best Product Design Software 2025
Before discussing the Top 3 Best Product Design Software in 2025, we need to understand what product design software is.

What is product design software?
The term product design software is defined as an application that design engineers and or applications. Engineers rely on the visualization, drafting, or designing of physical or digital products. These aids assist in streamlining the design process, improving collaboration, and precision at various levels of development, for example, but not:
3D Modeling: The detailed design of an object in three-dimensional pictures.
Prototyping: The process of constructing an object to test its design.
Simulation: Performing the same operation in the same manner as will be performed on the actual object in the field.
Rendering: Creating still images or animation for advertising or presentation purposes.
Some of the common product design software are SolidWorks, Fusion 360, and SketchUp. Among others, each has features designed for different fields like construction, manufacturing, and product design.
Top 3 Best Product Design Software 2025
The following is a ranking of the 3 most outstanding product design software in the year 2025. Based on their features, user preferences, and flexibility.
1. SolidWorks
It is recognized for its sophisticated three-dimensional modeling as well as simulation functions. Most appropriate for sectors such as air space engineering, auto industry, and heavy fabrication. Embraces comprehensive examination and teamwork tools.
Advantages and Disadvantages of SolidWorks.
Pros:
Comprehensive 3D Modeling: SolidWorks delivers advanced tools that support parametric modeling. Which provides the user with the ease of creating intricate 3D designs.
User-Friendly Interface: The interface is simple and easy to use for both novices and experts. Hence the learning curve is less as compared to many other CAD software.
Wide Industry Application: SolidWorks is widely used in automotive, aerospace, and manufacturing. Industries thus it can support a wide variety of industrial applications.
Simulation Capabilities: They have built-in simulations that allow the user to experience. How the product design works in practice and helps save the costs of building prototypes.
Vast Community Support: Enormous amounts of users, plus many tutorials and forum libraries, make it easy to fix problems and learn.
Add Ons & Integration: Various plugins are supported by SolidWorks and it also works with other software well.
Cons:
Cost: SolidWorks is costly for smaller enterprises and individuals given its high one-time purchase and license renewal fees.
Resource Hungry: It requires powerful systems which are sometimes expensive to manage.
Limited Usage on Mac: Most of the time, it is Windows-based. Hence it is not friendly to users of Apple computers.
Steep Learning Curve on Usage of Advanced Features: The basics are simple but most of the advanced features take time and effort to get mastered.
Not Appropriate for Artistic Modeling: Artistic or highly creative designs cannot be realized using SolidWorks since it is not meant for freeform or organic modeling.
Collaboration Problems: The collaboration features of the software are not as sophisticated or comfortable as the cloud-based ones like Onshape or Fusion 360.
#https://digitalanivipracticeb.com/top-3-best-product-design-software-2025/#what is product design software#fusion 360#sketchup#solidWorks#frequently ask questions
0 notes
Text
Top 5 Free Tools for Beginners in 3D Visualization

3D visualization has become an essential skill across various industries, from game development and animation to architectural design and engineering. As a beginner, navigating the myriad of available tools can be overwhelming. Fortunately, several free tools offer robust features to help you get started on your 3D visualization journey. In this blog, we will discuss the top 5 free tools for beginners in 3D visualization, focusing on ease of use, features, community support, and versatility.
1. Blender
Key Points:
Ease of Use: While Blender has a steep learning curve, its extensive tutorial resources make it accessible to beginners.
Features: Blender is a comprehensive tool for 3D modeling, animation, simulation, rendering, and more.
Community Support: One of Blender's strengths is its active community, which offers tutorials, forums, and plugins.
Versatility: Suitable for various applications including animation, game design, and visual effects.
Blender is arguably the most popular free 3D visualization tool available. It offers a wide range of features that rival those of expensive professional software. Whether you're interested in modeling, texturing, animation, or rendering, Blender has you covered. One significant advantage is the wealth of resources available for learning, including extensive documentation, video tutorials, and forums. For a more advanced perspective, you might consider how a 3D Visualization Company in Mumbai utilizes Blender for professional projects.
2. SketchUp Free
Key Points:
Ease of Use: Known for its intuitive interface, making it ideal for beginners.
Features: Offers basic 3D modeling tools with an emphasis on architectural design.
Community Support: Strong community with numerous tutorials and a large 3D Warehouse for models.
Versatility: Primarily geared towards architectural and interior design but can be adapted for other uses.
SketchUp Free is a user-friendly 3D modeling tool that operates directly in your web browser. It is especially popular among architects and interior designers but can be used for a variety of design projects. Its intuitive interface allows beginners to start creating models quickly. Additionally, its large online repository, known as the 3D Warehouse, provides thousands of pre-made models that can be imported into your projects. For more specialized needs, a 3D Visualization Company in Mumbai might offer additional tools and support.
3. Tinkercad
Key Points:
Ease of Use: Highly user-friendly and designed specifically for beginners.
Features: Simplified tools for basic 3D modeling and electronic circuit design.
Community Support: Active community with abundant tutorials and project ideas.
Versatility: Ideal for 3D printing and educational purposes.
Tinkercad is an online 3D modeling and CAD tool from Autodesk designed with simplicity in mind. It is a fantastic starting point for those new to 3D visualization, especially kids and educators. While it lacks the advanced features of more sophisticated tools, its drag-and-drop interface is perfect for getting a handle on the basics of 3D design. Tinkercad is also linked to popular 3D printing services, making it a great choice for designing objects to be printed. Many beginners start with Tinkercad before progressing to more advanced tools used by a 3D Visualization Company in Mumbai.
4. Fusion 360 for Personal Use
Key Points:
Ease of Use: User-friendly for beginners, though more complex than Tinkercad.
Features: Comprehensive CAD, CAM, and CAE tool with advanced features.
Community Support: Strong support community with official tutorials and user forums.
Versatility: Suitable for product design, engineering, and hobbyist projects.
Autodesk's Fusion 360 is a powerful tool that offers a free version for personal, non-commercial use. While it's more advanced than Tinkercad, it's still accessible to beginners thanks to its well-designed tutorials and learning resources. Fusion 360 combines CAD, CAM, and CAE capabilities, making it highly versatile for various types of design and engineering projects. Professionals often use Fusion 360 in conjunction with services offered by a 3D Visualization Company in Mumbai for more intricate projects.
5. FreeCAD
Key Points:
Ease of Use: Moderate learning curve, best suited for those with some technical background.
Features: Strong parametric 3D CAD modeling capabilities.
Community Support: Active open-source community with extensive documentation and forums.
Versatility: Ideal for mechanical engineering and product design.
FreeCAD is an open-source parametric 3D CAD modeler that supports a wide range of uses, from product design to mechanical engineering. Its parametric modeling capability allows users to easily modify design parameters, making it a powerful tool for those with a bit of technical expertise. FreeCAD's open-source nature means it's continually being improved by its community of users and developers. For a more comprehensive approach, you can see how FreeCAD integrates with the offerings of a 3D Visualization Company in Mumbai.
Conclusion
Starting with free tools is a great way for beginners to dive into the world of 3D visualization without a financial commitment. Each of these tools—Blender, SketchUp Free, Tinkercad, Fusion 360 for Personal Use, and FreeCAD—offers unique features and benefits to suit different needs and levels of expertise. By exploring these options, you can find the right tool to kickstart your 3D visualization journey. If you're looking for professional insights or advanced applications, consider consulting a 3D Visualization Company in Mumbai for further guidance. Happy modeling!
#3dvisualization#3dvisualization in india#3darchitecturalvisualization#visualization3d#interiorrendering#interior#interiorvisualization#3darchitecturalrendering
0 notes
Text
Inventor & AutoCAD: Key Tools in Modern Design and Engineering
In the world of design and engineering, two software platforms have become essential for professionals seeking precision, innovation, and efficiency—Autodesk Inventor and AutoCAD. These powerful tools serve distinct yet complementary roles, revolutionizing how engineers, architects, and designers bring their concepts to life.
Understanding AutoCAD: The Pioneer of CAD Software
AutoCAD, developed by Autodesk, is one of the most popular and widely-used computer-aided design (CAD) software platforms in the world. Since its inception in 1982, it has been a staple for architects, engineers, and construction professionals. AutoCAD is primarily used for 2D and 3D design, drafting, and modeling, providing users with powerful tools to create detailed technical drawings, blueprints, and schematics.
AutoCAD’s intuitive interface and robust library of commands allow professionals to draft with precision, from simple floor plans to complex mechanical designs. The software's adaptability makes it suitable for a wide range of industries, including architecture, civil engineering, electrical engineering, and product design.
Key features include:
Layer management for organizing complex drawings.
Parametric design to maintain relationships between drawing elements.
Customization through scripts and plugins to enhance productivity.
Inventor: Revolutionizing 3D Mechanical Design
While AutoCAD is excellent for 2D and general-purpose design, Inventor, also developed by Autodesk, is focused specifically on 3D mechanical design, simulation, and product development. Inventor is a powerful tool for engineers working on complex parts, assemblies, and simulations. It offers parametric, direct, and freeform modeling tools, allowing users to design intricate parts and assemblies with remarkable accuracy.
Inventor’s strength lies in its ability to simulate real-world mechanical functions, such as stress analysis and motion, enabling designers to test and refine their products before physical prototyping. This reduces errors, speeds up development, and improves overall product quality.
Key features include:
Assembly modeling to manage complex designs with multiple components.
Finite Element Analysis (FEA) for testing material stress and behavior.
Integrated CAD/CAM for seamless manufacturing processes.
Choosing Between AutoCAD and Inventor
Both AutoCAD and Inventor have unique strengths. AutoCAD excels in general-purpose drafting and 2D design, making it ideal for architectural layouts and initial concept drawings. Inventor, on the other hand, is better suited for detailed 3D mechanical design and product simulation. For companies working on both architectural designs and complex mechanical products, using AutoCAD for drafting and Inventor for 3D modeling provides an ideal combination.
Conclusion
For design and engineering professionals, mastering both AutoCAD and Inventor is essential for staying competitive in today’s fast-paced industries. By leveraging these tools, engineers and architects can streamline their workflows, improve design accuracy, and create more innovative solutions. Software CAD Australia is dedicated to providing high-quality software solutions like AutoCAD and Inventor, helping professionals unlock their creative potential and enhance productivity. With the right tools and support, achieving design excellence is within reach.
0 notes
Text
The Evolution of Free 2D CAD Software: What’s New in 2024?
Explores the latest advancements in 2D CAD tools available at no cost. In 2024, free 2D CAD software has become more powerful and accessible, offering enhanced features such as cloud integration, improved user interfaces, and expanded libraries of templates and symbols. These updates make it easier for designers, architects, and engineers to create precise technical drawings and designs without investing in expensive software. The evolution also includes better compatibility with other CAD programs, enabling seamless collaboration and data sharing. This blog highlights the key developments and how they empower users to achieve professional-quality results with free 2D CAD software in 2024.
Introduction to Free 2D CAD Software: What You Need to Know?
Free 2D CAD software offers powerful tools for creating precise technical drawings and designs without the cost associated with premium software. These tools are ideal for beginners, hobbyists, and professionals seeking a cost-effective solution. Understanding the basic functionalities and limitations of free 2D CAD software helps users make the most of these programs, whether for architectural plans, engineering schematics, or graphic designs.
Top Free 2D CAD Software Options for Beginners
For those new to computer-aided design, free 2D CAD software provides an accessible entry point. Popular options like LibreCAD, QCAD, and NanoCAD offer user-friendly interfaces and essential features that make learning CAD straightforward. These programs typically include tutorials and community support, allowing beginners to develop their skills and create professional-quality designs without a steep learning curve.
Advanced Features in Free 2D CAD Software: What’s Available?
While free 2D CAD software is often perceived as basic, many options include advanced features typically found in paid versions. These features may include layer management, customizable toolbars, precision drawing tools, and support for various file formats. Some free software also offers plugins or extensions that add functionalities such as 3D modeling, rendering, and collaboration tools, making them versatile for more complex projects.
Comparing Free 2D CAD Software: Which One Is Right for You?
Choosing the right free 2D CAD software depends on your specific needs and project requirements. Some software excels in simplicity and ease of use, while others offer more advanced tools for detailed work. Comparing features, user interfaces, and compatibility with your operating system can help you find the software that best suits your design goals, whether you’re working on simple sketches or intricate plans.
Free 2D CAD Software for Professional Use: Is It Enough?
Professionals in architecture, engineering, and design may wonder if free 2D CAD software meets industry standards. While some free programs are limited in scope, many provide robust features suitable for professional work. By selecting software with precise drawing tools, extensive libraries, and support for standard file formats, professionals can effectively use free 2D CAD software for their projects without compromising quality.
How to Get the Most Out of Free 2D CAD Software?
Maximizing the potential of free 2D CAD software involves learning its features and customization options. Users can enhance their efficiency by mastering keyboard shortcuts, utilizing templates, and exploring available plugins. Regular updates and active community forums also provide valuable resources for troubleshooting and improving design workflows. By investing time in learning the software, users can achieve results comparable to those of premium CAD programs.
The Limitations of Free 2D CAD Software: What You Should Know?
While free 2D CAD software offers many benefits, it’s important to be aware of its limitations. These may include fewer advanced tools, restricted file compatibility, and limited customer support. Some programs may also have licensing restrictions that affect commercial use. Understanding these limitations helps users set realistic expectations and decide when upgrading to paid software might be necessary for their projects.
Community Support and Resources for Free 2D CAD Software Users
One of the strengths of free 2D CAD software is the active communities that support it. Online forums, user groups, and tutorial sites provide a wealth of information and assistance, from basic how-tos to advanced problem-solving tips. Engaging with these communities can enhance your understanding of the software and keep you informed about updates and new features, making your experience with free 2D CAD software even more valuable.
Conclusion
Free 2D CAD software offers a range of tools and features suitable for both beginners and professionals. Whether you're creating simple drawings or complex designs, there’s a free CAD program to meet your needs. While these tools may have some limitations, understanding how to maximize their potential can lead to impressive results. By choosing the right software, learning its features, and engaging with supportive communities, you can accomplish your design goals without investing in costly software solutions. Free 2D CAD software provides a powerful and accessible platform for creativity and precision in various fields.
0 notes
Text
Top AI Tools for Engineering Students: A Comprehensive Guide
Artificial Intelligence (AI) is revolutionizing the world, and engineering students are at the forefront of this transformation. From simplifying complex calculations to enhancing productivity, AI tools have become indispensable in the educational journey of engineering students. This comprehensive guide will explore the best AI tools for engineering students and best AI tools for graduate students, providing insights into how these tools can enhance learning, foster creativity, and streamline research processes.
MATLAB: The Powerhouse for Computational Engineering
MATLAB is one of the most widely used tools among engineering students, particularly those specializing in fields like electrical, mechanical, and aerospace engineering. MATLAB’s powerful computational capabilities enable students to solve complex mathematical problems, perform simulations, and analyze data efficiently.
Why MATLAB is a Must-Have AI Tool
Advanced Mathematical Functions: MATLAB offers a wide range of built-in functions for advanced mathematical operations, making it easier for students to handle calculus, algebra, and statistical problems.
Simulink Integration: Simulink, a companion tool to MATLAB, allows for model-based design, which is crucial for control systems, signal processing, and digital communication.
Machine Learning Capabilities: With its robust machine learning toolbox, MATLAB enables students to create predictive models, perform classification tasks, and conduct deep learning experiments.
TensorFlow: A Deep Learning Framework for All Levels
TensorFlow, an open-source deep learning framework developed by Google, is among the best AI tools for engineering students and graduate students alike. It offers extensive libraries for building and training machine learning models, making it ideal for students interested in AI, machine learning, and data science.
Key Features of TensorFlow for Engineering Students
Versatility and Flexibility: TensorFlow supports various platforms, including mobile and embedded devices, making it a versatile choice for students working on diverse projects.
Comprehensive Documentation and Tutorials: TensorFlow provides extensive documentation and tutorials that guide beginners and advanced users alike, making it accessible for students at all levels.
Wide Range of Applications: From natural language processing to computer vision, TensorFlow supports a broad spectrum of applications, enabling students to explore different aspects of AI.
AutoCAD: Revolutionizing Design and Drafting
AutoCAD is a staple in the toolkit of engineering students, especially those focusing on civil, mechanical, and architectural engineering. This software automates the process of creating 2D and 3D designs, making it easier for students to visualize their projects and ideas.
Why AutoCAD Stands Out
Precision and Accuracy: AutoCAD offers high precision in creating detailed designs, which is crucial for engineering students working on complex projects.
Customizability: Students can customize the software with different plugins and tools to suit their specific needs, enhancing productivity and learning efficiency.
AI-Driven Features: With AI integration, AutoCAD now offers features like predictive text and automated dimensioning, making the design process faster and more efficient.
SolidWorks: A 3D CAD Software for Innovative Engineers
SolidWorks is another essential tool for engineering students, particularly those involved in mechanical engineering. It is known for its robust features that facilitate 3D modeling, simulation, and product design.
Benefits of Using SolidWorks
User-Friendly Interface: SolidWorks is known for its intuitive interface, making it easier for students to learn and use the software efficiently.
Powerful Simulation Tools: The software offers advanced simulation capabilities, allowing students to test their designs under various conditions and optimize them accordingly.
Integration with AI and Machine Learning: SolidWorks integrates AI and machine learning algorithms to enhance design processes, predict outcomes, and automate repetitive tasks.
Jupyter Notebooks: An Interactive Environment for Data Science
Jupyter Notebooks is a popular tool among engineering students, especially those focusing on data science and AI. This open-source web application allows students to create and share documents that contain live code, equations, visualizations, and narrative text.
Why Jupyter Notebooks is Essential
Interactive Learning: Jupyter Notebooks supports an interactive environment where students can run code in real-time, visualize data, and document their findings simultaneously.
Supports Multiple Programming Languages: It supports various programming languages such as Python, R, and Julia, making it versatile for students working on different projects.
Integration with AI Libraries: Jupyter Notebooks integrates seamlessly with popular AI libraries such as TensorFlow, PyTorch, and Scikit-Learn, making it easier for students to implement and test machine learning models.
Anaconda: A One-Stop Shop for Data Science and AI
Anaconda is a distribution of Python and R programming languages designed specifically for data science and AI. It is a must-have for engineering students working on machine learning, deep learning, or any data-intensive projects.
Advantages of Anaconda for Engineering Students
Pre-Packaged Libraries: Anaconda comes with hundreds of pre-installed libraries and packages, including NumPy, pandas, TensorFlow, and Keras, saving students the hassle of installing them manually.
Environment Management: It offers easy management of environments and dependencies, allowing students to work on multiple projects with different configurations seamlessly.
Robust Community Support: Anaconda has a strong community and a wealth of resources, including tutorials and forums, where students can get help and share knowledge.
PyCharm: The Python IDE for Professional Development
For engineering students focusing on software development, PyCharm is an excellent choice. This integrated development environment (IDE) is specifically designed for Python programming and supports a wide range of AI and machine learning projects.
Key Features of PyCharm
Intelligent Code Editor: PyCharm offers intelligent code completion, real-time error detection, and refactoring capabilities, enhancing coding efficiency and accuracy.
Integration with AI Tools: It integrates with various AI tools and libraries, making it easier for students to develop and deploy machine learning models.
Version Control Systems: PyCharm supports version control systems like Git and Subversion, which are essential for collaborative projects and maintaining code integrity.
LabVIEW: A Visual Programming Language for Engineers
LabVIEW is a visual programming environment primarily used by engineering students in fields such as electrical and mechanical engineering. It is designed to facilitate data acquisition, instrument control, and industrial automation.
Why Engineering Students Should Use LabVIEW
Visual Programming Interface: LabVIEW’s drag-and-drop interface makes it easier for students to design complex systems without extensive coding knowledge.
Real-Time Data Processing: The software allows for real-time data processing and analysis, which is crucial for engineering experiments and research.
Integration with Hardware: LabVIEW integrates seamlessly with various hardware components, making it ideal for students working on robotics, automation, and embedded systems.
PyTorch: An Open-Source Machine Learning Library
PyTorch, developed by Facebook’s AI Research lab, is another powerful machine learning library widely used by engineering and graduate students. It is particularly known for its dynamic computation graph, which allows for more flexibility and ease of use.
Benefits of Using PyTorch
Dynamic Computational Graphs: Unlike other frameworks, PyTorch provides dynamic computation graphs, making it easier to modify and debug models.
Extensive Library Support: PyTorch offers a wide range of libraries for neural networks, computer vision, and natural language processing, enabling students to experiment with different AI models.
Community and Resources: PyTorch has a robust community and plenty of resources, including tutorials, forums, and research papers, making it easier for students to learn and apply AI concepts.
Wolfram Mathematica: A Tool for Advanced Computation
Wolfram Mathematica is a powerful tool used by engineering students for complex computations, data analysis, and visualization. It combines computational power with an intuitive interface, making it ideal for both classroom learning and research projects.
Why Choose Wolfram Mathematica?
Symbolic Computation: Mathematica excels in symbolic computation, allowing students to solve complex equations and perform algebraic manipulations easily.
Data Visualization: The tool offers robust data visualization capabilities, enabling students to create detailed graphs, charts, and 3D models.
Integration with AI and Machine Learning: Mathematica integrates AI and machine learning functionalities, allowing students to perform tasks like image recognition, predictive analysis, and pattern detection.
Conclusion
The best AI tools for engineering students and graduate students are those that offer versatility, ease of use, and robust capabilities to handle complex tasks. From MATLAB and TensorFlow to AutoCAD and SolidWorks, each tool has unique features that cater to different aspects of engineering education and research. By leveraging these tools, students can enhance their learning experience, improve their problem-solving skills, and stay ahead in the ever-evolving field of engineering. Whether you are an undergraduate just starting out or a graduate student diving deep into specialized research, these AI tools are indispensable for your academic and professional growth.
0 notes
Text
Discover Free CAD Software Solutions for Designers
Discover free CAD software solutions tailored for designers seeking powerful tools without financial investment. These options provide robust features for both 2D drafting and 3D modeling, catering to various design needs. From intuitive interfaces like TinkerCAD for beginners to advanced capabilities of FreeCAD and LibreCAD, designers can create detailed plans and prototypes efficiently. Explore these alternatives to AutoCAD to enhance creativity and productivity without compromising on quality or functionality, making high-quality design accessible to all aspiring designers and professionals alike.
Overview of Free CAD Software Solutions
Explore a comprehensive overview of free CAD software solutions tailored for designers. Discover versatile tools that cater to various design needs, from 2D drafting to complex 3D modeling, without the financial investment of premium software.
Advantages of Using Free CAD Software
Learn about the advantages of opting for free CAD software, including cost-effectiveness, accessibility, and the ability to experiment with different design tools and techniques without upfront expenses.
Top Free CAD Software Tools for Designers
Explore top free CAD software tools like FreeCAD, LibreCAD, and SketchUp, each offering unique features such as parametric modeling, precise 2D drafting, and intuitive 3D modeling interfaces suitable for diverse design projects.
Features to Look for in Free CAD Software
Discover essential features to consider when selecting free CAD software, including usability, compatibility with industry standards, advanced modeling capabilities, and support for plugins or extensions to enhance functionality.
Choosing the Right Free CAD Software for Specific Design Needs
Understand how to choose the right free CAD software based on specific design needs, whether it's architectural drafting, mechanical engineering, product design, or industrial prototyping, ensuring optimal tool selection for project success.
Community Support and Resources for Free CAD Software Users
Explore the importance of community support and available resources for free CAD software users, including forums, tutorials, and user communities that provide valuable insights, troubleshooting assistance, and shared knowledge.
Tips for Getting Started with Free CAD Software
Gain practical tips for getting started with free CAD software, including installation guides, basic tutorials, workflow optimization techniques, and recommended learning resources to accelerate proficiency and maximize design potential.
Conclusion
Exploring free CAD software solutions offers designers valuable tools without financial barriers. Options like FreeCAD, LibreCAD, and others provide robust capabilities for 2D drafting, 3D modeling, and simulation, catering to diverse design needs. These platforms empower designers to innovate, prototype, and refine their creations with intuitive interfaces and community support. Whether for hobbyists, students, or professionals, leveraging its fosters creativity and skill development while ensuring projects are executed efficiently. Embracing these tools not only expands design possibilities but also encourages collaboration and knowledge-sharing within the global design community, driving continuous innovation in the field.
0 notes