#ConfigParser
Explore tagged Tumblr posts
Visit Tumblr Blog
Explore Tumblr blogs with no restrictions, modern design and the best experience.
Last Seen Tumblr Blogs


Fun Fact
Tumblr was created by web developers David Karp and Marco Arment.
Text
"TODO constants the color"
sentences that only make sense if you're doing absolutely batshit stupid bullshit
also christ I wrote this whole constants file but I think like. half of it is gonna have to go into a config file that I'll read with ConfigParser
aaaaaalright I'm sitting down to do a lot of work on this stupid python project I have to do for class so here's a giant post I'm gonna reblog repeatedly with me being angry with python
to start things off right: WHY THE FUCKING FUCKITY FUCK FUCK ARE CONSTRUCTORS CALLED THAT
98 notes
·
View notes
Text
Python:configparser compatible with 2.x and 3.x.
The difference introduced by configparser in python's 2.x version and 3.x version is only the case of letters (3.x version adds more functions), but there is a Configparser plug-in directly in python2.x, and python3.x needs to install it by itself:
>pip3 install configparser
Ensure that after configparser has been installed in Python environment, use the following code to be compatible with configparser
try:
import configparser as configparser
except Exception:
import ConfigParser as configparser
con = configparser.ConfigParser()
con.read("xxxx") # fileName
print(con.sections())
0 notes
Text
025 // Distractions III: External Random Item Drop Generator
So you may be wondering what happened to last week's post, and the answer is that I never wrote it because I was too busy trying to finish this side project I have been working on. And I finished it!
I think I might have offered to explain it a while ago, so I will do that now, since I have very little new art to offer at the moment (it is probably not why you are here but please bear with me).
This one is a bit long and is all about code..
For the last few weeks, I have been working on an external random item dropper for a couple of friends who want to start their own thing, and doing that required me to either construct an entire user interface arrangement in Pygame (which I have done twice already and have my own modules for but am not really super-de-duper into) or to learn at least enough Tkinter to make something I am not totally ashamed of (which is a lot of learning because I know-- which is to say, knew-- almost exactly nothing about Tkinter, not counting some stuff with Listboxes.
I opted for the latter and, in truth, it was pretty easy to learn. It was a bit frustrating at times because there are problems with Tkinter's 'widgets' (graphic interface objects) that can occur and lock up the software in a way that Tkinter considers normal and not an error and why would it tell you about it? For instance, if you try to use a "grid" arrangement in the same Frame (an object Tkinter uses to create layers of widget organization) as a "pack" arrangement, it will "Tkinter will happily spend the rest of your lifetime trying to negotiate a solution that both managers are happy with," or how replacing Variable objects with new ones that have the same name sometimes causes the whole affair to silently stop working and leave you clicking a button to no effect, wondering what is going on and why.
Problems which I overcame! Quickly and with some difficulty! Most of my time was spent on the interface, actually, since it was the part I knew the least about. The design was pretty easy (or it was easy in the extent that I produced an interface experience that I, personally, found satisfying, and which failed to produce a/any complaint(s) from the people for whom I made it) but the actual construction took a lot of learning when it came to displaying and updating the right variables in the right places and when. There are many values shared between user input boxes (Tk.Entry), where the user enters various bits of data, lists (Tk.Listbox), which have selectable entries and a lot of straight-forward appearance parameters, labels (Tk.Label), which display values either as static text or from various types of Variable, and, of course, the item data sheet that the user provides (read using ConfigParser from an simple external text document I can tell you how to make, and internally, as a chaotic dictionary of lists and Variables and strings and numbers). Incidentally, I ended up extending (adding my own functions and attributes to) a few of Tkinter's basic classes, and this part of the project was actually one of the most interesting. A great many parts of the original module have been deliberately constructed in a way that simplifies that kind of extension, and while I had to go outside of that on an occasion or two, it was absolutely a worthwhile lesson!
The Variables were the most perplexing part, because Tkinter is the least forthright about them and because they are more flexible than they let on. These variables can be equipped with callback functions that allow them to alter their contents, or the contents of other widgets, or do some other crazy third thing, whenever they are altered, or even just whenever something looks at their values. That part was easy and extremely useful once I got the hang of it! They can also be given specific names by which other functions and widgets may identify them, and while I found this quite useful as well, its lack of stability was somewhat less endearing since Tkinter will not tolerate two variables with the same name (a legitimate and preventable issue!) and will not necessarily tell you when this has happened or where (I am less okay with this).
Another interesting thing about Tkinter is that it offers multiple obvious ways of accomplishing the same thing, which is a bit of a problem for "The Zen of Python," a sort of mantra that a lot of people in the community take quite seriously. As an example, you may almost always alter the configuration of a widget in at least two ways: - Use Widget.config(some_attr = value) and change one or several attributes at once using arguments, or - Setting them using attribute names as keys, like so: Widget['some_attr'] = value. - There are other ways too but none spring to mind.
Also, widgets can be stored in attributes, but you can also call them up using their names: a widget created in the line
myObject.my_widj = Label(master=tk_root, text='Yo, babe(l), I am a Label!', name='lbl_annoyinglabel')
..can be accessed directly either by way of some object attribute reference:
myObject.my_widj.config(text = "Hey, id'jit, I'm a widget!")
..which is absolutely normal in Python, or by calling it by name from its master object:
tk_root.nametowidget('lbl_annoyinglabel')['text'] = 'Please stop talking.'.
Naturally, you would probably want to use the first method as often as possible, because it involves fewer operations and would probably be easier to maintain. But the second way, more elaborate though it may be, lets you save on assigning attributes by tracking widgets using Tcl's internal structure. (n.b.: I cannot say I have ever found myself running out of room for attributes in a namespace but I am also a complete amateur as a programmer so please bear with me. <3 )
Interestingly, actual structure of the input sheets was the next-most time-consuming part. Trying to find a data format that would be easily comprehensible by anyone who picked it up (probably only going to be two people, plus myself, if even that many) and which also met with ConfigParser's profoundly elusive approval was a somewhat complex task. It turned out to be exactly as hard as I thought it would be, at least, and there were no surprises here. You can see a blank template of the input sheet here!
The actual drop generator code-- the element which takes the user-supplied data and returns a random selection of items from it, according to their initial and supplemental parameters; the single element that the entire program is built to support-- only took an hour to complete, actually. I did it last and by then, all of the parameters and variables and their names and locations had become obvious, and since it was a pretty plain function to start with, it was done quickly. It was interesting to note how much more effort it was to pack this simple function up into a pretty interface than it took to build the core element itself. I suppose we see this everywhere: a car is just self-propelled chairs; a human is just a gangly, leaky chariot for a suite of genitalia; this software is just 'arbitrary decisions' packed in a pretty box. A very pretty box that I will no doubt look back on in two years and wonder what I was thinking, I hope!~ <3
Anyway I completed it and delivered it and it is my first free-standing piece of software that some other person might actually use for their purposes, and that is a sense of accomplishment I have not felt since the WSDOT departmental library people told me they wanted to include my undergraduate thesis in their stacks.
As an aside, I had considered making a companion tool to go with the drop generator that simplified drop sheet creation. It would not be over-hard to make: all it is liable to be is another Listbox with a text entry field attached, a button or two to add and remove entries, a few other configurables, and a ConfigParser set up to save it all out, but I feel as though the drop sheet format-- sensitive as it is to typographical problems and formatting issues-- is probably easy enough to use. Also there are two people using it and I am in touch with one of them almost every day. Still, food for future thought!
Anyway, back to my game, now! It has been a long time and I am ready to face it again with fresh eyes and fewer .. days.. to live.. I guess! Hm..
See you next time! :y
#development#python#tkinter#distractions#code solutions#random drops#ConfigParser#inform#completed#longpost
3 notes
·
View notes
Text
Manage MySQL Database Service (MDS) with Python
You only have to choose your favorite flavour to setup, administer, configure, backup or attach an analytics cluster to your MDS DB System, as Oracle maintains SDKs in several languages to integrate your software with Oracle Cloud Infrastructure. And in particular today I’d like to test the SDK for Python, you can find an introduction here (but you have also SDKs for Java, Go, Ruby, Javascript, .NET). Read an introduction to SDKs. First of all let’s create a virtual environment (venv) to work in a containerized environment. bash-3.2$ python3 -m venv . bash-3.2$ ll total 8 drwxr-xr-x 14 mortensi staff 448 20 Dic 09:30 bin drwxr-xr-x 2 mortensi staff 64 20 Dic 09:30 include drwxr-xr-x 3 mortensi staff 96 20 Dic 09:30 lib -rw-r--r-- 1 mortensi staff 75 20 Dic 09:30 pyvenv.cfg Use the venv: bash-3.2$ source bin/activate (Software) bash-3.2$ Install Python SDK from Python package Index. (Software) bash-3.2$ pip install oci Collecting oci Downloading oci-2.26.0-py2.py3-none-any.whl (7.2 MB) |████████████████████████████████| 7.2 MB 6.1 MB/s Collecting certifi Downloading certifi-2020.12.5-py2.py3-none-any.whl (147 kB) |████████████████████████████████| 147 kB 5.8 MB/s Collecting cryptography==3.2.1 Downloading cryptography-3.2.1-cp35-abi3-macosx_10_10_x86_64.whl (1.8 MB) |████████████████████████████████| 1.8 MB 5.7 MB/s Collecting configparser==4.0.2 Using cached configparser-4.0.2-py2.py3-none-any.whl (22 kB) Collecting python-dateutil<3.0.0,>=2.5.3 Using cached python_dateutil-2.8.1-py2.py3-none-any.whl (227 kB) Collecting pytz>=2016.10 Using cached pytz-2020.4-py2.py3-none-any.whl (509 kB) Collecting pyOpenSSL<=19.1.0,>=17.5.0 Downloading pyOpenSSL-19.1.0-py2.py3-none-any.whl (53 kB) |████████████████████████████████| 53 kB 2.3 MB/s Collecting six>=1.4.1 Downloading six-1.15.0-py2.py3-none-any.whl (10 kB) Collecting cffi!=1.11.3,>=1.8 Using cached cffi-1.14.4-cp39-cp39-macosx_10_9_x86_64.whl (177 kB) Collecting pycparser Using cached pycparser-2.20-py2.py3-none-any.whl (112 kB) Installing collected packages: certifi, six, pycparser, cffi, cryptography, configparser, python-dateutil, pytz, pyOpenSSL, oci Successfully installed certifi-2020.12.5 cffi-1.14.4 configparser-4.0.2 cryptography-3.2.1 oci-2.26.0 pyOpenSSL-19.1.0 pycparser-2.20 python-dateutil-2.8.1 pytz-2020.4 six-1.15.0 WARNING: You are using pip version 20.2.3; however, version 20.3.3 is available. You should consider upgrading via the '/Users/mortensi/Software/bin/python3 -m pip install --upgrade pip' command. (Software) bash-3.2$ And check that installation is all right. (Software) bash-3.2$ pip list Package Version --------------- --------- certifi 2020.12.5 cffi 1.14.4 configparser 4.0.2 cryptography 3.2.1 oci 2.26.0 pip 20.2.3 pycparser 2.20 pyOpenSSL 19.1.0 python-dateutil 2.8.1 pytz 2020.4 setuptools 49.2.1 six 1.15.0 And get also information about the SDK package. (Software) bash-3.2$ pip show oci Name: oci Version: 2.26.0 Summary: Oracle Cloud Infrastructure Python SDK Home-page: https://oracle-cloud-infrastructure-python-sdk.readthedocs.io/en/latest/index.html Author: Oracle Author-email: [email protected] License: Universal Permissive License 1.0 or Apache License 2.0 Location: /Users/mortensi/Software/lib/python3.9/site-packages Requires: pyOpenSSL, certifi, python-dateutil, pytz, cryptography, configparser Required-by: Now it’s time to make a test. Create a hello-world-like user.py file and edit: import oci config = oci.config.from_file("~/.oci/config", "DEFAULT") identity = oci.identity.IdentityClient(config) user = identity.get_user(config["user"]).data print(user) And test all works nicely (you must have set the right OCI SDK configuration file in “~/.oci/config”, read the how to here). (Software) bash-3.2$ python user.py { "capabilities": { "can_use_api_keys": true, "can_use_auth_tokens": true, "can_use_console_password": false, "can_use_customer_secret_keys": true, "can_use_o_auth2_client_credentials": true, "can_use_smtp_credentials": true }, "compartment_id": "ocid1.tenancy.oc1..[...]", "defined_tags": {}, "description": "[...]", [...] "time_created": "2019-04-14T21:04:04.293000+00:00" } All good so far? Now time to start something interesting to manage our MySQL DB System! Check the API here. Let’s say we urgently need a new DB System in an existing subnet which we can access from an existing bastion host. Here’s what we would do. Create a CreateDbSystemDetails with all the information needed to request OCI to create a MySQL DB System Pass it to create_db_system Find an example here. And here’s a working script with required parameters import oci config = oci.config.from_file("~/.oci/config", "DEFAULT") mysql_client = oci.mysql.DbSystemClient(config) COMPARTMENT_ID="ocid1.compartment..." SHAPE_NAME="VM.Standard.E2.1" SUBNET_ID="ocid1.subnet..." ADMIN_USERNAME="root" ADMIN_PASSWORD="Oracle1*" STORAGE_SIZE=50 AD="EOuL:US-ASHBURN-AD-1" # Send the request to service, some parameters are not required, see API # doc for more info create_db_system_response = mysql_client.create_db_system( create_db_system_details=oci.mysql.models.CreateDbSystemDetails( compartment_id=COMPARTMENT_ID, shape_name= SHAPE_NAME, subnet_id=SUBNET_ID, admin_username=ADMIN_USERNAME, admin_password=ADMIN_PASSWORD, data_storage_size_in_gbs=STORAGE_SIZE, availability_domain=AD)) # Get the data from response print(create_db_system_response.data) Which, once launched will produce: { "analytics_cluster": null, "availability_domain": "EOuL:US-ASHBURN-AD-1", "backup_policy": { "defined_tags": null, "freeform_tags": null, "is_enabled": true, "retention_in_days": 7, "window_start_time": "00:00" }, "channels": [], "compartment_id": "ocid1.compartment.oc1...", "configuration_id": "ocid1.mysqlconfiguration...", "data_storage_size_in_gbs": 50, "defined_tags": { "Oracle-Tags": { "CreatedBy": "oracleidentitycloudservice/...", "CreatedOn": "2020-12-23T18:01:18.203Z" } }, "description": null, "display_name": "mysqldbsystem20201223180120", "endpoints": [], "fault_domain": null, "freeform_tags": {}, "hostname_label": null, "id": "ocid1.mysqldbsystem.oc1.iad....", "ip_address": null, "is_analytics_cluster_attached": false, "lifecycle_details": null, "lifecycle_state": "CREATING", "maintenance": { "window_start_time": "MONDAY 07:35" }, "mysql_version": null, "port": null, "port_x": null, "shape_name": "VM.Standard.E2.1", "source": null, "subnet_id": "ocid1.subnet...", "time_created": "2020-12-23T18:01:20.148000+00:00", "time_updated": "2020-12-23T18:01:20.148000+00:00" } Now you can interrogate OCI about this DB System create_db_system_response object to understand when the instance is ready from lifecycle_state. You can use this other script passing the DB System id returned from the DB System creation response, for instance. import oci config = oci.config.from_file("~/.oci/config", "DEFAULT") mysql_client = oci.mysql.DbSystemClient(config) get_db_system_response = mysql_client.get_db_system("ocid1.mysqldbsystem...") # Get the data from response print(get_db_system_response.data) When the instance is ready (“lifecycle_state”: “ACTIVE”), you are ready to use the instance. This concludes this brief how-to administer your OCI MDS DB Systems straight from your intranet, no VPN needed. Easier, impossible. The post Manage MySQL Database Service (MDS) with Python appeared first on mortensi. https://www.mortensi.com/2020/12/manage-mysql-database-service-mds-with-python/
0 notes
Text
Python Program to check file exits or not
Happy Learning
#cppsecrets #python #free
0 notes
Link
A couple of days ago I posted here showing how I organised my 4k content using Library.Well someone asked if it was possible to automatically add any film from a studio containing Disney into it's own collection.Well here it is:https://ift.tt/2T8CPqf python3 from collections import defaultdict from plexapi.server import PlexServer from configparser import ConfigParser #Read config.ini file config_object = ConfigParser() config_object.read("config.ini") server = config_object["PLEXSERVER"] baseurl = (server["PLEX_URL"]) token = (server["TOKEN"]) films = (server["FILMSLIBRARY"]) plex = PlexServer(baseurl, token) movies_section = plex.library.section('films') added = movies_section.search(sort='titleSort') for movie in added: print('%s (%s)' % (movie.title, movie.studio)) if "Disney" in movie.studio: movie.addCollection('Disney') edit: Cleaned some redundant lines from the code as per some suggestions. via /r/PleX
0 notes
Link
0 notes
Text
python の configparser って全部文字列なんよねぇ。変数宣言のときみたいにある程度いい感じに型を判定してもよさそうなもんだけども。
0 notes
Text
Pro Python System Administration 2nd Edition
Pro Python System Administration 2nd Edition Download Introduction The role of the system administrator has grown dramatically over the years. The number of systems supported by a single engineer has also increased. As such, it is impractical to handcraft each installation, and there is a need to automate as many tasks as possible. The structure of systems varies from organization to organization, therefore system administrators must be able to create their own management tools. Historically, the most popular programming languages for these tasks were UNIX shell and Perl. They served their purposes well, and I doubt they will ever cease to exist. However, the complexity of current systems requires new tools, and the Python programming language is one of them. Python is an object-oriented programming language suitable for developing large-scale applications. Its syntax and structure make it very easy to read—so much so that the language is sometimes referred to as “executable pseudocode.” The Python interpreter allows for interactive execution, so in some situations an administrator can use it instead of a standard UNIX shell. Although Python is primarily an object-oriented language, it is easily adopted for procedural and functional styles of programming. Given all that, Python makes a perfect fit as a new language for implementing system administration applications. There are a large number of Linux system utilities already written in Python, such as the Yum package manager and Anaconda, the Linux installation program. The Structure of this Book This book contains 14 chapters, and each chapter solves a distinctive problem. Some examples span multiple chapters, but even then, each chapter deals with a specific aspect of the particular problem. In addition to the chapters, several other organizational layers characterize this book. First, I grouped the chapters by the problem type. Chapters 1 to 4 deal with network management issues; Chapters 5 to 7 talk about the Apache web server and web application management; Chapters 8 to 11 are dedicated to monitoring and statistical calculations; and Chapters 12 and 13 focus on database management issues. Second, I maintain a common pattern in all chapters. I start with the problem statement and then move on to gather requirements and proceed through the design phase before moving into the implementation section. Third, each chapter focuses on one or more technologies and the Python libraries that provide the language interface for the particular technology. Examples of such technologies could be the SOAP protocol, application plug-in architecture, or cloud computing concepts. More specifically, here’s a breakdown of the chapters: Chapter 1: Reading and Collecting Performance Data Using SNMP Most network-attached devices expose the internal counters via the Simple Network Management Protocol (SNMP). This chapter explains basic SNMP principles and the data structure. We then look at the Python libraries that provide the interface to SNMP–enabled devices. We also investigate the round robin database, which is the de facto standard for storing the statistical data. Finally, we look at the Jinja2 template framework, which allows us to generate simple web pages. Chapter 2: Managing Devices Using the SOAP API Complicated tasks, such as managing the device configuration, cannot be easily done by using SNMP because the protocol is too simplistic. Therefore, advanced devices, such as the Citrix Netscaler load balancers, provide the SOAP API interface to the device management system. In this chapter, we investigate the SOAP API structure and the libraries that enable the SOAP–based communication from the Python programming language. We also look at the basic logging functionality using the built-in libraries. This second edition of the book includes examples of how to use the new REST API to manage the load balancer devices. Chapter 3: Creating a Web Application for IP Address Accountancy In this chapter, we build a web application that maintains the list of the assigned IP addresses and the address ranges. We learn how to create web applications using the Django framework. I show you the way the Django application should be structured, tell how to create and configure the application settings, and explain the URL structure. We also investigate how to deploy the Django application using the Apache web server. Chapter 4: Integrating the IP Address Application with DHCP this chapter expands on the previous chapter, and we implement the DHCP address range support. We also look at some advanced Django programming techniques, such as customizing the response MIME type and serving AJAX calls. This second edition adds new functionality to manage dynamic DHCP leases using OMAPI protocol. Chapter 5: Maintaining a List of Virtual Hosts in an Apache Configuration File this is another Django application that we develop in this book, but this time our focus is on the Django administration interface. While building the Apache configuration management application, you learn how to customize the default Django administration interface with your own views and functions. Chapter 6: Gathering and Presenting Statistical Data from Apache Log Files In this chapter, the goal is to build an application that parses and analyses the Apache web server log files. Instead of taking the straightforward but in exible approach of building a monolithic application, we look at the design principles involved in building plug-in applications. You learn how to use the object and class type discovery functions and how to perform a dynamic module loading. This second edition of the book shows you how to perform data visualization based on the gathered data. Chapter 7: Performing Complex Searches and Reporting on Application Log Files this chapter also deals with the log file parsing, but this time I show you how to parse complex, multi-line log file entries. Chapter 8: A Web Site Availability Check Script for Nagios Nagios is one of the most popular open-source monitoring systems, because its modular structure allows users to implement their own check scripts and thus customize the tool to meet their needs. In this chapter, we create two scripts that check the functionality of a website. We investigate how to use the Beautiful Soup HTML parsing library to extract the information from the HTML web pages. Chapter 9: Management and Monitoring Subsystem this chapter starts a three-chapter series in which we build a complete monitoring system. THe goal of this chapter is not to replace mature monitoring systems such as Nagios or Zenoss but to show the basic principles of the distributed application programming. We look at database design principles such as data normalization. We also investigate how to implement the communication mechanisms between network services using the RPC calls. Chapter 10: Remote Monitoring Agents This is the second chapter in the monitoring series, where we implement the remote monitoring agent components. In this chapter, I also describe how to decouple the application from its configuration using the ConfigParser module. Chapter 11: Statistics Gathering and Reporting this is the last part of the monitoring series, where I show you how to perform basic statistical analysis on the collected performance data. We use scientific libraries: NumPy to perform the calculations and matplotlib to create the graphs. You learn how to find which performance readings fall into the comfort zone and how to calculate the boundaries of that zone. We also do the basic trend detection, which provides a good insight for the capacity planning. Chapter 12: Distributed Message Processing System this is a new chapter for the second edition of the book. In this chapter I show you how to convert the distributed management system to use Celery, a remote task execution framework. Chapter 13: Automatic MySQL Database Performance Tuning In this chapter, I show you how to obtain the MySQL database configuration variables and the internal status indicators. We build an application that makes a suggestion on how to improve the database engine performance based on the obtained data. Chapter 14: Amazon EC2/S3 as a Data Warehouse Solution this chapter shows you how to utilize the Amazon Elastic Compute Cloud (EC2) and o oad the infrequent computation tasks to it. We build an application that automatically creates a database server where you can transfer data for further analysis. You can use this example as a basis to build an on-demand data warehouse solution. Via TimoBook
0 notes
Link
Published on: 01.01.2018 Conclusion Sometimes perfect is the enemy of the good. Why use configuration file I had Python program, that needed to access device via IP address and to do some diagnostic and commands on it. At that time, I was accessing only one device (only one IP address). But could se... http://ift.tt/2EFEYjO
0 notes
Text
Python : Resolve : configparser Scrambling processing
#!/usr/bin/python
# -*- coding: UTF-8 -*-
try:
import configparser as configparser
except Exception:
import ConfigParser as configparser
con = configparser.ConfigParser()
# Setting specifies that utf-8-sig is used for encoding reading instead of utf-8
con.read("parser.conf", encoding="utf-8-sig") # File name
print(con.sections())
0 notes
Text
019 // Technical Notes, No.1: Lots to say about a map editor.
Part I: Introduction and Burncards
This week, I would like to take a moment and talk about my map editor. Sorry it was a bit late but if you like essays, you should not be disappointed!
n.b.: There will be a lot of talking and visitors will be forgiven for skipping the text and just looking at the images.
When I started this project, I decided that I would like to try making maps in the old way, by creating a sequence of graphic tiles and arranging them into grids of numbers that corresponded to specific ones. Naturally, putting the tiles in sequence manually (in raw text) would be tedious, error-prone, extremely time-consuming, and, ultimately, a profoundly frustrating and dissatisfying ordeal, so I elected to create a map editor for this purpose instead. This editor has since become a tool that does considerably more than just place tiles in a grid and convert graphic references into numbers and back again.
My editor, which has been under continuous development since 2013, displaying a very basic map used to test and edit new map features and effects. It operates mainly using the Pygame (interface) and ConfigParser (data handling) modules.
* Again, be forewarned that this is long! But there are pictures to reward you. Kind of.
When I began, I had very little idea of how complex each map was liable to become, and so I began work on the editor with the idea of keeping the software as flexible and extensible as possible. Unfortunately, when I began, I also had exactly no idea of how to create working software in Python, and the result was a kind of mash of functions and reinvented-wheels and features which could have been created in any number of better ways. For instance, as I mentioned in my post No.005, I only recently learned about, and how to use, the Tkinter module, and previously all of my prompts and inputs had been done using modules I made myself. I am very happy with these modules. But creating them took days I probably could have put into artwork or mapbuilding. Again, there is no disappointment, since I learned much about Pygame in the process, and my editor has a very personal, if slightly defective, character to it. Plus, it is easier to add new functions since I understand exactly mostly how it was made!
Probably the most elaborate element of the editor to work out was sorting out how to have it save and load data, but first I will bore you with a little background on the data itself..
The tile "chart" -- the sequence of numbers that describes where each tile goes -- was easy, but as you have seen, there is far more to each map than just the tiles. There are several types of special effect, there are blocking zones, there are interactable objects and sprites, there are moving background objects and objects whose appearance and behaviour changes depending on where you are on the map, and all of these elements have their own parameters and data that needs to be stored, and restored, during the editing process. To make matters more complicated, most of these object types have their own specific modules, and their age and quality changes a lot between the oldest ones (which include effects like blinking pixels and the sunbeam effects discussed in post No.016) and modules implemented as recently as last month (the simple animated sprites in post Nos.009 and 010). Although all of the modules work when I test them, the nomenclature they use-- the format of the data they use to generate and time effects-- is, if you will forgive the term, all over the map. (:y)
The data stored in a bland text file like this..

..becomes the lively (if somewhat strange-looking) foliage you see in here!
I have at many points been tempted to go back and revise the input structures of the oldest and least-comprehensible modules, but have every time decided not to, for two reasons: one is because they work and I find myself busy enough to leave well enough alone, and the other is because changing the data structure of these older modules would require that I go through every existing map that uses any updated module and revise the data it has recorded to reflect the new design. Which is super-de-duper tedious and exposes me to only a kabillion points of failure and only improves the look, rather than function, of the data as it is recorded in a file nobody besides myself is ever liable to see. And! There is a good chance that, later on in my planless, perhaps endless, development cycle, I will decide that the new format also sucks and that I want to change it again. No, no, no.
"Do how do you keep your data organized, then, if everything is such a mess??" I hear you shout. Well, that is a good question for which I have two solutions: one is that I keep pretty okay comments in the modules themselves (some of the older ones, not so much) which allow me to simply open an effect's module and look up how to supply data for each argument, and in what format, and the other, which is a large, single text file that gives a sample for a specific module and lists off what each element in that sample is for. The sample is always functional, so I can copy and paste it into the map's data file and simply revise the values and delete the copied descriptions when everything is in place! (Another problem with revising old data structures is that I would have to update all of my documentation, as well, and although this is by far the least taxing element of the job compared to updating old data and subsequent debugging, it is just another time-consuming thing I would have to dedicate time to doing. And I would really rather work on content than play with argument sequences. <_<;)
Anyway, at the end of the day, all of the effects and sprite data for every map is stored as plain text in a regular text file where I can view it, alter and adjust it, and repair (and create) problems manually; the editor does not handle every element of map design and there are a few things I can only revise by intervening directly in the map file, and that is fine because I would rather not spend those additional hours creating elements in the editor just to modify an effect that I use only rarely. But I still need to load and save those values, and what makes this complicated is the way Python handles data. I use the native ConfigParser module to load text data into the editor, and the data, when it arrives, arrives entirely as text string objects. This is fine for data that I do not need or want to edit using the software editor-- these elements can be preserved as strings in a block of 'options' (the name of a data element saved in a ConfigParser 'section') and 'values' (the data itself), then saved out verbatim when the work is done, because the editor does not need to understand the content, it only needs to remember it. Editable values are much more sophisticated because they have to be converted from strings to whatever their intended format should be, then put into a place where the editor can access and revise it. For tiles, this is easy: all of the tiles are laid out in a 2D array (actually a list of lists) and changing it is as easy as looking up the correct coordinates, then changing the value(s) stored there. Things like sprites and effect zones and moving background images are considerably harder, since, unlike a tile, each object will have more than just a single number to describe it..
Consider the example of a map prop I call a "Burncard." The name comes from an older map element that the idea is derived from, a "Postcard." Postcards are simple moving background (and foreground) objects whose location varies independently of the map, usually varying with the location of the player (actually, the center of the player's view of the map). With Postcards, I can add parallax effects and background objects and collections of graphics like clouds and mountains (as seen in post No.017) without too much fuss. Postcards, though, are still fairly complex objects and require some processing power to maintain as long as they appear on screen (many are not rendered when the player "isn't looking," though, and that was not so easy to pull off), and if the Postcard is not intended to move independently from the map (it has no parallax-adjusted motion), then to use a Postcard would be wasteful. Enter the Burncard: a Postcard which is 'burned' to the map during its initial rendering! Because tiles are all drawn to a single surface on load (the player then views a portion of this surface) rather than redrawn every single frame, I can simply throw these static props in on top of the tiles instead of redrawing them every frame! This way, the software has less to keep track of while the game is running, at the expense of an only trivially prolonged load-phase when the graphics are 'burnt' to the tile layers!
What makes Burncards more complicated is the fact that they have a number of attributes besides the address of their source files and coordinates for where they ought to be drawn on the map: they can have colour gels, they may be scaled or flipped, many are applied to different graphic layers, and they often have to be placed in a specific order when multiple Burncards overlaid atop eachother on the same layer. And all of that data has to be stored and manipulated, then converted to text data and pushed out into a file during save, and restored from that text data when editing resumes or the game parses the file for use. Burncards are pretty complex! To handle all these different parameters, Burncards are edited as "objects," a sort of programmatic Rolodex card created from a template and put into a collection tracked by the editor. When I load, the text data is converted from strings into whatever data type they look most like to Python (I made a tool to help with this using ast.literal_eval and used it to extend SafeConfigParser, for those of you in-the-know) and puts them into their appropriate attribute slots in a Burncard object according to the sequence in which the parameters are listed or using specifically-named elements in the data, and puts all those objects into a dictionary I can flip through and edit as needed. When the work is done, the editor goes through that entire dictionary, object-by-object, and converts the attributes back into text strings according to their content, stacks them up in the correct sequences, and puts all that data into a long, carefully-formatted block of text that ConfigParser can save out to a file. It's really handy! But if a single character is mislaid, I have to rummage through it to see what went wrong...

The lamp post in this screen capture is a Burncard! So is the log, the tree trunk at left, the bramble at the base of the lamp and the sapling just to the right across the trail, and the grass clumps in the fore- and background. Let’s see what the lamp looks like in the editor..
Here it is, ready to be changed! The background scenery is actually a Postcard, which the editor does not handle.
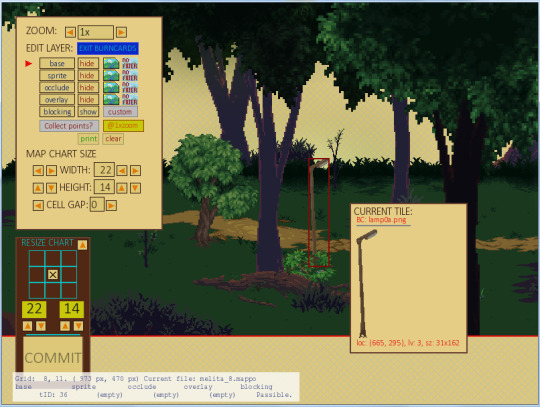
This is what it looks like to have the lamp selected, and if I click the "CURRENT TILE" sample..

..I come to this pane! Making this interface was a pain, let me tell you, and there are a few bits that do not quite function as they ought to, but I learned an awful lot in the attempt, and so far, it does everything I *need* it to..

..At the end of the day, the whole thing is saved out to a simple line of text. Here it is! (This line shows just the lamp. Notice how it appears twice on this map!)
For ever editable object, I have created some kind of small interface and data processing system, and although I would have certainly changed some things if I knew when I started what I know now, I am still content with how it has gone so far. Which is good because the damn this has probably taken longer to make than the game-proper. >:1
All said, this editor has delivered some really great effects and saved a lot of time, even if I have had to invest a lot of energy in it just to get this far, and even if there is still much work that yet awaits me.
It's a good editor, for something that I made myself without knowing at all what I was doing! It may not produce effects as complex as Unreal Editor but I happen to think it's much more elegant. (It also at least attempts to save my work when it crashes!)
Anyhow, this is all far too much text for a weekly post, so I will leave things there for now. Thank you for taking an interest in my editor, and for reading all the way to the end! :D
See you next week!
#longpost#inform#development#pygame#python#configparser#map editor#mappos#props#opark forest#assets#visual effects#game development
2 notes
·
View notes
Link
In this article I show you how to monitor Twitter and post alerts to a Slack channel. We built a nice tool to monitor whenever our domain gets mentioned on Twitter. The slacker and twython modules made this pretty easy. We also use configparser and logging. via Pocket
0 notes
Text
Python で設定ファイルを扱う
Python で設定ファイルを扱うときは ConfigParser モジュールを使えば良いみたい。
まずは設定ファイルから。ファイル名は "config.ini" で保存する。
[yasai] name = komatsuna price = 68
ConfigParser モジュールで使う設定ファイルは INI ファイルライクな構造を持っていて、セクションとエントリ (キーバリュー形式) から成る。 キーバリューはセミコロン (":") かイコール ("=") で分割して書く。
次に設定ファイルを読み出すプロ���ラム。
#!/usr/bin/env python # -*- coding: utf-8 -*- from ConfigParser import SafeConfigParser if __name__ == '__main__': filename = 'config.ini' parser = SafeConfigParser() parser.read(filename) name = parser.get('yasai', 'name') assert isinstance(name, str) print 'name: %s' % (name,) price = parser.getint('yasai', 'price') assert isinstance(price, int) print 'price: %s' % (price,)
パーサーを作って設定ファイルから設定を読み出して、あとは get するだけ。
実行結果は以下の通り。
name: komatsuna price: 68
1 note
·
View note