#ConnectivityManagement
Explore tagged Tumblr posts
Visit Tumblr Blog
Explore Tumblr blogs with no restrictions, modern design and the best experience.
Last Seen Tumblr Blogs


Fun Fact
Post activity is at the highest at 4:00 pm EDT; notes peak at 10:00 pm EDT.
Text
How to Increase Battery Life on Android

Increase Battery Life on Android: Image By Christopher Kidobi
Maximizing Your Android's Battery Life: Tips and Tricks for the Modern User
Your Android phone is a technological marvel, but what use is it if the battery dies halfway through the day? With countless apps, updates, and features available on our devices, it's essential to understand which of these have the most impact on battery life and how we can make smarter choices for longer-lasting power. Let's break it down: 1. Screen Brightness: Light on Battery, Heavy on Power Dimming the screen or enabling adaptive brightness is one of the most direct ways to improve battery longevity. The brighter your screen, the faster your battery depletes. 2. Notifications: Less is More Every time your phone buzzes with an app update, it's using power. Restrict notifications for apps that aren���t crucial. Trust us; not every app deserves to interrupt your day. 3. Battery Saver Mode: Your Low-Power Lifeline Battery Saver mode is Android's built-in feature for those critical battery moments. It minimizes background activities and offers a simpler interface to conserve what's left of your battery. 4. Background Activities: It’s What's Behind That Counts Hidden from view, many apps are hard at work. Dive into your settings and limit unnecessary background processes. A little effort can bring considerable energy savings. 5. Know Your Apps: The Power Players Regularly monitor which apps are the main culprits of battery drain. If an app seems too power-hungry, it's time for a rethink. Could there be a more efficient alternative? 6. Update and Elevate: The Fresh Approach Keeping your apps updated is not only about the latest features. More often than not, these updates include fixes and optimizations that boost battery efficiency. 7. Dark Mode: Easy on the Eyes and Battery For OLED or AMOLED screen users, dark mode isn't just a visual preference; it’s a battery saver. These screens consume less power displaying darker colors. 8. Location, Location, Location While location services enhance app functionality, not all apps need to know where you are. Fine-tune these settings to strike a balance between functionality and battery preservation. 9. Smart Connectivity: Only Connect When Necessary Turning off Wi-Fi, Bluetooth, or mobile data when they're not in use can be a game-changer. And if you're in a low-signal area, airplane mode can prevent battery drain from signal searching. 10. Sync Wisely Limit how often your apps sync data. Few apps require constant updates; for others, occasional syncing will do the trick. 11. Wi-Fi Over Mobile Data: A Power-Friendly Choice Given a choice between Wi-Fi and mobile data, always opt for Wi-Fi. It's generally gentler on your battery. 12. Widgets: Keep It Simple While widgets can offer quick info at a glance, they can also be silent battery drainers. Keep only the essential ones and remove the rest. 13. Sleep Tight: Faster Sleep Settings Trim down the time it takes for your phone to sleep after use. The quicker it rests, the more battery you save. 14. Cache In On Savings Regularly clearing your app cache can not only free up space but also potentially reduce unexpected battery drains. 15. Beware of Rogue Apps Always source your apps from reputable platforms and be on the lookout for any app that seems excessively power-hungry. When in doubt, uninstall. Also Read: How to clear cache on Android Futures of Increase Battery Life on Android - Adaptive AI Integration: Future Android systems will likely use more advanced artificial intelligence to learn user behavior, thereby optimizing battery usage based on individual patterns. - Advanced Dark Modes: As OLED and AMOLED screens become more common, advanced dark modes that further reduce power consumption might be developed. - Context-Aware Battery Management: Systems might adjust battery usage based on the user's context. For instance, saving more power during a user's typical sleep hours. - Better Background Management: Enhanced algorithms to determine which background processes are truly essential, leading to even fewer unnecessary background activities. - Integration with IoT: As homes and devices get smarter, Android devices might optimize battery based on surrounding connected devices. Also Read: How to Remove Bloatware on Android? 5 Simple Steps Benefits of Increase Battery Life on Android - Extended Battery Lifespan: By managing charge cycles more effectively, the overall lifespan of the battery could be improved. - Improved Device Performance: Less unnecessary background activity means more resources for the tasks you're actively engaging in. - Seamless User Experience: With adaptive features, the user won’t need to manually adjust settings as frequently. - Cost Savings: Optimizing battery usage can reduce the frequency of battery replacements or even device replacements. - Environmental Impact: Longer-lasting devices and batteries lead to less electronic waste. Optimizing your Android battery life is a blend of understanding its functions and adopting good habits. Armed with these tips, you're well on your way to making the most of your device throughout the day. Happy optimizing! Frequently Asked Questions (FAQs) Q1: What is Adaptive Brightness and how does it save battery? A1: Adaptive Brightness is a feature that automatically adjusts the screen brightness based on your environment and usage patterns. It can save battery by using only as much backlight as necessary, depending on the ambient light and your preferences. Q2: How often should I update my apps for better battery performance? A2: Regular updates are recommended. Developers constantly release optimizations and bug fixes that can enhance battery efficiency. Ideally, you should check for updates every couple of weeks. Q3: Is Dark Mode beneficial for all screen types? A3: Dark Mode is especially beneficial for OLED and AMOLED screens since these displays consume less power for dark pixels. However, the benefits might be minimal for LCD screens. Q4: How do I know if an app is draining too much battery? A4: Navigate to Settings > Battery. Here, you can see a breakdown of battery usage by app. If an app you don't use often shows high battery consumption, it might be worth investigating. Q5: Will constantly turning Wi-Fi and Bluetooth on and off affect my device? A5: Frequently toggling Wi-Fi and Bluetooth won't harm your device. However, the small battery savings from turning them off might be offset by the power used to turn them back on, especially if done very frequently in short intervals. Q6: What's the difference between clearing app cache and app data? A6: Clearing the app cache removes temporary files which might speed up your device and resolve minor glitches. Clearing app data, on the other hand, removes all files, settings, and accounts associated with the app. The latter is more drastic and will reset the app to its initial state. Q7: Can rogue apps damage my battery permanently? A7: While rogue apps can drain your battery faster, they're unlikely to cause permanent damage. However, consistently running your battery down to 0% or exposing it to extreme temperatures can be harmful in the long run. Q8: How does Battery Saver Mode differ from regular usage? A8: Battery Saver Mode reduces device performance, limits background processes, and may reduce features like vibration or location services to conserve power. It provides an essential, lower-power mode to extend battery life when needed. Q9: How can I ensure my app notifications aren’t draining my battery? A9: Limit notifications to only essential apps. Each notification can wake up your screen and use power. Go to Settings > Apps & notifications > > Notifications to manage these settings for individual apps. Q10: Why should I choose Wi-Fi over mobile data? A10: Wi-Fi is generally more power-efficient than mobile data. Cellular data requires your device to communicate with cell towers, which can be a more power-intensive process, especially if the signal is weak. https://howtoin1minute.com/ Read the full article
#Technology#Android#AppUpdates#BackgroundProcesses#BatteryLifespan#BatteryOptimization#CacheManagement#ConnectivityManagement#DarkMode#howto#LocationServices
0 notes
Text
Optimizing IoT Data Usage: Analytics and Insights from Connectivity Platforms
An IoT Connectivity Management Platform serves as a centralized solution for managing and optimizing the connectivity of Internet of Things (IoT) devices and networks.
It enables organizations to efficiently provision, monitor, and control IoT devices across various wireless networks, ensuring seamless connectivity and operational efficiency. These platforms facilitate the deployment of large-scale IoT solutions by simplifying device onboarding, configuration, and troubleshooting processes. They also provide robust security features, including device authentication and encryption, to protect data transmitted between devices and the cloud. IoT Connectivity Management Platforms leverage advanced analytics to monitor network performance, diagnose connectivity issues in real time, and optimize data usage to minimize costs. Furthermore, they support scalability by allowing organizations to easily scale up or down their IoT deployments based on changing business needs. With the proliferation of IoT devices across industries such as healthcare, manufacturing, and smart cities, these platforms play a crucial role in enabling innovation and driving digital transformation. As IoT continues to evolve, Connectivity Management Platforms are expected to evolve as well, integrating AI-driven insights and predictive capabilities to further enhance connectivity reliability and operational intelligence.
#IoT #ConnectivityManagement #IoTPlatform #InternetOfThings #IoTDevices #IoTNetwork #DigitalTransformation #IoTSecurity #DataAnalytics #IoTDeployment #SmartCities #IndustrialIoT #HealthcareIoT #ManufacturingIoT #AIinIoT #ScalableIoT #IoTSolutions #RealTimeMonitoring #DataSecurity #ConnectivityOptimization
0 notes
Text
android 고급 19강 network tacademy
original source : https://youtu.be/bJb6qJ5FrtU

===========================================================

networkinfo는 conncetiviymanager에서 getActiveNetworkInfo를 통해 얻는다.
===========================================================

===========================================================

===========================================================

requestRouteToHost를 통해 실제 host까지의 network가 연결되어 있는지를 확인할수 있다.
===========================================================

network 변화를 감지하는 receiver를 만들수 있다. 이때 발생하는 이벤트의 이름은 CONNECTIVITY_ACTION이다. 이 이벤트는 manifest의 intent-filter로 설정하면 감지할수 없고 registerReceiver()를 통해 코드로 등록되어야 한다.
===========================================================
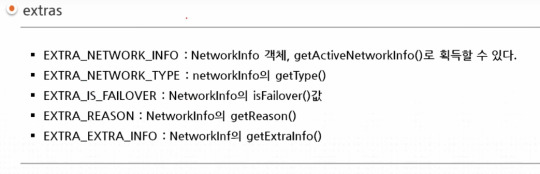
CONNECTIVITY_ACTION 이벤트를 감지한 receiver에서 전달되어 들어오는 intent에서 얻을수 있는 추가 정보를 설명하고 있다.
===========================================================

#19강#19#android#tacademy#고급#network#connectivity manager#connectivity#connectivitymanager#connetiviy_action#connectivity action#requestroutetohost#sticky
0 notes
Text
What is the Use of Middleware in the Cloud?
Configured And Controlled Connections And IntegrationsSecure Data Transport And ConnectivityManage Traffic Across Different SystemsMiddleware For EnterprisesMiddleware For PlatformsOracle WebLogic, IBM WebSphere, and Red Hat JBoss EAP are the most well-known enterprise middleware solutions. Businesses use middleware to deal with this complexity and maintain application development quickly and easily. Middleware can maintain application circumstances that are simple and reliable through a large number of stages. The cloud computing online training can assist you in learning everything there is to know about middleware. Learn how to become a Cloud Professional by finding the best DevOps online training.
Customer expectations are skyrocketing—from cheap shipping prices to fast text notifications to 24/7 customer service access and more—and achieving those needs necessitates meticulous coordination of all systems within a company. But how to keep everything structured and simplified if your CSM software does not interact with your big data platform or the tools you use for digital marketing campaigns? It is when middleware enters the picture. Here's a rundown of what middleware is and how to use it in the cloud. Also, a DevOps complete course can help you learn and implement middleware for your organization.
What is Middleware?
Middleware is software that sits in the middle of an operating system and the programs that execute on it. Middleware allows communication and data management for remote applications by acting as a covert translation layer. It's also known as plumbing since it links two apps so that data and databases may flow freely between them. Users can use middleware to allow the webserver to deliver dynamic web pages depending on a user's profile.
Middleware comes in a variety of shapes and sizes. Message brokers and transaction processing monitors, for example, specialize in one sort of communication. Others provide all of the communication and networking capabilities required to create a specific type of application. Others, such as an enterprise service bus (EBS), serve as a centralized integration hub for linking all of a company's components.
Because the earliest middleware operated as a mediator between an application front-end or client and a back-end resource - such as a database - from which the client may request data, the term "middleware" was coined. However, today's middleware goes well beyond this. For example, portal middleware comprises both the application front-end and tools for back-end communication, whereas database middleware usually includes its data store.
How Does Middleware Work?
Middleware allows developers to design applications without writing a new integration every time they need to connect to application components, data sources, computational resources, or devices. It is accomplished by offering diverse applications and services to interact using common messaging frameworks or web services. Middleware often provides services that allow components written in several languages to communicate with one another. Middleware offers features that enable developers the following in addition to offering this time-saving integration:
Middleware can alter the answer from the back-end application or service based on information in a client or front-end application request. Based on the location or IP address information in the HTTP request header, middleware application logic in a retailer's eCommerce application can arrange product search results from a back-end inventory database by nearest store location.
Middleware often uses Transport Layer Security (TLS) or similar network security protocol to build a secure connection from the front-end to back-end application data sources. It also has authentication capabilities, making requests for credentials or digital certificates from front-end applications more difficult. Enterprise middleware can grow to spread client requests over numerous servers, on-premises, or cloud applications, as demand surges. When numerous clients try to access the same back-end data source simultaneously, concurrent processing capabilities can help prevent difficulties.
Uses of Middleware in Cloud
Middleware is software that connects other programs, tools, and databases to offer users unified services. In the cloud application, there are two types of middleware: Enterprise Middleware and Platform Middleware.
Enterprise middleware allows a company to create an enterprise integration hub. The enterprise service bus (ESB), which functioned as the integration hub inside a service-oriented architecture, was the most widely used enterprise application integration middleware (SOA). An enterprise may now link applications, data, processes, and services across on-premises, private cloud, and public cloud environments using a cloud-hosted architecture known as iPaaS. It can accomplish this without buying, installing, managing, and maintaining integration middleware in its own data center, saving time and money.
Platform middleware can help with application development and delivery by providing a runtime hosting environment for application or business logic, such as a Java runtime environment (Java RE), containers, or both. Platform middleware can comprise corporate application servers, web servers, content management systems, and other forms of middleware.
Conclusion
Oracle WebLogic, IBM WebSphere, and Red Hat JBoss EAP are the most well-known enterprise middleware solutions. Businesses use middleware to deal with this complexity and maintain application development quickly and easily. Middleware can maintain application circumstances that are simple and reliable through a large number of stages. The cloud computing online training can assist you in learning everything there is to know about middleware. Learn how to become a Cloud Professional by finding the best DevOps online training.
0 notes
Text
Android App Entwicklung: ESP Controller ansprechen #1

Auf dem Markt gibt es diverse ESP Controller, der Vorteil eines solchen Microcontrollers ist es, das dieser über analoge & digitale Ein/Ausgänge verfügt und als Schnittstelle WiFi besitzt.

ESP12 In diesem Tutorial möchte ich erläutern wie man für diese Microcontroller eine Android App entwickelt und verschiedene Sensoren / Aktoren ansprechen oder auch auswerten kann. Solltest du im nachfolgenden Tutorial Fehler finden, oder Fragen haben, so kannst du dich gerne per E-Mail oder über das Kontaktformular an mich wenden.
Voraussetzung
Ich setze in diesem Tutorial voraus dass, das Tool Android Studio installiert, konfiguriert und lauffähig ist. Wie man Android Studio installiert habe ich im Tutorial https://draeger-it.blog/android-app-mit-einer-mysql-datenbank-verbinden-16-01-2016/#Entwicklungsumgebung ausführlich erläutert.
leeres Projekt zum Mitmachen
Am Anfang möchte ich gerne ein leeres Projekt zum Download anbieten. Dieses Projekt kann in Android Studio importiert werden und für die nächsten Schritte weiter ausgebaut werden.
Kommunikation zwischen den Geräten
Zuerst möchte ich meine Lösung für die Kommunikation zwischen den Geräten erläutern. Sicherlich gibt es mehrere Lösung für dieses Problem, jedoch habe ich mit dieser Lösung sehr gute Erfahrungen gesammelt. Das Android Gerät sendet einen Request an den ESP in dem dieser eine HTTP Adresse aufruft. An diese Adresse können HTTP GET Parameter angehängt und vom ESP ausgewertet werden. Als Ergebnis sendet der ESP ein Respond mit einem JSON String.

Kommunikation zwischen Android & ESP Der Vorteil an einem JSON ist, das es ein kompaktes Datenformat in einer leicht lesbaren Sprache (in diesem Fall deutsch) ist. Wenn du mehr über das JSON Format erfahren möchtest so empfehle ich dir den Wikipedia Artikel Seite „JavaScript Object Notation“. In: Wikipedia, Die freie Enzyklopädie. Bearbeitungsstand: 11. Januar 2019, 11:21 UTC. URL: https://de.wikipedia.org/w/index.php?title=JavaScript_Object_Notation&oldid=184617074 (Abgerufen: 16. Januar 2019, 14:28 UTC)
Layout
Für dieses Tutorial nutze ich ein einfaches TableLayout mit 4 TableRows. Die erste Zeile enthält ein EditText für die IP Adresse, die zweite Zeile ein EditText für den Text welcher abgesendet werden soll und die dritte Zeile enthält eine Schaltfläche für das ausführen der Aktion zum absenden des Textes. Die letzte Zeile enthält nur eine einfache TextView für das Anzeigen des empfangenen Ergebnisses.

ESPTutorialApp - Layout Das Layout für das Hauptfenster wird in der Datei "activity_main.xml" definiert. Damit wir die Komponenten später verwenden können legen wir uns jeweils ein Feld in der Klasse "MainActivity.java" an. Zusätzlich müssen diesen Feldern dann noch eine "Verbindung" zur Komponente mit "findViewById" in der Funktion "onCreate" hergestellt werden. private EditText ipAdressEditText; private EditText editText; private Button button; private TextView textView; @Override protected void onCreate(Bundle savedInstanceState) { super.onCreate(savedInstanceState); setContentView(R.layout.activity_main); ipAdressEditText = findViewById(R.id.ipAdressEditText); editText = findViewById(R.id.editText); button = findViewById(R.id.button); textView = findViewById(R.id.textView); } Da wir "nur" eine Handvoll komponenten für dieses Beispiel verwenden ersetze ich nicht die IDs durch sprechende Bezeichnungen. Jedoch empfehle ich wie bei dem Eingabefeld "ipAdressEditText" eine sprechende Bezeichnung zu wählen.
Berechtigungen der App setzen
Damit man mit einem Netzwerk kommunizieren kann, muss man der App die Berechtigung zum Zugriff auf das Internet geben. Der nachfolgende Text wird in der Datei "AndroidManifest.xml" eingetragen. Damit wir zusätzlich den Status abfragen können ob das Gerät mit einem Netzwerk verbunden ist, müssen wir die Berechtigung hinzufügen. Wenn die AndroidApp später über den GooglePlay Store ausgeliefert wird, muss der Benutzer diese Berechtigung manuell bestätigen.
Abfrage des Netzwerkstatus
Bevor wir ein Request an einen ESP Controller senden können benötigen wir eine Netzwerkverbindung. Diese baut das Handy/ Tablet in der Regel selber auf so das wir diese aus der App nutzen können. Jedoch kann es passieren das keine Netzwerverbindung besteht. Hier sollten wir den Benutzer mit einem einfachen Dialog darauf hinweisen. Wir holen uns also zuerst den "ConnectivityManager" aus den SystemServices. Der Manager kann null sein also prüfen wir zusätzlich ob dieser null ist bevor wir uns die Informationen über das aktive Netzwerk auslesen. Wenn das Gerät mit keinem Netzwerk verbunden ist so liefert die Methode "connectivityManager.getActiveNetworkInfo()" null zurück d.h. auch hier müssen wir auf null prüfen bevor wir mit der Methode "isConnected" prüfen können. Wenn keine Netzwerkverbindung besteht so wird ein Dialog angezeigt welcher den Titel "Fehlermeldung" trägt und als Text "Es besteht keine Netzwerkverbindung!" hat. Es wird für diesen Dialog nur eine Schaltfläche benötigt und beim betätigen wird der Dialog geschlossen. private boolean isNetworkAvailable() { ConnectivityManager connectivityManager = (ConnectivityManager) getSystemService(Context.CONNECTIVITY_SERVICE); NetworkInfo activeNetworkInfo = null; if (connectivityManager != null) { activeNetworkInfo = connectivityManager.getActiveNetworkInfo(); } boolean available = activeNetworkInfo != null && activeNetworkInfo.isConnected(); if(!available) { AlertDialog.Builder alertDialogBuilder = new AlertDialog.Builder(MainActivity.this); alertDialogBuilder.setTitle(getResources().getString(R.string.dialog_error)); alertDialogBuilder .setMessage(getResources().getString(R.string.msg_no_networkconnection)) .setCancelable(false) .setPositiveButton(getResources().getString(R.string.ok), new DialogInterface.OnClickListener() { public void onClick(DialogInterface dialog, int id) { dialog.cancel(); } }); AlertDialog alertDialog = alertDialogBuilder.create(); alertDialog.show(); } return available; } Wenn kein WLAN aktiviert ist, wird also nun ein Dialog angezeigt. Nun muss der Benutzer die App verlassen und manuell das WLAN aktivieren. Aktivieren der WLAN Verbindung aus der App Hier können wir den Benutzer im Dialog unterstützen und die "negative Schaltfläche" für das aktivieren des WLANs benutzen. Wir holen uns zuerst wieder den "WifiManager" aus den SystemServices und aktivieren dort das Wifi über die Methode "setWifiEnabled". .setNegativeButton(getResources().getString(R.string.activate_wifi), new DialogInterface.OnClickListener() { public void onClick(DialogInterface dialog, int id) { WifiManager wifi = (WifiManager) getSystemService(Context.WIFI_SERVICE); wifi.setWifiEnabled(true); dialog.cancel(); } }) Damit wir diese Funktion nutzen können müssen wir der App noch 2 zusätzliche Berechtigungen in der "AndroidManifest.xml" geben.

"Fehlermeldung keine Netzwerkverbindung" Je nach Android Version und gewählten Theme kann die Farbe und das Layout abweichen.
Absenden eines Request
Nachdem wir nun die Vorbereitungen zum erfolgreichen absenden eines Request erstellt haben möchten wir eine URLConnection zu einem Gerät aufbauen. Vorbereitungen Damit wir den Text aus dem Textfeld mit dem Button absenden können müssen wir zunächst diesem eine Aktion zuweisen. Dazu setzen wir der Funktion "setOnClickListener" das Interface "View.OnClickListener" ein. Zusätzlich prüfen wir in der Methode, ob eine aktive Netzwerkverbindung besteht. button = findViewById(R.id.button); button.setOnClickListener(new View.OnClickListener() { @Override public void onClick(View v) { if (isNetworkAvailable()) { sendRequest(ipAdressEditText.getText().toString(), editText.getText().toString()); } } }); Alternativ könnten wir auch der Klasse "MainActivity" das Interface "View.OnClickListener" implementieren und somit die Funktion "onClick". Das hätte den Vorteil das bei mehr als einen Button nur eine Funktion alles Regelt. Wir rufen in der Funktion dann die weitere neue Funktion sendRequest auf, dieser Funktion übergeben wir den Text aus dem EditText. private void sendRequest(String ipAdresse, String text) {} Aufbauen einer asynchronen Verbindung Die Verbindung zum ESP wird asynchron aufgebaut. Dieses macht man immer dann wenn man Daten an einen Empfänger sendet und nicht auf das Ergebnis warten möchte. Das Ergebnis wird dann abgearbeitet wenn dieses bereit steht. Wenn nach einer bestimmten Zeit keine Antwort kommt wir ein Timeout ausgelöst. Wir benötigen zunächst eine interne Klasse welche die Abstrakte Klasse "AsyncTask" erweitert. class RequestAsyncTask extends AsyncTask {...} Und einen Konstruktor welchem wir die IPAdresse und den Text als Parameter übergeben können. private final String text; private String ipAdresse; public RequestAsyncTask(String ipAdresse, String text) { this.ipAdresse = ipAdresse; this.text = text; } Mit dem einbinden der Abstrakten Klasse müssen wir mindestens die Methode "doBackground" implementieren. protected String doInBackground(Void... voids) {...} In dieser Methode senden wir unseren Text an den ESP. Zuerst möchten wir eine einfache Begrüßung absenden und empfangen. Dazu senden wir einen Text an den ESP Controller. Dazu bauen wir uns zuerst die Adresse zusammen, diese besteht aus dem Protokoll "http" (gefolgt von einem Doppelpunkt und zwei Slashes) der IP Adresse des ESP Controllers, dem Servlet welches angesprochen werden soll, in unserem Fall heißt dieses "greeting" und dem Parameter Möchte man mehrere Parameter anhängen so müssen diese mit einem "&" getrennt werden. Dazu aber später mehr. @Override protected String doInBackground(Void... voids) { try { StringBuffer urlBuffer = new StringBuffer(); urlBuffer.append("http://"); urlBuffer.append(ipAdresse); urlBuffer.append("/greeting"); urlBuffer.append("?text="); urlBuffer.append(text); URL url = new URL(urlBuffer.toString()); URLConnection conn = url.openConnection(); conn.setDoOutput(true); return readResult(conn); } catch (Exception e) { e.printStackTrace(); } return ""; } Da bei der Verbindung eine Exception auftreten kann muss diese abgefangen werden. Hier könnte man diese Fehlermeldung noch an die Oberfläche mit einem Dialog weitergeben. Als erstes erzeugen wir uns ein neues Feld vom Typ "String" um die ggf. auftretende Fehlermeldung zu speichern. private String errorMsg; Dieses Feld befüllen wir dann in dem Catch Block mit der Fehlermeldung: ... } catch (Exception e) { errorMsg = e.getMessage(); e.printStackTrace(); } ... Ich gebe zusätzlich den Stacktrace auf der Console aus. Die Fehlermeldung wird dann ausgewertet wenn das Ergebnis der Asyncronen Verbindung ausgewertet wird. Wenn keine Fehlermeldung aufgetreten ist so wird von der URLConnection das Ergebnis gelesen. private String readResult(URLConnection conn) throws IOException { BufferedReader reader = new BufferedReader(new InputStreamReader(conn.getInputStream())); StringBuilder sb = new StringBuilder(); String line; while ((line = reader.readLine()) != null) { sb.append(line); } return sb.toString(); } Dieses Ergebnis geben wir dann in der Methode "doInBackground" zurück, die Verarbeitung dieses Ergebnisses wird dann in der Methode "onPostExecute" verarbeitet. Wir haben uns im Catch Block beim absenden uns eine ggf. auftretende Fehlermeldung gespeichert, nun prüfen wir also ob dieses Feld befüllt ist. Da das Feld initial mit "null" belegt ist machen wir einen einfachen Null Check und prüfen zusätzlich ob das "result" nicht leer ist. (Wir sollten ja ein JSON vom ESP Controller erhalten.) Wenn das Feld "errorMsg" jedoch befüllt ist so zeigen wir die Fehlermeldung an. @Override protected void onPostExecute(String result) { super.onPostExecute(result); if (errorMsg == null && result.trim().length() > 0) { textView.setText(result); } else if (errorMsg != null) { showErrorMessage(errorMsg); } } Anzeigen der Fehlermeldung in einem Dialog Die neue Methode baut dann die Fehlermeldung auf und zeigt diese an. private void showErrorMessage(String message) { AlertDialog.Builder alertDialogBuilder = new AlertDialog.Builder(MainActivity.this); alertDialogBuilder.setTitle(getResources().getString(R.string.dialog_error)); alertDialogBuilder .setMessage(message) .setCancelable(false) .setPositiveButton(getResources().getString(R.string.ok), new DialogInterface.OnClickListener() { public void onClick(DialogInterface dialog, int id) { dialog.cancel(); } }); AlertDialog alertDialog = alertDialogBuilder.create(); alertDialog.show(); } Sollte also nun zbsp. eine Verbindung nicht aufgebaut werden können, so wird eine Fehlermeldung angezeigt.

Fehlermeldung beim aufbau einer Verbindung zu einem Gerät
Sketch für den ESP Controller
Nachdem wir unsere AndroidApp geschrieben haben wollen wir uns nun dem ESP Controller widmen. Dieser muss den Request annehmen, verarbeiten und eine Antwort (Respond) an das Android Gerät senden. Wir benötigen zunächst einen Microcontroller mit einem WiFi Chip, zumeist ist dieses ein ESP8266 oder ähnliches. Diese Microcontroller gibt es günstig bei ebay.de zu kaufen zbsp. den NodeMCU, WemosD1Mini.

Wemos D1 Mini mit ESP8266 Chip Ich verwende in diesem Tutorial den WittyCloud , dieser Microcontroller verfügt neben den üblichen Ein/Ausgängen noch zusätzlich über einen Fotowiderstand und einem NeoPixel. //Bibliotheken für die Kommunikation mit WiFi Geräten #include #include const char* ssid = ""; //SSID aus dem Router const char* password = ""; //Passwort für den Zugang zum WLAN ESP8266WebServer server(80); //Port auf welchem der Server laufen soll. void setup() { Serial.begin(115200); //Baudrate für die Serielle Geschwindigkeit. delay(10); //10ms. Warten damit die Seriele Kommunikation aufgebaut wurde. Serial.print("Aufbau der Verbindung zu: "); //Ausgabe der SSID auf der Seriellen Schnittstelle. Serial.println(ssid); WiFi.begin(ssid, password); //Initialisieren der Wifi Verbindung. while (WiFi.status() != WL_CONNECTED) { //Warten bis die Verbindung aufgebaut wurde. delay(500); //kleine Pause von 500ms. Serial.print("."); } //Wenn eine Verbindung erfolgreich aufgebaut wurde, //werden die Daten auf dem seriellen Ausgang ausgegeben. Serial.println(""); Serial.print("Mit "); Serial.print(ssid); Serial.println(" erfolgreich verbunden!"); //Wenn der Server angewiesen wird das Servlet mit der Bezeichnung "greeting" bereitzustellen //so wird die Funktion "callGreeting" aufgerufen. server.on("/greeting", callGreeting); server.begin(); // Starten des Servers. Serial.println("Server gestartet"); //Ausgabe auf der Seriellen Schnittstelle das der Server gestartet wurde. // Ausgabe der IP Adresse Serial.print("Adresse : http://"); Serial.print(WiFi.localIP()); Serial.println("/"); } void loop() { //alle Anfragen der Clients verarbeiten. server.handleClient(); //Hier wird keine Pause eingelegt da dieses sonst die Verarbeitung stören würde. } void callGreeting(){ //Eine Variable zum speichern des gelesenen Wertes. String text = "-undefined-"; //Über alle möglichen Parameter iterieren. for (int i = 0; i //Zuweisen der Schlüssel/Wertepaare String parameterName = server.argName(i); String parameterValue = server.arg(i); //Wenn der Parametername gleich "text" ist dann... if(parameterName == "text"){ //zuweisen des Wertes zu unserer Variable text = parameterValue; } } //Absenden eines JSONS mit einer Begrüßung und unseres gelesenen Textes. sendResult("{\"msg\": \"Hello from ESP8266!- "+text+"\"}"); } //Diese Funktion sendet eine Antwort an den Client. void sendResult(String content){ //200 ist die Antwort das alles OK ist, //text/html ist der MimeType //content ist unser Text server.send(200, "text/html", content); }

Ausführen der App - Absenden eines Request an den WittyCloud
Download
Review & Ausblick
Die erste Ausbaustufe ist geschafft und als nächstes folgt nun die Umwandlung des JSONs mit Hilfe von Google Gson. Und da der WittyCloud mit einem Sensor & einen Aktor daherkommt wollen wir diese verwenden und die Daten senden bzw. empfangen. D.h. den Fotowiderstand auslesen und dem NeoPixel einen Farbwert zuzuweisen. Read the full article
0 notes
Link
Http ApiClient Caching in Android
import android.content.Context
import android.util.Log
import com.commonlibs.util.helper.NetworkManager
import com.google.gson.Gson
import com.jakewharton.retrofit2.adapter.rxjava2.RxJava2CallAdapterFactory
import okhttp3.Cache
import okhttp3.CacheControl
import okhttp3.Interceptor
import okhttp3.OkHttpClient
import okhttp3.logging.HttpLoggingInterceptor
import retrofit2.Retrofit
import retrofit2.converter.gson.GsonConverterFactory
import java.io.File
import java.util.concurrent.TimeUnit
/**
* Api Client for retrofit Instance with Base Url
*/
class APIClient {
private var mRetrofit: Retrofit? = null
private val TAG = "RetrofitManager"
private val mHeaderCacheControl = "Cache-Control"
private val mHeaderPragma = "Pragma"
private var mCache: Cache? = null
private var mOkHttpClient: OkHttpClient? = null
/**
* getClient Retorfit instance
* @param mContext use for store caching
* @param mAPI search for base url
*/
fun getClient(mContext: Context, mAPI: Int): Retrofit {
if (mRetrofit == null) {
val interceptor = HttpLoggingInterceptor()
interceptor.level = HttpLoggingInterceptor.Level.BODY
mRetrofit = Retrofit.Builder()
.baseUrl(apiUrl(mAPI))
.addCallAdapterFactory(RxJava2CallAdapterFactory.create())
.addConverterFactory(GsonConverterFactory.create())
.client(getOkHttpClient(mContext))
.build()
}
return mRetrofit!!
}
/**
* Api url use to choose ase url
* @param selectUrl send number and get base url like 0-> 8800
*/
private fun apiUrl(selectUrl: Int): String {
return when (selectUrl) {
0 -> Constants.authURL
1 -> Constants.inventoryURL
2 -> Constants.merchantURL
3 -> Constants.customerURL
4 -> Constants.paymentURL
5 -> Constants.notificationURL
6 -> Constants.auctionURL
7 -> Constants.storeURL
8 -> Constants.shippingURL
else -> Constants.authURL
}
}
/**
* getOkHttpClient
* @param mContext use for store caches
*/
private fun getOkHttpClient(mContext: Context): OkHttpClient {
val cacheSize = 10 * 1024 * 1024 // 10 MB
val httpCacheDirectory = File(mContext.cacheDir, Constants.httpCacheDirectory)
val cache = Cache(httpCacheDirectory, cacheSize.toLong())
val networkCacheInterceptor = Interceptor { chain ->
val response = chain.proceed(chain.request())
val cacheControl = CacheControl.Builder()
.maxAge(2, TimeUnit.HOURS)
.build()
response.newBuilder()
.header(Constants.cacheControl, cacheControl.toString())
.build()
}
val loggingInterceptor = HttpLoggingInterceptor()
loggingInterceptor.level = HttpLoggingInterceptor.Level.BODY
return OkHttpClient.Builder()
.connectTimeout(3, TimeUnit.MINUTES)
.readTimeout(90, TimeUnit.SECONDS)
.writeTimeout(45, TimeUnit.SECONDS)
.addInterceptor(loggingInterceptor)
.cache(cache)
.addNetworkInterceptor(networkCacheInterceptor)
.build()
}
/**
* this client use for User Access APIs
*/
val client: Retrofit
get() {
if (mRetrofit == null) {
val loggingInterceptor = HttpLoggingInterceptor()
loggingInterceptor.level = HttpLoggingInterceptor.Level.BODY
val okHttpClient = OkHttpClient.Builder()
.addInterceptor(loggingInterceptor)
.addInterceptor(BasicAuthInterceptor(Constants.authHeaderUserName, Constants.authHeaderPassword))
.connectTimeout(Constants.http_timeout.toLong(), TimeUnit.SECONDS)
.connectTimeout(3, TimeUnit.MINUTES)
.readTimeout(90, TimeUnit.SECONDS)
.writeTimeout(45, TimeUnit.SECONDS)
.build()
mRetrofit = retrofit2.Retrofit.Builder()
.baseUrl(Constants.authURL)
.client(okHttpClient)
.addCallAdapterFactory(RxJava2CallAdapterFactory.create())
.addConverterFactory(GsonConverterFactory.create())
.build()
}
return mRetrofit!!
}
fun getRetrofitCache(mContext : Context, mAPI: Int): Retrofit {
if (mRetrofit == null) {
val httpClient = OkHttpClient.Builder()
.addInterceptor(provideOfflineCacheInterceptor(mContext))
.addNetworkInterceptor(provideCacheInterceptor(mContext))
.cache(provideCache(mContext))
mOkHttpClient = httpClient.build()
mRetrofit = Retrofit.Builder()
.baseUrl(apiUrl(mAPI))
.addConverterFactory(GsonConverterFactory.create(Gson()))
.client(mOkHttpClient!!)
.build()
}
return mRetrofit!!
}
//Cache store with size
private fun provideCache(mContext : Context): Cache? {
if (mCache == null) {
try {
mCache = Cache(
File(mContext.cacheDir, "http-cache"),
100 * 1024 * 1024) // 10 MB
} catch (e: Exception) {
Log.e(TAG, "Could not create Cache!")
}
}
return mCache
}
//get the cache and remove particular time
private fun provideCacheInterceptor(mContext : Context): Interceptor {
return Interceptor { chain ->
val response = chain.proceed(chain.request())
val cacheControl: CacheControl = if (NetworkManager(mContext).checkInternetConnection()) {
CacheControl.Builder()
.maxAge(0, TimeUnit.SECONDS)
.build()
} else {
CacheControl.Builder()
.maxStale(7, TimeUnit.DAYS)
.build()
}
response.newBuilder()
.removeHeader(mHeaderPragma)
.removeHeader(mHeaderCacheControl)
.header(mHeaderCacheControl, cacheControl.toString())
.build()
}
}
//getting the caches if internet are not available
private fun provideOfflineCacheInterceptor(mContext: Context): Interceptor {
return Interceptor { chain ->
var request = chain.request()
if (!NetworkManager(mContext).checkInternetConnection()) {
val cacheControl = CacheControl.Builder()
.maxStale(7, TimeUnit.DAYS)
.build()
request = request.newBuilder()
.removeHeader(mHeaderPragma)
.removeHeader(mHeaderCacheControl)
.cacheControl(cacheControl)
.build()
}
chain.proceed(request)
}
}
}
//String.xml
<!--Common String-->
<string name="AppTag">TAG</string>
<!--Message-->
<string name="msg_cache">Could not create Cache!</string>
<!--constant-->
<string name="cons_http">http-cache</string>
//Constant.kt
open class Constants {
companion object {
var authURL: String = "your_url"
var inventoryURL: String = "your_url"
var merchantURL: String = "your_url"
var customerURL: String = "your_url"
var paymentURL: String = "your_url"
var notificationURL: String = "your_url"
var auctionURL: String = "your_url"
var storeURL: String = "your_url"
var shippingURL: String = "your_url"
}
}
//NetworkManager.kt
import android.content.Context
import android.net.ConnectivityManager
class NetworkManager constructor(mContext: Context?) {
var mContext: Context? = null
init {
this.mContext = mContext!!
}
/* class for checking Internet connectivity */
fun checkInternetConnection(): Boolean {
if (mContext == null) return false
var con_manager: ConnectivityManager =
mContext!!.getSystemService(Context.CONNECTIVITY_SERVICE) as ConnectivityManager
return con_manager .activeNetworkInfo != null && con_manager.activeNetworkInfo.isConnected
}
}
//how to Applied
private val apiServicesCache = APIClient().getRetrofitCache(mBaseActivity, 1).create(RetrofitInterface::class.java)!!
/**
* Get Product Full Detail
* @param id product id
*/
fun getProductFullDetail(id: String): LiveData<ProductFullDetail> {
Log.d("TAG", "Similar Product id=$id")
val call = apiServicesCache.getProductFullDetails(id)
call.enqueue(object : Callback<ProductFullDetail> {
override fun onResponse(call: Call<ProductFullDetail>, response: Response<ProductFullDetail>) {
if (response.isSuccessful) {
mProductFullDetail.value = response.body()
}else {
mBaseActivity.showApiError(response.code().toString())
}
}
override fun onFailure(call: Call<ProductFullDetail>, t: Throwable) {
mBaseActivity.showApiError(t.message.toString())
}
})
return this.mProductFullDetail
}
//RetrofitInterface.kt
interface RetrofitInterface {
@GET("products/{id}")
fun getProductFullDetails(@Path("id") id: String): Call<ProductFullDetail>
}
0 notes
Text
Android Networking Tutorial: Getting Started
Update Note: This tutorial is now up to date with the latest version of Android Studio version 3.1.2, and uses Kotlin for app development. Update by Fuad Kamal. Original tutorial by Eunice Obugyei.
Networking has played a critical role in Android apps since the very beginning of Android development. Most apps don’t work in isolation; rather, they connect to an online service to retrieve data or perform other networking functions.
In this Android networking tutorial, you will create a simple app which connects to the GitHub API to retrieve and display a list of repositories.
In the process, you will learn about the following:
How to check your network connection status.
How to perform network operations.
How to leverage open source libraries to perform network operations.
How to profile the network performance of your app.
By the end of this tutorial, you will have built the GitHubRepoList app that runs a search query against the GithHub API and displays the results:
Note: This tutorial assumes you’re already familiar with the basics of Android development. If you are completely new to Android development, read through our Beginning Android Development tutorials to familiarize yourself with the basics.
Getting Started
Download the materials for this tutorial and unzip the projects. Open the starter project in Android Studio 3.1.2 or greater by selecting Open an existing Android Studio project from the Welcome to Android Studio window:
You can also use File > Open in Android Studio. Navigate to and select the starter project folder.
Open MainActivity.kt from the ui.activities package and look inside; the app is using a simple RecyclerView named repoList and populating it with a hard-coded list of repository names.
Build and run the project to see what you have to work with:
Required Permissions
To perform network operations in Android, your application must include certain permissions. Open manifests/AndroidManifest.xml, and add the following permissions before the application tag:
<uses-permission android:name="android.permission.ACCESS_NETWORK_STATE"/> <uses-permission android:name="android.permission.INTERNET" />
The ACCESS_NETWORK_STATE permission is required for your application to check the network state of the device, while the INTERNET permission is required for your application to access the Internet.
Before adding any Kotlin code, you’ll need to configure Android Studio to automatically insert import statements to save you from having to add each one manually.
Go to Android Studio > Preferences on macOS or File > Settings on PC, then go to Editor > General > Auto Import, select the Add unambiguous imports on the fly and Optimize imports on the fly (for current project) checkboxes and click OK.
Making a Network Request
MainActivity.kt defines a value url that contains the first network request you will make, but up until now you haven’t used it. The url value is a search using the Github API, for repositories containing the term “mario” written in Kotlin. You want to start with a narrow search so you aren’t overwhelmed with too much data at a first. Add the following code to the end of onCreate():
doAsync { Request(url).run() uiThread { longToast("Request performed") } }
Request is a placeholder class provided in the starter project, inside the data package.
Network requests are not allowed on the app main thread, also called the UI thread. Blocking the main thread would not only make for a bad user experience, but also the Android system would cause your app to throw an exception. doAsync() is part of a Domain Specfic Language or DSL provided by the Kotlin library Anko which provides a simple way to execute code on a thread other than the main thread, with the option to return to the main thread by calling uiThread().
Open Request.kt and replace the TODO comment in the run() function with the following two lines of code:
val repoListJsonStr = URL(url).readText() Log.d(javaClass.simpleName, repoListJsonStr)
That’s it! The readText() command makes the network request. The Log.d() call writes the network response to Logcat.
In one line of Kotlin you’ve managed to do what used to take a lot of complicated Java code. That’s one of the many benefits of Kotlin. It’s very concise and avoids a lot of the boilerplate code you used to have to write in Java.
readText() does have an internal limit of 2 GB file size. This should be fine in most cases, but if you are anticipating a huge response that will exceed that limit, there are many other extensions you can use, such as BufferedReader.forEachLine(), or you can use a third party networking library, as discussed later in this tutorial.
Build and run. The UI hasn’t changed at all in the emulator – it’s still showing the hard-coded list from before.
In Android Studio, click on the Logcat tab at the bottom of the screen, and you should see a bunch of JSON received in response to the network request you made. Tap the Use Soft Wraps button on the left toolbar to better see the JSON response.
Congratulations! You’ve already made your first network request with Android and Kotlin.
Checking the Network Connection
To provide a good user experience, you should be checking whether the user has a network connection before making the request. Add the following method to MainActivity:
private fun isNetworkConnected(): Boolean { val connectivityManager = getSystemService(Context.CONNECTIVITY_SERVICE) as ConnectivityManager //1 val networkInfo = connectivityManager.activeNetworkInfo //2 return networkInfo != null && networkInfo.isConnected //3 }
isNetworkConnected() checks that the device has an active Internet connection as follows:
Retrieves an instance of the ConnectivityManager class from the current application context.
Retrieves an instance of the NetworkInfo class that represents the current network connection. This will be null if no network is available.
Check if there is an available network connection and the device is connected.
Now replace the doAsync{…} code in the onCreate() method with the following:
if (isNetworkConnected()) { doAsync { Request(url).run() uiThread { longToast("Request performed") } } } else { AlertDialog.Builder(this).setTitle("No Internet Connection") .setMessage("Please check your internet connection and try again") .setPositiveButton(android.R.string.ok) { _, _ -> } .setIcon(android.R.drawable.ic_dialog_alert).show() }
This code first checks to see if there is a network connection. If there is one, the app makes the network request, otherwise it displays an alert to the user instead.
Set a breakpoint on the if expression and be sure to debug (not just run) your app by pressing the icon in Android Studio that looks like a little bug with a play button on it.
Android Studio will build and run your app, and then pause execution at the if statement. Now you can “step over” the code by pressing the step over button in the debug pane. If your emulator has a network connection, again the doAsync block should execute and you will see the resulting JSON response in the Logcat tab.
In the emulator, turn off WiFi if it’s on by swiping down from the top and toggling WiFi off. Then press the ... button at the bottom of the list of controls to open up the Extended controls window.
Click on the Cellular tab. To emulate no connection, set Data status to Denied. The Network Type and Signal Strength settings do not matter in this case.
Debug your app again. This time, when you step over your code, it should go into the else clause and an alert should show up on the emulator:
Be sure to set the Data status back to ‘Home’ for the rest of this tutorial. :]
Updating the UI
Now that you’re successfully making a network request when the user’s device has connectivity, you will update the UI so you can see the results on screen.
First, you need to define a data model that makes some sense of the JSON you are getting back from your response.
Right-click on the data package in the project, and from the context menu select New > Kotlin File/Class.
In the dialogue, name it Response and choose File for the type.
The file Response.kt will open. Enter the following code:
data class RepoResult(val items: List<Item>) data class Item( val id: Long?, val name: String?, val full_name: String?, val owner: Owner, val private: Boolean, val html_url: String?, val description: String?) data class Owner(val login: String?, val id: Long?, val avatar_url: String?)
In Kotlin, a data class is a convenient way to express a value object.
Now that you have a RepoResult, which in turn is a list of Item objects from your JSON response, you need to also modify the Adapter for your RecyclerView to accept this more complex object instead of the list of hard coded strings you were sending it before.
Open RepoListAdapter.kt and replace the contents below the package statement with the following:
import android.support.v7.widget.RecyclerView import android.view.LayoutInflater import android.view.View import android.view.ViewGroup import com.raywenderlich.githubrepolist.R import com.raywenderlich.githubrepolist.data.Item import com.raywenderlich.githubrepolist.data.RepoResult import com.raywenderlich.githubrepolist.extensions.ctx import kotlinx.android.synthetic.main.item_repo.view.* //1 class RepoListAdapter(private val repoList: RepoResult) : RecyclerView.Adapter<RepoListAdapter.ViewHolder>() { override fun onCreateViewHolder(parent: ViewGroup, viewType: Int): ViewHolder { val view = LayoutInflater.from(parent.ctx).inflate(R.layout.item_repo, parent, false) //2 return ViewHolder(view) } override fun onBindViewHolder(holder: ViewHolder, position: Int) { holder.bindRepo(repoList.items[position]) //3 } override fun getItemCount(): Int = repoList.items.size //4 class ViewHolder(view: View) : RecyclerView.ViewHolder(view) { fun bindRepo(repo: Item) { //5 with(repo) { itemView.username.text = repo.owner.login.orEmpty() //6 itemView.repoName.text = repo.full_name.orEmpty() //7 itemView.repoDescription.text = repo.description.orEmpty() } } } }
Here’s what’s going on in the updated class:
You are able to reference view components from the XML layout directly from your Kotlin code. This is because you are making use of Kotlin Android Extensions with this import statement.
R.layout.item_repo is the layout defined in item_repo.xml
You reference your position in the list of Items rather than the the position in the hardcoded list.
Likewise your list size is now set by the response rather than the hardcoded list.
You are passing in the Item type you defined earlier in your data class.
You populate the username text defined in item_repo.xml with the Owner.login defined in your data class definitions. An important best practice when dealing with JSON responses from an API is not to assume that every value will always be non-empty. So, if there is no value for the field, you just make it an empty string. This also illustrates some of the safety features of Kotlin; your app won’t be crashing because it tried to access a null value.
Likewise, you populate the name of the repository and the repository description.
Next, open the build.gradle file of the app module and add the following to the list of dependencies:
implementation 'com.google.code.gson:gson:2.8.2'
This will let you use the GSON library in your code.
Click the Make Project button at the top of Android Studio.
Open Request.kt and replace the entire class definition of Request with the following:
class Request() { companion object { //1 private val URL = "https://api.github.com/search/repositories" private val SEARCH = "q=mario+language:kotlin&sort=stars&order=desc" private val COMPLETE_URL = "$URL?$SEARCH" } fun run(): RepoResult { //2 val repoListJsonStr = URL(COMPLETE_URL).readText() //3 return Gson().fromJson(repoListJsonStr, RepoResult::class.java) //4 } }
Here:
You define a companion object to hold the API endpoint (URL), a search term, and then the combined API endpoint + search term. You could populate these from user input fields in the UI later if you want to.
The run() method now returns a data structure RepoResult which you defined in Response.kt.
Again, you execute the actual request using readText().
You use the GSON library to parse the JSON into your data structure.
Open MainActivity and in onCreate() remove setting the repoList.adapter near the top of the method. Then update the code inside the first block of the if expression with the following:
doAsync { val result = Request().run() uiThread { repoList.adapter = RepoListAdapter(result) } }
You have replaced the toast message with a single line of code that updates the Recycler View with the response from your network call.
You can also delete the declaration for the items property, as you are no longer using the hard-coded list.
Build and run. You should now see a list of repositories from GitHub in your UI:
Cool – your app connected to the GitHub API and retrieved a list of repositories for your perusal!
A Longer Search Result
Logcat itself has a limit, so if you had a very big search result earlier, you wouldn’t have been able to see the entire JSON result there.
Now that you are populating the UI with your actual search result, you are no longer concerned with dealing with a huge JSON result. The longer the result, the more you can see and scroll in your UI. So, why not have a look at all the Kotlin repositories on Github!
Open the Request class and replace the search parameter with the following:
private val SEARCH = "q=language:kotlin&sort=stars&order=desc"
Build and run. You should now see a much longer search result:
Go ahead and scroll the screen. Enjoy that silky smooth motion.
Actually, at the time of this writing, there aren’t that many Kotlin repositories. Which is great news for you because it means you are learning a brand-new language that is still somewhat niche and can earn you big bucks.
Open Source To The Rescue
Back in the Java days, performing network operations on Android used to be tedious. But with Kotlin, it’s super simple.
Yet there are still occasions where you might want to use a third party networking library. Next up, you will update your app to use the most popular of these libraries, Retrofit from Square, and as a bonus pretty up the UI with some images.
Retrofit
Retrofit is an Android and Java library which is great at retrieving and uploading structured data such as JSON and XML. Retrofit makes HTTP requests using another library from Square, OkHttp.
OkHttp is an efficient HTTP client which supports synchronous and asynchronous calls. It handles the opening and closing of connections along with InputStream-to-string conversion. It’s compatible with Android 2.3 and above.
Retrofit also lets you specify any of the following libraries for the data conversion:
Gson
Jackson
Moshi
Protobuf
Wire
Simple XML
Scalars (primitives, boxed, and String)
To use Retrofit, add the following dependencies to build.gradle of the app module and resync your Gradle files:
implementation 'com.squareup.retrofit2:retrofit:2.3.0' implementation 'com.squareup.retrofit2:converter-gson:2.3.0'
Also, delete the GSON dependency you added earlier (implementation 'com.google.code.gson:gson:2.8.2'); you’ll no longer need it since the parsing will be handled by the libraries specified with Retrofit.
Finally, for all these dependencies, the version numbers above are what was available at the time this tutorial was written. You should check what the current versions are and use those in your build.gradle file.
Click the Make Project button at the top of Android Studio.
Next, create a new package in your app called api by right-clicking on the root package and picking New > Package.
Right-click on the api package and from the context menu select New > Kotlin File/Class. Give it the name GithubService and for Kind select Interface:
Replace the contents of GithubService.kt below the package statement with the following:
import com.raywenderlich.githubrepolist.data.RepoResult import retrofit2.Call import retrofit2.http.GET interface GithubService { @GET("/repositories") fun retrieveRepositories(): Call<RepoResult> @GET("/search/repositories?q=language:kotlin&sort=stars&order=desc") //sample search fun searchRepositories(): Call<RepoResult> }
You’ve create an interface for use with Retrofit to connect to the GitHub api. You’ve added two methods to the interface with @GET annotations that specify the GitHub endpoints to make GET requests to.
Now make a second file in the api package, but for the Kind select Class, and name it RepositoryRetriever. Replace the empty class with the following:
class RepositoryRetriever { private val service: GithubService companion object { const val BASE_URL = "https://api.github.com/" //1 } init { // 2 val retrofit = Retrofit.Builder() .baseUrl(BASE_URL) //1 .addConverterFactory(GsonConverterFactory.create()) //3 .build() service = retrofit.create(GithubService::class.java) //4 } fun getRepositories(callback: Callback<RepoResult>) { //5 val call = service.searchRepositories() call.enqueue(callback) } }
Be sure to use the Retrofit import for the Callback:
import retrofit2.Callback
RepositoryRetriever does the following:
Specifies the base URL
Creates a Retrofit object
Specifies GsonConverterFactory as the converter which uses Gson for its JSON deserialization.
Generates an implementation of the GithubService interface using the Retrofit object
Has a method to create a Retrofit Call object on which you enqueue() a network call, passing in a Retrofit callback. A successful response body type is set to RepoResult
The Retrofit enqueue() method will perform your network call off the main thread.
Finally, you need to modify MainActivity to use Retrofit for making the network request and handling the response.
First, add the following to properties at the top of MainActivity:
private val repoRetriever = RepositoryRetriever() // 1 // 2 private val callback = object : Callback<RepoResult> { override fun onFailure(call: Call<RepoResult>?, t: Throwable?) { Log.e("MainActivity", "Problem calling Github API", t) } override fun onResponse(call: Call<RepoResult>?, response: Response<RepoResult>?) { response?.isSuccessful.let { val resultList = RepoResult(response?.body()?.items ?: emptyList()) repoList.adapter = RepoListAdapter(resultList) } } }
Your two properties are:
A RepositoryRetriever.
A Retrofit Callback object that has two overrides, onFailure() and onResponse().
In the success callback method, you update the RecyclerView adapter with the items in the response.
Update onCreate() method to delete the doAsync{…} block and replace it with a call to the RepositoryRetriever:
override fun onCreate(savedInstanceState: Bundle?) { super.onCreate(savedInstanceState) setContentView(R.layout.activity_main) repoList.layoutManager = LinearLayoutManager(this) if (isNetworkConnected()) { repoRetriever.getRepositories(callback) } else { AlertDialog.Builder(this).setTitle("No Internet Connection") .setMessage("Please check your internet connection and try again") .setPositiveButton(android.R.string.ok) { _, _ -> } .setIcon(android.R.drawable.ic_dialog_alert).show() } }
If Android Studio has trouble with generating the imports, add the following three imports get added to the class:
import retrofit2.Call import retrofit2.Callback import retrofit2.Response
Build and run to verify everything still works. Your app should look the same. But now you’re using Retrofit to handle networking under the hood.
Network Profiling
OkHttp contains a logging interceptor that you could use to log network requests and responses that you make with Retrofit, which can help wih debugging your network calls. However, Android Studio 3.0 introduced the Android Network Profiler, which replaces the need for the logging interceptor.
Instead of running or debugging your app, click the Android Profiler icon at the top right corner in Android Studio:
Your app will build and run like before, but now the Android Profiler tab will also open:
The profiler displays real time data of your app’s performance. You can toggle the real-time feedback by pressing the “Live” button in the Profiler. What you see here is a shared timeline which includes data for the CPU, memory, and network usage.
To access the detailed profiling tools, such as the Network Profiler, click on the corresponding graph. Click on the Network graph and you will see detailed performance information from when your app made the network request and received the response:
The profiler sometimes has trouble when a network call happens when your app first starts up. Let’s add a refresh button so we can refresh the data and make a second call after the app starts up.
Open the file res/layout/activity_main.xml and update the content as follows:
<?xml version="1.0" encoding="utf-8"?> <LinearLayout xmlns:android="http://schemas.android.com/apk/res/android" android:layout_width="match_parent" android:layout_height="match_parent" android:orientation="vertical"> <android.support.v7.widget.RecyclerView android:id="@+id/repoList" android:layout_width="match_parent" android:layout_height="0dp" android:layout_weight="1" /> <Button android:id="@+id/refreshButton" android:layout_width="match_parent" android:layout_height="wrap_content" android:text="Refresh" /> </LinearLayout>
You’ve converted to a LinearLayout and added a button to refresh the screen.
Back in onCreate(), add the following button on click listener at the end of the method:
refreshButton.setOnClickListener { repoRetriever.getRepositories(callback) }
Now build and run the app using the prfile button. After the app starts up, tap the refresh button, and you’ll get a second network call to the GitHub API.
Click inside the network profiler, and then drag to select the second network call. A panel will open with a Connection View tab for the selected network call. Select the network call in the list, and another panel will open with Overview, Response, Request, and Call Stack tabs:
The various tabs give you the information you need to debug any issues that occur when calling a back-end API.
Adding Images to the Mix
Time to spice things up! Complete your app by bringing in the icons for each repository as well.
You can do this using the Picasso library, also from Square. You need to modify the app build.gradle file to use Picasso by adding the following dependency:
implementation 'com.squareup.picasso:picasso:2.71828'
Now open ReposListAdapter and populate the icon using the following statement at the end of the with block inside the bindRepo() method of the view holder:
Picasso.get().load(repo.owner.avatar_url).into(itemView.icon)
Build and run and your app. It should look similar to this:
Where to Go From Here?
You’ve explored (and survived!) a crash-course on network operations in Android. :] You can download the final project using the button at the top or bottom of the tutorial.
For more details on the open source projects used in this Android networking tutorial, check out the Retrofit and Picasso pages on Square’s GitHub pages.
You can also check out the Android Profiler page on the Android developer site, and techniques for reducing device battery drain by optimizing your app’s network activity: Reducing Network Battery Drain.
For a deeper dive into Android networking and Retrofit, check out our Android Networking video course.
I hope you enjoyed this tutorial; if you have any questions or comments, please join the forum discussion below!
The post Android Networking Tutorial: Getting Started appeared first on Ray Wenderlich.
Android Networking Tutorial: Getting Started published first on https://medium.com/@koresol
0 notes
Text
Ericsson unlocks IoT ecosystem with IoT Accelerator Marketplace
Content : Press releases ; Category : IoT ; HashTags : #developers,#IoT,#ConnectivityManagement
Enabling massive adoption of Massive IoT is a stepping stone to making 5G a reality
IoT Accelerator Marketplace boosts the potential for players in the Cellular IoT ecosystem to deliver value
Easy onboarding of partners and customer applications for service providers advancing to enterprise IoT. Application developers and application partners can easily and efficiently join the ecosystem and scale their business in a cost-efficient way
from Ericsson News Center http://ift.tt/2EX0sfS
0 notes
Text
WiseFy
A wrapper around WifiManager and ConnectivityManager for Android.
from The Android Arsenal http://ift.tt/2uYFcAq
0 notes
Text
セルラー重い通信
ConnectivityManager connectivityManager = (ConnectivityManager) getSystemService(Context.CONNECTIVITY_SERVICE); NetworkInfo info connectivityManager.getActivityNetworkInfo(); if (info == null) { // return; } int netType info.getType(); if(netType == ConnectivityManager.TYPE_WIFI) { // } else if (netTupe == ConnectivityManager.TYPE_MOBILE) { // }
0 notes
Text
Cheap Internet Service near 56590 Minnesota
Then check wether device is connected to internet or not using ConnectivityManager. ...
0 notes
Text
Android wear 개발방법(Network Access and Syncing)
original source : https://developer.android.com/training/wearables/data-layer/network-access.html
Network Access and Syncing
With Android Wear 2.0, a watch can communicate with a network directly.
This direct network access replaces the use (in Wear 1.x) of the Data Layer API for connecting to a network .
Network Access
watch's network traffic generally is proxied through the phone. But when a phone is unavailable, Wi-Fi and cellular networks are used, depending on the hardware. The Wear platform handles transitions between networks.
You can use protocols such as HTTP, TCP, and UDP. However, the android.webkit APIs (including the CookieManager class) are not available. You can use cookies by reading and writing headers on requests and responses.
��고사항
The JobScheduler API for asynchronous jobs, including polling at regular intervals (described below)
Multi-networking APIs if you need to connect to specific network types; see Multiple Network Connections
High-bandwidth Network Access
The Android Wear platform manages network connectivity.
The platform chooses the default, active network by balancing two factors:
The need for long battery life
The need for network bandwidth
Acquiring a High-Bandwidth Network
high-bandwidth network가 항상 사용가능한게 아니므로 high-bandwidth network 가 필요한 경우아래의 과정을 거쳐야 한다.
Check for an active network, and if there is one, check its bandwidth.
If there isn't an active network, or its bandwidth is insufficient, request access to an unmetered Wi-Fi or cellular network.
ConnectivityManager class 를 사용하여 네트워크가 있는지 밴드크기 어떤지 확인가능하다.
int MIN_BANDWIDTH_KBPS = 320; mConnectivityManager = (ConnectivityManager) getSystemService(Context.CONNECTIVITY_SERVICE); Network activeNetwork = mConnectivityManager.getActiveNetwork(); if (activeNetwork != null) { int bandwidth = mConnectivityManager.getNetworkCapabilities(activeNetwork).getLinkDownstreamBandwidthKbps(); if (bandwidth < MIN_BANDWIDTH_KBPS) { // Request a high-bandwidth network } } else { // You already are on a high-bandwidth network, so start your network request }
You can request an unmetered, high-bandwidth network using the ConnectivityManager. When the network is ready (e.g., the device's Wi-Fi radio connects to a saved network), the onAvailable() method of your NetworkCallback instance is called. If a suitable network is not found, the onAvailable() method is not called. Therefore, you should time-out your request manually; see Waiting for Network Availability.
mNetworkCallback = new ConnectivityManager.NetworkCallback() { @Override public void onAvailable(Network network) { if (bindProcessToNetwork(network)) { // socket connections will now use this network } else { // app doesn't have android.permission.INTERNET permission } } }; NetworkRequest request = new NetworkRequest.Builder() .addTransportType(NetworkCapabilities.TRANSPORT_WIFI) .addTransportType(NetworkCapabilities.TRANSPORT_CELLULAR) .addCapability(NetworkCapabilities.NET_CAPABILITY_NOT_METERED) .addCapability(NetworkCapabilities.NET_CAPABILITY_INTERNET) .build(); mConnectivityManager.requestNetwork(request, mNetworkCallback);
Releasing the Network
사용이 끝난 network는 release해야 한다.
mConnectivityManager.bindProcessToNetwork(null); mConnectivityManager.unregisterNetworkCallback(mNetworkCallback);
또 이작업은 activity's onStop() method 안에서도 실행되어야 한다.
Waiting for Network Availability
if a watch cannot connect to a network, the onAvailable() method of your NetworkCallback instance is not called. Therefore, you should time-out the request after a predetermined length of time and release any associated resources.
int MESSAGE_CONNECTIVITY_TIMEOUT = 1; long NETWORK_CONNECTIVITY_TIMEOUT_MS = 10000 mHandler = new Handler() { @Override public void handleMessage(Message msg) { switch (msg.what) { case MESSAGE_CONNECTIVITY_TIMEOUT: // unregister the network break; } } }; mNetworkCallback = new ConnectivityManager.NetworkCallback() { @Override public void onAvailable(Network network) { mHandler.removeMessages(MESSAGE_CONNECTIVITY_TIMEOUT); ... } }; mConnectivityManager.requestNetwork(request, mNetworkCallback); mHandler.sendMessageDelayed( mHandler.obtainMessage(MESSAGE_CONNECTIVITY_TIMEOUT), NETWORK_CONNECTIVITY_TIMEOUT_MS);
Monitoring the Network State
mNetworkCallback = ConnectivityManager.NetworkCallback { @Override public void onCapabilitiesChanged(Network network, NetworkCapabilities networkCapabilities) { int bandwidth = mConnectivityManager.getNetworkCapabilities(network).getLinkDownstreamBandwidthKbps(); if (bandwidth < MIN_BANDWIDTH.KBPS) { // handle insufficient network bandwidth } } @Override public void onLost(Network network) { // handle network loss } }
Launching the Wi-Fi Settings Activity
사용자가 저장한 wi-fi가 없거나 접근 불가능한 경우 사용자를 wi-fi 설정 activity로 이동시킬수 있다.
context.startActivity(new Intent("com.google.android.clockwork.settings.connectivity.wifi.ADD_NETWORK_SETTINGS"));
Cloud Messaging
For sending notifications, apps can directly use Firebase Cloud Messaging (FCM)
By default, notifications are bridged (shared) from a phone app to a watch. If you have a standalone Wear app and a corresponding phone app, duplicate notifications can occur.
Using Background Services
You should schedule jobs with the JobScheduler API, which enables your app to register for Doze-safe code execution.
Jobs should use a JobInfo.Builder object to provide constraints and metadata.
To schedule a task that requires networking, use setRequiredNetworkType(int networkType), specifying NETWORK_TYPE_ANY or NETWORK_TYPE_UNMETERED; note that NETWORK_TYPE_UNMETERED is for large data transfers while NETWORK_TYPE_ANY is for small transfers
To schedule a task while charging, use setRequiresCharging(boolean requiresCharging)
To specify that a device is idle for a task, use setRequiresDeviceIdle(boolean requiresDeviceIdle); this method is useful for lower-priority background work or synchronization, especially when used with setRequiresCharging
Note that some low-bandwidth networks, such as Bluetooth LE, are considered meter
Scheduling with constraints
You can use the builder method setExtras to attach a bundle of app-specific metadata to the job request. When your job executes, this bundle is provided to your job service. Note the MY_JOB_ID value passed to the JobInfo.Builder constructor. This MY_JOB_ID value is an app-provided identifier. Subsequent calls to cancel, and subsequent jobs created with that same value, will update the existing job.
JobInfo jobInfo = new JobInfo.Builder(MY_JOB_ID, new ComponentName(this, MyJobService.class)) .setRequiredNetworkType(JobInfo.NETWORK_TYPE_UNMETERED) .setRequiresCharging(true) .setExtras(extras) .build(); ((JobScheduler) getSystemService(JOB_SCHEDULER_SERVICE)) .schedule(jobInfo);
아래는 위의 작업을 서비스하는 부분설명. JobParameters object is passed into the onStartJobmethod. The JobParameters object enables you to get the job ID value along with any extras bundle provided when scheduling the job.
The onStartJobmethod is called on the main application thread, and therefore any expensive logic should be run from a separate thread .
When work is complete, you would call the jobFinished method to notify JobScheduler that the task is done.
public class MyJobService extends JobService { @Override public boolean onStartJob(JobParameters params) { new JobAsyncTask().execute(params); return true; } private class JobAsyncTask extends AsyncTask
0 notes
Text
Http ApiClient Caching
http://bit.ly/2OP8MzX
Http ApiClient Caching in Android
import android.content.Context
import android.util.Log
import com.commonlibs.util.helper.NetworkManager
import com.google.gson.Gson
import com.jakewharton.retrofit2.adapter.rxjava2.RxJava2CallAdapterFactory
import okhttp3.Cache
import okhttp3.CacheControl
import okhttp3.Interceptor
import okhttp3.OkHttpClient
import okhttp3.logging.HttpLoggingInterceptor
import retrofit2.Retrofit
import retrofit2.converter.gson.GsonConverterFactory
import java.io.File
import java.util.concurrent.TimeUnit
/**
* Api Client for retrofit Instance with Base Url
*/
class APIClient {
private var mRetrofit: Retrofit? = null
private val TAG = "RetrofitManager"
private val mHeaderCacheControl = "Cache-Control"
private val mHeaderPragma = "Pragma"
private var mCache: Cache? = null
private var mOkHttpClient: OkHttpClient? = null
/**
* getClient Retorfit instance
* @param mContext use for store caching
* @param mAPI search for base url
*/
fun getClient(mContext: Context, mAPI: Int): Retrofit {
if (mRetrofit == null) {
val interceptor = HttpLoggingInterceptor()
interceptor.level = HttpLoggingInterceptor.Level.BODY
mRetrofit = Retrofit.Builder()
.baseUrl(apiUrl(mAPI))
.addCallAdapterFactory(RxJava2CallAdapterFactory.create())
.addConverterFactory(GsonConverterFactory.create())
.client(getOkHttpClient(mContext))
.build()
}
return mRetrofit!!
}
/**
* Api url use to choose ase url
* @param selectUrl send number and get base url like 0-> 8800
*/
private fun apiUrl(selectUrl: Int): String {
return when (selectUrl) {
0 -> Constants.authURL
1 -> Constants.inventoryURL
2 -> Constants.merchantURL
3 -> Constants.customerURL
4 -> Constants.paymentURL
5 -> Constants.notificationURL
6 -> Constants.auctionURL
7 -> Constants.storeURL
8 -> Constants.shippingURL
else -> Constants.authURL
}
}
/**
* getOkHttpClient
* @param mContext use for store caches
*/
private fun getOkHttpClient(mContext: Context): OkHttpClient {
val cacheSize = 10 * 1024 * 1024 // 10 MB
val httpCacheDirectory = File(mContext.cacheDir, Constants.httpCacheDirectory)
val cache = Cache(httpCacheDirectory, cacheSize.toLong())
val networkCacheInterceptor = Interceptor { chain ->
val response = chain.proceed(chain.request())
val cacheControl = CacheControl.Builder()
.maxAge(2, TimeUnit.HOURS)
.build()
response.newBuilder()
.header(Constants.cacheControl, cacheControl.toString())
.build()
}
val loggingInterceptor = HttpLoggingInterceptor()
loggingInterceptor.level = HttpLoggingInterceptor.Level.BODY
return OkHttpClient.Builder()
.connectTimeout(3, TimeUnit.MINUTES)
.readTimeout(90, TimeUnit.SECONDS)
.writeTimeout(45, TimeUnit.SECONDS)
.addInterceptor(loggingInterceptor)
.cache(cache)
.addNetworkInterceptor(networkCacheInterceptor)
.build()
}
/**
* this client use for User Access APIs
*/
val client: Retrofit
get() {
if (mRetrofit == null) {
val loggingInterceptor = HttpLoggingInterceptor()
loggingInterceptor.level = HttpLoggingInterceptor.Level.BODY
val okHttpClient = OkHttpClient.Builder()
.addInterceptor(loggingInterceptor)
.addInterceptor(BasicAuthInterceptor(Constants.authHeaderUserName, Constants.authHeaderPassword))
.connectTimeout(Constants.http_timeout.toLong(), TimeUnit.SECONDS)
.connectTimeout(3, TimeUnit.MINUTES)
.readTimeout(90, TimeUnit.SECONDS)
.writeTimeout(45, TimeUnit.SECONDS)
.build()
mRetrofit = retrofit2.Retrofit.Builder()
.baseUrl(Constants.authURL)
.client(okHttpClient)
.addCallAdapterFactory(RxJava2CallAdapterFactory.create())
.addConverterFactory(GsonConverterFactory.create())
.build()
}
return mRetrofit!!
}
fun getRetrofitCache(mContext : Context, mAPI: Int): Retrofit {
if (mRetrofit == null) {
val httpClient = OkHttpClient.Builder()
.addInterceptor(provideOfflineCacheInterceptor(mContext))
.addNetworkInterceptor(provideCacheInterceptor(mContext))
.cache(provideCache(mContext))
mOkHttpClient = httpClient.build()
mRetrofit = Retrofit.Builder()
.baseUrl(apiUrl(mAPI))
.addConverterFactory(GsonConverterFactory.create(Gson()))
.client(mOkHttpClient!!)
.build()
}
return mRetrofit!!
}
//Cache store with size
private fun provideCache(mContext : Context): Cache? {
if (mCache == null) {
try {
mCache = Cache(
File(mContext.cacheDir, "http-cache"),
100 * 1024 * 1024) // 10 MB
} catch (e: Exception) {
Log.e(TAG, "Could not create Cache!")
}
}
return mCache
}
//get the cache and remove particular time
private fun provideCacheInterceptor(mContext : Context): Interceptor {
return Interceptor { chain ->
val response = chain.proceed(chain.request())
val cacheControl: CacheControl = if (NetworkManager(mContext).checkInternetConnection()) {
CacheControl.Builder()
.maxAge(0, TimeUnit.SECONDS)
.build()
} else {
CacheControl.Builder()
.maxStale(7, TimeUnit.DAYS)
.build()
}
response.newBuilder()
.removeHeader(mHeaderPragma)
.removeHeader(mHeaderCacheControl)
.header(mHeaderCacheControl, cacheControl.toString())
.build()
}
}
//getting the caches if internet are not available
private fun provideOfflineCacheInterceptor(mContext: Context): Interceptor {
return Interceptor { chain ->
var request = chain.request()
if (!NetworkManager(mContext).checkInternetConnection()) {
val cacheControl = CacheControl.Builder()
.maxStale(7, TimeUnit.DAYS)
.build()
request = request.newBuilder()
.removeHeader(mHeaderPragma)
.removeHeader(mHeaderCacheControl)
.cacheControl(cacheControl)
.build()
}
chain.proceed(request)
}
}
}
//String.xml
<!--Common String-->
<string name="AppTag">TAG</string>
<!--Message-->
<string name="msg_cache">Could not create Cache!</string>
<!--constant-->
<string name="cons_http">http-cache</string>
//Constant.kt
open class Constants {
companion object {
var authURL: String = "your_url"
var inventoryURL: String = "your_url"
var merchantURL: String = "your_url"
var customerURL: String = "your_url"
var paymentURL: String = "your_url"
var notificationURL: String = "your_url"
var auctionURL: String = "your_url"
var storeURL: String = "your_url"
var shippingURL: String = "your_url"
}
}
//NetworkManager.kt
import android.content.Context
import android.net.ConnectivityManager
class NetworkManager constructor(mContext: Context?) {
var mContext: Context? = null
init {
this.mContext = mContext!!
}
/* class for checking Internet connectivity */
fun checkInternetConnection(): Boolean {
if (mContext == null) return false
var con_manager: ConnectivityManager =
mContext!!.getSystemService(Context.CONNECTIVITY_SERVICE) as ConnectivityManager
return con_manager .activeNetworkInfo != null && con_manager.activeNetworkInfo.isConnected
}
}
//how to Applied
private val apiServicesCache = APIClient().getRetrofitCache(mBaseActivity, 1).create(RetrofitInterface::class.java)!!
/**
* Get Product Full Detail
* @param id product id
*/
fun getProductFullDetail(id: String): LiveData<ProductFullDetail> {
Log.d("TAG", "Similar Product id=$id")
val call = apiServicesCache.getProductFullDetails(id)
call.enqueue(object : Callback<ProductFullDetail> {
override fun onResponse(call: Call<ProductFullDetail>, response: Response<ProductFullDetail>) {
if (response.isSuccessful) {
mProductFullDetail.value = response.body()
}else {
mBaseActivity.showApiError(response.code().toString())
}
}
override fun onFailure(call: Call<ProductFullDetail>, t: Throwable) {
mBaseActivity.showApiError(t.message.toString())
}
})
return this.mProductFullDetail
}
//RetrofitInterface.kt
interface RetrofitInterface {
@GET("products/{id}")
fun getProductFullDetails(@Path("id") id: String): Call<ProductFullDetail>
}
via Blogger http://bit.ly/2uJuhZQ
0 notes
Text
Android Networking Tutorial: Getting Started
Update Note: This tutorial is now up to date with the latest version of Android Studio version 3.1.2, and uses Kotlin for app development. Update by Fuad Kamal. Original tutorial by Eunice Obugyei.
Networking has played a critical role in Android apps since the very beginning of Android development. Most apps don’t work in isolation; rather, they connect to an online service to retrieve data or perform other networking functions.
In this Android networking tutorial, you will create a simple app which connects to the GitHub API to retrieve and display a list of repositories.
In the process, you will learn about the following:
How to check your network connection status.
How to perform network operations.
How to leverage open source libraries to perform network operations.
How to profile the network performance of your app.
By the end of this tutorial, you will have built the GitHubRepoList app that runs a search query against the GithHub API and displays the results:
Note: This tutorial assumes you’re already familiar with the basics of Android development. If you are completely new to Android development, read through our Beginning Android Development tutorials to familiarize yourself with the basics.
Getting Started
Download the materials for this tutorial and unzip the projects. Open the starter project in Android Studio 3.1.2 or greater by selecting Open an existing Android Studio project from the Welcome to Android Studio window:
You can also use File > Open in Android Studio. Navigate to and select the starter project folder.
Open MainActivity.kt from the ui.activities package and look inside; the app is using a simple RecyclerView named repoList and populating it with a hard-coded list of repository names.
Build and run the project to see what you have to work with:
Required Permissions
To perform network operations in Android, your application must include certain permissions. Open manifests/AndroidManifest.xml, and add the following permissions before the application tag:
<uses-permission android:name="android.permission.ACCESS_NETWORK_STATE"/> <uses-permission android:name="android.permission.INTERNET" />
The ACCESS_NETWORK_STATE permission is required for your application to check the network state of the device, while the INTERNET permission is required for your application to access the Internet.
Before adding any Kotlin code, you’ll need to configure Android Studio to automatically insert import statements to save you from having to add each one manually.
Go to Android Studio > Preferences on macOS or File > Settings on PC, then go to Editor > General > Auto Import, select the Add unambiguous imports on the fly and Optimize imports on the fly (for current project) checkboxes and click OK.
Making a Network Request
MainActivity.kt defines a value url that contains the first network request you will make, but up until now you haven’t used it. The url value is a search using the Github API, for repositories containing the term “mario” written in Kotlin. You want to start with a narrow search so you aren’t overwhelmed with too much data at a first. Add the following code to the end of onCreate():
doAsync { Request(url).run() uiThread { longToast("Request performed") } }
Request is a placeholder class provided in the starter project, inside the data package.
Network requests are not allowed on the app main thread, also called the UI thread. Blocking the main thread would not only make for a bad user experience, but also the Android system would cause your app to throw an exception. doAsync() is part of a Domain Specfic Language or DSL provided by the Kotlin library Anko which provides a simple way to execute code on a thread other than the main thread, with the option to return to the main thread by calling uiThread().
Open Request.kt and replace the TODO comment in the run() function with the following two lines of code:
val repoListJsonStr = URL(url).readText() Log.d(javaClass.simpleName, repoListJsonStr)
That’s it! The readText() command makes the network request. The Log.d() call writes the network response to Logcat.
In one line of Kotlin you’ve managed to do what used to take a lot of complicated Java code. That’s one of the many benefits of Kotlin. It’s very concise and avoids a lot of the boilerplate code you used to have to write in Java.
readText() does have an internal limit of 2 GB file size. This should be fine in most cases, but if you are anticipating a huge response that will exceed that limit, there are many other extensions you can use, such as BufferedReader.forEachLine(), or you can use a third party networking library, as discussed later in this tutorial.
Build and run. The UI hasn’t changed at all in the emulator – it’s still showing the hard-coded list from before.
In Android Studio, click on the Logcat tab at the bottom of the screen, and you should see a bunch of JSON received in response to the network request you made. Tap the Use Soft Wraps button on the left toolbar to better see the JSON response.
Congratulations! You’ve already made your first network request with Android and Kotlin.
Checking the Network Connection
To provide a good user experience, you should be checking whether the user has a network connection before making the request. Add the following method to MainActivity:
private fun isNetworkConnected(): Boolean { val connectivityManager = getSystemService(Context.CONNECTIVITY_SERVICE) as ConnectivityManager //1 val networkInfo = connectivityManager.activeNetworkInfo //2 return networkInfo != null && networkInfo.isConnected //3 }
isNetworkConnected() checks that the device has an active Internet connection as follows:
Retrieves an instance of the ConnectivityManager class from the current application context.
Retrieves an instance of the NetworkInfo class that represents the current network connection. This will be null if no network is available.
Check if there is an available network connection and the device is connected.
Now replace the doAsync{…} code in the onCreate() method with the following:
if (isNetworkConnected()) { doAsync { Request(url).run() uiThread { longToast("Request performed") } } } else { AlertDialog.Builder(this).setTitle("No Internet Connection") .setMessage("Please check your internet connection and try again") .setPositiveButton(android.R.string.ok) { _, _ -> } .setIcon(android.R.drawable.ic_dialog_alert).show() }
This code first checks to see if there is a network connection. If there is one, the app makes the network request, otherwise it displays an alert to the user instead.
Set a breakpoint on the if expression and be sure to debug (not just run) your app by pressing the icon in Android Studio that looks like a little bug with a play button on it.
Android Studio will build and run your app, and then pause execution at the if statement. Now you can “step over” the code by pressing the step over button in the debug pane. If your emulator has a network connection, again the doAsync block should execute and you will see the resulting JSON response in the Logcat tab.
In the emulator, turn off WiFi if it’s on by swiping down from the top and toggling WiFi off. Then press the ... button at the bottom of the list of controls to open up the Extended controls window.
Click on the Cellular tab. To emulate no connection, set Data status to Denied. The Network Type and Signal Strength settings do not matter in this case.
Debug your app again. This time, when you step over your code, it should go into the else clause and an alert should show up on the emulator:
Be sure to set the Data status back to ‘Home’ for the rest of this tutorial. :]
Updating the UI
Now that you’re successfully making a network request when the user’s device has connectivity, you will update the UI so you can see the results on screen.
First, you need to define a data model that makes some sense of the JSON you are getting back from your response.
Right-click on the data package in the project, and from the context menu select New > Kotlin File/Class.
In the dialogue, name it Response and choose File for the type.
The file Response.kt will open. Enter the following code:
data class RepoResult(val items: List<Item>) data class Item( val id: Long?, val name: String?, val full_name: String?, val owner: Owner, val private: Boolean, val html_url: String?, val description: String?) data class Owner(val login: String?, val id: Long?, val avatar_url: String?)
In Kotlin, a data class is a convenient way to express a value object.
Now that you have a RepoResult, which in turn is a list of Item objects from your JSON response, you need to also modify the Adapter for your RecyclerView to accept this more complex object instead of the list of hard coded strings you were sending it before.
Open RepoListAdapter.kt and replace the contents below the package statement with the following:
import android.support.v7.widget.RecyclerView import android.view.LayoutInflater import android.view.View import android.view.ViewGroup import com.raywenderlich.githubrepolist.R import com.raywenderlich.githubrepolist.data.Item import com.raywenderlich.githubrepolist.data.RepoResult import com.raywenderlich.githubrepolist.extensions.ctx import kotlinx.android.synthetic.main.item_repo.view.* //1 class RepoListAdapter(private val repoList: RepoResult) : RecyclerView.Adapter<RepoListAdapter.ViewHolder>() { override fun onCreateViewHolder(parent: ViewGroup, viewType: Int): ViewHolder { val view = LayoutInflater.from(parent.ctx).inflate(R.layout.item_repo, parent, false) //2 return ViewHolder(view) } override fun onBindViewHolder(holder: ViewHolder, position: Int) { holder.bindRepo(repoList.items[position]) //3 } override fun getItemCount(): Int = repoList.items.size //4 class ViewHolder(view: View) : RecyclerView.ViewHolder(view) { fun bindRepo(repo: Item) { //5 with(repo) { itemView.username.text = repo.owner.login.orEmpty() //6 itemView.repoName.text = repo.full_name.orEmpty() //7 itemView.repoDescription.text = repo.description.orEmpty() } } } }
Here’s what’s going on in the updated class:
You are able to reference view components from the XML layout directly from your Kotlin code. This is because you are making use of Kotlin Android Extensions with this import statement.
R.layout.item_repo is the layout defined in item_repo.xml
You reference your position in the list of Items rather than the the position in the hardcoded list.
Likewise your list size is now set by the response rather than the hardcoded list.
You are passing in the Item type you defined earlier in your data class.
You populate the username text defined in item_repo.xml with the Owner.login defined in your data class definitions. An important best practice when dealing with JSON responses from an API is not to assume that every value will always be non-empty. So, if there is no value for the field, you just make it an empty string. This also illustrates some of the safety features of Kotlin; your app won’t be crashing because it tried to access a null value.
Likewise, you populate the name of the repository and the repository description.
Next, open the build.gradle file of the app module and add the following to the list of dependencies:
implementation 'com.google.code.gson:gson:2.8.2'
This will let you use the GSON library in your code.
Click the Make Project button at the top of Android Studio.
Open Request.kt and replace the entire class definition of Request with the following:
class Request() { companion object { //1 private val URL = "https://api.github.com/search/repositories" private val SEARCH = "q=mario+language:kotlin&sort=stars&order=desc" private val COMPLETE_URL = "$URL?$SEARCH" } fun run(): RepoResult { //2 val repoListJsonStr = URL(COMPLETE_URL).readText() //3 return Gson().fromJson(repoListJsonStr, RepoResult::class.java) //4 } }
Here:
You define a companion object to hold the API endpoint (URL), a search term, and then the combined API endpoint + search term. You could populate these from user input fields in the UI later if you want to.
The run() method now returns a data structure RepoResult which you defined in Response.kt.
Again, you execute the actual request using readText().
You use the GSON library to parse the JSON into your data structure.
Open MainActivity and in onCreate() remove setting the repoList.adapter near the top of the method. Then update the code inside the first block of the if expression with the following:
doAsync { val result = Request().run() uiThread { repoList.adapter = RepoListAdapter(result) } }
You have replaced the toast message with a single line of code that updates the Recycler View with the response from your network call.
You can also delete the declaration for the items property, as you are no longer using the hard-coded list.
Build and run. You should now see a list of repositories from GitHub in your UI:
Cool – your app connected to the GitHub API and retrieved a list of repositories for your perusal!
A Longer Search Result
Logcat itself has a limit, so if you had a very big search result earlier, you wouldn’t have been able to see the entire JSON result there.
Now that you are populating the UI with your actual search result, you are no longer concerned with dealing with a huge JSON result. The longer the result, the more you can see and scroll in your UI. So, why not have a look at all the Kotlin repositories on Github!
Open the Request class and replace the search parameter with the following:
private val SEARCH = "q=language:kotlin&sort=stars&order=desc"
Build and run. You should now see a much longer search result:
Go ahead and scroll the screen. Enjoy that silky smooth motion.
Actually, at the time of this writing, there aren’t that many Kotlin repositories. Which is great news for you because it means you are learning a brand-new language that is still somewhat niche and can earn you big bucks.
Open Source To The Rescue
Back in the Java days, performing network operations on Android used to be tedious. But with Kotlin, it’s super simple.
Yet there are still occasions where you might want to use a third party networking library. Next up, you will update your app to use the most popular of these libraries, Retrofit from Square, and as a bonus pretty up the UI with some images.
Retrofit
Retrofit is an Android and Java library which is great at retrieving and uploading structured data such as JSON and XML. Retrofit makes HTTP requests using another library from Square, OkHttp.
OkHttp is an efficient HTTP client which supports synchronous and asynchronous calls. It handles the opening and closing of connections along with InputStream-to-string conversion. It’s compatible with Android 2.3 and above.
Retrofit also lets you specify any of the following libraries for the data conversion:
Gson
Jackson
Moshi
Protobuf
Wire
Simple XML
Scalars (primitives, boxed, and String)
To use Retrofit, add the following dependencies to build.gradle of the app module and resync your Gradle files:
implementation 'com.squareup.retrofit2:retrofit:2.3.0' implementation 'com.squareup.retrofit2:converter-gson:2.3.0'
Also, delete the GSON dependency you added earlier (implementation 'com.google.code.gson:gson:2.8.2'); you’ll no longer need it since the parsing will be handled by the libraries specified with Retrofit.
Finally, for all these dependencies, the version numbers above are what was available at the time this tutorial was written. You should check what the current versions are and use those in your build.gradle file.
Click the Make Project button at the top of Android Studio.
Next, create a new package in your app called api by right-clicking on the root package and picking New > Package.
Right-click on the api package and from the context menu select New > Kotlin File/Class. Give it the name GithubService and for Kind select Interface:
Replace the contents of GithubService.kt below the package statement with the following:
import com.raywenderlich.githubrepolist.data.RepoResult import retrofit2.Call import retrofit2.http.GET interface GithubService { @GET("/repositories") fun retrieveRepositories(): Call<RepoResult> @GET("/search/repositories?q=language:kotlin&sort=stars&order=desc") //sample search fun searchRepositories(): Call<RepoResult> }
You’ve create an interface for use with Retrofit to connect to the GitHub api. You’ve added two methods to the interface with @GET annotations that specify the GitHub endpoints to make GET requests to.
Now make a second file in the api package, but for the Kind select Class, and name it RepositoryRetriever. Replace the empty class with the following:
class RepositoryRetriever { private val service: GithubService companion object { const val BASE_URL = "https://api.github.com/" //1 } init { // 2 val retrofit = Retrofit.Builder() .baseUrl(BASE_URL) //1 .addConverterFactory(GsonConverterFactory.create()) //3 .build() service = retrofit.create(GithubService::class.java) //4 } fun getRepositories(callback: Callback<RepoResult>) { //5 val call = service.searchRepositories() call.enqueue(callback) } }
Be sure to use the Retrofit import for the Callback:
import retrofit2.Callback
RepositoryRetriever does the following:
Specifies the base URL
Creates a Retrofit object
Specifies GsonConverterFactory as the converter which uses Gson for its JSON deserialization.
Generates an implementation of the GithubService interface using the Retrofit object
Has a method to create a Retrofit Call object on which you enqueue() a network call, passing in a Retrofit callback. A successful response body type is set to RepoResult
The Retrofit enqueue() method will perform your network call off the main thread.
Finally, you need to modify MainActivity to use Retrofit for making the network request and handling the response.
First, add the following to properties at the top of MainActivity:
private val repoRetriever = RepositoryRetriever() // 1 // 2 private val callback = object : Callback<RepoResult> { override fun onFailure(call: Call<RepoResult>?, t: Throwable?) { Log.e("MainActivity", "Problem calling Github API", t) } override fun onResponse(call: Call<RepoResult>?, response: Response<RepoResult>?) { response?.isSuccessful.let { val resultList = RepoResult(response?.body()?.items ?: emptyList()) repoList.adapter = RepoListAdapter(resultList) } } }
Your two properties are:
A RepositoryRetriever.
A Retrofit Callback object that has two overrides, onFailure() and onResponse().
In the success callback method, you update the RecyclerView adapter with the items in the response.
Update onCreate() method to delete the doAsync{…} block and replace it with a call to the RepositoryRetriever:
override fun onCreate(savedInstanceState: Bundle?) { super.onCreate(savedInstanceState) setContentView(R.layout.activity_main) repoList.layoutManager = LinearLayoutManager(this) if (isNetworkConnected()) { repoRetriever.getRepositories(callback) } else { AlertDialog.Builder(this).setTitle("No Internet Connection") .setMessage("Please check your internet connection and try again") .setPositiveButton(android.R.string.ok) { _, _ -> } .setIcon(android.R.drawable.ic_dialog_alert).show() } }
If Android Studio has trouble with generating the imports, add the following three imports get added to the class:
import retrofit2.Call import retrofit2.Callback import retrofit2.Response
Build and run to verify everything still works. Your app should look the same. But now you’re using Retrofit to handle networking under the hood.
Network Profiling
OkHttp contains a logging interceptor that you could use to log network requests and responses that you make with Retrofit, which can help wih debugging your network calls. However, Android Studio 3.0 introduced the Android Network Profiler, which replaces the need for the logging interceptor.
Instead of running or debugging your app, click the Android Profiler icon at the top right corner in Android Studio:
Your app will build and run like before, but now the Android Profiler tab will also open:
The profiler displays real time data of your app’s performance. You can toggle the real-time feedback by pressing the “Live” button in the Profiler. What you see here is a shared timeline which includes data for the CPU, memory, and network usage.
To access the detailed profiling tools, such as the Network Profiler, click on the corresponding graph. Click on the Network graph and you will see detailed performance information from when your app made the network request and received the response:
The profiler sometimes has trouble when a network call happens when your app first starts up. Let’s add a refresh button so we can refresh the data and make a second call after the app starts up.
Open the file res/layout/activity_main.xml and update the content as follows:
<?xml version="1.0" encoding="utf-8"?> <LinearLayout xmlns:android="http://schemas.android.com/apk/res/android" android:layout_width="match_parent" android:layout_height="match_parent" android:orientation="vertical"> <android.support.v7.widget.RecyclerView android:id="@+id/repoList" android:layout_width="match_parent" android:layout_height="0dp" android:layout_weight="1" /> <Button android:id="@+id/refreshButton" android:layout_width="match_parent" android:layout_height="wrap_content" android:text="Refresh" /> </LinearLayout>
You’ve converted to a LinearLayout and added a button to refresh the screen.
Back in onCreate(), add the following button on click listener at the end of the method:
refreshButton.setOnClickListener { repoRetriever.getRepositories(callback) }
Now build and run the app using the prfile button. After the app starts up, tap the refresh button, and you’ll get a second network call to the GitHub API.
Click inside the network profiler, and then drag to select the second network call. A panel will open with a Connection View tab for the selected network call. Select the network call in the list, and another panel will open with Overview, Response, Request, and Call Stack tabs:
The various tabs give you the information you need to debug any issues that occur when calling a back-end API.
Adding Images to the Mix
Time to spice things up! Complete your app by bringing in the icons for each repository as well.
You can do this using the Picasso library, also from Square. You need to modify the app build.gradle file to use Picasso by adding the following dependency:
implementation 'com.squareup.picasso:picasso:2.71828'
Now open ReposListAdapter and populate the icon using the following statement at the end of the with block inside the bindRepo() method of the view holder:
Picasso.get().load(repo.owner.avatar_url).into(itemView.icon)
Build and run and your app. It should look similar to this:
Where to Go From Here?
You’ve explored (and survived!) a crash-course on network operations in Android. :] You can download the final project using the button at the top or bottom of the tutorial.
For more details on the open source projects used in this Android networking tutorial, check out the Retrofit and Picasso pages on Square’s GitHub pages.
You can also check out the Android Profiler page on the Android developer site, and techniques for reducing device battery drain by optimizing your app’s network activity: Reducing Network Battery Drain.
For a deeper dive into Android networking and Retrofit, check out our Android Networking video course.
I hope you enjoyed this tutorial; if you have any questions or comments, please join the forum discussion below!
The post Android Networking Tutorial: Getting Started appeared first on Ray Wenderlich.
Android Networking Tutorial: Getting Started published first on https://medium.com/@koresol
0 notes
Text
Ericsson unlocks IoT ecosystem with IoT Accelerator Marketplace
Content : Press releases ; Category : IoT ; HashTags : #developers,#IoT,#ConnectivityManagement
Enabling massive adoption of Massive IoT is a stepping stone to making 5G a reality
IoT Accelerator Marketplace boosts the potential for players in the Cellular IoT ecosystem to deliver value
Easy onboarding of partners and customer applications for service providers advancing to enterprise IoT. Application developers and application partners can easily and efficiently join the ecosystem and scale their business in a cost-efficient way
from Ericsson News Center http://ift.tt/2GIGO3y
0 notes
Text
Ericsson unlocks IoT ecosystem with IoT Accelerator Marketplace
Content : Press releases ; Category : IoT ; HashTags : #developers,#IoT,#ConnectivityManagement
Enabling massive adoption of Massive IoT is a stepping stone to making 5G a reality
IoT Accelerator Marketplace boosts the potential for players in the Cellular IoT ecosystem to deliver value
Easy onboarding of partners and customer applications for service providers advancing to enterprise IoT. Application developers and application partners can easily and efficiently join the ecosystem and scale their business in a cost-efficient way
from Ericsson News Center http://ift.tt/2HF2i2P
0 notes