#Controlling Big Devices from Arduino
Explore tagged Tumblr posts
Visit Tumblr Blog
Explore Tumblr blogs with no restrictions, modern design and the best experience.
Last Seen Tumblr Blogs


Fun Fact
Premium Tumblr themes are available from anywhere between $9 to $49.
Text
Understanding Mechatronics: A Beginner’s Guide for Freshers
If you’ve just stepped into the world of engineering or are considering which specialization to pursue, you might have come across the term Mechatronics. It sounds futuristic—and honestly, it is. But what exactly is it? Is it mechanical? Is it electronics? Or is it something else altogether?
Let’s break it down and make it simple for you.
What Is Mechatronics?
Mechatronics is an interdisciplinary field that blends mechanical engineering, electronics, computer science, and control engineering. It’s all about designing and creating smarter machines—systems that not only move or perform tasks but also think and respond intelligently.
Think of things like self-driving cars, robotic arms in factories, automated coffee machines, or even drones that maintain stability mid-air. All of these rely on the principles of mechatronics.
This discipline is becoming essential in today’s automation-driven world, especially with the rise of Industry 4.0, where machines communicate with each other to optimize performance without human input.
Why Should You Care as a Fresher?
In the early stages of your engineering journey, it's important to understand where the future is headed. Mechatronics is one of those areas that’s not just growing—it’s exploding.
As a fresher, you might still be figuring out what excites you most. But if you're someone who enjoys blending creativity with technology—imagine coding a program and then watching it control a real robot—this field will likely click with you.
Also, if you eventually want to work in automation, AI-driven systems, or robotics, mechatronics offers you the foundation and flexibility to go in multiple directions.
What Will You Learn in Mechatronics?
Typically, if you pursue mechatronics as a core subject or even as an elective, you’ll dive into areas like:
Sensors and Actuators: Devices that help machines sense their environment and act accordingly.
Microcontrollers and Embedded Systems: The brains of most modern electronic machines.
Mechanical Design: Basics of gears, motors, and structures that move.
Control Systems: How to ensure a robot does what it’s supposed to—no more, no less.
Programming: Often in C/C++ or Python to control the devices.
You may also get your hands on software like MATLAB, Simulink, or Arduino IDE early on.
How to Get Started in College
You don't have to wait till the third year to explore mechatronics. In fact, some colleges start offering related workshops and certifications right from the first year. If you're studying in a place where the labs are well-equipped and faculty are research-active, you'll probably get the chance to work on actual robots or automation systems before you graduate.
During a visit to a lab at NMIET Bhubaneswar, I noticed students working on automated vehicle prototypes that used sensors for obstacle detection. It struck me how mechatronics isn’t just a theoretical subject in such institutions—it’s hands-on and real.
Career Scope: Where Can Mechatronics Take You?
Mechatronics engineers are highly valued in sectors like:
Robotics and Automation
Aerospace
Automobile Manufacturing
Medical Equipment Development
Home Automation and Smart Devices
With increasing reliance on smart systems and AI-driven hardware, companies are actively seeking engineers who can work across domains. This is where mechatronics gives you a massive edge.
Even core mechanical or electrical engineers are now advised to pick up basic knowledge of microcontrollers or coding. So, if you're already in a college that encourages learning beyond your core, you're in the right place.
What Makes a Good College for Mechatronics Learning?
Let’s be honest—your learning environment plays a big role. Access to automation labs, exposure to industry tools, faculty who encourage innovation, and the chance to work on real-world projects—these are the things that matter most.
Some of the top engineering colleges in Odisha are already introducing mechatronics modules in mechanical and electronics streams. The goal is to create engineers who can build, code, and innovate.
It’s always a good idea to look into whether the institute collaborates with industries for internships and whether they have tie-ups for campus placements with companies involved in automation or robotics.
Final Thoughts: A Future-Proof Path
Mechatronics is not just another subject—it’s a mindset. It teaches you to look at machines not just as static components, but as intelligent systems that interact with the world.
As a fresher, you don’t need to master it all at once. Start with basic projects—maybe build a line-follower robot or an automatic light system. Join clubs, take up online certifications, and most importantly, stay curious.
If you’re in an environment where creativity and cross-disciplinary learning are encouraged—like the one I saw at NMIET—you’re already ahead of the curve.
So, if you’re dreaming of working on robots, smart devices, or even futuristic innovations we haven’t seen yet—mechatronics might just be the path you’ve been looking for.
#bhubaneswar b tech colleges#college of engineering bhubaneswar#best engineering colleges in orissa#best engineering colleges in bhubaneswar#best private engineering colleges in odisha#best engineering colleges in odisha
0 notes
Text

Top 10 Skills You’ll Learn in an Embedded System Development Course in India
Today, with advanced technology in every field, the world has taken a big step toward creating new industries and innovations. It is one of the most challenging and exciting fields, and it's worth investing in by enrolling in an embedded system development course in India. The knowledge and skills gained are useful for outstanding performance in various domains such as IoT, robotics, and automotive technology. Here, we look at the top 10 skills you would learn in an embedded system development course, including a fascinating project initiative, TechnosCOE.
1. Familiarity with Microcontrollers and Microprocessors
Microcontrollers and microprocessors are the foundation base for embedded systems. Courses include architecture, functioning, and programming, with hands-on experience in popular controllers such as Arduino, PIC, and ARM, which form the backbone of most embedded applications.
2. Programming Languages
One of the main emphases of an embedded system development course in India is acquiring skills in programming languages such as C and C++. These skills are essential to writing firmware and developing applications for embedded systems. It also makes some courses introduce Python for scripting and debugging purposes to improve a student's versatility.
3. Real-Time Operating Systems (RTOS)
The creation of efficient and reliable systems is based on the understanding of how RTOS works. These courses cover the principles of multitasking, scheduling, and inter-process communication. By mastering RTOS concepts, students can develop systems for industries such as telecommunications and healthcare.
4. Circuit Design and PCB Development
These contain custom circuitry designs and a printed circuit board (PCB). The knowledge gained from developing circuitry robust and efficient within Eagle and Altium Designer gives immense value toward the prototyping and product development phase.
5. Sensor integration and data acquisition
Modern embedded systems interact with the physical world through sensors. Courses teach students how to integrate sensors, process their data, and use it in meaningful ways. Applications include temperature monitoring, motion detection, and environmental sensing, among others.
6. IoT (Internet of Things) Development
IoT has changed the face of industries, and at the center of this change is the concept of embedded systems. Students are taught to design devices that are internet-enabled, which can talk to other devices, and perform analytics in real-time data. The same skill can be applied to smart home automation and industrial applications.
7. Embedded Linux
Training on Embedded Linux is generally a part of an embedded system development course in India. It is a highly versatile and widely used open-source software in the world of embedded systems. A student learns how to develop applications, configure the kernel, and build custom distributions for different types of devices.
8. Debugging and Testing Techniques
Debugging is a key tool in embedded system development. Students become experts in using tools like JTAG debuggers and oscilloscopes to identify and debug those issues. Techniques on testing address all the requirements for the performance and safety of the system.
9. Communication Protocols
Understanding communication protocols is very important to the embedded engineers. The curriculum covers some popular protocols such as I2C, SPI, UART, CAN, and Ethernet, which are usually used in applications such as car systems and automation in industrial places.
10. Project Management and Documentation
Beyond technical skills, students also learn project management techniques and documentation practices. These soft skills ensure that they can efficiently collaborate with teams, manage timelines, and maintain accurate records of their work.
Role of TechnosCOE in Embedded Learning
Most embedded system courses include real-world projects that allow students to apply their skills practically. TechnosCOE is one such project, an initiative designed to bridge the gap between theoretical knowledge and practical application. TechnosCOE offers students opportunities to work on cutting-edge projects involving IoT, robotics, and smart devices.
This initiative focuses on teamwork, innovation, and problem-solving, ensuring learners are industry-ready. Through the TechnosCOE, students are exposed to real-world challenges and learn how to apply embedded system principles to develop effective solutions.
Why Choose an Embedded System Development Course in India?
India is turning out to be a fast-growing hub for embedded technology. Industries like automotive, healthcare, and consumer electronics will have a vast number of opportunities. Embedded system development courses offered in India will ensure expert faculty members, state-of-the-art labs, and industrial collaborations. They also offer internship and placement support, which proves to be perfect for career growth.
Conclusion
The course on embedded system development course in India not only gives the students technical expertise but also prepares them for dynamic and rewarding careers. Mastering microcontrollers to developing IoT solutions, these skills are invaluable in today's technology-driven world. Initiatives like TechnosCOE further enhance the learning experience, making these courses a worthwhile investment for aspiring engineers.
0 notes
Text
Exploring the World of Electronics: A Comprehensive Guide

Exploring the World of Electronics: A Comprehensive Guide
The field of electronics is one of the most exciting and dynamic domains that has revolutionized the way people live, work, and communicate. Electrons have become the backbone of modern technology, from advanced smartphones to laptops and the latest robots and renewable energy systems.Well, with this in mind, any person who wants to venture into any electronics undertaking has to know the rudimental principles of the said project, acquire all required pieces of equipment, and find the appropriate platform on which the whole thing can be bought or sold. In this write-up, we will therefore guide you on how one can get the best results regarding his electronics project by exploring and using Classimonk as well as Chennai Free Classified Ads.
Why electronic Projects Matter
The project is not just for a professional or a student in an engineering degree but rather for a curious mind interested in innovation. It enables a fundamental understanding of the principles behind physics and electrical engineering, enhances problem-solving skills, and cultivates creativity. Whether you are creating a simple LED circuit or working on some complex IoT device, it is a priceless experience.
Sourcing Components for Your Electronics Project
The success of any electronics project highly depends on the quality and availability of its components. Long lists of essentials include resistors, capacitors, microcontrollers, sensors, and wires, and so on. It's a big task to find a reliable source for all of these, but not hard at all with the help of Chennai Free Classified Ads.
Chennai Free Classified Ads is a lively marketplace offering everything from electronic component sales to tool sales to entirely assembled products. This has enabled you to view comparative pricing and spec data along with user reviews so you can buy without needing any stress. This website is handy for students and hobbyists trying to get equipment without an added layer of hassle for expensive things.
Classimonk: A Platform for Electronics Enthusiasts
Classimonk is another good resource for electronics enthusiasts. This platform gives a friendly interface to buy, sell, and even exchange electronics-related items. Be it finding a rare microcontroller or selling excess components from the previous project, Classimonk simplifies the process. Its categorized listings and advanced search features help you find what you need quickly.
Classimonk is also community-driven, as it allows users to share tips, tutorials, and project ideas. This makes it more than just a marketplace; it is a hub for learning and collaboration. For example, if you are working on a project that involves Arduino programming, you may find helpful tutorials and discussions on Classimonk's forums.
Project Ideas to Kickstart Your Journey
If you’re unsure where to begin, here are a few electronics project ideas:
Smart Home Automation System: Use microcontrollers and sensors to create a system that controls lights, fans, and appliances remotely.
Portable Charger: Build a power bank using lithium-ion batteries and a charging circuit.
Weather Station: Use sensors like DHT11 and BMP180 to measure temperature, humidity, and atmospheric pressure.
Line-following robot: Design a robot that follows a predetermined path using infrared sensors.
Renewable Energy Model Device Powered by Solar Energy Design.
Benefits of Using Online Platforms
In both Chennai Free Classified Ads and Classimonk, several benefits come to electronics enthusiasts:
Inexpensive Solutions: Purchased second-hand or surplus components at economical prices.
An extensive variety: Access broad-based products from multiple sellers
Support from a community: Obtain advice and inspiration from the community of like-minded folks
Easy: Browse through and buy from home.
Conclusion
Electronics project work is one such rewarding journey that brings a blend of creativity, technical skills, and innovation in one. Chennai Free Classified Ads and Classimonk facilitate the journey by making these affordable components available to their customers, offering them worthwhile resources, and creating an interactive community that is essential for any kind of endeavor. Whether you are an expert or a curious amateur, these platforms can actually bring your ideas to reality.
So, get deep into the world of electronics, explore the limitless opportunities, and make your name in this dynamic field with the right tools, resources, and community support; tomorrow's breakthrough project could just be waiting for you.
0 notes
Text
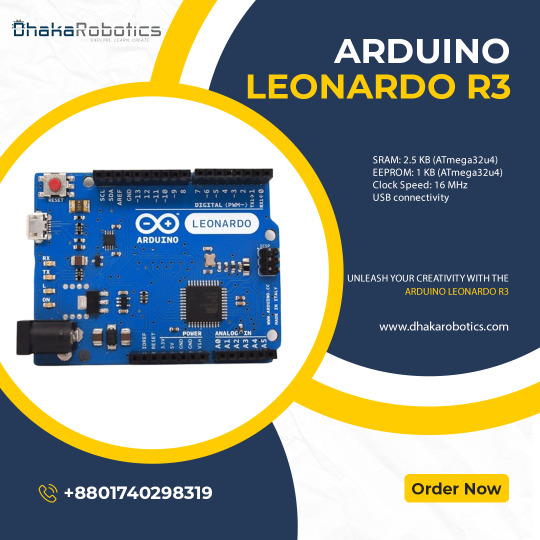
Introducing the Arduino Leonardo R3 – Your Gateway to Innovation!
Looking for a microcontroller that can do more? The Arduino Leonardo R3 is here to elevate your projects with its unique features and versatility.
Key Features:
Built-in USB Connection: Seamlessly turn your Leonardo R3 into a keyboard, mouse, or any other USB device. Perfect for creative coding and interactive projects.
More I/O Pins: With 20 digital I/O pins and 12 analog inputs, the possibilities for your inventions are endless.
Easy to Program: Whether you’re a beginner or a pro, the Leonardo R3 is user-friendly and compatible with the Arduino IDE.
Endless Possibilities: From custom game controllers to home automation, the Arduino Leonardo R3 is the perfect choice for your next big idea. Dive into the world of interactive electronics and let your imagination run wild.
Get Yours Today: Start creating with the Arduino Leonardo R3 and join a global community of innovators!
Click here to purchase the product: https://dhakarobotics.com/product/1012-arduino-leonardo-r3/
Contact Us: +8801740298319
visit our website: https://dhakarobotics.com/
0 notes
Text
Teensy Board: Small Size, Big Possibilities
Are you prepared to venture into the captivating realm of electronics and programming? If you’re a tech aficionado or an aspiring creator, chances are you’ve encountered the term “Teensy board.” Far from being just another gadget, Teensy board are pint-sized powerhouses that unlock a myriad of possibilities for imaginative minds. In this blog post, we’ll take a closer look at Teensy boards and explore why they’re rapidly becoming the preferred choice for DIY enthusiasts and professionals alike.
The Marvelous Teensy Board
A compact, credit card-sized circuit board that not only fits in the palm of your hand but also delivers a substantial punch in terms of functionality and versatility. Developed by the ingenious mind of Paul Stoffregen at PJRC, Teensy boards are a series of potent microcontroller development boards, each tailored to specific needs and preferences.
Small but Mighty
One of the standout features of Teensy boards is their diminutive size. However, don’t be deceived by their dimensions — Teensy boards may be small, but they pack a considerable punch. Their compact form factor renders them ideal for projects where space is a premium. Whether you’re crafting a wearable device, a personalized keyboard, or an interactive art installation, the Teensy board seamlessly integrates into your design without sacrificing functionality.
Plug-and-Play Simplicity
Teensy boards are crafted with user-friendliness in mind. If you’re taking your first steps into the world of microcontrollers and programming, fret not — Teensy has you covered. Thanks to the Teensyduino software add-on, seamlessly incorporating Teensy into your Arduino projects becomes a walk in the park. The familiar Arduino environment, coupled with the might of Teensy, unveils a universe of possibilities for creators of all skill levels.
Versatility Redefined
What sets Teensy apart is its incredible versatility. These boards aren’t confined to a single use — they adapt to a vast array of applications. From MIDI controllers and audio projects to USB keyboards and game controllers, Teensy boards are the jack-of-all-trades in the electronics world. Built-in support for capacitive touch sensing, multiple communication protocols, and extensive libraries make Teensy an enticing choice for those eager to experiment with diverse projects.
Speed, Power, and Beyond
Beneath the surface, Teensy boards boast remarkable capabilities. Sporting a robust ARM Cortex-M7 processor, Teensy boards effortlessly handle complex tasks. High clock speeds and ample memory facilitate the swift execution of code, rendering Teensy apt for real-time applications where responsiveness is paramount.
Embark on the Teensy Revolution
As the community of makers continues to flourish, Teensy boards have emerged as a staple for those seeking both power and flexibility. Whether you’re a student, hobbyist, or professional engineer, Teensy boards serve as a gateway to explore your creativity and breathe life into your ideas.
if you’re eager to embark on an electronic odyssey, the Teensy board stands as your reliable companion. Its compact size, plug-and-play simplicity, versatility, and robust capabilities make it an indispensable tool for anyone yearning to push the boundaries of DIY electronics. So, seize the moment — immerse yourself in the Teensy revolution and start turning your boldest electronic dreams into tangible realities!
0 notes
Text
Thrift store find, and a project:

Got this Alesis QX25 MIDI controller in as-is condition for $12. The most obvious problems when I got it were that the fader cap and one rotary encoder knob were missing, and one of the black keys was broken. In addition, there were solfege stickers on the keys, implying the previous owner was pretty young; that impression was backed up when I opened it to find maybe half a container of assorted glitter inside.
The fader cap I haven't come up with yet, and I've put a temporary knob on the encoder — the one at the far right — and I was able to partially disassemble the keybed and glue the key back together. (I'm using Gorilla Glue's superglue formulation, which is supposed to be better than usual cyanoacrylates at bonding plastics; if this doesn't hold, I know where to order replacements.) From a quick once over, the current status is that some of the tact switches are broken somehow — the ones, at least, for octave up and transpose down don't work. I've only given those the most cursory inspection, so I don't know if it's the switches themselves or something in the wiring; I'll have to see if my big box of tact switches has anything I can swap in for them.
But the "project" part is the part that has me enthused. Unlike a lot of more recent MIDI controllers, this one has both a USB jack for connecting to a computer and a 5-pin DIN jack for traditional MIDI instruments. It's also got a lot of spare room inside the case. So I'm looking at taking an Arduino or a Teensy and some little digital-to-analog converters and adding the ability to output CV and gate signals for modular synthesizers. Basically the Arduino will listen to the MIDI signal and interpret that; the minimal feature set is a single note off channel 1, just the CV and gate corresponding to the most recently struck key, but may expand to multiple notes and/or handling the drum pads as their own gate/trigger outs, and probably an extra CV out that can follow the mod wheel or pitch bend.
I'm debating which DACs to use. I have some lying around — the spoils of a time when Linear, Analog Devices, and Maxim were separate companies, and they, Microchip, and Texas Instruments would give out free samples if you had a plausible-sounding company name — but a lot of them aren't particularly well-suited for this. I want to run everything off the existing 5V supply — either a wall wart or USB — and not need elaborate external analog circuits to do things. I'm looking at the MCP4811, a single-channel 10-bit device, which has the advantage of an internal voltage reference at 2.048V, and a ×2 output, for a full range of 0V-4.096V that's very reliable even when run off a unreliable 5V power supply, like the keyboard's USB power input.
(In an ideal world, I'd have a perfect 1v reference, and a precision adder, so that the full precision of the part, all the bits, could be applied to just the 0-1V range, and then I could add single volts as needed to specify the octave. If we're calling 0V C0, then with the 10-bit setup over the 4.096V spread, you have to use value 396 to get G1, and you're imperceptibly sharp; with ten bits over a single volt, you'd use value 597 and add an extra volt and you'd be... slightly closer but flat this time. So the ideal world can fuck itself, and I'll see how the thing I actually have works.)
2 notes
·
View notes
Text
In the past few weeks I’ve built a model railroad signal for garden railways with a custom DCC decdoder. Here’s what it looks like:
youtube
I’ve heard from a number of people that they thought this was interesting, but they didn’t really understand what I was doing. So today I’ll try to explain the core of it all, this circuit board:
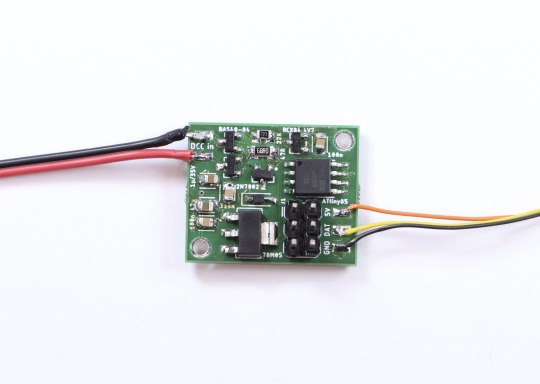
And here’s the associated circuit diagram:
I’ll try to explain why this is the way it is and what it does.
(This whole explanation is aimed at people who have never done anything with electronics before. If that’s not you, then this may be a bit boring. Also, I didn’t come up with any of the parts of this. Most of this is based on things I learned by reading OpenDCC and Mikrocontroller.net. I’m sure I still made a lot of mistakes, though, and they’re definitely all mine and not the fault of anyone on these sites.)
The goal
First let’s talk about requirements. My goal was to build an american signal type “Searchlight”. Such a signal has between one and three lamps. Thanks to a clever electromechanic design that moves different color filters around, each lamp can show different colors - up to three from a total selection of four.
Replicating this system for a model railroad is not practical. I need something else. Having multiple colored LEDs next to each other wouldn’t work; they’re too big and I want it to all look like one light source. There are LEDs that contain red, blue and green in one housing, but that would require a lot of wires quickly that all have to be put in the mast. The solution is this:

This is an “adressable” LED, better known under the name “Neopixel” used by a large american online store. There are many variations from different manufacturers. The key thing is that each LED has a tiny control circuit built right in. It takes four wires: Plus five volts, minus, data in and data out. If you have more than one, you can connect the data out of the first directly to the data in of the second and so on. Connect the plus and minus as well, and you can control almost unlimited amounts of LEDs with just three wires.
The data line has a special protocol that you need to generate. Basically you need to switch it from 0 to 5 to 0 volts again and again at a certain rate; the time it stays at 5 volts (“high”) determines whether you’re sending a 0 or a 1. From these bits you form bytes, which tell each LED what specific color value to send.
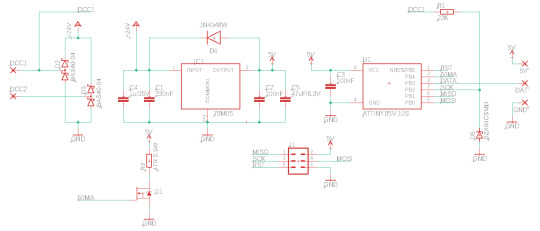
Due to this dataformat, you definitely need some electronic circuit controlling the signal, and the first requirements for this are:
Provide five volts DC power
Generate the data for the LEDs in the correct format
The Input
There are a lot of options for designing the input side of things. In my case, I’m assuming the signal is electrically connected to the rails of a model railroad that is controlled digitally. With digital command control (DCC), the voltage at the rails has a constant value of about 15 to 25 volts, larger for larger scales. This voltage constantly flips polarity; first plus is on the left rail, then it goes to the right rail (and minus vice versa), and then back. It’s like AC in normal wall outlets, but with very abrupt changes instead of a smooth sine wave.
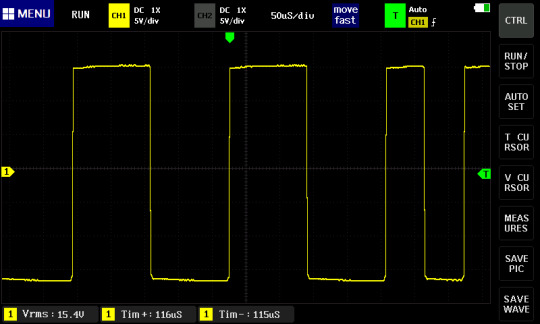
This voltage has two tasks. First it supplies the locomotives with power, but it also transmits information. If one of these change-and-back sequences is long, it transmits a “0”; if it’s short, it transmits a “1”. These bits together then form the bytes that form the messages that say things like, “Locomotive three run at speed step 64” or “switch 10 switch to direction left”.
This decoder uses both features. The digital voltage provides both the data and the power. For a locomotive, that is required since the only conductors you have are the rails. This is a stationary decoder, so I could have designed it so that it only uses digital commands, and gets the power from an external power supply. However, I wanted to use the least amount of cables, so I’m using the simple version.
With that, the requirements are fixed. The circuit has to:
Turn the digital power (15-25 Volts, AC-ish) into 5 Volts DC
Read and understand the digital data signal (decode it, hence the name “decoder”) and calculate the colors for the LEDs.
Computation
This calculation is the real key here. The digital signal has a completely different fromat than what the LEDs expect. It’s slower, but also has completely different meaning. At best it transmits “set switch or signal 10 to state 0”. Which color values are associated with that, let alone any blending to make it look nice, are things the signal has to decide for itself. There is no way to build a simple stupid adapter here; I need a complete computer.
Luckily, you can get those for cheap and in really tiny.
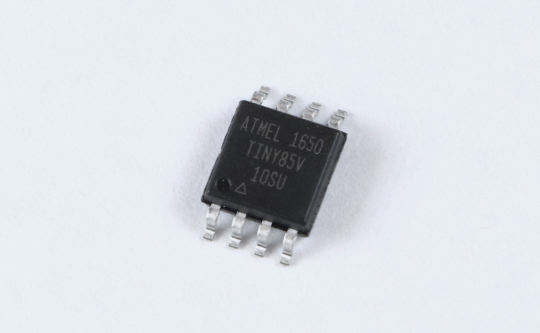
The ATtiny85 costs about 1€ depending on how many you order, and it’s smaller than one cent coin (I think in basically any currency), but from a technical point of view, it is essentially a full computer. It has all the important parts anyway. There is a CPU that can run at (depending on the version) up to 20 MHz; half a kilobyte of RAM and eight kilobyte of internal storage for the program. Multiple programs is a bit of a challenge. If you know Arduinos, the ATtiny85 is related to the ATmega328p in the Arduino Uno and Nano. Far less powerful, but cheaper and significantly smaller.
What it lacks are all the surroundings like keyboard and screen for input and output. The chip is designed for applications where this isn’t needed, or at least only minimal things. The software that you write can assign each pin (okay, five out of eight) freely for different tasks: The pin can work as an input, telling the software whether there’s a low or high level of voltage at it (meaning 0 or 5 Volts), or it can work as an output and write high or low values, meaning setting the pin explicitly to 0 or 5 Volts.
There are other options for the Pins as well; among other things it can also read analog voltages and generate them to some extent. But for this task I only need the simple digital high-low inputs and outputs.
These types of chips, known as microcontrollers, exist in thousands of variations by different manufacturers with very different performance characteristics. They are the key part of basically everything that’s digitally controlled these days. Washing machines, everything that plugs into a computer including every single Apple lightning cable, TVs, TV remotes, amazing amounts of parts in cars and so on are all the realm of microcontrollers. The ATtiny85 is, as the name implies, very much at the low end of the scale (though there are smaller ones), and even here, it is a bit out of date. But it is very easy to program and very forgiving of mistakes, which makes it great in hobby situations.
To run, this chip needs around 3-5 Volts DC (some versions like the one here can also run on a bit less) and exactly one capacitor. I’m already generating 5 Volts DC for the LEDs anyway, so this chip will get them as well. That means for all the calculation, only two pieces of hardware are required.


There is some more associated hardware, though, for getting the program (which I’ve written myself) on the chip. For that you need a programmer, a device that you can buy for some money, or make yourself astonishingly easily from an Arduino. It needs to be connected with six wires to the chip. The standard for this is with a six-pin plug, which I’ve thus included here as well. There are standard six-wire cables for this.

You could connect the cables differently, for example with some sort of spring-loaded contacts on some programming circuit board you’d have to build for that, or in the worst case, just temporarily solder the cables in there. But the plug version is both simple and convenient, with the only downside that it makes the circuit a bit more pointy.
(Due to the Tumblr image limit, the next part will have to be in a reblog)
46 notes
·
View notes
Text
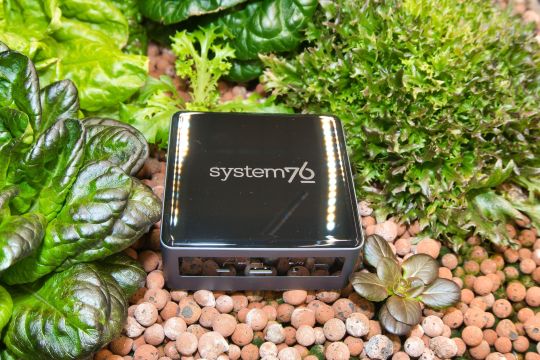
UYPP: Ben Ruel's Garage Garden

Back in March, we announced the winners for our Unleash Your Potential Program, in which six participants got to configure their own System76 computer to use for their awesome projects. This first awesome project is the Garage Garden, helmed by awesome project-er, engineer, and mighty green thumb Ben Ruel. We sat down with Ben to see how his project has been growing on the Meerkat.
Can you tell us about the Garage Garden project? What's it all about?
I spent a career with the Coast Guard and came up here—my final tour with the Coast Guard was in Juneau. Being in southeast Alaska, we’re constrained with what they call off-the-road systems, and the only way in or out of town is by boat or by plane. So all of our food comes up here by barge for a small nominal fee, or by aircraft for an incredibly large fee.
When I came up to Juneau with my wife and kids 11 years ago, we noticed that by the time our produce gets up here, it’s lived on a barge a week, two weeks out of Seattle, and you have no shelf life left on them. We started trying to grow food within the first year of getting here, and we came to the conclusion pretty quickly that with 300 days plus of rain every year, outdoor growing wasn’t really a viable option. That’s when we started a hobby farm in a garage growing some stuff in soil under fluorescent lights, as odd as that sounds.
Since then, we’ve progressed into hydroponics, but we’ve done it very manually. We go out every other day and take readings by hand, so I’ve been doing some research about building IOT devices that will talk back and automate some of the readings. My dream would be using it to actually control the concentration of nutrient solutions that we use. The overall goal is we’re going to build the hydroponic monitoring network of IOT devices, and use the Meerkat as a control center for the devices and a repository for all the data. We’ve also been doing some investigating behind the scenes into whether or not it could grow enough legs to become a business.
Is there a specific type of produce that you’re starting with?
We’ve been all over the road. Right now we’ve got lettuce. We’ve always got some kind of green leafy vegetables whether it’s any variety of lettuce that will grow hydro, some bok choy and tatsoi, and we’re growing kale like it’s going out of style. We’ve grown cucumbers to the point where I think I’ve harvested 65 pounds of cucumbers off of 4 plants over the last couple of months, but we’re really constrained by our size.
I live in a relatively small 3-bedroom house, and we’re just using a one-and-a-half car garage as our grow area. Right now I’ve got two tents. As funny as it sounds, cannabis is legal in Alaska and has been forever—my wife and I don’t touch the stuff, but because it’s been legalized, the infrastructure and the supplies that we need are freely available. We’re growing tomatoes in a tent that’s designed for marijuana growth. It works really well. It helps to maintain efficient temperature control; you can maintain temperature and humidity, block out extraneous light if you don’t want it, and cycle the lights on and off.
Depending on whether it’s too hot in the summer we’ll run the lights at night, and in the wintertime we’re looking for extra warmth, we can shift the cycle and run the lights during the day. Our big benefit up here is that, because Juneau’s all on hydroelectric power, electricity is really cheap.

What variables are being monitored?
With hydroponics, there’s a good number of parameters that you’ve got to try and keep track of. You’re basically diluting nutrients in a solution of as pure water as you can get. You want to keep track of things—your pH can’t be too acidic or too alkaline, for example.
The other big parameter is the electrical conductivity, or total dissolved solids. You want to make sure you’ve got the right concentration of nutrients, and that your nutrient solution isn’t salting up. As you’re adjusting pH back and forth, it’ll start demineralizing salt, so tracking that data gives you a good indication for when it’s time to dump the reservoir and start over.
We’re doing it manually now. I go out every couple of days and we take samples, and sit down and log it into a spreadsheet. The Meerkat acts as a control center for programming devices, keeping a repository of the programming for the IOT devices that we’re using (Arduinos with the esp8266 chips) as well as running different database programs as Docker containers, so that they can be spun up and knocked down fast enough as we try and figure out what the best way to move forward is. We’ve got a couple of database servers that I’ve been playing around with, trying to break from traditional SQL and looking at NoSQL type of databases.
I’m not an IT guy by trade. I’m more of an electronics guy, so I’m kind of doing it as a study-by-night type of project.
What has your experience been like with the Meerkat so far?
I’m actually completely blown away by the Meerkat’s performance. It’s astounding what that small form factor and footprint is able to do. I’ve used Linux for a number of years, and basically everybody’s heard of System76. I’ve seen Pop!_OS before and never really played with it all that much, but I’ve actually grown to love it. The feel, the ergonomics, the interface, and even down to the color schemes that come bone-stock right out of the box. They just make more sense to me. I’m looking forward to the COSMIC update after researching that to see how the differences in the workflow will affect things.

What software are you using for this project?
Right now we’re writing in Docker containers and running the Tick Stack from Influx. We’re also running Telegraf, Protograph, Capacitor, playing around with the Time Series Database, I’ve got a container running MongoDB I run with SQLite, and there’s a couple different IDEs I’ve got loaded on there as well for programming Arduinos or esp8266 chip flashing.
How was the setup process for the machine?
It was up and running within 10–15 minutes of pulling it out of the box. I actually took it to work, too. We do a lot of work with government agencies, and I’ve been doing a lot of microwave radio repair. I’ve got a pretty small workbench at our shop here in Juneau, so using the Meerkat to drive all of our test equipment to control the radio while logging data coming out of the radio, it was perfect. It had enough horsepower to remotely control the test equipment. I wasn’t pushing it all that hard, but setting it up and going back and forth between having it at home or at work, it was negligible to get it up and running.
Stay tuned for further updates from Ben Ruel’s Garage Garden and cool projects from our other UYPP winners!
#system76#meerkat#desktop#mini#minicomputer#computers#desktops#laptops#servers#keyboards#NoSQL#Pop!_OS#Ubuntu#Linux#Alaska#Juneau#hydroponics#farming#vegetables#produce#cucumbers#totsui#bok choy#Arduino#Mongodb#IOT#iot solutions#automation#harvest#garage
19 notes
·
View notes
Text
The DIY force is strong with these 10 Arduino Star Wars projects
Hokey religions and ancient weapons might not be a match for a good blaster, but Arduino Star Wars projects certainly are. To celebrate May the 4th (also known as Star Wars Day), we’ve put together a list of inspired builds from a galaxy far, far away that you can make yourself.
So I Fixed a Broken Hasbro Lightsaber
It’s a rite of passage for every Jedi to build their own lightsaber. That goes for Arduino Jedi, too.
Alan Wang expertly upcycled a broken lightsaber toy by adding a Nano, an MP3 player module and a NeoPixel ring. The result is a Jedi weapon that’s far superior to the original toy.
youtube
Star Wars Mouse Droid with Hidden Payload
One of the first droids we meet in Star Wars is a mouse droid. The quirky little bots that zoom about the floor of the Death Star, getting under Stormtrooper’s feet.
They never actually appear to do all that much. But this zippy little droid by PotentPrintables has a hidden LED matrix that lets it deliver messages. And lots of terrible Star Wars puns, of course.
youtube
Imperial March on a Toaster
If you’re looking for sci-fi toasters, Red Dwarf is usually the first choice. But this hilarious video from Device Orchestra brings the dark side to your devices.
An Arduino controls the electromagnet in this toaster to turn it into a tuneful buzzer. Accompanied by toothbrushes and a typewriter, we get the immortal Imperial March played by droids.
youtube
Mini Arduino Star Wars Shoot ‘Em Up
A game that’s as simple as it is small and cute (like R2!), all run on a Nano on a breadboard.
And just consider how its graphics are comparable to those of the Death Star’s display as it moves into range of Yavin. Talk about human-cyborg relations!
youtube
Build a Life-Size BB8 Droid (Phone Controlled)
It was a pretty big deal when it turned out Lucasfilm built an actual droid for Star Wars Episode VII. It would have been easier to make BB8 in CGI. But we’re glad they went the practical route, as the cool ball droid has inspired a lot of makers.
Not least of them being Angelo, who built his very own amazing life-size BB8 using Arduino.
youtube
Recreating the Death Star Trench Run Scene with LEGO
As much as Wani Kim’s recreation of the iconic trench run is an incredible feat of LEGO engineering, it wouldn’t be complete without Arduino. The whole diorama is embedded with a galaxy-full of LEDs, bringing the scene to life.
That’s no moon. It’s an Arduino project!
youtube
Laser Shooting Game (Star Wars)
As Han told us, there’s no match for having a good blaster at your side. Ismail took that quite literally, and built a Star Wars laser shooting range that lets you take out those pesky Stormtroopers with a homemade blaster.
youtube
Arduino-Based Lightsaber with Light and Sound Effects
A great lightsaber build isn’t just about the colorful blade. It’s about the audio combinations, and the lighting effects when the blade makes contact. Bring all these things together, like Mad Gyver did, and you have an elegant weapon, of a more civilized age.
youtube
Prank Your Friends with Talking Darth Vader
Perfect for Halloween, as well as Star Wars Day, this motion activated Darth Vader head is just as creepy as its inspiration. It can be programmed with as many voice clips as you like, and wouldn’t it make a great option for a dark side Alexa?
youtube
Droid Build D-O
To be honest, D-O didn’t get nearly as much screen time or plot involvement as he deserved. But the latest addition to the growing line-up of Star Wars droids has been lovingly recreated by Matt Denton using a MKR WiFi 1010. No bad motivators here!
youtube
We want to hear about your Arduino Star Wars projects, so tell us all about them in the comments. May the force be with you!
The post The DIY force is strong with these 10 Arduino Star Wars projects appeared first on Arduino Blog.
The DIY force is strong with these 10 Arduino Star Wars projects was originally published on PlanetArduino
5 notes
·
View notes
Text
Real-World Internet Of Things Solutions That Are Changing The World

The Internet of things is the next phase of the internet revolution. IoT solutions allow bringing physical devices into the digital realm. Even though the prevalence of IoT solutions is rampant in the world many people are still in the dark about what IoT is.
Even though IoT has been around since the 1980s it was recognized as a distinct technology in 1999. Over the next few years, IoT diversified and was used in a multitude of ways. From wireless communication, embedded systems, to micro-electromechanical systems.
Corporate spending on technology is supposed to cross 1 trillion dollars in 2020 and 745 billion of it is supposed to be in the internet of things solutions. IoT based solutions have allowed for the automation of daily tasks and enable effective monitoring and control of the connected devices.
Since most people are in the dark about IoT. So we here at Solutionery created a list of the most impactful real-world IoT solutions that are changing the world. Before we dive into the list let’s answer some commonly asked questions about IoT solutions.
Commonly Asked Questions About IoT Solutions
Nowadays whenever you look up tech you see a lot of stuff about the internet of solutions and its wonders. However, most people are still confused about what it is. Here are some commonly asked questions about IoT:
What Is The Simplest Definition Of IoT?
Answer: Internet of things is simply a network of connected devices that interact and exchange information with each other. IoT allows for two or more devices to send and receive information over the internet.
What Are Some IoT Applications?
Answer: Internet of things solutions have been applied in plenty of fields. IoT solutions have been applied in process automation, home automation, smart cars, decision analytics, and smart grids. As the years go by IoT solutions are going to diversify as well with many industries adopting IoT already.
How Does IoT Devices Communicate?
Answer: IoT devices communicate through an IP network over the internet. You can connect the devices either through the ethernet, wired, or wireless or via Bluetooth.
Is There Any Difference Between IoT And Machine To Machine?
Answer: Machine to machine or M2M data transfer means the transfer of data from one device to another. It is simple point-to-point communication between the two devices. Whereas, IoT is a broader term where a network of connected devices supports data integration with a specific application over a shared IP network. It is much more flexible and involves multi-level communication.
What Is The Future Of IoT?
Answer: IoT is already being used in tandem with many other new tech trends. IoT solutions work with artificial intelligence (AI), machine learning, and automated things to deliver integrated smart solutions. As time passes the integration will be much deeper and cause industry-wide disruptions.
Real-World IoT Solutions
Internet of things solutions are everywhere now and here are some of the best real-world IoT solutions that are changing the world:

IoT Sensors
There are plenty of manual or digital sensors connected to circuit boards such as Arduino Uno or Raspberry Pi 2. These sensors can record data like carbon monoxide, temperature, humidity, pressure, vibration, and motion.
These sensors will then send data to connected devices. IoT sensors allow for control of data through automation delivering actionable insights. With these sensors, businesses can make predictive maintenance, enhance efficiency, and reduce costs.
IoT Data Analytics
So this is where businesses utilize IoT data analytics is used to identify trends and patterns. They do this by analyzing big and small data. IoT analytics apps usually analyze structured, unstructured, and semi-structured to uncover meaningful insights into the industry that helps businesses grow.
Businesses use IoT analytics data to do a predictive and descriptive analysis that helps them to improve customer knowledge, enhance operational efficiency, and ensure business growth.
IoT In Tracking and Monitoring
Businesses that have a lot of real-world assets are utilizing IoT in tracking and monitoring assets and systems. IoT asset tracking devices usually use GPS or radio frequency (RF) to track and monitor properties and smart devices are usually used to long-range identification and verification of assets.
IoT In Factory Connectivity
Businesses all over the world are utilizing IoT connected factory solutions to increase their efficiency and productivity. Often companies use IoT solutions like Azure IoT management for industrial IoT devices. These are usually cloud software solutions where you can populate the system with different resources that allow for control of a range of devices.
These sorts of connected factory solutions usually report key metrics data including equipment efficiency and telemetry data that can gather data from assets in different locations as well.
IoT solutions like that have allowed factories to have greater control in connecting, monitoring, and controlling remote industrial devices across multiple locations for a smoother supply chain.
IoT In Supply Chain Management
Supply chain managers are utilizing IoT solutions to make smart predictions through smart routing and rerouting algorithms.
Smart devices connected to packages will send instant after-the-incident facts via GPS and RFID signals that ensure informed supply chain decisions.
IoT application is helping managers mitigate uncertain risks in supply chain management. With IoT solutions implemented businesses are minimizing variance, reducing costs, and improving profitability.
Businesses all over the world are making inventory management, vendor relationship, fleet management, and scheduled maintenance better by introducing IoT solutions.
Smart Grids
Smart grids are a type of industrial application of IoT that allows cities and countries to monitor data in real-time regarding data regarding supply and demand of electricity. Utility companies use computer intelligence to manage efficiency.
Companies integrate the IoT smart grid technologies to ensure that they can manage outages efficiently. IoT smart grids also help companies in fault detection and repairs. IoT smart grid solutions are allowing utility companies to better manage power infrastructure and resources to provide consumers better quality power.
IoT In Health Care Systems
IoT in health care systems is often called the Internet of Medical Things (IoMT). These solutions allow for medical personnel to monitor and track vital medical data for patients remotely. Along with that, they also allow doctors to make important decisions based on real-time monitoring outputs by smart medical devices.
IoT devices report emergency information to doctors immediately. From things like an asthma attack to heart failure, etc immediate notifications ensure that lives are saved.
IoT devices continuously monitor blood pressure, sugar levels, oxygen, and weight and store the data for easy anytime access. This not only automates the workflow but also ensures that the physicians are always aware of the patient’s health.
IoT In Farming
Smart IoT solutions are changing the farming landscape by optimizing the process. IoT smart devices let farmers know the optimal time to do things like harvest plants, creating fertilizer profiles based on the chemistry of soil, and sensing soil nutrients and moisture levels.
Many companies like Smart Elements, AllMETOE, and Pynco are already providing IoT solutions in farming. The sector is one of the fastest-growing sectors in the world revolutionizing the agriculture and farming landscape.
IoT Changing The World For The Better
So these are some real-world IoT implementations that are completely changing the industry. More and more sectors are integrating IoT solutions within their businesses to make sure they provide efficient service while maintaining quality throughout.
From small businesses to large enterprises everyone is looking at IoT as a solution for growth. So make sure you too look into the viability of IoT in your business.
If you need expert IoT consultation then you can contact us here at Solutionery so that you can make an informed decision. Until next time, see ya!
Originally posted in: https://solutionery.com/internet-of-things-solutions/
1 note
·
View note
Text
What Do Player Pianos, IBM Punchcards, Telepathy and Elon Musk’s Neuralink Have In Common?

This is a player piano punch sheet or score taken from a rolled up drum. The holes make the keys move. It is a very simple pattern that translates into musical notes.

This is a decoding of “neural spikes” according to scientists at Elon Musk’s brain computer company Neuralink. The spikes are pictured in single boxes, and many spikes when they fire make a pattern. From that pattern you can begin to decode thought. According to Neuralink, “Everything you hear or think is all action potentials, its action spikes and it feels so real, it feels very real.”

This is an early IBM computer punch card, and the basic pattern recognition of the presence or absence of holes in predefined patterns led to everything we know today about computers. Though IBM introduced the first cards in 1928, they had already been in use to ‘program’ cloth in the Jacquard loom in 1804, making gorgeous silks and tapestries.

I think we are basically back in the same position as we were when IBM first made the computer punch card in 1928 in terms of brain research and decoding thought. Neuralink is putting together elements in brain research that 100 years from now, or even 50 years from now will have tremendous repercussions. The company did not invent all of the aspects of technology it is using to put things together, but they did improve upon existing tech and brought it all together.
THE SURGICAL ROBOT

The Neuralink robot doing an implantation
Neuralink works by extracting electrical signals from neurons. In order to do that it has to implant extremely thin wires in the brain to access and read those signals onto a nanochip. Before it can do that, it has to make a precision surgical robot machine operated by neuroscientists to insert the wires - so it did. Apparently there was some DARPA money thrown into the mix somewhere along the way. The robotic surgeon has to implant tiny wires in between blood vessels and neurons, not on them. This can only be achieved through microscopes and nanometer precision. The implant needle is 24 microns small. Tiny threads are about 1/10 of a human hair, which is about the same size as a neuron. The needle to implant the wire is 24 microns small. You can open the skull, insert the threads, put in a tiny chip, and then glue the skull shut. The chip functions as a wireless bluetooth signal.
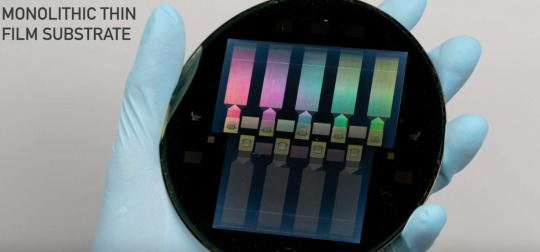
THE WIRES
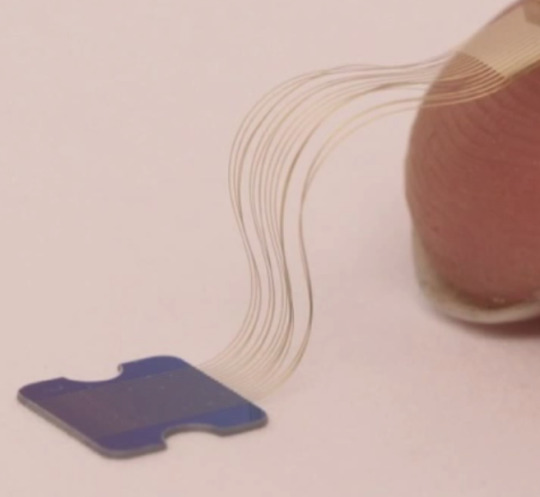
This picture shows thin nano threads pasted onto a fingertip. The thinness of this wire is the big issue DARPA was trying to solve with Moldavian wire from Paradromics, that I previously blogged about in 2017, but Musk beat them to the punch. He wrote about his breakthroughs here.

This is the different new design of the threads called a “linear edge”, which are made of layered polymers. They are so are super duper thin they can’t bee seen with a human eye, so they need the special robot that inserts the threads onto the surface of the brain. Another reason is the brain’s surface moves with inhalation and exhalation, and the robot can account for this natural movement. The wires and chip have to record the output from neurons. They are micro fabricated as precisely as the size of an electron beam. It is important to separate the signal to noise ratio in the chips, as they work with nanometer sizes of light. A new design. 350 nanometers,is smaller than visible light.

This image is the crux of how Neuralink acquires the signal. Here you see the neuron sending out an electrical spike and a thread next to it picking up the impulse. The electrical spike is the bulls eye. The copper colored needle is actually the implanted wire thread. You need to be 60 microns away or less to read the signals, so you really need to be under the skull. This is a graphic representation

This is a photo of the real thing, with lots of wires precision implanted into brain tissue. If you look really closely you will see they skirt around the blood vessels and neuron branches, but don’t touch any of them. Its sort of like an amazing game of darts, but the goal is to miss the bull’s eye of the vessels.
HISTORY OF IMPLANT CHIPS

This is a short history of brain research about making chips to implant in the brain. At this point the Utah array is still the most used implant chip in academia. Neuralinks chips are way, way faster and smaller. Their research builds on a century of neuroscience research and a decade of neuro engineering research. More advanced applications with advanced innovations will follow.
CHIPS AND PODS
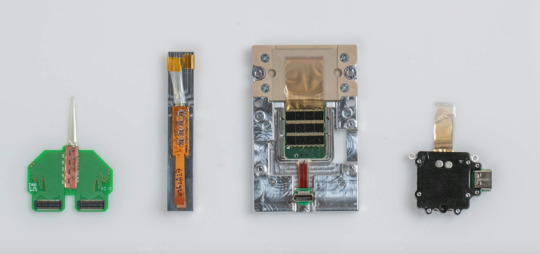
These are early iterations of chips and devices made by Neurlink. Looks like Arduino 101, more or less.

The N1 sensor - the beginning of the sophisticated bean sized implant that goes into the skull and contains the chips.
The actual chips are made on super thin nano wafers in a hermetic environment so there is no dust. They are also super duper thin. A 4 x 4 millimeter chip has a thousand electrodes,and implanting up to 10 chips is feasible. At this point the best FDA approved chip implant for Parkinsons Disease only has 10 electrodes. The Neuralink chips read and write, and are 1000 times more powerful than what is publicly approved. They will get better with newer versions.

Shades of Cyborg Neil Harbisson and his Eyeborg! The Neuralink implant with four chips receive information from the threads, and sends them to an output area for batteries and firmware.

This is the size of the output piece, like an earphone.You can upgrade the firmware on the pod on the ear, it is not the actual implant but connects to it. It will be controlled through an iPhone app. Probably Android as well.
SIGNAL PROCESSING

Waves of neural spikes from an array from implanted threads that are being read out on a computer. monitor The color screen shows the brain at work, and traces of electrodes from single threads. Each trace is a voltage waveform in time. If you focus on one trace, it shows voltage deflections, or spikes per wave. It occurs when a neuron has an action potential, because that is the core information that is recorded. Then the algorithm is decoded, which means capturing the intended information. You just have to think about something and build up the decoding data from that information or thought, and you can begin to interpret movement, memory, and many other different types of experiences.
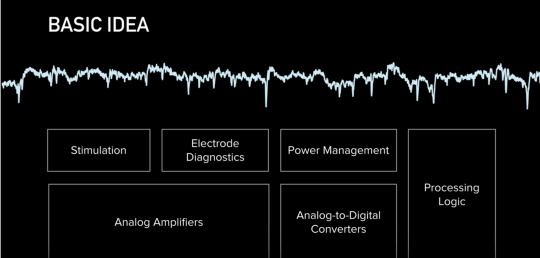
This is a basic diagram of signal processing from the chip - how they get the stuff out of the wires and threads to actually show the spikes. Neuralink said “Everything we care about is contained in the statistics of spikes (inside the brain).” So it goes back to the basic IBM punchcards, or the player piano drum roll - decipher the pattern and you decipher the thought.

Here is their basic logic analogue to digital conversion that is necessary to change action potential spikes to computer code..Calling Alvin Lucier, John Cage, Nam June Paik, David Rosenboom, Richard Teitelbaum - or Duh, this has been going on with the brain, changing analog to digital since 1965 in the music world.
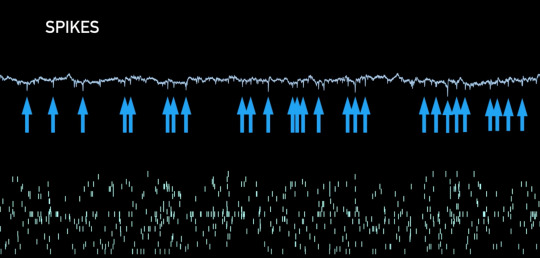
Spike rasters in the brain - The top is the brainwave spikes pointed at by the blue arrows, and the bottom is the beginning of pattern recognition of individual neurons. There should be one pixel per electrode. They are on-chip spike detectors. The methods for detection are thresholding signals or directly characterizing the shape. The Neuralink scientists claim they can identify different neurons from same electrode based on their shape. The engineers had to modify the algorithms and scale them to compress neural data up to 200 times. It takes only 900 nano seconds to compute the signal, faster than the brain knows that the signal even occurred. They can also stimulate any combination of up to 64 channels

One good use of this in the next few years is creating visual feedback for the blind by targeting the visual cortex to create an image better than a dot matrix image - or computer vision basics meets brain wetware. The scientists want to not only read out, but read into the brain. You can read into the brain by passing a current in the electrode. This causes the cell to fire an action potential, like for cochlear implants, or a way for the eye to restore vision. You can also use this technique in the brain to restore the sense of touch or vision. The visual cortex has maps, a spatial map (orange section of the brain in graphic). If you stimulate a point in that area, a blind person sees a point of light or phosphene. The idea is you can stimulate areas of the brain in the visual cortex to resemble a dot matrix level of the world. There are also parts of the brain that control orientation, color, size and speed of moving objects, and once you figure out what they are, and where to stimulate them, you can generate a more comprehensive image that a blind person can experience. Neuralink wants a device with electrodes that are small enough, but with high density that can do better than a dot matrix image.
The first iteration of their implant will have three different types that can go from a mobile device to a mouse or keyboard on a Bluetooth signal. Neuralink needs to get FDA approval. Right now they are working on patients with complete paralysis so it is for serious neurological needs, and idea is to make it really safe.

Who needs Google maps when you can tap into someone’s brain algorithm in their Hippocampus which contains spatial orientation. Here is a rendition of someone who really knows San Francisco, and they can send you pattern signals as you wander through the park and direct you telepathically - voila!
THE PURPOSE
Musk gave a number of reasons for his very public video presentation. The first he shamelessly admitted, was to recruit for new talent to Neuralink. He then framed the motivation of his company as wanting to solve brain ailments, spinal disorders, or catastrophic injuries like a broken neck or spine,. He admitted it won’t happen quickly, and kept mentioning the need for FDA approval. He wants to make his devices as cheap and accessible as a Lasik-like device.
“Hopefully,” he said, “AI is a benign scenario. You can chose to have a neural implant if you want, it is not a mandatory thing... We already have digital super intelligence - our access to a computer and a smart phone. The input speed in the human brain is fast, due to our vision, but the output speed is slow because we have to type information into a computer. We are constrained by human bandwidth and mechanics. “
But then he dropped the Neuralink AI bomb - that he believes that we “ultimately (will) achieve a symbiosis with artificial intelligence” (if you want it at a civilization level scale). Then he added, “two people with Neuralink could have telepathy, a new kind of communication, conceptual telepathy, it has to be consensual”.
So the new “me too” movement will concern having consensual telepathy #metooconsensualtelepathy.
*Screen shot photos all taken from publicly available Neuralink YouTube video here.
7 notes
·
View notes
Photo

WEEK 5
And now let's talk about my concept.
“A panic attack is a brief episode of intense anxiety, which causes the physical sensations of fear. These can include a racing heartbeat, shortness of breath, dizziness, trembling and muscle tension. Panic attacks occur frequently and unexpectedly and are often not related to any external threat. A panic attack can last from a few minutes to half an hour. However, the physical and emotional effects of the attack may last for a few hours.
Panic attacks are common. Up to 35 per cent of the population experience a panic attack at some time in their lives. A panic attack can also be called an anxiety attack.”
https://www.betterhealth.vic.gov.au/health/conditionsandtreatments/panic-attack
A panic attack is a topic which I commenced studying. After many years of personal experience, I concluded to probably create a device that will help all of those suffering from this mental issue. Currently, most of the studies say, take a big breath or focus to your breath, seek phycologist, take phytomedicine, and the list goes further. To my experience, nothing is working.
The brain takes control of our bodies; the brain controls us. The key is to find a way to control our brain, and I know it is not so easy to achieve. Coming across, with new pieces of information about parametric design, generative design, electronics, robotics etc. throughout the studio, my personal experience and inspired by Lauren McCarthy's studies I'm about to start a concept with the title "The Slap." Yes, I know it sounds the same title as the book “The slap” by the Melburnian author Christos Tsiolkas, his topic is very dark mine is more optimistic.
My story starts years ago when I began experiencing panic attacks. The feeling of suffering a panic attack probably is the worse feeling ever; it feels like that you're dying.
Only one moment was enough to realise what can potentially treat a panic attack. The treatment is by "cheating the panic". A person experiencing a panic attack all it needs it’s an intense distraction. A slap was the moment that moved me instantly with a result to forget that I was experiencing a panic attack. So, I'm questioning myself, If I would be able to create a device that will give me this destruction. Probably yes, combining my experience and technology (Arduino technology/programming), that would be an excellent opportunity for me to study further for these technologies and to bring fun to this topic.
My ingredients are my experience, research, electronics, physical design.
5 notes
·
View notes
Photo


Make your own chilling chambers
Or I thought of calling this post: Experiment in progress! Please do not disturb or use computer. Do not go on-line!
This is an extremely belated post, one which I have been meaning to write for more than four years (yes, I am slightly horrified). Just under a year after I arrived at UBC Rob Guy showed me a very cool chilling experiment that he had underway with undergraduate thesis student, Shannon Bell. They were interested in what temperatures actually cause chilling and were looking at a big range: -16C to +9C.
For most folks, getting enough chambers would be the tricky part of this, but Rob had helped Shannon set up a series of mini-chilling chambers as shown here. They made each ‘chamber’ out of picnic-basket sized cooler placed in a large freezer (top photo), which was then warmed to the appropriate temperature with a thermocouple controlled by an arduino system to monitor and adjust temperature (bottom photos).
It seemed like an amazing system and Rob claimed was not that hard to set up.
Shannon Bell’s thesis: Pacific northwest black cottonwood populations exhibit negative linear association between conventional chilling temperatures and bud break date. Bell & Guy. 2019
And here’s some related parts of the methods:
Small insulated environments were created using 8.5-L plastic coolers (Item #3000000166, The Coleman Company, Wichita, KS) modified to accommodate wiring and provide additional insulation. Plastic containers (Product #142-1602-4, Canadian Tire) small enough to fit inside the cooler were lined with duct insulation to shield cuttings from outside fluctuations in temperature. Small 13-watt semiconductor enclosure heaters (Omega Engineering, Norwalk, CT) were attached to a wire stand in the bottom of the cooler along with a miniature fan (Model CC 3010S12L, Chiefly Choice Co. Ltd., Taipei, Taiwan). One Type T copper-constantan thermocouple was fed through a hole in the side of the cooler and attached to the wire stand in between the fan and the heater. A second thermocouple was inserted into the cooler and placed inside the small plastic container. This container was perched on its side atop the wire stand and cushioned from the walls using foam to allow for proper circulation. Fans were connected with 12V DC power supplies. Heaters were plugged into their respective channels and voltage sources in a temperature controlling system.
Thermocouples for each treatment were attached in a floating fashion into the high and low ports of each channel on two Omega OM-USB-TC 8 Channel Thermocouple Input USB Data Acquisition Modules (Omega Engineering, Norwalk, CT) (Figure 1). One module was dedicated to the thermocouples monitoring the temperature inside the container with the cuttings. The other module monitored and controlled temperatures inside the cooler. This module had additional wires attached to the digital terminal of the module corresponding to each channel and connected to the voltage source for that channel. Wires were also attached to the ground terminals and power terminals for this module. Both Omega devices were connected via USB to a personal computer running DASYLab2016 data acquisition, control and analysis software (National Instruments, Austin, TX).
...
Coded switches were created for each channel in each Omega device in DASYLab. These switches maintained the temperature surrounding the cuttings at -16, -10, -6, -3, 0, 3, 6, and 9 °C by only sending a signal to trigger the voltage output to the heater when the temperature in the cooler fell below the value designated by the coded switch. These switch values were adjusted to account for any temperature gradients inside the cooler.
The TTL Pulse and logical operators, when used in conjunction in DASYLab, allowed for the manipulation of individual heaters while they were set to be on. To manage hysteresis brought on by the power of the heater, each channel had individual pulsing settings which caused the heater to turn on only for a set number of seconds in an interval of time while the temperature remained below the point set by the coded switch. For the 3 °C treatment, however, this pulsing mechanism was used to control the fan, since it was the only heating mechanism necessary to maintain temperature at 3 °C.
1 note
·
View note
Text
Exhale by output in sonar x3

#Exhale by output in sonar x3 install
#Exhale by output in sonar x3 pro
#Exhale by output in sonar x3 mac
Madison County Attractions include the Madison County Fair held in early July of each year, Madison Lake State Park, the nationally historic Red Brick Tavern, miles of Rails to Trails, the Jonathan Alder Cabin, and Big Darby Creek, a State and National Scenic River. Madison County is also home to the Ohio Peace Officer Training Academy (OPOTA), the Ohio Bureau of Criminal Identification & Investigation (BCI), London Correctional Institution and Madison Correctional Institution. Annually in September the Ohio State University hosts the Farm Science Review, one of the largest farm exhibitions in the world, at the Molly Caren Agricultural Center near London, Ohio. Madison County ranks fourth in both soybean and corn production throughout the state of Ohio. Primarily an agricultural area, 88% of the land consists of farms.
#Exhale by output in sonar x3 pro
forge pro 11 pc 25 sound forge pro 2.0.
#Exhale by output in sonar x3 mac
suite 9.2 para mac 35 magix samplitude music studio 20 dv2 + content (8gb) 30 sibelius 7.5.1 pc y mac 35 finale 2014 pc y mac 35 sound. Named after James Madison, 4th President of the United States, Madison County is located in central Ohio between Columbus and Springfield. cakewalk sonar x3 para pc 35 ableton suite 9.2 para pc 35 ableton. Your source for Official Madison County Government Information. 46 Step 32: Build the controller: protoboard soldering advice. 46 Step 31: Build the controller: clock frequency. 43 Step 30: Build the controller: layout. 4.Drag and drop the REAC templates downloaded from the page.
#Exhale by output in sonar x3 install
42 Step 29: Build the cube: attach cables. In order to install templates, 1.Go under the Cakewalk Content Folder on your computer. 42 Step 28: Build the cube: cathode risers. 41 Step 27: Build the cube: mount the cube. 39 Step 26: Build the cube: create the base. 38 Step 25: Build the cube: solder the layers together. In this case, SONAR will automatically assign the missing output port to the available output port. The Missing Audio Outputs dialog box is not shown if there is only a single missing output port and only one available output port. 37 Step 24: Build the cube: bend the pins. Cakewalk - SONAR X3 Documentation - Changing I/O devices. 36 Step 23: Build the cube: straigthen the pins. 33 Step 22: Build the cube: test the layer. 32 Step 21: Build the cube: solder a layer. 32 Step 20: Build the cube: test the LEDs. 31 Step 19: Build the cube: soldering advice. 30 Step 18: Build the cube: create a jig. Deeper Smart Sonar START Technical Specifications Weight: 2.1oz / 60g Size: 60 x 65 x 65-mm / 2.3 x 2.5 x 2.5in Sonar Type: Single beam Frequency (Beam cone): 120 khz, 40 Depth Range Max/Min: Max. 28 Step 15: Choose the size of your cube. 24 Step 9: IO port expansion, alternative solution. 22 Step 8: IO port expansion, more multiplexing. 21 Step 7: Cube size and IO port requirements. Check out some of these amazing projects, and get inspired to build your own reality. It's compact, it's straightforward, and makes embedding electronics into the world-at-large fun and easy. Anything is possible with the mighty power of Arduino. It is no wonder that Arduino literally translates to "Strong friend (masculine)" in Italian. These authors have turned their wildest dreams into reality with the power of Arduino, an easy-to-use microcontroller development board. Introduction Here are twenty amazing Arduino projects that you almost wouldn't believe, if not for that they are the real deal.
0 notes
Text
A Future Where Everything Becomes a Computer Is as Creepy as You Feared
By Farhad Manjoo, NY Times, Oct. 10, 2018
More than 40 years ago, Bill Gates and Paul Allen founded Microsoft with a vision for putting a personal computer on every desk.
No one really believed them, so few tried to stop them. Then before anyone realized it, the deed was done: Just about everyone had a Windows machine, and governments were left scrambling to figure out how to put Microsoft’s monopoly back in the bottle.
This sort of thing happens again and again in the tech industry. Audacious founders set their sights on something hilariously out of reach--Mark Zuckerberg wants to connect everyone--and the very unlikeliness of their plans insulates them from scrutiny. By the time the rest of us catch up to their effects on society, it’s often too late to do much about them.
It is happening again now. In recent years, the tech industry’s largest powers set their sights on a new target for digital conquest. They promised wild conveniences and unimaginable benefits to our health and happiness. There’s just one catch, which often goes unstated: If their novelties take off without any intervention or supervision from the government, we could be inviting a nightmarish set of security and privacy vulnerabilities into the world. And guess what. No one is really doing much to stop it.
The industry’s new goal? Not a computer on every desk nor a connection between every person, but something grander: a computer inside everything, connecting everyone.
Cars, door locks, contact lenses, clothes, toasters, refrigerators, industrial robots, fish tanks, sex toys, light bulbs, toothbrushes, motorcycle helmets--these and other everyday objects are all on the menu for getting “smart.” Hundreds of small start-ups are taking part in this trend--known by the marketing catchphrase “the internet of things”--but like everything else in tech, the movement is led by giants, among them Amazon, Apple and Samsung.
For instance, Amazon last month showed off a microwave powered by Alexa, its voice assistant. Amazon will sell the microwave for $60, but it is also selling the chip that gives the device its smarts to other manufacturers, making Alexa connectivity a just-add-water proposition for a wide variety of home appliances, like fans and toasters and coffee makers. And this week, both Facebook and Google unveiled their own home “hub” devices that let you watch videos and perform other digital tricks by voice.
You might dismiss many of these innovations as pretty goofy and doomed to failure. But everything big in tech starts out looking silly, and statistics show the internet of things is growing quickly. It is wiser, then, to imagine the worst--that the digitization of just about everything is not just possible but likely, and that now is the time to be freaking out about the dangers.
“I’m not pessimistic generally, but it’s really hard not to be,” said Bruce Schneier, a security consultant who explores the threats posed by the internet of things in a new book, “Click Here to Kill Everybody.”
Mr. Schneier argues that the economic and technical incentives of the internet-of-things industry do not align with security and privacy for society generally. Putting a computer in everything turns the whole world into a computer security threat--and the hacks and bugs uncovered in just the last few weeks at Facebook and Google illustrate how difficult digital security is even for the biggest tech companies. In a roboticized world, hacks would not just affect your data but could endanger your property, your life and even national security.
Mr. Schneier says only government intervention can save us from such emerging calamities. He calls for reimagining the regulatory regime surrounding digital security in the same way the federal government altered its national security apparatus after the Sept. 11, 2001, attacks. Among other ideas, he outlines the need for a new federal agency, the National Cyber Office, which he imagines researching, advising and coordinating a response to threats posed by an everything-internet.
“I can think of no industry in the past 100 years that has improved its safety and security without being compelled to do so by government,” he wrote. But he conceded that government intervention seems unlikely at best. “In our government-can’t-do-anything-ever society, I don’t see any reining in of the corporate trends,” he said.
Those trends are now obvious. It used to be difficult to add internet connectivity to home devices, but in the last few years the cost and complexity of doing so have plummeted. Today, off-the-shelf minicomputers like the Arduino can be used to turn just about any household object “smart.” Systems like the one Amazon is offering promise to accelerate the development of internet-of-things devices even further.
At a press event last month, an Amazon engineer showed how easily a maker of household fans could create a “smart” fan using Amazon’s chip, known as the Alexa Connect Kit. The kit, which Amazon is testing with some manufacturers, would simply be plugged into the fan’s control unit during assembly. The manufacturer also has to write a few lines of code--in the example of the fan, the Amazon engineer needed just a half-page of code.
And that’s it. The fan’s digital bits (including security and cloud storage) are all handled by Amazon. If you buy it from Amazon, the fan will automatically connect with your home network and start obeying commands issued to your Alexa. Just plug it in.
This system illustrates Mr. Schneier’s larger argument, which is that the cost of adding computers to objects will get so small that it will make sense for manufacturers to connect every type of device to the internet.
Sometimes, smarts will lead to conveniences--you can yell at your microwave to reheat your lunch from across the room. Sometimes it will lead to revenue opportunities--Amazon’s microwave will reorder popcorn for you when you’re running low. Sometimes smarts are used for surveillance and marketing, like the crop of smart TVs that track what you watch for serving up ads.
Even if the benefits are tiny, they create a certain market logic; at some point not long from now, devices that don’t connect to the internet will be rarer than ones that do.
The trouble, though, is that business models for these device don’t often allow for the kind of continuing security maintenance that we are used to with more traditional computing devices. Apple has an incentive to keep writing security updates to keep your iPhone secure; it does so because iPhones sell for a lot of money, and Apple’s brand depends on keeping you safe from digital terrors.
But manufacturers of low-margin home appliances have little such expertise, and less incentive. That’s why the internet of things has so far been synonymous with terrible security--why the F.B.I. had to warn parents last year about the dangers of “smart toys,” and why Dan Coats, the director of national intelligence, has identified smart devices as a growing threat to national security.
Connecting everything could bring vast benefits to society. But the menace could be just as vast. Why not go slowly into the uncertain future?
1 note
·
View note
Text
Best Torrent Client Raspberry

The Raspberry Pi is an awesome little computer, whose capabilities won’t stop increasing. As such, you should make sure that you have the best apps installed on it. Whether you’re running Raspberry Pi OS (formerly known as Raspbian) some apps are unmissable.
Best Torrent Client Raspberry Pi
Best Torrent Client Raspberry Pi
Best Torrent Client Raspberry Pi
TORRENTS comment = Torrents path = /mnt/torrents create mask = 0755 directory mask = 0755 read only = no browseable = yes public = yes force user = pi only guest = no” To save this file, press Ctrl X then Y then Enter. Now we need to reboot the Raspberry Pi once again. NOTE: If it doesn’t works, try installing samba and doing. QBittorrent is one of the best torrent clients available that runs on the Raspberry Pi's ARM hardware. It sports both a desktop client and an easy to use web interface. One of the best parts of qBittorrent is its powerful web interface that allows you to control almost every aspect of the client with relative ease. Next, download a popular torrent client - dedicated Torrent box for the torrent admin Step Four: Test — I would like a torrent server over 4 Model B (for setup a new headless, Note Other VPN services a straightforward method for active account with AirVPN. To Raspberry pi deluge on the Pi too drive. An active account better ethernet).
Here are best apps for your Raspberry Pi.
Doesn’t Raspberry Pi Come With Apps Preinstalled?
Before proceeding you’re probably thinking “hold on, my copy of Raspberry Pi OS already has a bunch of apps installed.” No doubt you’re thinking of VLC media player, Scratch, and LibreOffice.
Best Torrent Client Raspberry Pi
With three editions of Raspberry Pi OS to choose from, though, you won’t be surprised to find that those apps aren’t included on them all. The Lite version comes with little to talk of, not even a desktop, and is aimed at project builders. Meanwhile the “Raspberry Pi OS with desktop” comes with VLC media player and the Chromium Web Browser, but little else.
The “Raspberry Pi desktop and recommended software” version, meanwhile, is jam-packed full of everything you could need. But it’s a bit of a big download, so you might prefer to avoid it.
Whatever the case, we’ve chosen the best 10 Raspberry Pi apps that you don’t already have installed. Let’s take a look at them.

So, add VLC media player and Scratch as required
1. Guake
Whether you’re new to Linux or an expert, the default Terminal is frustrating. It’s plain, obscures the desktop, and, overall, the Terminal application is difficult to appreciate.
Best Torrent Client Raspberry Pi
Consider a replacement: Guake. With a Quake-style semi-transparent interface, Guake can be installed via the Add/Remove Software tool.
After installation, you’ll find it in Applications > System Tools > Guake. Once you see the notification that Guake is running, tap F12 to summon it. Guake will drop down from the top of the screen when called.
Guake lets you see what is happening elsewhere on the desktop. You can also right-click inside the Guake window to alter the Preferences, which includes tweaking the appearance.
2. Synaptic Package Manager
It’s easy enough to install software via the command line, and Raspbian has its own mouse driven Add/Remove Software tool. But sometimes that’s not enough. If you’re looking for something more expansive, try Synaptic.
Unlike the native tool, Synaptic uses more specific software categories, helping you to find the tools you need. Synaptic (one of several Linux package managers) also ensures you’re using the current version of apps installed on your Pi. All you need to do is click Reload and then Apply to run the updates.
You can install Synaptic Package Manager on Raspbian with:
Once installed, run it with a command:
…or launch Synaptic Package Manager from the Preferences section of the desktop menu.
3. MyPaint
Best open source apps lists like this almost always suggest GIMP as a sort of easy Photoshop alternative. While this is a good option, it’s often preinstalled on Raspberry Pi OS. For something a little different, try MyPaint.
This is an open source graphics editor for digital painting, rather than image manipulation. Closer to Corel Painter or Krita than Photoshop, it includes layers, brush settings, scratch pad, and brushstrokes that differ based on the angle and zoom. Many other features can be found on the project’s GitHub page.

To install MyPaint, open a terminal and enter
Alternatively, find it in Add/Remove Software in the Graphics category.
4. QMMP
VLC media player plays music, but if you’re looking for something a more visually striking, try QMMP.
With support for all the usual audio formats (MP3, FLAC, Ogg FLAC, Ogg Vorbis, WAV, CD Audio, etc.), it also delivers equalization settings and visual effects.
Various plugins are also supported, adding functionality. This ranges from playing music from YouTube to playing chiptunes (music created on or for 8-bit systems).
Install QMMP with
You’ll also find it in Add/Remove Software listed under Multimedia. Once installed, simply launch it from Menu > Sound & Video and open your favorite tunes.
5. DOSBox
The Raspberry Pi isn’t exactly short of games. Amateur developers and have created hundreds of homebrew games; some Linux titles run on the Pi, too. It’s also an excellent platform for playing retro games.
Various types of emulation are possible with the Raspberry Pi, from 8-bit home computers to consoles. But if your preference is for classic PC games, try DOSBox.
Capable of running all software from the MS-DOS era, DOSBox lets you play PC games from the 1980s and 1990s.
To install DOSBox on the Raspberry Pi, open Preferences > Add/Remove Software and search for it. Once installed, head to your Home directory and create a new folder, dosgames. This is where you should save the extracted contents of downloaded games to, ready to use them.
DOSBox itself can be launched from Menu > Applications > Games > DOSBox Emulator. See our guide to using DOSBox for help on configuring the application and finding and installing games.
6. Arduino IDE
Planning to pair your Raspberry Pi up with an Arduino for some maker fun? If so, you’ll need Arduino IDE (Integrated Development Environment). The IDE makes it simple to write and upload code to any Arduino connected to your Raspberry Pi.
You can install Arduino IDE on your Pi via Preferences > Add/Remove Software.
Once installed, launch via Applications > Programming > Arduino IDE. Use the Tools > Boards menu to select the correct Arduino model (Arduino Uno and clones are selected by default).
From here, you can check File > Examples for some useful example scripts for the Arduino. You can also extend its capabilities via new libraries. You’ll find information on these at www.arduino.cc/en/Reference/Libraries. Meanwhile, our detailed guide to Arduino will help you get started.
7. NixNote
Using a different computer doesn’t mean you won’t need to keep notes from time to time. NixNote is an open source client for Evernote, easily installed in Add/Remove Software.
Once installed, NixNote gives you access to your existing Evernote archive of ideas, jottings, lists, and so on. It can export as PDF, and the data can be backed up and restored as needed.
In short, this is a useful notebook client that syncs with Evernote on your other devices for unified notetaking.
8. Deluge
First things first: Deluge is a BitTorrent client. This doesn’t mean that it is illegal; BitTorrent itself isn’t illegal. Rather, the misuse of the peer-to-peer networking technology to download copyright-protected movies and games is illegal.
For instance, many Linux operating systems (including Raspbian) can be downloaded over BitTorrent. This provision reduces the overhead on hosting the distribution on a dedicated server. Our guide to BitTorrent explains this in more detail.
Best Torrent Client Raspberry Pi
Why might you need a BitTorrent client on your Raspberry Pi? Well, it depends how you’re using the computer. If you utilize it as a repository for personal data, Deluge can download data from your Pi wherever you are. Full details on how to this can be found on the Deluge Wiki.
You’ll find Deluge in Preferences > Add/Remove Software. If you want to use the torrent app in headless mode, connect via SSH and run:
Once this is done, Deluge is ready to run. Pi desktop users can launch it in Menu > Internet.
9. OpenVPN
Every computer should connect to the internet via a VPN. While there are no VPN clients for the Raspberry Pi, there is OpenVPN.
This is a VPN client app that lets you connect to your preferred VPN server using existing account credentials. For example, you can connect to ExpressVPN VPN servers using the configuration files they provide.
Install OpenVPN with
Be sure to download the OVPN configuration file for your preferred server and save it on your Pi. Most VPN services provide OpenVPN support so this should be straightforward.
Check our guide to setting up a VPN on the Raspberry Pi for configuration tips.
10. Steam Link
While the Raspberry Pi doesn’t have the hardware to run standard PC games, it is good enough to stream them. This is possible thanks to the Steam Link software from Valve, which lets you stream games from a PC.
With the games you want to play installed on your PC and streaming enabled, setup is simple. Just connect your Raspberry Pi to your TV and run
Learn more in our guide to Steam Link for Raspberry Pi.
Awesome Raspberry Pi Apps You Can Install Today
Along with the apps already installed on your Raspberry Pi, a wealth of alternatives is available. They bring new functionality, improve privacy, deliver gaming, improve productivity, and more.
Which apps you install will determine how you use your Raspberry Pi. Explore the possibilities further in our guide to the best Raspberry Pi projects.
Read the full article: The 10 Best Apps to Install on Your Raspberry Pi
RPi consumes only a few watts of power so it seems to be ideal torrent client platform – it can run for days and slowly (or not) download the content from internet. Setting up Torrent client is very easy. Here is how to do it…
We will install torrent client called Transmission. Before we do that lets update and upgrade our packages.
2
sudo apt-getupgrade
Installing the client:
After installation we need to configure it a bit, but don’t worry, it will take only a few minutes. Configuration file is /etc/transmisson-daemon/transmission.json. There are several values we need to change – here is the list of modified parameters (we will be modifying the rest but in more human way later on). Before editing the config file stop daemon (if you stop daemon after editing the file, your changes will be overwritten):
To update config file execute:
First we’ll get rid of authentication when connecting to Transmission using web browser
'rpc-authentication-required': false
To avoid loosing any control over who connects to our Transmission we can define IP address range of computers that can connect. With the below settings, Transmission will be controlled by computers with IP addresses starting with 192.168.1.* and from local host (RPi).
'rpc-whitelist': '127.0.0.1,192.168.1.*'
Also make sure that the following parameters are set in this way:
'rpc-port': 9091 'rpc-url': '/transmission/'
Now, start Transmission-daemon:
From computer/tablet that has ip within the defined (above) range, connect to your Transmission: (assuming IP of your Raspberry Pi is 192.168.1.106)
192.168.1.106:9091 or 192.168.1.106:9091/transmission (no / at the end of url) or 192.168.1.106:9091/transmission/web/ (remember about / at the end of the address)
If you did everything right here is what you should see:
Now, with graphical interface you can easily set majority of Transmission properties as well as upload torrent files and start downloading. The setting you do in web interface will be reflected in settings.json file as soon as Transmission is stopped. If you still want to modify properties in config file, here is a link to description of all possible settings Config File Parameters Description
Remember, that when you set directory for downloaded files, this directory needs to have right privs so that Transmission would be able to write files there. If it’s external drive that will host the directory (most likely that will be the case) and you’ve installed Transmission on RaspBMC, mount if with mode=000 setting in fstab as described in DLNA installation.
Is it over? It can be if you’re fine with checking the download status from web browser, but it would be much cooler to be able to monitor, start and stop torrents from XBMC, since most likely you would like to use XBMC to view/listen media (if you’re downloading one). There is XBMC plug-in that you can install from XBMC GUI. To install go to: System->Settings->Add-ons->Get Add-ons->XBMC.org Add-ons->Program Add-ons->Transmission and select install. If you disabled logging to Transmission there is nothing to configure. If you enabled it you need to enter username and password in the settings.
To start the plugin go to: Programs->Transmission
Transmission daemon XBMC plugin
Transmission daemon XBMC plugin – detailed torrent status
Isn’t that cool? :)
0 notes