#Convert PPK Key for SSH
Explore tagged Tumblr posts
Visit Tumblr Blog
Explore Tumblr blogs with no restrictions, modern design and the best experience.
Last Seen Tumblr Blogs


Fun Fact
Tumblr was acquired by Yahoo for $1.1B in 2013.
Text
Convert PuTTY PPK SSH keys to OpenSSH format for seamless use on Ubuntu systems. This step-by-step guide ensures your existing SSH keys work perfectly across different operating systems.
#Convert PPK Key for SSH#cross-platform SSH#key conversion#Linux security#OpenSSH#PPK format#PuTTY#SSH authentication#SSH client#SSH keys#Ubuntu
2 notes
·
View notes
Text
Setting up Dev Endpoint using Apache Zeppelin with AWS Glue
AWS Glue is a powerful tool that is managed, relieving you of the hassle associated with maintaining the infrastructure. It is hosted by AWS and offers Glue as Serverless ETL, which converts the code into Python/Scala and execute it in Spark environment.

AWS Glue provisions all the required resources (Spark cluster) at runtime to execute the Spark Job which it takes ~7-10 mins and then starts executing your actual ETL code. To reduce this time AWS Glues provides Development endpoint, which can be configured in Apache Zeppelin (provisioned with the spark environment) to interactively, run, debug and test ETL code before deploying as Glue job or scheduling the ETL process.
In order to successfully set up the Dev Endpoint on AWS Glue, first let us understand some of its prerequisites:
An IAM Role for the Glue Dev Endpoint with the necessary policies. E.g.: AWSGlueServiceRole
Table in Glue Data Catalog and the necessary connection
I am assuming that you know your way around VPC networking, security groups, etc., E.g.: The Dev Endpoint requires a security group that allows the port 22, since we need that for the SSH tunneling.
Further, we can move on to the process involved in setting up the Dev Endpoint on AWS Glue. Here’s how it goes:
Create an SSL Key Pair
You can create it using PuTTyGen tool or you can create it under AWS EC2 -> Network & Security -> Key Pairs
You need the Public Key which should look like:
You will need the Private Key in .ppk format. If you’re using PuTTYgen, you will get it in the .ppk format whereas in case of EC2 you will get the file in .pem format and you will have to convert it into .ppk using the PuTTygen conversion tool.
Make sure that the file has permissions of 400 or 600 – in case of Linux whereas in case of windows follow the below steps:
Right click on PEM file > Properties > Security > Advanced.
Make sure that you are the owner of the file and have disabled the inheritance (once you have disabled it, it will look like below screenshot)
Spin up the AWS Glue Dev Endpoints:
Create it by going to AWS Glue -> Dev endpoints -> Add endpoint and you should see this:
In Development endpoint name: Give it any name; IAM Role: Select the role which you’ve created; and Click Next.
Choose “Skip Networking Information” if you have S3 data stores, otherwise you can select the rest two as per your instances or security groups. Click Next.
Now from your key pair values, paste the Public Key here as shown below and click Next:
Review the details and click on Finish:
Now let the process run and wait until the Provisioning status shows a “READY” State.
SSH tunnel for Glue Dev Endpoint: When your dev endpoint is provisioned, check that its network interface has a public address attached to it and make note of it (e.g., ec2-xx-xxx-xxx-xx.us-west-2.compute.amazonaws.com).
a. Create SSH tunnel using PuTTY:
b. Using SSH:
Zeppelin Notebook:
Write your first Glue program:
Download the Zeppelin Notebook 0.7.3 version.
Unzip the file and copy the folder under C: Drive.
Go to localhost:8080
On the top-right corner, click anonymous > interpreter > Search for spark > edit
Have Connect to existing process checked
Set host to localhost and port to 9007
Under properties, set master to yarn-client
Remove executor.memory and spark.driver.memory properties if they exist.
Save, Ok.
Under Notebook, create Notebook > select Spark Interpreter
Try your program and execute it.
And with that, your AWS Glue is up and running. Obviously this was just scratching the surface. There is a lot more to learn but I’ll cover those in another blog.
Reach out to us at Nitor Infotech to learn more about how you can deploy AWS Glue to simplify your ETL work, and if you’re in the mood for some light reading, you can take a look at a blog that I had penned down about AWS Redshift PartiQL.
1 note
·
View note
Text
Download Puttygen 0.74 Updated Version
PuTTY is the world's most popular free SSH and telnet client. Downloads, tutorials, how-tos, vulnerabilities. Download PuTTY for Windows. Fast downloads of the latest free software! TortoiseGit 64-bit. TortoiseGit is a Windows Shell Interface to Git.
Puttygen aka Putty Key Generator
The key generation utility – PuTTYgen can create various public-key cryptosystems including Rivest–Shamir–Adleman (RSA), Digital Signature Algorithm (DSA), Elliptic Curve Digital Signature Algorithm (ECDSA), and Edwards-curve Digital Signature Algorithm (EdDSA) keys.
The aforementioned public-key cryptosystems principally focus on secure data transmission and digital signatures.
Although PuTTYgen collects keys in its native file format i.e. .ppk files, the keys can easily be converted to any file format. For Windows, the software interface is PuTTYgen.exe, whereas, for Linux OS the command-line adaptation is available using SSH commands.
How to use PuTTYgen?

PuTTYgen is used to generate public or private key pair for creating SSH keys. Below is the complete guidance about how to generate RSA key in the Windows operating system:
Once you install the PuTTY on your machine, you can easily run PuTTYgen. For the same, go to Windows -> Start Menu -> All Programs -> PuTTY -> PuTTYgen.
Download PuTTYgen on Windows
To download PuTTYgen the primary requisite is to acquire the copy of PuTTY installation package.
For the 64-bit operating system, one must install the 64-bit version of PuTTY, i.e. putty-64bit-<version>-installer.msi.Similarly, for the 32-bit operating system, the respective 32-bit version of PuTTY, i.e. putty-<version>-installer.msi needs to be installed.
Download PuTTYgen for Mac
Below is the detailed guide to download PuTTYgen on Mac operating system. Mac OS has a built-in command-line SSH client known as Terminal.
To utilize it, go to Finder and then opt for Go -> utilities from the top menu. After that find the terminal which supports SSH connections to remote servers.
However, to run PuTTYgen for mac, the first one must have to install PuTTY. There are multiple ways to install PuTTY, which are Homebrew or MacPorts. Both alternatives will also install the command-line of adaptations of PuTTYgen.
Download PuTTYgen for Ubuntu/Linux
To download PuTTYgen for Ubuntu (Linux) operating system, a user to first install PuTTY. However, in some Linux distributions, the SSH key generation tool – PuTTYgen needs to be installed independently from the PuTTY client.
For example, Debian Linux requires the below-given code to install PuTTYgen: sudo apt install putty-tools
#Download Putty#Putty#Putty Key Generater#Free Putty Download#Download Free Putty#Puttygen For Windows#Puttygen For Linux#Puttygen For Mac#Putty Download
1 note
·
View note
Text
PuTTYkey Download Guide for Windows
PuTTYkey is a key generator tool for creating pairs of public and private SSH keys. It is one of the components of the open-source networking client PuTTY. Although originally written for Microsoft Windows operating system, it is now officially available for multiple operating systems including macOS, Linux.
PuTTYgen.exe is the graphical tool on Windows OS. While on the other side, Linux OS has the only command-line version that could be accessible using SSH commands.
PuTTYkey aka PuTTY Key Generator
The key generation utility – PuTTYkey can create various public-key cryptosystems including Rivest–Shamir–Adleman (RSA), Digital Signature Algorithm (DSA), Elliptic Curve Digital Signature Algorithm (ECDSA), and Edwards-curve Digital Signature Algorithm (EdDSA) keys.
The aforementioned public-key cryptosystems principally focus on secure data transmission and digital signatures.
Although PuTTYkey collects keys in its native file format i.e. .ppk files, the keys can easily be converted to any file format. For Windows, the software interface is PuTTYgen.exe, whereas, for Linux OS the command-line adaptation is available using SSH commands.
How to use PuTTYgen?
PuTTYgen is used to generate public or private key pair for creating SSH keys. Below is the complete guidance about how to generate RSA key in the Windows operating system:
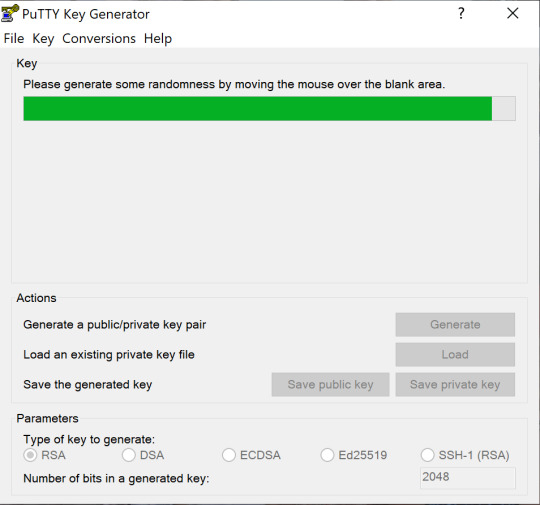
Once you install the PuTTY on your machine, you can easily run PuTTYgen. For the same, go to Windows → Start Menu → All Programs → PuTTY → PuTTYgen.
You will see the PuTTY key generator dialog box on your screen
You will find a “Generate” button in that dialog. Clicking on it will lead to generating the keys for you.
Now you will need to add a unique key passphrase in the Key passphrase and Confirm passphrase field.
Click on the “Save Public Key” and “Save Private Key” buttons to save your public and private keys.
You will see the text starting with ssh-RSA in the Public key for pasting into the OpenSSH authorized_keys file field which is located at the top of the window. Copy that entire text to your clipboard by pressing ctrl+c as you will require the key to paste on your clipboard in the public key tool of the control panel or directly on the cloud server.
Various Ways to Use RSA Key Pair
RSA key pair generated through PuTTYgen is used in two various ways defined as below:
To assign while creating a new cloud server
You can choose the public key from the given list of keys at the time of creating a cloud server. If you don’t find your key in that list, then first add and then assign it.
Assign to an existing cloud server
At the time of connecting to the cloud server, first of all, you need to tell PuTTY to use it for utilizing your newly created RSA key pair.
Download PuTTYgen
PuTTYgen being a component of the terminal emulator PuTTY does not have to be downloaded separately, hence, comes with the PuTTY.msi installation package. You can follow the simple steps to download PuTTYgen software for your system.
That is the reason why you don’t need to download PuTTYgen separately. Once you download PuTTY software, you will be able to install and run PuTTYgen easily in no time. Below is the complete instruction about how to download and install PuTTY on Windows.
Apart from that, it is also integrated into third-party programs such as the WinSCP installation package. Below you can find a complete PuTTYgen download and installation guide for all operating systems.
Download PuTTYgen on Windows
To download PuTTYgen the primary requisite is to acquire a copy of the PuTTY installation package. For the 64-bit operating system, one must install the 64-bit version of PuTTY, i.e. putty-64bit-<version>-installer.msi.Similarly, for the 32-bit operating system, the respective 32-bit version of PuTTY, i.e. putty-<version>-installer.msi needs to be installed.
To get PuTTY, go to the PuTTY Installation Download page, whereby the complete installation package will be available with setup instructions, installation guide, and download links to all other components of PuTTY such as putty.exe, pscp.exe, psftp.exe, puttytel.exe, plink.exe, pageant.exe, and putty.zip.
Following the successful download of the PuTTY installation package. It is time to install the program. Go to How to install PuTTY on Windows, whereby you will find the step by step guidance for PuTTY installation for Windows operating system.
After successfully downloading and installing PuTTY on your Windows machine, you are just 2-3 clicks away to run PuTTYgen. Follow the below-given step by step guide to run PuTTYgen:
Run PuTTYgen on Windows
To run PuTTYgen, Go to Windows → Start Menu → All Programs → PuTTY → PuTTYgen. You will see a window for the PuTTY Key Generator on your screen.
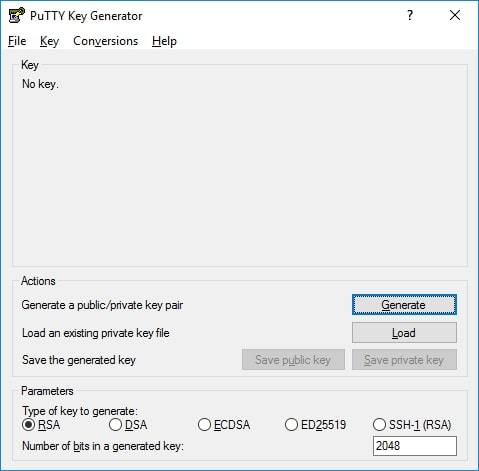
Voila! Now you can generate public or private key pair using PuTTYgen.
Types of Keys Supported on PuTTYgen
It is important to know the types of key PuTTYgen supports prior to using it. Below are the key types that it currently supports for SSH-2 and SSH-1 protocol:-
SSH-1 protocol:- For SSH-1 only supports one key i.e. Rivest–Shamir–Adleman (RSA)
SSH-2 protocol:- SSH-2 supports multiple key types that include – Digital Signature Algorithm (DSA), Elliptic Curve Digital Signature Algorithm (ECDSA) and Ed25519.
The above description is a detailed brief on downloading and running PuTTYkey on all major operating systems.
1 note
·
View note
Text
How to convert a PEM Key to a PPK Key to Connect to a Linux VM on AWS or Azure Platform in Windows 10 and 11
How to convert a PEM Key to a PPK Key to Connect to a Linux VM on AWS or Azure Platform in Windows 10 and 11
Converting PEM Key to PPK A public/private key pair is required to connect to a running Linux instance using an SSH client. An SSH client is not included with Windows. PuTTY is a popular SSH client that is available for free download and use. PuTTY, on the other hand, does not support the PEM (Privacy Enhanced Mail) key format. Because the key obtained from AWS EC2 Instance or Microsoft Azure…

View On WordPress
0 notes
Text
Putty Ssh For Mac

Putty Ssh Alternative Mac
Ssh Client For Mac
Putty Alternative Mac
Putty Free Download
Ssh And Putty Download For Mac
PuTTYgen is a key generator tool for creating pairs of public and private SSH keys. It is one of the components of the open-source networking client PuTTY. Although originally written for Microsoft Windows operating system, it is now officially available for multiple operating systems including macOS, Linux. PuTTYgen.exe is the graphical tool on Windows OS. While on the other side, Linux OS has the only command-line version could be accessible using SSH commands.
1 Download PuTTYgen
1.1 Download PuTTYgen on Windows
1.2 Download PuTTYgen for Mac
1.3 Download PuTTYgen for Ubuntu/Linux
1.3.3 Types of Keys Supported on PuTTYgen
Puttygen aka Putty Key Generator
The key generation utility – PuTTYgen can create various public-key cryptosystems including Rivest–Shamir–Adleman (RSA), Digital Signature Algorithm (DSA), Elliptic Curve Digital Signature Algorithm (ECDSA), and Edwards-curve Digital Signature Algorithm (EdDSA) keys.
The aforementioned public-key cryptosystems principally focus on secure data transmission and digital signatures.
Although PuTTYgen collects keys in its native file format i.e. .ppk files, the keys can easily be converted to any file format. For Windows, the software interface is PuTTYgen.exe, whereas, for Linux OS the command-line adaptation is available using SSH commands.
How to use PuTTYgen?
Cyberduck is a file transfer client for Apple Mac and Microsoft Windows Cyberduck is a fairly popular file transfer client for Apple Mac and Microsoft Windows. It supports FTP, SFTP, WebDAV, Amazon S3, OpenStack Swift, Backblaze B2, Microsoft Azure & OneDrive, Google Drive and Dropbox.
PuTTYgen is used to generate public or private key pair for creating SSH keys. Below is the complete guidance about how to generate RSA key in the Windows operating system:
Once you install the PuTTY on your machine, you can easily run PuTTYgen. For the same, go to Windows -> Start Menu -> All Programs -> PuTTY -> PuTTYgen.
You will see the PuTTY key generator dialog box on your screen
You will find a “Generate” button in that dialog. Clicking on it will lead to generating the keys for you.
Now you will need to add a unique key passphrase in the Key passphrase and Confirm passphrase field.
Click on the “Save Public Key” and “Save Private Key” buttons to save your public and private keys.
You will see the text starting with ssh-RSA in the Public key for pasting into OpenSSH authorized_keys file field which is located at the top of the window. Copy that entire text to your clipboard by pressing ctrl+c as you will require the key to paste on your clipboard in the public key tool of control panel or directly on the cloud server.
Various Ways to Use RSA Key Pair
RSA key pair generated through PuTTYgen is used in two various ways defined as below:

To assign while creating a new cloud server You can choose the public key from the given list of keys at the time of creating a cloud server. If you don’t find your key in that list, then first add and then assign it.
Assign to an existing cloud server At the time of connecting to the cloud server, first of all, you need to tell PuTTY to use it for utilizing your newly created RSA key pair.
PuTTYgen being a component of the terminal emulator PuTTY does not have to be downloaded separately, hence, comes with the PuTTY .msi installation package. You can follow the simple steps to download PuTTYgen software for your system. That is the reason why you don’t need to download PuTTYgen separately. Once you download PuTTY software, you will be able to install and run PuTTYgen easily in no time. Below is the complete instruction about how to download and install PuTTY on Windows.
Apart from that, it is also integrated into third-party programs such as WinSCP installation package. Below you can find a complete PuTTYgen download and installation guide for all operating systems.
PuTTY Download - Free SSH & Telnet Client. PuTTY is a popular SSH, Telnet, and SFTP client for Windows. It is typically used for remote access to server computers over a network using the SSH protocol. This is the download page. For more information on PuTTY, see the PuTTY page. For information on SSH (Secure Shell), see the here.
PuTTY is an open source network file transfer application that supports various network protocols such as Telnet, SCP, and SSH. The networking client PuTTY enables the user to access another computer within the same network.
Download PuTTYgen on Windows
To download PuTTYgen the primary requisite is to acquire the copy of PuTTY installation package. For the 64-bit operating system, one must install the 64-bit version of PuTTY, i.e. putty-64bit-<version>-installer.msi.Similarly, for the 32-bit operating system, the respective 32-bit version of PuTTY, i.e. putty-<version>-installer.msi needs to be installed.
To get PuTTY, go to PuTTY Installation Download page, whereby the complete installation package will be available with setup instructions, installation guide, and download links to all other components of PuTTY such as putty.exe, pscp.exe, psftp.exe, puttytel.exe, plink.exe, pageant.exe and putty.zip.
Following the successful download of the PuTTY installation package. It is time to install the program. Go to How to install PuTTY on Windows, whereby you will find the step by step guidance for PuTTY installation for Windows operating system.
After successfully downloading and installing PuTTY on your Windows machine, you are just 2-3 clicks away to run PuTTYgen. Follow the below-given step by step guidance to run PuTTYgen:
Run PuTTYgen on Windows
To run PuTTYgen, Go to Windows -> Start Menu -> All Programs -> PuTTY -> PuTTYgen. You will see a window for the PuTTY Key Generator on your screen.
Voila! Now you can generate public or private key pair using PuTTYgen.
Download PuTTYgen for Mac
Below is the detailed guide to download PuTTYgen on Mac operating system. Mac OS has a built-in command-line SSH client known as Terminal. To utilize it, go to Finder and then opt for Go -> utilities from the top menu. After that find the terminal which supports SSH connections to remote servers.
However, to run PuTTYgen for mac, the first one must have to install PuTTY. There are multiple ways to install PuTTY, which are Homebrew or MacPorts. Both alternatives will also install the command-line of adaptations of PuTTYgen.
Ported PuTTY for Mac
Mac has the port of PuTTY which can be installed in various ways described as below:
Installation using Homebrew: First, install the ‘brew command line’ Once installed use the below-given command to install PuTTY:- sudo brew install putty
Installation using MacPorts: First of all, one must install MacPorts and then use the command-line to install PuTTY. Here is the command to install PuTTY via MacPorts sudo port install putty Additionally, a user can also add a shortcut to the desktop by writing the following command line –cp /opt/local/bin/putty ~/Desktop/PuTTY
However, there is an alternative way to install PuTTY on Mac OS. Cyberduck is a widely used Mac OS SSH Client. Once PuTTY installed on the Mac OS, a user can convert PuTTY derived private key format to OpenSSH.
To convert the private key to standard PEM format, type the following command –
puttygen privatekey.ppk -O private-openssh -o privatekey.pem

You can also read the guide to convert .pem file to .ppk using puttygen.
Download PuTTYgen for Ubuntu/Linux
Putty Ssh Alternative Mac
To download PuTTYgen for Ubuntu (Linux) operating system, a user to first install PuTTY. However, in some Linux distributions, the SSH key generation tool – PuTTYgen needs to be installed independently from the PuTTY client.
For example, Debian Linux requires the below-given code to install PuTTYgen:
sudo apt install putty-tools
Ssh Client For Mac
Generate Key Pair for Authentication in Linux
To create the key pair for authentication in Linux use the below command:-
puttygen -t rsa -b 2048 -C 'user@host' -o keyfile.ppk
Various Command Line Options of PuTTY in Linux
Below are few important command line options in the Linux operating system for PuTTY:
PuTTYgen [-t keytype [-b bits] [-q] | keyfile] [-C new-comment] [-P] [-O output-type | -p | -l | -L] [-o output-file]
Options:
Keyfile – It is the name of the existing key file to read at the time of changing the current key.
–t keytype – The command specifies the type of key to creating. Its acceptable values are RSA and dsa.rsa1.
-b bits – This command specifies a total number of bit in a particular key. 1024 is the perfect size for DSA key, while 2048 or 4096 are the perfect size for RSA keys.
–q – The command suppresses the message about progress at the time of key generation.
-C new-comment – The command will specify the comment to describe the key. It can be used for the new and/or existing key. Key operation is not affected by a comment. However, it is used to recognize the key owner, it’s not reliable completely as any value can be applied to it.
–P – Using the command will update the passphrase of a key. Passphrase helps to encrypt the private key. As passphrase can’t add or update on a command line, it prompts a new passphrase tool to alter it.
–old-passphrase-file – The old password of the key remains in this file. The command is used when the key is protected by a passphrase.
–new-passphrase file – This command prompts the new passphrase of the key. It comes in the action either at the time of generating a new key or while applying –P command to change the passphrase.
-O output-type – This command defines what to give in output. By default, the private key is the output.
Thus, above are the prominent commands of PuTTYgen in Linux operating system. Besides that, there are many other commands available to perform various tasks from the command prompt in Linux at flank speed.
Types of Keys Supported on PuTTYgen
It is important to know the types of key PuTTYgen supports prior to using it. Below are the key types that it currently supports for SSH-2 and SSH-1 protocol:-
SSH-1 protocol:- For SSH-1 only supports one key i.e. Rivest–Shamir–Adleman (RSA)
SSH-2 protocol: – SSH-2 supports multiple key types that include – Digital Signature Algorithm (DSA), Elliptic Curve Digital Signature Algorithm (ECDSA) and Ed25519.
The above description is a detailed brief on downloading and running PuTTYgen on all major operating systems. For further details please check the Download PuTTY page.
Background
Most Unix-like systems are configured to use the SSH protocol for remote access, but most SSH client applications do not support PIV as required by Federal policy. Putty-CAC, a fork of the Open Source Putty SSH client, resolves this issue.
Note that Van Dyke Secure CRT, a commercial product, also supports PIV SSH login for multiple platforms, including Windows and Mac.
Installing PuTTY-CAC
If you have a forge.mil account, download the latest Putty-CAC package from forge.mil. If you do not have access to forge.mil, you can also download it at https://risacher.org/putty-cac. Source code is available at https://github.com/risacher/putty-cac
There is no installer available for the binaries, so you must either: ● Place the executable files in a directory that you have execute rights over. ● Build an installation package to install the executables in the location you choose. This will enable the Putty-CAC applications to be available from the Start Menu.
At a minimum, you must install the following packages: ● putty.exe ● pageant.exe
Verify the version of PuTTY that was installed by opening the application and clicking About in the lower left corner.
Launch pageant from the PuTTY install directory, (eg, C:Program FilesPutty-CAC). Pageant will appear in the taskbar on the bottom right of your desktop;it will not open a window.
You must now insert the CAPI Key and configure PuTTY-CAC. Follow the steps below.
Putty Alternative Mac
Add CAPI Key into Pageant

Open Windows Explorer or click Start > Computer.
Open Pageant by clicking the executable.
A window will not open, but the Pageant icon will appear on the menu bar. Right-click the icon and select View Keys.
The Pageant Key List window will appear. Click Add CAPI Cert.
Select your Smart Card Logon certificate from the Windows Security window.
● Make sure you choose the correct certificate! Select “Click here to view certificate properties,” click “Details,” scroll half-way, and locate Enhanced Key Usage. It should begin with “Smart Card Logon;” this indicates it is the correct certificate. If you do not see this field, select a different certificate. Note: If multiple certificates exist, you may want to clear out the expired or revoked certificates by following How To – FIXME: PIV Card – Clear certificate store. ● Click OK to close the details window.
Highlight the correct Smart Card certificate and click OK.
The Pageant Window will now display the certificate information.
Click Close.
Warning: You must re-add your certificate every time pageant is started.
Configure PuTTY-CAC
Right-click the Pageant icon again from the menu bar and select New Session. This will launch PuTTY.
From within PuTTY, enter the destination IP address or hostname in the Host Name (or IP address) textbox to setup a new profile, or if you already have profiles set up in PuTTY, load that profile.
Note: If you have multiple destination profiles, you will have to do the following steps for each profile
Enter a descriptive name under Saved Sessions textbox (if setting up a new profile).
On left panel, select Connection > SSH > CAPI thencheck the box beside the words Attempt “CAPI Certificate” (Key-only) auth (SSH-2).
From within PuTTY, select Connection > SSH > Auth then select both “Allow agent forwarding” and “Allow attempted changes of username in SSH-2.”
Click Session, then Save. This profile is now configured for PIV logon.
To get your PIV card’s SSH key, in PuTTY, go to Connection > SSH > CAPI and select the browse button on the right side. This will automatically fill in the “Cert” and “SSH keystring” fields.
Copy and paste the SSH keystring value from PuTTY into Notepad as you will need to include the SSH key when you contact the jumpbox support team or create a service ticket.
The configuration file should contain “Host *” and “ForwardAgent yes” and exist in the same folder where they place the SSH key.
In Saved Sessions, click Save to save your configuration.
Putty Free Download
Verify PIV Login
Ssh And Putty Download For Mac
Open Pageant (if not already running) and make sure your CAPI key is populated, close the Pageant window. Right click the Pageant icon and choose “New Session”. This will open PuTTY-CAC.
Load one of your saved sessions that you previously configured for PIV logon.
When prompted, enter your remote Unix/Linux account name, and you should be prompted for your PIV PIN.
Enter your PIN, click OK and you should be logged in.
Once logged in, run ‘ssh-add –l’ to ensure that the forwarding agent is working. If you do not see the key printed when you run this command, something is wrong and you will not be prompted for your PIN if you ssh further into the environment.
Both the cert key that was pasted into the .ssh/authorized_keys and the config file need to be copied or scp’d to all the servers you will connect to in the data center. If the forwarding agent is working when you ssh to a server beyond the jumphost, you should be prompted for the PIN again.
After each server you ‘jump’ to, the output of ssh-add –l should always show the key. If not, either permissions are wrong or a file is mislabeled, or missing.
0 notes
Text
Convert private key generated via OCI Console to ppk
I am pretty new on the Oracle Cloud Infrastructure technology, so maybe I am talking about something you already know. But anyway I prefer to share this case: it can help if you encounter the same problem as me. Let’s take the risk to have too much information rather than nothing! The problem I was doing some tests on the new MySQL Database Service and during the setup I decided to generate my ssh keys via the OCI console: When I tried to connect via PuTTY or MobaXterm to my compute instance using the opc account and my private key (generated previously), I got the following error: Looking at the keys generated via the Oracle Cloud console, I saw that they were defined in the following format: The solution Actually I don’t work directly on a Linux system. So I need to convert my private key if I want to make it usable via my connection tools. First step is to transform it to RSA format. I can do it using OpenSSL: # openssl rsa -in ssh-key-2020-11-24.key -out ssh-key-2020-11-24.rsa Second and last step is to convert it to ppk format. I can do it using PuTTYgen. I load the private key: I filter on all files types: I select my RSA key and I click on Open: I click on Ok on the following message: and then on Save private key: So I save the key with a ppk format: Tests I can now use my private key to connect to my OCI compute instance via PuTTY: or MobaXterm: Hope this can help you! Cet article Convert private key generated via OCI Console to ppk est apparu en premier sur Blog dbi services. https://blog.dbi-services.com/convert-private-key-generated-via-oci-console-to-ppk/
0 notes
Text
Bash Script for Automatic Creation and Generation of Public Private Key for Linux Server Login
Bash Script for Automatic Creation and Generation of Public Private Key for Linux Server Login
Wrote this quick blurb so I never have to do this process again.
The general idea is to take the output that is created on the screen, copy and paste it to a file somewhere on your computer, and either use it as is with your environment ssh configuration or convert it to a *.ppk for Putty.
What the script does is the following:
Create the .ssh directory as the user you are currently…
View On WordPress
0 notes
Text
Way To Create SSH Key Linux
Create SSH Key Linux
Which you could learn here the system to generate SSH key Linux command line. By the way, every plan of website hosting provides facilitation to attach through SSH. In case you are on Reseller web hosting. Then the advisor will aid you to attach through SSH command line. In addition, shared web hosting additionally furnish the ability to connect through SSH command line. For this reason, you need to create SSH key. After construction download it. Finally, join through SSH client.
Hold in intellect: If the server identifies layout is like that identity####. Then you might be on colossal disk server so you don’t have the ability to attach by way of SSH. Now simply proceed to examine generate SSH key Linux command line.
Create SSH Key Linux
First, allow SSH and after it login CPanel. Now click on SSH/ Shell access which is below safety. After it simply clicks on control SSH key, then on Generate new key. Form a password and once more password within the 2nd field. Key-password
finally, click on Generate key. Now you are going to get a victorious message. When you will attain on subsequent screen click on manage Authorization. Here you're going to see a message wherein wording use “the important thing with the identity “id_dsa” (this title may just vary based on your settings) is currently……….” Now click on Authorize button. Download and Convert SSH Key
First, putty gen download from the net. Now login to CPanel. Click on SSH/ Shell access so we can find protection. Now click on manage SSH keys After it clicks on view/ download for you to exhibit under exclusive keys. Here you'll find download key button click on it. Now open putty gen, and click on Load ultimately, click on puTTy confidential Key files(*.Ppk) from the drop down menu and alter it to All files (*.*). Next, decide on id_dsa file which you've gotten downloaded. Confidential-key-file
Step To Create SSH Key Linux
Now pen it. A popup box will appear and ask you Password. Insert password and hit enter. Enter-go-phrase
here you're going to get a positive message. Puttygen-realize
simply click on save confidential key by way of clicking on the button which has shown within the beneath the photo. Keep-private-key
SSH via Putty
Open Putty, below connection, click on SSH and after it on Auth. Putty-auth
Now browse that will exhibit under private key for authentication. Now simply select the exclusive key which you have downloaded. Open it. Right here click on Session and insert 2222. You should use the domain title for the host identify. After it clicks on the open button for connection. For those who see a security alert then click on yes button. Putty-safety-alert
Create SSH Key Linux
right here you'll see login part. Just enter CPanel username. Now enter a password. As a result of safety rationale, you'll not able to look your password whilst typing. Now you have logged in to your account via SSH. You've got examine generate SSH key Linux Command Line. When you face any quandary to generate SSH key Linux Command Line then contact with website hosting provider.
Generate SSH Key
The Truth About Allowed Memory Size Exhausted Error
Login VPS Via SSH
OMG! The Best Site PHP Settings Command Line Ever!
0 notes