#Puttygen For Linux
Explore tagged Tumblr posts
Visit Tumblr Blog
Explore Tumblr blogs with no restrictions, modern design and the best experience.
Last Seen Tumblr Blogs


Fun Fact
In 2020, Tumblr had 29.4 million users in the US.
Text
2 notes
·
View notes
Text
Download Puttygen 0.74 Updated Version
PuTTY is the world's most popular free SSH and telnet client. Downloads, tutorials, how-tos, vulnerabilities. Download PuTTY for Windows. Fast downloads of the latest free software! TortoiseGit 64-bit. TortoiseGit is a Windows Shell Interface to Git.
Puttygen aka Putty Key Generator
The key generation utility – PuTTYgen can create various public-key cryptosystems including Rivest–Shamir–Adleman (RSA), Digital Signature Algorithm (DSA), Elliptic Curve Digital Signature Algorithm (ECDSA), and Edwards-curve Digital Signature Algorithm (EdDSA) keys.
The aforementioned public-key cryptosystems principally focus on secure data transmission and digital signatures.
Although PuTTYgen collects keys in its native file format i.e. .ppk files, the keys can easily be converted to any file format. For Windows, the software interface is PuTTYgen.exe, whereas, for Linux OS the command-line adaptation is available using SSH commands.
How to use PuTTYgen?

PuTTYgen is used to generate public or private key pair for creating SSH keys. Below is the complete guidance about how to generate RSA key in the Windows operating system:
Once you install the PuTTY on your machine, you can easily run PuTTYgen. For the same, go to Windows -> Start Menu -> All Programs -> PuTTY -> PuTTYgen.
Download PuTTYgen on Windows
To download PuTTYgen the primary requisite is to acquire the copy of PuTTY installation package.
For the 64-bit operating system, one must install the 64-bit version of PuTTY, i.e. putty-64bit-<version>-installer.msi.Similarly, for the 32-bit operating system, the respective 32-bit version of PuTTY, i.e. putty-<version>-installer.msi needs to be installed.
Download PuTTYgen for Mac
Below is the detailed guide to download PuTTYgen on Mac operating system. Mac OS has a built-in command-line SSH client known as Terminal.
To utilize it, go to Finder and then opt for Go -> utilities from the top menu. After that find the terminal which supports SSH connections to remote servers.
However, to run PuTTYgen for mac, the first one must have to install PuTTY. There are multiple ways to install PuTTY, which are Homebrew or MacPorts. Both alternatives will also install the command-line of adaptations of PuTTYgen.
Download PuTTYgen for Ubuntu/Linux
To download PuTTYgen for Ubuntu (Linux) operating system, a user to first install PuTTY. However, in some Linux distributions, the SSH key generation tool – PuTTYgen needs to be installed independently from the PuTTY client.
For example, Debian Linux requires the below-given code to install PuTTYgen: sudo apt install putty-tools
#Download Putty#Putty#Putty Key Generater#Free Putty Download#Download Free Putty#Puttygen For Windows#Puttygen For Linux#Puttygen For Mac#Putty Download
1 note
·
View note
Photo

(via Convert a PEM Key to a PPK Key on a Linux and Windows)
0 notes
Text
Setting up Dev Endpoint using Apache Zeppelin with AWS Glue
AWS Glue is a powerful tool that is managed, relieving you of the hassle associated with maintaining the infrastructure. It is hosted by AWS and offers Glue as Serverless ETL, which converts the code into Python/Scala and execute it in Spark environment.

AWS Glue provisions all the required resources (Spark cluster) at runtime to execute the Spark Job which it takes ~7-10 mins and then starts executing your actual ETL code. To reduce this time AWS Glues provides Development endpoint, which can be configured in Apache Zeppelin (provisioned with the spark environment) to interactively, run, debug and test ETL code before deploying as Glue job or scheduling the ETL process.
In order to successfully set up the Dev Endpoint on AWS Glue, first let us understand some of its prerequisites:
An IAM Role for the Glue Dev Endpoint with the necessary policies. E.g.: AWSGlueServiceRole
Table in Glue Data Catalog and the necessary connection
I am assuming that you know your way around VPC networking, security groups, etc., E.g.: The Dev Endpoint requires a security group that allows the port 22, since we need that for the SSH tunneling.
Further, we can move on to the process involved in setting up the Dev Endpoint on AWS Glue. Here’s how it goes:
Create an SSL Key Pair
You can create it using PuTTyGen tool or you can create it under AWS EC2 -> Network & Security -> Key Pairs
You need the Public Key which should look like:
You will need the Private Key in .ppk format. If you’re using PuTTYgen, you will get it in the .ppk format whereas in case of EC2 you will get the file in .pem format and you will have to convert it into .ppk using the PuTTygen conversion tool.
Make sure that the file has permissions of 400 or 600 – in case of Linux whereas in case of windows follow the below steps:
Right click on PEM file > Properties > Security > Advanced.
Make sure that you are the owner of the file and have disabled the inheritance (once you have disabled it, it will look like below screenshot)
Spin up the AWS Glue Dev Endpoints:
Create it by going to AWS Glue -> Dev endpoints -> Add endpoint and you should see this:
In Development endpoint name: Give it any name; IAM Role: Select the role which you’ve created; and Click Next.
Choose “Skip Networking Information” if you have S3 data stores, otherwise you can select the rest two as per your instances or security groups. Click Next.
Now from your key pair values, paste the Public Key here as shown below and click Next:
Review the details and click on Finish:
Now let the process run and wait until the Provisioning status shows a “READY” State.
SSH tunnel for Glue Dev Endpoint: When your dev endpoint is provisioned, check that its network interface has a public address attached to it and make note of it (e.g., ec2-xx-xxx-xxx-xx.us-west-2.compute.amazonaws.com).
a. Create SSH tunnel using PuTTY:
b. Using SSH:
Zeppelin Notebook:
Write your first Glue program:
Download the Zeppelin Notebook 0.7.3 version.
Unzip the file and copy the folder under C: Drive.
Go to localhost:8080
On the top-right corner, click anonymous > interpreter > Search for spark > edit
Have Connect to existing process checked
Set host to localhost and port to 9007
Under properties, set master to yarn-client
Remove executor.memory and spark.driver.memory properties if they exist.
Save, Ok.
Under Notebook, create Notebook > select Spark Interpreter
Try your program and execute it.
And with that, your AWS Glue is up and running. Obviously this was just scratching the surface. There is a lot more to learn but I’ll cover those in another blog.
Reach out to us at Nitor Infotech to learn more about how you can deploy AWS Glue to simplify your ETL work, and if you’re in the mood for some light reading, you can take a look at a blog that I had penned down about AWS Redshift PartiQL.
1 note
·
View note
Text
PuTTYkey Download Guide for Windows
PuTTYkey is a key generator tool for creating pairs of public and private SSH keys. It is one of the components of the open-source networking client PuTTY. Although originally written for Microsoft Windows operating system, it is now officially available for multiple operating systems including macOS, Linux.
PuTTYgen.exe is the graphical tool on Windows OS. While on the other side, Linux OS has the only command-line version that could be accessible using SSH commands.
PuTTYkey aka PuTTY Key Generator
The key generation utility – PuTTYkey can create various public-key cryptosystems including Rivest–Shamir–Adleman (RSA), Digital Signature Algorithm (DSA), Elliptic Curve Digital Signature Algorithm (ECDSA), and Edwards-curve Digital Signature Algorithm (EdDSA) keys.
The aforementioned public-key cryptosystems principally focus on secure data transmission and digital signatures.
Although PuTTYkey collects keys in its native file format i.e. .ppk files, the keys can easily be converted to any file format. For Windows, the software interface is PuTTYgen.exe, whereas, for Linux OS the command-line adaptation is available using SSH commands.
How to use PuTTYgen?
PuTTYgen is used to generate public or private key pair for creating SSH keys. Below is the complete guidance about how to generate RSA key in the Windows operating system:
Once you install the PuTTY on your machine, you can easily run PuTTYgen. For the same, go to Windows → Start Menu → All Programs → PuTTY → PuTTYgen.
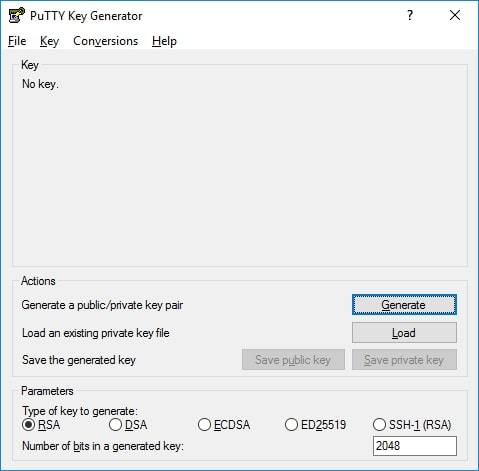
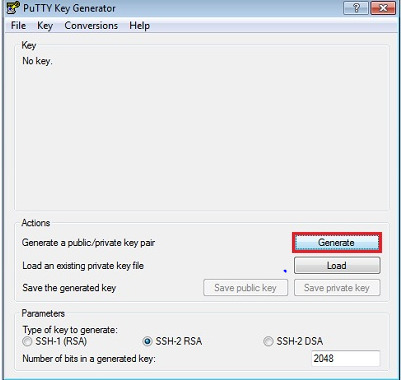
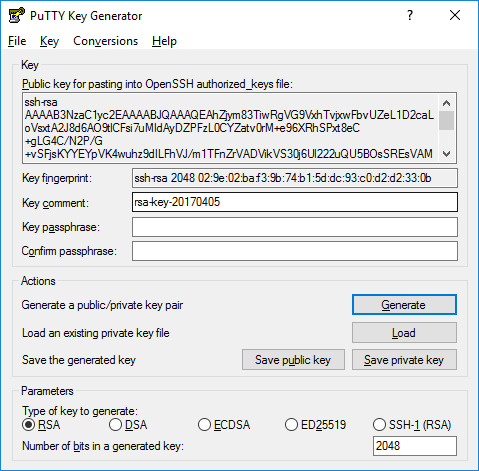
You will see the PuTTY key generator dialog box on your screen
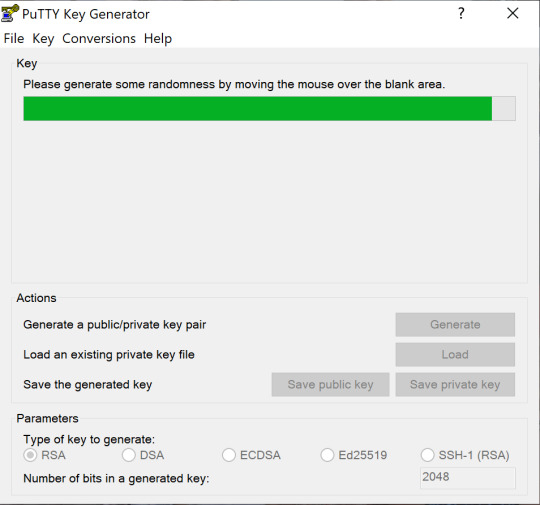
You will find a “Generate” button in that dialog. Clicking on it will lead to generating the keys for you.
Now you will need to add a unique key passphrase in the Key passphrase and Confirm passphrase field.
Click on the “Save Public Key” and “Save Private Key” buttons to save your public and private keys.
You will see the text starting with ssh-RSA in the Public key for pasting into the OpenSSH authorized_keys file field which is located at the top of the window. Copy that entire text to your clipboard by pressing ctrl+c as you will require the key to paste on your clipboard in the public key tool of the control panel or directly on the cloud server.
Various Ways to Use RSA Key Pair
RSA key pair generated through PuTTYgen is used in two various ways defined as below:
To assign while creating a new cloud server
You can choose the public key from the given list of keys at the time of creating a cloud server. If you don’t find your key in that list, then first add and then assign it.
Assign to an existing cloud server
At the time of connecting to the cloud server, first of all, you need to tell PuTTY to use it for utilizing your newly created RSA key pair.
Download PuTTYgen
PuTTYgen being a component of the terminal emulator PuTTY does not have to be downloaded separately, hence, comes with the PuTTY.msi installation package. You can follow the simple steps to download PuTTYgen software for your system.
That is the reason why you don’t need to download PuTTYgen separately. Once you download PuTTY software, you will be able to install and run PuTTYgen easily in no time. Below is the complete instruction about how to download and install PuTTY on Windows.
Apart from that, it is also integrated into third-party programs such as the WinSCP installation package. Below you can find a complete PuTTYgen download and installation guide for all operating systems.
Download PuTTYgen on Windows
To download PuTTYgen the primary requisite is to acquire a copy of the PuTTY installation package. For the 64-bit operating system, one must install the 64-bit version of PuTTY, i.e. putty-64bit-<version>-installer.msi.Similarly, for the 32-bit operating system, the respective 32-bit version of PuTTY, i.e. putty-<version>-installer.msi needs to be installed.
To get PuTTY, go to the PuTTY Installation Download page, whereby the complete installation package will be available with setup instructions, installation guide, and download links to all other components of PuTTY such as putty.exe, pscp.exe, psftp.exe, puttytel.exe, plink.exe, pageant.exe, and putty.zip.
Following the successful download of the PuTTY installation package. It is time to install the program. Go to How to install PuTTY on Windows, whereby you will find the step by step guidance for PuTTY installation for Windows operating system.
After successfully downloading and installing PuTTY on your Windows machine, you are just 2-3 clicks away to run PuTTYgen. Follow the below-given step by step guide to run PuTTYgen:
Run PuTTYgen on Windows
To run PuTTYgen, Go to Windows → Start Menu → All Programs → PuTTY → PuTTYgen. You will see a window for the PuTTY Key Generator on your screen.
Voila! Now you can generate public or private key pair using PuTTYgen.
Types of Keys Supported on PuTTYgen
It is important to know the types of key PuTTYgen supports prior to using it. Below are the key types that it currently supports for SSH-2 and SSH-1 protocol:-
SSH-1 protocol:- For SSH-1 only supports one key i.e. Rivest–Shamir–Adleman (RSA)
SSH-2 protocol:- SSH-2 supports multiple key types that include – Digital Signature Algorithm (DSA), Elliptic Curve Digital Signature Algorithm (ECDSA) and Ed25519.
The above description is a detailed brief on downloading and running PuTTYkey on all major operating systems.
1 note
·
View note
Text
Se connecter en SSH avec PuTTY avec un jeu de clés
PuTTY permet de se connecter à des serveurs distants Linux ou Unix en SSH, permettant ainsi de sécuriser vos connexions en les chiffrant par une paire de clés générées par PuTTYgen. Source : https://ift.tt/avzynRo
0 notes
Text
Windows 8.1 key generator free 無料ダウンロード.Start Menu 8 Free
Windows 8.1 key generator free 無料ダウンロード.PuTTYgen Download Guide for Windows, Linux and Mac

Windows 10 Product Key Viewer.Windowsのプロダクトキーを簡単に確認できるソフト「Windows 10 Product Key Viewer」 | フリーソフトラボ.com
Windows Pro ISOファイルを無料でダウンロードする方法は以下の通りです。 1.Windows 用のインストール メディアを作成するにアクセスします。 2.[メディアの作成]をクリックして『』をダウンロードします。 · Download Serial Key Generator for Windows to create serial keys for your C#.NET, , C++ Builder, Delphi, and Java applications. Serial 5/5(2) 商品説明 ・Windows Professional 32/bit ・国内正規品、1PC対応、永続版のプロダクトキーです。 ・ご注文確認後、注文承諾メールにてプロダクトキーをお知らせします。4,4/5()
Windows 8.1 key generator free 無料ダウンロード.Serial Key Generator - Free download and software reviews - CNET Download
· Download Serial Key Generator for Windows to create serial keys for your C#.NET, , C++ Builder, Delphi, and Java applications. Serial 5/5(2) · Windows 8 の展開用PC作成の際に一時的にプロダクトキーが必要になるときがあります。 そんなときのためにライセンス認証には使用できないインストール専用のプロダクトキー��公開されています。 Windows バージョン 既定のプロダクト キー Start Menu 8 Freeの新機能. Start Menu 8 は Windows 8 / / 10 向けのスタートメニューと UI を取り戻すことができるカスタマイズツールです。 新しいスタートメニューや UI を慣れ親しんだ Windows 7 スタイルに戻すことができます。
By joining Download. com, you agree to our Terms of Use and acknowledge the data practices in our Privacy Policy. Features: Generate serial keys using custom number of columns and characters per column. Generate up to 2 million serial keys in one turn 1 million with 32 bit version of SKG.
Export serial keys to CSV, TXT documents. Import serial keys from CSV, TXT documents. Export serial keys to MySQL and MS SQL databases SQL Query generator. Export serial keys to encrypted registration files SHA Update encrypted registration files add new serial keys, delete or validate existing serial keys.
Source code generator for encrypted registration files supporting C. NET, Visual Basic. INNO and NSIS scripts are also supported!
Validate, add and delete serial keys from MS SQL server. Documentation and example projects for VB. NET, C. Lifetime free upgrades. Join or Sign In Sign in to add and modify your software Continue with email By joining Download. MOST POPULAR APPS. Free YouTube Downloader. IObit Uninstaller. Internet Download Manager. WinRAR bit.
VLC Media Player. MacX YouTube Downloader. Microsoft Office YTD Video Downloader. Adobe Photoshop CC. VirtualDJ Avast Free Security. WhatsApp Messenger. Talking Tom Cat. Clash of Clans. Subway Surfers. TubeMate 3.
Google Play. XXX Video Player - HD X Player. YouTube Downloader and MP3 Converter Snaptube. Free COVID at-home test kits. Spider-Man: Across the Spider-Verse trailer. Omicron vs. New Google Maps features. Walmart PS5 and Xbox Series X restock. Windows Windows. Most Popular. New Releases. Desktop Enhancements.
Networking Software. Trending from CNET. Home Windows Developer Tools Software Installation Tools Serial Key Generator. Serial Key Generator By VCL Examples Free to try. Download Now. Key Details of Serial Key Generator. Create serial keys for your C. NET, VB. Clicking on the Download Now Visit Site button above will open a connection to a third-party site. com cannot completely ensure the security of the software hosted on third-party sites. Developer's Description By VCL Examples.
Serial Key Generator is application specially designed for software developers to help protect your applications by serial key registration. Just in a few clicks you are able to generate serial keys and to implement them inside your C.
INNO and NSIS scripts are also supported. Full Specifications. What's new in version 7. Version 7. Source code generator and example projects for INNO and NSIS. Updated help and documentation, new demonstration videos. Improved application performance. Release July 4, Date Added July 22, Operating Systems. Operating Systems Windows 10, Windows , Windows 8, Windows Vista, Windows, Windows Server , Windows 7, Windows XP.
Additional Requirements None. Total Downloads , Downloads Last Week Report Software. Related Software. Install and configure your products and applications reducing the total cost of ownership. Advertise features of a program on installation and allow users the option to install only specific features on demand. CD Key Generator Free to try. Easy SIS Creator Free. Generate SIS installation files for Symbian OS.
User Reviews. Show Reviews.
0 notes
Text
How to Setup a Deep Learning AWS Instance to Run a Jupyter Notebook Server

If you are a machine learning professional, you would be using the Jupyter notebooks frequently. There can be problems running code in our laptops due to limited memory and the limited number of cores. Some models like SVM or GridSerach operations can take a lot of time to run on our Windows laptops. If working with anaconda, You will find that Python runs slower in Windows compared to Linux. To get around these limitations and run our models faster, we have various options available with us like
1. AWS Sagemaker 2. Azure ML 3. Cloud AI from Google
These are SAS offerings from major cloud providers and then there are others options from other providers also. One drawback would be that we will have to use their Jupyter notebooks instead of directly running our self-created notebooks.
In this post, I will discuss the option to use AWS EC2 resources for raw computing power. These can be used as follows
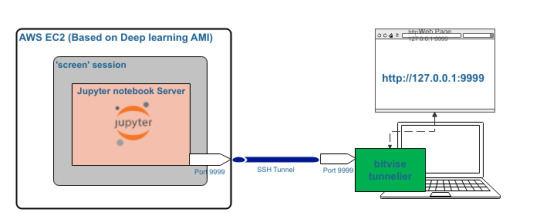
1. Create AWS EC2 instance using Deep learning AMI. 2. Run Jupyter Server in EC2 instance. 3. Connect to Jupyter server from your laptop over SSH tunnel
This will ensure that you can use the higher computing power of AWS and yet get the convenience of Jupyter notebook model. Do remember that AWS is a costly resource. You should check the AWS cost calculator for more details before choosing any resource.
Below detailed steps can be used to set up your own AWS EC2 box for Machine learning
1. Download and install network tools on your Windows machine from putty and bitvise tunnelier. Also get filezilla.
2. Create AWS EC2 instance using highest version of Deep Learning AMI. Choose Ubuntu or Amazon EMI as per your comfort. These AMIs are preloaded with anaconda based environments as also Jupyter notebook package.
3. Choose the proper amount of RAM and HDD as you can afford. Opt for higher values but make sure to turn off machines when not needed. AWS Instance scheduler service can be used to schedule instances as per fixed time slot. Alternatively, install the AWS app on mobile and use it to shut down machines at will.
4. Opt for Elastic IPs if multiple colleagues will use it. Please release Elastic IPs when not needed. These IPs costs $3 per month if not attached to an instance.
5. For SSH and FTP, Enable ports 20, 21 & 22. Use security group or set these values during EC2 instance creation.
6. Convert PEM files downloaded from AWS to PPK file using PuttyGen tool.
7. Connect to EC2 instances using Putty and generated PPK file.
8. If needed, create new conda environment. To get all required packages, Install seaborn, notebook, kmodes and scikit-learn in the new environment. This should bring in most scientific packages as a dependency.
9. Copy self-generated Jupyter notebook and data files to EC2 using SFTP client Filezilla or bitvise SFTP tool.
10. To start Jupyter Server in EC2 instance, use the command “Jupyter notebook — port port-num” where the port number could be anything you choose. In the terminal, you will see Token for connection. This token has to be used later on. Find the entry in terminal output and save it for future. Every new run generates a new token.
11. Use Putty or bitvise tunnelier to create SSH tunnel. For long-term and more convenient options, use bitvise tunnelier. Port mapping in bitvise tunnelier should be done as given in the screenshots towards the end.
12. Jupyter notebook can now be opened in your laptop browser using http://127.0.0.1:PortNumber. You will be asked to provide token copied from terminal earlier. You can now navigate to notebook copied earlier to EC2 instance. This will feel like you are working on windows machine.
13. For persistence run, Use ‘screen’ command to run Jupyter notebook on AWS machine. This will then ensure that it is not affected by Putty or bitvise terminal closure. Every new run needs a new token. To avoid token option, create passwords.
14. Make sure to restrict AWS access your public IP. This will avoid misuse. Never share PPK or PEM file with any unknown entity.
15. Deep learning AMIs do not impose Machine configuration. These AMIs can be any configuration available. If you have a personal account, AWS may not allow you to choose more than 32 GB RAM.
More details are given by AWS and others at below links. I have also shared bitvise configuration options.
1. Running Jupyter Notebook Tutorials 2. Configure a windows putty client for AWS access 3. Test by Logging in to the Jupyter notebook server 4. Automatic SSH tunneling from Windows 5. AWS Deep Learning AMI Homepage 6. Developer Guide and Release Notes 7. Forum: AWS Deep Learning AMIs 8. Bitvise client 9. https://www.putty.org/ 10. https://filezilla-project.org/ 11. Use screen command in Linux 12. AWS Cost calculator
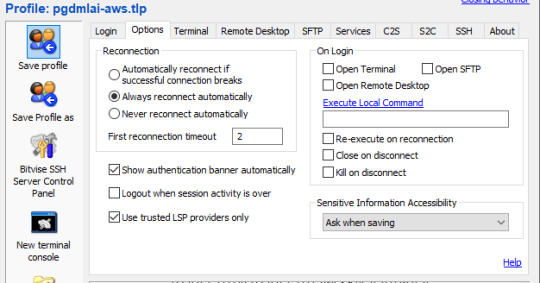
Bitvise client options


1 note
·
View note
Text
How To Run Keygen Exe On Mac
How To Run Keygen Exe On Mac Iso
Run Keygen Exe On Mac Catalina
Keygen Exe Download
How To Run Keygen Exe On Mac Windows 10
Being a Mac user, I can proudly say it is one of the most powerful machine ever built for the Developers. When I switched to Mac from Windows, for 2-3 days I found it very difficult to operate Mac. But now, I can’t think of switching back considering the User-friendly GUI and my love for UNIX. Though everything is just amazing, but there’s always room for improvement and Mac is no exception to it.
Keygen MacOS Sierra Fix #Keygen วิธีแก้ปัญหา MacOS Sierra ลง keygen ไม่ได้ Download UPX.out: https://drive.google.com/open?id. How to run Xforce Keygen Mac OS fixed has built in proxy and VPN for 100% safety and anonymity. Our tool is 100% safe and secure, w us only open source technology and every one can edit and see our code, all instructions ar included after installation.
Intervalzero rtx keygen green crack finish time. — Featured Firm —. Crack zahir dongle. Batman arkham asylum crack razor keygen cubase 6 mac. Xforce keygen free download - XForce.
PuTTYgen is a key generator tool for creating pairs of public and private SSH keys. It is one of the components of the open-source networking client PuTTY. Although originally written for Microsoft Windows operating system, it is now officially available for multiple operating systems including macOS, Linux.
Well, there is a software called winebottler for mac, you just need to install that in your mac and then simply open your.exe file with wine by right clicking and 'open with'. Once wine opens up you can select the appropriate options and click okay and your executable file would be converted to mac file which can be readily executed on mac.
Most of the people don’t even realise that many of the apps that they used to run on Windows are not available for Mac until they hit the roadblocks. Some of them end up paying the hefty amount for Parallel Desktop and other install Windows via BootCamp. In case you don’t need complete Windows experience and just want to run some apps or programs, we have a better solution for you. Today, at GizmoStorm, we are with How To Run exe Files On Mac Without Installing Windows :
Before We Begin, You Need:
How To Run Keygen Exe On Mac Iso
Mac running on OS X 10.6 Snow Leopard or above.
WineBottler and Wine app installed on your Mac. Both the app comes in a single package, just drag both the apps to Application folder.
(DownloadWineBottlerPackage)
How To Run exe Files On Mac Without Installing Windows
Step 1: Done with installing WineBottler and Wine app? If not, please follow the pre-requisite section before proceeding further. WineBottler packages the Windows-based applications like media players, applications, business tools and any other significant program that has not been ported to OS X into mac bundles.
See also : How To Record Skype Video Calls On Mac For Free (Yosemite and Mavericks Supported)
Step 2: Keep your .exe file that you want to run on your Mac handy.
Step 3: Now head over to the file and double click on it. I am a big fan of classic games and Sonic is one of them, so in my case, I’ll be using Sonic.exe
Step 4: It’ll ask you if you want to run the .exe file directly or want to convert it to Mc bundle first, the choice is totally yours. For illustration purpose I am selecting the latter.
Step 5: A window will pop up. Keep the settings same, but the particular settings highlighted in the screenshot totally depends upon your choice. Select any one of them according to your needs, it’ll not be a problem.
Step 6: Press the Install button, sit back and relax as Wine will do rest of the work for you. Finally, you’ll be gifted with the Mac bundled application of your favourite windows .exe file.
See also : How To Record Android Screen Without ADB On Mac
In case you didn’t understand the procedure, we have a video tutorial for you :
I Hope it was your successful attempt to Run exe Files On Mac Without Installing Windows. Still facing any issues or errors, feel free to ask in the comment box provided below. Keep subscribedfor latest How-tos at Gizmostorm. For more Mac Tutorials, head over to Mac How-tos section right away.
Download AutoCAD 2019 full setup free with Xforce keygen - crack to activate it instantly ! Follow step by step method to get it activated for free without license key!
AutoCAD 2019 64 bit crack
Autocad 2019 32 bit crack
Run Keygen Exe On Mac Catalina
Autocad 2019 keygen MAC
Autocad 2019 keygen
Autocad 2019 Xforce keygen
autocad 2019 patch
Autocad 2019 activation key
How to Activate Autocad 2019 for free
Autocad 2019 keygen only
autocad 2019 serial number
autocad 2019 system requirements
autocad 2019 direct link
autocad 2019 activation code
autocad 2019 activation
autocad 2019 activation code generator
autocad 2019 app
autocad 2019 activation key
autocad 2019 crack installation
autocad 2019 crack xforce download
autocad 2019 crack xforce free download
autocad 2019 configuration require
autocad 2019 crack reddit
autocad 2019 hack
autocad 2019 install error
autocad 2019 installation guide
autocad 2019 install error 1603
autocad 2019 including specialized toolsets
autocad 2019 image
autocad 2019 installed but not opening
autocad 2019 installation stuck
autocad 2019 is not found on this computer
autocad 2019 keygen mac
autocad 2019 mac xforce
autocad 2019 mac download
autocad 2019 portable
Keygen Exe Download
--------------------------------
About AutoCAD 2019
--------------------------------
How To Run Keygen Exe On Mac Windows 10
It is professional desktop software to create precise 2D and 3D drawings, an ideal program for architects, engineers, and construction. Autocad 2019 is a powerful computer-aided design (CAD) and drafting software, the world’s leading 2D and 3D CAD application tools. This makes it very complex for beginners, although there is extensive documentation and a series of tutorials to get you started. Autocad 2019 enables you to create, visualize, document, and share your ideas like never before. The intuitive interface has been much improved in past years and now makes it much easier to identify the different functions available.
0 notes
Text
Criando Chave Publica e Private com PuttyGen
Criando Chave Publica e Private com PuttyGen
Vou ensinar a criar uma chave publica e privada utilizando Putty Gen para acesso a VMs linux no Azure. 1-) Baixar e instalar o putty genhttps://www.puttygen.com/download-putty#PuTTY_for_windows 2-) Gerar a chave Publica Abra o Putty Gen e clique em “generate” Agora fique mexendo o mouse até gerar a chave Isso mesmo, mexendo o mouse se deixar o mouse parado ele não criar a chave 3-) Teremos…

View On WordPress
0 notes
Text
Putty Ssh For Mac

Putty Ssh Alternative Mac
Ssh Client For Mac
Putty Alternative Mac
Putty Free Download
Ssh And Putty Download For Mac
PuTTYgen is a key generator tool for creating pairs of public and private SSH keys. It is one of the components of the open-source networking client PuTTY. Although originally written for Microsoft Windows operating system, it is now officially available for multiple operating systems including macOS, Linux. PuTTYgen.exe is the graphical tool on Windows OS. While on the other side, Linux OS has the only command-line version could be accessible using SSH commands.
1 Download PuTTYgen
1.1 Download PuTTYgen on Windows
1.2 Download PuTTYgen for Mac
1.3 Download PuTTYgen for Ubuntu/Linux
1.3.3 Types of Keys Supported on PuTTYgen
Puttygen aka Putty Key Generator
The key generation utility – PuTTYgen can create various public-key cryptosystems including Rivest–Shamir–Adleman (RSA), Digital Signature Algorithm (DSA), Elliptic Curve Digital Signature Algorithm (ECDSA), and Edwards-curve Digital Signature Algorithm (EdDSA) keys.
The aforementioned public-key cryptosystems principally focus on secure data transmission and digital signatures.
Although PuTTYgen collects keys in its native file format i.e. .ppk files, the keys can easily be converted to any file format. For Windows, the software interface is PuTTYgen.exe, whereas, for Linux OS the command-line adaptation is available using SSH commands.
How to use PuTTYgen?
Cyberduck is a file transfer client for Apple Mac and Microsoft Windows Cyberduck is a fairly popular file transfer client for Apple Mac and Microsoft Windows. It supports FTP, SFTP, WebDAV, Amazon S3, OpenStack Swift, Backblaze B2, Microsoft Azure & OneDrive, Google Drive and Dropbox.
PuTTYgen is used to generate public or private key pair for creating SSH keys. Below is the complete guidance about how to generate RSA key in the Windows operating system:
Once you install the PuTTY on your machine, you can easily run PuTTYgen. For the same, go to Windows -> Start Menu -> All Programs -> PuTTY -> PuTTYgen.
You will see the PuTTY key generator dialog box on your screen
You will find a “Generate” button in that dialog. Clicking on it will lead to generating the keys for you.
Now you will need to add a unique key passphrase in the Key passphrase and Confirm passphrase field.
Click on the “Save Public Key” and “Save Private Key” buttons to save your public and private keys.
You will see the text starting with ssh-RSA in the Public key for pasting into OpenSSH authorized_keys file field which is located at the top of the window. Copy that entire text to your clipboard by pressing ctrl+c as you will require the key to paste on your clipboard in the public key tool of control panel or directly on the cloud server.
Various Ways to Use RSA Key Pair
RSA key pair generated through PuTTYgen is used in two various ways defined as below:

To assign while creating a new cloud server You can choose the public key from the given list of keys at the time of creating a cloud server. If you don’t find your key in that list, then first add and then assign it.
Assign to an existing cloud server At the time of connecting to the cloud server, first of all, you need to tell PuTTY to use it for utilizing your newly created RSA key pair.
PuTTYgen being a component of the terminal emulator PuTTY does not have to be downloaded separately, hence, comes with the PuTTY .msi installation package. You can follow the simple steps to download PuTTYgen software for your system. That is the reason why you don’t need to download PuTTYgen separately. Once you download PuTTY software, you will be able to install and run PuTTYgen easily in no time. Below is the complete instruction about how to download and install PuTTY on Windows.
Apart from that, it is also integrated into third-party programs such as WinSCP installation package. Below you can find a complete PuTTYgen download and installation guide for all operating systems.
PuTTY Download - Free SSH & Telnet Client. PuTTY is a popular SSH, Telnet, and SFTP client for Windows. It is typically used for remote access to server computers over a network using the SSH protocol. This is the download page. For more information on PuTTY, see the PuTTY page. For information on SSH (Secure Shell), see the here.
PuTTY is an open source network file transfer application that supports various network protocols such as Telnet, SCP, and SSH. The networking client PuTTY enables the user to access another computer within the same network.
Download PuTTYgen on Windows
To download PuTTYgen the primary requisite is to acquire the copy of PuTTY installation package. For the 64-bit operating system, one must install the 64-bit version of PuTTY, i.e. putty-64bit-<version>-installer.msi.Similarly, for the 32-bit operating system, the respective 32-bit version of PuTTY, i.e. putty-<version>-installer.msi needs to be installed.
To get PuTTY, go to PuTTY Installation Download page, whereby the complete installation package will be available with setup instructions, installation guide, and download links to all other components of PuTTY such as putty.exe, pscp.exe, psftp.exe, puttytel.exe, plink.exe, pageant.exe and putty.zip.
Following the successful download of the PuTTY installation package. It is time to install the program. Go to How to install PuTTY on Windows, whereby you will find the step by step guidance for PuTTY installation for Windows operating system.
After successfully downloading and installing PuTTY on your Windows machine, you are just 2-3 clicks away to run PuTTYgen. Follow the below-given step by step guidance to run PuTTYgen:
Run PuTTYgen on Windows
To run PuTTYgen, Go to Windows -> Start Menu -> All Programs -> PuTTY -> PuTTYgen. You will see a window for the PuTTY Key Generator on your screen.
Voila! Now you can generate public or private key pair using PuTTYgen.
Download PuTTYgen for Mac
Below is the detailed guide to download PuTTYgen on Mac operating system. Mac OS has a built-in command-line SSH client known as Terminal. To utilize it, go to Finder and then opt for Go -> utilities from the top menu. After that find the terminal which supports SSH connections to remote servers.
However, to run PuTTYgen for mac, the first one must have to install PuTTY. There are multiple ways to install PuTTY, which are Homebrew or MacPorts. Both alternatives will also install the command-line of adaptations of PuTTYgen.
Ported PuTTY for Mac
Mac has the port of PuTTY which can be installed in various ways described as below:
Installation using Homebrew: First, install the ‘brew command line’ Once installed use the below-given command to install PuTTY:- sudo brew install putty
Installation using MacPorts: First of all, one must install MacPorts and then use the command-line to install PuTTY. Here is the command to install PuTTY via MacPorts sudo port install putty Additionally, a user can also add a shortcut to the desktop by writing the following command line –cp /opt/local/bin/putty ~/Desktop/PuTTY
However, there is an alternative way to install PuTTY on Mac OS. Cyberduck is a widely used Mac OS SSH Client. Once PuTTY installed on the Mac OS, a user can convert PuTTY derived private key format to OpenSSH.
To convert the private key to standard PEM format, type the following command –
puttygen privatekey.ppk -O private-openssh -o privatekey.pem

You can also read the guide to convert .pem file to .ppk using puttygen.
Download PuTTYgen for Ubuntu/Linux
Putty Ssh Alternative Mac
To download PuTTYgen for Ubuntu (Linux) operating system, a user to first install PuTTY. However, in some Linux distributions, the SSH key generation tool – PuTTYgen needs to be installed independently from the PuTTY client.
For example, Debian Linux requires the below-given code to install PuTTYgen:
sudo apt install putty-tools
Ssh Client For Mac
Generate Key Pair for Authentication in Linux
To create the key pair for authentication in Linux use the below command:-
puttygen -t rsa -b 2048 -C 'user@host' -o keyfile.ppk
Various Command Line Options of PuTTY in Linux
Below are few important command line options in the Linux operating system for PuTTY:
PuTTYgen [-t keytype [-b bits] [-q] | keyfile] [-C new-comment] [-P] [-O output-type | -p | -l | -L] [-o output-file]
Options:
Keyfile – It is the name of the existing key file to read at the time of changing the current key.
–t keytype – The command specifies the type of key to creating. Its acceptable values are RSA and dsa.rsa1.
-b bits – This command specifies a total number of bit in a particular key. 1024 is the perfect size for DSA key, while 2048 or 4096 are the perfect size for RSA keys.
–q – The command suppresses the message about progress at the time of key generation.
-C new-comment – The command will specify the comment to describe the key. It can be used for the new and/or existing key. Key operation is not affected by a comment. However, it is used to recognize the key owner, it’s not reliable completely as any value can be applied to it.
–P – Using the command will update the passphrase of a key. Passphrase helps to encrypt the private key. As passphrase can’t add or update on a command line, it prompts a new passphrase tool to alter it.
–old-passphrase-file – The old password of the key remains in this file. The command is used when the key is protected by a passphrase.
–new-passphrase file – This command prompts the new passphrase of the key. It comes in the action either at the time of generating a new key or while applying –P command to change the passphrase.
-O output-type – This command defines what to give in output. By default, the private key is the output.
Thus, above are the prominent commands of PuTTYgen in Linux operating system. Besides that, there are many other commands available to perform various tasks from the command prompt in Linux at flank speed.
Types of Keys Supported on PuTTYgen
It is important to know the types of key PuTTYgen supports prior to using it. Below are the key types that it currently supports for SSH-2 and SSH-1 protocol:-
SSH-1 protocol:- For SSH-1 only supports one key i.e. Rivest–Shamir–Adleman (RSA)
SSH-2 protocol: – SSH-2 supports multiple key types that include – Digital Signature Algorithm (DSA), Elliptic Curve Digital Signature Algorithm (ECDSA) and Ed25519.
The above description is a detailed brief on downloading and running PuTTYgen on all major operating systems. For further details please check the Download PuTTY page.
Background
Most Unix-like systems are configured to use the SSH protocol for remote access, but most SSH client applications do not support PIV as required by Federal policy. Putty-CAC, a fork of the Open Source Putty SSH client, resolves this issue.
Note that Van Dyke Secure CRT, a commercial product, also supports PIV SSH login for multiple platforms, including Windows and Mac.
Installing PuTTY-CAC
If you have a forge.mil account, download the latest Putty-CAC package from forge.mil. If you do not have access to forge.mil, you can also download it at https://risacher.org/putty-cac. Source code is available at https://github.com/risacher/putty-cac
There is no installer available for the binaries, so you must either: ● Place the executable files in a directory that you have execute rights over. ● Build an installation package to install the executables in the location you choose. This will enable the Putty-CAC applications to be available from the Start Menu.
At a minimum, you must install the following packages: ● putty.exe ● pageant.exe
Verify the version of PuTTY that was installed by opening the application and clicking About in the lower left corner.
Launch pageant from the PuTTY install directory, (eg, C:Program FilesPutty-CAC). Pageant will appear in the taskbar on the bottom right of your desktop;it will not open a window.
You must now insert the CAPI Key and configure PuTTY-CAC. Follow the steps below.
Putty Alternative Mac
Add CAPI Key into Pageant

Open Windows Explorer or click Start > Computer.
Open Pageant by clicking the executable.
A window will not open, but the Pageant icon will appear on the menu bar. Right-click the icon and select View Keys.
The Pageant Key List window will appear. Click Add CAPI Cert.
Select your Smart Card Logon certificate from the Windows Security window.
● Make sure you choose the correct certificate! Select “Click here to view certificate properties,” click “Details,” scroll half-way, and locate Enhanced Key Usage. It should begin with “Smart Card Logon;” this indicates it is the correct certificate. If you do not see this field, select a different certificate. Note: If multiple certificates exist, you may want to clear out the expired or revoked certificates by following How To – FIXME: PIV Card – Clear certificate store. ● Click OK to close the details window.
Highlight the correct Smart Card certificate and click OK.
The Pageant Window will now display the certificate information.
Click Close.
Warning: You must re-add your certificate every time pageant is started.
Configure PuTTY-CAC
Right-click the Pageant icon again from the menu bar and select New Session. This will launch PuTTY.
From within PuTTY, enter the destination IP address or hostname in the Host Name (or IP address) textbox to setup a new profile, or if you already have profiles set up in PuTTY, load that profile.
Note: If you have multiple destination profiles, you will have to do the following steps for each profile
Enter a descriptive name under Saved Sessions textbox (if setting up a new profile).
On left panel, select Connection > SSH > CAPI thencheck the box beside the words Attempt “CAPI Certificate” (Key-only) auth (SSH-2).
From within PuTTY, select Connection > SSH > Auth then select both “Allow agent forwarding” and “Allow attempted changes of username in SSH-2.”
Click Session, then Save. This profile is now configured for PIV logon.
To get your PIV card’s SSH key, in PuTTY, go to Connection > SSH > CAPI and select the browse button on the right side. This will automatically fill in the “Cert” and “SSH keystring” fields.
Copy and paste the SSH keystring value from PuTTY into Notepad as you will need to include the SSH key when you contact the jumpbox support team or create a service ticket.
The configuration file should contain “Host *” and “ForwardAgent yes” and exist in the same folder where they place the SSH key.
In Saved Sessions, click Save to save your configuration.
Putty Free Download
Verify PIV Login
Ssh And Putty Download For Mac
Open Pageant (if not already running) and make sure your CAPI key is populated, close the Pageant window. Right click the Pageant icon and choose “New Session”. This will open PuTTY-CAC.
Load one of your saved sessions that you previously configured for PIV logon.
When prompted, enter your remote Unix/Linux account name, and you should be prompted for your PIV PIN.
Enter your PIN, click OK and you should be logged in.
Once logged in, run ‘ssh-add –l’ to ensure that the forwarding agent is working. If you do not see the key printed when you run this command, something is wrong and you will not be prompted for your PIN if you ssh further into the environment.
Both the cert key that was pasted into the .ssh/authorized_keys and the config file need to be copied or scp’d to all the servers you will connect to in the data center. If the forwarding agent is working when you ssh to a server beyond the jumphost, you should be prompted for the PIN again.
After each server you ‘jump’ to, the output of ssh-add –l should always show the key. If not, either permissions are wrong or a file is mislabeled, or missing.
0 notes
Text
Convert private key generated via OCI Console to ppk
I am pretty new on the Oracle Cloud Infrastructure technology, so maybe I am talking about something you already know. But anyway I prefer to share this case: it can help if you encounter the same problem as me. Let’s take the risk to have too much information rather than nothing! The problem I was doing some tests on the new MySQL Database Service and during the setup I decided to generate my ssh keys via the OCI console: When I tried to connect via PuTTY or MobaXterm to my compute instance using the opc account and my private key (generated previously), I got the following error: Looking at the keys generated via the Oracle Cloud console, I saw that they were defined in the following format: The solution Actually I don’t work directly on a Linux system. So I need to convert my private key if I want to make it usable via my connection tools. First step is to transform it to RSA format. I can do it using OpenSSL: # openssl rsa -in ssh-key-2020-11-24.key -out ssh-key-2020-11-24.rsa Second and last step is to convert it to ppk format. I can do it using PuTTYgen. I load the private key: I filter on all files types: I select my RSA key and I click on Open: I click on Ok on the following message: and then on Save private key: So I save the key with a ppk format: Tests I can now use my private key to connect to my OCI compute instance via PuTTY: or MobaXterm: Hope this can help you! Cet article Convert private key generated via OCI Console to ppk est apparu en premier sur Blog dbi services. https://blog.dbi-services.com/convert-private-key-generated-via-oci-console-to-ppk/
0 notes
Text
How to Use Puttygen on Windows for key generation
How to Use Puttygen on Windows for key generation
SSH key pairs can be used for secure login to Linux server with out prompting for password.
Puttygen is a very useful key generator which can be used to generate key pairs for login to Linux node on cloud or on premise using putty utility. It uses the private key in ppk format to login to Linux node
About SSH Key pair
SSH Key pair consists of two parts
1.Public key and Private key
View On WordPress
0 notes
Text
Multi-GPU Deep Learning with Azure Data Science Virtual Machines (DSVM)
Introduction
There are a ton of options out there for doing deep learning in the cloud and Azure is no stranger to this space.
From Floydhub, to Paperspace, AWS Sagemaker, Google Cloud, and probably more; there are so many options for cloud compute. In this article we’ll cover Azure’s DSVMs.
Here are some pros of Azure (that I’ve found), along with some other general thoughts.
PROS:
Price. The price on Azure is always nice. Enough said.
Customer support is great. If you have a ticket and label it severe, you get a call from a tech in <2 hours. That’s pretty awesome!
Azure has a lot of unique services. From Azure Databricks to ML Studio, getting your feet wet with Azure is not a bad thing.
NEUTRAL COMMENTS:
Do we need to learn every platform on the planet? Probably not. You could probably just learn 1 and stick with it. But sometimes I run into issues on 1 cloud platform, and it’s nice to be flexible.
Azure doesn’t appear to have training options with auto-shutdown similar to Sagemaker. AWS might have the market on this one (to my knowledge). To run training jobs on Sagemaker with auto-shutdown requires additional coding, so I actually don’t prefer this option myself, so I list this as neutral.
Working with storage on Azure is a bit of a head scratcher to me. I’m not an expert here, so I have this as neutral because I have seen some stuff where Azure can tap into AWS? Working with Azure Blob storage feels very different to me and less intuitive, but that’s my subjective opinion. There is always a workaround, which is to load your data directly to the DSVM (which is what I tend to do).
Okay, let’s get on with the show!
Step #1: Create an Account
First thing we need to do is create an account. This should be self explanatory. Just click any of the buttons related to signing up and follow the prompts. I personally choose the Pay-As-You-Go option (pick whatever you want). Once you’re done you can access your Azure Portal.
Step #2: Create a DSVM Instance
At this point you should be able to access the Azure portal.

Search for “Data Science Virtual Machine” and click the “Data Science Virtual Machine - Ubuntu 18.04″ link under “Marketplace”. This is important. You need this particular Virtual Machine type!

Now simply click the blue “Create” button.

This should take us to the “Create a virtual machine” form where we can start to enter the specifications of our virtual machine (VM).
Subscription = whatever your subscription is.
Resource group = Create a new one by clicking “Create new” or just select one if you already have one.
Virtual machine name = give the machine a name.
Region = make sure to select the region closest to your physical location.
Availability options = you can leave this alone if you want.
Image = select your operating system. For accessing Jupyter from an IP address, then Linux is the OS you want. In this demo I’ll use the Linux option.

Now this is where things get more interesting...
Azure Spot instance = I selected “Yes” because I value a cheaper price over reliability
Size = This one is the most important. NC instances include GPUs. If you’re doing deep learning, you want a NC instance. To change the size to an NC instance, select “Change size” and search for “NC” (note that you might need to remove some of the filters.
Authentication type = you can select “SSH public key” or “Password”. For SSH you can click “Learn more ... “ to figure out how to make it work. For Windows you can use PuTTYGen go generate what you need. I think “Password” is easier (just write down your information somewhere so you don’t forget).

If really want to up your security, you can revise the last section, otherwise you can ignore the last section and click “Review + create”.

Step #3: Launch your DSVM
(or request quota increase and redo the prior steps)
Finally, you can review your selections, and if everything looks good, you can click “Create”.
--WARNING!--
Note: It’s possible that you might need an quota increase (i.e. request access to particular instances), in which case the following article will show you how to request a quota increase using “Help + support” (Azure has nice documentation on this so I’m not going to reinvent the wheel here). https://docs.microsoft.com/en-us/azure/azure-portal/supportability/per-vm-quota-requests
Once you click “Create” your deployment should kick off, and once it’s completed you should see the following screen, at which point you can click “Go to resource” (I’ve redacted information from my screen for obvious reasons).

Step #4: Launch Jupyter
This will take you to the main page of your DSVM instance. Note your “Public IP address”. We’re going to use this to access JupyterHub on our DSVM.
From your browser, type the following, (and fill in <your-public-ip-address> with your “Public IP address”).
https:// <your-public-ip-address>:8000
Having issues on this part? Here are some tips:
Note that the “https://” part is very important, you need this.
If you hit warnings, just bypass them by clicking Advanced > proceed, or any links that allow you to continue forward (even the Azure people recommend this - https://docs.microsoft.com/en-us/azure/machine-learning/data-science-virtual-machine/dsvm-ubuntu-intro)
Timeout issues?
Try just waiting a few minutes, sometime Azure will auto-correct any issues it notices and this takes a minute.
Try restarting the VM.
Use PuTTY to SSH into your machine using your IP address, username and password. From SSH, try running “jupyter notebook”. If this is not recognized, it probably means you didn’t select a DSVM from the marketplace, and instead you just launched a normal VM which doesn’t come with pre-installed data science tools. I would walk through these instructions again.
Still having issues?
Try a different browser.
If all of this still doesn’t work, submit a ticket to Azure in the same way you requested a quota increase, i.e. using “Help + support”.
You’ll be prompted for a username and password, and you can use the same one you created when you created the DSVM.
Step #5: Working with Data
Once you’re in Jupyter, the next logical thing you might want to do is work with data. How do we do this?
First, we probably want to store some data on Azure. There are many options, but I’ll be using Blob storage because it’s easy and fits many needs.
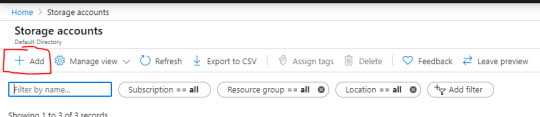
Go back to the Search feature and type in “Storage” and Select “Storage accounts”.

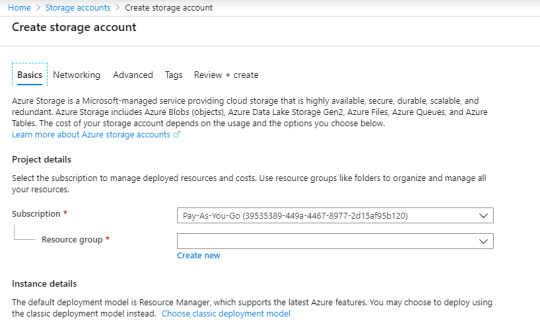
Select “Add”.
This will bring you to a form to fill out. When you’re done, you can select “Review + create” and complete any other prompts.
Once you’re done, you should have a new storage account. On the homepage of your new storage account, you should see a section\link for “Containers”. Click this.
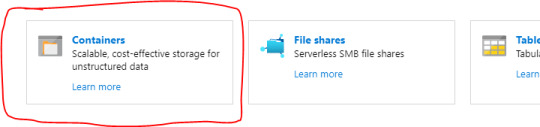
From here you can add a new container by clicking “+ Container”.

Now you can click “Upload” to upload any data that you want.

Now the next logical question is, how do we tap into this data from Jupyter? It’s actually very easy (as long as you’re not so worried about security).
Once you’ve uploaded some data, click the file. This should bring up a new panel showing information related to the file, along with a URL.
You can simply use this URL in your Python code! How awesome is that!
For example, you could read as CSV via pandas as follows:
df = pd.read_csv(https://<storage-account-name>.blob.core.windows.net/<container-name>/<data-file-name>)
Pretty great right!
If you want to read in a file line by line, I found the following StackOverflow link very helpful: https://stackoverflow.com/questions/1393324/in-python-given-a-url-to-a-text-file-what-is-the-simplest-way-to-read-the-cont
Now you should have everything you need to start doing some data science and deep learning on Azure!
Step #6: Run some Deep Learning!
If you want to check out something that I personally ran on Azure, you can check out my following GitHub repository.
https://github.com/yeamusic21/Jigsaw-Multilingual-Custom-LSTM-Horovod-Hyperopt-on-Azure
In this repository I used Hyperopt to do hyperparameter search on a custom LSTM and I leveraged Horovod for multi-GPU processing; and then I used Azure to run this on a multi-GPU machine!
The End! :-D
That’s all there is!
Hope you found this helpful! :-D
0 notes
Text
PuTTYgen
PuTTYgen is a key generator tool for creating pairs of public and private SSH keys. It is one of the components of the open-source networking client PuTTY.
Although originally written for Microsoft Windows operating system, it is now officially available for multiple operating systems including macOS, Linux. PuTTYgen.exe is the graphical tool on Windows OS. While on the other side, Linux OS has the only command-line version could be accessible using SSH commands
https://www.softlookup.com/display.asp?ID=294323
0 notes