#Cricut Design Space Guide
Explore tagged Tumblr posts
Visit Tumblr Blog
Explore Tumblr blogs with no restrictions, modern design and the best experience.
Last Seen Tumblr Blogs


Fun Fact
Tumblr posted its first advertisements in May 2012 and subsequently earned $13M in revenue.
Text
How to Make Custom Shirts With Cricut: A Step-by-Step Guide
I am obsessed with my Cricut machine and create projects on it every day. You can call it my hobby or my big passion for crafting. Recently, I have made dozens of custom shirts with my Cricut Maker machine, and you can create some on your own, too. Following this guide, your guesswork will be reduced to zero, as I will share some of the easiest steps on how to make custom shirts with Cricut.
If you are interested in my tutorial, I would recommend you continue it till the end so as not to miss anything important. I have been creating unique stuff with my Cricut for more than 6 years now; it has been a beautiful journey for me.
Whether you are a beginner or a well-trained Cricut user, this post will help you get some ideas for starting something new. I hope you found this blog helpful and that you will come back for more Cricut-related blogs like this one. Let’s start learning how to design shirts with Cricut for beginners.
Which Is the Best Cricut for Making Shirts?
When you are making a custom shirt, you will have this doubt about which machine to choose. My answer would be to choose anyone you have. Whether you have Cricut Maker, Joy, or Explore, you can choose anyone with your iron-on vinyl to make a perfect custom shirt.
However, you will need to insert the fine point blades to cut this type of vinyl. I hope you got an answer to it. Let’s move forward with this guide on making your custom shirt.
How to Make Custom Shirts With Cricut Machine?
When you are clear about which machine to use and what design you wanna make, let’s get started with my steps. Well, you will need a few things before you move your hands on the desktop. So, gather up all the listed things here.
Cricut Explore Air 2
EasyPress 2
EasyPress mat
Shirt apparel
Weeding tool
Brayer tool
Scissors
Standard mat
Premium vinyl
Are you ready with all these? So you’re good to go. When you are ready, head to your Cricut Design Space and show some of your creativity. And follow all the steps carefully.
Step 1: Go to the Cricut Design Space App
In the first step, you should go to your Design Space and pick a design to print on your shirt. As the Cricut app is full of ready-to-make designs, fonts, images, and templates, you won’t have to hustle to make a design. I am using my Explore Air 2 machine; you can use a machine you’re familiar with.
Step 2: Adjust Your Design
Once you are ready with your final design, you can take some time to make that fit for you. For example, you can change the design’s color. On the Cricut Design Space canvas, you will get a few options on the right-hand side, from where you can choose your favorite color for the shirt.
Step 3: Change Vinyl Color
Here, you need to change your vinyl color as your shirt’s color may not be a good match with the vinyl’s color. In order to keep the color vibrant and not blend them, you have an option to change the color of your iron-on vinyl. To do this, you should click on the Layers option on the canvas. After that, you can click on the white box with the Layer option and pick a color for your vinyl.
Step 4: Final Your Design
If you find the color combo not as expected, you can change it. Once you have done all the updates, you are ready to save your design. You need to hit the Save button along with the name of your project to remember what this design is about. I am making a design that says “Cutest Bachelor.” Let’s check more steps on how to make custom shirts with Cricut.
Step 5: Load Your Material (Iron-on Vinyl)
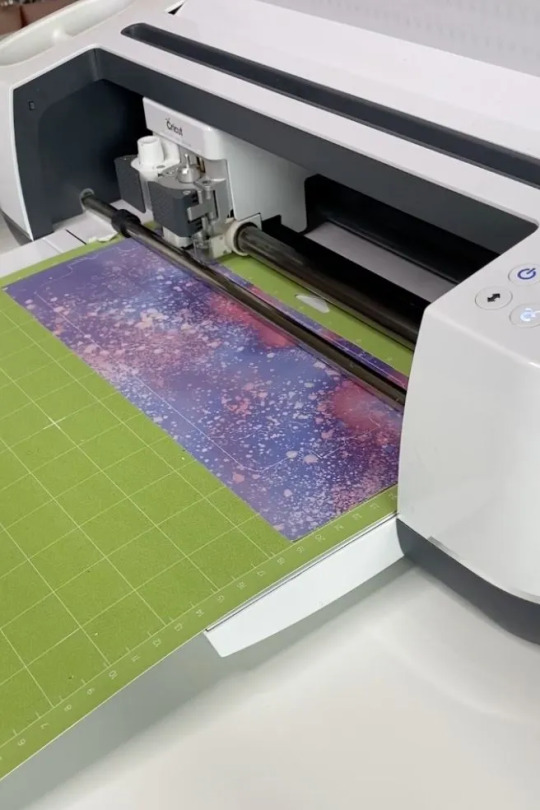
In this step, you are ready to cut your project with your special Cricut machine. Don’t forget to load your vinyl on a Cricut cutting mat and then into the Cricut machine. Once you are done, you can start the cutting. Also, select the correct size of your mat on your machine so that your design fits the cutting mat. And the most important thing is to align the iron-on vinyl correctly to get an expected cut.
Step 6: Cut Your Design
When your design is ready, and you have checked all the settings, you can allow your Cricut machine to perform a cut for you. Once you hit the Go button on your machine, it will show you a preview of your final design. If you are satisfied with it, click the Continue button to get a cut. Once the design is fully cut, unload your cutting mat.
Step 7: Weed Out the Excess Vinyl
When you have a cut in your hand, take a weeding tool and take out excess vinyl to make the design clear and ready to be ironed. You can use your hands too, but a weeding tool is more convenient. Now, you have finally come to the main part of how to make custom shirts with Cricut.
Step 8: Ready Your EasyPress
When your design is ready, you can set your Cricut EasyPress to cotton or linen to get the desired results. So, now you need to put your weeded design on the shirt apparel and use a Cricut EasyPress 2 to heat it. However, before that, you must use a brayer tool to remove lint and fibers from the shirt’s fabric. Once you do that, for the next steps.
Step 9: Preheat Your Shirt
When your apparel is ready, use your EasyPress to preheat it for 15 seconds with moderate pressure to remove the moisture and wrinkling. For the final heating, you should consider a Cricut Heat Guide that will help you find the best setting for your design. After that, use the temperature and pressure accordingly.
Step 10: Apply Heat to Your Shirt
And the last step is to just apply the heat as the Cricut guide suggests. Use a towel to place on your vinyl design, and apply heat for 30 seconds. Using a towel will prevent your iron-on from getting damaged. Viola, you have just designed a perfect custom shirt with your Cricut.
Conclusion
You were all wondering how to make custom shirts with Cricut. And with my blog, you might have found this process a bit easier than before, I guess. Don’t worry; if you follow the instructions carefully, I can bet you can make a fabulous shirt.
However, be mindful of the heating setting as it can ruin your project and waste everything. It’s always better to use a household iron while making your first project. When you get familiar with the process, you can take one step ahead with an EasyPress.
Source Url :- how to make custom shirts with Cricut
Visit here for more Information:- · cricut design space log in
· cricut machine
· cricut machine setup
· how to make custom shirts
· step-by-step guide
· install cricut design space
#how to make custom shirts with Cricut#CRICUT DESIGN SPACE LOG IN#CRICUT MACHINE#CRICUT MACHINE SETUP#STEP-BY-STEP GUIDE#INSTALL CRICUT DESIGN SPACE
0 notes
Text
How to Upload Fonts to Cricut Design Space: Stepwise Guide
What’s up, crafters? I am sure you are thinking of something creative, am I right? Well, making crafts is nothing new to you, but there are multiple ways to upgrade yourself. Are you thinking about uploading a new font to your Design Space? Sure, you can do that and create your own font. The best part is that this process is going to be easy for you. So, follow me to learn how to upload fonts to Cricut software.
You don’t need to spend hours finding the right font in Cricut Design Space — rather, you can find it somewhere else, which is what I’m going to tell you about. Adding fonts to the Cricut app is an extremely easy process. So, let’s get started with that.
How to Find a Perfect Font to Upload?
Options for perfect fonts are never-ending. There are many places to find Cricut fonts, and some of my favorite ones are fonts.google.com and Creative Fabrica. On these websites, you will surely find some cool fonts. Apart from them, there are also some sources like
Creative Market and dafont.com are where you can get some high-quality fonts completely free.
Isn’t it great? However, not all fonts will be free on them, and to get some specific fonts, you may need to pay some money. So, if your purpose is to sell items you make, you can go for the paid fonts that often have a commercial use license.
How to Download a New Font to Cricut Design Space?
If you have finally selected your perfect font and you are all set to download it, go ahead with my simplest steps here.
Download your font from a site and check where it gets downloaded to your folder.
Then, unzip your font folder and then double-click on that file. Usually, you will get the font files in .ttf or .otf type. But, I will .otf file.
Now, continue with all the on-screen prompts on your desktop to get the font file.
When your font is installed, launch your the Cricut software.
After that, you need to create a new project.
Next, add the new text layer and choose the text box to add the text to Design Space.
That’s how you will add the font easily to your Design Space canvas. When you download fonts, your guesswork will become zero as you will know which font to use.
How to Upload Fonts to Cricut on a Windows PC?
Are you a Windows user? Perfect. Most of my work is PC-based, so I can tell you well how to upload fonts correctly to your Design Space. Look at the steps below.
In the first step, download your font file, move it to your Downloads folder, and get the downloaded file.
Then, right-click on the file if it’s compressed and choose Extract to get the files.
Now, your font will be added to your PC and the software.
You have understood the download procedure. You can move it to the Cricut Design app canvas by using the steps I have shared at the start.
How to Upload Fonts to Cricut on Your Mac Computer?
Well, if you are a Mac user, I have different steps for you. I don’t use Mac often, but for all of you, I tried adding a font to my friend’s Macbook. So, the steps are easy; let’s check them below.
Similarly, download a font file to your Mac.
After that, unzip your file if it is compressed in the .zip format.
Double-click on the font in your Finder window and let the font install.
You will get your fonts in just three simple steps. Now, you can do anything with your fonts and make great projects.
How to Upload Fonts to Cricut on Smartphones (Android/iPhone)?
If you prefer a mobile phone to use Cricut Design Space, don’t worry. You can also get the latest fonts on your device. Follow my steps below.
For Android
First of all, install an app to manage fonts. I prefer iFont.
Then, download your font and navigate to it under the Downloads folder.
Now, if your file is compressed into .zip format, get the file.
Launch your iFont app and then head to the My Font option.
Next, open that option to see the preview of your font and then install it on your device.
At last, hit the Set option to finish the installation.
These are the final steps for adding fonts to Cricut on an Android smartphone. Now, create your favorite designs with your unique fonts.
For iPhone
iPhone users don’t need to worry; I have a separate section for them. You will also need to install an app to manage fonts. iFont is a perfect app for you, too. Let’s look at the steps.
First of all, install the iFont app to manage your fonts.
Then, download your font and unzip it from the Downloads folder.
Now, launch your iFont and choose the Font Finder.
After that, choose the Open Files window and search for your font file to install.
Next, choose the Installer tab and hit the Install button with the font to allow the installation.
Then, hit the Continue button and then click the Allow option.
Next, launch your Settings app and close the iFont app.
Now, click on the Profile Downloaded option.
Finally, you will get the option to Install your favorite font.
Finally, the font is installed on our iPhone, and you are all set to use it. Now, you have learned the uploading process on almost all the devices.
Conclusion
If you are thinking about how to upload fonts to Cricut Design Space, this blog can be helpful to you. Fonts are so creative and can add spark to your lovely projects. Also, if you are someone who likes to sell your creative items, the addition of a great font will level up your projects and will make you grow as a crafter. I have shared all my favorite sources with you, like dafont.com and Creative Fabrica; if you have better sources than mine, go for it.
#Setup Cricut Machine#Cricut Machine Stepwise Guide#How to Upload Fonts on Cricut Design Space#Stepwise Guide#How to Upload Fonts#cricut explore air 2#cricut setup#cricut new machine setup#cricut crafts
0 notes
Text
Free Cricut Sticker Guide!

This is a niche but useful tool I made. If you use a Cricut machine for stickers and print on 8.5 x 11 paper then feel free to take this guide image and upload into cricut design space. Steps below if you wanna use this!
When you add this image to your canvas set it to about 7.4 inches width by 9.9 inches height. Add whatever stickers you wanna make together into the space and make sure they are within this shape. Turn this shape invisible in the layers section of your canvas, and attach all the stickers together. If you kept everything inside the shape I made then there should be no errors and you will be using the maximum amount of space possible with cricut's print then cut setup.
I made this because I found the corners to be fickle to work within and so far having this guide instead of guessing and checking has made it a lot easier. I hope it helps you too!
22 notes
·
View notes
Text
How to Calibrate Cricut Explore Air 2? (Full Guide!)
Cricut Explore Air 2 is a worthwhile machine for crafters who want to make pro-level crafting projects. The machine offers precise cuts for more than 100 different types of materials, including Cricut Smart Material, leather, wood, glass, metal, etc. With its easy-to-use interface, the machine allows users to work on DIY projects even if they are novices. Moreover, sometimes crafters may need to perform Cricut Explore Air 2 calibration before a cut.
Calibration is a process that helps set the machine’s blade to cut the design accurately without any flaws. Many users don’t know the procedure and struggle to get the perfect cut. If you have the same problem, then the follow-up blog will provide you with all the information about calibrating your machine.
Cricut Explore Air 2 Calibration on Windows/Mac
If you are using your Cricut Explore Air 2 machine on a computer, then the following is the extensive guide that will help you perform the calibration process.
Step 1: Selecting the Printer
Open the ‘Cricut Design Space app‘, sign in to your account, and then click on the Settings option.
Then, follow the path Machines > Machine Calibration, and select Cricut Explore Air 2.
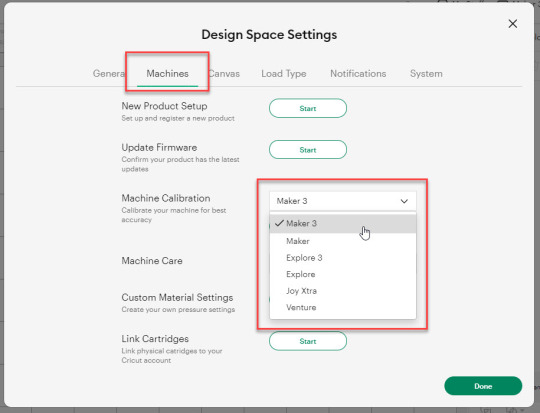
After selecting your crafting machine, click on the Start option.
Depending on the machine you choose, you will be asked to complete the calibration; select the Print Then Cut option.
In the next step, choose what you like to use with your printer machine for the process.
After that, click on the Continue option.
Step 2: Starting the Calibration Cut
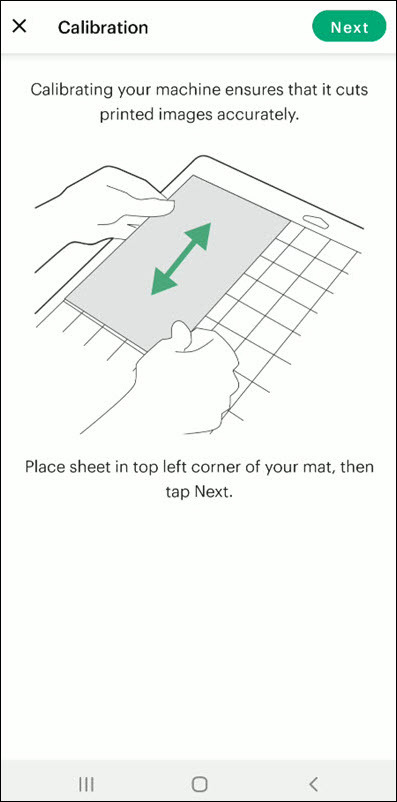
Now, you should place the printed calibration sheet on the mat, position it perfectly, and select the Continue option.
For the next step, ensure that your machine is ON and connected to your computer using USB or Bluetooth. Select the machine from the drop-down menu, insert the cutting mat into your crafting machine, and click Go.
Furthermore, the device will start scanning the markings for the calibration.
After the cutting is complete, check if the cut-makings are touched without unloading the mat from the machine. (If the markings are touched, then choose the Yes option in the app and select Continue to move to the next step.)
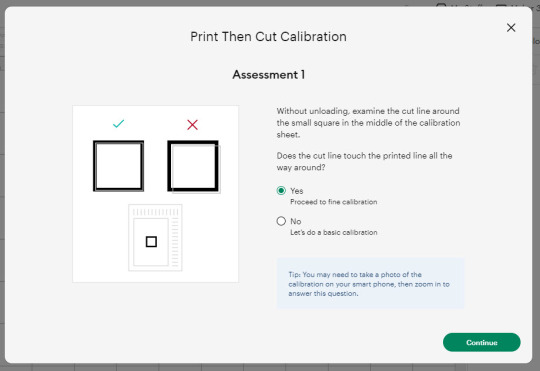
Note: If you choose the No option, then the machine will perform a cut for the next time for the accurate cut.
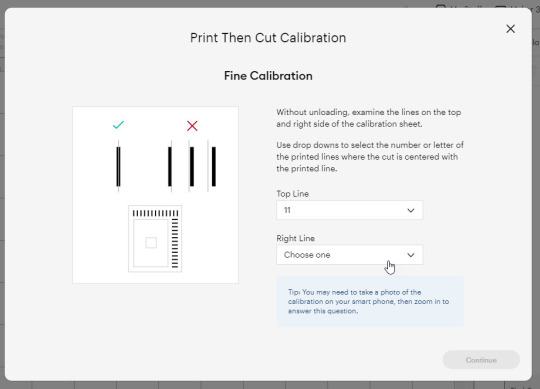
Also, the machine will start the calibration cut at the top and side of the page.
Now, check if the markings are correct without unloading the mat from the device. (The cut should be on or before line 1 and on or before line 21.)
If your cut meets all the conditions, choose the line closest to the center of the printed lines, the same as the following image; when you are done, select the Continue option.
In the next step, the Cricut Explore Air 2 machine will perform a confirmation cut around the large sheet. When this step is complete, unload the mat from the machine and remove the calibration sheet; now, you need to answer the final question on the app.
You need to choose Yes, cut is close enough to the center if you are happy with the cut. (Select no and follow the further process if you are not happy with the cut.)
Cricut Explore Air 2 Calibration On iOS/Android
The follow-up method will allow you to Calibrate your Explore Air 2 machine without any hassle. So, let’s begin the process.
Step 1: Connecting the Printer to Your Machine
Start by signing into your Cricut account on the app and selecting the menu option from the upper right corner.
After that, tap on Settings and then select Print Then Cut Settings.
Also, tap on the Calibration.
Next, you have to choose the Send to Printer, or I have a calibration sheet option.
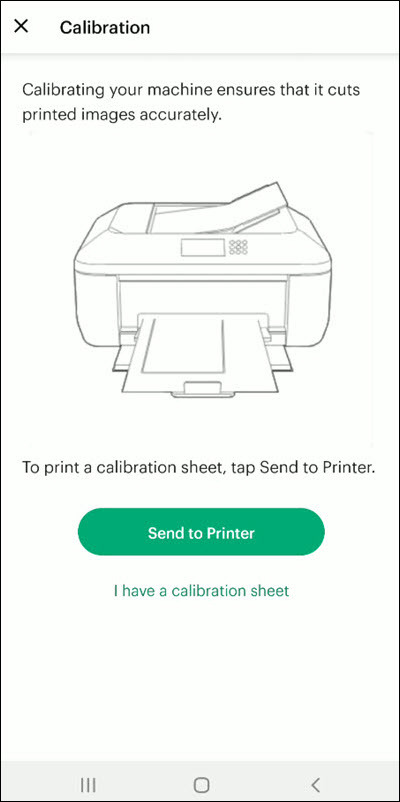
Now, the preview of the calibration sheet will appear on the screen (it can be a little different depending on the device you are using.)
Afterward, tap “Select a printer” and select the printer device you are using. Then, choose Next.
Step 2: Perform Sheet Calibration Process
After that, take the printed calibration sheet, place it onto the machine mat perfectly, and select Next.
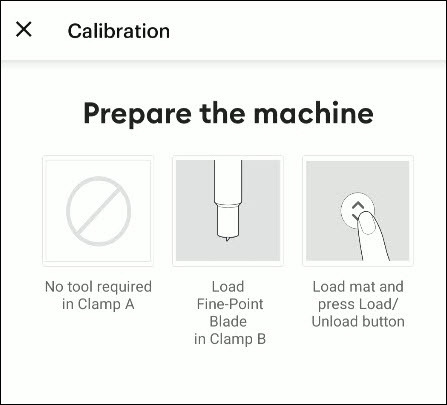
Specify the appropriate material setting for your machine.
Then, after loading the mat into the machine, press the Go button on it.
Also, the machine will look for the marking for the calibration and then start the cutting process near the small square.
Afterward, without unloading the mat from the machine, check for the cut to ensure the cut touches the marked lines all the way around. (If the lines touch the cut, then tap Yes in the app, then select Next to proceed with the next step.)
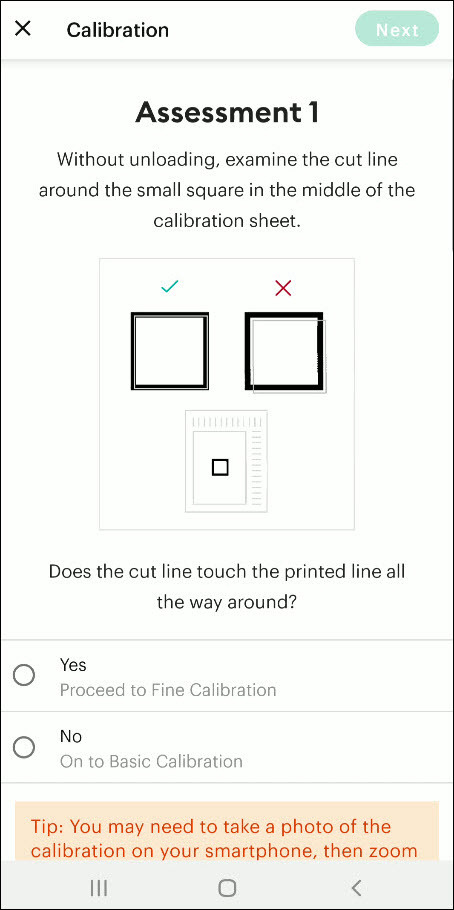
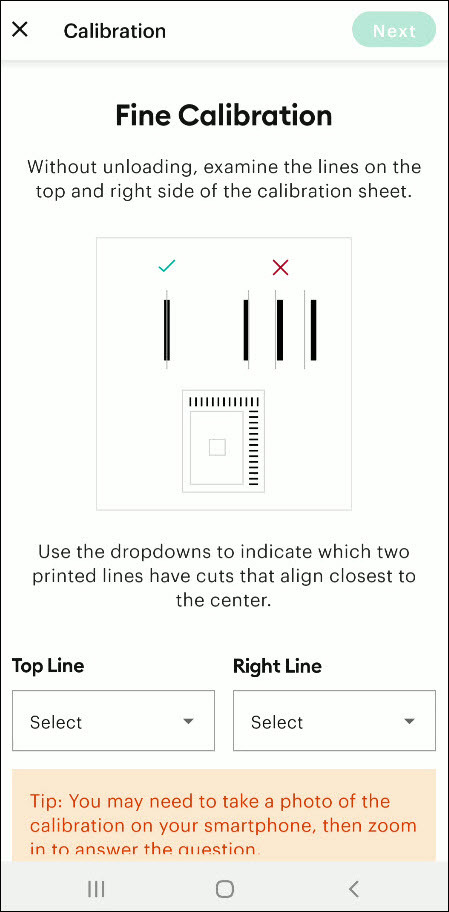
However, if you select the No option, then the machine will try to cut close to the top and sides of the page. (Once done, look closely without unloading the mat; there should be a cut before line 1 and on or after line 21.)
If the cut meets these lines, you need to specify which cut is closest to the center of the printed lines and the right side of the calibration sheet.
Once you are done, select Next to move forward.
After that, keep following the instructions on the screen to complete the procedure.
Once the process is complete, you can start cutting materials on your machine.
Final Words
Cricut Explore Air 2 calibration is the best way to get the pin-point cuts. These methods will help you to perform the calibration process on computer and smartphone devices. With these methods, you cannot only calibrate your Explore Air 2 but also any other cutting machine of the brand. Furthermore, if you have any doubts regarding the procedure or have any issues, then it would be good to ask for more assistance and guidance.
Frequently Asked Questions
Why Is My Cricut Explore 2 Not Cutting Properly?
Cricut Explore machines are known for their flawless and fast-cutting results. Sometimes, it is due to the material you are trying to cut on your device. Also, in some cases, the machine faces technical issues. To get your machine out of this problem and start cutting properly, you can use the calibration procedure. The process to calibrate your machine is simple.
Why Should I Calibrate My Cricut Machine?
However, the cuts can sometimes be misaligned due to various reasons. Crafters can calibrate their devices to get the blades and cuts aligned to their initial position. After the calibration, the machine starts to provide flawless cuts once again. However, the calibration process is a little complex and differs from device to device. So, you must know the whole process before performing it.
What Is the Thickest Setting on Cricut Explore Air 2?
We all know that Cricut cutting machines are known for their fast and flawless cuts, even for intricate designs. Thus, the Cricut Explore machine can cut a wide range of materials of a certain thickness. If you want to cut the wood, metal, leather, etc., then your machine can cut up to 2mm. However, different materials need to use specific blades to get the desired results.
Source: How to Calibrate Cricut Explore Air 2
#how to calibrate cricut explore air 2#cricut design space app#cricut design space download#cricut design space software#cricut machine setup#cricut explore air 2 setup
2 notes
·
View notes
Text
How to Connect Cricut Joy to Computer? (Full Guide)
Wants to Learn ‘how to connect Cricut machine and you want to connect it to a computer‘? You can do it effortlessly with the help of this article. This machine is more compact than other Cricut cutting machines. With a sleek appearance and amazing results, Cricut Joy is the choice for many crafters. As a Cricut user and a professional crafter, I’m here to guide you with it. Let’s learn how to connect Cricut Joy to computer.
When it comes to connecting Cricut Joy to a computer, this machine doesn’t support a USB connection. Therefore, you have only one option for connection – Bluetooth. So, I’ll tell you about the Bluetooth connection on your Windows and Mac computers. Let’s get ready with the process.
Minimum System Requirements for Cricut Joy
Before you connect a machine to your computer, check whether your computer and machine are compatible. Why does this matter? You might know that Cricut runs a software called Design Space. This software has some minimum system requirements for a device that is added to it. So, let’s check out those requirements.
For Windows
For a Windows system, Design Space needs Windows 10 or 11 or the latest versions with an AMD processor or an equivalent one. It should also have a minimum of 2GB RAM, good free storage, and compatibility with Firefox, Microsoft Edge, and Google Chrome.
For Mac
For a Mac computer, Cricut Design Space needs a 14.x or newer operating system. Also, an Intel or equivalent processor. It should also have 2GB RAM and 300 MB storage. When you know the most important requirements, let’s dive into the steps involved in connecting your machine to a computer.
How to Connect Cricut Joy to Computer (Windows and Mac)
To connect your machine to your computer, you need to follow the steps given below. Here, you’ll see the steps for Windows and Mac computers.
For Windows
To connect your machine to a Windows computer, check out the given steps. As you already know, Cricut Joy doesn’t support USB, so we’ll stick to the Bluetooth connection.
To start, unpack your machine and collect all the accessories from the machine’s box.
Then, install your machine at least 10-15 feet away from the computer.
Now, connect the machine to a power source and turn it on.
After that, go to the Start menu and hit the Settings option.
Next, you should click on the Devices option.
In the next step, ensure that Bluetooth is ON.
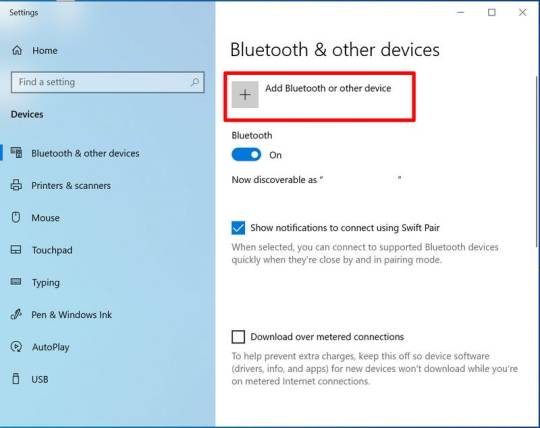
Moving forward, hit the “Add Bluetooth or other device” option.
Also, tap on the Bluetooth and let the computer search for your machine model.
When the machine appears on the screen, select it and let it connect.
Lastly, your devices are paired with Bluetooth connection.
That’s how to connect Cricut Joy to computer. When you know everything, it’s time to try the connection for your devices.
For Mac
If you’re a Mactonish, below are the steps for connecting your crafting machine to your Mac.
To get started, connect your Mac to a power cord.
Then, install your machine on a flat surface and keep it at least 10-15 feet away from your Mac.
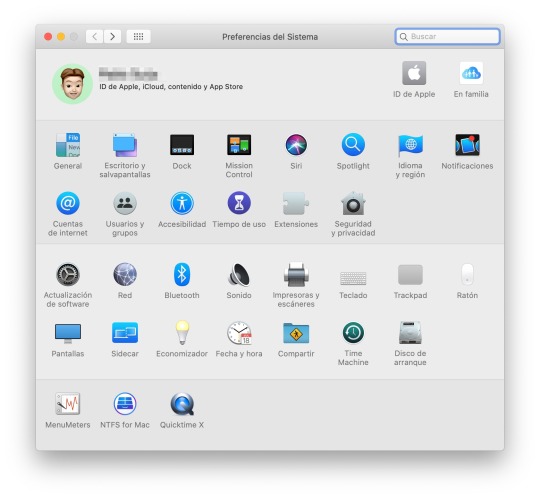
Now, go to your Apple menu and select System Preferences.
After that, locate the Bluetooth option on the Mac.
Also, check whether Bluetooth is ON.
In the next step, choose your machine from the list of available devices.
Finally, your machine is paired with your Mac.
That’s how to connect your machine to a Mac computer. Finally, you can start creating projects with your brand-new machine. Now, let’s take a look at the steps for a Mac computer.
Conclusion
Finally, you know how to connect Cricut Joy to computer. Start creating your DIY projects quickly. This machine is excellent for beginners and for DIY pros. The only thing you need to care about is the minimum system requirements for the Design Space software. Besides that, this tiny tool is travel-friendly and works well for you. The crafting machine can become your companion when you need it.
FAQs
How to Download Cricut Design Space on Computer?
To get the Design Space software on a computer, follow these steps:
To start, launch a browser and navigate to https://cricut.com/setup.
Then, accept the Terms of Use and its Privacy Policy.
Now, hit the Download button on the screen.
After that, let the file download under the Downloads folder.
Next, visit the Downloads folder and find the app file.
Double-click on the folder to open it.
In the next step, run the installation and continue with the on-screen directions.
Finally, sign in to your account.
Can I Connect My Cricut Joy to Computer via USB?
No, you can’t use a USB to connect your machine to your computer. It doesn’t support USB. However, you can use a Bluetooth connection to set up a connection between your machine and your computer.
How to Connect Cricut Joy to Windows 11?
You can connect a machine to Windows 11 via a Bluetooth connection. Go to your laptop and search for Bluetooth and other devices. Then, turn on the Bluetooth option. Now, let your laptop locate your machine. Then, choose your machine’s name from the list of devices and let the pairing happen.
Source: How to Connect Cricut Joy to Computer
#how to connect Cricut Joy to computer#cricut design space download#cricut design space app#cricut design space software#cricut joy setup
2 notes
·
View notes
Text
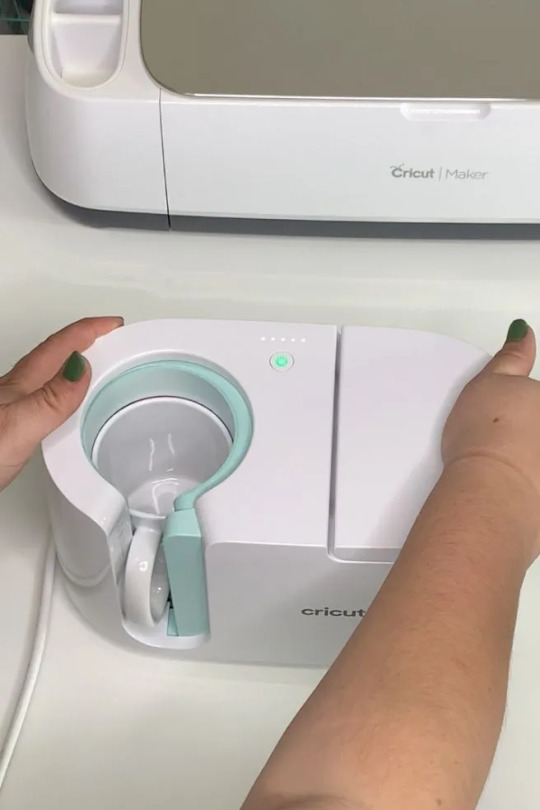
How to Use a Cricut Mug Press: A Step-by-Step Guide
When I first bought my Cricut Mug Press, I was quite nervous about learning how to use a Cricut Mug Press. It took some time to read many articles and gather all the essential information. Now that I have gained experience using it, I want to share all the basic instructions for using this Cricut machine. If you are uncertain about using it, make sure to read this post to the end.
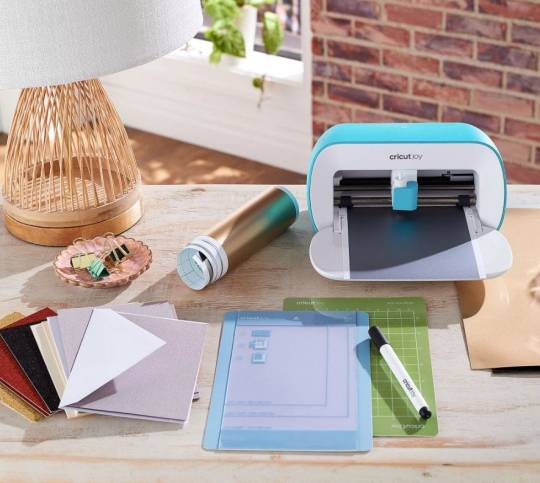
The Cricut Mug Press is a small yet impressive tool that transforms plain mugs into stylish designer pieces. Despite its compact size, it is incredibly capable and essential for crafting custom mugs for personal use or as gifts for loved ones. So, let’s start with the materials you will need for your project.
Tools and Supplies You Need to Create a Personalized Mug
Before learning how to use a Cricut Mug Press, it is important to know the necessary materials you are going to need. Here is a detailed list:
Cricut cutting machine: You will have to use this machine to cut designs from the infusible ink sheet. Suitable Cricut models are Cricut Maker 3, Explore 3, or Joy.
Cricut Mug Press: This is the machine used to transfer the infusible ink design onto your mug.
Sublimation mug: Specific mugs made for the Mug Press machine are necessary because they fit perfectly and ensure the best results. Using other mugs of different shapes and sizes may not fit or work well with the machine.
Infusible ink sheet: This material is basic as it is where you will cut your designs, which will later be transferred onto the mug using heat in the machine.
Heat-resistant tape: It is essential for securing the infusible ink sheet onto the mug during the pressing process.
Lint roller: Used to ensure the surface of the mug is clean and free of debris before applying the infusible ink design.
Weeding tools: These are used to remove excess or unwanted material from the design before transferring it to the mug.
Once you have assembled all these supplies and tools, ensure your setup is ready. Connect your Cricut machine to power and turn it on. Establish a connection between the machine and your device using Bluetooth or USB. Download the Design Space app on your device and log in with your account. This setup is essential before proceeding with the Mug Press.
Before beginning to use the Mug Press, ensure it is on and heating up properly. Following these steps ensures you are ready to create custom mugs with your Cricut machine.
How to Use a Cricut Mug Press in 4 Simple Steps?
When you have assembled all the necessary tools and completed the setup, you can start working on your project. Here are the 4 steps you need to follow to use the Mug Press:
Step 1: Create a Design on Cricut Software

Step 2: Cut and Weed Out the Excess Material

After completing the design, insert the material into the machine and press the Load button. The design will be cut quickly. Once the cutting is done, unload the material and use a weeding tool to peel away any unwanted parts from the design.
Step 3: Transfer the Design to Your Mug

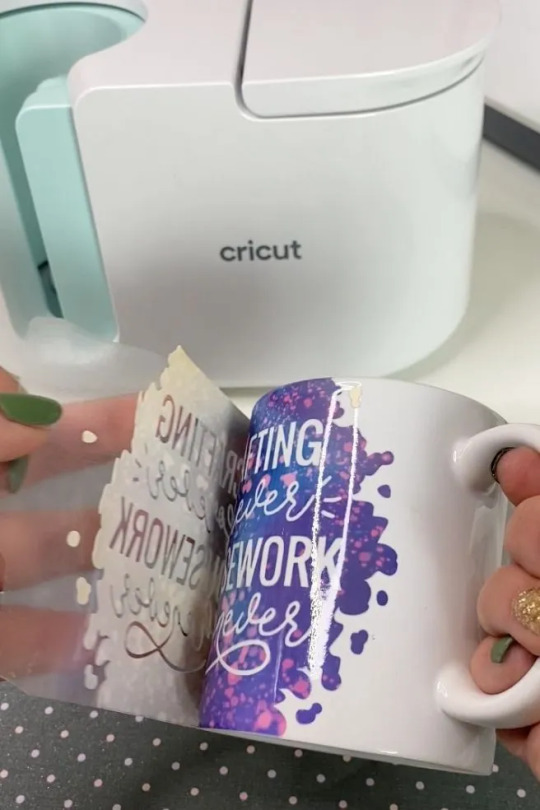
Step 4: Reveal the Final Result

When the pressing is complete, carefully remove the mug from the machine, handling it by the handle to avoid burns. Allow the mug to cool for 20–30 minutes. During this time, it’s important to avoid touching the heated areas to prevent injury. Once the mug has cooled down completely, it will be ready for use, showing your newly transferred design beautifully.
Conclusion
In short, learning how to use a Cricut Mug Press is quite easy. As you can see, the process is simple. First, gather all the necessary tools and accessories and set them up. Once the setup is done, create a design on the Design Space app, cut it on the Cricut cutting machine, and press the design onto the mug using the Mug Press machine. Once the pressing is finished, you will have a beautiful mug ready to use however you like.
FAQs
What Are the Supplies Required for Cricut Mug Press?
To work with a Cricut machine and create designer mugs, you will need some essential supplies:
Cricut cutting machine
Cricut Mug Press
Infusible Ink
Heat-resistant tape
Weeding tool
Lint roller
Sublimation Ink
These tools are important to prepare and execute projects with Cricut effectively.
Do I Need a Computer to Use Cricut Mug Press?
No, not necessarily! You can download the Cricut Design Space app on your computer or any device. If you don’t have a computer, you can use your Android or iOS mobile instead. However, using a computer for the app allows you to work on projects more effectively. Just ensure your computer runs on either Windows or macOS, as Chromebooks do not support the software.
Can I Use Any Mug in Cricut Mug Press?
No, you cannot! The mug used in the Cricut Mug Press must meet specific criteria. It should have a maximum height of 4.72 inches and a diameter between 3.2 to 3.4 inches, with a capacity of 10 to 16 ounces (295 to 450 ml). Also, the mug’s surface should be plain; textured or rough mug surfaces are not suitable for the machine. Ideally, the mug should be white for best results.
Source: how to use a Cricut Mug Press
Visit here to Know More: Cricut Easy Press
Pinterest
2 notes
·
View notes
Text
How Do I Set Up My Cricut Maker? [Ultimate Guide]
Buying a new Cricut Maker can be overwhelming for all of us. Initially, setup can be daunting, but once you do it, you will love the overall process. However, you can easily set up any Cricut machine without needing much assistance.
The post is all about how do I set up my Cricut Maker. Through this write-up, we will see the items while unboxing the new Cricut Maker. Further, you will explore the Cricut Maker and its types. Afterward, we will explain the complete process of setting up your Cricut Maker machine.
What Do You Get in the Cricut Maker Box?
Unboxing a new product is always an exciting task. While unboxing the Cricut Maker machine, we got several items that we will be discussing here. However, you always have the option to select the bundles when you buy the machine from Cricut's official website.
Following are the items that you get in the box of the new Cricut Maker:
Apart from these, you will get the following:
The best thing is that we get the blades and tools along with the new Cricut machine. These blades allow us to try various products before buying more blades.
How Do I Set Up My Cricut Maker on a Computer?
When we talk about setting up Cricut Maker machine, it means we want to connect it to our devices like computers or mobile phones. However, there are certain ways to connect these machines to our devices. For example, we can connect our Cricut Maker to our computer or phone via Bluetooth or USB cable. So, it is the users’ choice to choose which way is the most suitable for them.
Below, we explain how to set up Cricut Maker. This method is only applicable for Windows or Mac users only:
How Do I Set Up My Cricut Maker on a Mobile?
Here's how to set up your Cricut Maker on Mobile devices with iOS or Android operating systems:
Cricut Maker is the most advanced and versatile in Cricut's lineup. However, the box contains various items that you can use to make several projects uninterruptedly. In this write-up, we explained the Maker and its features in detail. It helps the users to get an overview of machines so that they can use them without any hassle. After exploring the Maker cutting machine, the blog found out how do I set up my Cricut Maker.
FAQs
Question 1: Can I set up the Cricut Maker easily?
Answer: People think the setup is daunting, but this is not the case. Cricut machines are just like printers. The only difference is that Cricut has blades to cut. However, when you go through the notice period, you will find the setup is too easy and complete in less time. While setting up, you will need to download and install the Design Space app. This app will guide you through the further setup process, making it easy for beginners to set up the machine in one go.
Question 2: How do I connect my mobile phone to my Cricut?
Answer: Here, we are going to show you the method to connect your mobile device to the Cricut machine. Here, we are using iPhone or iOS devices. So, ensure you have an iOS device.
Question 3: Can I use the Cricut without its software?
Answer: No, you must use the Cricut Design Space app to send your design to your Cricut device. The machine is the companion for your Cricut cutting machine. Without this machine, you can't cut anything. However, the Design Space is essential for creating intricate designs and then sending them to the machine. Also, the app is the only way to maintain communication between your computer and Cricut.
Visit: cricut.com/setup
cricut.com/setup
Source: https://cricutmakersetup.wordpress.com/2023/10/21/how-do-i-set-up-my-cricut-maker-ultimate-guide/
#cricut explore air 2#design space setup#cricut maker#cricut.com/setup#cricut.com design space#cricut.com/create#cricut.com sign in#design cricut.com download#digital design
2 notes
·
View notes
Text
3 Beautiful Ways to Use Pressed and Dried Flowers | DIY Crafts You’ll Actually Keep!
I started working with dried flowers and pressed botanicals a few years ago, and it has taught me a few things.
Delicate dried flowers can burn or disintegrate in epoxy resin.
Glossy Mod Podge however much we love it, can make you cry (and even ruin your floral project).
Depending on your project, pressed flowers MUST be chosen as carefully as you would choose fabric, paper, or paint colors.
So how can you still work with these lovely mediums and create long lasting, archival art that you can be proud of? Read more to learn about 3 of the most botanical-friendly crafts.
Framed Glass Art
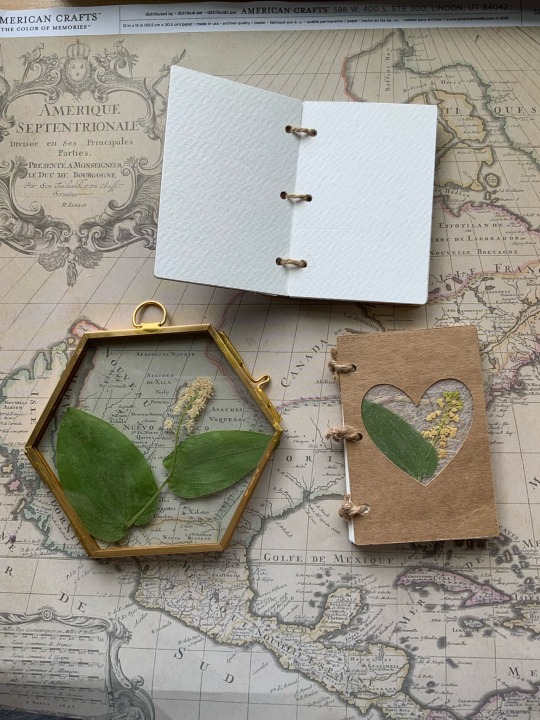
What you’ll need:
Double sided glass frame. (any size)I buy mine on Aliexpress or Amazon.
Clear glue, glossy mod podge, or a tape runner.
Pressed flowers
Scissors
How to make it:
Start by selecting your botanical specimens and arranging them in your frame. Use scissors to trim and refine your arrangement until it is to your liking.
Remove all of the flowers, and strategically place dots of clear glue on the inner glass. Wait until your glue becomes tacky. The time will depend on the type of glue that you’re using.
Tip: Test out the cure time by placing a few different sized glue dots on a plastic surface. See how long it takes for the glue to become more viscous and less runny.
Place the flowers onto the glass. Make sure to tack down all specimens with glue until they’re difficult to move. Allow the glue to dry completely before closing the glass frame.
Once dry, display your beautiful arrangement!
I love making smaller arrangements for office spaces and display shelves. These also make adorable secondary gifts in care packages.
Glass offers a more eco-friendly alternative to epoxy resin. Though I love working with resin, I’ve started to become more conscious and selective of my usage to creation ratio.
2. Floral Bookmarks
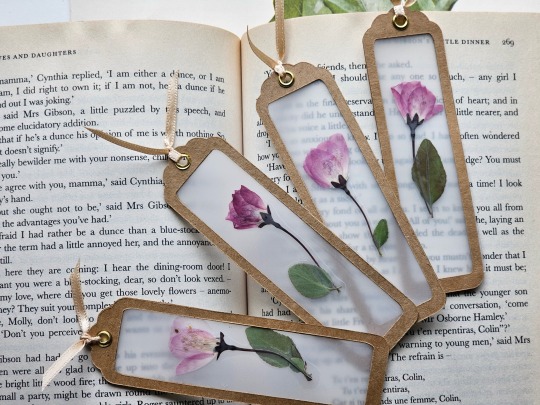
What you’ll need:
Pressed flowers. Preferably long stem flowers that press very flat such as fleabane and daisies. You can also use small flowers without stems.
Self or thermal laminating sheets.
Thermal laminator. (If using thermal lamination)
Scissors
Cricut Cutting Machine (highly recommended for a cleaner result) However, you can also create your own frames. Simply use two gift tags or rectangular pieces of paper. Measure and cut out another rectangle of your preferred size in the center of your paper. Use an X-Acto knife to make the cut out.
Kraft paper cardstock
Glue stick, or my personal recommendation, Kuretake Glue Pens. They will make less of a mess, and create a longer lasting bond on kraft paper.
How to make it:
If using a Cricut machine, start a new project in Cricut Design Space.
Search for “bookmark frame” in the “images” section.
Select a design you like the shape of. You can also create your own by “slicing” new shapes into existing templates.
Resize your design. Choose whatever size will accommodate the shape of your flowers.
Cut out your frames out on kraft paper.
Once you’ve cut out your design, remove half of the frames from the mat. Leave the other half on the mat. This will make keeping them flat easier once you’re ready to assemble everything.
Laminate your flowers. Be sure to use your frame as a guide to arrange them within the window. Leave an inch of space between each arrangement for cutting if you’re making more than one bookmark.
Cut around the flowers, leaving a bit of allowance for gluing them onto the frame. I never measure like I should. Just use the frame as guide to avoid cutting off too much laminating plastic. We will hide the ugly jagged cutting job later. 😅
Return to the mat and apply a generous layer of Kuretake glue to the entire surface of the frames still stuck to the Cricut mat.
Carefully place the laminated floral arrangement on the frame.
Apply another layer of glue around the edges of the lamination, and also on the other frame.
Place the second frame over one of the mat frames, and press down firmly. Tip: You can also place a book on top to keep them flat.
Let your bookmarks dry for about 20 minutes before adding your embellishments. I love using key charms, grommets, ribbons, or tassels.
Check out my inspo photos below! Get creative with decorating.
3. UV Resin Pendants
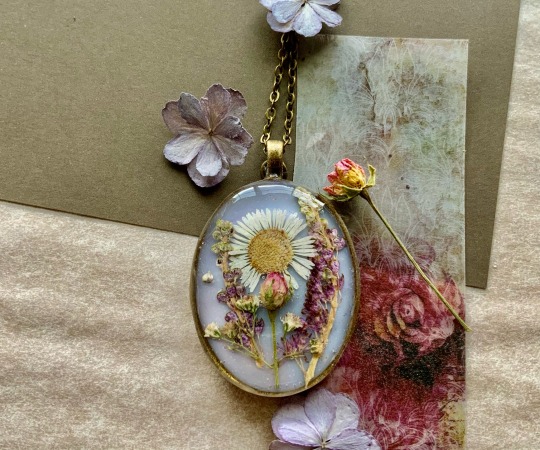
Before I started working with UV resin, I was told that it isn’t light fast. Which is true for most resins on the market. I’ve also heard that it yellows over time and that the UV light burns flowers.
These are all things that I’ve experienced working with flowers in UV resin. However, I’ve managed to make projects that have stayed glossy, clear, and beautiful for over 2 years now, and I want to share my tips and tricks!
Tip #1: USE a high quality UV resin such as the one from Counter Culture DIY.
Tip #2: AVOID using delicate flowers such as forget-me-nots, hydrangeas, larkspur, etc. If the petals are thin and delicate, they WILL become distorted or burn. Think florets, spaced petals, and small leaves.
Tip #3: USE opaque, strong, and VERY flat flowers such as pressed Violets, Chamomile, Fleabane daisies, Rosettes, Queen Anne’s Lace, and Baby’s Breath.
Tip #4: AVOID flowers with too many overlapping petals. These will trap air bubbles inside of your resin layers that tend to express during curing. They tend to cause very large holes and gaps.
What you’ll need:
Very high quality UV resin (My suggestion: Counter Culture DIY)
Cabochon bases or frame pendants
Barrier tape (if using a frame instead of cabochon base.)
Toothpicks to pop bubbles (I actually prefer using a sewing needle)
Light Curer such as a nail lamp. I use the Melody Susie 36W nail lamp from Amazon. Counter Culture DIY sells one specifically for their UV resin as well.
Pressed Flowers (My favorite seller on Etsy)
Optional: Colorants. I use mica powders, acrylic paints, and black and white resins from Counter Culture DIY (not sponsored, I wish!) These give your resin a background to stand out against.
Nitrile gloves
How to make it:
Start by applying a thin layer of UV resin to your base or taped frame. This will be the layer with color (if using pigments).
2. Pop any visible bubbles with a toothpick and cure the first layer for about 1-3 minutes.
3. Apply a thin dot of clear resin to the first cured layer. This will give your flowers something to stick to as you arrange them.
4. Once your flowers are arranged, apply a few strategic dots of resin around them to keep them in place. Cure the first thin layer without covering the flowers completely. Remember to pop bubbles!
5. Continue to add thin layers. Cure each layer for 1-3 minutes each. Repeat this process until your flowers are covered and your top coat has a domed appearance.
6. Finished! Avoid touching your project for several minutes until fully cooled. You don’t want fingerprints in your shiny top coat!
For more floral project ideas, check out my Pinterest below!
#pressed flowers#unique gifts#vintageinspired#art#home & lifestyle#floraldesign#fashion#books and literature#cottagecore#beauty#art tutorial#easy art#art ideas#artists on tumblr#books & libraries#floralart#handmade art#diy art#diy tutorial#journaling#inspo#writing#craftinspiration#my art#art supplies#artwork#floral#flowers#paper craft#diy ideas
3 notes
·
View notes
Text
Top 5 Cricut Beginner Projects to Get Started
Buying a Cricut machine for the first time, and if you are a beginner, the device can be intimidating by its features and looks. It can also seem like a complicated machine, with many blades, mats, materials, and tools. So, choosing your first project can be challenging given the wide range of Cricut machine's abilities. As you might already know, Cricut machines are cutting devices, and its high-end models can cut more than 300 materials. This blog contains curations of Cricut beginner projects to help you understand and work smoothly with the machine.
1. Custom Phone Case
If you want to make your mobile's trendiest new phone case, it is possible with your Cricut machine. You can mainly use the Explore machine for creating this project. It is because, along with Design Space, select your respective smartphone model from the iPhone and Android phones list. You can make a perfect Cricut phone case in just a few minutes.
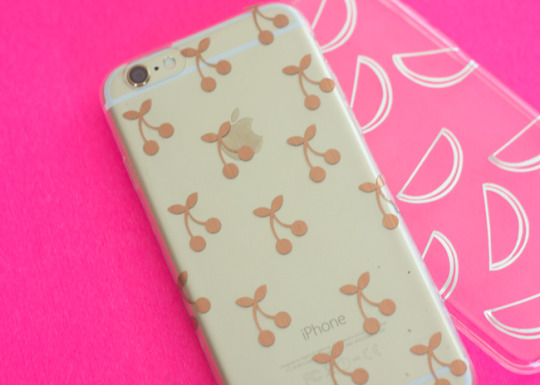
Further, the supplies you need for creating a personalized phone case are an Explore or Maker machine. You also need a clear phone case, foil adhesive vinyl, or standard permanent vinyl. Also, you need Transfer tape and the respective designs you want to cut on the material.
2. Cute Face Mug
It is one of the easiest Cricut beginner projects. You just need to cut some vinyl material and stick it on a mug with a clean surface. You can select super cute designs from the official Design Store or create your design. You can choose some cute doodles you or your kids like. And you can make various faces and expressions, even using animals such as a kitty, puppy, or unicorn.
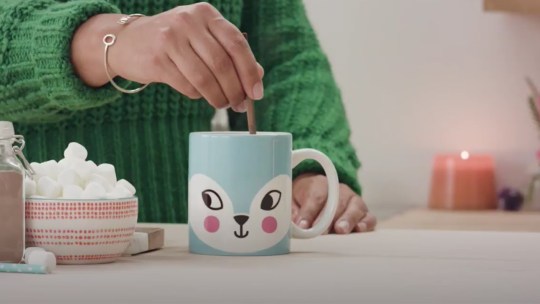
Further, the supplies you need for this project are a sheet of vinyl, a Cricut Machine, and a weeding tool. Plus, you need Transfer tape to transfer the design onto the surface of the mug.
3. Greeting Cards
You can make a set of greeting cards with your new Cricut machine as your first project. To do this project, all you need to do is cut two types or colors of cardstock, fold them, and put them together. Creating a set of greeting cards is very simple and quick, and you will also have cards with fancy patterned looks.

Further, all the standard cards are 5 x 7 inches, so you can keep them in envelopes and mail them easily. So, you need a standard cardstock, A Fine-point blade, a Cricut Joy, or Explore. Plus, the design of your greeting card. Additionally, you don't have to score or glue the end products. That is why it is the easiest of all Cricut beginner projects.
4. Wall Decals
The wall decals are another set of great projects to begin your Cricut crafting journey. You can add inspirational quotes or simple messages in your living room or bedroom. For this project, it is better to use regular permanent vinyl. However, you can also use colored vinyl to create a pop-up look.

Further, this project requires a Cricut machine, permanent vinyl, and an SVG design file. Additionally, you need to measure your space and cut the quote of your choice. After missing, clean the wall, free it from dirt, and then apply the design.
5. Coasters
Another way to decorate your coffee or personal table is by adding personalized coasters. Making coasters is easy and takes less time. It also needs less materials to make it. All you need to create a coaster is first to decide on the design you can easily peel off from the material. In addition, you need permanent vinyl and cut the design on it using your Cricut Maker or Joy.
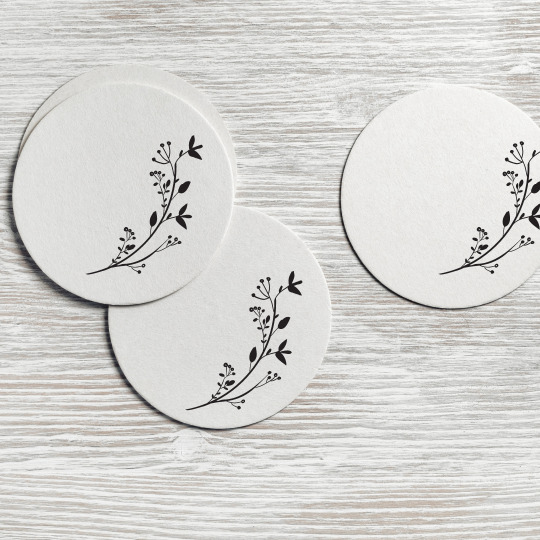
Further, using permanent vinyl to make coasters assures you of longer life and won't quickly come off from the coaster.
Conclusion
Using a Cricut machine is easy once you get comfortable with the materials, tools, and Design Space. To get comfortable as a fresh user, you must pick up projects that read to you the fundamental aspects of working with a Cricut machine. This blog will be an easy guide and Cricut beginner projects to help you in the initial stages of working with the device. In addition, you need to pick a project with fewer materials, simple steps, and less time to complete. Once you master the basic techniques, you can create complex designs and projects.
FAQs
What is the helpful advice on Cricut beginner projects?
Some important suggestions are to pay attention to instructions and get suitable materials/supplies and tools for your project. Additionally, if you are in doubt, test it first. As a beginner, you need to accept that you will make certain mistakes, and that's Okay. And your aim should always be learning and on the process and less on perfection.
What should ideally be the first Cricut project for a beginner?
Ideally, Card making is the first project new users should try with their Cricut machines. It is because you can make your cards for any situation. You can use your machine to cut the design on your cardstock and remove all the extra materials. Now; you will have your first Cricut project.
Do you need a computer to work with Cricut machine?
No, you don't need a computer to work with Maker. It is because you can use Cricut Maker with your Android or iPhone. But you can only do some things you want with a mobile. So, to use the machine's full potential, connecting it to the computer is a must.
#Cricut Beginner Projects#Top 5 Cricut Beginner Projects to Get Started#Cricut.com/setup#www.cricut.com/setup
2 notes
·
View notes
Text
How to Pair Cricut Machine via Bluetooth or USB? (Easy Tips)
Cricut machines are a must-have for DIY crafters, designers, and small business owners. Whether you’re working on vinyl decals, paper crafts, or fabric designs, pairing your Cricut machine correctly is the first step to getting started.
I still remember the day my Cricut machine arrived as if it were yesterday. But within minutes, my excitement faded as I struggled to connect the machine to my laptop. I couldn’t figure out how to connect it to my laptop. But you don’t have to worry about that. Pairing your Cricut isn’t as complicated as it seems once you know what to do.
In this blog, I’ll explain exactly how to pair Cricut machine with your Windows or Mac, whether you use Bluetooth or a USB cable. It’s a beginner-friendly guide designed to help you avoid the roadblocks I encountered.
Let’s get your machine up and running so you can start creating!
Step 1: Turn On Your Cricut Machine
Before you start pairing, make sure your machine is powered on. Follow these steps:
Plug in your machine: Make sure the power cable is connected to the machine and plugged into a power source.
Turn on the machine: Press the power button (usually located on the side or top) to turn it on. A blinking light indicates readiness.
Step 2: Connect via Bluetooth (Wireless Connection)
You can connect your machine wirelessly via Bluetooth. Here’s how to do it:
For Windows Users
Follow the steps given below to learn how to pair Cricut machine via Bluetooth on Windows:
Open Bluetooth settings: Click onthe Start menu, then select Settings, then Devices. After that, go to Bluetooth & other devices.
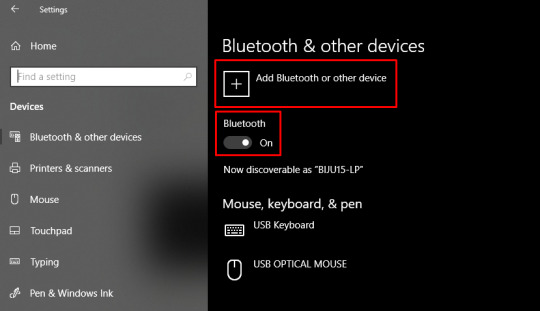
Turn on Bluetooth: Ensure Bluetooth is turned on in your computer’s settings.
Put your machine in pairing mode: Press and hold the Bluetooth button on the machine. The machine’s Bluetooth light will begin blinking, indicating that it’s ready to pair.
Select your machine in Bluetooth settings: On your computer, under the “Bluetooth & other devices” settings, click on Add Bluetooth or another device. Choose Bluetooth, then select your machine from the list of available devices.
Confirm the connection: Once paired, the Bluetooth light on your machine will stop blinking and become solid, indicating that it is connected to your computer.
TIP: Cricut Explore and Maker models include Bluetooth functionality by default. Older models may require a separate Bluetooth adapter.
For Mac Users
Follow the stepwise guide listed below to learn how to pair Cricut machine via Bluetooth on a Mac:
Open Bluetooth settings: Tap on the Apple menu > System Preferences > Bluetooth.
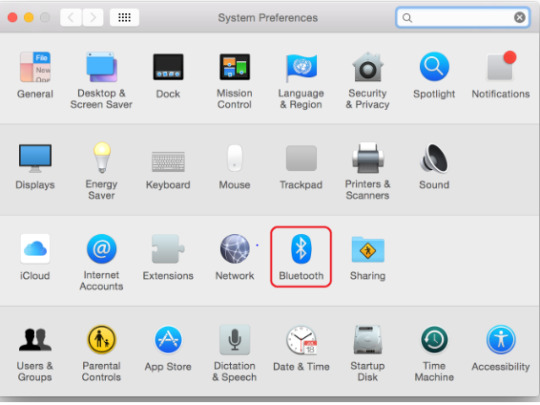
Enable Bluetooth: Make sure Bluetooth is turned on in your Mac’s settings.
Put your machine in pairing mode: Press and hold the Bluetooth button on your machine until the Bluetooth light blinks.
Select your machine name: On your Mac, you should see your machine model in the list of available Bluetooth devices. Click on Pair to connect.
Confirm the pairing: After pairing, the Bluetooth light on your machine will remain solid, confirming the connection.
Step 3: Connect Using a USB Cable (Wired Connection)
If you prefer a wired connection or your device doesn’t support Bluetooth, you can connect your crafting machine using a USB cable.
Locate the USB port on your machine: The USB port is on the left side of the machine, where you can connect the USB cable.
Plug in the USB cable: Now, connect one end of the USB cable to the machine and the other end to a USB port on your computer.
Open Design Space: Launch the software on your computer, and the machine should be automatically recognized.
If prompted, follow the on-screen prompt to complete the setup.
Step 4: Setup Cricut Design Space on Your Device
Now that your Cricut machine is paired with your device, you need to set up Design Space to start creating designs.
Download Design Space: If you haven’t already, download and install Design Space on your computer or mobile device.
Create or sign in to your account: Open the software and either sign in with your existing account or create a new account.
Select your machine name: Once logged in, the software will automatically detect your machine. If not, go to Settings and select your machine from the list.
Start designing: Once everything is set up, you can start creating your projects in Design Space and send them to the cutting machine for cutting.
Troubleshooting Cricut Pairing Issues
Sometimes, your machine may not pair correctly due to device settings or software glitches. Here are quick fixes.
Turn off both the machine and your computer or phone. Turn them back on and retry the pairing steps.
Remove any old Bluetooth devices that could be conflicting.
Ensure both your device’s operating system and the Design Space software are updated to their latest versions.
Clear the cache in the Cricut Design Space software.
Reopen the software and attempt to pair again.
Final Words
Pairing your machine doesn’t have to be difficult. Whether you use Bluetooth or a USB cable, the steps above will help you connect quickly and efficiently. Just keep your software up to date, follow the correct steps, and stay patient!
Once your Cricut machine is paired, the world of crafting will be at your fingertips!
Frequently Asked Questions (FAQs)
What to do if Design Space doesn’t recognize my Cricut machine?
If Design Space isn’t recognizing your machine, make sure of the following key points:
Ensure that the Bluetooth or USB connection is enabled and that the machine is discoverable.
Restart both your computer and machine.
Ensure your machine is within the recommended range of 15 feet from your device.
Make sure Cricut Design Space and your machine’s firmware are up to date.
If updates don’t resolve the issue, consider uninstalling and reinstalling Cricut Design Space.
Do all Cricut Machines have Bluetooth?
No, not all Cricut machines have Bluetooth connectivity out of the box. While newer models like the Cricut Joy, Joy Xtra, Maker, Maker 3, Explore Air 2, Explore 3, and Venture utilize Bluetooth, older models like the Explore One require a separate Bluetooth adapter to connect to devices.
Note: Cricut Explore and Explore One require a Bluetooth adapter.
Can I pair the same Cricut Machine with multiple devices?
Yes, you can connect extra devices to one Cricut machine, but only one device can actively control the machine at a time. This prevents conflicts and ensures that the machine receives clear instructions. You can install Cricut Design Space on multiple devices and access the same account and projects. You can connect to the machine via USB or Bluetooth, and the software will guide you through selecting the desired machine for your project.
SOURCE: How to Pair Cricut Machine via Bluetooth or USB
#how to pair Cricut machine#Cricut Setup#Cricut software app#cricut machine setup#cricut design space app#cricut design space software
0 notes
Text
Pressed with Personality: DIY Letterpress and Embossed Cards
You’ve ironed, etched, stamped, stitched, and painted your way through this crafty jungle. But now, dear artisan, it's time to press your point—literally. Welcome to the beautifully tactile world of letterpress and embossing.
These techniques have been wooing paper lovers since the Renaissance, and they’re still the gold standard for elegance. Whether you’re crafting wedding invitations, thank-you notes, or business cards with bite—today’s projects are all about giving typography some serious texture.
🖨️ What Is Letterpress & Embossing?
Let’s define our new playthings:
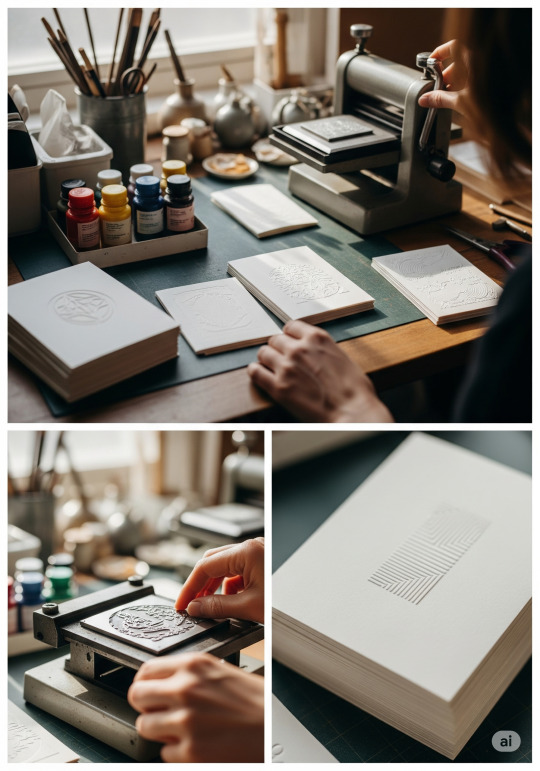
Letterpress involves pressing inked, raised type into paper for a deep, crisp print.
Embossing creates a raised design (no ink necessary!) by pushing paper between two dies—one raised, one recessed.
Debossing is the reverse of embossing: it presses inward for a sunken-in effect.
For home crafters, we’re keeping it manual and DIY-friendly (read: no $20K letterpress machines today, folks).
🧰 What You’ll Need:
Blank cards or thick paper (at least 200gsm)
Embossing folder or DIY embossing stencil
Embossing tool (or blunt stylus)
Letter stamps or letterpress plates (can be 3D printed!)
Optional: Die-cutting/embossing machine (e.g. Sizzix, Cricut Cuttlebug)
Ink pad (for letterpress effect)
Washi tape, ruler, pencil, and a steady hand
🔠 Typography Tips for Pressed Crafts
Serif fonts shine here—think traditional, classy, and deeply readable.
All-caps serif gives authority to invitations and formal cards.
Avoid hyper-thin fonts—they don’t press well and may look like faint bruises on paper.
Bold script fonts can add elegance when embossed.
🧭 Step-by-Step: Handcrafted Press & Emboss Projects
✉️ Embossed Greeting Card
Sketch Your Layout Lightly draw guide lines in pencil.
Place Your Paper in Folder Or use a DIY stencil (cut from cardboard) for single words or initials.
Rub with Embossing Tool Trace the stencil edges with pressure—work slowly for smooth outlines.
Flip & Admire The reverse side should show a raised effect. Simple, clean, chic.
🖋️ Letterpress Effect (Without a Machine)
Ink Your Letters Using alphabet rubber stamps or carved wood blocks.
Align & Press Firmly Onto cardstock. Apply even pressure—use a book on top if needed.
Optional Deboss Touch While ink is still fresh, press a clean stylus around the edges of the letter to add depth.
🧠 Unique Fact of the Day:
The first movable type letterpress dates back to the 15th century, invented by Johannes Gutenberg. This single invention sparked the modern printing revolution—and yet here you are, doing it for fun, with ink-stained fingers and homemade stencils. The full-circle moment is chef’s kiss.
💌 Typography-Based Project Ideas
Thank-You Cards: Embossed initials or words like “GRATEFUL” or “YOU ROCK.”
Wedding Invitations: Classic serif fonts, letterpress-inked dates.
Quote Cards: Letterpress a motivational phrase, frame it, or slip it into a gift.
Mini Business Cards: Debossed logos + your name in clean serif = classy AF.
Gift Tags: Use small stencils to emboss monograms or festive words like “JOY” or “LOVE.”
✨ Crafting Wisdom:
For embossing: dampen paper very slightly—a light mist can help it mold better.
For letterpress: always test your ink pad and spacing on scrap paper.
Don’t be afraid to combine embossed designs with ink for mixed-media style.
🧪 Experiment Ideas:
Use metallic ink for a luxe letterpress.
Try blind embossing—no ink, just texture—for an ultra-minimalist vibe.
Pair embossed words with hand-lettered embellishments for a “hybrid typography” look.
🔤 Font Pick of the Day:
Try Playfair Display, Cormorant Garamond, or Lora for elegant serif type. For something whimsical, try Bodoni Moda or Libre Baskerville—they look amazing when pressed!
https://letterhanna.com/pressed-with-personality-diy-letterpress-and-embossed-cards/
0 notes
Text
How to Download Cricut App on Computer? (Complete Tutorial)
In this step-by-step guide, we will show you ‘how to download Cricut app on computer‘, whether you’re using Windows or Mac. Cricut Design Space is the essential software needed to design and connect to your Cricut machine. It allows users to create and personalize various projects, from greeting cards to home decor.
Although Cricut Design Space is also available for mobile users, many users still prefer the convenience and ease of working on a computer. It is also free to use, with additional features available through a paid subscription called Cricut Access.
Basic System Requirements for Using Cricut Design Space
Before downloading Cricut Design Space, ensure that your computer meets the system requirements.
Windows
Mac
How to Download Cricut App on Computer?
In this section, you will learn how to download the Cricut app on Windows and Mac, with step-by-step instructions for downloading the appropriate version for your operating system.
So let’s get started!
For Windows
For Mac
Set Up a Cricut Machine
After installing Design Space, it’s time to set up your machine and start designing!
Troubleshooting Tips While Downloading Cricut App
If you encounter any issues while downloading or using the Cricut Design Space software, here are some troubleshooting tips you can try:
Problem 1: Design Space Won’t Open
Problem 2: Design Space Won’t Connect to Machine
Problem 3: Design Space Freezes or Crashes
Conclusion
Now that you’ve successfully learned ‘how to download Cricut app on computer‘, you can explore the world of possibilities for creating and designing with your crafting machine. Whether you’re using Windows or Mac, you can follow this guide to get you started today. It has a larger workspace, enhanced features, and faster performance so that you can create even more intricate designs for all your crafting projects.
Frequently Asked Questions (FAQs)
How to Connect Cricut to Computer with Bluetooth?
Place your machine and device within 10-15 feet of your computer and follow these steps:
How to Update Cricut Design Space on Windows?
It’s important to update Cricut Design Space regularly to ensure you always use the latest features and fixes.
Can I use Design Space offline after downloading it on my computer?
Yes, you can use Design Space offline, but you need to plan ahead. After downloading the app and logging in at least once with an internet connection, you can save projects and fonts for offline use. Here’s how:
Remember, certain features, such as uploading images, browsing the Cricut library, or accessing the latest updates, still require an internet connection.
Visit: cricut.com/setup
Source: https://explorenewmachine.com/how-to-download-cricut-app-on-computer-complete-tutorial/
#DownloadCricutApponComputer#cricutcomsetup#installcricutdesignspaceapp#wwwcricutcomsetuplogin#cricutcreateconnecttocomputer#cricutcomsetupmac#cricutnewproductsetup#settingupmycricutmaker#connectingcricutmakertocomputer#cricutsetupcreateaccount#cricutcuttingmachinesetup#cricutsetuponcomputer#settingupnewcricutmaker#cricutsetuplogin#cricutaccountsetup#cricutcomsetupdownload#cricutinstallsetup#cricutprintersetup
0 notes
Text
How to Set Up Cricut Maker Machine? [Step-By-Step Guide]
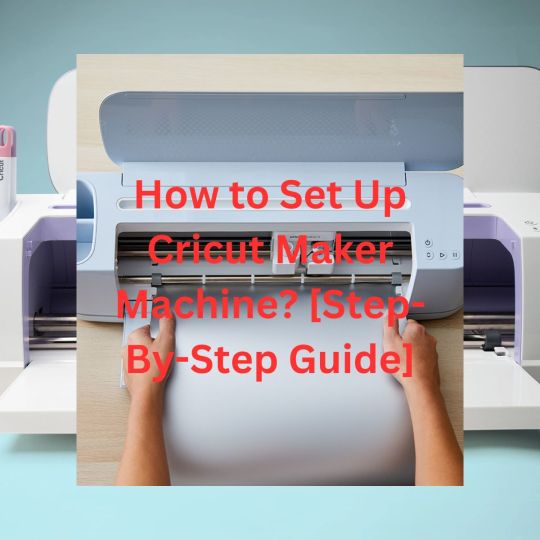
So, you have come to this blog to learn how to Set Up Cricut Maker. Calibration is one of the processes you have to do when you are using the Print Then Cut feature on the machine. Also, crafters need to calibrate the new blades after installing them on the device to ensure they are working correctly and fit at the right place to cut the projects. Also, calibration is a long and complex process, but it is easy to learn. If you are also new to calibration, then this blog is going to help you with everything you need. So, keep reading the following write till the end to acquire extensive info about calibration on the Cricut Maker machine.
Why Should You Do the Cricut Maker Calibration?
Before we jump on the process of how to calibrate Cricut Maker, let’s understand why you should do it in the first place. It is known to doubt Cricut is a perfect machine for cutting different types of materials with utmost precision and accuracy. However, if you are using the Print Then Cut feature on your machine, then you have to do some extra settings to get the flawless cut result. And to get the perfect cut result, you need to perform the calibration of your Cricut Maker machine. By doing the calibration, there is no chance of making any mistakes during the cut, and you will enjoy the pro-level designs cut for your projects.
The Process to Calibrate the Cricut Maker Machine
If you want to learn the complete process of how to calibrate Cricut Maker, then follow the follow-up steps and do as it suggest.
Step 1: Log in to Your Cricut Account
Firstly, open the Cricut Design Space app and sign in with your account.
After that, on the top bar of the app, click on the account menu (☰) option.
And then, from the open pane, click on Calibration.
After that,the knife blade, rotatory blade, and Print Then Cut options will show up on the screen; choose Print Then Cut.
Next, choose the printer you will use for the Print Then Cut feature and then click on Print.
In the next step, you are required to keep the printed calibration sheet on your machine mat. Also, position it on the top-left right of the screen.
Furthermore, click on the Continue option.
Step 2: Connect the Cricut Machine to Your Device
Now, make sure you have already turned ON your Cricut Maker machine.
After that, connect the machine to a device via Bluetooth or USB cord.
When you are on the next screen, open the drop-down menu and click on your Cricut Maker machine name.
Also, you need to choose the materials settings and load the mat onto the machine.
And then press the Go button.
Now, the machine will scan for the calibration markings on the sheets. Then, it will cut a small square at the center of the page. If the cut is up to the mark, then click on the Yes option to move forward; otherwise, choose No.
Furthermore, the Cricut machine performs the calibration cuts on the top side of the page.
After that, you have to check the lines without even unloading the mat from the machine.
The Design Space will ask you about the number and letters that are close to the cuts. Choose the numbers and letters, then click on the Continue option.
Next, the machine will perform the cut for the large rectangle on the sheet.
Step 3: Unload the Mat From the Cricut Machine
Once that’s done, you need to unload the mat from the machine and choose the following response based on your results.
You should click on the Yes option if the cut is as per your requirement.
If you are not happy with the cut, click on No to head back to the calibration process once again.
After that, click the Save & Close option to save the calibration settings.
Finally, you can perform the Print Then Cut feature on your machine.
Causes of Calibration Problems on Cricut Maker
You can get the issue in calibration if you are not following the steps correctly. Also, you should make sure you are loading the mat, paper, and machine blade correctly. Plus, calibration is important for cutting the projects. You can contact the Cricut customer care service to get more information about the calibration process and its correct process.
Frequently Asked Questions
How to Calibrate Cricut Maker Knife Blade?
Here are the steps you need to follow to calibrate the Cricut Maker knife blade.
On the design space, choose the Menu and then click on Calibration.
Then select the option Knife Blade when you are asked about the type of calibration.
Next, attach the blade to the machine and load a plane paper into it too.
After that, click on the Continue option.
From the menu, click on the Maker Machine option.
Then, choose the Go button to start the cut.
After that, the machine will cut the paper.
Unload the mat and check the cut lines to make sure they are correct.
Then, choose the Good Overlap or Bad Overlap option based on the cut results.
Follow the cuts until the blades start perfectly.
What is Calibration in a Cricut Maker Machine?
Calibration is a process where crafters can increase the precision and accuracy of the cuts while using a new blade. Also, it is necessary to do the calibration on the Cricut Maker machine when you use the Print Then Cut feature. By doing that, you will execute flawless results for your DIY design when you cut them on the machine.
Which Cricut Machine Comes with a Calibration Feature?
To enhance the alignment, precision, and cut performance of your Cricut machine, you can do the calibration. This feature is available only for the Cricut Maker machine. Plus, the calibration is currently available for Windows and Mac users only. Crafters who use iOS or Android devices cannot use calibration on their devices for their Cricut Maker machine.
Visit - Cricut.com/setup
design.cricut.com
www.cricut.com/setup
Cricut Design Space
#Cricut Maker Machine#Cricut.com/setup#cricut new machine setup#cricut design space login#design.cricut.com#cricut explore air 2#cricut design space#Set Up Cricut#Step-By-Step Guide#Set Up Cricut Machine#Cricut Maker Calibration
0 notes
Text
How to ‘Print Then Cut’ on Cricut? (Complete Tutorial)
If you use a Cricut machine, regardless of whether you are a hobbyist or a professional crafter, there is a very high possibility that you have heard about the feature named “Print Then Cut.” But have you ever wondered, “What is Print Then Cut in Cricut?” or “How to Print Then Cut on Cricut” If yes, but you couldn’t find the exact answer, then this guide is just for you because we will explore the Print Then Cut feature in this guide. So, without further delay, let’s dive into this.
What Is the Print Then Cut Feature?
Print Then Cut is a feature that allows you to create designs in Cricut Design Space and then print those on your home printer. Later, load the prints into your Cricut machine (Explore, Maker, or Venture) for cutting. The machine automatically scans your print or marker through the sensors. Lastly, cut them with precision to achieve accurate and clean results. This feature is very useful if your process is handled correctly, allowing you to create a variety of products like stickers, toppers, and other cutouts.
Requirements to Use the Print Then Cut Feature
If you are fascinated by the Cricut Print Then Cut feature, then continue reading because, in this section, you’ll learn what things and standards you have to meet to use the Print Then Cut feature.
1. A Smart Compatible Cricut Cutting Machine
Before you begin practicing Print Then Cut, first make sure the machine you are using is compatible with the Print Then Cut feature. For reference, here are some Cricut series names:
2. A Smart Compatible Printer
Select a fully functional printer model. However, there is no such obligation to choose or prefer any of the specific ones. But here are some tips for choosing a printer that will work for you:
Inkjet Printer (Recommended)
Laser Printers
3. Suitable Printable Materials
How to Setup Print Then Cut in Cricut Design Space
After understanding the materials required, let’s move on to creating a project with Print Then Cut:
Step 1: Design Template in Cricut Software
Step 2: Print Your Design
Step 3: Load and Cut the Selected Design
Troubleshooting Tips for Print Then Cut
Here are some troubleshooting tips if you are facing any issues during the use of the feature:
Conclusion
Print Then Cut is a powerful feature that opens up new possibilities for using the Cricut machine. It’s an easy way to print externally and cut with a Cricut machine. In the end, we hope you find this guide helpful and informative for learning “How to Print Then Cut on Cricut” Use the guided instructions to complete the Print Then Cut process on your own without any hassle. However, if you still
encounter any problems, we recommend reaching out to us. We are professionals who are dedicated to ensuring every individual achieves a seamless experience with the Cricut machine.
Frequently Asked Questions (FAQs)
How to Flip Text in Cricut Design Space?
Check out the steps given below to flip your text in Cricut Design Space:
How to Contour in Cricut Design Space?
To contour in Cricut Design Space, follow these steps:
How to Import an Image From Google to Cricut Design Space?
Learn how to transfer an image from Google to Cricut Design Space, consider the following steps:
Visit: cricut.com/setup
Source: https://cricutmakermachines.com/how-to-print-then-cut-on-cricut-complete-tutorial/
#PrintThenCutonCricut#cricutcomsetup#installcricutdesignspaceapp#wwwcricutcomsetuplogin#cricutcreateconnecttocomputer#cricutnewproductsetup#settingupmycricutmaker#connectingcricutmakertocomputer#cricutsetupcreateaccount#cricutcuttingmachinesetup#cricutsetuponcomputer#settingupnewcricutmaker#cricutsetuplogin#cricutaccountsetup#cricutcomsetupdownload#cricutinstallsetup#cricutprintersetup
0 notes
Text
How to Use a Cricut to Make Shirts? (Full Guide)
Do you want to launch your first project but are still unsure about what to create? If so, let me tell you about one of the most popular and easiest crafts you can make: a personalized T-shirt!

Heat transfer vinyl enables crafters to personalize fabric projects by adding designs and text using heat and pressure. It’s a versatile material that is not limited to making T-shirts. You can create various DIY projects, such as wall hangings, hats, caps, tote bags, shoes, and numerous other items.
What You Need to Create a Shirt With Cricut
Make sure you have the following essentials before you start creating shirts with your machine:
Any Cricut Explore, Maker, or Joy machine
Cricut EasyPress 2
Weeding tool
T-shirt
EasyPress mat
Heat transfer vinyl
Scraper tool
Smart iron-on
StandardGrip cutting mat
How to Use a Cricut to Make Shirts: Easy Steps
If this is your first time crafting, follow these simple steps to make a shirt with your Cricut machine:
Step 1: Download Design Space
Go to a web browser and type design.cricut.com/setup
Now, enter your machine model in the search field.
Next, select the checkbox at the bottom left of the page.
After installation, open Cricut Design Space and Sign In. If you don’t have an account, click on Create Cricut ID and follow the instructions.
Step 2: Click on New Project
Once you have signed in successfully, open your Design Space.
Head over to the Cricut Design Space home page and click the New Project icon to start from scratch.
Then, it will take you directly to the canvas where you’ll design.

Step 3: Select the Text Menu
From the left-hand side of the navigation bar, you’ll see an option for “Text.”
After that, you have to click on the Text button.
Next, a text box will show up on your screen for you to enter text. Type whatever you want to get printed on your T-shirt.

Step 4: Design Your Text
At the top of the dropdown menu, select Font if you want to change the Font.
Get ready to choose your favorite text style from a list of hundreds of fonts.

Click on whichever you find the best.
Step 5: Curve Your Text
In the same dropdown menu at the top, you will find the Curve option. Click on it.
After clicking on the Curve option, a slider will show up on your display, allowing you to adjust the curve of your text by moving it left or right.

Step 6: Finalize Your Design
Once you’re satisfied with your design, click “Make It”.
Then, the Cricut Design Space will command your machine to cut.
You will be asked to choose between using a cutting mat and not using one.
Ensure you select “Mirror” on the cut screen when using iron-on and click Continue.
Step 7: Get Ready to Cut
Switch on your machine by pressing the power button.
Next, choose the base material type that best suits your material. I am selecting Smart Iron-On from the list. This step helps your machine determine the required pressure amount for cutting.
Place the HTV’s shiny, plastic sheet down on the mat. Smooth it out to remove any air bubbles or wrinkles.
Place the mat into your machine, positioning it under the rollers.
Press the up and down arrow buttons on your machine. It will pull up your mat, and it will be loaded successfully.
Finally, click on the Go or Start button to begin the cutting process.
Once cut, remove the excess vinyl using the weeding tool. Slowly lift a corner and pull it gently away from the transfer sheet.
Step 8: Transfer Your Design to T-shirt
Preheat your EasyPress. This will make your machine ready to transfer material to the shirt.
Ensure your shirt is clean and ready to receive the transfer design by using a lint roller to remove lint and debris from the shirt.
Place your shirt on the heat mat to ensure your safety.
Place your design on the shirt wherever you prefer, according to your personal preference.
Visit cricut.com/en/heatguide and select your machine from the available options.
Select your specific heat-transfer material and base material, then click the Apply button.
Follow the Cricut heat guide instructions and set your EasyPress to 315°F for 30 seconds if you’re using HTV.
Use light pressure and place your EasyPress on the design you’ve put on your T-shirt.
If your press is smaller than your design, divide your design into sections and heat it accordingly.
Peel off the backing sheet, and that’s it you’re done! Your design will stay intact on your T-shirt even after multiple washes!
Congratulations! Now that you’re no longer a beginner after learning how to use a Cricut to make shirts, your customized T-shirt is ready to wear and shine.
Final Thoughts
Remember, practice makes a man perfect, so don’t demotivate yourself if it doesn’t go as you want. Keep trying to strive for perfection. One last piece of advice I want to share with you is to always try to wash your T-shirt inside out so that it lasts a long time.
Have fun designing your projects, and share your thoughts with us!
Frequently Asked Questions (FAQs)
How Do I transfer a Cricut Image to a Shirt?
Follow the steps to learn if you want to transfer the image to a shirt:
On the left-hand side of the toolbar panel, click on the Image option if you want to use the image from the Cricut library.
If you want to personalize your T-shirt with your own image, slide down the toolbar, find the “Upload” option, and click on it.
Upload and resize your design. Ensure that the Mirror option is activated.
Finalize your design and cut it using the Cricut Design Space instructions.
Weed your T-shirt design and use the heat press machine to transfer the design.
Which Vinyl Is Best for Shirts?
HTV (Heat Transfer Vinyl) is often considered the best option for crafting T-shirts due to its versatility, ease of use, and durability. It allows for complex designs and is affordable for small orders. It also offers a wide range of special effects, textures, and finishes, making it ideal for personalized and high-end customization. However, you can use adhesive vinyl as a cheaper alternative.
Why Is My Cricut iron-on vinyl Not Sticking?
Iron-on transfers might not adhere properly due to several reasons:
Ensure the EasyPress or iron is set to the correct temperature for your specific vinyl and base material, as recommended in the Cricut Heat Guide.
Use firm, even pressure. Ironing boards and plastic surfaces can both hinder and facilitate proper adhesion.
Apply heat for the recommended duration, and consider reapplying heat to the material for an additional 10-15 seconds.
Ensure you’re using the correct peel type for your specific vinyl.
Source: How to Use a Cricut to Make Shirts
1 note
·
View note
Text
How to Setup Cricut Machine? [Computer & Smartphone]
Do you want to learn how to set up a Cricut machine? Worry not—this blog covers all the necessary information you need to know.
Cricut machines are paving a new path for crafters around the world to make brand-like DIY projects at home. In addition, the Cricut machines are easy to use and come with advanced connectivity options to streamline the setup process. By following the instructions, crafters can complete the machine setup and start their crafting journey easily.
However, some users may find it difficult to complete the setup from scratch or face issues. As a result, it is necessary to have a proper understanding of the setup. So, let’s learn about the Cricut machine setup on PC and smartphone devices.
How to Set Up a Cricut Machine on a Computer?
Follow-up guides will help you complete your machine setup on a computer device using the Bluetooth connection and downloading the Design Space app. Follow the steps properly to establish a successful connection.
Step 1: Connect via Bluetooth
First, you need to unbox your machine, turn it on, and then place it within the 10-15 feet range of your computer.
On your PC, open the Settings window by going to the Start menu and then choose the Devices option.
On the next page, ensure that the Bluetooth toggle is on and then click on the “Add Bluetooth or other device” option.
Click on Bluetooth on the open page; it will start looking for your crafting machine.
You need to look for your machine name in the results and select it. (You can look for your machine’s Bluetooth device code, which is printed or engraved on your machine and is near the serial number.)
If asked to enter the password, then enter 0000 and then click on the Pair option.
Now, the Bluetooth pairing of your crafting machine will be complete with your PC.
After that, you can move to the next step of your Cricut machine set up.
Step 2: Download Cricut Design Space
At the start, browse the official Cricut support website Cricut.com/setup on your PC and type the name of your machine in the search section.
After that, you need to click on the checkbox next to the “I agree to Cricut Terms of Use and Privacy Policy” option, then select the Download button.
Now, the download process will start, and the screen will show a progress bar indicating the download status.
Wait for the download to complete; double-click on the Cricut Design Space setup file in your browser to begin the installation.
Open the downloaded file from the Downloads section on your device.
Once you launch the Cricut file, a prompt will ask if you trust this app. Select the right option to continue with the installation process.
Now, the installation process will appear in a pop-up box.
After the installation, you should complete the sign-in process using the Cricut account credentials. (If you are a new user, then click on “Cricut Cricut ID” to make a new account.)
Then, choose the option to set up your machine and then select it.
When the setup process is complete, you can continue with your first project.
How to Set Up a Cricut Machine on a Smartphone?
Carefully read the procedures below and use them if you want to set up your cutting machine on your smartphone.
Step 1: Establish the Bluetooth Connection
First, you need to turn on your machine and bring your smartphone near your machine.
From the homescreen, tap on Settings and then go to Bluetooth.
Now, you need to ensure that the Bluetooth toggle is on; if the toggle is off, then tap on it to turn it on.
Your device will search for all the available Bluetooth devices and show them on the screen.
From the list of devices, you need to tap on your machine. (If you see a prompt to type the PIN, then enter 0000 and then tap on Pair.)
Next, your device will be connected via Bluetooth.
Step 2: Download the Cricut App
Go to your smartphone device’s home screen and tap on the Google Play Store or Apple App Store icon.
Once the app opens, go to the search bar and enter ‘Cricut Design Space‘ to search for it.
From the list of results, tap on the Cricut green C icon and then choose the Install option to start the download.
Once the download is complete, open the app. (The app icon will also be added to your device’s home screen.)
Complete the sign process and tap on the Machine Setup option.
Click on your machine model number from the options, and then the setup will be complete.
Here you go! You can now create awesome crafts using the Cricut supplies and machines.
Final Words
With the help of the above-mentioned guides, you can complete your Cricut cutting machine setup on a PC or smartphone running various operating systems, such as Mac, iOS, Android, and Windows. Carefully use the specific method according to the device you are using, and start your crafting journey right away. However, if you are facing any problems or need more help with the setup, then it would be good to seek further help.
Frequently Asked Questions
How to set up my Cricut machine?
Below are the major steps you can follow to set up your machine with a device.
First, you should turn on the machine and keep it close to your PC or mobile phone.
After that, connect both devices using the USB cable or Bluetooth connectivity.
Next, you are required to download and install the Design Space app on your device.
Once the download is complete, complete the sign-in process. (Create a new account if needed.)
Then, choose the Machine Setup option to search for the machine.
Select the machine, and the setup will be successful; you can start using it.
Why can’t I connect my Cricut machine?
The process of setting up the machine is simple, but you can face many problems. Here are some major reasons you are unable to complete the setup.
The machine may not be compatible with your device if it does not meet the system requirements or lacks Bluetooth connectivity.
You are following the wrong method when setting up the machine.
You have downloaded a corrupt or outdated app.
The devices are not within the same network connection range.
Connection settings on computers or smartphones are not correct, and other issues.
Can I use Cricut machine without completing setup?
Cricut mainly offers heat press devices and cutting machines. If you want to use the heat press device, then there is no need to complete the setup. However, if you want to work with the cutting machine, then it is necessary to connect it to a desktop or smartphone device to use its functions. In addition, without completing the setup, you will not be able to use the machine. For the hassle-free setup of your machine, you need to have proper knowledge of the whole procedure.
Source: How to Setup Cricut Machine
#how to setup cricut machine#setup cricut machine#Cricut Setup#cricut machine setup#Cricut design space Software
1 note
·
View note