#STEP-BY-STEP GUIDE
Text
Articulated Paper Dolls: A Step-by-Step Guide
Today, we’re diving into the whimsical world of articulated paper dolls. These charming creations are not just a throwback to simpler times; they’re a fantastic way to spark imagination, exercise your artistic skills, and create something truly unique. Whether you’re a seasoned artist or a curious beginner, making articulated paper dolls is an enjoyable and rewarding experience. Occassionally, we…

View On WordPress
#Art Blog#Art for Beginners#art therapy#Articulated Paper Dolls#Artistic creativity#artistic expression#Artistic Skills#Cardstock Crafts#Creative Art Projects#creative hobbies#Customization#DIY Crafts#Fine Motor Skills#Handmade Toys#Hands-on Art#Imagination#Paper Cutting#Paper Doll Making#Step-by-Step Guide#Vintage Toys
6 notes
·
View notes
Text
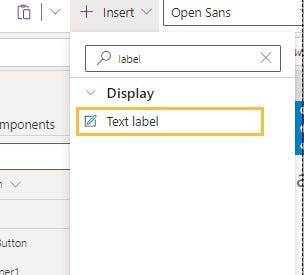
Count The Rows In A Power Apps Gallery With AllItemsCount
Overview:
In this blog post, we’ll explore how to count Power Apps Gallery Rows using the AllItemsCount property. We’ll insert a label to show the count of all gallery items and then implement the exact code for precise counting. Each step comes with images and clear instructions. By the end, you’ll master the display of the total number of items in any gallery. Let’s dive in!

This code we use and count how many items in gallery
Read Full Post here: How to Count Rows in Power Apps Gallery: A Step-by-Step Guide (softwarezone365.com)
View Post On:
LinkedIn: (4) Software Zone 365: Company Page Admin | LinkedIn
Twitter: https://twitter.com/365_zone40741/status/1712883279580614768
Medium: Microsoft’s Power Platform Potential: Unlocking Business Impact (softwarezone365.com)
Pinterest: https://www.pinterest.com/pin/1065875436793645010
Reddit: https://www.reddit.com/user/SoftwareZone365/comments/1773k2e/count_the_rows_in_a_power_apps_gallery_with/
Quora: https://www.quora.com/profile/Software-Zone-365/In-this-blog-post-we-ll-explore-how-to-count-Power-Apps-Gallery-Rows-using-the-AllItemsCount-property-We-ll-insert-a-l
GitHub: Count The Rows In A Power Apps Gallery With AllItemsCount · softwarezone365/PowerApps Wiki (github.com)
Instagram: https://www.instagram.com/p/CyWOuK8sGc9/
Facebook: https://m.facebook.com/story.php?story_fbid=300738072723966&id=100083633251137&mibextid=ZbWKwL
#development#AllItemsCount#App Development#BrowseGallery1#Coding in Power Apps#Gallery Items#Gallery Management#Gallery Rows#Item Counting#Label Count#Microsoft Power Apps#Power Apps#Power Apps Functions#Power Apps Gallery#Power Apps Tips#Power Apps Tutorial#Power platform#Row Counting Technique#Step-by-Step Guide#Text Property
2 notes
·
View notes
Text
A Roadmap to SAP S/4 HANA Implementation Success
Discover a step-by-step guide to achieving successful SAP S/4 HANA implementation. Learn key strategies, best practices, and solutions for a seamless transition.
#SAP S/4 HANA#implementation guide#success roadmap#digital transformation#business optimization#best practices#seamless transition#key strategies#step-by-step guide#implementation solutions
0 notes
Text
Discover the detailed process of constructing a house in India with our comprehensive step-by-step guide. From initial planning and approvals to the final finishing touches, this guide covers every aspect of building your dream home. Learn about site preparation, foundation laying, structural work, and interior design, along with tips for choosing the right materials and ensuring quality control. Ideal for homeowners, builders, and anyone interested in understanding the nuances of house construction in India.
#House Construction#Home Building#Construction Process#India#Step-by-Step Guide#Building a House#Construction Tips#Home Design#Construction Planning#Real Estate#Shree TMT#Quality Construction Materials#Indian Construction Methods#Homeowner Guide#Construction Approval Process
0 notes
Text
Welcome to the exciting world of creating and selling adult colouring books – a venture where artistic flair meets savvy business strategy. This comprehensive guide will help you harness the power of artificial intelligence (AI) tools and Amazon Kindle Direct Publishing (KDP) to transform your creative visions into a potential source of income.
#AI#Amazon KDP#Colouring Book Creation#Colouring for Stress Relief#Mindfulness Colouring#Publish on Amazon#Relaxing Colouring Books#Step-by-Step Guide
1 note
·
View note
Text
How to Make Custom Shirts With Cricut: A Step-by-Step Guide
I am obsessed with my Cricut machine and create projects on it every day. You can call it my hobby or my big passion for crafting. Recently, I have made dozens of custom shirts with my Cricut Maker machine, and you can create some on your own, too. Following this guide, your guesswork will be reduced to zero, as I will share some of the easiest steps on how to make custom shirts with Cricut.
If you are interested in my tutorial, I would recommend you continue it till the end so as not to miss anything important. I have been creating unique stuff with my Cricut for more than 6 years now; it has been a beautiful journey for me.
Whether you are a beginner or a well-trained Cricut user, this post will help you get some ideas for starting something new. I hope you found this blog helpful and that you will come back for more Cricut-related blogs like this one. Let’s start learning how to design shirts with Cricut for beginners.
Which Is the Best Cricut for Making Shirts?
When you are making a custom shirt, you will have this doubt about which machine to choose. My answer would be to choose anyone you have. Whether you have Cricut Maker, Joy, or Explore, you can choose anyone with your iron-on vinyl to make a perfect custom shirt.
However, you will need to insert the fine point blades to cut this type of vinyl. I hope you got an answer to it. Let’s move forward with this guide on making your custom shirt.
How to Make Custom Shirts With Cricut Machine?
When you are clear about which machine to use and what design you wanna make, let’s get started with my steps. Well, you will need a few things before you move your hands on the desktop. So, gather up all the listed things here.
Cricut Explore Air 2
EasyPress 2
EasyPress mat
Shirt apparel
Weeding tool
Brayer tool
Scissors
Standard mat
Premium vinyl
Are you ready with all these? So you’re good to go. When you are ready, head to your Cricut Design Space and show some of your creativity. And follow all the steps carefully.
Step 1: Go to the Cricut Design Space App
In the first step, you should go to your Design Space and pick a design to print on your shirt. As the Cricut app is full of ready-to-make designs, fonts, images, and templates, you won’t have to hustle to make a design. I am using my Explore Air 2 machine; you can use a machine you’re familiar with.
Step 2: Adjust Your Design
Once you are ready with your final design, you can take some time to make that fit for you. For example, you can change the design’s color. On the Cricut Design Space canvas, you will get a few options on the right-hand side, from where you can choose your favorite color for the shirt.
Step 3: Change Vinyl Color
Here, you need to change your vinyl color as your shirt’s color may not be a good match with the vinyl’s color. In order to keep the color vibrant and not blend them, you have an option to change the color of your iron-on vinyl. To do this, you should click on the Layers option on the canvas. After that, you can click on the white box with the Layer option and pick a color for your vinyl.
Step 4: Final Your Design
If you find the color combo not as expected, you can change it. Once you have done all the updates, you are ready to save your design. You need to hit the Save button along with the name of your project to remember what this design is about. I am making a design that says “Cutest Bachelor.” Let’s check more steps on how to make custom shirts with Cricut.
Step 5: Load Your Material (Iron-on Vinyl)
In this step, you are ready to cut your project with your special Cricut machine. Don’t forget to load your vinyl on a Cricut cutting mat and then into the Cricut machine. Once you are done, you can start the cutting. Also, select the correct size of your mat on your machine so that your design fits the cutting mat. And the most important thing is to align the iron-on vinyl correctly to get an expected cut.
Step 6: Cut Your Design
When your design is ready, and you have checked all the settings, you can allow your Cricut machine to perform a cut for you. Once you hit the Go button on your machine, it will show you a preview of your final design. If you are satisfied with it, click the Continue button to get a cut. Once the design is fully cut, unload your cutting mat.
Step 7: Weed Out the Excess Vinyl
When you have a cut in your hand, take a weeding tool and take out excess vinyl to make the design clear and ready to be ironed. You can use your hands too, but a weeding tool is more convenient. Now, you have finally come to the main part of how to make custom shirts with Cricut.
Step 8: Ready Your EasyPress
When your design is ready, you can set your Cricut EasyPress to cotton or linen to get the desired results. So, now you need to put your weeded design on the shirt apparel and use a Cricut EasyPress 2 to heat it. However, before that, you must use a brayer tool to remove lint and fibers from the shirt’s fabric. Once you do that, for the next steps.
Step 9: Preheat Your Shirt
When your apparel is ready, use your EasyPress to preheat it for 15 seconds with moderate pressure to remove the moisture and wrinkling. For the final heating, you should consider a Cricut Heat Guide that will help you find the best setting for your design. After that, use the temperature and pressure accordingly.
Step 10: Apply Heat to Your Shirt
And the last step is to just apply the heat as the Cricut guide suggests. Use a towel to place on your vinyl design, and apply heat for 30 seconds. Using a towel will prevent your iron-on from getting damaged. Viola, you have just designed a perfect custom shirt with your Cricut.
Conclusion
You were all wondering how to make custom shirts with Cricut. And with my blog, you might have found this process a bit easier than before, I guess. Don’t worry; if you follow the instructions carefully, I can bet you can make a fabulous shirt.
However, be mindful of the heating setting as it can ruin your project and waste everything. It’s always better to use a household iron while making your first project. When you get familiar with the process, you can take one step ahead with an EasyPress.
Source Url :- how to make custom shirts with Cricut
Visit here for more Information:- · cricut design space log in
· cricut machine
· cricut machine setup
· how to make custom shirts
· step-by-step guide
· install cricut design space
#how to make custom shirts with Cricut#CRICUT DESIGN SPACE LOG IN#CRICUT MACHINE#CRICUT MACHINE SETUP#STEP-BY-STEP GUIDE#INSTALL CRICUT DESIGN SPACE
0 notes
Text
Beginning to End: The Creation of a Blog Post
I’ve been asked by several new start-up businesses how I do everything that I do. That’s a long list. I decided that today I would tackle the process I go through to put out a blog post and hopefully the step-by-step guide will help some people create their own method for blogging about their passions.
Idea
Inspiration can come from anywhere as cliche as that sounds. Since I’ve themed my blog…

View On WordPress
#blog guide#blog post#blog post guide#blogger#blogging#how to#sidehustle#smallbusinessadvice#smallbusinesssupport#step-by-step guide
0 notes
Text
Looking for a quick and reliable method to find your passport number? Look no further than their meticulously crafted A Step-by-Step Guide to Locating Your Passport Number. This comprehensive resource offers expert tips and detailed instructions to seamlessly locate that elusive number and take the stress out of the passport management process. Read to know more.
0 notes
Text
Check out my newest tutorial - How to Fill A Shape With An Image in Microsoft Word. It will guide you through the process of inserting an image into a shape in Microsoft Word and aid in improving your graphic design skills. #imagefill #insertimage #microsoftwordtutorial #godservdesigns #shapefill #fillashape #graphicdesigner
BUY THE BLUE SKY FUNERAL PROGRAM TEMPLATE
https://etsy.me/3NSVLFn
#shapefill#wordtutorial#godservdesigns#diywordhack#insertimageintoword#funeralprogram#bluefuneralprogramtemplate#wordtemplate#Microsoft Word#image insertion#Graphic Design#Microsoft Office#Microsoft Word Tips#Tutorial for Beginners#DIY Design#Graphic Design in Word#Image Editing#Step-by-Step Guide#designtutorial#Document Editing
0 notes
Text
Unleash Your Festive Glam: A Step-by-Step Guide to Simple Yet Creative Makeup Looks
The gleeful season is upon us, and it’s the perfect time to sparkle and radiate with festive makeup looks that mirror the joyful spirit of festivities. Whether it’s a cosy gathering with loved ones or a swanky shindig, your makeup can be the highlight of your festive ensemble. Embrace the magic of the season and plunge into these step-by-step guides to easily elevate your festive makeup looks and…

View On WordPress
#beauty tips#creative makeup looks#Festive makeup#Festive Season#holiday beauty#makeup inspiration#Makeup tutorial#simple glam#step-by-step guide
1 note
·
View note
Text
Step-by-Step Guide: Using QR Codes in Snapseed for Seamless Image Editing
Snapseed, Google’s versatile and user-friendly photo editing app, continues to innovate with features that simplify the way we edit and share images. One such feature is the integration of QR codes, which allows users to share their editing workflows effortlessly. In this comprehensive guide, we’ll walk you through the process of using Snapseed QR codes in Snapseed for seamless image editing, ensuring that your creative vision shines through with ease.
Visit us:
#Step-by-Step Guide#ios app development#website development company#QR Codes in Snapseed#snapseed qr codes#snapseed qr#blockchain application development
0 notes
Text
In our increasingly globalized world, effective communication is vital for businesses, organizations, and individuals. Zoom Interpretation, offered by Metaphrasis, is a powerful tool that enables seamless multilingual communication during virtual meetings, webinars, and conferences. This step-by-step guide will walk you through the process of setting up and utilizing Zoom Interpretation to ensure clear and effective communication with participants who speak different languages.
What is Zoom Interpretation?
Zoom Interpretation is a feature that allows meeting hosts to provide real-time interpretation services in multiple languages. It ensures that participants who speak different languages can engage in discussions, presentations, and collaborations without language barriers.
Why is it essential in today's globalized world?
As businesses expand globally and international collaborations become the norm, overcoming language barriers is crucial. Zoom Interpretation fosters inclusivity, facilitates international communication, and ultimately leads to better outcomes in various sectors.
Getting Started with Zoom Interpretation
Before you can harness the power of Zoom Interpretation, you need to set up your account and activate this feature.
Sign up for a Zoom account
If you don't already have a Zoom account, sign up on the Zoom website. It's free to create an account, and you can choose from various subscription plans depending on your needs.
Activate the Zoom Interpretation feature
To use Zoom Interpretation, log in to your Zoom account and navigate to the settings. Ensure that the "Interpretation" feature is enabled. This step is essential for conducting multilingual meetings.
Setting Up Your Meeting
Now that your Zoom account is ready, it's time to schedule your multilingual meeting and enable interpretation.
Schedule a meeting
In your Zoom account, schedule a new meeting as you normally would. Set the date, time, and other meeting details.
Enable interpretation
While setting up the meeting, you'll find the "Interpretation" option. Enable it to access interpretation settings for this specific meeting.
Select interpreters
You'll need to have interpreters for each language you want to support. Select the interpreters for your meeting and assign them specific languages to interpret.
Preparing Your Interpreters
Once Professional interpreters are selected, it's crucial to prepare them adequately for the meeting.
Provide materials and context
Share any relevant meeting materials, agendas, or presentations with your interpreters in advance. Providing context helps them prepare and deliver accurate interpretations.
Test interpreter audio and connection
Ensure that your interpreters have the necessary equipment and a stable internet connection. Conduct audio tests to verify sound quality and minimize technical glitches during the meeting.
Joining the Meeting as an Interpreter
On the day of the meeting, interpreters need to join the session correctly.
Using the Zoom desktop app
Interpreters can join the meeting through the Zoom desktop app. They should select the language they'll interpret and connect to the meeting.
Connecting via web browser
Alternatively, interpreters can join through a web browser by clicking on the provided link and following the instructions. This option is convenient if they don't have the Zoom app installed.
Interpreting During the Meeting
Once the meeting starts, interpreters play a crucial role in facilitating communication between participants.
Switching between languages
Interpreters can switch between languages seamlessly during the meeting, ensuring that all participants understand and engage in the discussion.
Muting original audio
To avoid confusion, interpreters can mute the original audio when they are actively interpreting. This helps participants focus on the interpretation.
Participant Experience
Participants also have a role in making Zoom Interpretation work effectively.
How participants select their language
Participants can choose their preferred language for interpretation in the Zoom settings. This ensures that they hear the meeting in a language they understand.
Hearing the interpretation
Participants will hear the interpretation in real-time, making it easier for them to engage in discussions and follow presentations.
Best Practices for Effective Interpretation
To ensure the success of your multilingual meeting, follow these best practices.
Speak clearly and at a moderate pace
Interpreters should speak clearly and at a pace that allows participants to follow along comfortably. Avoid speaking too fast or too slowly.
Manage interruptions and feedback
Encourage participants to avoid interrupting the interpreter and provide feedback on interpretation quality after the meeting.
Troubleshooting and Tips
Despite careful planning, technical issues may arise during your multilingual meeting.
Dealing with technical issues
Have a plan in place to address technical problems quickly, such as interpreter disconnects or audio issues.
Enhancing interpreter performance
Continuously provide feedback to interpreters to help them improve their skills and deliver high-quality interpretations.
Security and Privacy
Protecting your data and ensuring privacy is paramount when using Zoom Interpretation.
Ensuring data protection
Understand Zoom's data security policies and inform participants about data handling during meetings.
Controlling access
Manage participant access to the meeting and interpretation features to prevent unauthorized use.
Feedback and Evaluation
Gather feedback from participants and interpreters to assess the effectiveness of Zoom Interpretation.
Collecting feedback from participants
Use surveys or post-meeting discussions to gather feedback on the interpretation quality and overall meeting experience.
Continuous improvement
Use feedback to make improvements and ensure that future meetings are even more effective and inclusive.
Cost and Subscription Plans
Zoom Interpretation offers both free and paid options.
Free and paid options
Review Zoom's subscription plans to choose the one that best suits your organization's needs and budget.
Choosing the right plan for your needs
Consider factors such as the number of participants, meeting frequency, and required features when selecting a plan.
Real-life Success Stories
Learn from organizations that have successfully implemented Zoom Interpretation to enhance their global communication.
Future Developments
Stay informed about upcoming features and enhancements to make the most of Zoom Interpretation.
Conclusion
Zoom Interpretation, powered by Metaphrasis, is a game-changer in breaking down language barriers during virtual meetings. By following this step-by-step guide, you can confidently set up and utilize Zoom Interpretation to ensure effective multilingual communication in any setting.
#Zoom account#step-by-step guide#Language Barriers#Interpretation#Metaphrasis#Virtual Meetings#Professional interpreters#Zoom Interpretation#Zoom Website
0 notes
Text
How to Start a Podcast: A Step-by-Step Guide
Starting a podcast can be an exciting way to share your passion, connect with an audience, and perhaps even monetize your content. Here’s a step-by-step guide to help you launch your podcast:
1. Define Your Niche
Topic Selection: Choose a topic you’re passionate about and knowledgeable in. The best podcasts often come from hosts who genuinely care about their subject.
Audience: Understand your…
View On WordPress
0 notes
Text
DIY: FURNITURE UPCYCLING
Hello everyone, how are you my DIY lovers who like to reuse their old things and do new things in their home.Today we’re going to delve into furniture upcycling where old repurposed pieces are given a second lease of life.All my mates grab your paint brushes and a little circus because we are going to turn trash into gold in one less and get ready to do as you did.
Gold from Waste: Some Guidance…

View On WordPress
#Budget-Friendly#Creative Projects#diy#Eco-Friendly#Environmental Sustainability#Furniture Makeover#Furniture Restoration#Furniture Upcycling#Green Living#Home Decor#home improvement#Interior Design#recycling#Recycling Furniture#Repurposing Furniture#Step-by-Step Guide#Sustainable Living#Thrift Store Finds#Upcycled Home Decor#WOOD
1 note
·
View note
Text
Ever wanted to design your own Tabletop Roleplaying Game for your kid?
Here's a step-by-step guide from Steph @TTRPGkids.
1 note
·
View note
Text


One last dance, please
#art#illustration#my art#persona#sketch#makoto yuki#minato arisato#persona 3#persona 3 reload#aigis#persona 3 aigis#wanted to add the “im so lost without you” from the ep aigis opening#was thinking about how makominato was smthn like aigis' guide (teaching her the steps) but then he left and now shes so lost without him#what if i cried#i cant wait for episode aigis#crying thumbs up emoji
2K notes
·
View notes
Last Seen Blogs

pepper-pouts
Spontaneous teaparty

friend-of-faust
Collection of Arcana Art & References

et4308932
Untitled

originalnutrition
Original Nutrition

emeraldinthesky
Strange Trails