#CRICUT MACHINE
Explore tagged Tumblr posts
Visit Tumblr Blog
Explore Tumblr blogs with no restrictions, modern design and the best experience.
Last Seen Tumblr Blogs


Fun Fact
If you dial 1-866-584-6757, you can leave an audio post for your followers.
Text

Cheap Cricut. Real cheap- not even a cricket.
172 notes
·
View notes
Text


Kris Stickers
Some reason Tumblr wouldnt let me post so this is being posted late 😭
Will be making stickers of the others soon :]
#small artist#artists on tumblr#art#artwork#digital art#art growth#artist support#digital artist#amateur artist#procreate#procreate art#deltarune art#deltarune kris#deltarune#deltarune fanart#sticker design#stickers#cricut machine#cricut
17 notes
·
View notes
Text

Love Coffee? ☕️
These cute coffee☕️ stickers are available in our Etsy shop!
God bless
😇😇
#etsy#handmade#crafts#etsyseller#etsyshop#coffee#coffeeandcrafts#coffee stickers#stickers#sticker#handmade stickers#food stickers#coffee cup#onlineshop#onlinestore#etsyitems#cricut#Cricut machine
0 notes
Text
Cricut Joy Xtra: A Rant
This rant won’t have anything to do with anime, movies, or games. Instead, I need to get something off my chest regarding a purchase I made last year. Feel free to click off now or read on and get mad with me. Something you may not know about me is that I enjoy journaling and scrapbooking. It’s how I unwind and relax after a stressful time. I also enjoy recycling scraps of paper and turning them…
0 notes
Text
9 Creative Cricut Easter Projects to Celebrate the Holiday
It's a leap year, and the excitement of celebrating Easter is on the next level. This year, I will celebrate the festival with my newborn grandchildren. Ever since he came into our lives, I have become much more active and participate in daily routine work. As her grandma, I made the day special by creating custom Cricut Easter projects with my crafting machine.
Ever since I got the Cricut machine, I have taken plenty of orders and started my own business, which has made me independent and improved the family's financial condition. But this time, the reason for many crafts is slightly personal, as I will make projects for my grandson. In this blog, I share my favorite Cricut projects for Easter that you can easily make at home within a few minutes.
1. Basket
Collect your eggs and keep them safe from getting damaged by storing them inside the personalized basket. You can make one of these Cricut Easterprojects with any cut-die machine using Smart Materials & other crafting tools. Besides, you can easily decorate the design on any basket. Also, you can use this custom-made bucket to store items in future days.
2. 3D Card
If you love simplicity, you should make a 3D card and give it to your loved ones. The cards are one of the easiest and simplest crafts any DIYer can make from their crafting machine. With the help of this project, it will be more accessible for users to pen down their feelings into words. Most crafters prefer to use a Cricut Joy machine and card mat to complete this project.
3. Table Runner
Subsequently, decorate your dining table by placing a personalized table runner. There are several Cricut Easter projects, but making this DIY craft is my favorite. The crafter can make this project from any crafting machine using the sewing tool kit and design the runner according to their table size. In addition, users can give it as a present to loved ones.
4. Candy Box
Surprise your children by giving them sweet candies of different flavors. Place the candy box on the table and let your children choose their favorite candy. Users can also make this craft in various sizes and decorate it with colors. Moreover, users must use a Cricut cutting machine, materials, and other supplies to get the best results.
5. Lollipop Holder
If you love lollipops, you need a holder by your side. The holder allows users to handle and take the candy anywhere easily. A DIYer can easily do this project with a Cricut model, materials, and other supplies. The craft machine can also make a holder of any size, shape, and color.
6. Plate
Serve your guests delicious lunch on a customized plate in your dining area. Among the variety of Cricut Easter projects, I prefer this craft as it gives them a new look and makes them look much more classy. Plus, users can make this do-it-yourself craft using a Cricut machine, materials, and other items.
7. Doormat
Make your guests feel at home by placing a personalized Happy Easter doormat. This craft might seem complicated to make, but it isn't. You have to be a little patient while doing this DIY project. Users must have a Cricut machine, specific materials, and other tools.
8. Welcome Porch
Equally important, decorate your home by placing an eye-pleasing welcome porch near the front door. Apart from the front door, you can also put it in your garden, near your room or backyard, while preparing for the house. If you intend to make one of the Cricut Easter projects, you need a cut-die machine, materials, etc.
9. Mason Jars
Finally, discuss the last Cricut project you can make with the cut-die machine. By decorating the mason jars, you will preserve the food items and give the kitchen a new look by organizing them. Also, all users must decorate the jars by sticking labels, decals, and stickers.
Final Words
This blog will help you understand the various projects made from cut-die machines for this festival. However, all DIYers must use compatible tools while making any craft. The Design Space app will help users design the project and transfer it to the Cricut machine for the cutting process.
FAQs
Question: Which Easter Crafts Can I Make With Cricut?
Answer: Cricut is a smart cutting machine that can cut hundreds of materials in any shape and size for various occasions. Various Easter crafts can be made out of Cricut, which are as follows:
Colorful pillows
Monogram sign
Garden flags
Wreath
Table runner
Pop-up card
Bouquet
Question: Can I Start My Own Business by Selling Cricut Easter Projects?
Answer: If you are enthusiastic, you can start your own business by selling Easter crafts. To make the desired craft out of the cut-die machine, you must have complete knowledge about the craft machine, its tools, and how to make a perfect craft for the event. They should also know what's trending in the market and how to fulfill the customer's needs.
Question: Do I Need to Have Cricut Design Space While Making Any Easter Day Craft?
Answer: Yes, all DIYers must-have Cricut Design Space on their respective devices while making any Easter craft. This Cricut app offers thousands of images, fonts, and ready-to-make projects that help users create the design of their preference.
Source Url :- cricut easter projects
#cricut.com/setup#cricut explore air 2#cricut accessories#cricut joy app#cricut machine#best cricut machine#cricut access#cricut explore air 2 accessories#cricut easter projects
0 notes
Text

Take Your Projects to the Next Level with Explore Air 2 Accessories
What if you had a crafting machine that could organize and decorate every basic item in your home and office? It's not just a dream anymore; the Cricut machine can make it a reality. Simply choose a Cricut model that fits your needs and budget, then complete the setup process. After that, visit cricut explore air 2 accessories to download the Cricut software, then connect the Cricut machine to your computer or mobile, and start your DIY projects.
Visit here for more Information :- https://mycricutspace.com/
#cricut accessories#cricut explore air 2 accessories#cricut.com/setup#cricut explore air 2#cricut joy app#cricut machine#best cricut machine#cricut access
0 notes
Text

DIY Delight: Getting Started with the Best Cricut Machine
Are you interested in the world of crafting and eager to bring your creative vision to life? Explore the possibilities with the Cricut machine. This smart tool is a game-changer for those who are curious about crafting and eager to unlock their creativity skills. With the Cricut machine, you can easily cut symbols, images, text, and vibrant sticker designs from various materials, from paper to HTV, fabric, and balsa wood. Also, making your DIY projects is possible with the free software provided by Cricut, available at cricut.com/setup.
Visit here for more Information :- https://setupwindowsmachine.com/
0 notes
Text

Introducing the Cricut Venture™ Everything Bundle!
Unlock endless creative possibilities with the Cricut Venture Machine™ Everything Bundle. This comprehensive package includes everything you need to embark on your crafting journey with confidence and creativity.
Whether you’re a seasoned crafter or just starting out, the Cricut Venture™ Everything Bundle has you covered. From cutting and crafting to drawing and embossing, this all-in-one bundle offers a versatile array of tools and accessories to bring your ideas to life.
0 notes
Text
How to Use Cricut Machine? [A Comprehensive Guide]
Along with the craft plotter, the users also need to buy supplies & accessories to finish the project as per their choice. However, one thing that is common among them is the Design Space app. It is digital software that permits the DIYer to draw something creative and out of the box. Continue reading this blog to learn in detail about the Cricut cutting machine.
How to Setup Cricut Machine on a Computer?
Every crafter will agree that before starting the crafting process, it’s compulsory to set up the craft plotter. They can set up their cut-die machines with PCs as well as mobile devices very easily. However, it will be the user’s call to decide via which device they will be setting up their machine. Read the following steps to learn about setting up a Cricut craft machine with a Desktop.
First, start plug in your cut-die machine & power it on.
Next, connect both devices with each other via a USB cable or pair it up with Bluetooth.
Now, open the search engine and go to the Design Space setup page.
Following this, download and install the Cricut software on your system.
Next, sign in, create your Cricut ID, and start setting up your cutting machine.
Lastly, you will get to know about the setup that has come to an end when called for the test cut.
Further finishing up the Cricut cutter machine setup process with PCs, the crafter needs to connect their Cricut cut die machine with PCs using Bluetooth.
How to Connect Cricut Machine to a PC Wirelessly?
The user got the authority to cut the materials wirelessly with their electronic cutting machine. Have a look at the following steps and learn about connecting a Cricut machine with the Windows/Mac operating system:
For Windows
Ensure that your Cricut cut die machine is on and within 10–15 ft of your PC.
After that, press the Start menu and tick the Settings option (gear icon).
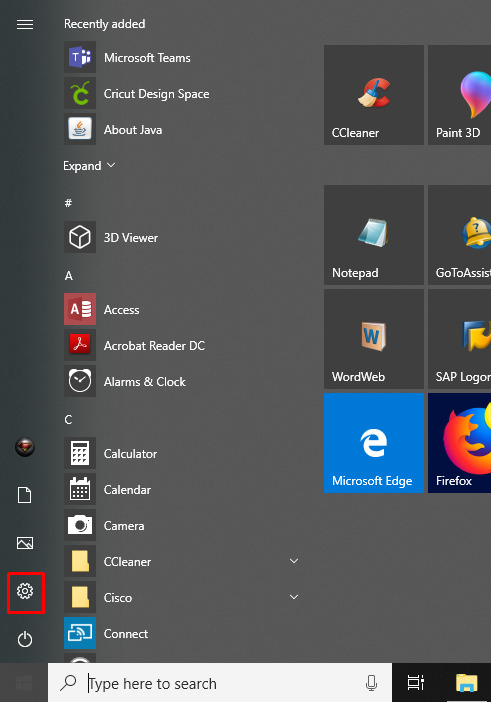
Now, click the Devices and then enable your device’s Bluetooth.
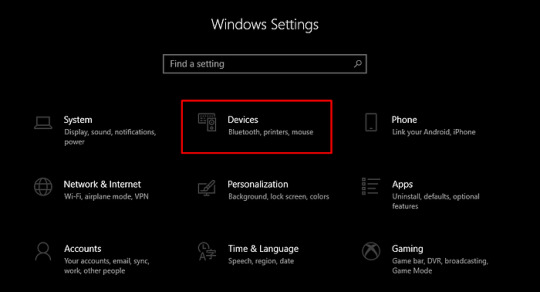
Next, press the Add Bluetooth or other devices and select Bluetooth.
Following this, choose your machine and start typing the PIN number.
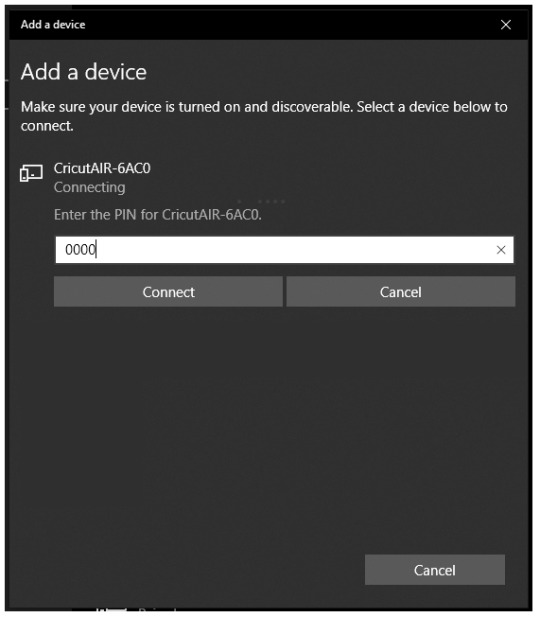
After entering the PIN, select the Connect button given on the left side of the screen.
Finally, the connection process of your craft plotter with a Windows computer will come to an end.
Apart from Windows OS, the crafter can also connect their Cricut craft machine with Mac systems. For that, they need to read the section given below.
For Mac
First, cross-check that your Cricut machine is on and within 10–15 ft of your PC.
Next, choose the System Preferences given under the Apple tab.
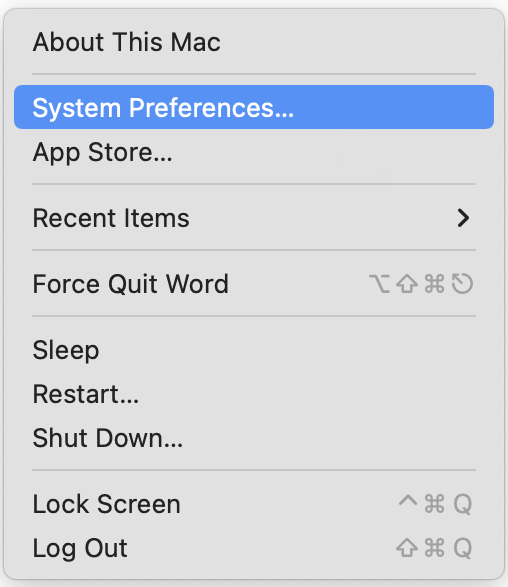
Now, press the Bluetooth icon visible on the System Preferences page.
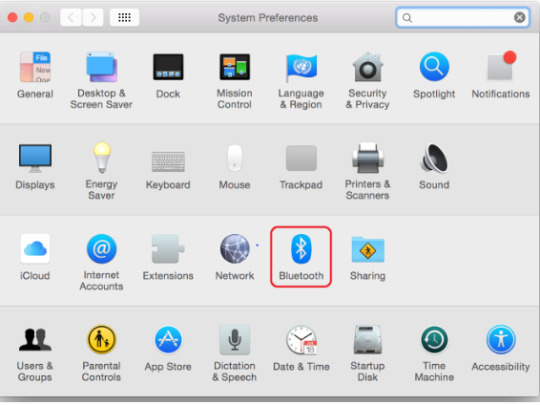
Afterward, a Bluetooth window will open and turn on the Bluetooth (if it isn’t on).
Next, select your Cricut model name from the list appearing and tick the Pair button.
Following this, fill in the PIN code and tick the Pair option appearing on the right side of the screen.
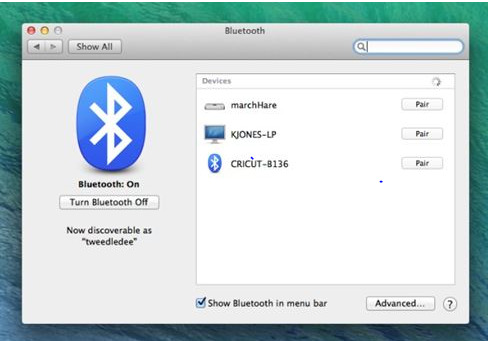
At last, both the devices will successfully get connected with each other.
With the wireless connection completion of the Cricut machine with PCs, the DIYer can now start by creating custom projects.
What Projects Can You Craft Out of Cricut Machine?
After learning so much about the Cricut cutting machine, the crafters become capable enough to craft different custom projects. You can create projects for personal as well as professional purposes. The DIYer can also use a Cricut craft machine and start their own business. Have a look at the list of popular projects that you can prepare out of the machine:
Greeting Cards
Custom T-Shirts, Mugs & Hats
Paper Lanterns
Personal Coasters
Cake Toppers
Custom Tumblers & Water Bottles
DIY Window Decal
Tote Bag.
Wood Sings
Doormats
Car Labels
Bookmarks
Earrings
Banner
Monograms
In brief to the post, we really hope that you were able to come across all the details regarding the Cricut machine.
Frequently Asked Question
Question: How Can I Connect My Cricut Machine to My iOS via Bluetooth?
Answer: Go through the following steps and learn about the wireless connection process:
First, enable your Cricut cut die machine & be within 10–15 ft of the smartphone.
Now, go to Settings and turn on your device’s Bluetooth.
After turning on the Bluetooth, select your machine name from the list.
Next, fill in the blank with PIN, i.e., 0000, and click the Pair option.
Finally, your wireless pairing process will come to an end.
Question: How Do I Setup My Cricut Machine on My Mobile Device?
Answer: Read the below steps to learn about the steps about cutting machine setup process:
Start the process by plugging in the machine and switching it on.
Next, pair up your mobile device with a Cricut machine with Bluetooth.
Now, install the Cricut Design Space app, launch it & create your Cricut ID.
After that, click the Menu tab and select the Machine Setup.
Choose your machine model and follow the on-screen.
You will know the setup is complete when called for a test cut.
Question: What Kind of Projects Can I Make With Cricut Machine?
Answer: There are tons of custom projects that the crafter can create out of their respective cutting machine. Read the following projects that can be crafted out of the cut-die machine:
Jar Labels
Bookmarks
DIY Mugs
Custom T-Shirts
Party Signs
Invitation Cards
Cupcake Toppers
Personal Banner
Bachelorette Party Props
Table Number Sign
Etch Glass
Custom Stickers
DIY Hats
Personal Wine Bag
Source: Cricut Machine
#Cricut Machine#CRICUT DESIGN SPACE LOGIN#HOW TO CONNECT CRICUT MACHINE TO LAPTOP#SETUP CRICUT DESIGN SPACE SETUP
1 note
·
View note
Text
How to Connect Cricut to Computer? [3 Easy Methods]

Introduction
If you are trying to connect your Cricut machine to a computer, you can do it easily. This blog will cover three main methods by which you can connect both your devices. Those are USB, Bluetooth, and Wi-Fi. All three methods are simple and convenient. However, people use Wi-Fi methods more commonly.
Also, Cricut machines are becoming famous, and people are admiring them more. Even the professionals are using a Cricut machine to make the crafts of your choice. But to use your Cricut machine, you will need to connect it to a computer. Let’s see how to connect Cricut to computer.
Which Methods are Used to Connect Cricut to Your Computer?
As we know, there are three methods to connect Cricut to computers such as USB, Bluetooth, and Wi-Fi. Also, all the Cricut machines are compatible with the USB connection and come with a USB cable. Bluetooth is also available on both devices. A wireless option is also available on both devices. So, you can choose from these options to connect your Cricut to the computer.
How to Connect Cricut to Computer?
As we have already discussed the methods, let’s see them in a more detailed way. We will see each method one by one. So, prepare the steps carefully and follow them accordingly.
Method 1: Using a USB Cable
It’s the basic and conventional method to connect your Cricut to a computer. However, this method needs both of your devices in proximity. Plus, it’s the simplest method, too. Look at the steps below.
First, ensure that both of your devices – Cricut machine and computer are turned on.
Then, find the USB cable which you’ve got in your machine’s package. Then, connect it to your devices.
After that, continue with downloading and installing the Cricut Design Space via cricut.com/setup.
Once you’ve installed Design Space, sign in to your Cricut ID or Create a New ID.
You’ve successfully connected your Cricut machine to the computer using a USB cable. Let’s move to the next step, which is via Bluetooth.
Method 2: Via a Bluetooth Connection
Bluetooth connection is wireless and doesn’t need setting up cables. In this method, you can keep your devices at a distance, but it should not be too much. A distance of 10-15 feet is considerable. Let’s see the steps below.
First, make sure that your Cricut machine is connected to the power supply.
After this, you are all ready to connect both devices via Bluetooth.
Go to Settings on your computer, open the Bluetooth tab, and tap on Connect to pair both devices.
After that, navigate to cricut.com/setup and get the Cricut Design Space software.
After downloading and installing the software, log in to your Cricut. If you are a new user, create a new ID.
At last, you’ll get a confirmation message that your setup is complete.
Finally, your computer and Cricut machine are connected by Bluetooth.
Method 3: With a Wi-Fi Network
A wireless connection is the most preferable way to connect your Cricut machine to a computer. Almost every user finds this method convenient to set up their devices. Here are the steps to connect Cricut to the computer.
Ensure that your Cricut machine is turned on and connected to Wi-Fi.
Then, connect your computer to the same Wi-Fi connection.
Now, visit Cricut’s official website to download Cricut Design Space.
Open the Design Space software and sign in with your Cricut ID. Create a new ID if you’re a new user.
After that, click the Settings icon at the top right corner.
Then, tap on the machine under the Settings option.
Next, click on the Connect Machine option.
The screen will show you the directions to go with.
Once your Cricut machine is connected to Wi-Fi, you can check it under the machine tab.
At last, click on your Cricut model to select it and do anything with your machine.
Finally, your Cricut machine is connected to the computer over Wi-Fi. Now, you can take a test project to check if the connection is working. Your Cricut machine’s package has enough sample materials that you can use to create a test project.
Conclusion
You may have understood how to connect Cricut to computer. We have seen all the main three methods which are popular for connection. You can choose any of these three methods- USB, Bluetooth, or Wi-Fi. The USB method requires a USB cable, which you have received with your Cricut machine’s package. Also, both devices can be paired with Bluetooth, which is a wireless connection and works similarly. Then comes the most used method, Wi-Fi, which is also a wireless connection. You’ll need an internet connection for this to set up.
FAQs
Which Method is Best to Connect Cricut to Computer?
All the methods- wired as well as wireless is best for connecting your Cricut machine to the computer. However, the Wi-Fi connection method is well-suited for all types of workplaces. You can print from anywhere using a Wi-Fi connection. Besides, the other methods, such as Bluetooth and USB connection, are also good when the devices are placed in proximity to each other.
Why is My Cricut Not Connected to Computer?
Although all three methods are convenient and good for connecting your Cricut machine and computer, you must pay attention to the requirements of each method. Otherwise, you may face issues with the connection. For instance, a USB connection may be interrupted when the USB cables are loose or broken. The Bluetooth connection may not work if your devices aren’t paired. A Wi-Fi connection may get down when the internet connection is not stable.
Do I Need a Computer to Connect to Cricut?
Not at all. You don’t need only a computer to Connect to your Cricut Machine. You can also use your laptop, tablet, and smartphone to connect your Cricut. The process is similar to the computer. You’ll have to download and install the Cricut software and log in to it to start using your Cricut machine. However, Chromebooks are not compatible to connect to your Cricut.
0 notes
Text


Hey tumblr, I made smth!!
#17776#17776 football#what football will look like in the future#17776 nine#17776 ten#17776 juice#stickers#ive never been happier to have a cricut machine#thatz a lie i make so many stickerz
252 notes
·
View notes
Text
BTW i forgot to mention but I do have an orbulon shirt

#little bit wonky in places as this design was not ideal for the cricut machine but still a wonderful thing#orbulon#warioware#art
144 notes
·
View notes
Text


Cutting out more stickers
This time Abe and Zaur! Mary being next
#small artist#artists on tumblr#art#artwork#digital art#art growth#artist support#amateur artist#digital artist#procreate#procreate art#human oc#cowboy oc#robot oc#oc#oc art#stickers#sticker design#cricut#cricut machine
7 notes
·
View notes
Text
now that i can make stickers at home i'm vaguely considering the option of printing stickers for other artist alley/merch peeps given the struggle with manus as of recent. idk is there interest for that
#blab#idk if this'll be a thing but idk i could prob do it for like 4ish USD per 8.5 x 11 sheet. maybe.#but also i'd have to get the ok from my sis since it's her cricut machine lmaooo... granted i'm the one maintaining the blades/etc now#anyway yeah idk. may be a thing i offer thru etsy if there's interest.
10 notes
·
View notes
Text
How to Make Custom Shirts With Cricut: A Step-by-Step Guide
I am obsessed with my Cricut machine and create projects on it every day. You can call it my hobby or my big passion for crafting. Recently, I have made dozens of custom shirts with my Cricut Maker machine, and you can create some on your own, too. Following this guide, your guesswork will be reduced to zero, as I will share some of the easiest steps on how to make custom shirts with Cricut.
If you are interested in my tutorial, I would recommend you continue it till the end so as not to miss anything important. I have been creating unique stuff with my Cricut for more than 6 years now; it has been a beautiful journey for me.
Whether you are a beginner or a well-trained Cricut user, this post will help you get some ideas for starting something new. I hope you found this blog helpful and that you will come back for more Cricut-related blogs like this one. Let’s start learning how to design shirts with Cricut for beginners.
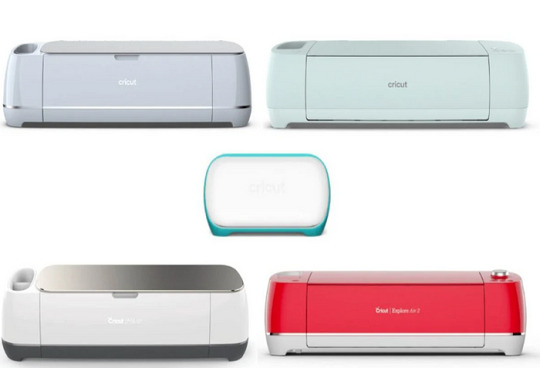
Which Is the Best Cricut for Making Shirts?
When you are making a custom shirt, you will have this doubt about which machine to choose. My answer would be to choose anyone you have. Whether you have Cricut Maker, Joy, or Explore, you can choose anyone with your iron-on vinyl to make a perfect custom shirt.
However, you will need to insert the fine point blades to cut this type of vinyl. I hope you got an answer to it. Let’s move forward with this guide on making your custom shirt.
How to Make Custom Shirts With Cricut Machine?
When you are clear about which machine to use and what design you wanna make, let’s get started with my steps. Well, you will need a few things before you move your hands on the desktop. So, gather up all the listed things here.
Cricut Explore Air 2
EasyPress 2
EasyPress mat
Shirt apparel
Weeding tool
Brayer tool
Scissors
Standard mat
Premium vinyl
Are you ready with all these? So you’re good to go. When you are ready, head to your Cricut Design Space and show some of your creativity. And follow all the steps carefully.
Step 1: Go to the Cricut Design Space App
In the first step, you should go to your Design Space and pick a design to print on your shirt. As the Cricut app is full of ready-to-make designs, fonts, images, and templates, you won’t have to hustle to make a design. I am using my Explore Air 2 machine; you can use a machine you’re familiar with.
Step 2: Adjust Your Design
Once you are ready with your final design, you can take some time to make that fit for you. For example, you can change the design’s color. On the Cricut Design Space canvas, you will get a few options on the right-hand side, from where you can choose your favorite color for the shirt.
Step 3: Change Vinyl Color
Here, you need to change your vinyl color as your shirt’s color may not be a good match with the vinyl’s color. In order to keep the color vibrant and not blend them, you have an option to change the color of your iron-on vinyl. To do this, you should click on the Layers option on the canvas. After that, you can click on the white box with the Layer option and pick a color for your vinyl.
Step 4: Final Your Design
If you find the color combo not as expected, you can change it. Once you have done all the updates, you are ready to save your design. You need to hit the Save button along with the name of your project to remember what this design is about. I am making a design that says “Cutest Bachelor.” Let’s check more steps on how to make custom shirts with Cricut.
Step 5: Load Your Material (Iron-on Vinyl)
In this step, you are ready to cut your project with your special Cricut machine. Don’t forget to load your vinyl on a Cricut cutting mat and then into the Cricut machine. Once you are done, you can start the cutting. Also, select the correct size of your mat on your machine so that your design fits the cutting mat. And the most important thing is to align the iron-on vinyl correctly to get an expected cut.
Step 6: Cut Your Design
When your design is ready, and you have checked all the settings, you can allow your Cricut machine to perform a cut for you. Once you hit the Go button on your machine, it will show you a preview of your final design. If you are satisfied with it, click the Continue button to get a cut. Once the design is fully cut, unload your cutting mat.
Step 7: Weed Out the Excess Vinyl
When you have a cut in your hand, take a weeding tool and take out excess vinyl to make the design clear and ready to be ironed. You can use your hands too, but a weeding tool is more convenient. Now, you have finally come to the main part of how to make custom shirts with Cricut.
Step 8: Ready Your EasyPress
When your design is ready, you can set your Cricut EasyPress to cotton or linen to get the desired results. So, now you need to put your weeded design on the shirt apparel and use a Cricut EasyPress 2 to heat it. However, before that, you must use a brayer tool to remove lint and fibers from the shirt’s fabric. Once you do that, for the next steps.
Step 9: Preheat Your Shirt
When your apparel is ready, use your EasyPress to preheat it for 15 seconds with moderate pressure to remove the moisture and wrinkling. For the final heating, you should consider a Cricut Heat Guide that will help you find the best setting for your design. After that, use the temperature and pressure accordingly.
Step 10: Apply Heat to Your Shirt
And the last step is to just apply the heat as the Cricut guide suggests. Use a towel to place on your vinyl design, and apply heat for 30 seconds. Using a towel will prevent your iron-on from getting damaged. Viola, you have just designed a perfect custom shirt with your Cricut.
Conclusion
You were all wondering how to make custom shirts with Cricut. And with my blog, you might have found this process a bit easier than before, I guess. Don’t worry; if you follow the instructions carefully, I can bet you can make a fabulous shirt.
However, be mindful of the heating setting as it can ruin your project and waste everything. It’s always better to use a household iron while making your first project. When you get familiar with the process, you can take one step ahead with an EasyPress.
Source Url :- how to make custom shirts with Cricut
Visit here for more Information:- · cricut design space log in
· cricut machine
· cricut machine setup
· how to make custom shirts
· step-by-step guide
· install cricut design space
#how to make custom shirts with Cricut#CRICUT DESIGN SPACE LOG IN#CRICUT MACHINE#CRICUT MACHINE SETUP#STEP-BY-STEP GUIDE#INSTALL CRICUT DESIGN SPACE
0 notes
Text
Try your hands on paper, vinyl, HTV, fabric, and other materials this time. Working with different types of materials has become efficient and effortless in the presence of a Cricut machine setup. You can start making personalized keychains, stunning home decor, custom doormats, eye-catching labels and stickers, and more. The best part about making the Cricut project is that you can use the Cricut Design Space app. Visit cricut.com/setup and download and install the application on your systems to browse through fonts and images present in the library. There are many possibilities with a Cricut explore air 2 software and its compatible application.
#cricut maker setup#cricut machine set up#cricut maker 3#cricut explore air 2#cricut machine#cricut new machine setup#cricut design space login#cricut mug press#cricut crafts#cricut design space download#cricut software app#Cricut
1 note
·
View note