#DNS Refresh Command
Explore tagged Tumblr posts
Visit Tumblr Blog
Explore Tumblr blogs with no restrictions, modern design and the best experience.
Last Seen Tumblr Blogs


Fun Fact
28.6 is the average number of monthly visits per US mobile user.
Text
why is my vpn failing to connect
🔒🌍✨ Get 3 Months FREE VPN - Secure & Private Internet Access Worldwide! Click Here ✨🌍🔒
why is my vpn failing to connect
VPN troubleshooting tips
VPN troubleshooting can be a headache, especially when you're trying to protect your online privacy or access geo-blocked content. Here are some tips to help you troubleshoot common VPN issues:
Check Your Internet Connection: Before troubleshooting your VPN, ensure that your internet connection is stable. A weak or intermittent connection can cause VPN disruptions.
Restart Your Device: Sometimes, a simple restart can resolve connectivity issues. Restart your computer, smartphone, or router to refresh the network settings.
Switch Servers: If you're unable to connect to a VPN server, try switching to a different server location. The server you're trying to connect to may be experiencing high traffic or technical issues.
Update VPN Software: Make sure you're using the latest version of your VPN software. Updates often include bug fixes and security patches that can improve performance and stability.
Check Firewall and Antivirus Settings: Your firewall or antivirus software may be blocking the VPN connection. Temporarily disable these settings to see if it resolves the issue.
Clear DNS Cache: Flushing your DNS cache can help resolve DNS-related VPN issues. Open the command prompt and type "ipconfig /flushdns" (without quotes) to clear the cache.
Reset VPN Settings: If you've made changes to your VPN settings that may be causing issues, reset the settings to their default configurations.
Contact VPN Support: If you've tried troubleshooting on your own and still can't resolve the issue, reach out to your VPN provider's customer support for assistance. They may be able to identify the problem and provide a solution.
By following these troubleshooting tips, you can quickly resolve common VPN issues and enjoy a secure and unrestricted internet browsing experience.
Network connectivity issues with VPN
When it comes to network connectivity issues with VPN (Virtual Private Network), it can cause frustration and disrupt your online activities. VPNs are commonly used to ensure a secure and private connection over the internet. However, issues with network connectivity can arise from various factors.
One of the common reasons for network connectivity issues with VPN is a poor internet connection. If your internet speed is slow or inconsistent, it can lead to disruptions in the VPN connection, causing delays or disconnections. It is important to have a stable internet connection to ensure smooth VPN usage.
Another reason for network connectivity problems with VPN could be due to firewall settings or antivirus software blocking the VPN connection. In some cases, the firewall may perceive the VPN connection as a security threat and block it, leading to connectivity issues. Adjusting the firewall settings or temporarily disabling the antivirus software can help resolve this issue.
Additionally, outdated VPN software or incorrect configuration settings can also result in network connectivity issues. It is essential to regularly update the VPN software to ensure compatibility with the latest network protocols and configurations. Checking and adjusting the VPN settings according to the recommended guidelines can help improve network connectivity.
In conclusion, network connectivity issues with VPN can be troubleshooted by addressing the internet speed, firewall settings, antivirus software, and software updates. By identifying and resolving these issues, you can enjoy a secure and seamless VPN connection for your online activities.
VPN connection errors
VPN connection errors can be frustrating when you are trying to browse the internet securely and privately. There are several common VPN connection errors that users may encounter, causing disruptions in their online activities.
One common VPN connection error is the 'VPN server not responding' error. This error occurs when the VPN server you are trying to connect to is not reachable. It may be due to server maintenance, server overload, or network issues. To resolve this error, you can try connecting to a different server or contacting your VPN provider for assistance.
Another common VPN connection error is the 'authentication failed' error. This error usually occurs when there is an issue with the username or password entered. Double-check your login credentials to ensure they are correct. If the issue persists, reset your password or contact your VPN provider for help.
The 'connection timed out' error is also a frequent VPN connection error. This error occurs when the connection takes too long to establish, leading to a timeout. To fix this error, try connecting to a different server with a stronger connection or resetting your network settings.
Overall, encountering VPN connection errors is not uncommon, but most issues can be resolved with simple troubleshooting steps. If you continue to experience connection errors, it is recommended to reach out to your VPN provider for further assistance. Remember to regularly update your VPN software to prevent potential errors and ensure a smooth browsing experience.
VPN not connecting
When your VPN is not connecting, it can be frustrating and concerning, especially if you rely on it for privacy and security reasons. There are several potential reasons why your VPN may not be connecting, and understanding these can help you troubleshoot the issue.
One common reason for a VPN not connecting is internet connectivity issues. Make sure you have a stable internet connection and try connecting to different networks to see if the problem persists. Additionally, check if other devices on the same network can connect to the VPN to determine if the issue is with your device specifically.
Another possible reason for a VPN connection failure is firewall or antivirus settings blocking the connection. Ensure that your firewall and antivirus software are not preventing the VPN from establishing a connection. You may need to configure your firewall settings to allow the VPN to connect securely.
It's also important to check if the VPN server you are trying to connect to is operational. Sometimes VPN servers undergo maintenance or experience downtime, which can prevent users from connecting. Try connecting to a different server or contacting your VPN service provider for assistance.
If you are using a VPN client software, make sure it is up to date. Outdated software can sometimes cause connection issues, so check for updates and install them if available.
By troubleshooting these common reasons for VPN connection failures, you can hopefully resolve the issue and get your VPN up and running smoothly again. If the problem persists, contacting your VPN provider's customer support for further assistance may be necessary.
Debugging VPN connection failures
Debugging VPN Connection Failures: A Comprehensive Guide
Virtual Private Networks (VPNs) are essential tools for ensuring secure and private communication over the internet. However, like any technology, VPNs can sometimes encounter connectivity issues that need to be addressed promptly. Here’s a comprehensive guide to debugging VPN connection failures:
Check Your Internet Connection: Before troubleshooting the VPN, ensure that your internet connection is stable. A weak or fluctuating connection can lead to VPN errors.
Verify VPN Settings: Double-check the VPN settings, including server address, authentication credentials, and encryption protocols. Even a small typo in these settings can disrupt the connection.
Restart VPN Service: Sometimes, simply restarting the VPN service or application can resolve connectivity issues. Close the VPN client, wait a few moments, and then reopen it.
Update VPN Software: Ensure that you are using the latest version of the VPN client. Developers often release updates to fix bugs and improve compatibility.
Firewall and Antivirus: Check if your firewall or antivirus software is blocking the VPN connection. Temporarily disable these programs and attempt to connect to the VPN again.
Switch Servers: If you’re unable to connect to a specific VPN server, try connecting to a different server location. Sometimes, servers may be temporarily overloaded or undergoing maintenance.
Protocol Selection: Experiment with different VPN protocols (e.g., OpenVPN, L2TP/IPsec, IKEv2) to see if one works better than others in your network environment.
Contact VPN Provider: If you’ve tried all the above steps and still can’t establish a connection, reach out to your VPN provider’s customer support for assistance. They may have specific troubleshooting steps tailored to their service.
By following these steps, you can effectively diagnose and resolve VPN connection failures, ensuring uninterrupted access to a secure internet connection. Remember to document any steps you take, as this information can be helpful in future troubleshooting efforts.
0 notes
Text
what to do if vpn not working
🔒🌍✨ Get 3 Months FREE VPN - Secure & Private Internet Access Worldwide! Click Here ✨🌍🔒
what to do if vpn not working
VPN troubleshooting steps
Title: Essential VPN Troubleshooting Steps: Fixing Common Connection Issues
Virtual Private Networks (VPNs) are invaluable tools for ensuring online privacy and security. However, like any technology, they can sometimes encounter issues that disrupt your browsing experience. Here are some essential troubleshooting steps to address common VPN connectivity problems:
Check Your Internet Connection: Before troubleshooting the VPN, ensure your internet connection is stable. A weak or intermittent connection can cause VPN disruptions.
Restart Your Device: Sometimes, a simple restart can resolve connectivity issues by refreshing your device's network settings.
Update Your VPN Client: Ensure you're using the latest version of your VPN client. Developers frequently release updates to address bugs and improve performance.
Switch Servers: If you're experiencing slow speeds or unable to connect to a specific server, try switching to a different server location. Overloaded or faulty servers can impact performance.
Disable Firewall or Antivirus: Your firewall or antivirus software may block VPN connections. Temporarily disable them to see if they're causing the issue, but remember to re-enable them afterward for continued protection.
Clear DNS Cache: Flushing your DNS cache can resolve DNS-related issues that affect VPN connectivity. Open the Command Prompt (Windows) or Terminal (Mac/Linux) and enter the appropriate command to flush the DNS cache.
Check VPN Settings: Review your VPN settings to ensure they're configured correctly. Verify your login credentials, protocol settings, and any custom configurations.
Contact VPN Support: If you've exhausted all troubleshooting steps and still can't resolve the issue, reach out to your VPN provider's customer support. They can offer personalized assistance and may identify underlying problems.
By following these troubleshooting steps, you can quickly diagnose and resolve common VPN connectivity issues, ensuring a seamless and secure browsing experience. Remember to stay informed about VPN best practices to maximize your online privacy and security.
Common VPN issues
Virtual Private Network (VPN) technology is widely used to ensure online security and privacy. However, users may encounter common issues while using VPN services. Understanding these issues can help users troubleshoot and resolve them effectively.
One common issue faced by VPN users is slow connection speed. This can occur due to various reasons such as server congestion, inadequate bandwidth, or the distance between the user and the VPN server. To address this problem, users can try connecting to a different server or upgrading their internet plan for higher speeds.
Another common VPN issue is connectivity problems. Sometimes, users may find it challenging to establish a connection or maintain a stable connection to the VPN server. This could be due to firewall settings, network interference, or incompatible VPN protocols. Users can try changing the VPN protocol, disabling firewalls temporarily, or contacting their VPN service provider for assistance.
DNS leaks are also a prevalent issue with VPNs. When a DNS leak occurs, the user's browsing activity may be exposed to their ISP, compromising their privacy. To prevent DNS leaks, users can configure their VPN client correctly or use DNS leak protection features provided by some VPN services.
Moreover, compatibility issues with devices or operating systems can cause VPN malfunctions. Users should ensure that their VPN service supports their device and OS version to avoid compatibility issues.
In conclusion, understanding common VPN issues and their potential solutions is essential for a seamless and secure VPN experience. By addressing these issues proactively, users can make the most of their VPN service while safeguarding their online privacy and security.
VPN connection problems
VPN Connection Problems
Virtual Private Networks (VPNs) are widely used for ensuring online privacy and security, but issues with VPN connections can sometimes arise. Understanding common problems and how to troubleshoot them can help ensure a seamless VPN experience.
One common issue with VPN connections is slow or unstable connection speeds. This could be due to the server load, distance to the server, or even your own internet connection. To improve speed, try connecting to a closer server or using a different VPN protocol.
Another issue users may encounter is difficulty connecting to the VPN server. This could be caused by misconfigured settings, firewall restrictions, or antivirus software blocking the connection. Double-checking settings and temporarily disabling firewalls and antivirus software can help resolve this issue.
Occasionally, VPN connections may also drop unexpectedly. This could be due to network interruptions, server issues, or software conflicts. Setting up automatic reconnection in your VPN client settings and ensuring that your software is up to date can help minimize connection drops.
It's important to note that some public networks or countries may block VPN connections altogether. In such cases, using the obfuscation feature offered by some VPN providers can help bypass these restrictions.
By understanding and addressing these common VPN connection problems, users can ensure a secure and reliable browsing experience. Prioritizing proper troubleshooting and maintenance can help maximize the benefits of VPN usage.
VPN troubleshooting guide
A Virtual Private Network (VPN) is a powerful tool for ensuring your online privacy and security. However, like any technology, VPNs can sometimes encounter issues that may disrupt your connection or compromise its effectiveness. In this VPN troubleshooting guide, we will cover some common problems and their solutions to help you get back to surfing the web safely and anonymously.
One of the most common VPN troubleshooting issues is a slow internet connection. If you are experiencing sluggish speeds while connected to your VPN, try disconnecting and reconnecting to a different server. Sometimes, connecting to a server that is geographically closer to your location can help improve your speeds.
Another common problem is difficulty in connecting to the VPN server. If you are unable to establish a connection, check your internet connection and ensure that your VPN software is up to date. You may also want to try switching to a different VPN protocol to see if that resolves the issue.
Furthermore, if you are experiencing DNS leaks or IP address leaks, your anonymity may be compromised. To fix this issue, make sure that your VPN has a built-in kill switch feature that will disconnect your internet if the VPN connection drops unexpectedly.
By following these troubleshooting tips, you can resolve common VPN issues and enjoy a seamless and secure browsing experience. Remember that if you encounter persistent problems, reaching out to your VPN provider's customer support team for further assistance is always a wise choice.
Fixing VPN connection errors
When using a Virtual Private Network (VPN) service, encountering connection errors can be frustrating. However, understanding the common issues and knowing how to fix them can help you maintain a stable and secure connection.
One frequent VPN connection error is due to internet connectivity issues. Make sure that your internet connection is stable and working correctly before trying to connect to the VPN. If you are using a Wi-Fi connection, try switching to a wired connection to see if that resolves the issue.
Another common cause of VPN connection errors is incorrect login credentials. Double-check your username and password to ensure they are entered correctly. It's also possible that your VPN account may have expired or been suspended, so verify your account status with your VPN provider.
Additionally, you may encounter VPN connection errors due to firewall or antivirus settings blocking the VPN connection. Check your firewall and antivirus software settings to ensure that the VPN application is allowed to establish a connection.
If you continue to experience VPN connection errors, try switching to a different VPN server location. Sometimes specific server locations may be experiencing issues, so choosing an alternative server can help resolve the problem.
In conclusion, troubleshooting VPN connection errors requires checking your internet connection, verifying login credentials, adjusting firewall settings, and switching server locations if necessary. By following these steps, you can effectively fix VPN connection errors and enjoy a secure browsing experience.
0 notes
Text
does vpn work when comcast router won't change dns
🔒🌍✨ Get 3 Months FREE VPN - Secure & Private Internet Access Worldwide! Click Here ✨🌍🔒
does vpn work when comcast router won't change dns
VPN compatibility with Comcast router
A Virtual Private Network (VPN) is a useful tool that provides online privacy and security by creating a private network connection over a public internet connection. When it comes to using a VPN with a Comcast router, compatibility may vary depending on the specific router model and VPN service being used.
Comcast routers generally work well with most VPN services. However, there are a few factors to consider to ensure compatibility. Firstly, some older Comcast router models may not support VPN connections, so it is important to check the specifications of your router before attempting to set up a VPN. Additionally, certain VPN protocols may not be supported by all routers, so it is recommended to choose a VPN service that offers a variety of protocols such as OpenVPN, L2TP/IPsec, or IKEv2 for better compatibility.
Setting up a VPN with a Comcast router typically involves accessing the router's settings through a web browser and configuring the VPN connection manually. Some VPN providers offer step-by-step instructions or even custom router firmware to simplify the setup process. Alternatively, users can also connect their devices directly to the VPN without needing to configure the router itself.
Overall, while most Comcast routers are compatible with VPN services, it is advisable to check for any specific requirements or limitations to ensure a smooth and secure connection. By choosing a reliable VPN service and following the necessary steps for setup, users can enjoy enhanced privacy and security while browsing the internet through their Comcast router.
DNS configuration issues on Comcast router
Title: Troubleshooting DNS Configuration Issues on Comcast Router
DNS (Domain Name System) configuration issues can be a common frustration for Comcast router users. When your DNS settings aren't properly configured, you might experience slow internet speeds, intermittent connectivity problems, or even the inability to access certain websites. Here are some steps to troubleshoot DNS configuration issues on your Comcast router:
Check DNS Settings: Start by logging into your Comcast router's admin interface. Look for the DNS settings section, where you can manually specify the DNS servers to use. Ensure that the settings are correct and match the recommended DNS server addresses provided by Comcast.
Restart Router: Sometimes, a simple router restart can resolve DNS issues. Turn off your Comcast router, wait for a few minutes, and then power it back on. This can help refresh the DNS settings and establish a new connection to the DNS servers.
Flush DNS Cache: Your device may be holding onto outdated DNS information in its cache. Open the command prompt on your computer and type the command "ipconfig /flushdns" (for Windows) or "sudo killall -HUP mDNSResponder" (for macOS) to flush the DNS cache.
Use Alternative DNS Servers: If the default Comcast DNS servers are causing problems, consider using alternative DNS servers such as Google DNS (8.8.8.8 and 8.8.4.4) or Cloudflare DNS (1.1.1.1 and 1.0.0.1). Update the DNS settings on your router accordingly.
Contact Comcast Support: If you've tried the above steps and are still experiencing DNS issues, reach out to Comcast customer support for assistance. They may be able to troubleshoot the problem further or provide additional guidance.
By following these steps, you can effectively troubleshoot and resolve DNS configuration issues on your Comcast router, ensuring a smoother and more reliable internet browsing experience.
VPN bypass for Comcast DNS restrictions
Virtual Private Networks (VPNs) offer a reliable solution for users looking to bypass Comcast DNS restrictions and access restricted content on the internet. Comcast is known for implementing DNS restrictions that limit users' access to certain websites. By using a VPN, users can effectively bypass these restrictions and enjoy a more open and unrestricted browsing experience.
When a user connects to a VPN server, their internet traffic is encrypted and routed through the VPN server. This process masks the user's IP address, making it appear as though they are accessing the internet from a different location. As a result, Comcast's DNS restrictions are circumvented, allowing users to access blocked websites and content without any limitations.
VPNs offer users an added layer of privacy and security by encrypting their internet traffic, protecting them from potential cyber threats and surveillance. In addition to bypassing Comcast DNS restrictions, VPNs can also help users access geo-restricted content by virtually changing their location to a different country.
There are many VPN providers available on the market, each offering different features and levels of security. It's essential for users to research and choose a reputable VPN service that meets their specific needs. By using a VPN to bypass Comcast DNS restrictions, users can enjoy a more open and secure browsing experience while maintaining their privacy and anonymity online.
Troubleshooting VPN connection on Comcast network
Troubleshooting VPN Connection on Comcast Network
Virtual Private Networks (VPNs) are invaluable tools for securing your online activities and accessing restricted content. However, encountering connectivity issues on a Comcast network can be frustrating. Here are some troubleshooting steps to resolve VPN connection problems:
Check Your Internet Connection: Before troubleshooting your VPN, ensure that your Comcast internet connection is stable. Test other devices connected to the network to rule out any general connectivity issues.
Restart Your Devices: Sometimes, a simple restart can fix connectivity issues. Restart your computer, router, and modem to refresh the network connection.
Update VPN Software: Ensure that your VPN software is up to date. Outdated versions may not be compatible with the latest network configurations.
Switch VPN Servers: If you're experiencing issues with a specific VPN server, try connecting to a different one. Sometimes, servers can become overcrowded or experience technical problems.
Check Firewall and Antivirus Settings: Firewalls and antivirus software may block VPN connections. Temporarily disable them to see if they're causing the problem.
Reset Network Settings: Resetting your network settings can resolve configuration issues. Go to your device's network settings and choose the option to reset network settings to default.
Contact Comcast Support: If you've tried all the above steps and still can't connect to your VPN, reach out to Comcast's customer support. They can check for any network outages or provide further assistance.
Consider Alternative VPN Protocols: Some VPN protocols may work better on Comcast networks than others. Experiment with different protocols like OpenVPN, L2TP/IPsec, or IKEv2 to see if any offer better stability.
By following these troubleshooting steps, you can hopefully resolve any VPN connection issues on your Comcast network and enjoy secure and unrestricted internet access.
Alternative DNS setup for VPN on Comcast router
When setting up a VPN on a Comcast router, alternative Domain Name System (DNS) configurations might be necessary to ensure smooth and secure connectivity. DNS is responsible for translating domain names into IP addresses, enabling users to access websites using human-readable addresses.
By default, Comcast routers use the ISP-provided DNS servers, which might not be optimal for VPN usage due to potential privacy concerns or performance issues. To address this, users can manually configure alternative DNS servers on their Comcast router to enhance the VPN experience.
One popular alternative DNS service is Google Public DNS, which offers fast and secure resolution for domain names. To set up Google Public DNS on a Comcast router for VPN usage, users can access the router's settings through a web browser and navigate to the DNS configuration section. Here, they can input the primary and secondary IP addresses for Google Public DNS (8.8.8.8 and 8.8.4.4, respectively) to replace the default DNS servers.
Another alternative is OpenDNS, known for its filtering options and security features. Users can set up OpenDNS on their Comcast router by entering the appropriate DNS server IP addresses provided by OpenDNS in the router settings.
By configuring alternative DNS servers on their Comcast router for VPN usage, users can potentially enhance privacy, security, and performance when browsing the internet through a VPN connection. Experimenting with different DNS services can help optimize the VPN experience on Comcast routers.
0 notes
Text
can't resolve hostname when connected to vpn
🔒🌍✨ Get 3 Months FREE VPN - Secure & Private Internet Access Worldwide! Click Here ✨🌍🔒
can't resolve hostname when connected to vpn
VPN hostname resolution issues
Title: Troubleshooting VPN Hostname Resolution Issues: A Guide
In the realm of virtual private networks (VPNs), hostname resolution problems can be a frustrating hurdle. Whether you're trying to access resources on your corporate network or browsing the web anonymously, encountering issues with resolving hostnames can disrupt your workflow and compromise your online security. Understanding and troubleshooting these issues is crucial for maintaining a seamless VPN experience.
One common cause of VPN hostname resolution issues is DNS (Domain Name System) misconfiguration. When you connect to a VPN, your device relies on DNS servers to translate human-readable hostnames into IP addresses. If your VPN's DNS settings are incorrect or if there's a mismatch between your device's DNS configuration and the VPN's DNS server, you may experience difficulties resolving hostnames.
Additionally, network congestion or latency can contribute to hostname resolution problems. If the VPN server or your internet connection is experiencing high traffic or latency, DNS queries may take longer to process, leading to delays in hostname resolution.
Another potential culprit is firewall or security software blocking DNS queries or interfering with the VPN connection. Overly restrictive firewall settings can prevent your device from communicating with the VPN's DNS server, resulting in failed hostname resolution attempts.
To troubleshoot VPN hostname resolution issues, start by checking your device's DNS settings and ensuring they match those recommended by your VPN provider. Try switching to a different DNS server or manually configuring your device to use the VPN's DNS server exclusively.
If network congestion is suspected, consider connecting to a different VPN server or using a VPN protocol that offers better performance under high load. Additionally, review your firewall settings and temporarily disable any security software that may be blocking DNS traffic or interfering with the VPN connection.
By understanding the potential causes of VPN hostname resolution issues and following these troubleshooting steps, you can resolve connectivity issues and enjoy a smoother VPN experience.
Troubleshooting VPN hostname resolution
When using a Virtual Private Network (VPN) to connect to servers or websites, encountering issues with hostname resolution can be a common problem. VPN hostname resolution refers to the process of translating a domain name into an IP address, allowing your device to locate and connect to the intended server.
If you are experiencing difficulties with VPN hostname resolution, there are several troubleshooting steps you can take to resolve the issue. Firstly, ensure that your internet connection is stable and that the VPN connection is active. Sometimes, simply disconnecting and reconnecting to the VPN can help refresh the connection and resolve hostname resolution problems.
Another common solution is to flush your DNS cache. This process clears out any outdated or incorrect IP address mappings that may be causing hostname resolution issues. To do this, open the command prompt on your device and enter the command "ipconfig /flushdns".
Additionally, check your VPN settings to ensure that you are using the correct DNS servers provided by your VPN service. Incorrect DNS settings can lead to hostname resolution failures, so verifying this information is crucial.
If the issue persists, try changing the DNS server addresses manually on your device to popular public DNS servers like Google DNS (8.8.8.8 and 8.8.4.4) or Cloudflare DNS (1.1.1.1 and 1.0.0.1). This can sometimes bypass any DNS-related problems caused by the VPN connection.
By following these troubleshooting steps, you can effectively address VPN hostname resolution issues and ensure a smooth and seamless browsing experience while connected to a VPN.
DNS configuration VPN connection
Title: Understanding DNS Configuration for VPN Connections
In the realm of virtual private networks (VPNs), DNS configuration plays a pivotal role in ensuring secure and seamless connectivity. DNS, or Domain Name System, serves as the internet’s directory by translating domain names into IP addresses. When setting up a VPN connection, configuring DNS settings correctly is crucial for maintaining privacy, security, and efficient data routing.
First and foremost, VPN users should understand the importance of DNS privacy. Traditional DNS queries are often unencrypted, leaving sensitive information vulnerable to interception by ISPs or malicious actors. To mitigate this risk, VPN providers typically offer DNS encryption as part of their service. By routing DNS queries through the encrypted VPN tunnel, users can safeguard their browsing activity and prevent DNS leaks.
Moreover, DNS configuration directly impacts the performance of VPN connections. Improperly configured DNS settings can lead to latency issues, DNS leaks, or even DNS hijacking. To optimize performance, VPN users should ensure that their DNS settings align with their VPN provider’s recommendations. This may involve manually configuring DNS servers or utilizing automatic DNS assignment provided by the VPN client.
In addition to privacy and performance considerations, DNS configuration can also influence access to geo-restricted content. By leveraging DNS manipulation techniques, some VPN services enable users to bypass location-based restrictions and access content from around the globe. However, users should exercise caution and ensure compliance with applicable laws and regulations when circumventing geo-blocking measures.
In conclusion, DNS configuration is a critical aspect of VPN connectivity, encompassing privacy, performance, and accessibility concerns. By understanding the role of DNS in VPN connections and implementing proper configuration practices, users can enhance their online security and unlock a seamless browsing experience.
VPN connectivity hostname problems
When it comes to VPN connectivity hostname problems, understanding the root causes and potential solutions is crucial for a seamless connection experience. One common issue users face is the inability to connect to a VPN server using the specified hostname. This can occur due to various reasons, such as misconfigured settings, network congestion, or server issues.
To troubleshoot VPN connectivity hostname problems, it is essential to first ensure that the hostname is entered correctly. Even a small typo can lead to connection failures. Double-checking the spelling and format of the hostname can help avoid this simple yet common mistake.
If the hostname is entered correctly and connection issues persist, checking the network settings is the next step. Firewalls, antivirus programs, or other security measures can sometimes block VPN connections, affecting the hostname resolution. Temporarily disabling these security features or adding the VPN server to the list of exceptions can help resolve the problem.
In some cases, VPN connectivity hostname problems may be caused by DNS issues. Manually configuring the DNS settings or switching to a different DNS server can sometimes improve hostname resolution and establish a successful VPN connection.
Additionally, contacting the VPN service provider for assistance can be beneficial, as they can offer specific guidance tailored to their servers and configurations. By troubleshooting methodically and seeking expert help when needed, users can overcome VPN connectivity hostname problems and enjoy secure and uninterrupted VPN connections.
Resolving hostname VPN network
When using a VPN network, it is common to encounter issues with resolving hostnames. A hostname is a label assigned to a device connected to a network, which helps in identifying it. When this label cannot be resolved, it can lead to connectivity problems within the VPN network.
There are several reasons why hostname resolution may fail within a VPN network. One common issue is related to DNS (Domain Name System) configuration. DNS servers translate domain names into IP addresses, allowing devices to locate each other on the internet. If the DNS server settings are not properly configured within the VPN network, hostnames may not be resolved correctly.
To resolve hostname issues in a VPN network, there are a few troubleshooting steps that can be taken. One approach is to check the DNS settings on the VPN server and ensure that they are correctly configured. Updating the DNS server address to a reliable and fast service can help improve hostname resolution.
Another troubleshooting step is to flush the DNS cache on the devices connected to the VPN network. This can help clear any outdated DNS records that may be causing hostname resolution problems.
In some cases, switching to a different VPN server or restarting the VPN connection can also help resolve hostname issues. By taking these steps and ensuring proper DNS configuration, users can improve the connectivity and performance of their VPN network.
0 notes
Text
can't connect to the internet without vpn
🔒🌍✨ Get 3 Months FREE VPN - Secure & Private Internet Access Worldwide! Click Here ✨🌍🔒
can't connect to the internet without vpn
VPN troubleshooting tips
Troubleshooting VPN Connection Issues: Tips for Smooth Connectivity
Virtual Private Networks (VPNs) serve as essential tools for securing online privacy and accessing geo-restricted content. However, encountering connectivity issues can be frustrating. Here are some troubleshooting tips to ensure a seamless VPN experience:
Check Your Internet Connection: Before troubleshooting the VPN, ensure that your internet connection is stable. Weak or fluctuating connections can disrupt VPN functionality.
Restart Your Devices: Sometimes, a simple restart can resolve connectivity issues. Reboot your computer, smartphone, or router to refresh network settings.
Switch Servers: If you're having trouble connecting to a specific VPN server, try switching to another one. Sometimes, servers can become overcrowded or experience technical issues.
Update VPN Software: Ensure that you're using the latest version of your VPN client. Developers often release updates to address bugs and improve performance.
Disable Firewall or Antivirus: Firewalls and antivirus software can sometimes block VPN connections. Temporarily disable these programs to see if they're causing the issue.
Change VPN Protocols: VPNs use different protocols to establish connections. Experiment with switching between protocols like OpenVPN, IKEv2, or L2TP/IPsec to see if one works better for your network.
Clear DNS Cache: Flushing your DNS cache can resolve DNS-related issues that may be interfering with your VPN connection. Open the command prompt and type "ipconfig /flushdns" (without quotes) to clear the cache.
Contact VPN Support: If none of the above solutions work, reach out to your VPN provider's customer support. They can offer personalized assistance and troubleshoot specific issues with your account or network configuration.
By following these troubleshooting tips, you can resolve common VPN connection issues and enjoy a secure and uninterrupted browsing experience.
Internet connection issues without VPN
Experiencing Internet connection issues without using a Virtual Private Network (VPN) can be a frustrating and disruptive experience for users. VPNs play a crucial role in ensuring a secure and private connection to the internet, but when connection issues arise without utilizing a VPN, several factors could be at play.
One common issue users face without a VPN is the lack of security and privacy protection. When surfing the web without a VPN, sensitive information such as browsing history, login credentials, and personal data are vulnerable to cyber threats like hacking, surveillance, and data breaches. This can lead to identity theft, financial loss, and privacy violations, highlighting the importance of using a VPN to encrypt data and shield online activities from prying eyes.
Moreover, without a VPN, users may encounter restricted access to online content and services. Some websites and online platforms enforce geo-restrictions or censorship based on users' locations or IP addresses. In such cases, not having a VPN to mask the real IP address can result in limited access to specific websites, streaming services, or online resources that are otherwise available in certain regions.
Furthermore, without the encryption and anonymity provided by a VPN, users may experience slower internet speeds and connectivity issues due to bandwidth throttling by Internet Service Providers (ISPs) or network congestion. VPNs can help bypass ISP throttling and optimize connection speeds, especially when streaming high-definition content, online gaming, or downloading large files.
In conclusion, facing internet connection issues without utilizing a VPN can compromise security, privacy, and online accessibility. By employing a reliable VPN service, users can safeguard their internet activities, bypass geo-restrictions, and enhance their online experience with improved speed and reliability.
VPN vs
VPN vs. Proxy: Understanding the Key Differences
In the digital age, ensuring online privacy and security has become paramount. Two common tools used for this purpose are Virtual Private Networks (VPNs) and proxies. While both serve similar functions, they operate differently and offer distinct advantages and disadvantages.
A Virtual Private Network (VPN) encrypts your internet connection, routing your data through a secure server before reaching its destination. This encryption ensures that your online activities remain private and protected from prying eyes, such as hackers or government surveillance. Additionally, VPNs allow users to access geo-restricted content by masking their IP address and appearing as though they are browsing from a different location.
On the other hand, proxies act as intermediaries between a user and the internet. They reroute internet traffic through a remote server, masking the user's IP address in the process. While proxies can provide some level of anonymity, they typically do not encrypt data, leaving it vulnerable to interception.
One key difference between VPNs and proxies lies in their encryption capabilities. VPNs encrypt all data passing through their servers, whereas proxies may or may not offer encryption depending on the type used. As a result, VPNs offer a higher level of security, making them preferable for activities requiring confidentiality, such as online banking or accessing sensitive information.
Another factor to consider is speed. Since VPNs encrypt all data, they may experience some decrease in internet speed. However, advancements in technology have minimized this impact, with many VPN providers offering high-speed connections. Proxies, on the other hand, often provide faster speeds since they do not encrypt data. However, this comes at the cost of security.
In summary, while both VPNs and proxies offer methods for enhancing online privacy and accessing restricted content, VPNs provide superior security through encryption, making them the preferred choice for safeguarding sensitive information. Proxies, on the other hand, may offer faster speeds but lack the comprehensive protection of VPNs. Ultimately, the choice between the two depends on individual needs and priorities regarding privacy, security, and internet speed.
VPN alternatives for internet access
In the world of cyberspace, internet security is a top priority for many individuals and organizations. While Virtual Private Networks (VPNs) are often touted as a popular and effective tool for ensuring online privacy and security, there are several VPN alternatives that can also be considered for internet access.
One alternative to VPNs is using proxy servers. These servers act as intermediaries between a user’s device and the internet, allowing for anonymous browsing and masking the user’s IP address. While proxies can provide some level of privacy and security, they do not offer the same level of encryption and data protection as VPNs.
Another option is the use of Tor (The Onion Router) network. Tor is a free software that directs internet traffic through a worldwide volunteer network of servers to conceal a user’s location and usage from anyone conducting network surveillance. While Tor offers a high level of anonymity, it can be slower than VPNs due to the rerouting of traffic through multiple servers.
For individuals looking for a more secure option, encrypted messaging apps such as Signal and Telegram can also be used to protect communication and data transmission. These apps utilize end-to-end encryption to ensure that messages and files are only accessible to the sender and recipient.
Ultimately, while VPNs are a popular choice for internet security, exploring alternative options such as proxy servers, Tor network, and encrypted messaging apps can provide additional layers of protection for users seeking to safeguard their online activities and information. It is important to carefully assess the features and limitations of each alternative to determine the most suitable solution for individual security needs.
VPN bypass methods for restricted networks
In today's interconnected world, the use of Virtual Private Networks (VPNs) has become increasingly popular for individuals looking to protect their online privacy and access restricted content. However, there are instances when VPNs themselves are restricted on certain networks, posing a challenge for users. In such cases, knowing about VPN bypass methods can be crucial.
One common VPN bypass method for restricted networks is the use of obfuscated servers. These servers disguise VPN traffic as regular HTTPS traffic, making it harder for network administrators to detect and block the VPN connection. By using obfuscated servers, users can circumvent network restrictions and access the internet securely.
Another VPN bypass method is to utilize different VPN protocols. Some networks may block specific VPN protocols, such as OpenVPN or PPTP. Switching to a less commonly blocked protocol, such as L2TP/IPSec or SSTP, can help bypass these restrictions and establish a successful VPN connection.
Additionally, setting up a VPN on port 443 can also be an effective bypass method. Port 443 is commonly used for secure HTTPS connections, and many networks allow traffic on this port to pass through without interference. By configuring the VPN to operate on port 443, users can potentially evade network restrictions and enjoy unrestricted access to the internet.
In conclusion, while VPN restrictions on certain networks can be a hindrance, there are several effective bypass methods available to users. By exploring obfuscated servers, different VPN protocols, and port configurations, individuals can overcome network limitations and maintain their online privacy and security.
0 notes
Text
can t connect to internet without vpn mac
🔒🌍✨ Get 3 Months FREE VPN - Secure & Private Internet Access Worldwide! Click Here ✨🌍🔒
can t connect to internet without vpn mac
VPN setup for Mac
Setting up a VPN on your Mac device is a straightforward process that can enhance your online privacy and security. By using a VPN (Virtual Private Network), you can encrypt your internet connection and protect your personal data from potential cyber threats.
To begin the VPN setup on your Mac, you first need to choose a reliable VPN service provider. There are many options available in the market, so make sure to select one that fits your specific needs in terms of security features, server locations, and pricing.
Once you have chosen a VPN service, you can download and install the VPN application from the provider's website or the Apple App Store. Follow the on-screen instructions to set up the VPN on your Mac and log in using your credentials provided by the VPN service.
After logging in, you can select a server location from the available options provided by the VPN application. Choosing a server closer to your physical location can help improve connection speed, while selecting a server from another country can help you access geo-blocked content.
Once you have connected to a server, you can verify your VPN connection by checking your IP address to ensure that your internet traffic is encrypted and secure. You can now browse the internet, stream content, and conduct online activities with an added layer of privacy and anonymity.
In conclusion, setting up a VPN on your Mac is a simple process that can significantly enhance your online security and privacy. By following these steps, you can enjoy a safer and more secure internet browsing experience on your Mac device.
Troubleshoot internet connection Mac
Internet connectivity issues can be frustrating, especially when using a Mac. If you are facing difficulties with your internet connection on your Mac, there are several troubleshooting steps you can try to resolve the issue.
The first step is to check if the issue lies with your internet service provider. Ensure that there are no outages in your area by contacting your ISP or checking their website for any updates.
Next, verify if the Wi-Fi or wired connection is properly set up on your Mac. Check if the Wi-Fi is turned on and that you are connected to the correct network. If you are using an Ethernet connection, make sure the cable is securely plugged in.
Another troubleshooting step is to restart your Mac and networking devices. Sometimes, a simple reboot can fix connectivity issues by refreshing the network settings.
If the problem persists, try resetting the network settings on your Mac. This can be done by going to System Preferences > Network, selecting the network connection, and clicking on the "Advanced" button to renew the DHCP lease or reset the network configuration.
In some cases, clearing the DNS cache on your Mac can also help resolve internet connection issues. Open Terminal and enter the command "sudo killall -HUP mDNSResponder" to flush the DNS cache.
If none of the above solutions work, you may want to consider contacting Apple Support or visiting an authorized service provider to diagnose any hardware-related issues with your Mac's networking components.
By following these troubleshooting steps, you can hopefully resolve any internet connectivity issues you may be experiencing on your Mac and get back to browsing the web seamlessly.
VPN not connecting on Mac
When you are trying to connect to a VPN on your Mac and encounter issues with the connection, it can be frustrating. There are several reasons why your VPN may not be connecting on your Mac, and understanding these reasons can help you troubleshoot the problem effectively.
One common reason for a VPN not connecting on a Mac is a poor internet connection. Make sure that your internet connection is stable and strong before attempting to connect to the VPN. You can try switching to a different network or restarting your router to improve the connection.
Another potential cause of VPN connection issues on a Mac is firewall or antivirus software blocking the VPN connection. Check your firewall settings and make sure that the VPN application is allowed to establish a connection. You may need to temporarily disable your firewall or antivirus software to see if it is causing the problem.
It is also possible that the VPN server you are trying to connect to is experiencing issues. In this case, try connecting to a different server location or contacting your VPN provider for assistance.
If you are still unable to connect to the VPN on your Mac, you may need to reinstall the VPN application or update it to the latest version. This can help resolve any software-related issues that may be preventing the connection.
By troubleshooting these common reasons for a VPN not connecting on a Mac, you can hopefully resolve the issue and regain access to a secure and private internet connection.
Mac VPN connection issues
Title: Troubleshooting Common Mac VPN Connection Issues
When it comes to ensuring your online privacy and security, using a VPN (Virtual Private Network) on your Mac is essential. However, like any technology, VPNs can encounter issues that may disrupt your connection. Here are some common Mac VPN connection issues and how to troubleshoot them:
Unable to Connect to VPN Server: If you're unable to establish a connection to your VPN server, first ensure that your internet connection is stable. Check if other devices can connect to the internet. If the issue persists, try connecting to different VPN servers offered by your VPN provider. Sometimes, server overload or maintenance can cause connection failures.
Slow Connection Speeds: Slow VPN speeds can be frustrating, but they're often caused by factors like server congestion or your internet service provider (ISP) throttling VPN traffic. To improve speeds, try connecting to servers closer to your physical location or upgrading to a premium VPN plan with faster servers and better bandwidth allocation.
VPN Disconnects Frequently: If your VPN connection drops frequently, it could be due to network interference, outdated VPN software, or conflicting applications. Ensure that your VPN client is up to date and try disabling any firewall or antivirus software temporarily to see if they're causing the disconnects.
DNS Leaks: DNS leaks can compromise your privacy by revealing your browsing history to your ISP. To prevent DNS leaks on your Mac, enable the VPN's built-in DNS leak protection feature or manually configure your network settings to use the VPN's DNS servers.
Compatibility Issues: Sometimes, certain VPN protocols may not be compatible with your Mac's operating system or network configuration. Try switching between different VPN protocols (e.g., OpenVPN, IKEv2, L2TP/IPsec) to see if that resolves the compatibility issues.
By troubleshooting these common Mac VPN connection issues, you can enjoy a seamless and secure browsing experience while protecting your online privacy and data. If problems persist, don't hesitate to reach out to your VPN provider's customer support for further assistance.
Internet access without VPN Mac
Title: Enjoy Seamless Internet Access without VPN on Mac: Exploring Alternatives
In today's digital age, ensuring online privacy and security is paramount. While Virtual Private Networks (VPNs) offer a robust solution for safeguarding your internet activities, some users may prefer to access the web without VPNs on their Mac devices. Whether it's due to performance concerns, compatibility issues, or simply personal preference, there are several alternative methods to enjoy internet access without relying on a VPN.
One approach is to utilize built-in security features and settings offered by your Mac operating system. Macs come equipped with a range of tools designed to enhance privacy and protect against online threats. By configuring your system preferences and utilizing features such as the built-in firewall, secure browser settings, and encrypted connections, you can enhance your online security without the need for a VPN.
Another option is to explore privacy-focused web browsers that prioritize user anonymity and security. Several browsers, such as Brave, Firefox, and Tor, offer robust privacy features, including built-in ad blockers, tracking prevention, and encrypted connections. By using these browsers instead of traditional ones, users can enjoy a safer and more private browsing experience without the need for a VPN.
Additionally, users can consider utilizing alternative networking technologies, such as proxies and proxy servers, to access the internet securely without a VPN. While not as comprehensive as VPNs, proxies can provide an extra layer of anonymity and security by masking your IP address and encrypting your internet traffic.
In conclusion, while VPNs are a popular choice for securing internet access, there are viable alternatives available for Mac users who prefer to forego VPN usage. By leveraging built-in security features, exploring privacy-focused browsers, and utilizing alternative networking technologies, users can enjoy a safer and more private online experience without the need for a VPN.
0 notes
Text
can't browse vpn network
🔒🌍✨ Get 3 Months FREE VPN - Secure & Private Internet Access Worldwide! Click Here ✨🌍🔒
can't browse vpn network
VPN connection issues
Title: Troubleshooting Common VPN Connection Issues
Virtual Private Networks (VPNs) have become indispensable tools for maintaining online privacy and security. However, like any technology, they can sometimes encounter connection issues that disrupt their functionality. Understanding and troubleshooting these problems is essential for ensuring a seamless VPN experience.
One of the most common VPN connection issues is slow speeds. This can be caused by various factors, such as network congestion, server overload, or distance from the VPN server. To address this problem, users can try connecting to a different server closer to their location or during off-peak hours when network traffic is lower.
Another frequent issue is intermittent disconnections. This can occur due to unstable internet connections, firewall settings, or outdated VPN software. To resolve this issue, users should ensure they have a stable internet connection, adjust firewall settings to allow VPN traffic, and regularly update their VPN client to the latest version.
Some users may also encounter compatibility issues with certain devices or operating systems. In such cases, it's important to check the VPN provider's compatibility list and ensure that the VPN client is compatible with the device and operating system being used. Additionally, updating the device's firmware or operating system to the latest version can often resolve compatibility issues.
DNS leaks are another concern that can compromise user privacy when using a VPN. This occurs when the device's DNS requests are not routed through the VPN tunnel, potentially exposing browsing activity to third parties. To prevent DNS leaks, users can configure their device to use the VPN's DNS servers or use a VPN provider that offers built-in DNS leak protection.
In conclusion, while VPNs offer numerous benefits, they can sometimes encounter connection issues that need to be addressed. By understanding the common causes of these problems and following troubleshooting steps, users can ensure a reliable and secure VPN connection.
Network browsing problems
Title: Troubleshooting Network Browsing Problems: A Comprehensive Guide
Network browsing problems can be frustrating and disruptive, hampering productivity and causing undue stress. Whether you're unable to access shared folders, experiencing slow browsing speeds, or encountering frequent timeouts, understanding and resolving these issues is crucial. Here's a comprehensive guide to help you troubleshoot network browsing problems effectively.
Check Network Connectivity: Ensure that your device is connected to the network properly. Verify cables, Wi-Fi connections, and router configurations.
Restart Devices: Sometimes, a simple restart can resolve network browsing issues. Restart your computer, router, and modem to refresh connections.
Update Network Drivers: Outdated or faulty network drivers can cause browsing problems. Update your network adapter drivers to the latest version from the manufacturer's website.
Scan for Malware: Malware infections can disrupt network browsing. Use reputable antivirus software to scan and remove any malicious programs.
Review Firewall Settings: Firewalls can block network traffic, causing browsing issues. Check firewall settings to ensure they're not overly restrictive.
Reset TCP/IP Stack: Resetting the Transmission Control Protocol/Internet Protocol (TCP/IP) stack can resolve network communication issues. Open Command Prompt as administrator and type 'netsh int ip reset' followed by 'netsh winsock reset' then restart your computer.
Flush DNS Cache: Flushing the Domain Name System (DNS) cache can resolve DNS-related browsing problems. Open Command Prompt and type 'ipconfig /flushdns' followed by pressing Enter.
Verify Network Shares: Ensure that shared folders are accessible and permissions are set correctly. Check network share settings on both the host and client devices.
Update Firmware: Outdated router firmware can cause network browsing issues. Check for firmware updates on the router manufacturer's website and install them if available.
Contact ISP: If you've tried all troubleshooting steps and still experience network browsing problems, contact your Internet Service Provider (ISP) for assistance. There may be issues with your internet connection that require professional intervention.
By following these steps, you can effectively troubleshoot and resolve network browsing problems, ensuring seamless connectivity and optimal performance for your devices. Remember to approach each step systematically and seek professional help if needed.
Internet access restrictions
Internet access restrictions refer to the various limitations imposed on individuals or groups in terms of accessing certain websites, content, or online services. These restrictions can be put in place by governments, organizations, schools, or even internet service providers. While the reasons behind internet access restrictions may vary, they often aim to regulate online behavior, protect users from harmful content, or prevent illegal activities.
Governments often impose internet access restrictions for political reasons, such as censoring content that goes against their ideologies or blocking certain websites to maintain control over information flow. In some cases, restrictions are also put in place to combat cybercrime, protect national security, or prevent the spread of fake news and misinformation.
Organizations and schools may implement internet access restrictions to increase productivity, prevent employees or students from accessing inappropriate content, or ensure network security. By using firewalls, content filters, or blacklisting certain websites, these entities can control and monitor internet usage within their premises.
Internet service providers may also restrict access to certain websites or services either to comply with regulations, manage network traffic, or offer tiered internet packages. They may throttle or block access to specific types of content, such as streaming services or torrent websites, in order to prioritize bandwidth for other users or push customers towards higher-priced plans.
While internet access restrictions can serve valid purposes, they also raise concerns about censorship, freedom of speech, and privacy. Striking a balance between protecting users and upholding their rights remains a complex challenge in today's digitally connected world.
VPN server connectivity
Title: Enhancing Connectivity: Understanding VPN Server Connectivity
In today's interconnected digital landscape, maintaining a secure and reliable connection is paramount. VPN (Virtual Private Network) servers play a crucial role in ensuring privacy, security, and unrestricted access to online content. Understanding VPN server connectivity is essential for optimizing your online experience.
VPN servers act as intermediaries between your device and the internet. They encrypt your data and route it through a secure tunnel, shielding it from prying eyes and potential threats. Connectivity to these servers is pivotal for enjoying the benefits of VPN technology.
One key aspect of VPN server connectivity is the selection of server locations. VPN providers typically offer a wide array of servers spread across various countries and regions. Users can choose servers based on their specific needs, such as accessing geo-restricted content or minimizing latency.
Furthermore, the reliability and speed of VPN server connections significantly impact user experience. A stable connection ensures seamless browsing, streaming, and downloading, while fast speeds enable swift data transfer without noticeable lag.
It's also important to consider the protocol used for VPN server connectivity. Popular protocols like OpenVPN, IKEv2, and L2TP/IPsec offer varying levels of security and performance. Users should select the protocol that best aligns with their requirements for privacy and speed.
Moreover, VPN server load and capacity play a crucial role in maintaining consistent connectivity. High server loads can result in slower speeds and potential connection drops. Opting for VPN providers with robust infrastructure and sufficient server capacity can help mitigate these issues.
In conclusion, VPN server connectivity is a cornerstone of modern online security and accessibility. By understanding the factors that influence connectivity, users can make informed decisions to enhance their VPN experience. Whether it's selecting the right server location, optimizing connection speeds, or choosing the appropriate protocol, prioritizing connectivity ensures a seamless and secure online journey.
Troubleshooting VPN browsing
Troubleshooting VPN Browsing: Tips to Resolve Connectivity Issues
Virtual Private Networks (VPNs) offer users a secure and private way to browse the internet. However, encountering browsing issues while using a VPN is not uncommon. Here are some troubleshooting tips to help resolve connectivity issues and ensure a smooth browsing experience:
Check your internet connection: Before troubleshooting VPN issues, ensure that your internet connection is stable. Poor internet connectivity can cause browsing problems even when using a VPN. Restart your router or switch to a different network to rule out connection issues.
Verify VPN settings: Double-check your VPN settings to ensure they are configured correctly. Make sure you are connected to the appropriate server location and that your login credentials are accurate. If necessary, reinstall the VPN application to reset settings.
Switch VPN protocols: VPN protocols determine how data is transmitted between your device and the VPN server. If you're experiencing browsing issues, try switching between different protocols (such as OpenVPN, L2TP/IPsec, or IKEv2) to see if one provides better connectivity.
Disable firewall or antivirus software: Sometimes, firewall or antivirus software can interfere with VPN connections, leading to browsing problems. Temporarily disable these programs and see if your VPN connection improves. Remember to re-enable them once troubleshooting is complete.
Clear cache and cookies: Accumulated cache and cookies in your browser can sometimes conflict with VPN connections. Clearing your browser's cache and cookies can help resolve browsing issues and improve VPN performance.
Contact VPN support: If you've tried the above steps and are still experiencing browsing problems, reach out to your VPN provider's customer support team. They can offer personalized assistance and troubleshoot any underlying issues with your VPN connection.
By following these troubleshooting tips, you can resolve VPN browsing issues and enjoy a secure and seamless internet experience. Remember to stay informed about VPN best practices to optimize your online privacy and security.
0 notes
Text
DNS server is not responding?
The DNS Server Is Not Responding Error
DNS is an integral part of the internet and translates domain names into IP addresses, allowing you to access websites by typing easy-to-remember words or numbers. But sometimes the server stops responding and you’re stuck with an annoying error message.
This article will explain what the problem is and how to fix it. We will explore some of the most effective methods including restarting your router, flushing DNS cache, and disabling software like antivirus or firewalls.
Restart your router or modem
The DNS (Domain Name System) is essentially the Internet’s phone book, matching easily memorized website names to their corresponding IP addresses. The entire process of querying various servers takes a fraction of a second and is imperceptible to users.
Each computer or device that connects to the Internet has a DNS server setting at either the operating system level or the router level. The latter is more important because it dictates which DNS servers all devices on a network use for Internet access.
The operating system level setting is called a DNS resolver; when a user enters a website address into their browser, the recursive resolver sends a request to the network to find out what the actual IP address is for that site. The resolver then caches the answer for future use and hands it back to the software that entered the name.
Refresh your browser’s cache
When you see this error, it usually means that your computer or browser can’t reach the DNS servers. This could be because of a variety of different reasons, including malware or a faulty router.
One of the quickest ways to find out what’s causing this issue is to use another device to connect to the internet. If you can visit the website on another device, it indicates that the problem is with your computer or browser.
Occasionally, your DNS cache can get outdated. To resolve this, you need to flush your DNS cache. This process is similar to clearing your browser’s cache but it resets the IP addresses instead of deleting your web pages. To do this, follow the steps below for your operating system.
Try a different browser
One of the quickest ways to troubleshoot DNS issues is to use a different browser. If the website loads without error in another browser, it is likely that the problem is local to your device and not a result of an Internet or DNS server outage.
To make sure the issue is not with your network connection, try accessing the site using a mobile data connection. This will help you to determine whether the problem is with your browser or your home Wi-Fi.
If you’re able to load the site using a different browser but still see the “DNS Server is not responding” error, it could be that your antivirus or firewall program is interfering with your internet connection. If this is the case, temporarily deactivating your firewall or antivirus program should allow you to navigate the web normally. This will also help you to clear any DNS cache that may be causing the issue.
Reconnect your modem or router
When you try to load a website and are met with the “DNS Server Not Responding” error message, it can be extremely frustrating. However, the good news is that most of these errors have simple solutions.
You can usually fix this problem by restarting your router or modem. Simply unplug the device and wait about 30 seconds before plugging it back in. Then, try opening the website again. If this doesn’t work, try using another device to access the internet (like a mobile phone on Wi-Fi or ethernet cable).
You can also use a command prompt to flush your DNS cache. This will clear IP addresses and other DNS related data from your computer’s cache, which may help resolve the “DNS server is not responding” error. To do this, open a command prompt by pressing the Win key and typing cmd. Then, type ipconfig /flushness and press enter.
0 notes
Text
How to Clear Cache on Windows 10/11


6 Comprehensive Methods to Clear Cache on Windows 10/11!
Windows 10 is a powerhouse, designed to offer a seamless user experience. Yet, over time, accumulated cache can occasionally bog down its performance. Fear not, for this article will be your comprehensive guide on how to clear cache on Windows 10/11, allowing your PC to breathe freely again. 1. Clear Browser Cache: Your Gateway to the Internet https://www.youtube.com/watch?v=NYevMttVAFM Clear Cache on Windows 10/11: Video From Youtube Web browsers such as Chrome, Firefox, and Edge constantly store data to enhance your browsing experience. To ensure they don't become the reason for a slowdown: - Launch your preferred browser. - Use the shortcut Ctrl + Shift + Delete for instant access to data clearing options. - Opt to clear cached images, files, and any other relevant data. - Confirm by clicking Clear. 2. Microsoft Store: Clearing for a Smooth Shopping Experience Sometimes, glitches with the Microsoft Store trace back to cache problems. To sort this: - Input "wsreset" in the Windows search bar and select the application. - A blink-and-you-miss-it command prompt window will appear, followed by the Microsoft Store launch. Voila! Cache cleared. 3. Temporary Files and System Cache: Unseen but Crucial These files can accumulate swiftly and clog system performance. - Search for "Disk Cleanup" in Windows. - Opt for the drive you want to refresh (commonly the C: drive). - Tick boxes like "Temporary files" and any other clutter you'd like to get rid of. - Finalize by clicking "OK" and then "Delete Files". 4. Windows Update Cache: Ensuring Smooth Updates Updates are essential, but sometimes they might face hiccups due to cache. - Initiate a Command Prompt with administrator rights. - Key in "net stop wuauserv" and proceed with Enter. - Journey to C:WindowsSoftwareDistribution and discard everything inside. - Revert to the Command Prompt and restart the update service with "net start wuauserv". 5. Thumbnail Cache: For Those Perfect Previews Thumbnails give you quick previews, but cache issues can disrupt this. - Look up "Disk Cleanup" on Windows. - Choose the typical C: drive. - Ensure "Thumbnails" is checked alongside any other options you wish to address. - Wrap up with "OK" and a "Delete Files" confirmation. 6. DNS Cache: Streamlining Your Connection Encountering odd website behaviors? DNS cache might be at play. - Start an administrator-level Command Prompt. - Simply type "ipconfig /flushdns" and give it an Enter. All done! Also Read: How to clear cache on Android
Features
- Immediate System Refresh: Deleting cache instantly declutters and refreshes your system. - Enhanced Browsing Experience: Clearing browser cache ensures you're seeing the latest version of websites. - Optimal Microsoft Store Performance: Ensure a glitch-free shopping experience with cache maintenance. - Smooth Windows Updates: Keep updates running smoothly by managing the Windows Update cache. - Quick Thumbnail Loading: Prevent broken or slow-to-load thumbnail previews. - Uninterrupted DNS Performance: Ensure a stable connection by addressing DNS cache. Also Read: How to Clear Phone Cache on iPhone
Benefits
- Speed Boost: With cleared cache, most users notice an immediate improvement in system responsiveness. - Storage Recovery: Cache files can take up a significant amount of storage. Clearing them can free up precious space on your drive. - Problem Prevention: Regular cache management can preemptively solve many problems before they arise. - Enhanced Security: Clearing cache, especially in browsers, can help ensure your privacy and protect sensitive data. External Sources: Windows 10 Support, Wikipedia on Computer Cache Knowing how to clear cache on Windows 10 effectively can feel like wielding a magic wand. With the right steps, you can instantly boost performance, ensuring your Windows 10 experience is as smooth and efficient as it was meant to be. Happy computing!
FAQs
Why is clearing cache on Windows 10 important? Clearing cache helps in enhancing the speed and performance of your system. Over time, accumulated cache can slow down your computer and hinder its functionality. How often should I clear my browser cache? While there's no strict rule, it's generally recommended to clear browser cache every 4-6 weeks. This ensures you're viewing the most updated versions of webpages and prevents websites from loading slowly. Does the "wsreset" command clear cache for all Windows apps? The "wsreset" command is specifically designed to reset the Microsoft Store. It clears the cache of the Microsoft Store app, which can solve certain functionality issues. Are there any risks associated with clearing Windows Update Cache? While clearing the Windows Update Cache can solve update-related issues, there is a slight risk. Deleting the wrong files can cause further update complications. Always ensure you're following the steps correctly and only deleting contents inside the specified folder. What does the "ipconfig /flushdns" command do? This command is used to clear the DNS (Domain Name System) cache. DNS cache stores the IP addresses of web servers that contain recently viewed websites. By clearing it, you're removing all the old and possibly incorrect entries, which can resolve some connectivity issues. After clearing cache, will my computer instantly speed up? In many cases, clearing cache can lead to noticeable improvements in speed. However, the first time you revisit certain applications or websites, they might load slightly slower as they rebuild their cache. Do I need third-party software to clear cache? While the methods mentioned in the article utilize built-in Windows features, there are third-party software options that can automate and provide deeper cleaning. However, always download such software from reputable sources to avoid malware. Why do thumbnails need cache? Thumbnails use cache to quickly display previews of content, such as pictures or videos, without needing to fully load the file. Clearing the thumbnail cache can help when these previews aren't displaying correctly. Is clearing cache the same as deleting my saved files and data? No, clearing cache will not delete personal files or essential data. Cache consists of temporary files meant to speed up tasks. When cleared, some tasks might take slightly longer the first time as the cache rebuilds. Can I selectively choose what cache to clear? Yes, tools like "Disk Cleanup" provide options on which types of cache and temporary files you wish to clear, offering users flexibility in their cleaning process. Read the full article
1 note
·
View note
Text
Orbi Home WiFi System
What's a Wi-Fi System?

Wi-Fi System are half breeds of sorts. They offer a simple method to cover your home in Wi-Fi without the requirement for extra wiring, range extenders, or passages. For a few, setting up a passage is not feasible, as it requires running links. Reach extenders are remote and genuinely simple to arrange, however their sign yield is ordinarily half as solid as the sign coming from your switch.
The most recent yield of Wi-Fi System uses expansion hubs, or satellites, to expand your Wi-Fi signal. A portion of these System use network innovation, where the satellites speak with one another to give inclusion all through your home, however the Orbi switch utilizes a committed Wi-Fi band to speak with its satellite. The greatest benefit that Wi-Fi System have over range extenders is that the satellites are all essential for a similar arrange and give consistent network as you meander all through the house, and needn't bother with any setup or the executives. Most reach extenders, then again, make an auxiliary Wi-Fi network that requires some level of the board and should be signed in to for Wi-Fi access. All things considered, you normally have more power over your organization when utilizing a switch/extender arrangement.
Design and Features

The Orbi framework accompanies a switch and one satellite; they are indistinguishable in appearance and are encased in a white, delicate touch walled in area that resembles a somewhat crushed chamber. At 8.8 by 6.7 by 3.1 inches (HWD), they are fundamentally bigger than the hexagon-molded Luma parts (4.1 by 4.6 by 1.1 inches) and the square Eero segments (4.7 by 4.7 by 1.3 inches). While not ugly, they unquestionably don't offer the smooth feel of the Ubiquiti Amplifi HD, the Google OnHub, and the Starry Station, which are all intended to be found where they can be seen. The Orbi is accessible as a two-piece pack that offers 4,000 square feet of inclusion. Netgear additionally has an individual independent switch ($249.99) that conceals to 2,000 square feet, and it will in the end deliver singular satellites ($249.99 every) that give up to 2,000 square feet of inclusion.
A tri-band AC3000 gadget, the Orbi switch has six inner recieving wires and can convey hypothetical throughputs paces of 1,266Mbps to customers (400Mbps on the 2.4GHz band and 866Mbps on the 5GHz band). The third band is which isolates the Orbi from the opposition; it's viewed as a backhaul band since it is committed simply to interchanges between the switch and the satellite. This is a 5GHz band that can arrive at most extreme rates of 1,733Mbps. The Ubiquiti, the Luma, and the Eero are double band frameworks and don't utilize a devoted band for switch to-satellite transmissions.
At the highest point of every part is a LED light ring. On the switch, the ring is strong white while booting up and squints golden when it loses its Internet association. A flickering blue and maroon light shows that you've arrived at your Internet traffic edge (more on this later), and when the light is out, everything is working appropriately. Around back, at the base of the switch, are three Gigabit LAN ports, a WAN port, a USB 2.0 port, and Sync, Power, and Reset catches. Regardless of Netgear's promoted claims that the USB port can be utilized to associate peripherals, like hard drives and printers, it was not working at the hour of this survey, and a representative couldn't affirm a date when a firmware update would fix the issue.
The satellite part likewise has a light ring that flickers white while the satellite is booting up and turns strong blue when the association with the switch is acceptable, golden when it's reasonable, and maroon when it loses its association. The lights make it simple to put the satellite in a focal area that will give a solid connect to the switch. At the back of the base are four Gigabit LAN ports, Reset, Sync, and Power catches, and a USB 2.0 port that doesn't work.
Though the Luma, Ubiquiti, and Eero frameworks are totally arranged and controlled utilizing a portable application, the Orbi utilizes a Web-based comfort, albeit a versatile application is in progress. The comfort is not difficult to utilize, and not at all like the opposition, it offers the sort of essential and progressed settings that you get with a conventional switch. The landing page incorporates tabs for Basic and Advanced settings, and presentations essential status data for Internet, Wireless, Attached Devices, and Parental Controls. Here, you can get to fundamental Internet (Dynamic or Static IP, DNS, and MAC Address) and Wireless (SSID name and Security) settings and see which customers are associated and their IP address. You can likewise set up visitor organizations, an element that was missing when the Orbi was first delivered.
On the off chance that you need more command over your organization, the Advanced tab takes you to an Advanced Security area, where you can set up Parental Controls to hinder admittance to sites, limit admittance to clients, and have email cautions sent when somebody attempts to get to an impeded site. You can likewise get to Advanced Wireless settings that let you change communicate power, empower beamforming and MU-MIMO, utilize the switch as a passage, and design things like Static Routing, VPN Service, and Port Forwarding.
Remembered for the Advanced settings is a Traffic Meter that allows you to see Internet traffic insights and spot limits on month to month transfer and download limits. At the point when the meter sees that it's arrived at its edge, you can have it closed down Internet admittance to all customers. You can likewise utilize Advanced settings to design things like IPv6 burrowing, see framework logs, and update the switch's firmware.
Installation and Performance

The Orbi framework is exceptionally simple to introduce. I connected the switch to my modem and associated it to my PC, fueled it up, and composed http://orbilogin.com in my program's location bar to dispatch the arrangement wizard. Following 10 seconds or somewhere in the vicinity, it effectively associated with the Internet and provoked me to set up the satellite or to avoid this progression and do it later, which I did. I was then approached to make a secret word and answer two security questions, and was given the alternative to change the switch's SSID name. The switch required around 90 seconds to refresh its firmware and was all set.
To install the satellite, I put it around 30 feet from the Orbi switch in my lounge, connected it, and stuck around two minutes while it adjusted with the switch. During this time, the light ring squinted white and maroon and afterward turned strong blue, demonstrating a decent sign with the switch. That is it.
I played out a progression of throughput tests on both the switch and the satellite. Likewise with the Luma and Eero frameworks, the Orbi utilizes a type of programmed band controlling that doesn't permit you to isolate the 2.4GHz band from the 5GHz band, so my outcomes depend on consolidated throughput speeds. On account of its utilization of a devoted backhaul band, throughput on the Orbi satellite module was almost indistinguishable from that on the switch. With the other Wi-Fi frameworks, satellite throughput was fundamentally not as much as switch throughput.
In my single-client closeness (same-room) tests, the Orbi switch turned in an entirely decent score of 480Mbps, and the satellite conveyed a similarly great 470Mbps. The Luma switch conveyed 457Mbps, however its satellite finished out at 106Mbps, and the Eero could just deal with a top score of 188.7Mbps from any module. The Ubiquiti Amplifi HD scored 459Mbps in the nearness test when associated with the switch and 193Mbps when associated with its most grounded satellite.
A good ways off of 30 feet, the Orbi switch scored 223Mbps, and the satellite scored 220Mbps. The Ubiquiti Amplifi HD switch likewise showed a throughput of 223Mbps, however its satellite maximized at 168Mbps. The Luma switch acquired 76.1Mbps, and its satellite scored 77.2Mbps, while the Eero scored 71.2Mbps. Via examination, our Editors' Choice midrange switch, the Linksys EA7500 Max-Stream AC1900 MU-MIMO Gigabit Router, had a throughput of 495Mbps (nearness) and 298Mbps (30 feet), and our top pick for top of the line switches, the D-Link DIR-895L/R, scored 515Mbps and 324Mbps, separately.
I tried the Orbi's MU-MIMO throughput utilizing three indistinguishable Acer Aspire R13 PCs furnished with Qualcomm's QCA61x4A MU-MIMO hardware. The switch arrived at the midpoint of 128Mbps in the closeness test, and the satellite scored 127.6Mbps. At 30 feet, both the switch and the satellite arrived at the midpoint of 124Mbps. These MU-MIMO scores can't coordinate with the scores from our top-performing top of the line switch, the D-Link DIR-895L/R (264.6Mbps and 134.5Mbps, individually), however they are absolutely good. The other Wi-Fi frameworks we've tried don't uphold MU-MIMO innovation.
Conclusion
Home Wi-Fi system offer an easy to understand option in contrast to the more mind boggling switch/extender arrangements used to cover your home with remote inclusion, and the Netgear Orbi High-Performance AC3000 Tri-Band Wi-Fi System (RBK50) is at present the best of the expanding crop. Both the switch and the satellite conveyed higher scores on our single-client throughput tests than the Luma, Eero, and Ubiquiti frameworks, and the Orbi system offers more LAN network and the board choices too.
Albeit the Orbi's MU-MIMO execution in testing was acceptable, it isn't exactly just about as quick as what you get from a top of the line switch like the D-Link DIR-895L/R, or even a midrange switch, for example, the Linksys EA7500, however in any event it upholds the innovation. All things considered, empowered USB ports would be welcome augmentations. We're anticipating trying the as of late declared frameworks from Amped Wireless (Ally), (Google Wifi), and Plume, yet right now the Netgear Orbi RBK50 is top pick for home Wi-Fi system.
1 note
·
View note
Text
How to install XFCE Desktop Environment on Arch Linux
Hello Welcome back to my tumblr blog. Today I’m gonna show you how to install Xfce4 Desktop Environment to your Arch Linux computer.
By default, Arch Linux is command line only interface after installed to your computer. Arch Linux didn’t come with GUI or desktop, so you have to install it by yourself. In this tutorial, I’m gonna show you how to install XFce4 for your Arch Linux Computer.
I asummed you have installed Arch Linux by yourself before installing DE, so let’s get started
Stage 1 : Preparation

1. Login to your computer using your username and password

2. Make sure your computer is connected to the Internet. Here is how to check it :
Check your IP Address using this command :
“ip addr show”
Ping a website or DNS. In this case I pinged Google public DNS :
“ping 8.8.8.8″

3. Make sure to refresh the package repository index in case the repo is not sync with the server by using this command :
“sudo pacman -Syyy”
Stage 2 : Installation

4. After refreshed the package repository, you are ready to install desktop environment.
First of all you need to install xorg, a display server for your desktop. Install it by using the following command :
“sudo pacman -S xorg xorg-server”
This is required as xorg will be your window display server for your Desktop environment.

5. Now, You’re ready to install Xfce4 Desktop Environment. Install XFCE4 Desktop Environment using this following command :
“sudo pacman -S xfce4″
I decided to install all packages so i deciced to proceed with default installation. Press enter.
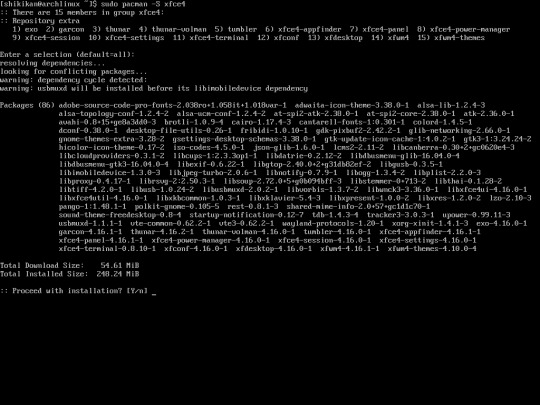
6. Now, install all packages by typing “y” then press “enter”

Now your computer is installing the packages required for your Desktop Environment. Sit back, wait and relax.

7. Now, you need to install display manager as well. Install it using the following command:
“sudo pacman -S lightdm lightdm-gtk-greeter xfce4-goodies”
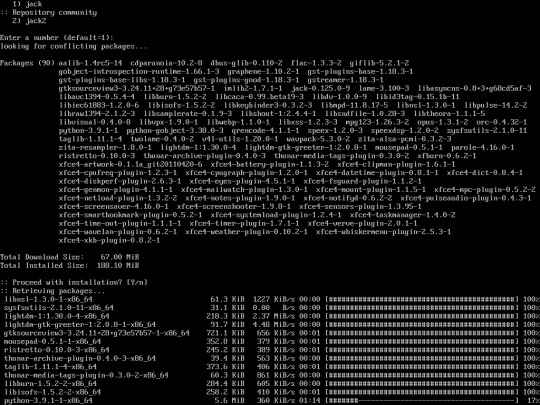
install it by pressing “enter” or type”y” then “enter”

now enable lightdm using the following command
“sudo systemctl enable lightdm”
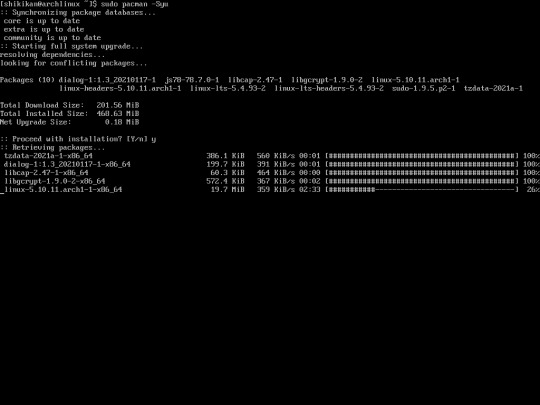
after finished installing lightdm, don’t forget to install all of the update using this command :
“sudo pacman -Syu”

now we’re done, reboot your computer using this command :
“sudo reboot”
Then congratulations, you just installed xfce4 desktop environment on your computer. Now let’s see how it looks


Terminal

Congratulations, you just installed xfce4 desktop environment on your computer.
1 note
·
View note
Text
Top 6 Windows Command Prompt Commands You Must Know

The command prompt has been a part of Windows for a very long time, but now, it is gradually disappearing from the Windows interface. Its disappearance will make the system better as it is an obsolete and unnecessary tool that belongs to the era of text-based input. However, there are still a few useful CMD commands and improvements to the system. Here are those few commands you must know about:
Assoc
On Windows, most of the files are associated with a unique program, and everything is assigned in a particular order to open the file by default. But it can be challenging to remember all the associations and work through them at once. This is where the Assoc command comes to the rescue as it will help you remind the associations. Enter the ‘assoc’ command on your display to check the list full of filename extensions and program associations. It will also enable you to use the commands properly. You can also extend the command for tweaking the file associations.
If you are working on Windows 10, then you can access a user-friendly interface and change the file type association in seconds. For this purpose, you have to open the Settings app on your desktop. From there, go to Apps and click on Default Apps. Then, select ‘Choose Default App by File Type.’
File Comparison
The File Comparison command will help you identify the differences in text between two files. If you are a programmer, this command will prove beneficial to help you figure out the minute mistakes or changes you have made in two versions of a file. Even writers, students, etc., can use it for an easy and quick way to check their files. To use this command, you have to type ‘fc’ followed by the directory path and file name of both the files you want to compare. You can also choose to extend the command as per your preferences. If you type ‘/b,’ it will start comparing only binary output, and entering the ‘/c’ command will disregard the case of texts you have chosen to compare.
Ipconfig
The Ipconfig command imparts the IP address your computer is using at the moment. Like every other device, if your PC is connected to a Wi-Fi router, you will receive your router’s local network address. This command is useful due to its extensions. Use the ‘ipconfig /release’ command with ‘ipconfig /renew’ to force your Windows PC into getting a new IP address. You can use this command when your PC claims not to have any new IP address. Using the ‘ipconfig /flushdns’ command, you can refresh your DNS address.
Ping
When you cannot figure out if the packets are reaching a particular networked device or not, use the Ping command on your desktop. You can use this command to send a series of test packets to the specified address by typing ‘ping’ followed by the IP address or web domain. If the command prompts an arrival and return, it indicates that the device can communicate with your PC. In case it fails to do so, know that something is interrupting or blocking communication between your PC and the device. With this, you can determine the root cause of the issue, which could either be network hardware failure or an improper configuration.
Systeminfo
Using the Systeminfo command, you will receive a detailed configuration overview on your desktop screen. You will find a list containing the operating system and hardware details on it. You can check the original Windows installation date, BIOS version, last boot time, network card configurations, installed hotfixes, and more through this list. Type ‘systeminfo /s’ followed by the hostname of your desktop on your local network. You might even have to add additional syntax elements for the domain, user name, and password to the original command. Here is an example of doing that:
systeminfo /s [host_name] /u [domain]\[user_name] /p [user_password]
Tasklist
Using the Tasklist command, you will receive the latest list of all the tasks running on your computer. Sometimes, this command can act a little redundant with the Task manager, yet it can find tasks hidden from your view in a specific utility. You can also add a wide range of modifiers to use it as per your requirements. Use the ‘Tasklist -svc’ command to check the services related to all the tasks. With the ‘tasklist -v’ command, you will receive additional details related to each task. You can use these commands for advanced level troubleshooting.
In similar ways, multiple other commands serve a different purpose and help you have a better and smooth experience using the Windows PC. Some commands are only relevant to Windows 8 and 8.1, but the ones mentioned above can be used on Windows with any version. But these commands will act differently on each Windows version, depending on the update you are currently using.
Secure buyings provides you with the best range of antivirus software so that your device is always protected from online threats. Our sites provide you assured antivirus product like NORTON SECURITY, McAfee SECURITY, WEBFOOT SECURITY & OFFICE APPLICATIONS for the customer fullfil the problem of online threads.
SOURCE – Top 6 Windows Command Prompt Commands You Must Know
#McAfeeInternetSecurity#NortonInternetSecurity#WebrootSecureAnywhereAntivirus#Securebuyings#Windows Command
1 note
·
View note
Text
Space Names and Cheap Web Hosting Information

In the event that you are keen on beginning a web based business, an Internet blog or simply need modest web facilitating data then this article should help.
In the event that you need to have a web nearness for business or individual use it is significant you comprehend a couple of fundamentals to guarantee that your web nearness is as effortless as could reasonably be expected.
How about we start by taking a gander at modest web facilitating data. Likewise find modest individual web facilitating data.
Put resources into a decent area name, a decent space name is your connection to the outside world and find out about modest web facilitating data. it doesn't generally need to be the name of your organization or explicit to your prerequisites however needs to relate here and there.
For instance: on the off chance that you have a site selling infant garments called "CuteBaby Ltd" there are not very many scans for that term, then again in the event that you can purchase the space name "babyclothes" or "childrenswear" it would have an obviously better possibility of ascending in the web crawlers as long as the website whenever constructed well and streamlined effectively obviously. Click here Best Web Hosting India
At the point when you have enlisted the space name it doesn't have a place with you in the feeling of property however it allows you to have sole rights to utilize that area name for the time allotment you continue paying for enrollment expenses with a modest individual web facilitating organization.
One of the numerous valid statements about having your own space name is this is your perpetual site address and this can be facilitated with any web facilitating organization. In the event that you dont like the administration provided by your present web facilitating supplier then simply move it. there's a lot of modest web facilitating data out there and we will talk about how you can discover modest web facilitating data later in the article.
On the off chance that you do change facilitating suppliers it doesn't influence your webpage guests, all the data is moved and dns records are refreshed to guarantee that to your guests the exchange is consistent to the new modest individual web facilitating supplier.
Additionally on the off chance that you have an issue you never again are permitted to utilize their administrations they own and control your space name and you would be halted from utilizing the name you have burned through cash on and developed. You have the possibility of losing all your traffic or guests, in addition to your fame in the web crawlers in light of the fact that your pages no longer have URLs.
Ensure you have your site with a business facilitating supplier. The rationale behind this is basic, you are paying for an assistance so they ought to be anxious to guarantee your site all around kept up with little personal time. This means you will be paying a normal expense each month yet this permits you to be completely free and have full command over your site. The other point is that facilitating bundles are so modest now you would be frantic not to utilize them.
In the event that you do choose to stay with your free area provider you will find that the url sending innovation doesn't function just as the manner in which an ordinary facilitating does. Best case scenario, it will prompt startling amazements and specialized issues to a portion of your web guests and your site will never get listed accurately by the web indexes.
To discover modest individual web facilitating data is simple, there are numerous spots that flexibly all the data you could need to discover modest web facilitating data. All the top level space specialists have a rundown of licensed recorders that you can glance through, these are organizations that are permitted to enlist and keep up your area name for you.
1 note
·
View note
Link
Err… “DNS server could not be found” errors are most common when you try to visit some websites on Google Chrome. Don’t worry! You are not alone here!
More than 80% of internet users may have faced the issue with “DNS server could not be found” message which occurs when the Domain Name Server is not available.
So, why do we call it Unavailable?
There are a few possibilities that one of three things causing the error to pop up every time you try to reach some websites.
Either, the DNS address is not configured properly in your PC or it’s Invalid
The server at the address might be defective for some reason.
Or, it happens that the address is unreachable.
Without having more information about the particular “DNS server could not be found” error. We only assume the following methods mentioned in this article may help you to get rid of the disaster.
For instance, when you visit some websites the first that happens in the backend is the browser contacts the DNS server. Henceforth, the DNS lookup gets failed which results in nasty “DNS server could not be found” error messages.
When you pay a visit to a website, of course the website know about your visit but do you know you are also observable by the third party trackers used by the website.
You may be surprised to know that the majority of websites uses third-party trackers in order to collect information of the users such as geographical location, devices used to view the website and so on.
Although these trackers are somehow responsible for taking out your personal information. Moreover, these trackers cover millions of websites and the company behind them create massive data by combining data trackers collects from each site.
Now, you must be thinking why should we tell you that?
Unlike every other website you pay a visit, it keeps all your sessions during the visits. This is done through the use of “Cookies”. Although Google Chrome allows most of the website to load trackers or a few websites asks the user consent before it uses the cookies.
The “DNS server could not be found” issue might arise from here. This is due to because most trackers do not have an effective mechanism to opt out, therefore, when you visit a website that blocks the trackers and third-party trackers will eventually get blocked showing you “DNS server could not be found “errors.
Look at the below screenshot to know what we’re talking about.

In this article, we’ll find the fixes to the problems so that you do not have to worry about the “DNS server could not be found” again.
Or, there are two possible reasons
The DNS server is working but network connection can’t reach it
The DNS server is not working even if your network can reach it
If it happens to be any one of the following then, there might be a physical problem with the network, even a software problem with the interface causing this. A configuration problem with the network or a firewall blocking access.
Usually, you need to check the network configuration and later check the automatic repair function by clicking at the network icon.
If it isn’t helpful. Please read the entire post for resolving the “DNS server could not be found” error in a more advanced way.
Ensure you have updated the drivers
The reason why you are seeing “DNS server could not be found” error messages on your browser is due to the incorrect, outdated or corrupt drivers. Ensure that you have the latest driver installed in your system.
Manual driver update
In order to manually update your drivers, visit your hardware manufacturers website and search for the most updated version from the list. If you have a problem finding the correct drivers then, you can simply contact the manufacturers and get everything you need.
Automatic driver update
You can find tons of the easy to use automatic driver updater tool that scans your Pc and download the missing or outdated drivers for you. This is defiantly a better option for them who are not willing to download each driver. Plus, most of them you find them on the web are free!
Clear Chrome’s Host Cache
Apart from outdated driver issues chrome host cache corruption will prevent you from accessing the websites. Though you can make an easy fix to it you will need to follow some steps.
Step 1 Open Google chrome type in an address bar “chrome://net-internals/#dns
Step 2 Now press the enter key and message will be displayed on the screen stating something below in the screenshot.
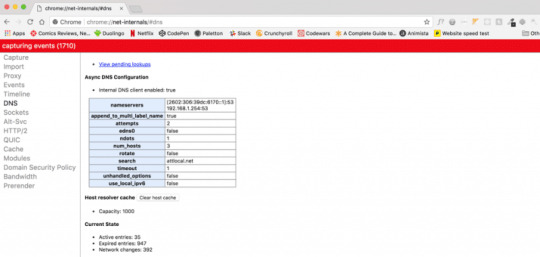
Step 3 Now you need to click at the button saying “Clear host cache” next to host resolver cache.
Step 5 Assuming that you have completed the above steps now refresh the page and see if the issues are still persisting.
Delete the files in your ‘etc’ folder
Though this is another fix to the “DNS address could not be found” issue. Follow the below steps to make a fix to it.
Step 1 Browse through your ‘etc’ folder found in C:\Windows\System32\drivers\etc.
Step 2 Once you have found the exact folder. Attempt to delete all the files in it.
Step 3 Ensure that Google Chrome is closed down before performing the operation
Step 4 Now, open the Google chrome after you have finished with the following steps.
Step 5 Check the websites to see if the problem is resolved or not.
More Findings
If the error messages appear stating the “DNS address could not be found” means the browser is not able to find the Domain Name System. There is a lot of fix to it such as changing your DNS server.
The issue to “Server DNS address could not be found—3300” is due to the misconfiguration. In order to make a fix to this. Follow the below steps.
Step 1 Press the Windows logo + R (for the run command) from the keyboard.
Step 2 Go to the control panel
Step 3 Select the “Network and Sharing Center”
Step 4 Click on “Change adapter settings” from the left side of the screen.
Step 5 Right-click on the Local Area or Wireless Network Connection icon and Visit the properties.
Step 6 Now, you will come to know about the list of connection is using.
Step 7 Click on the “Internet Protocol Version 4” (TCP/IPv4)
Step 8 Once selected ‘Click on the properties” button.
Step 9 You will get a “General tab” then
Step 10 If “obtain DNS server Address automatically is not selected” then, check the box to select it. And click on the “Ok” button.
In case, if it is already selected then, select to use the following DNS server address instead and click on done.
Note: The Preferred DNS server should contain 8.8.8.8 along with than the Alternate DNS server should be 8.8.4.4
Know how to renew and clear your DNS
If you use a windows computer, windows stores the IP address of the websites you pay a visit. This is done for faster loading of the website you visit more frequently. The cache present is either corrupt or outdated but you can renew and clear it using the following steps mentioned below.
Step 1 Press the Windows + R key to bring out the Run box. Now, open “Command Prompt” using the combination of keys CTRL + SHIFT + Enter to open the command prompt in administrator mode.
Step 2 It may look a little tricky especially for non-tech savvy users but here, you have to type in ipconfig /flushdsns and hit the “Enter” key. This will allow wiping out the cache if it’s outdated or corrupt.
Step 3 Well, you’re done with flushing the DNS. Reboot the system in order to see the new affected changes.
Make use of a VPN (Virtual Private Network)
If you still have the server DNS addresses could not be found the error with some websites then, download and use a VPN service to resolve the issue. It is done to make access to some website forbidden by your ISP (Internet Service Provider).
If you are not sure which VPS service you should choose, you can always go for NordVPN used by millions of users on the web to make access to the blocked websites from the ISPs.
FAQs: –
What does it mean when you have a DNS error?
DNS error refers to as the connection to the network or internet access has been abandoned. Usually it the DNS error depicts that it is unable to look up the IP address for the domain you are accessing.
How do you fix a DNS error?
Flushing the DNS cache is the best solution to make a fix to the DNS error. If you are not sure how to do it. Please refer to the steps mentioned in the article.
What is a DNS address error?
DNS refers to the Domain Name System that translates the website address into IP address to connect. The DNS address error might be occurring due to DNS cache. Although flushing it using the command prompt may help. Or it could be the issue arising from your ISP. One possibility is that you’re trying to access an already downed server.
The post DNS server could not be found appeared first on Letohost.
https://ift.tt/2LTeul3
1 note
·
View note
Text
Imagine accessing an important website, only to be greeted with the dreaded "The Service is Unavailable" error message. This roadblock can be frustrating and inconvenient, especially when you need the information or service immediately. But fear not! This comprehensive guide will explore the possible causes behind this pesky error and walk you through a series of effective solutions to restore your access swiftly. By the end of this article, you will be well-equipped to tackle this issue head-on, ensuring a smooth and uninterrupted browsing experience. So, let's dive in and conquer the "The Service is Unavailable" error together! Understanding the Error What Causes "The Service is Unavailable" Error? This error can occur for various reasons, such as server downtime, maintenance, or configuration problems. Understanding the cause can help you determine the best solution. Common Solutions Refresh the Webpage A simple solution is to refresh the webpage. Sometimes, the server might be busy or temporarily down. Give it a few seconds and try again. Clear Browser Cache and Cookies Clearing your browser's cache and cookies can often resolve website issues. Cache stores website data, while cookies store user information. Clearing them ensures a fresh start. Check Internet Connection Ensure that your internet connection is stable. If you're experiencing connectivity issues, the error might be related to your network. Disable VPN or Proxy If you're using a VPN or proxy, try disabling them. These tools can cause connection issues, leading to errors. https://dailytechnotes.com/woocommerce-the-ultimate-guide-to-the-leading-e-commerce-platform/ Advanced Solutions Check the Website's Server Status Visit websites like "Down for Everyone or Just Me" to check if the website's server is down. You'll need to wait for it back up if it's down. Restart Your Router/Modem Sometimes, restarting your router or modem can fix connectivity issues. Turn off your device, wait 30 seconds, and turn it back on. Flush DNS Cache Flushing your DNS cache can resolve website access issues. To do this, open Command Prompt, type "ipconfig /flushdns" and hit enter. Contact the Website Owner or Hosting Provider. Contact the Website Owner or hosting provider to report the issue if all else fails. They may provide information on server status or planned maintenance. Conclusion "The Service is Unavailable" error can be frustrating, but with these solutions, you should be able to resolve it quickly. Remember that patience and persistence are key when troubleshooting website issues. Don't forget to follow us on our Twitter account for more articles like this.
0 notes