#DbContext
Explore tagged Tumblr posts
Visit Tumblr Blog
Explore Tumblr blogs with no restrictions, modern design and the best experience.
Last Seen Tumblr Blogs


Fun Fact
Average visit duration of Tumblr.com is 10 mins and 25 secs.
Text
Generic Repository Pattern in C#
I just implemented the Code First Generic Repository Pattern in C#! Say goodbye to repetitive repository code 👋 Check out my implementation and let me know your thoughts! #CSharp #RepositoryPattern #CodeFirst #UnitofWork
Have you ever dreaded writing the same boilerplate repository code repeatedly? You’re not alone; I will share my implementation of the Code First Generic Repository Pattern in C#. I will only include some of the code because it will make the post incredibly long. At the end of the post, I will share a Goal donation to post a Git download link so you can take it for a spin. As a bonus, the…
#CodeEfficiency#CodeFirst#CRUDOperations#CSharp#DatabaseManagement#DbContext#DependencyInjection#DesignPatterns#EntityFramework#GenericRepository#Migrations#RepositoryPattern#SoftwareDevelopment#UnitofWork
0 notes
Text
Entity Framework Core in a Console app: Running multiple concurrent DbContexts in multiple services
The lifetime of your DbContext will start when its instance is made and finishes up when that instance is disposed of (Think “using here”). So, your DbContext instance is designed for a single short task. Yep, this means that the lifetime of your DbContext instance is usually very short. Don’t worry, connections are cached so are quick. Let’s see how we can access and use a new instance of a…

View On WordPress
0 notes
Link
Using Multiple DbContexts in a Single Query Execution
This article delves into how to manage and use multiple DbContexts in a single query execution efficiently. We will explore various techniques, their pros and cons, and provide ample code examples to illustrate the concepts.
One well-liked Object-Relational Mapping (ORM) framework for.NET applications is called Entity Framework (EF). It removes the requirement for the majority of the data access code that developers typically have to write by enabling developers to interface with databases using.NET objects. The DbContext, a session with the database that can be used to query and save data, is the main idea behind Entity Framework.
In many applications, you might find yourself needing to interact with multiple databases. This can be due to various reasons such as microservices architecture, multiple data sources, or legacy systems. The challenge arises when you need to perform a single operation that spans multiple databases, each represented by its own DbContext...
Learn more here:
https://nilebits.com/blog/2024/06/multiple-dbcontexts-in-a-single-query/
0 notes
Text
Database Migration for .Net Core Projects - #Ankaa
Database Migration for .Net Core Projects You can find all my .Net core posts here. I am adding a new post after a long break because I recently joined a new company called AttachingIt. It is an awesome security-related company, and now, I am going to work on this awesome product. Source de l’article sur DZONE https://ankaa-pmo.com/database-migration-for-net-core-projects/ #Net_Core #Database #Database_Migrations #Dbcontext #Migration #Schema #Tutorial
#.net core#database#database migrations#dbcontext#migration#schema#tutorial#Actualités#Méthodes et organisation des process IT
0 notes
Text
WCF Data Services with Windows Phone - bandwidth requirements measured
In connection with testing Synchronization between a SQL Server Compact database on Windows Phone 8 and a SQL Server database (via a WCF Data Services service hosted in IIS), I have done some interesting observations regarding bandwidth requirements, that I would like to share. I am testing against the Chinook sample database, by downloading the entire PlaylistTrack table (8715 rows) to the device via my WCF Data Services service. On the server side, I am using the latest release version of the WCF Data Services server components, version 5.3.0. Version 5.1 or later includes the newer lightweight JSON format (just to compare I am also including sizes for the previous JSON format) On the server side, I have created a ASP.NET Web Application with a WCF Data Service, that exposes the Chinook database on my SQL Server via an Entity Framework DbContext. The power of WCF Data Services is that this requires basically no code to configure. I have configured my service like this: public class SyncService : DataService { // This method is called only once to initialize service-wide policies. public static void InitializeService(DataServiceConfiguration config) { config.UseVerboseErrors = true; //config.SetEntitySetAccessRule("TrackPurchases", EntitySetRights.WriteAppend); config.SetEntitySetAccessRule("*", EntitySetRights.AllRead); config.DataServiceBehavior.MaxProtocolVersion = DataServiceProtocolVersion.V3; } } In order to access the IIS Express hosted service from my Windows Phone 8 emulator, I followed the instructions here: http://msdn.microsoft.com/en-us/library/windowsphone/develop/jj684580(v=vs.105).aspx To measure the size of the payload, I am using Fiddler2, by following the instructions here: http://blogs.msdn.com/b/fiddler/archive/2010/10/15/fiddler-and-the-windows-phone-emulator.aspx The WCF Data Services team also supply a WCF Data Services client for Windows Phone, that can take advantage of a Service Reference, but this client has some severe limitations, that affects bandwidth consumption in a bad way: It only supports the XML based ATOM format, but you can enable compression, as described here: http://blogs.msdn.com/b/astoriateam/archive/2011/10/04/odata-compression-in-windows-phone-7-5-mango.aspx On the client side, I am simply using HttpWebRequest to call the REST url, and including support for gzip via the ICSharpCode.SharpZipLib library (for example http://nuget.org/packages/SharpZipLib-WP7/ ) Here is the implementation of the WebClient: static public async Task GetData(Uri uri, bool useJson = true, bool version3 = true, bool compress = true) { //uri = new Uri(uri.AbsoluteUri + "&format=json"); HttpWebRequest client = WebRequest.CreateHttp(uri); { if (compress) client.Headers = "deflate, gzip"; if (version3) { client.Headers = "3.0"; } else { client.Headers = "2.0"; } if (useJson) client.Accept = "application/json"; using (WebResponse response = await client.GetResponseAsync()) { string result = await response.GetResponseText(); DataContractJsonSerializer serializer = new DataContractJsonSerializer(typeof(T)); T resultType; using (MemoryStream stream = new MemoryStream(Encoding.Unicode.GetBytes(result))) { resultType = (T)serializer.ReadObject(stream); } return resultType; } } } public static async Task GetResponseText(this WebResponse response) { using ( Stream stream = response.IsCompressed() ? new GZipInputStream(response.GetResponseStream()) : response.GetResponseStream()) { using (var reader = new StreamReader(stream)) { return await reader.ReadToEndAsync(); } } } public static bool IsCompressed(this WebResponse response) { return Regex.IsMatch((response.Headers ?? "") .ToLower(), "(gzip|deflate)"); } (I am using Microsoft.Threading.Tasks.Extensions.dll to implement GetResponseAsync) I am using DataContext classes generated by my SQL Server Compact Toolbox for deserialization, with a small addition - I have added this attribute to all EntitySet and EntityRef properties (this will be included in the next Toolbox release): I am calling the following URL: http://:2065/SyncService.svc/PlaylistTracks This is my test code: //ATOM-XML await WebClient.GetData(uri, false, false, false); //Verbose json await WebClient.GetData(uri, true, false, false); //Verbose json + gzip await WebClient.GetData(uri, true, false, true); //Plain json await WebClient.GetData(uri, true, true, false); //Plain json + gzip await WebClient.GetData(uri, true, true, true); public class PlaylistTrackRoot { public List value { get; set; } } And finally the unbelievable numbers for the download of the entire PlaylistTrack table with 8715 rows (remember, that ATOM is the default WCF Data Services client format) Payload type Body size (bytes) Body size (MB) ATOM-XML 9,322,665 (100 % – default DS client implementation) 8.89 MB JSON (verbose) 5,016,977 (54 %) 4.78 MB JSON (verbose) + gzip 328,410 (3,5 %) 0.31 MB JSON (plain) 790,845 (8,5 %) 0.75 MB JSON (plain) + gzip 43,023 (0,5 %) 0.04 MB So before you decide to use the WCF Data Services Windows Phone client, beware that the only format currently available is ATOM-XML. With the 5.1.0 or later desktop client, however, you can use the of the DataServiceContext to request JSON - ctx.Format.UseJson() – the default is still ATOM-XML.
1 note
·
View note
Text
Dot Net Core Interview Questions and Answers - Part 08:
Q073. What is the use of the launchSettings.json file in ASP.NET Core? Q074. What is the use of a global.json file in ASP.NET Core? Q075. What is the use of the appsettings.json file in ASP.NET Core? Q076. What is the use of the bundleconfig.json file in ASP.NET Core? Q077. What is the use of the project.json file in ASP.NET Core? How it is different from the project.lock.json file? Q078. What is the use of the bower.json file in ASP.NET Core? Q079. What is the use of package.json in ASP.NET Core? Q080. What is the appsettings.Environment.json file in .Net Core? Q081. What is the Environment Variable in ASP.NET Core? How can you read the Environment Variables? Q082. How to use multiple startup files based on environments in ASP.NET Core? Q083. What is DbContext in .Net Core? How can you define the database connection string in ASP.Net Core?
Please visit www.techpointfunda.com for more Interview Questions and Answers.
#dotnetcoreinterviewquestions#aspdotnetcore#coreinterviewquestionsandanswers#CSharpInterviewQuestionsAndAnswers#dotnetInterview#InterviewQuestionsAndAnswers#InterviewPreparation#techpointfundamentals#techpointfunda#techpoint
1 note
·
View note
Text
Asp.Net Core Identity .Net 8: Seeding Users and Roles
When your application is first deployed, getting your Roles and User (admin) up into the data is job #1. Asp.Net Core Identity for .Net 8 has you covered. Create this public static class in the same folder as your Identity DBContext public class IdentitySeeder{ public static async Task InitializeAsync(IServiceProvider serviceProvider) { var roleManager =…

View On WordPress
0 notes
Text
MySQL Connector/NET 8.0.24 has been released
Dear MySQL users, MySQL Connector/NET 8.0.24 is the latest General Availability releaseof the MySQL Connector/NET 8.0 series. This version supports .NET 5.0and the X DevAPI, which enables application developers to write codethat combines the strengths of the relational and document modelsusing a modern, NoSQL-like syntax that does not assume previousexperience writing traditional SQL. To learn more about how to write applications using the X DevAPI, see http://dev.mysql.com/doc/x-devapi-userguide/en/ For more information about how the X DevAPI is implemented inConnector/NET, see http://dev.mysql.com/doc/dev/connector-net NuGet packages provide functionality at a project level. To get thefull set of features available in Connector/NET such as availabilityin the GAC, integration with Visual Studio’s Entity Framework Designerand integration with MySQL for Visual Studio, installation through theMySQL Installer or the stand-alone MSI is required. Please note that the X DevAPI requires at least MySQL Server version8.0 or higher with the X Plugin enabled. For general documentationabout how to get started using MySQL as a document store, see http://dev.mysql.com/doc/refman/8.0/en/document-store.html To download MySQL Connector/NET 8.0.24, see http://dev.mysql.com/downloads/connector/net/ Installation instructions can be found at https://dev.mysql.com/doc/connector-net/en/connector-net-installation.html Changes in MySQL Connector/NET 8.0.24 (2021-04-20, GeneralAvailability) Functionality Added or Changed * The IgnorePrepare connection-string option was deprecated in the Connector/NET 8.0.23 release and removed in the Connector/NET 8.0.24 release. The removed option instructed Connector/NET to ignore all calls to MySqlCommand.Prepare() that were made using the classic MySQL protocol. (Bug #31872906) * Improved server disconnection handling of X Protocol connections now creates a log entry and returns an error message, as needed, after Connector/NET receives a connection-close notice from the server. Connector/NET detects three new types of warning notices. Connection idle notice. This notice applies to a server connection that remains idle for longer than the relevant timeout setting. Connector/NET closes the connection when it receives the notice in an active session or while a new session is being created. An attempt to use the invalid session returns the “Connection closed. Reason: connection idle too long” error message. Server shutdown notice. If a connection-close notice is received in a session as a result of a server shutdown, Connector/NET terminates the session with the “Connection closed. Reason: server shutdown” error message. All other sessions that are connected to the same endpoint are removed from the pool, if connection pooling is used. Connection killed notice. If the connection being killed from another client session, Connector/NET closes the connection when it receives the notice in an active session or while a new session is being created. An attempt to use the invalid session returns the “Connection closed. Reason: connection killed by a different session” error message. * If a classic MySQL protocol connection experiences a server timeout, Connector/NET now reports more precise disconnection information to affected .NET applications when the server provides improved error messages. * Previously, Connector/NET added client support for the MySQL Enterprise Edition SASL LDAP authentication plugin with SCRAM-SHA-1 and SCRAM-SHA-256 as authentication methods. Connector/NET now also supports GSSAPI/Kerberos as an alternative authentication method for classic MySQL protocol connections. SASL-based LDAP authentication does not apply to clients running macOS. * The SSH Tunneling (port forwarding) feature, which was added to support MySQL products in making secure connections on Windows, is no longer needed by other products. Now, using an alternative such as OCI or SSH.NET to create a tunnel is preferred. The related connection options (SshHostName, SshKeyFile, SshPassPhrase, SshPassword, SshPort, and SshUserName) are no longer valid when making Connector/NET connections, starting with this release. Bugs Fixed * Pound symbols in JSON columns were interpreted improperly when using accent-sensitive collation. (Bug #32429236) * Several data types could not be mapped by running Scaffold-DbContext on valid MySQL tables. This fix upgrades Microsoft Entity Framework libraries to the latest and also adds all previously excluded mappings to the EFCore and EFCore5 projects. (Bug #32424742, Bug #102381) * Constructing a regular expression for each read diminished the performance of Connector/NET. This fix limits the construction to one instance, which now is reused. (Bug #32386454, Bug #101714) * A data table declared using valid database.table syntax within an Entity Framework model could have extra database names in the generated query (for example, database.database.table). (Bug #32358174, Bug #101236) * Incomplete GUID mapping in the Entity Framework Core implementation caused an error when the Contains method was used to filter records. (Bug #32173133, Bug #93398) * Additional error codes now prevent unexpected exceptions after a query. Thanks to Stanislav Revin for the patch. (Bug #32150115, Bug #101592) * An exception was thrown if any CHAR(36) columns containing a NULL value were referenced in a query. New validation now checks for NULL values when the MySqlDbType member is Guid. (Bug #32049837, Bug #101252) On Behalf of Oracle/MySQL Engineering Team,Tvarita Jain https://insidemysql.com/mysql-connector-net-8-0-24/
0 notes
Text
Entity Framework DataContext Oluşturma
Entity Framework DataContext Oluşturma
Merhaba bu makalede entity framework’de DataContext sınıfını oluşturmak için visual studio’dan nasıl yardım alabileceğimizden bahsedeceğim. Öncelikle bu işlemi manuel olarak daha önce oluşturdğumuz bir örnek varsa oradan copy paste ile oluşturabileceğimizi belirteyim, yani illa bu yöntemi kullanarak oluşturmak zorunda değiliz. Bu yöntem yeni başlayan ve dbcontext sınıfı oluşturmayı bilmeyenler…

View On WordPress
0 notes
Text
webapplication4: entity framework
consoleApp1
Scaffold-DbContext "Server=NHNAM5\SQLExpress;Database=SchoolDB;Trusted_Connection=True;" Microsoft.EntityFrameworkCore.SqlServer -OutputDir Models
Server=(localdb)\mssqllocaldb;Database=aspnet-53bc9b9d-9d6a-45d4-8429-2a2761773502;Trusted_Connection=True;MultipleActiveResultSets=true
Server=localhost\SQLEXPRESS;Database=master;Trusted_Connection=True;
"Data Source=.;Initial Catalog=testApi;Integrated Security=True"
NHNAM5\SQLEXPRESS
check your service SQLEXPRESS (not VSS writer)
# add-migration shopcore # update-database
idax 3.6.5.4.1 D:\Console_app\Idax-3-3.6.5\Idax-3-3.6.5\Idax3D.AssetRules\ConfigParams.json
C#: base(), lock, TryGetValue, concurrentbag, guid
var _scenariofile = args.Where(field => field.ToLower().Contains("partial")).FirstOrDefault();
a??b { if ( ! a null ) return a; else return b; }
0 notes
Link
0 notes
Text
What is Entity Framework?

Microsoft Entity Framework (EF) is an Object Relational Mapping framework that provides an abstraction layer (a kind of mapping) between two incompatible systems (i.e. Object oriented programming languages with Relational databases). It enables the developers to work with domain specific objects. It enables us to interact with relational data in an object oriented way, meaning we can retrieve and manipulate data as strongly typed objects using LINQ queries. Components of Entity Framework Architecture Below are the components of Entity Framework – Entity Data Model (EDM)LINQ to EntitiesEntity SQLObject ServiceEntity Client Data Provider ADO.Net Data Provider Entity Data Model (EDM) Conceptual Model : These are the model classes which contain the relationships. These are independent of the database design. Mapping : The Mapping will have the information on how the Conceptual Models are mapped to Storage Models.Storage Model : Storage Models are database design models, which contains database tables, views, stored procedures and keys with relationships. LINQ to Entities LINQ to Entities is a query language which we used to write queries against the object models and the query result will return the entities defined in the Conceptual Model. Entity SQL Entity SQL is a query language is like LINQ to Entities. This is a bit complex compared to LINQ to Entities. A developer who is using this should learn this separately. Entity Client Data Provider Responsibility of Entity Client Data Provider is to convert the LINQ to Entities or Entity SQL queries to a SQL query, which is understood by the underlying database. This finally communicates with ADO.NET Data Provider which in turn used to talk to the database. DB Context When we create an edmx file, it will have the list of entities and context class which will be derived from DB Context class. DBContext is responsible for Insert, Update and Delete functionalities of the entities. It acts like a bridge between the database and entity classes. Object Context Object Context manages all the database operations, like database connection, and manages various entities of the Entity Model. DB Context is a wrapper around Object Context. Difference between ObjectContext and DbContext Conceptually, both these are here for the same reason. DBContext is wrapper around Object Context.Prior to EF 4.1, EDM used to use Object Context as base class for Context classes.There were some difficulties been observed in Object Context so now Db Context is introduced in EF 6.0 and this is used for all the development models –Database First, Model First and Code First.Object Context supports complied queries, but DB Context not.Object Context supports self-tracking entities, but DB Context does not.DB Context is thread safe, but Object Context not. Read the full article
0 notes
Text
Simple Identity In Asp.Net Core Tutorial from scratch part 1
New Post has been published on https://is.gd/d7mlXc
Simple Identity In Asp.Net Core Tutorial from scratch part 1

Asp.net core Identity used for a security-related feature in your asp.net core application.
Asp.net core identity is a membership system that adds a login functionality to our app.
It is a built-in membership system.
Uses of Asp.net core Identity
Is used to create, update, read and delete user accounts
Authentication and authorization
Is also used for password recovery
Two-factor authentication with SMS
Asp.net core Identity supports external login like Facebook, Google and Microsoft
Steps for Identity In Asp.Net Core
Step 1
Need to add IdentityDBContext instead of DbContext means In Your application DbContext class must inherits from IdentityDbContext class.

Now our code becomes
public class OurDbContext:IdentityDbContext public DbSet<Student> Students get; set; public OurDbContext(DbContextOptions<OurDbContext> options):base(options) protected override void OnModelCreating(ModelBuilder modelBuilder) modelBuilder.Seed();
The identityDbContext is present in namespace of Microsoft.AspNetCore.Identity.EntityFrameworkCore;
Now Why we inherit from IdentityDbContext instead of DbContext because it has all the DbSet properties that are used for managing the Identity-related table in underlying database.
Now we can see the inner details of the IdentityDbContext class you can see
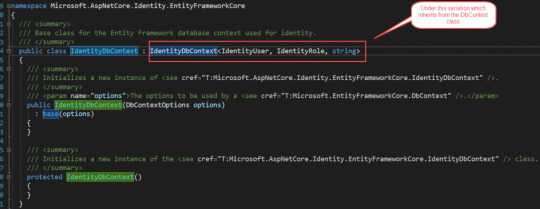
Our application works because it ultimately inherits from DbContext class.
Step 2:
Add identity services to our application. The services which are required are added to a startup.cs class file under the configureservices method.
services.AddIdentity<IdentityUser, IdentityRole>();
Now our configureservices method in a startup.cs class looks like below
public void ConfigureServices(IServiceCollection services) services.AddMvc(); services.AddTransient<IStudentRepository,StudentRepo>(); services.AddDbContextPool<OurDbContext>(options => options.UseSqlServer(_config.GetConnectionString("StudentDBString"))); services.AddIdentity<IdentityUser, IdentityRole>(); services.AddScoped<IStudentRepository, SQLStudentRepository>();
In this AddIdentity method first we pass IdentityUser as the first parameter so why we use this, because if you go to definition of this class you will find it inherits from IdentityUser<string> class and if you go further it will to that class you will know it uses the field like email, username and many more like below which is used to manage the properties of registered user class.
using System; namespace Microsoft.AspNetCore.Identity /// <summary>Represents a user in the identity system</summary> /// <typeparam name="TKey">The type used for the primary key for the user.</typeparam> public class IdentityUser<TKey> where TKey : IEquatable<TKey> /// <summary> /// Initializes a new instance of <see cref="T:Microsoft.AspNetCore.Identity.IdentityUser`1" />. /// </summary> public IdentityUser() /// <summary> /// Initializes a new instance of <see cref="T:Microsoft.AspNetCore.Identity.IdentityUser`1" />. /// </summary> /// <param name="userName">The user name.</param> public IdentityUser(string userName) : this() this.UserName = userName; /// <summary>Gets or sets the primary key for this user.</summary> [PersonalData] public virtual TKey Id get; set; /// <summary>Gets or sets the user name for this user.</summary> [ProtectedPersonalData] public virtual string UserName get; set; /// <summary>Gets or sets the normalized user name for this user.</summary> public virtual string NormalizedUserName get; set; /// <summary>Gets or sets the email address for this user.</summary> [ProtectedPersonalData] public virtual string Email get; set; /// <summary> /// Gets or sets the normalized email address for this user. /// </summary> public virtual string NormalizedEmail get; set; /// <summary> /// Gets or sets a flag indicating if a user has confirmed their email address. /// </summary> /// <value>True if the email address has been confirmed, otherwise false.</value> [PersonalData] public virtual bool EmailConfirmed get; set; /// <summary> /// Gets or sets a salted and hashed representation of the password for this user. /// </summary> public virtual string PasswordHash get; set; /// <summary> /// A random value that must change whenever a users credentials change (password changed, login removed) /// </summary> public virtual string SecurityStamp get; set; /// <summary> /// A random value that must change whenever a user is persisted to the store /// </summary> public virtual string ConcurrencyStamp get; set; = Guid.NewGuid().ToString(); /// <summary>Gets or sets a telephone number for the user.</summary> [ProtectedPersonalData] public virtual string PhoneNumber get; set; /// <summary> /// Gets or sets a flag indicating if a user has confirmed their telephone address. /// </summary> /// <value>True if the telephone number has been confirmed, otherwise false.</value> [PersonalData] public virtual bool PhoneNumberConfirmed get; set; /// <summary> /// Gets or sets a flag indicating if two factor authentication is enabled for this user. /// </summary> /// <value>True if 2fa is enabled, otherwise false.</value> [PersonalData] public virtual bool TwoFactorEnabled get; set; /// <summary> /// Gets or sets the date and time, in UTC, when any user lockout ends. /// </summary> /// <remarks>A value in the past means the user is not locked out.</remarks> public virtual DateTimeOffset? LockoutEnd get; set; /// <summary> /// Gets or sets a flag indicating if the user could be locked out. /// </summary> /// <value>True if the user could be locked out, otherwise false.</value> public virtual bool LockoutEnabled get; set; /// <summary> /// Gets or sets the number of failed login attempts for the current user. /// </summary> public virtual int AccessFailedCount get; set; /// <summary>Returns the username for this user.</summary> public override string ToString() return this.UserName;
So whatever properties are present in this class you have the corresponding column to underlying table.
But if you see in this class we have an only limited set of properties but in real-time scenario we might require some different fields to add these fields we can create another custom class and make sure that it is inherited from this IdentityUser class.
So in that class we can include additional properties which we required. And then remove this identityuser class from that configureservice AddIdentity method and add our new added class in that place.

IdentityRole: this is another built-in class provided by asp.net core identity system and it is used to manage user roles in the system.
AddEntityFrameworkStores: this is used for accessing or retrieving data from the underlying database table.
services.AddIdentity<IdentityUser, IdentityRole>() .AddEntityFrameworkStores<OurDbContext>();

Step 3:
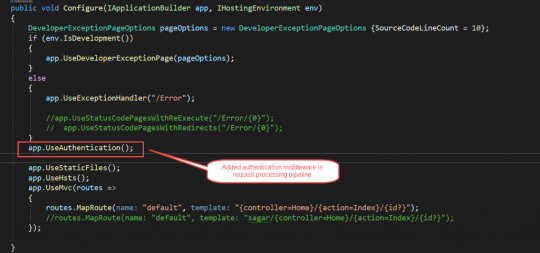
Add authentication middleware
To add authentication middleware in processing pipeline you need to add UseAuthentication extension in Configure method in configure service method in the startup.cs file. And also remember to add this before MVC middleware.
Now our code looks like this below
public void Configure(IApplicationBuilder app, IHostingEnvironment env) DeveloperExceptionPageOptions pageOptions = new DeveloperExceptionPageOptions SourceCodeLineCount = 10; if (env.IsDevelopment()) app.UseDeveloperExceptionPage(pageOptions); else app.UseExceptionHandler("/Error"); //app.UseStatusCodePagesWithReExecute("/Error/0"); // app.UseStatusCodePagesWithRedirects("/Error/0"); app.UseAuthentication(); app.UseStaticFiles(); app.UseHsts(); app.UseMvc(routes => routes.MapRoute(name: "default", template: "controller=Home/action=Index/id?"); //routes.MapRoute(name: "default", template: "sagar/controller=Home/action=Index/id?"); );
Step 4:
Now in this, we have added IdentityDbContext in our DB context class so we need to add migration command to use for migration.
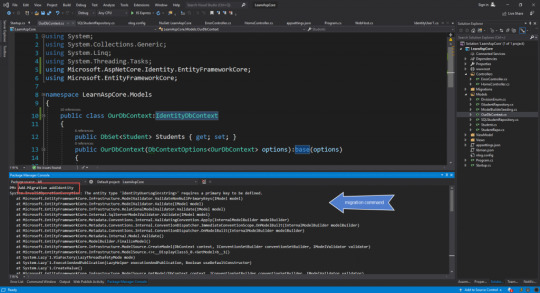
But doing this it will cause an error,
The entity type ‘IdentityUserLogin<string>’ requires a primary key to be defined.

The root cause of error in below class
public class OurDbContext:IdentityDbContext public DbSet<Student> Students get; set; public OurDbContext(DbContextOptions<OurDbContext> options):base(options) protected override void OnModelCreating(ModelBuilder modelBuilder) modelBuilder.Seed();
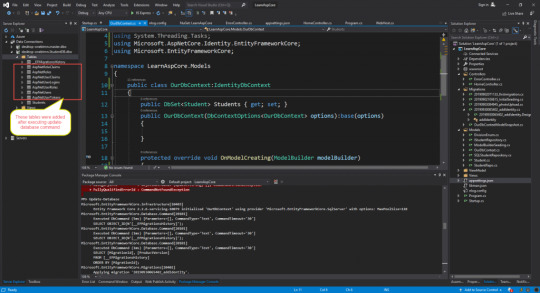
In this OnModelCreating method, we need to call base class OnModelCreating method why because keys are mapped here and we need to call this for that we use base keyword to access this and our code becomes.
public class OurDbContext:IdentityDbContext public DbSet<Student> Students get; set; public OurDbContext(DbContextOptions<OurDbContext> options):base(options) protected override void OnModelCreating(ModelBuilder modelBuilder) base.OnModelCreating(modelBuilder); modelBuilder.Seed();

Now again we run Migration command which is below in Package Manager Console
Add-Migration addIdentity

Below is the migration code snippet

After this, you need to fire another command to update the database
Update-database
Using this command we will able to add required tables in our database and after executing this command below tables were added in the database
If you see the properties present in IdentityUser class were matching with the columns in AspNetUserLogins table see below image

For Entity Framework Part 1 Visit Link
For Entity Framework Part 2 Visit Link
For Entity Framework Code First Migration Visit Link
0 notes
Photo

(via سرفصل آموزشی ای اس پی دات نت کور وب ای پی آی)
مزیت اصلی این دوره؟ به جای اینکه ماه ها وقت صرف کنین تحقیق کنین، مطالعه کنین و موارد کاربردی و مهم API نویسی رو یاد بگیرین توی این دوره همشو یک جا و سریع یاد میگیرین و تو وقتتون صرفه جویی میشه. همچنین یک پله هم به Senior Developer شدن نزدیک میشین آشنایی با ASP.NET Core زبان ASP.NET Core نگارشی از .NET محسوب می شود که بر پایه .NET Core استوار است. این زبان به نوع سیستم عامل وابسته نیست و نیازی به واسط برنامه نویسی ویندوز ندارد. اگرچه ویندوز هنوز هم یکی از سیستم عامل های برتر محسوب می شود اما نرم افزار های تحت وب روز به روز اهمیت و کاربرد بیشتری پیدا می کنند. شرکت مایکروسافت به منظور گسترش حوزه کارکرد .NET زبان ASP.NET Core را معرفی کرد است. به این معنی که نرم افزار های ایجاد شده با ASP.NET Core می توانند در محیط های مختلفی میزبانی شوند. زبان ASP.NET Core برخلاف MVC نخستین، ارتباطی با پروژه های وب فرم ندارد و در مقایسه با MVC نخستین، بسیار ساده تر شده است. و به دلیل این که ASP.NET Core مبتنی بر فریم ورک .NET Core می باشد، می توان با استفاده از آن پروژه های وب مختلفی که قابلیت میزبانی در محیط های مختلف و سیستم عامل های گوناگون داشته باشد، را ایجاد کرد. 📷 ASP.NET Core چیست ؟ ASP.NET Core یک فریم ورک جدید برای ساخت برنامه مدرن همچون برنامه های تحت وب و برنامه های موبایلی می باشد که توسط شرکت مایکروسافت ارائه شده است. برنامه های نوشته شده با این فریم ورک قابلیت اجرا شدن در ویندوز، لینوکس و مک را دارند. این فریم ورک ویژگی های Web API و MVC را به فریم ورک برنامه نویسی وب متصل می سازد. ASP.NET Core 1.0 یک باز نویسی از فریم ورک فعلی ASP.NET 4.6 است که تقریبا قابلیت های یکسانی با نسخه ۴٫۶ دارد اما بسیار سبک تر و ماژولارتر است. منظور از Cross Platform این است که برنامه های ایجاد شده می توانند بر روی چندین پلتفرم اجرا شوند. برنامه های ASP.NET Core هم بر روی .NET Core و .NetFramework اجرا می شوند. این تکنولوژی با هدف بهینه سازی فریم ورک های مبتنی بر محاسبات ابری پیاده سازی شده است که میزان بار اضافی بر روی سرور را بسیار کاهش می دهد. این تکنولوژی باعث می شود تا در زمان طراحی و پیاده سازی میزان انعطاف پذیری برنامه های توسعه دهندگان افزایش یابد. چرا ASP.NET Core ؟ در لیست زیر برخی از مهم ترین ویژگی های فریم ورک ASP.NET Core را مشاهده می کنید: - متن باز و رایگان - Cross Platform - سبک، قدرتمند و ساده - امکان دسترسی به محیط محاسبات ابری - ارتقاء سطح ماژولار بودن - پشتیبانی و سازگاری کامل با NuGet Package - یکپارچه سازی فریم ورک های سمت کاربر مدرن و BackEnd - و سایر موارد فهرست سرفصل ها و رئوس مطالب مطرح شده در این مجموعه آموزشی - لایه بندی اصولی پروژه (Project Layering and Architecture) : در این دوره لایه بندی اصولی یک پروژه را از ابتدا شروع و هر بخش را بررسی می کنیم. همچنین مباحث Repository و UOW رو هم بررسی می کنیم. - احراز هویت (Authentication) - ASP.NET Core Identity : احراز هویت توسط Identity + سفارشی سازی - (Json Web Token) JWT : احراز هویت توسط Jwt + یکپارچه سازی آن با Identity - (Json Web Encryption) JWE : ایمن سازی توکن ها بوسیله رمزنگاری توکن (JWE) - Security Stamp : جلوگیری از اعتبارسنجی توکن به هنگام تغییر دسترسی های کاربر جهت امنیت بیشتر - Claims : کار با Claim ها و تولید خودکار آنها توسط ClaimsFactory - Logging (ثبت خطا ها) - Elmah : استفاده از Elmah برای ��اگ خطا ها در Memory, XML File و Database - NLog : استفاده از NLog برای لاگ خطا ها در File و Console - Custom Middleware : نوشتن یک میدلویر سفارشی جهت لاگ تمامی خطا (Exception) ها - Custom Exception : نوشتن Exception برای مدیریت ساده تر خطا ها - Sentry : ثبت خطا ها در سیستم مدیریت لاگ sentry.io (مناسب برای پروژه های بزرگ) - تزریق وابستگی (Dependency Injection ) - ASP.NET Core IOC Container : استفاده از Ioc container داخلی Asp Core - Autofac : استفاده از محبوب ترین کتابخانه Autofac (Ioc Container) - Auto Registeration : ثبت خودکار سرویس ها توسط یک تکنیک خلاقانه با کمک Autofac - ارتباط با دیتابیس (Data Access) - Entity Framework Core : استفاده از EF Core - Auto Entity Registration : ثبت Entity های DbContext به صور�� خودکار توسط Reflection - Pluralizing Table Name : جمع بندی نام جداول EF Core به صورت خودکار توسط کتابخانه Pluralize.NET و Reflection - Automatic Configuration : اعمال کانفیگ های EntityTypeConfiguration (FluentApi) به صورت خودکار توسط Reflection - Sequential Guid : بهینه سازی مقدار دهی identity برای Guid به صورت خودکار توسط Reflection - Repository : توضیحاتی در مورد معماری اصولی Repository در EF Core - Data Intitializer : یک معماری اصولی برای Seed کردن مقادیر اولیه به Database - Auto Migrate : آپدیت Database به آخرین Migration به صورت خودکار - Clean String : اصلاح و یک دست سازی حروف "ی" و "ک" عربی به فارسی و encoding اعداد فارسی در DbContext به صورت خودکار به هنگام SaveChanges - Versioning : نسخه بندی و مدیریت نسخه های پروژه + سفارشی سازی و ایجاد یک معماری حرفه ای - ابزار (Swashbuckle) Swagger - Swagger UI : ساخت یک ظاهر شکیل به همراه داکیومنت Aciton ها و Controller های پروژه و امکان تست API ها توسط Swagger UI - Versioning : یکپارچه سازی اصولی Swagger با سیستم نسخه گذاری (Versioning) - JWT Authentication : یکپارچه سازی Swagger با سیستم احراز هویت بر اساس Jwt - OAuth Authentication : یکپارچه سازی Swagger با سیستم احراز هویت بر اساس OAuth - Auto Summary Document Generation : تولید خودکار داکیومنت (توضیحات) برای API های پروژه - Advanced Customization : سفارشی سازی های پیشرفته در Swagger - دیگر قابلیت ها - API Standard Resulting : استاندارد سازی و یک دست سازی خروجی API ها توسط ActionFilter - Automatic Model Validation : اعتبار سنجی خودکار - AutoMapper : جهت Mapping اشیاء توسط کتابخانه محبوب AutoMapper - Auto Mapping : سفارشی سازی وایجاد یک معماری حرفه ای برای Mapping اشیا توسط Reflection - Generic Controller : ساخت کنترلر برای عملیات CRUD بدون کد نویسی توسط ارث بری از CrudController - Site Setting : مدیریت تنظیمات پروژ توسط Configuration و ISnapshotOptions - Postman : آشنایی و کار با Postman جهت تست API ها - Minimal Mvc : حذف سرویس های اضافه MVC برای افزایش پرفرمنس در API نویسی - Best Practices : اعمال Best Practices ها جهت بهینه سازی، افزایش پرفرمنس و کدنویسی تمیز و اصولی - و چندین نکته مفید دیگر ...
0 notes
Text
Come migrare un progetto da ASP.NET MVC a ASP:NET CORE

Quella che segue è una guida pratica su come procedere alla migrazione di un progetto dal framework ASP.NET MVC verso ASP.NET Core. Le indicazioni passo passo scritte dal team del progetto open-source nopCommerce possono essere facilmente applicate a qualsiasi altro progetto ASP.NET MVC. La guida spiega anche le ragioni per cui potrebbe essere opportuno passare ad ASP.NET Core soprattutto per tutti quei progetti non ancora a pieno regime.
Perchè migrare verso ASP.NET Core?
Prima di iniziare con i primi passi della guida (utilizzando come esempio il progetto nopCommerce), diamo un rapido sguardo ai vantaggi di questo framework. Sicurezza: ASP.NET Core è un framework già piuttosto maturo,noto e diffuso e ha già alle spalle diversi aggiornamenti che lo rendono piuttosto stabile, tecnologicamente avanzato e resistente ad attacchi XSRF/CSRF. Multipiattaforma: è uno degli aspetti che contraddistingue ASP.NET Core rendendolo estremamente popolare. Le applicazioni sviluppate in ASP.NET Core possono girare indifferentemente tanto in ambiente Windows che in ambiente Unix. Architettura Modulare: ASP.NET Core viene fornito sotto forma di pacchetti NuGet, e questo consente di ottimizzare le applicazioni includendo i pacchetti necessari. Questo aspetto migliora le prestazioni di ogni soluzione e riduce il tempo richiesto per l’aggiornamento dei singoli componenti. Questa è la seconda importante caratteristica che consente agli sviluppatori di integrare agevolmente nuove funzionalità nella loro soluzione. Le performance sono un altro punto di forza. ASP.NET Core può gestire 23 volte (2.300%) più richieste al secondo di ASP.NET 4.6, ed 8 volte (800%) più richieste al secondo di node.js. Puoi controllare un test dettagliato sulle perfomance nella screenshot seguente:

Risultati del test di numero massimo di risposte al secondo in base al framework Il Middleware è una nuova pipeline dell’app leggera e rapida per la gestione delle richieste. Ogni componente del middleware si occupa di processare una richiesta HTTP, e può decidere di restituire un risultato o passare la richiesta al componente successivo. Questo approccio conferisce allo sviluppatore un pieno controllo della pipeline HTTP e contribuisce allo sviluppo di semplici moduli. Tutto ciò questo costituisce un fattore molto importante soprattutto per progetti open-source. Oltretutto ASP.NET Core offre funzionalità che semplificano lo sviluppo di progetti web. nopCommerce utilizzava già alcune di queste caratteristiche, ad esempio il modello Model-View-Controller, la sintassi Razor, il model binding, e la validazione. Quella che segue invece è una lista delle caratteristiche più rilevanti introdotte con ASP.NET Core: Helper Tag (Tag helper). Parti di codice server che si occupano della creazione e rendering di elementi HTML nei file Razor. Componenti di Visualizzazione (View component). Un nuovo strumento simile alle viste parziali (partial view), ma con performance decisamente superiori. nopCommerce usa i componenti di visualizzazione ogni qualvolta sia necessario riutilizzare parti rilevanti di logica nel rendering. Inserimento delle Dipendenze (Dependency injection) nelle viste. Sebbene buona parte dei dati visualizzati nelle viste provenga dal controller, nopCommerce utilizza in alcuni casi la dependency injection direttamente nelle viste. Ovviamente ASP.NET Core ha moltissime altre caratteristiche, quelle che abbiamo indicato sono semplicemente quelle più interessanti. Consideriamo adesso i punti da tenere in mente quando si migra un progetto su un nuovo framework.
Migrazione
I contenuti che seguono contengono parecchi link alla documentazione ufficiale di ASP.NET Core per offrire informazioni estremamente dettagliate su questo argomento e una guida completa per gli sviluppatori che si trovino a dover affrontare questo delicato compito per la prima volta. Fase 1. Accertarsi di avere a disposizione tutti gli strumenti necessari La prima cosa da fare è accertarsi di avere Visual Studio aggiornato alla versione 15.3 o successiva ed installare l’ultima versione dell’SDK .NET Core. Un altro strumento utile da utilizzare prima di iniziare il processo di migrazione è .Net Portability Analyzer. Questo tool può costituire un ottimo punto partenza per farsi una prima idea di quanto complessa possa essere la migrazione del progetto verso la nuova piattaforma. E’ opportuno precisare che lo strumento non copre tutte le criticità della migrazione per cui molti è assai probabile che nel corso del processo emergano imprevisti che dovranno essere risolti di volta in volta. Gli step che descriveremo da qui in avanti sono quelli seguiti nella migrazione del progetto nopCommerce; il primo passo è stato aggiornare i link alle librerie usate nel progetto in modo che fosserp compatibili con .NET Core. Fase 2. Analisi dei pacchetti NuGet per verificare la compatibilità con gli standard .Net Se in un progetto si utilizzano pacchetti NuGet occorre assicurarsi che questi siano compatibili con .NET Core: a tal proposito, un ottimo strumento per verificare la compatibilità dei pacchetti è NuGetPackageExplorer. Fase 3. Il nuovo formato del file csproj in .NET Core Con .NET Core è stato introdotto un nuovo metodo per l’aggiunta di riferimenti a pacchetti di terze parti. Quando si aggiunge una nuova libreria di classi occorre aprire il file di progetto e modificare il contenuto in questo modo: netcoreapp2.2 ... ... I riferimenti alle librerie collegate saranno caricati automaticamente. Fase 4. Aggiornamento dei Namespace Per aggiornare i namespace, sarà sufficiente eliminare tutti i riferimenti al namespace System.Web e sostituirli con Microsoft.AspNetCore. Fase 5. Utilizzare Startup.cs piuttosto che Global.asax per la configurazione dell’applicazione ASP.NET Core ha un nuovo sistema per avviare l’app. Il punto di ingresso (entry point) è Startup ed è in questo file nel metodo Configure che i middleware vengono aggiunti alla pipeline. Elementi da Gestire nel file Startup.cs: Configurazione del middleware per le richieste MVC e WebAPI. Configurazione per la Gestione delle eccezioni. E’ inevitabile che nella migrazione si verifichino dei conflitti, è dunque necessario prepararsi configurando correttamente la gestione delle eccezioni. Con UseDeveloperExceptionPage, viene aggiunto un middleware per intercettare le eccezioni in ambiente di sviluppo. Routing MVC. La registrazione di nuove route è stata modificata. Adesso si utilizza IRouteBuilder al posto di RouteCollection come nuova modalità per la registrazione di vincoli (IActionConstraint) Filtri MVC/WebAPI. I filtri dovrebbero essere aggiornati in modo da essere conformi con la nuova implementazione di ASP.NET Core. Formattatori personalizzati nell'API Web ASP.NET Core Associazione di modelli (Binding Model) //add basic MVC feature var mvcBuilder = services.AddMvc(); //add custom model binder provider (to the top of the provider list) mvcBuilder.AddMvcOptions(options => options.ModelBinderProviders.Insert(0, new NopModelBinderProvider())); /// /// Represents model binder provider for the creating NopModelBinder /// public class NopModelBinderProvider : IModelBinderProvider { /// /// Creates a nop model binder based on passed context /// /// Model binder provider context /// Model binder public IModelBinder GetBinder(ModelBinderProviderContext context) { if (context == null) throw new ArgumentNullException(nameof(context)); var modelType = context.Metadata.ModelType; if (!typeof(BaseNopModel).IsAssignableFrom(modelType)) return null; //use NopModelBinder as a ComplexTypeModelBinder for BaseNopModel if (context.Metadata.IsComplexType && !context.Metadata.IsCollectionType) { //create binders for all model properties var propertyBinders = context.Metadata.Properties .ToDictionary(modelProperty => modelProperty, modelProperty => context.CreateBinder(modelProperty)); return new NopModelBinder(propertyBinders, EngineContext.Current.Resolve()); } //or return null to further search for a suitable binder return null; } } Aree. Per aggiungere aree in una applicazione ASP.NET Core, occorre aggiungere una route al file Startup.cs. Utilizzo delle Aree Il concetto di Aree (Areas in lingua inglese) è particolarmente importante, e per questo merita un approfondimento ulteriore. Nel codice seguente possiamo vedere come è possibile aggiungere un'area Admin: app.UseMvc(routes => { routes.MapRoute("areaRoute", "{area:exists}/{controller=Admin}/{action=Index}/{id?}"); routes.MapRoute( name: "default", template: "{controller=Home}/{action=Index}/{id?}"); }); In conseguenza alla configurazione di cui sopra, nella root dell’applicazione andremo a creare una cartella chiamata Areas all’interno della quale dovrà essere presente una cartella Admin.

L’attributo potrà a quel punto essere utilizzato per collegare il controller a quest’area: public class AdminController : Controller { public IActionResult Index() { return View(); } } Le informazioni relative al routing, necessarie per istruire il middleware MVC su quale controller eseguire in base alla URL richiesta dalla HTTP request, sono definite nell'attributo , utilizzando la tecnica nota come attribute-based routing introdotta a partire dalla versione 5 di ASP.NET MVC. Fase 6. Migrazione dei gestori e dei moduli HTTP verso il Middleware Gli handler e i moduli HTTP si avvicinano molto al concetto di Middleware in ASP.NET Core, ma a differenza dei moduli l’ordine dei middleware si basa sull’ordine in cui vengono aggiunti alla pipeline. L’ordine dei moduli si basa principalmente sugli eventi del ciclo di vita dell’applicazione. L’ordine del middleware per le risposte è l’opposto dell’ordine per le richieste mentre l’ordine dei moduli per richieste e risposte è esattamente lo stesso. Avendo chiaro in mente questo concetto, si può procedere all’aggiornamento. Cosa dovrebbe essere aggiornato: Migrazione di moduli verso il middleware (AuthenticationMiddleware, CultureMiddleware, etc.) Migrazione dei gestori verso il middleware Utilizzo del nuovo strumento middleware L’autenticazione in nopCommerce non si basa su alcun sistema predefinito; viene invece utilizzato un AuthenticationMiddleware personalizzato, sviluppato secondo la nuova struttura di ASP.NET Core, nel seguente modo: public class AuthenticationMiddleware { private readonly RequestDelegate _next; public AuthenticationMiddleware(IAuthenticationSchemeProvider schemes, RequestDelegate next) { Schemes = schemes ?? throw new ArgumentNullException(nameof(schemes)); _next = next ?? throw new ArgumentNullException(nameof(next)); } public IAuthenticationSchemeProvider Schemes { get; set; } public async Task Invoke(HttpContext context) { context.Features.Set(new AuthenticationFeature { OriginalPath = context.Request.Path, OriginalPathBase = context.Request.PathBase }); var handlers = context.RequestServices.GetRequiredService(); foreach (var scheme in await Schemes.GetRequestHandlerSchemesAsync()) { try { if (await handlers.GetHandlerAsync(context, scheme.Name) is IAuthenticationRequestHandler handler && await handler.HandleRequestAsync()) return; } catch { // ignored } } var defaultAuthenticate = await Schemes.GetDefaultAuthenticateSchemeAsync(); if (defaultAuthenticate != null) { var result = await context.AuthenticateAsync(defaultAuthenticate.Name); if (result?.Principal != null) { context.User = result.Principal; } } await _next(context); } } ASP.NET offre molti middleware già pronti per l’uso, ma ogni sviluppatore può creare i propri middleware personalizzati ed aggiungerli alla pipeline della richiesta. Per semplificare questo processo, nel progetto nopCommerce abbiamo aggiunto una interfaccia specifica (INopStartup) che ogni nuovo middleware deve implementare. public interface INopStartup { /// /// Add and configure any of the middleware /// /// Collection of service descriptors /// Configuration of the application void ConfigureServices(IServiceCollection services, IConfiguration configuration); /// /// Configure the using of added middleware /// /// Builder for configuring an application's request pipeline void Configure(IApplicationBuilder application); /// /// Gets order of this startup configuration implementation /// int Order { get; } } Ecco un esempio di come è possibile aggiungere e configurare un middleware custom: /// /// Represents object for the configuring authentication middleware on application startup /// public class AuthenticationStartup : INopStartup { /// /// Add and configure any of the middleware /// /// Collection of service descriptors /// Configuration of the application public void ConfigureServices(IServiceCollection services, IConfiguration configuration) { //add data protection services.AddNopDataProtection(); //add authentication services.AddNopAuthentication(); } /// /// Configure the using of added middleware /// /// Builder for configuring an application's request pipeline public void Configure(IApplicationBuilder application) { //configure authentication application.UseNopAuthentication(); } /// /// Gets order of this startup configuration implementation /// public int Order => 500; //authentication should be loaded before MVC } Fase 7. Utilizzo della Dependency Injection di ASP.NET Core L’inserimento delle dipendenze (Dependency injection) è uno degli aspetti chiave quando si progetta un’app in ASP.NET Core. Con questa tecnica è possibile sviluppare applicazioni cosiddette “loosely coupled” (applicazioni dove ciascun componente conosce ed utilizza meno informazioni possibili degli altri componenti) più testabili, modulari e dunque più facili da gestire. Per iniettare dipendenze si usano i contenitori IoC (Inversion of Control). In ASP.NET Core, questo contenitore è rappresentato dall’interfaccia IServiceProvider. I servizi vengono installati nell’app nel metodo Startup.ConfigureServices(). Ogni servizio può essere configurato con una di queste diverse durate (scope): temporaneo (transient) con ambito (scoped) singleton services.AddDbContext(options => options.UseSqlServer(Configuration.GetConnectionString("DefaultConnection")) ); services.AddSingleton(); Fase 8. Utilizzo della shell di compatibilità con progetti WebAPI (Shim) Per semplificare la migrazione di Web API esistenti suggeriamo di utilizzare il pacchetto NuGet Microsoft.AspNetCore.Mvc.WebApiCompatShim che supporta queste funzionalità compatibili: Aggiunta di in un tipo ApiController; Associazione dei modelli secondo la modalità web API; Estensione dell’associazione dei modelli in modo che le azioni del controller possano accettare parametri di tipo HttpRequestMessage; Aggiunta di strumenti di formattazione di messaggi che abilitano le azioni a restituire risultati del tipo HttpResponseMessage. services.AddMvc().AddWebApiConventions(); routes.MapWebApiRoute(name: "DefaultApi", template: "api/{controller}/{id?}" ); Fase 9. Migrazione della Configurazione dell’Applicazione Precedentemente alcune impostazioni venivano salvate nel web.config. Adesso si utilizza un nuovo approccio basato su un sistema di coppie chiave-valore impostate tramite provider di configurazione. Questo è il sistema raccomandato da ASP.NET Core e nel nostro progetto noi usiamo il file appsettings.json. Se per qualsiasi ragione si volesse continuare ad utilizzare file *.config è comunque possibile utilizzare il pacchetto NuGet System.Configuration.ConfigurationManager, anche se in questo caso l’applicazione perderà la sua portabilità e potrà girare esclusivamente su IIS. E’ anche possibile utilizzare come provider di configurazione Azure key storage, In questo caso, che non è quanto abbiamo fatto nel nostro progetto, si può fare riferimento a questa guida. Fase 10. Migrazione dei contenuti statici su wwwroot Per quanto riguarda i contenuti statici occorre definire una directory radice web. Questa directory di default è wwwroot ma è possibile configurare una cartella differente indicandola nel middleware.

Fase 11. Migrazione di Entity Framework verso EF Core. Se il progetto usa alcune caratteristiche specifiche di Entity Framework 6, non supportate da EF Core, probabilmente è opportuno eseguire l’applicazione sul Framework .NET rinunciando alla portabilità dell’app che in questo caso potrà girare solo in ambiente Windows con server IIS. Quello che segue è un elenco delle principali modifiche di cui sarà necessario tener conto: il namespace System.Data.Entity è sostituito da Microsoft.EntityFrameworkCore; La signature del costruttore DbContext è stata modificata. Adesso occorre iniettare DbContextOptions; Il metodo HasDatabaseGeneratedOption(DatabaseGeneratedOption.None) è stato sotituito da ValueGeneratedNever(); Il metodo WillCascadeOnDelete(false) è stato sostituito da OnDelete(DeleteBehavior.Restrict); Il metodo OnModelCreating(DbModelBuilder modelBuilder) è stato sostituito da OnModelCreating(ModelBuilder modelBuilder); Il metodo HasOptional non esiste più; L’oggetto configuration è cambiato, e poichè l’attributo ComplexType non è più disponibile, viene utilizzato OnModelCreating; L’interfaccia IDbSet è stata sostituita da DbSet; ComplexType - il supporto per i ComplexType è apparso prima in EF Core 2 con il tipo di entità Owned, e poi con EF Core 2.1 con il supporto per tabelle senza chiave primaria con QueryType; Chiavi esterne in proprietà shadow EF Core, generate usando il Template Id a differenza di EF6 che usa _Id. Su EF Core aggiungere le chiavi all’entità come normali proprietà; Per supportare la Dependency Injection per DbContext, è necessario configurare il DbContex in ConfigureServices. /// /// Register base object context /// /// Collection of service descriptors public static void AddNopObjectContext(this IServiceCollection services) { services.AddDbContextPool(optionsBuilder => { optionsBuilder.UseSqlServerWithLazyLoading(services); }); } /// /// SQL Server specific extension method for Microsoft.EntityFrameworkCore.DbContextOptionsBuilder /// /// Database context options builder /// Collection of service descriptors public static void UseSqlServerWithLazyLoading(this DbContextOptionsBuilder optionsBuilder, IServiceCollection services) { var nopConfig = services.BuildServiceProvider().GetRequiredService(); var dataSettings = DataSettingsManager.LoadSettings(); if (!dataSettings?.IsValid ?? true) return; var dbContextOptionsBuilder = optionsBuilder.UseLazyLoadingProxies(); if (nopConfig.UseRowNumberForPaging) dbContextOptionsBuilder.UseSqlServer(dataSettings.DataConnectionString, option => option.UseRowNumberForPaging()); else dbContextOptionsBuilder.UseSqlServer(dataSettings.DataConnectionString); } Per verificare che EF Core generi una database con la stessa struttura di quello generato da Entity Framework è possibile utilizzare SQL Compare. Fase 12. rimuovere tutti i riferimenti a HttpContext, sostituire tutte le vecchie classi ed aggiornare i namespace Durante la migrazione del progetto ci si accorgerà che un gran numero di classi sono state rinominate o spostate sotto altri namespace ed ora è necessario attenersi ai nuovi requisiti. Ecco una lista delle modifiche principali in cui ci si potrà imbattere: HttpPostedFileBase 🡪 FormFile l’accesso ad HttpContext adesso può avvenire tramite IHttpContextAccessor HtmlHelper 🡪 HtmlHelper ActionResult 🡪 ActionResult HttpUtility 🡪 WebUtility ISession anzichè HttpSessionStateBase accessibile da HttpContext.Session nel namespace Microsoft.AspNetCore.Http Cookies restituisce IRequestCookieCollection: un IEnumerable , per cui al posto di HttpCookie possiamo utilizzare KeyValuePair nel namespace Microsoft.AspNetCore.Http Modifiche nei Namespace SelectList 🡪 Microsoft.AspNetCore.Mvc.Rendering UrlHelper 🡪 WebUtitlity MimeMapping 🡪 FileExtensionContentTypeProvider MvcHtmlString 🡪 IHtmlString and HtmlString ModelState, ModelStateDictionary, ModelError 🡪 Microsoft.AspNetCore.Mvc.ModelBinding FormCollection 🡪 IFormCollection Url.Scheme 🡪 this.Url.ActionContext.HttpContext.Request.Scheme Altre modifiche IsNullOrEmpty(IHtmlString) 🡪 String.IsNullOrEmpty(variable.ToHtmlString()) - non esiste più e non è necessario HttpUnauthorizedResult 🡪 UnauthorizedResult - la direttiva non esiste più e non è necessaria SetInnerText - il metodo è sostituito da InnerHtml.AppendHtml AllowGet quando restituisce Json non è più necessario JavaScriptStringEncode. JavaScriptEncoder.Default.Encode RawUrl. Request.Path + Request.QueryString dovrebbe essere connesso separatamente AllowHtmlAttribute - la classe non esiste più XmlDownloadResult - adesso si può utilizzare semplicemente return File(Encoding.UTF8.GetBytes (xml), "application / xml", "filename.xml"); - la direttiva non esiste più e non è necessaria Fase 13. Aggiornamento delle funzionalità di Autenticazione ed autorizzazione Come già detto in precedenza, il progetto nopCommerce non utilizza il sistema di autenticazione predefinito ma bensì un sistema implementato nel middleware. Comunque ASP.NET Core ha un suo sistema per l’autenticazione che è possibile approfondire nella documentazione ufficiale. Per la protezione dei dati piuttosto che il MachineKey si utilizza il sistema di protezione predefinito. Di regola le chiavi sono generate all’avvio dell’applicazione e come sistema di storage è possibile scegliere tra queste opzioni: File system - storage basato su file system Azure Storage - storage su oggetto Azure BLOB Redis - storage sul sistema di cache Redis Registry - utilizzato se le l’applicazione non ha accesso al file system EF Core - storage su database Se non è possibile utilizzare i provider predefiniti si può specificare un proprio provider imlpementando un IXmlRepository custom. Fase 14. Aggiornamento di JS e CSS Il modo in cui vengono utilizzate le risorse statiche è cambiato, adesso devono essere posizionate nella cartella wwwroot a meno che non venga impostata una diversa posizione. Quando si utilizzano blocchi javascript predefiniti raccomandiamo di posizionarli alla fine della pagine utilizzando l’attributo del tag script asp-location = "Footer". Stesso discorso per i file js. Utilizzare l’estensione BundlerMinifier al posto di System.Web.Optimization. L’estensione si occupa di creare bundle e di minificare il javascript e css in fase di compilazione (leggi la documentazione). Fase 15. Migrazione delle viste Innanzitutto le Child Action non sono più utilizzate ed al suo posto ASP.NET Core raccomanda l’utilizzo di uno strumento con elevate performance - Componenti di Visualizzazione (ViewComponent) - che viene chiamato in modo asincrono. Ecco come ricevere una stringa da un componente: /// /// Render component to string /// /// Component name /// Arguments /// Result protected virtual string RenderViewComponentToString(string componentName, object arguments = null) { if (string.IsNullOrEmpty(componentName)) throw new ArgumentNullException(nameof(componentName)); var actionContextAccessor = HttpContext.RequestServices.GetService(typeof(IActionContextAccessor)) as IActionContextAccessor; if (actionContextAccessor == null) throw new Exception("IActionContextAccessor cannot be resolved"); var context = actionContextAccessor.ActionContext; var viewComponentResult = ViewComponent(componentName, arguments); var viewData = ViewData; if (viewData == null) { throw new NotImplementedException(); } var tempData = TempData; if (tempData == null) { throw new NotImplementedException(); } using (var writer = new StringWriter()) { var viewContext = new ViewContext( context, NullView.Instance, viewData, tempData, writer, new HtmlHelperOptions()); // IViewComponentHelper is stateful, we want to make sure to retrieve it every time we need it. var viewComponentHelper = context.HttpContext.RequestServices.GetRequiredService(); (viewComponentHelper as IViewContextAware)?.Contextualize(viewContext); var result = viewComponentResult.ViewComponentType == null ? viewComponentHelper.InvokeAsync(viewComponentResult.ViewComponentName, viewComponentResult.Arguments): viewComponentHelper.InvokeAsync(viewComponentResult.ViewComponentType, viewComponentResult.Arguments); result.Result.WriteTo(writer, HtmlEncoder.Default); return writer.ToString(); } } Non è più necessario utilizzare HtmlHelper, ASP.NET Core include molti Tag Helper predefiniti. Quando l’applicazione è in esecuzione, Razor li gestisce lato server ed infine li converte in elementi html standard. Ciò rende lo sviluppo di applicazioni molto più semplice. Ovviamente è possibile implementare propri tag helper. Abbiamo iniziato ad utilizzare la dependency injection nelle viste piuttosto che abilitare impostazioni e servizi utilizzando EngineContext. Quindi gli elementi principali da tenere a mente nella migrazione delle viste sono i seguenti: Conversione di Views/web.config in Views/_ViewImports.cshtml - per importare namespaces ed iniettare le dipendenze. Questo file non supporta altre funzionalità di Razor quali ad esempio le definizioni di sezione. Conversione di namespaces.add in @using Migrazione delle impostazioni verso il sistema di configurazione dell’applicazione Render e Styles.Render non sono più disponibili, vanno sostituiti da link a dati di output di libman o BundlerMinifier
Conclusioni
La migrazione di una applicazione web complessa è un processo lungo che necessariamente presenta ostacoli e imprevisti. Noi abbiamo pianificato la migrazione verso il nuovo framework in modo che la prima versione stabile del progetto venisse rilasciata al più presto. Tuttavia così facendo non abbiamo potuto trasferire l’intero progetto su .NET Core, ed in particolare sono rimaste fuori tutte le funzionalità relative ad EntityFramework. Pertanto per la nostra prima release abbiamo utilizzato un approccio misto - l’architettura .NET Core con i riferimenti al Framework .NET. Essere stati i primi non è stato facile, ma siamo certi di aver preso la decisione corretta e la nostra grande comunità ci ha supportati: siamo riusciti ad adattare completamente il nostro progetto solo dopo la release di .NET Core 2.1, avendo già per quella data una soluzione stabile già funzionante e basata sulla nuova architettura. A quel punto rimaneva solo da sostituire qualche pacchetto e riscrivere il lavoro con EF Core. Così abbiamo dovuto impiegare solo pochi mesi e due release per migrare completamente il progetto verso il nuovo framework. Possiamo dire con una certa serenità che nopCommerce è il primo grande progetto sottoposto ad una migrazione di questa natura. In questa guida abbiamo provato a mettere insieme l’intero processo di migrazione in una forma strutturata e a descrivere vari colli di bottiglia in modo che altri sviluppatori possano basarsi su questo materiale e seguire la roadmap nella soluzione degli stessi task. Read the full article
#Areas#ASP.NET#ASP.NETCore#ASP.NETMVC#C#DbContext#DependencyInjection#EFCore#EntityFramework#EntityFrameworkCore#HttpContext#Middleware#Namespace
0 notes