#Disable IntelliSense
Explore tagged Tumblr posts
Visit Tumblr Blog
Explore Tumblr blogs with no restrictions, modern design and the best experience.
Last Seen Tumblr Blogs


Fun Fact
There are dozens of funny blogs to kill time on Tumblr.
Text
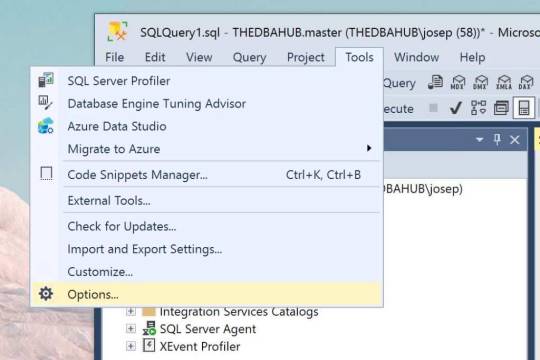
How to Disable IntelliSense in SQL Server Management Studio
In the dynamic world of database management, SQL Server Management Studio (SSMS) stands as a pivotal tool for developers and administrators. However, there are instances when the IntelliSense feature, despite its helpful intentions, might become more of a hindrance than a help. Whether due to performance issues or personal preference, disabling IntelliSense can streamline your coding experience.…
View On WordPress
0 notes
Link
0 notes
Text
Did y’all know that microsoft’s C++ compiler and microsoft’s C++ intellisense use different frontends so you need to do two separate pragmas to disable the same warning in your build and in your IDE? And also it doesn’t work in the IDE?
4 notes
·
View notes
Text
Choosing a Blood Pressure Monitor
In picking a blood pressure monitor the precision of the gadget ought to be the most significant thought. Furthermore, the dependability of the readings ought to be considered. Thirdly, the usability of the gadget ought to be considered.
Precision alludes to how much the blood pressure readings got really mirrors the genuine pressure inside the supply routes at the time that readings are performed. Unwavering quality then again, alludes to how much blood pressure readings mirror the normal blood vessel pressure inside a 24-hour timeframe.
youtube
The system of the individual playing out the measurements, the properties of the measuring gadget, and arm choice are the fundamental factors that decide precision. The recurrence of readings, the account of the readings and understanding the numerous components that can influence blood pressure are the primary factors that decide the unwavering quality of the readings.
One of most basic purposes behind an incorrect perusing is malpositioning of the arm in relationship to the heart when a perusing is being taken. In the event that the perusing is brought with the arm hanging down well underneath the degree of the heart the perusing is probably going to be deceptively higher than the genuine pressure, and if the arm is situated higher than the level the heart the perusing is probably going to be misleadingly low. Incidentally, if the arm isn't bolstered by a stationary structure, for example, a stand or someone else on the off chance that another person is playing out the perusing, yet is held in position against gravity by the person on whom perusing is being played out, a specific level of isometric exercise is being performed which can affect the perusing. On the off chance that accomplishing appropriate arm situating is an issue, a wrist monitor with the Omron protected propelled situating sensor innovation is a reasonable arrangement. The gadget will caution you with a trademark blare signal and won't start to peruse at all if the arm isn't in appropriate position. It permits you to take readings sitting and lying, realizing that at the precision of your readings isn't being undermined by inappropriate arm position. Since sitting readings are performed with the arm flexed at the elbow and bolstered by the hand of the contralateral arm isometric exercise isn't performed during the readings.
Another exceptionally basic reason for an invalid blood pressure perusing is an ill-advised sleeve size in relationship to the outline of the upper arm. For the most part, if the sleeve size is excessively little comparative with the upper arm perimeter the perusing will be higher than the genuine blood vessel pressure. On the other hand, if the sleeve size is unreasonably huge for the periphery of the arm the perusing will be lower than the genuine pressure. The sleeves utilized for upper arm measurements come in a few grown-up sizes. There is no institutionalization of the sizes between makers, however for reasonableness the essential sizes are grown-up, grown-up enormous and thigh. A few makers additionally produce an additional huge grown-up size which is the size in the middle of grown-up huge and thigh. To guarantee utilization of the fitting sleeve size the American Heart Association prescribes that you measure your upper arm perimeter and select a sleeve with a predefined arm boundary run that incorporates your measurement. On the off chance that your arm outline surpasses that of the biggest sleeve accessible you ought to consider one of the wrist monitors which by and large oblige wrist peripheries between 13.5 cm to 21 cm or 5.25 crawls to 8.5 inches.
On the off chance that the sleeve isn't swelled sufficiently high before collapse is started the systolic perusing may be lower than the genuine blood vessel pressure. In the event that the swelling and flattening process is hindered and dreary the general perusing is probably going to be off base. To take out the mistakes related with these specialized defects, a computerized unit, especially one with the IntelliSense innovation is a conceivable arrangement. IntelliSense is a restrictive innovation created by Omron which permits monitors to consequently blow up and empty at a level ideal for every individual client, in this way guaranteeing exactness and solace. It requires no modifications.
There are commonly a couple and some of the time a few point contrasts in blood pressure readings between arms. The predominant arm for example the correct arm in a right-gave individual and the left arm in a left-gave individual as a rule has the higher perusing, which is viewed as the perusing generally intelligent of the pressure inside the courses of the body when all is said in done.
Therefore, that arm ought to be arm in which readings are taken. A portion of the blood pressure gadgets, especially the wrist monitors are intended to take readings from left arm or wrist separately, which implies that your readings may be invalid if your are correct given. A feasible answer for this issue, regardless of whether you are left-given yet have higher readings in the correct arm would be one of the units that can be changed in accordance with take readings from the ideal arm or wrist.
On the off chance that you are outwardly disabled and experience issues perusing the screen of a blood pressure measuring gadget there are some quality talking units that will give you a sound perusing notwithstanding a LCD show.
1 note
·
View note
Text
Linux develpoment workspace manager

#LINUX DEVELPOMENT WORKSPACE MANAGER CODE#
#LINUX DEVELPOMENT WORKSPACE MANAGER CODE#
code-workspace file, the first time you add a second folder to a workspace, VS Code will automatically create an "untitled" workspace. You can start off by opening a folder in VS Code and then later add more folders as you see fit. It is easy to add or remove folders in your workspace. code-workspace file has been opened, some areas of the user interface (for example, the root of the File Explorer) show an extra (Workspace) suffix next to the name. Note: The visual difference of having a folder opened versus opening a. code-workspace JSON file that lists the folders of the workspace. Instead of opening a folder as workspace, you will open a. Multi-root workspaces are an advanced capability of VS Code that allows you to configure multiple distinct folders to be part of the workspace. You can also add other folder-specific configurations such as workspace-specific settings (versus global user settings), task definitions, and debugging launch files (see below in the workspace settings section).Ī single-folder workspace opened inside VS Code Multi-root workspaces Once a folder has been opened, VS Code will automatically keep track of things such as your open files and editor layout so the editor will be as you left it when you reopen that folder. You don't have to do anything for a folder to become a VS Code workspace other than open the folder with VS Code. Alternatively if you launch VS Code from a terminal, you can pass the path to a folder as the first argument to the code command for opening. The easiest way to open a workspace is using the File menu and selecting one of the available folder entries for opening. In this mode, some of VS Code's capabilities are reduced but you can still open text files and edit them. For example, when you open a new VS Code window by selecting a file from your platform's File menu, you will not be inside a workspace. Note: It is also possible to open VS Code without a workspace. Think of a workspace as the root of a project that has extra VS Code knowledge and capabilities. You may see the terms "folder" and "workspace" used interchangeably in VS Code documentation, issues, and community discussions. Selectively enable or disable extensions only for that workspace.Store and restore UI state associated with that workspace (for example, the files that are opened).Persist task and debugger launch configurations that are only valid in the context of that workspace.Configure settings that only apply to a specific folder or folders but not others.The concept of a workspace enables VS Code to: In most cases, you will have a single folder opened as the workspace but, depending on your development workflow, you can include more than one folder, using an advanced configuration called Multi-root workspaces. Configure IntelliSense for cross-compilingĪ Visual Studio Code "workspace" is the collection of one or more folders that are opened in a VS Code window (instance).
0 notes
Text
Zen studio

Zen studio how to#
Zen studio code#
Zen studio download#
Zen studio code#
# create a new window code -n # change the language code -locale=es # open diff editor code -diff # open file at specific line and column code -goto package.json:10:5 # see help options code -help # disable all extensions code -disable-extensions. # open the current directory in the most recently used code window code -r. See the platform specific setup topics if VS Code is added to your environment path during installation ( Running VS Code on Linux, macOS, Windows). Make sure the VS Code binary is on your path so you can simply type 'code' to launch VS Code. VS Code has a powerful command line interface (CLI) which allows you to customize how the editor is launched to support various scenarios. Keyboard Shortcut: ⌃R (Windows, Linux Ctrl+R)ĭisplays a Quick Pick dropdown with the list from File > Open Recent with recently opened folders and workspaces followed by files. Navigate between recently opened folders and workspaces This will open the currently selected file in the background and you can continue selecting files from Quick Open. You can open multiple files from Quick Open by pressing the Right arrow key. Repeat the Quick Open keyboard shortcut to cycle quickly between recently opened files. Typing commands such as edt and term followed by a space will bring up dropdown lists. Tip: Type ? to view commands suggestions. Keyboard Shortcut: ⌘P (Windows, Linux Ctrl+P) If you forget a keyboard shortcut, use the Command Palette to help you out.ĭownload the keyboard shortcut reference sheet for your platform ( macOS, Windows, Linux). Keyboard Shortcut: ⇧⌘P (Windows, Linux Ctrl+Shift+P)Īll of the commands are in the Command Palette with the associated key binding (if it exists). Help > Editor Playground.Īccess all available commands based on your current context. Try out VS Code's code editing features, like multi-cursor editing, IntelliSense, Snippets, Emmet, and many more. If you are looking to improve your code editing skills open the Interactive Editor Playground. As you discover and learn, the walkthroughs track your progress. Pick a Walkthrough for a self-guided tour through the setup steps, features, and deeper customizations that VS Code offers. You will get an overview of VS Code's customizations and features. The best way of exploring VS Code hands-on is to open the Get Started page. Prefer a video? You can watch a recent Microsoft Build talk Visual Studio Code tips and tricks, which describes 20 tips and tricks for working productively with VS Code. You can find platform specific setup instructions at Running VS Code on Linux, macOS, and Windows.
Zen studio download#
If you don't have Visual Studio Code installed, go to the Download page. This topic goes pretty fast and provides a broad overview, so be sure to look at the other in-depth topics in Getting Started and the User Guide to learn more. You'll become familiar with its powerful editing, code intelligence, and source code control features and learn useful keyboard shortcuts.
Zen studio how to#
"Tips and Tricks" lets you jump right in and learn how to be productive with Visual Studio Code. Configure IntelliSense for cross-compiling.
0 notes
Text
Intelli studio update network error

#Intelli studio update network error how to#
#Intelli studio update network error update#
#Intelli studio update network error code#
Use the editor.tabCompletion setting to enable it. Also, pressing Tab after inserting a suggestions will insert the next best suggestion.īy default, tab completion is disabled. This works regardless of the suggest widget showing or not. The editor supports "tab completion" which inserts the best matching completion when pressing Tab. You can change these settings in your settings.json file as described in User and Workspace Settings. The settings shown below are the default settings. You can customize your IntelliSense experience in settings and key bindings.
#Intelli studio update network error code#
VS Code IntelliSense offers different types of completions, including language server suggestions, snippets, and simple word based textual completions. The inferred symbols are presented first, followed by the global identifiers (shown by the Word icon). IntelliSense gives both inferred proposals and the global identifiers of the project. The JavaScript code below illustrates IntelliSense completions. Because JavaScript is dynamic and doesn't need or enforce types, any suggests that the variable can be of any type. In the image above, you can see several any types. When applicable, a language service will surface the underlying types in the quick info and method signatures. You can close this by pressing ⌃Space (Windows, Linux Ctrl+Space) again or by clicking on the close icon.Īfter choosing a method you are provided with parameter info.
#Intelli studio update network error update#
The expanded documentation will stay so and will update as you navigate the list. The accompanying documentation for the method will now expand to the side.
#Intelli studio update network error how to#
See Customizing IntelliSense below to learn how to disable or customize VS Code's IntelliSense features.Īs provided by the language service, you can see quick info for each method by either pressing ⌃Space (Windows, Linux Ctrl+Space) or clicking the info icon. If you prefer, you can turn off IntelliSense while you type. For example, "cra" will quickly bring up "createApplication". Tip: The suggestions widget supports CamelCase filtering, meaning you can type the letters which are upper cased in a method name to limit the suggestions. You can trigger IntelliSense in any editor window by typing ⌃Space (Windows, Linux Ctrl+Space) or by typing a trigger character (such as the dot character (. Pressing Tab or Enter will insert the selected member. If you continue typing characters, the list of members (variables, methods, etc.) is filtered to only include members containing your typed characters. If a language service knows possible completions, the IntelliSense suggestions will pop up as you type. A language service provides intelligent code completions based on language semantics and an analysis of your source code. VS Code IntelliSense features are powered by a language service. Configure IntelliSense for cross-compiling.
0 notes
Text
Visual Studio Laravel

Visual Studio Laravel
Search results for 'laravel', Visual Studio Code on marketplace.visualstudio.com. Out of the blue, Microsoft jumps into the editor wars with an incredible offering that gives Sublime Text an overwhelming run for its money. In fact, it just might surpass it! So come along, as I demonstrate the ins, the outs, the tips, the techniques. Say hello to your new best friend: Visual Studio Code. Laravel Intellisense is a Visual Studio Code plugin by Mohamed Benhida that provides some nice auto-completion for things like Eloquent models, factories, config, and API resources. The extension works only on Laravel projects and a project is considered a Laravel project only if there is an artisan file in the root directory. Gaurav Makhecha; Credits. PHP Parser by Glayzzle. Currently, you're free to use this extension. I would highly appreciate you buying the world a.

Visual Studio Laravel
Travel through your Laravel app by just clicking on links.
Features
Open Latest Log File
Open latest log file from anywhere. Select the Command Laravel Traveller: Open Latest Log File or press Ctrl+o Ctrl+l (Cmd+o Cmd+l for Mac). You can change the default keyboard shortcut as well.
Technical Notes
The following glob pattern is used to search log files: 'storage/logs/laravel*.log'
Route -> Controller
Link to controller + action from the routes files:
Link to controller + action as per route group namespace:
You can add a simple comment // Route::namespace = NAMESPACE to apply group namespace on file. For example, the routes/api.php in the Laravel app has Api namespace applied by default.
Technical Notes
The controller links are added only in the files that are inside /routes directory or sub-directories and end with .php
php-parser by glayzzle is being used to get the AST of the file and add links based on that.
We consider only the static calls to Route::(get/post/put/patch/delete) and add links to the second parameter of those calls.
We suggest you to write route groups like: Route::namespace('Admin')->group(function() (..)) (as per Laravel documentation) instead of Route::group(('namespace' => 'Admin'), function() (..)) (namespace not supported by extension this way).
Automatic Controller Creation
If the controller does not exist, you'll be asked whether the extension should create it for you automatically. Action method will also be added to the controller. If you want to customize the stub that is used to create the controller, Add stubs/controller.plain.stub to your project's root directory. Please check the Stub Customization section of the Laravel documentation for instructions.
Technical Notes
For automatic controller creation, the default namespace is set to AppHttpControllers.
Automatic Method Creation
If the method does not exist, you'll be asked whether the extension should create it for you automatically. If you want to customize the stub that is used to create the method, Add stubs/method.stub to your project's root directory. (( methodName )) placeholder will be replaced with the actual method name.
Technical Notes
php-parser by glayzzle is being used to get the AST of the controller file and add the method to the end of the file. Basic expectations are that there will be a namespace at the top, a class, and at least 1 method in the controller file.
Controller -> View
Link to blade views from the controllers:
Technical Notes
The view links are added only in the files that are inside /app/Http/Controllers directory or sub-directories and end with .php
It uses this regex to find lines with view helper: ^s*return view((')(https://github.com/freshbitsweb/laravel-traveller/blob/master/.*?)(').*).*$
Currently, it links to the blade files in resources/views directory.
Mailable -> View
Link to blade views from the Mail classes:
Technical Notes
The view or markdown links are added only in the files that are inside /app/Mail directory or sub-directories and end with .php
It uses this regex to find lines with view or markdown method call: ^.*->(?:view|markdown)((')(https://github.com/freshbitsweb/laravel-traveller/blob/master/.*?)(').*).*$
Currently, it links to the blade files in resources/views directory.
View -> View
Link to blade views from the blade view:
Technical Notes
The view or markdown links are added only in the files that are inside /resources/views directory or sub-directories and end with .blade.php
It uses this regex to find lines with view or markdown method call: ^.*@(?:extends|include)((')(https://github.com/freshbitsweb/laravel-traveller/blob/master/.*?)(').*).*$
Currently, it links to the blade files in resources/views directory.
Route -> View
Link to blade views from the Route files:
Technical Notes
The view links are added only in the files that are inside /routes directory or sub-directories and end with .php
php-parser by glayzzle is being used to get the AST of the file and add links based on that.
Currently, it links to the blade files in resources/views directory.
Model -> Model
Link to models from the related model files:
Technical Notes
The model links are added only in the files that are inside /app directory and end with .php. and links to models in app directory only.
It uses this regex to find lines with relationship calls: ^s*return $this->(?:hasOne|belongsTo|hasMany|belongsToMany|morphOne|morphMany)((')(https://github.com/freshbitsweb/laravel-traveller/blob/master/.*?)(').*$
Route -> Route
Link to other routes from route files:
Technical Notes
The route links are added only in the files that are inside /routes directory and end with .php.
The definitions needs to be in this format: Route::group((), base_path('(ROUTE_FILE_PATH)'));
Configuration
5 of the features: Route -> Controller, Controller -> View, Mailable -> View, View -> View, and Model -> Model are toggelable: You can disable them from VSCode settings if you do not need them.
Technical Notes
The extension works only on Laravel projects and a project is considered a Laravel project only if there is an artisan file in the root directory.
Authors
Credits
Treeware
Currently, you're free to use this extension. I would highly appreciate you buying the world a tree in return.
Evernote is chinese app store. It’s now common knowledge that one of the best tools to tackle the climate crisis and keep our temperatures from rising above 1.5C is to plant trees. If you contribute to our forest you’ll be creating employment for local families and restoring wildlife habitats.
WPS Office for Mac. WPS PDF to Word 40.3MB. WPS Office For Linux. WPS Data Recovery Master 5.5MB. WPS Office For Android. WPS Office For iOS. WPS PDF For Android. PDF Editor For Android. PDF Converter Pro For Android. WPS Fill & Sign. Wps english download. Download WPS A new generation of office solutions With PDF, Cloud, OCR, file repair, and other powerful tools, WPS Office is quickly becoming more and more people’s first choice in office software.
You can buy trees at for our forest here offset.earth/treeware
To use Astropad Studio you will need to make a user account. Creating a user account is easy, by entering your email and making a password. Your user license for Astropad Studio will be tied to this account. To enter Studio, log in to your user account through your iPad. Luna Display turns any Mac or iPad into a wireless second display for Mac. Makers of Astropad Studio and Luna Display. Turn your iPad into a drawing tablet with Astropad Studio. Extend your Mac display to any iPad or Mac with Luna Display. Astropad. Enjoy a 30-day free trial! Pick a payment plan to get started.
Notes on silencing. Read more about Treeware at treeware.earth
Special Thanks to
Laravel Community
VS Code Community
0 notes
Photo

10 Must-have VS Code Extensions for JavaScript Developers
In this article, I’ll focus on a list of must-have VS Code extensions for JavaScript developers.
Visual Studio Code (VS Code) is undoubtedly the most popular, lightweight code editor today. It does borrow heavily from other popular code editors, mostly Sublime Text and Atom. However, its success mainly comes from its ability to provide better performance and stability. In addition, it also provides much-needed features like IntelliSense, which were only available in full-sized IDEs like Eclipse or Visual Studio 2017.
The power of VS Code no doubt comes from the marketplace. Thanks to the wonderful open-source community, the editor is now capable of supporting almost every programming language, framework and development technology. Support for a library or framework comes in various ways, which mainly includes snippets, syntax highlighting, Emmet and IntelliSense features for that specific technology.
VS Code Extensions by Category
For this article, I’ll focus on VS Code extensions specifically targeting JavaScript developers. Currently, there are many VS Code extensions that fit this criterion, which of course means I won’t be able to mention all of them. Instead, I’ll highlight VS Code extensions that have gained popularity and those that are indispensable for JavaScript developers. For simplicity, I’ll group them into ten specific categories.
Snippet Extensions
When you first install VS Code, it comes with a several built-in snippets for JavaScript and Typescript. Snippets help you write repetitive code quickly. However, you may find these may not be enough. You can easily create your own, or you can simply install an extension that includes a bunch of new useful snippets. A quick tip if you want snippets to show on top of suggestions is to use this configuration:
{ "editor.snippetSuggestions": "top" }
Here are some of the most popular snippet extensions for JavaScript developers. However, I would recommend you install just one for simplicity’s sake.
JavaScript (ES6) code snippets, by Charalampos Karypidis. This is currently the most popular javaScript snippet extension with over 3+ million installs to date. This extension provides ES6 syntax for JavaScript, TypeScript, HTML, React and Vue. All snippets include a final semicolon.
JavaScript (ES6) code snippets in StandardJS style, by James Vickery. This is basically a fork of the above extension for those who prefer StandardJS style convention—that is, the snippets don’t have semicolons.
JavaScript standardjs styled snippets, by capaj. Another StandardJS Styled snippets but this one is more popular with over 72k installs. Originally forked from Atom StandardJS snippets. Contains a huge collection of handy snippets and supports JavaScript, TypeScript and React.
JavaScript Snippets, by Nathan Chapman. A collection of JavaScript snippets with about 33k+ installs to date. This snippet extension supports Node.js, BDD Testing frameworks such as Mocha and Jasmine.
Atom JavaScript Snippet, by Saran Tanpituckpong. With about 26k+ installs to date, the snippets in this extension were ported from atom/language-javascript. JavaScript snippets ported from the atom/language-javascript extension.
Syntax Highlighting Extensions
The latest version of VS Code supports better syntax colorization and is now more in line with the standards set in Atom grammar. Hence, extensions such as JavaScript Atom Grammar are no longer needed.
However, we still have a few syntax highlighting extensions that are quite useful when it comes to certain types of projects and file extensions. Here’s a few:
Babel JavaScript, by Michael McDermott. With over 550k+ installs to date, this extension provides syntax highlighting for ES201x JavaScript, React, FlowType and GraphQL code.
DotENV, by 833,737. With over 833k installs to date, this extension supports syntax highlighting for environment settings — that is, .env files.
Bracket Pair Colorizer 2, by CoenraadS. With 730k+ installs, this extension highlights matching brackets with different colors, helping you identify which bracket belongs to which block.
Linter Extensions
Have you have ever gotten into a debate with your teammates over tabs vs spaces or semicolons vs no semicolons? You’ll realize that people have strong opinions about which coding style to use. Nevertheless, everyone on the same team needs to use the same coding style regardless of their opinion.
However, it’s quite common for programmers to forget which coding styling they agreed to work with. To enforce the rules, we need to use linters that compare your code with the rules you’ve established. You define your rules by picking a popular coding style such as Standard, Google, and Airbnb. You can use them as is or use a configuration file to customize the rules. VS Code doesn’t have a built-in JavaScript linter, so you’ll need to install an extension.
Here are the extensions we have available:
ESLint, by Dirk Baeumer. With over 8 million installs, this is the most popular extension providing support for the ESLint library. In order for the extension to work, your project will need ESLint packages and plugins installed. You’ll also need to specify an .eslintrc, which will specify the rules the extension will use to lint your code .
JSHint, by Dirk Baeumer. With 1.2M+ installs, this extension supports linting with the JSHint library. A .jshintrc configuration file is required for the extension to lint your code.
StandardJS – JavaScript Standard Style, by Sam Chen. This extension (259k+ installs) simply integrates JavaScript Standard Style into VS Code. You’ll need to install standard or semiStandard as a dev dependency in your project. No configuration file is required. You’ll need to disable VS Code’s built-in validator for this extension to work.
JSLint, by Andrew Hyndman. This extension provides linting with the JSLint library. You’ll need to install jslint locally or globally for the extension to work. It has 109k+ installs to date.
If you’d like an overview of available linters and their pros and cons, check out our comparison of JavaScript linting tools.
Node Package Management Extensions
Every JavaScript project needs to at least one npm package, unless you’re someone who likes doing things the hard way. Here are a few VS Code extensions that will help you work with managing and working with npm packages more easily.
npm, by egamma. With over 2.3M+ installs, this extension uses package.json to validate installed packages. If anything is missing or versions are mismatched, the extension will provide you with clickable options to fix the issue. In addition, you can also run npm scripts defined in package.json right inside the editor.
–npm IntelliSense, by Christian Kohler. With 1.9M+ installs, this extension provides autocompleting npm modules in import statements.

Path IntelliSense, by Christian Kohler. With 2.7M+ installs, this extension autocompletes filenames. It also works inside HTML and CSS files.
Node exec, by Miramac. With 168k+ installs, this extension allows you to execute the current file or your selected code with Node.js by pressing F8 on your keyboard. You can also cancel a running process by pressing F9.
View Node Package by Dominik Kundel. With 55k+ installs, this extension allows you to quickly view a Node package source and documentation while you’re working with your code.
Node Readme, by bengreenier. With 52k+ installs, this extension allows you to quickly open an npm package documentation right inside the VS Code editor as a separate tab.
Search node_modules, by Jason Nutter. By default, the node_modules folder is excluded from VS Code’s built-in search. With over 470k installs, this extension allows you to quickly navigate and open files in node_modules by traversing the folder tree.

Source: vscode-search-node-modules
Import Cost by Wix. This displays how much disk space a package is using when you import it. The extension has 562K+ installs.

Source: import-cost
Formatting Extensions
More often than not, we sometimes write code that’s out of alignment with the rest of the code. To fix this, we need to go back and fix the indentation in each line. In addition, we need to ensure braces and tags are properly formatted in a readable format. This process can quickly get tedious.
Luckily, we have extensions that can do the work for us. Please note extensions such as Prettier and Beautify can’t both be active simultaneously.
Prettier Code Formatter, by Esben Petersen. This is the most popular extension that supports formatting of JavaScript, TypeScript and CSS using Prettier. It has over 5.7 million installs to date. It’s recommended you install prettier locally as a dev dependency.
Beautify, by HookyQR. A jsBeautifier extension that supports JavaScript, JSON, CSS and HTML. It can be customized via a .jsbeautifyrc file. It’s now the second most popular formatter, with 4.4 million installs to date.
JS Refactor, by Chris Stead. This provides a number of utilities and actions for refactoring JavaScript code, such as extracting variables/methods, converting existing code to use arrow functions or template literals, and exporting functions. It has 140k+ installs to date.
JavaScript Booster, by Stephan Burguchev. This is an amazing code refactoring tool. It features several coding actions such as converting var to const or let, removing redundant else statements, and merging declaration and initialization. Largely inspired by WebStorm, it has 74k+ installs to date.

Source: vscode-javascript-booster
Continue reading 10 Must-have VS Code Extensions for JavaScript Developers on SitePoint.
by Michael Wanyoike via SitePoint https://ift.tt/2VvpsSb
0 notes
Text
Microsoft Visual Studio 2019 reach general avaialbility

Microsoft Visual Studio 2019 reach general avaialbility. Some of the new features included in this release are IntelliCode for AI-assisted IntelliSense, expanded refactoring capabilities, smarter debugging and more. What’s new in Visual Studio 2019: IDE Collaborate with others using Visual Studio Live Share, which is installed by default. Additional language support for C++, VB.NET, and Razor gives guests a solution view and sharing of source control diffs. Open code you recently worked on or start from one of the most commonly used flows like clone, open, or new project through the new start window. Create new projects with an improved search experience and filters using the new list of templates sorted by popularity. Have more vertical room for your code and a modernized look and feel through a set of new visual changes in the shell. View a sharper version of your IDE regardless of your display configuration and/or scaling, as we have improved support for per monitor awareness. Use an improved search capability in Visual Studio for menus, commands, options, and installable components. Quickly understand your code file’s ‘health’ with a document indicator. Run and configure through a one-click code cleanup from the indicator. Easily manage the preview features you are opted in to with a new Preview Features page in the Options dialog. MSBuild and Visual Studio now target .NET Framework 4.7.2 by default. Performance Take control of how solutions load by using Visual Studio’s new performance improvements that affect stepping speed, branch switching speed, and more. See solution load progress in the Task Status Center. Choose which projects to load on solution open with solution filter files. Improve your typing performance by limiting the impact of auxiliary components. Toggle the new option to disable restoring of your project hierarchy state and tool window state. General Debugging Search keywords within the Watch, Autos, and Locals windows while debugging to improve your ability to find objects or values. View a dropdown of format specifiers in the Watch, Autos, and Locals windows when inspecting data. Use a custom visualizer, now compatible with .NET Core. Debug very large applications with large numbers of modules and PDBs. Source Control and Team Explorer Temporarily store changes so you can work on another task by using Team explorer’s Git tools support for Git stash. Check out the optional extension available on the Visual Studio Market Place, Pull Requests for Visual Studio, that integrates Pull Request reviews into Visual Studio. Use the new Azure DevOps work item experience that focuses on developer workflows, including user-specific work item views, creating a branch from a work item, searching for work items with #mentions, and inline editing. Programming Languages Save time when writing C++ and XAML code by using Visual Studio IntelliCode, an optional extension that gives AI-assisted recommendations for your code. Learn about the F# language and tools open source contributions that have been incorporated. These changes have stabilized the existing F# feature set. Easily add Python virtual and conda environments using the Python Add Environment dialog. Web Technologies Take advantage of the added support for working with .NET Core 3.0 projects. Check out CPU profiling of ASP.NET. Use snapshot debugger for .NET web apps running on Virtual Machines, Virtual Machine Scale Sets, and Azure Kubernetes Service. Mobile Development with Xamarin Experience improvements to Xamarin.Android initial and incremental build performance. Take advantage of enhanced productivity in the Xamarin Android Designer. Check out the new property panel for Xamarin.Forms controls. Improve performance through the shortened the workload size for Xamarin and improved the Android emulator. Use Intellicode with Xamarin.Forms XAML. Universal Windows Platform (UWP) Use the IntelliCode extension with XAML with the help of our added support. You can download Visual Studio 2019 from Microsoft here. Read the full article
0 notes
Text
How to start using VS Code like a pro!
Choosing an IDE when you first start learning to code doesn’t seem such a big deal. Most of them are free, easy to install and efficient. Let’s look at how to make the most ouf of your text editor.
In this post, I’m going to review some tips and techniques as well as some of the most important features of Microsoft Visual Code.
VS Code is one of the best IDEs out there. You can check my previous post on how the major text editors stand against one another.
1) First you’ll need to install it by going on the download page here.
2) Once VSC is installed, here are some basic addons you can look into:
Git. Although VSC does come with a built-in Git tool (more on that later), it will require Git to be installed for it to work. You can install Git here.
NodeJS. You’ll also want to make sure you have NodeJS installed on your computer at this point. Link is here.
Chrome Debugger. Using Chrome Dev tools is of course pretty handy but this extension brings all the tools into VS Code for clarity (Chrome is only rendering your code so all the editing and testing is kept under your IDE’s umbrella). Check out this nifty extension here.
3) At this point, you have a working setup and you can start your first projects.
Or you can start installing some additional extensions. Here are some of my favourites:
Auto Close Tag will automatically close your tags when you code. The HTML auto-closing is built-in in the most recent versions of VS Code so this extension is actually only needed for Javascript. The great thing is that it’s configurable. Check out the guide for that extension here: Auto Close Tag
Git History allows you to view history of the current branch, all branches. Compare commits, view details of the commits, compare changes against previous files. It provides you with a nice graph view of your changes on files. Check it out here.
IntelliSense for CSS class names will offer suggestions of class names as you type them based on the CSS files of your workspace. The nice think is that it supports and recognise CSS classes placed in ‘link’ tags so for example, if you link Bootstrap to your page, it will see it and suggest Bootstrap class names as you type them. Check it out here.
This extension contains code snippets for JavaScript in ES6 syntax. That’s a must have since JS is a must-know. You can install it from here.
SVG Viewer allows you to preview your SVG files. If you don’t work with SVGs, well you should, it’s scalable, it doesn’t ever pixelate, it’s the future. You can check that extension here.
There are many other useful extensions you should check out, for example if you’re into React (like me) there are many linters you can use to improve on your workflow.
Now let’s look into the UI.
VS Code User Interface:
Like many other code editors, VS Code features a a Navigation bar on the left, editor space on the right and a status bar at the bottom.
You can move the Side Bar to the right hand side (View > Move Side Bar Right) or toggle its visibility (⌘B).
Side by Side Editing
You can have up to three editors open side by side. If you already have one editor open, there are multiple ways of opening another editor to the side of the existing one:
Ctrl (Mac: Cmd) click on a file in the Explorer.
⌘\ to split the active editor into two.
Open to the Side from the Explorer context menu on a file.
Click the Split Editor button in the upper right of an editor.
Drag and drop a file to the either side of the editor region.
Ctrl+Enter (Mac: Cmd+Enter) in the Quick Open (⌘P) file list.
Minimap - outline view
A Minimap (outline view) gives you a high level overview of your source code which is very useful for quick navigation and code understanding. A file's minimap is shown in the right side of the editor. You can click or drap the shaded area to quickly jump to different sections of your file.
If you would like to disable minimap, you can set "editor.minimap.enabled": false in your user or workspace settings
Explorer
The Explorer is used to browse, open, and manage all of the files and folders in your project. VS Code is file and folder based - you can get started immediately by opening a file or folder in VS Code.
After opening a folder in VS Code, the contents of the folder are shown in the Explorer. You can do many things from here:
Create, delete, and rename files and folders.
Move files and folders with drag and drop.
Use the context menu to explore all options.
Tip: You can drag and drop files into the Explorer from outside VS Code to open them up.
Zen Mode
Zen Mode lets you focus on your code by hiding all UI except the editor (no Activity Bar, Status Bar, Side Bar and Panel) and going to full screen. Zen mode can be toggled using View menu, Command Palette or by the shortcut ⌘K Z. Double Esc exits Zen Mode. The transition to full screen can be disabled via zenMode.fullScreen. Zen Mode can be further tuned by the following settings: zenMode.hideStatusBar, zenMode.hideTabs, zenMode.fullScreen and zenMode.restore.
Finally, your VS Code workflow will be vastly improved by learning and using its keys-shortcuts.
Key Shortcuts:
If you'd like to modify the default keyboard shortcuts, see Key Bindings for details.
⌥⌘→ go to the right editor.
⌥⌘← go to the left editor.
⌃Tab open the next editor in the editor group MRU list.
⌃⇧Tab open the previous editor in the editor group MRU list.
⌘1 go to the leftmost editor group.
⌘2 go to the center editor group.
⌘3 go to the rightmost editor group.
⌘K ⌘← go to the previous editor group.
⌘K ⌘→ go to the next editor group.
⌘W close the active editor.
⌘K W close all editors in the editor group.
⌘K ⌘W close all editors.
Note that if you are used to Atom, Sublime or another editor's key binding, you can search the VS Marketplace for the relevant extension. It will replace the built-in shortcuts with the ones commonly linked to a given editor.
Workspace functionality
You can add a folder to a dedicated Workspace to gather your directories into one place. You can name and save your Workspaces.
You can link folders but also settings to specific workspaces.
Specific syntax highlighting for a specific workspace. The JSON file for workspace settings is just a flat file you can share with team or modify.
You can learn about how to use workspaces here.
Explorer
VS Code now highlights edited files based on status.
Source Control
You can hover over the highlight colour in the gutter, click on it to open an editor showing what the changes/additions were.
You can stage changes one by one via the mini editor. Changes staged that way are ready to be committed right away.
Layout
Vertical docking for panels:
View > Integrated Terminal will show it at the bottom but you can now click on the “Move to the Right” button to have your terminal on the side.
Editor:
This is super cool! You can not only fold portions of code but also create “Regions” so encapsulate code portions between comments with a specific formatting (//#region section -> #end region) and VS Code will make that portion foldable.
This can be pretty neat when working in a team, you can assign a portion of code to a person by commenting it like #region John-toTest.
Note that this might not fully supported on all languages so you’re fee to contribute to that on GitHub.
For visual examples and more info on those features, check out Kenneth Auchenberg's video:
This is the beginning of a new series on how to get the most out of your text editor.
Make sure you share this post if you found it interesting! :)
0 notes