#Download WordPress Automatic Plugin
Explore tagged Tumblr posts
Visit Tumblr Blog
Explore Tumblr blogs with no restrictions, modern design and the best experience.
Last Seen Tumblr Blogs


Fun Fact
Kazakhstan’s Minister of Communications and Informatics has blocked the Tumblr site because it contained 60 sites of terrorism, extremism, and pornography in 2015.
Text
How to Enable Auto-Sync Photos from Dropbox to WordPress?
Managing media files and keeping them organized on your WordPress website can be a daunting task. Dropbox users can now simplify this process with the powerful File Manager for Dropbox (Integrate Dropbox plugin), which allows seamless auto-synchronization of your Dropbox folders with your WordPress site. Whether you're uploading photos, videos, or documents, this plugin ensures your content is always up-to-date and easily accessible. Here’s how you can get started:
What is Integrate Dropbox?
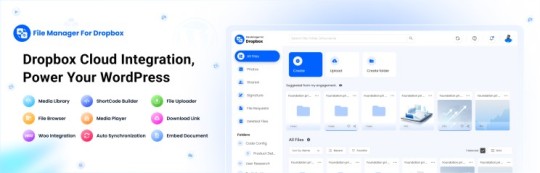
File Manager for Dropbox (Integrate Dropbox) is a WordPress plugin designed to sync your Dropbox content directly to your WordPress pages, posts, or media library. This plugin makes it easy to:
Upload images, videos, or files from Dropbox to your WordPress site.
Auto-sync shared folders for real-time updates.
Showcase Dropbox content on your website without the hassle of manual uploads.
By automating the synchronization process, Integrate Dropbox saves time and improves efficiency for bloggers, photographers, businesses, and anyone managing a WordPress site.
Who Benefits from the Integrate Dropbox Plugin?
Photographers: Automatically sync and display photo albums on your portfolio site.
Content Creators: Keep your website updated with the latest files, presentations, or videos.
Businesses: Share brochures, product catalogs, and documents seamlessly with your clients.
Using the Integrate Dropbox Plugin, you can seamlessly upload photos to your website in real time by creating a Dropbox folder and embedding it on your site using a shortcode. This functionality is perfect for events like photo booths at Christmas or New Year’s parties, where you want the latest uploads to be visible instantly.
How to Auto-Sync Photos from Dropbox to WordPress
youtube
Step 1: Install and Activate the Integrate Dropbox Plugin
Download and install the Integrate Dropbox Plugin from the WordPress Plugin Directory.
Activate the plugin from the Plugins section of your WordPress Dashboard.
youtube
Step 2: Connect Your Dropbox Account
Go to Settings > Integrate Dropbox in your WordPress admin panel.
Click Connect Dropbox Account.
Authorize the connection by logging in to Dropbox and allowing the app access.
Step 3: Create a Dropbox Folder for Uploads
Log in to your Dropbox account.
Create a new folder named, for example, Event Photos.
Share the folder with your event team or photographers, allowing them to upload photos in real time.
Step 4: Sync the Dropbox Folder with Your Website
In your WordPress dashboard, navigate to the Integrate Dropbox section.
Click Shortcode Builder and select Gallery or Slider Carousel module.
Choose the Dropbox folder (Event Photos) you created earlier.
Customize display settings like layout, style, and auto-refresh interval.
Copy the generated shortcode.
Why Use the File Manager for Dropbox Plugin?
Here are a few reasons why Dropbox users find this plugin invaluable
Effortless Media Management: Say goodbye to manually downloading files from Dropbox and re-uploading them to WordPress. With auto-sync, your Dropbox content is always mirrored on your site.
Real-Time Updates: Any changes made in your Dropbox folder are automatically reflected on your WordPress site. This feature is particularly useful for shared folders, ensuring collaboration is seamless.
Streamlined Image and Photo Uploads: Photographers and content creators can easily showcase their work by syncing their image folders directly to WordPress. No need for duplicate uploads or tedious file management.
Embed Dropbox Content: Display Dropbox files in a visually appealing format on your WordPress posts and pages, perfect for portfolios, galleries, or downloadable resources.
Customizable Settings: Configure folder synchronization, access permissions, and display preferences to meet your specific needs.
Wrapping Up
File Manager for Dropbox plugin simplifies your workflow and eliminates the hassle of manual uploads, making it the perfect solution for Dropbox users who rely on WordPress. To learn more about this plugin and its features, visit the plugin directory or explore the settings after installation.
Start syncing your Dropbox folders today and elevate your WordPress site to the next level!
5 notes
·
View notes
Text

THIS WEEK ONLY, MEGA DISCOUNT 98% OFF!
Build professional, stunning websites with 12,000+ original GPL WordPress themes and plugins at an unbelievable price!
For just $3.99 per item or with a membership, enjoy:
100% virus-free, original items directly from trusted developers
Unlimited downloads and usage on multiple domains
Automatic updates straight to your dashboard
The freedom to create flawless WordPress and WooCommerce websites
Here you get:
Premium GPL themes & plugins for 98% OFF
Fully legal & secure under the GNU GPL License
7-day free trial + 30-day money-back guarantee—risk-free!
So, please be in a hurry! The offer is valid for this week only—don’t miss out! Transform your website with top-notch themes and plugins without breaking the bank!
#MegaSale#WordPressGPL#PremiumThemes#PluginsForLess#WPSuperBox#WordPressSale#GPLPlugins#WebDesign#WooCommerceThemes#WebsiteOptimization#WordPressWebsite#WordPressCommunity#WebsiteDevelopment#SecureDownloads#UnlimitedDownloads#GPLMarketplace#DigitalTools#BusinessWebsite#WebDesignTools#AffordableThemes#WordPressDeals
#wordpress plugins#wordpress#web development#web developing company#gplplugins#wordpress theme#gplthemes#wordpressplugins#wordpressthemes
2 notes
·
View notes
Text
TL;DR, to the best of my ability
There are three "main" WordPress organizations. There's WordPress.com, a commercial site for WordPress, where you can pay to host a site using the WordPress code, and WordPress.com handles the hosting.
There's also WordPress.org, a nonprofit website that lets you download the code for WordPress, which you then have to host yourself (or through a third party.)
Finally, there's the WordPress Foundation, a charity which is dedicated to keeping the WordPress code accessible for all. While the WordPress.org website contains a donation page for the Foundation, the two are unrelated entities. All 3 are owned or managed by Mullenweg, though the Foundation is not owned by Automattic.
WordPress, the code itself, is open source and under a General Public Licence. That means anyone can use the code, modify it, share it, etc.
In 2010, Mullenweg transfered the copyright of WordPress from WordPress.com to the WordPress foundation. The stated reason was to seperate WordPress from any corporation, and the move was in direct response to concerns about Mullenweg's power over WordPress.
However, what Mullenweg didn't disclose about this exchange, is that the SAME DAY, control of the trademarks and source code was transferred directly back, effectively meaning there was no change at all. This is illegal, particularly because Mullenweg never disclosed that transaction to any tax agencies.
WordPress Engine (WPE) is a third-party tool widely used in the WordPress community to manage websites. It allows users to host websites, download themes and plugins from WordPress.org, automatically update any code that needs to be updated, and several other features. In the past, they were endorsed by WordPress.org, thereby directly acknowledging (through the terms and conditions of their endorsement) that WPE was using the copyright legally.
In 2024, Mullenweg made the claim that WPE was using the trademark illegally, and had been for a long time. He then demanded several million dollars in exchange for a licence, and threatened to defame WPE unless he recieved it.
He wasn't given the money, and went on to deliver a keynote speech at a major WordPress event in which he claimed many untrue and harmful things about WPE. He directly encouraged the audience to stop using WPE, claimed that they were harming the open source ecosystem and WordPress itself, and even that WPE employees would be fired if they supported WordPress.
After this, WPE still refused to provide the money. As retaliation, Mullenweg blocked WPE's access to WordPress.org, disabling many of the features WPE users rely on. These are things like automatic code updates, access to the WordPress community and blogs, and downloading plugins. This made WPE unusable for many users, directly causing a loss in profit.
WordPress.com started offering a year of free hosting to new customers, hoping to attract customers forced off of WPE, contributing to another loss of profit.
Mullenweg also began sending messages to WPE's CEO, attempting to poach her for Automattic. When she ignored his first text offering to hire her, he sent her another, this time telling her that if she didn't respond by midnight, he would tell a major WPE investor and the press that she had been trying to work at WordPress.com for the past year.
This claim was a lie, and WPE's CEO had even declined an offer from 2022 to manage WordPress.com.
It's also now suggested that Mullenweg is trying to acquire the WPE brand, after Tweets where he implies that he wishes to "take over" WPE. This would be even more illegal, as a clear example of anticompetitive behavior.
TL;DR of my TL;DR?
He lied about who owned the WordPress trademark, lied about it on his tax returns, wrongfully accused another company of trademark infringement, publically slandered them, then attempted to extort their CEO.
uh oh! owner's being sued for worker abuse! get out the boop meter so everybody forgets
38K notes
·
View notes
Text
Understanding Cross-Site Scripting (XSS) and How to Prevent It
Hey there, web enthusiasts! If you’re building a website or running an online business, keeping it safe is a top priority. One threat you need to know about is Cross-Site Scripting, or XSS. As someone who’s seen the web evolve, I���m here to break down what XSS is, why it’s a big deal, and how you can stop it in its tracks. Let’s get into it with a clear, friendly guide, backed by solid insights, so you can keep your site secure in 2025.
What Is Cross-Site Scripting (XSS)?
XSS is a type of security flaw where attackers sneak harmful code—usually JavaScript—into a website. When users visit the site, this code runs in their browsers, causing trouble. Imagine someone slipping a prank note into your mailbox that messes with your computer when you open it. That’s XSS in a nutshell. A 2024 OWASP report lists XSS among the top 10 web vulnerabilities, affecting 53% of tested sites.
There are three main types of XSS:
Stored XSS: Harmful code is saved on the server, like in a comment section, and runs for every visitor.
Reflected XSS: The code comes from a user’s input, like a search query, and runs immediately.
DOM-based XSS: The code messes with the website’s structure in the browser without touching the server.
Why care? XSS can steal user data (like login details), redirect people to fake sites, or even deface your website. For businesses using web development services in Bhubaneswar, a single XSS attack can damage trust and cost customers.
Why XSS Is a Problem
Attackers love XSS because it’s sneaky and effective. Say you run a Bhubaneswar e-commerce site. If someone injects code into your product review section, it could steal customers’ credit card info or trick them into downloading malware. A 2024 Verizon Data Breach Report says 30% of web attacks involve XSS, costing businesses millions in fixes and lost revenue.
The impact goes beyond money. Users lose faith if their data gets compromised, and your brand takes a hit. Small businesses, especially, can struggle to recover. That’s why understanding and preventing XSS is critical, whether you’re coding your own site or working with web development services in Bhubaneswar.
How to Prevent XSS Attacks
Good news: you can protect your website from XSS with some practical steps. Here’s a straightforward plan to keep your site safe, based on industry best practices.
1. Clean Up User Input
Always check and clean any data users send to your site, like form submissions or comments. This process, called input sanitization, removes or neutralizes harmful code. Libraries like DOMPurify can help strip out dangerous scripts. A 2024 Snyk study found that sanitizing input cuts XSS risks by 60%.
For example, if a user tries to post “<script>badStuff()</script>” in a comment, your site should convert it to plain text so it can’t run. Developers in Bhubaneswar often use frameworks like React or Angular, which have built-in tools to handle this.
2. Use Safe Coding Practices
When building your site, avoid risky practices like directly inserting user input into your HTML. Instead, use safe APIs like innerText instead of innerHTML in JavaScript. Also, set HTTP headers like Content Security Policy (CSP) to limit what scripts can run. A 2024 Mozilla guide says CSP reduces XSS incidents by 40%.
If you’re not a coding expert, team up with developers who know these tricks. They’ll make sure your site’s code is solid from the start.
3. Escape Data Properly
Escaping means adding special characters to user input so browsers don’t treat it as code. For instance, turning “<” into “<” ensures it displays as text, not a script. Most modern frameworks, like Django or Laravel, do this automatically, but double-check if you’re coding manually. A 2024 Synopsys report notes proper escaping stops 50% of XSS attempts.
4. Keep Software Updated
Outdated software is an open door for attackers. Regularly update your content management system (like WordPress), plugins, and libraries. A 2024 Patchstack study found 25% of XSS attacks exploit known vulnerabilities in old software. Set reminders to check for updates monthly to stay ahead.
5. Test Your Site Regularly
Run security scans to catch XSS flaws before attackers do. Tools like Burp Suite or OWASP ZAP can spot weak points. Also, consider hiring a security expert to do a thorough check, especially for business sites. In Bhubaneswar, local developers often offer testing as part of their services.
Why This Matters in 2025
With cybercrime expected to cost $10.5 trillion globally by 2025, per a 2024 Cybersecurity Ventures report, XSS prevention is non-negotiable. India’s digital economy is booming, and Bhubaneswar is a growing tech hub, making secure websites a must for businesses. Protecting your site builds trust, keeps users safe, and saves you from costly breaches.
Ready to secure your website? Start by checking your user inputs, using safe coding habits, and keeping everything updated. If you need help, local experts can guide you. Stay proactive, and keep XSS out of your story. Your users—and your business—will thank you!
#digital marketing agency bhubaneswar#website development companies in bhubaneswar#best digital marketing company in bhubaneswar#digital marketing services in bhubaneswar#web development services in bhubaneswar#digital marketing agency in bhubaneswar
0 notes
Text
Academy LMS Certificate Addon Nulled Script 1.3

Academy LMS Certificate Addon Nulled Script: Unlock Free Certification Power for Your Learning Platform Boost your online learning experience effortlessly with the Academy LMS Certificate Addon Nulled Script. This powerful tool allows you to generate professional certificates for your students automatically, enhancing course credibility and motivating learners to achieve their goals. By integrating this addon, you can provide seamless certification on course completion without extra cost, thanks to its nulled version available for free download on our site. Comprehensive Overview of Academy LMS Certificate Addon Script The Academy LMS Certificate Addon is a fully functional, cost-free version of the premium certificate extension designed for Academy LMS. It enables course creators and administrators to generate, customize, and distribute certificates efficiently within their LMS environment. Whether you run an educational institution, corporate training, or personal coaching platform, this addon helps you deliver a professional finish to your courses. Technical Specifications Compatibility: Fully compatible with the latest versions of Academy LMS Certificate Customization: Editable templates for text, images, and signatures Automation: Auto-generation of certificates upon course completion File Formats: Supports PDF export and direct download Language Support: Multilingual certificate capabilities Security: Includes basic protection to prevent certificate forgery Features and Benefits of Using Academy LMS Certificate Addon Nulled Script With the Academy LMS Certificate Addon Nulled Script, you enjoy several advantages that elevate your LMS offering: Professional Certification: Deliver polished, branded certificates that enhance your course value. Increased Learner Engagement: Motivate students by recognizing their achievements officially. Cost Efficiency: Access premium features without spending on licenses by downloading the nulled version. Easy Integration: Seamlessly add the addon to your existing Academy LMS setup with minimal configuration. Customization Flexibility: Tailor certificates to match your brand’s style and messaging. Ideal Use Cases for the Certificate Addon The Academy LMS Certificate Addon Nulled Script is perfect for: Online educational institutions awarding course completion certificates Corporate training programs aiming to certify employee skill development Freelance instructors and coaches who want to add value to their training services Any learning platform seeking to enhance credibility and learner satisfaction How to Install and Use the Academy LMS Certificate Addon Script Installing the Academy LMS Certificate Addon is straightforward. After downloading the addon for free from our website, follow these simple steps: Upload the addon zip file to your WordPress dashboard under Plugins > Add New > Upload Plugin. Activate the plugin from the plugins list. Navigate to the Academy LMS settings and locate the Certificate Addon tab. Customize your certificate template with your preferred logo, text, and signature images. Save your settings and test the addon by completing a course to see the certificate generated automatically. For further resources and complementary themes to enhance your LMS, explore our collection of nulled wordpress themes. Frequently Asked Questions (FAQs) Is the Academy LMS Certificate Addon Nulled Script safe to use? Yes, when downloaded from a trusted source, this nulled addon is tested for safety and functionality. We recommend always backing up your site before installation. Will this addon receive updates? Nulled scripts typically do not come with official updates. However, our site offers the latest nulled versions as they become available to keep your LMS running smoothly. Can I customize the certificate design? Absolutely! The addon includes customizable templates, allowing you to adjust text, colors, logos, and signatures to fit your branding.
How do I download the Academy LMS Certificate Addon Nulled Script for free? You can easily download this addon and other related tools such as nulled plugins from our website without any cost. Does it work with the latest Academy LMS version? Yes, the nulled script is updated to support the latest Academy LMS releases to ensure compatibility and performance. Empower your Academy LMS platform today by integrating the Academy LMS Certificate Addon—your gateway to professional certification without the price tag.
0 notes
Text
YITH Amazon S3 Storage nulled plugin 3.0.4

YITH Amazon S3 Storage Nulled Plugin – Premium Cloud Storage for Free! Supercharge your WordPress media management with the YITH Amazon S3 Storage nulled plugin – enjoy all the benefits of premium cloud storage without the expensive subscription! This fully functional nulled version gives you seamless integration with Amazon S3, allowing you to securely store and deliver your media files with blazing-fast speed. With this nulled plugin, you'll get all the advanced features of the original, including automatic file synchronization, easy migration, and reduced server load – completely free! Perfect for website owners who want enterprise-level storage solutions without the high costs, it's simple to set up and works perfectly. Why pay for premium cloud storage when you can get identical performance at zero cost? Download the YITH Amazon S3 Storage nulled plugin today and optimize your website's media delivery – effortlessly and affordably!
0 notes
Text

Work Smarter, Not Harder Use Dropbox As WordPress Hosting
Running a WordPress site often means juggling increasing hosting costs as your content grows. Many website owners find themselves paying premium prices for storage space, especially when their sites become media-heavy with images, videos, and documents.
Maximize Efficiency and Minimize Hosting Costs with Our Integrate Dropbox Plugin for WordPress
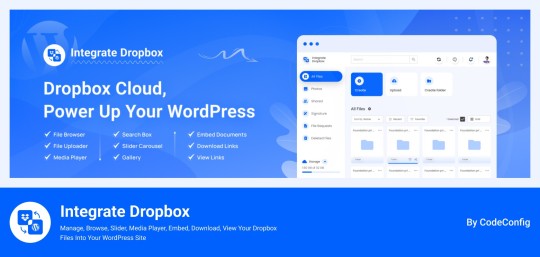
Integrate Dropbox best plugin for WordPress. Our Dropbox integration plugin reimagines how WordPress handles media storage. Instead of relying solely on your hosting server's storage, your media library seamlessly connects with Dropbox's robust infrastructure.
In the digital age, managing media files and optimizing website performance are top priorities for businesses and content creators. The balance between delivering rich media content and maintaining hosting efficiency can be challenging. That’s where Dropbox Integration Plugin comes in, providing a seamless bridge between Dropbox and WordPress to help you streamline file management, save on hosting costs, and enhance your user experience—all without coding hassles.
Why Hosting Optimization Matters
Every media file, video, or high-quality image hosted directly on your WordPress site consumes hosting resources. For companies scaling their content, this can quickly lead to higher hosting costs, slower load times, and potential website downtime. By integrating Dropbox with WordPress, CodeConfig’s plugin allows users to manage, display, and play Dropbox-hosted files directly on their site, significantly reducing the hosting load.
Integrate Dropbox Key Features To Solve Real Problems
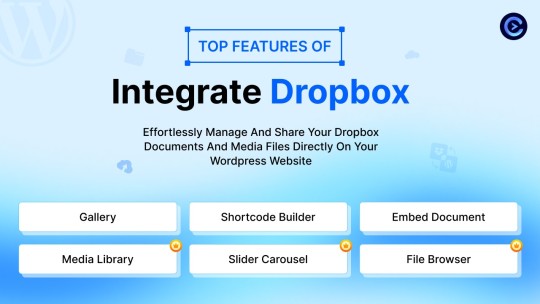
Our plugin is packed with features designed to make Dropbox integration simple, secure, and efficient:
Media Library Integration Directly access Dropbox files from your WordPress Media Library. Upload files, use high-quality images for featured posts, and seamlessly add media to your content without overloading your hosting.
Elementor and Gutenberg Integration Designed to work with popular page builders, our plugin offers 7 customizable blocks for Gutenberg and over 7 Elementor widgets. Effortlessly add Dropbox-hosted media, galleries, sliders, and file browsers to your pages without coding.
WooCommerce Compatibility For e-commerce sites, our plugin provides a unique solution for downloadable products. Upload product files to Dropbox and offer them as downloadable products in WooCommerce. This ensures smooth delivery and saves precious server space.
Dynamic File Browser, Gallery, and Media Player Add Dropbox files as interactive elements, such as galleries or media players, directly into your content. This feature is ideal for course creators and content-heavy websites. Our Slider Carousel and Media Player are customizable to fit your brand’s aesthetic, offering both style and function.
Shortcode Builder and Custom Embeds With our intuitive Shortcode Builder, users can quickly generate and customize modules like media players, sliders, and file browsers. Embed files, set view-only permissions, and create download links—all with simple shortcodes. This means less reliance on heavy plugins and more control over your content display.
Saving Costs Without Sacrificing Quality
Using CodeConfig’s Dropbox Integration Plugin not only reduces hosting expenses but also delivers a faster, more reliable user experience. By offloading storage to Dropbox, your website can handle more traffic and richer content without performance dips.
Our responsive design ensures that these features look great on both desktop and mobile, providing a seamless experience across devices.
Lightning-Fast Media Management
WordPress users can now upload media directly through the familiar WordPress interface while the plugin automatically syncs it to Dropbox. No need to learn new tools or change your workflow - everything happens behind the scenes.
Enhanced Website Performance
By offloading media storage to Dropbox, your WordPress site becomes significantly lighter and faster. Your server resources focus on running core WordPress functions rather than handling heavy media requests.
4 notes
·
View notes
Text
Migrate or move WordPress website to a new host in 2025
Why You Might Need to Move Your WordPress Site
Your website is important. But sometimes, your web host may be slow, expensive, or not helpful. When that happens, it’s smart to move your website to a better hosting company. A better host can help your site load faster, stay online, and keep visitors happy.
You can move your website in two ways:
Manually (you do everything step by step)
Automatically (you use a plugin to help)
This full guide will show you both ways. It will also teach you what to do after you move your site to make sure everything works.
If this sounds hard, don’t worry. You can also get help from Creation Wave LLC. We help people move WordPress websites safely and quickly.
Table of Contents
Manual vs Automatic Migration
Manual Migration – Step by Step
How to Move WordPress Without cPanel
How to Use a Plugin to Migrate Your Site
What to Check After Migration
Final Thoughts and Expert Help
Should You Move Your Site Manually or Use a Plugin?
There are two ways to move your WordPress site:
Manual Migration
This is where you download your files and database and upload them to the new host yourself. It gives you more control, but you need to be careful. One small mistake can break your site. This is better for large websites or people with some technical skills.
Automatic Migration
This uses a WordPress plugin to move your site. It is easier and faster. It is perfect for small websites or beginners. You don’t have to touch any code.
If you're not sure which to pick, try a plugin first. If it doesn't work or gives errors, you can move it manually or get expert help.
Need help? Creation Wave LLC offers both manual and automatic WordPress migration services.
Manual WordPress Migration (Step-by-Step Guide)
This part will show you how to manually move your WordPress website to a new host.
Step 1: Choose a New Hosting Company
Make sure your new host is fast, secure, and helpful. Look for companies that offer good customer support and daily backups.
Types of hosting:
Shared hosting (basic and cheap)
VPS hosting (faster and more private)
Managed WordPress hosting (easy and fully managed)
Dedicated server (for very large sites)
If you need help picking the right host, Creation Wave LLC can help you choose the best one.
Step 2: Backup Your WordPress Files
Your website files are very important. They include your theme, plugins, images, and settings.
To back them up:
Use an FTP client like FileZilla.
Connect to your old host using FTP login details.
Find the folder named “public_html” or your WordPress folder.
Download all the files to your computer.
Wait until the download finishes before going to the next step.
Step 3: Export Your Database
Your website database has all your posts, pages, user accounts, and comments.
To export it:
Log in to cPanel on your old host.
Open phpMyAdmin.
Click your WordPress database name on the left.
Click the “Export” tab at the top.
Choose “Quick” and “SQL” format.
Click “Go” to download the file.
Save this file in a safe place.
Step 4: Create a New Database on Your New Host
Now go to your new hosting account. Do this:
Log into cPanel.
Click “MySQL Databases.”
Create a new database.
Create a new user and give it a strong password.
Add the user to the database and give it all permissions.
Write down the database name, user name, and password. You will need them soon.
Step 5: Upload WordPress Files to New Host
Now it’s time to put your website files on the new server.
To upload:
Open FileZilla again.
Connect to your new host with your new FTP details.
Go to the folder named “public_html” or root folder.
Upload all your website files from your computer.
Wait for the upload to finish before moving on.
Step 6: Import Your Database
Now you need to import your old database to the new host.
Log in to cPanel on the new host.
Open phpMyAdmin.
Click your new database name.
Click the “Import” tab.
Choose the .sql file you downloaded earlier.
Click “Go.”
This will add your old content to your new hosting account.
Step 7: Update the wp-config.php File
WordPress needs to know how to connect to the database.
In FileZilla, find and open the file “wp-config.php.”
Right-click and choose Edit.
Update the database name, user, and password:
define('DB_NAME', 'your_new_db_name'); define('DB_USER', 'your_new_db_user'); define('DB_PASSWORD', 'your_new_password');
Save and close the file.
Now WordPress can talk to the new database.
Step 8: Point Your Domain to the New Host
This is the final step.
Log into the account where you bought your domain (like GoDaddy or Namecheap).
Find DNS or Nameserver Settings.
Change the nameservers to the new hosting company’s nameservers.
Save and wait.
It can take 1–24 hours for the DNS to update fully. After that, your site will be live on the new host.
How to Migrate Without cPanel
Some hosting providers don’t use cPanel. That’s okay. You can still migrate your website.
Here’s what to do:
Ask your host for FTP access and MySQL access.
Use FileZilla to upload files.
Use another tool like Adminer or CLI (command-line) to import your database.
Update your wp-config.php file as shown earlier.
If this sounds too technical, Creation Wave LLC can do it for you.
How to Use a Plugin to Migrate Your WordPress Site
If you want an easier way, use a migration plugin. Here are three good ones:
All-in-One WP Migration
Simple drag-and-drop tool.
Great for beginners.
Duplicator
Makes a full copy of your website.
Offers more options for developers.
UpdraftPlus (Paid)
Does backups and migrations.
Good support.
To use a plugin:
Install the plugin on your old website.
Use the plugin to export the full site.
Set up a clean WordPress install on your new host.
Install the same plugin there.
Import the file you exported earlier.
After a few minutes, your site should be live.
What to Check After Migration
After moving your website, test everything. Check the following:
Is your homepage loading fast?
Are all your pages and posts showing?
Are your images loading?
Can you log into the WordPress dashboard?
Are all your plugins working?
Is the site mobile-friendly?
Also test your contact forms, menus, and links. You can use free tools like GTmetrix or Google PageSpeed to check speed.
If anything looks broken, go back and check your steps.
Need help? Creation Wave LLC offers a full post-migration checkup.
Final Thoughts
Moving your WordPress website can feel scary. But with the right steps, it’s not so hard. This guide helps you move your site by yourself or with a plugin. You also learned how to test your site after moving.
A better host can give you faster speed, better uptime, and better support. If you don’t want to take risks or waste time, you can let experts do it for you.
1 note
·
View note
Text
Fixing WordPress Update Issues Made Easy: A Beginner’s Guide to Smooth Website Maintenance

Keeping your WordPress website updated is one of the smartest things you can do for better security, performance, and features. But what happens when those updates don’t go as planned?
If you’ve ever seen your website freeze, crash, or show strange errors after clicking "Update," don’t worry—you’re not alone, and you don’t need to be a developer to fix it.
In this guide, we’ll explain why WordPress updates fail and share simple, beginner-friendly solutions to get your website back on track—quickly and safely.
⚠️ Common Reasons Why WordPress Updates Fail
WordPress is built on multiple moving parts—your core WordPress files, themes, and plugins. An update may fail if just one part doesn’t play nicely with the others.
Here are the top reasons why updates might not go through:
🌐 Weak or unstable internet connection
🔌 Plugin conflicts that interfere with the update
🎨 Themes that aren’t compatible with the latest WordPress version
🧠 Low server memory or execution time limits
🔒 Incorrect folder or file permissions
📁 Corrupted or incomplete update downloads
🛠️ Simple Fixes for WordPress Update Problems
✅ Step 1: Always Back Up Your Website
Before making any changes, install a backup plugin like UpdraftPlus or BackupBuddy and save a complete version of your site. This ensures that if something goes wrong, you can restore your site in minutes.
✅ Step 2: Clear Your Cache
Sometimes, the issue isn’t with the update—it’s with what your browser is showing.
Clear your browser cache (Ctrl+Shift+R or Command+Shift+R)
If you use a caching plugin (like WP Super Cache or W3 Total Cache), clear your site’s cache from the plugin dashboard
Then, try the update again.
✅ Step 3: Troubleshoot Plugin Conflicts
If an update causes your site to break, the issue might be a plugin.
Here’s how to find out:
Install the Health Check & Troubleshooting plugin.
Enable “Troubleshooting Mode”—this temporarily disables all plugins for you only.
Try running the update again.
If the update works now, reactivate your plugins one at a time. The one that breaks the update is your troublemaker.
✅ Step 4: Check Hosting Limits
Your hosting environment might be too limited for updates to complete properly.
Ask your hosting provider these questions:
Is my PHP memory limit at least 256MB?
Is my maximum execution time at least 300 seconds?
Can these settings be increased if needed?
If not, consider upgrading to a better hosting plan for smoother WordPress performance.
✅ Step 5: Perform a Manual WordPress Update
When automatic updates fail, a manual update is a reliable workaround:
Download the latest WordPress version from WordPress.org
Unzip the files on your computer
Use FTP software (like FileZilla) to access your site files
Replace the wp-admin and wp-includes folders with the new versions
Leave the wp-content folder as-is (it holds your themes and plugins)
Open your site and follow any update prompts for the database
This process ensures a clean, fresh installation—without losing content or settings.
✅ Step 6: Fix File Permissions
Improper file permissions can block updates.
Use a plugin like WP File Manager or ask your host to set:
All folders to 755
All files to 644
These settings help WordPress update safely without risking your site’s security.
✅ Step 7: Remove Stuck Maintenance Mode
If you see the message:
“Briefly unavailable for scheduled maintenance. Check back in a minute.” …your site update was interrupted and left in maintenance mode.
Here’s how to fix it:
Access your site files through FTP or your hosting file manager (like cPanel)
Go to your website’s root folder
Delete the file called .maintenance
Refresh your site—it should be back to normal
This takes less than a minute and often solves the issue instantly.
💡 When to Call in the Pros
If these solutions don’t work—or if you feel unsure about any step—don’t hesitate to get help from professionals.
Here are your options:
Contact your web hosting support
Hire a trusted WordPress expert
Reach out to a reputable company like Websenor for quick, affordable help
🎯 Final Word: Let Websenor Handle Your WordPress Maintenance
WordPress update problems are common—but they don’t have to be stressful. With some basic know-how and a methodical approach, you can often fix these issues yourself.
But if you'd rather skip the hassle, Websenor is here to help. Our team specializes in:
WordPress core and plugin updates
Website backups and security
Speed optimization and error fixes
We'll keep your website running smoothly, so you can focus on your business, not your backend.
👉 Ready to stop worrying about WordPress updates? Contact Websenor today and let us take care of everything behind the scenes.
0 notes
Text
Unlocking Seamless Integrations: A Comprehensive Guide to the 'Contact Form to Any API' WordPress Plugin
In today's digital landscape, integrating your website's contact forms with various APIs is crucial for streamlined operations and enhanced user experiences. The Contact Form to Any API WordPress plugin stands out as a versatile tool, enabling seamless connections between your contact forms and a multitude of third-party services. This comprehensive guide delves into the features, benefits, and practical applications of this powerful plugin.

Understanding the Need for API Integration
Before exploring the plugin's capabilities, it's essential to grasp the significance of API integrations:
Enhanced Efficiency: Automating data transfer between your website and external platforms reduces manual tasks.
Improved Data Accuracy: Direct integrations minimize errors associated with manual data entry.
Real-Time Updates: Immediate data synchronization ensures up-to-date information across platforms.
Scalability: As your business grows, integrated systems can handle increased data flow without additional overhead.
Introducing 'Contact Form to Any API'
Developed by IT Path Solutions, 'Contact Form to Any API' is designed to bridge the gap between your WordPress contact forms and external APIs. Whether you're using Contact Form 7 or WPForms, this plugin facilitates the transmission of form data to various services, including CRMs, marketing platforms, and custom APIs.
Key Features
1. Broad API Compatibility
Supports Over 150 APIs: Seamlessly connect with platforms like Mailchimp, HubSpot, Zapier, Odoo CRM, and more.
Custom API Integration: Configure connections with virtually any REST API, providing unparalleled flexibility.
2. Flexible Data Transmission
Multiple HTTP Methods: Choose between POST and GET requests based on your API's requirements.
JSON Formatting: Send data in simple or nested JSON structures, accommodating complex API schemas.
Header Customization: Set custom headers, including Authorization tokens, to meet specific API authentication needs.
3. File Handling Capabilities
File Upload Support: Enable users to upload files through your forms.
Base64 Encoding: Automatically convert uploaded files to Base64 format for API compatibility.
4. Data Management and Export
Database Storage: Store form submissions within your WordPress database for easy access.
Export Options: Download submission data in CSV, Excel, or PDF formats for reporting and analysis.
5. Conditional Data Sending
Timing Control: Decide whether to send data to the API before or after the form's email notification is dispatched.
6. Authentication Support
Multiple Authentication Methods: Utilize Basic Auth, Bearer Tokens, or custom headers to authenticate API requests.
Pro Version Enhancements
Upgrading to the Pro version unlocks additional features:
Multi-API Support: Send form data to multiple APIs simultaneously.
Advanced JSON Structures: Handle multi-level JSON formats for complex integrations.
Priority Support: Receive expedited assistance from the development team.
OAuth 2.0 and JWT Integration: Facilitate secure connections with APIs requiring advanced authentication protocols.
Real-World Applications
The versatility of 'Contact Form to Any API' opens doors to numerous practical applications:
CRM Integration: Automatically add new leads to your CRM system upon form submission.
Email Marketing: Subscribe users to your mailing list in platforms like Mailchimp or Sendinblue.
Support Ticketing: Create support tickets in systems like Zendesk or Freshdesk directly from contact forms.
Project Management: Generate tasks in tools like Trello or Asana based on form inputs.
User Testimonials
The plugin has garnered positive feedback from the WordPress community:
"Does exactly what is needed – connects your contact form to API. Works great out of the box, and amazing support." — Olay
"I used the free plugin for a while already, recently stepped over to the pro and I must say the pro and agency version come with amazing new features and the support is quick and always there to help you with any questions!" — Samuellegrand
Getting Started: Installation and Configuration
Step 1: Installation
Navigate to your WordPress dashboard.
Go to Plugins > Add New.
Search for "Contact Form to Any API."
Click "Install Now" and then "Activate."
Step 2: Configuration
Access the plugin settings via the WordPress dashboard.
Choose the form (Contact Form 7 or WPForms) you wish to integrate.
Enter the API endpoint URL.
Configure the request method (POST or GET).
Set up headers and authentication details as required.
Map form fields to the corresponding API parameters.
Save your settings and test the integration.
Best Practices for Optimal Integration
Test Thoroughly: Use tools like Postman to test API endpoints before full integration.
Secure Sensitive Data: Ensure that authentication tokens and sensitive information are stored securely.
Monitor Logs: Regularly check logs for any errors or issues in data transmission.
Stay Updated: Keep the plugin and WordPress core updated to benefit from the latest features and security patches.
Conclusion
'Contact Form to Any API' stands as a robust solution for WordPress users seeking seamless integration between their contact forms and external services. Its flexibility, extensive feature set, and user-friendly interface make it an invaluable tool for enhancing website functionality and streamlining workflows.
Whether you're aiming to automate lead generation, enhance customer support, or synchronize data across platforms, this plugin offers the capabilities to achieve your goals efficiently.
0 notes
Text
Is Elementor Pro GPL Safe? The Truth Nobody Tells You

Introduction
If you are a web designer or developer, you have probably heard of Elementor Pro, one of the strongest page builders for WordPress. But what about Elementor Pro GPL? Is it safe? Is it legal to use? Is it capable of filling the role of the official Elementor Pro without sacrificing security and functionality?
There has been a lot of misinformation and fear about GPL (General Public License) plugins. Some say they are unsafe, while others defend them as the best way to go about being frugal with premium tools. In this article, we will be uncovering the true facts about Elementor Pro GPL and demystifying it, basically giving you the confidence to make a fair assessment without falling for the scaremongering.
What is Elementor Pro GPL?
Before we survey safety issues, let's clarify what Elementor Pro GPL is all about.
The concept of GPL (General Public License) allows free distribution, modification, and sharing of a software application. So by definition, any WordPress-related plugin brought in under GPL will be stopped from legal redistribution.
Elementor Pro is also GPL-Licensed. In contrast, the original version provides premium support, direct updates, and licensing restrictions.
Elementor Pro GPL is the same plugin, only that third-party providers have gone on to redistribute it, most times for little money.
But does that mean it is, therefore, safe? Let's break it down.

Are you wondering if Elementor Pro is safe to use under the GPL license? Here's what you need to know:
1. It Depends on Where You Download It From
One of the biggest dangers in using Elementor Pro GPL is downloading from a site that is not trusted.
Some suppliers inject malware or harmful scripts into plugin files.
In some cases, the plugins may be outdated and miss critical security updates.
Solution: Always download Elementor Pro GPL from a trusted GPL provider who offers regular updates and guarantees files that are free from malware.
2. No Automatic Updates (Unless You Handle Them Manually)
When you buy Elementor Pro from the official site, you get automatic updates. You do not get that with the Elementor Pro GPL, unless your GPL provider offers updates.
Solution: Ensure that your provider has frequent updates or manually download the latest version from a reputable source to keep your plugin safe.
3. The Code is 100% Legal and Identical
Since WordPress and Elementor Pro are both licensed under GPL, the code itself is completely legal. There is no difference between the Elementor Pro from the official site and the one from a GPL provider except for the lack of support and licensing restrictions.
This means the plugin works just like the original version.
Bottom Line: Elementor Pro GPL is NOT an illegal or pirated version. It is just a legally redistributed copy.
4. It Does Not Have Official Customer Support
The downside to Elementor Pro GPL is that there is no official support if you encounter any issues with the software.
If you come across a bug, need troubleshooting assistance, or require personalized support, you won't be able to get it from them.
Some specific GPL providers offer limited remote assistance, which may not be as reliable as official Elementor support.
Solution: This shouldn't be a major issue if you are comfortable doing your own troubleshooting or relying on WordPress forums.
Who Should (and Shouldn't) Use Elementor Pro GPL?
Use Elementor Pro GPL If:
You are a freelancer or agency managing multiple sites and want to reduce costs.
You are generally okay with performing manual updates and can handle minor issues.
You want access to all the premium features of Elementor Pro without paying licensing fees.
Avoid Elementor Pro GPL if:
You heavily rely on official customer support.
You prefer not to deal with manual updates for this plugin.
You are unfamiliar with trusted GPL providers and are concerned about potential security risks
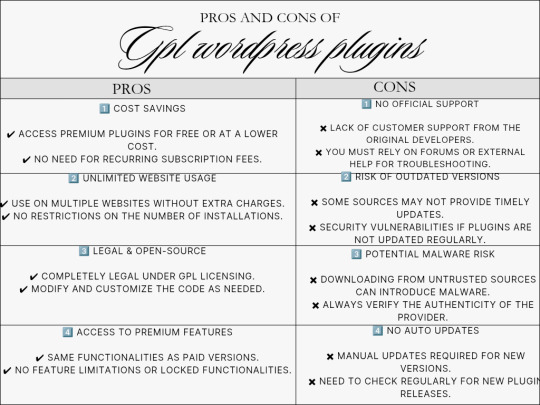
How to Safely Use Elementor Pro GPL
To reduce the risk and assure security, follow these guidelines:
Download from a Trustworthy Source – Make sure to select a trusted GPL provider with positive reviews and regular updates.
Scan Before Installation – Use tool like Virus-Totals or Wordfence to check for malware on the files.
Back Up Regularly: Make sure you always back up your site prior to updating or when installing the new GPL plugin.
Update Regularly – Ensure the latest version of the software is installed to guard against vulnerabilities.
Use Additional Security Plugins - install Wordfence or Sucuri for possible monitoring of threats.

Final Verdict: Should You Use Elementor Pro GPL?
Actually, Elementor Pro GPL may be used, but not as carelessly.
Of course, if you want a cheaper way of getting all the bells and whistles from Elementor, the most recommendable option is to use GPL plugins from a trusted wholesaler. For official support and to have automatic updates, it might be wise to invest in the official Elementor Pro.
Want to save money and run the full gamut of Elementor Pro? Well, do your research about providers, choose a reliable one, and enjoy them breaking the bank!
0 notes
Text
TicketGo Nulled Script 4.2.2

Download TicketGo Nulled Script for Free – The Ultimate Support Ticket System If you're looking for a reliable, efficient, and feature-rich support ticket management solution, the TicketGo Nulled Script is the perfect choice for your business or project. Whether you're running a digital agency, a tech startup, or an eCommerce store, TicketGo empowers you to manage customer support like a pro—without spending a dime. Now available for free download, this nulled script opens the door to premium features without the premium price tag. What is TicketGo Nulled Script? The TicketGo Nulled Script is a robust, fully-featured PHP-based support ticket system designed to streamline and automate your customer service workflows. It enables businesses to handle support queries, assign agents, prioritize tickets, and track progress through an intuitive dashboard. Best of all, you can download this premium-grade tool for free and integrate it easily into your existing system. Why Choose TicketGo Nulled Script? Support ticket systems are crucial for any service-based business. With the TicketGo Nulled Script, you get a polished, powerful backend with clean code, easy installation, and rich customization options. It’s a complete support system solution at zero cost—perfect for startups and developers who need professional tools without breaking the bank. Technical Specifications Language: PHP Database: MySQL Framework: Laravel Responsive Design: Fully mobile-optimized License: Nulled (No license required) Key Features & Benefits 1. Advanced Ticket Management Organize and manage support tickets with ease using the integrated dashboard. The system supports ticket categorization, priority tagging, and real-time updates to ensure efficient resolution. 2. Multi-Agent Support Assign different agents to specific tickets or departments. With the TicketGo Nulled Script, collaboration is seamless, boosting your team’s productivity. 3. Customizable Email Notifications Keep your users informed with automatic email alerts for ticket updates, agent responses, and ticket closures. You can customize templates to match your brand voice. 4. User-Friendly Interface The intuitive, clean design ensures a smooth user experience for both customers and agents. No steep learning curve—just plug and play. 5. Analytics & Reporting Gain insight into your support operations with built-in analytics. Monitor agent performance, ticket trends, and response times directly from the dashboard. Common Use Cases Freelancers: Manage client queries and feedback efficiently. Startups: Deliver professional-grade customer support from day one. eCommerce Platforms: Handle order-related issues and customer complaints systematically. Software Developers: Track bugs and feature requests from users. How to Install TicketGo Nulled Script Download the TicketGo Nulled Script zip file from our website. Extract the files and upload them to your server directory using FTP or cPanel. Create a MySQL database and import the included SQL file. Configure your .env file with the correct database credentials. Access your domain in the browser to complete the setup wizard. Frequently Asked Questions (FAQs) Is TicketGo Nulled Script safe to use? Yes, the version provided has been tested for malware and backdoors. However, it's always recommended to scan any file before installation. Do I need a license to use TicketGo? No. The TicketGo Nulled Script available on our platform is fully nulled and does not require any license for use. Can I use it for commercial projects? Absolutely! This script is ideal for both personal and commercial projects. Just install, configure, and start managing tickets professionally. Where can I download other helpful tools? We offer a wide range of nulled plugins to support your development and design needs. Looking for top-tier WordPress security? Check out the powerful iThemes Security Pro NULLED for complete protection of your WordPress site—absolutely free!
Conclusion With the TicketGo , you can build a high-functioning, client-friendly support system without the high costs. It’s the ideal solution for anyone seeking a streamlined, efficient way to handle support tickets while enjoying full control over the features and appearance. Download now and elevate your support game—no licenses, no subscriptions, just pure performance.
0 notes
Text
YITH Auctions for WooCommerce nulled plugin 4.8.0

Transform your WooCommerce store into a powerful auction platform without spending a fortune! The YITH Auctions for WooCommerce nulled plugin gives you complete access to premium auction features—absolutely free. Enjoy seamless bid management, countdown timers, automatic emails, and more, just like the paid version. This fully functional nulled plugin is easy to install and integrates perfectly with your WordPress site. Whether you're running a small business or a large eCommerce store, you can now host exciting auctions and boost customer engagement without the high costs. Why pay for premium when you can get the same professional tools for free? Download the YITH Auctions for WooCommerce nulled plugin today and start selling with dynamic auctions—risk-free and budget-friendly!
0 notes
Text
10 Best Free Legal Compliance Plugins for WordPress – Speckyboy
New Post has been published on https://thedigitalinsider.com/10-best-free-legal-compliance-plugins-for-wordpress-speckyboy/
10 Best Free Legal Compliance Plugins for WordPress – Speckyboy
When running a business online, it’s important to make sure you follow the laws of your area, country, and internationally. The laws can differ depending on where you are and what kind of website you have. Thankfully, WordPress plugins can assist you in meeting these legal requirements.
Remember, these suggestions are not a replacement for real legal advice. If you have specific questions, it’s best to ask a professional who knows the law.
To help set you on the right legal track, we have a collection of WordPress plugins that can help with many of the different legal aspects of running a website. We’ve organized them by category to make it easier for you to find what you need. These plugins can be a big help in making sure your website is on the right side of the law.
EU Cookie Law WordPress Plugins
Cookie Notice by dFactory
Cookie Notice by dFactory provides an easy way to let your site’s visitors know about your use of cookies. You can customize a notice that will appear either on the top or bottom of the page. Users can accept, decline, or read more about your policies via clickable buttons.
CookieYes Cookie Banner & Compliance Plugin
Cookie Law Info will create a customizable banner to inform visitors of your cookie policies. The banner can be automatically removed after a few seconds, or you can require the user to accept your terms manually.
Privacy Policy & Terms of Service WordPress Plugins
Auto Terms of Service & Privacy Policy
Automattic, the company behind WordPress.com, have created both a Terms of Service and Privacy Policy under the Creative Commons Sharealike license.
Auto Terms of Service and Privacy Policy brings these documents to your site. Simply add your organization’s info in the plugin settings and display the documents via a WordPress Shortcode. This plugin is meant for sites based in the United States.
WPLegalPages Privacy Policy & T&Cs Generator
WPLegalPages will generate a variety of must-have compliance documents for your website. The free version of the plugin includes a privacy policy, terms & and conditions, DCMA policy, and more.
Setup is simple – enter your business name and select which documents you want to generate. A cookie consent bar is also included. The pro version ups the ante with guided wizards, age verification, and popups.
EU VAT WordPress Plugins
WooCommerce EU VAT Compliance
Those running WooCommerce can take the pain out of VAT with WooCommerce EU VAT Compliance. It will record a customer’s location, show VAT calculations in the backend, and automatically add VAT to product pricing. You can even block out EU customers if you’d rather not collect VAT at all.
EDD Quaderno
EDD Quaderno helps to make Easy Digital Downloads shops compliant with VAT and the intricacies of other locales. It will also create improved versions of the standard EDD receipts. To use the plugin, you’ll need a Quaderno account.
Age Verification WordPress Plugins
Age Gate
Age Gate is a highly configurable plugin for restricting age-based content. Select the minimum age along with the content you want to protect, and underage users will be locked out.
Choose from a variety of user input methods (dropdown, text field, or yes/no buttons) and customize the look of the UI to match your website. The plugin is also SEO-friendly and won’t try to restrict common search bots.
Easy Age Verify
Make age verification simple with Easy Age Verify. The plugin offers turnkey settings based on different types of website content. It’s also built with accessibility and SEO in mind. The pro version is fully customizable, with the ability to match your site’s look.
Digital Signature WordPress Plugins
Gravity Forms Signature Add-On
This unofficial add-on for Gravity Forms will allow users to digitally sign documents on your website. There’s also a version for Ninja Forms.
CF7Sign – Signature Field For Contact Form 7
Adding a signature field to your Contact Form 7 forms is just a click away. Once you’ve installed and activated CF7Sign, a “Sign” field will be added to your forms’ options. There’s not much room for customization here, but it’s a dead-simple solution.
Keeping it Legal
Granted, it can be a bit of a hassle to keep track of compliance issues. But that doesn’t make it any less vital to do so. WordPress plugins are there to make the task a bit easier – even automating the process in some cases.
So, there’s no excuse for slacking! Take some time to learn your responsibilities as a website owner and use the handy plugins above to help you manage. Obviously, using these plugins alone won’t make you compliant – but they will help set you on the right path.
Legal Compliance WordPress Plugin FAQs
What Are Legal Compliance WordPress Plugins?
They are plugins designed to help your WordPress site adhere to legal regulations. They cover aspects like privacy policies, cookie consent, and terms of service requirements.
Who Needs Legal Compliance Plugins for Their WordPress Site?
Anyone who wants to ensure their site complies with legal standards, such as GDPR, CCPA, or other regional laws. This is particularly important for sites that handle user data or operate internationally.
Why Is It Important to Use Legal Compliance Plugins on WordPress?
They help protect you from legal issues by ensuring your website meets the necessary legal standards for data protection and privacy.
Can These Plugins Guarantee My Site Is Fully Legally Compliant?
While they significantly help in compliance, you should consult with a legal professional to make sure your site meets all specific legal requirements.
Are Legal Compliance Plugins Easy to Use and Set Up?
Most of these plugins are user-friendly, offering guided setup processes and pre-designed templates for legal documents.
Do I Need a Legal Compliance Plugin If My Site Doesn’t Sell Anything?
Yes, if your site collects any form of user data, including through contact forms or analytics tools, compliance with privacy laws is very important.
More Essential Free WordPress Plugins
Related Topics
Top
#Accessibility#ADD#add-on#Advice#amp#Analytics#bots#Business#buttons#ccpa#compliance#content#cookies#data#data protection#Design#display#dropdown#easy#Essential WordPress Plugins#eu#form#Forms#GATE#gdpr#generator#gravity#issues#it#law
0 notes
Text
WordPress Update Problems? Here’s How to Fix Them (No Tech Skills Needed)

Keeping your WordPress website up to date is critical for security, speed, and access to new features. But let’s face it—when an update fails, it can feel like the whole site is crashing down, especially if you don’t have a technical background.
Don’t panic.
Most WordPress update errors are easy to fix with a bit of guidance. In this beginner-friendly guide, we’ll break down why updates fail and what you can do to resolve them—no developer required.
🛑 Why Do WordPress Updates Fail?
WordPress runs on a system of interconnected parts: the core platform, themes, and plugins. If one of these components doesn’t align properly during an update, things can break.
Here are some of the most common causes:
📡 Poor internet connection that interrupts the update
🔌 Conflicts between plugins
🎨 Theme incompatibility
💾 Insufficient server memory or time limits
🔐 Incorrect file and folder permissions
🧩 Corrupted or incomplete update files
The first step toward fixing any problem is understanding where it’s coming from.
🛠️ How to Fix WordPress Update Errors (Step by Step)
✅ 1. Back Up Your Site First
Before trying anything, create a full backup of your website using a plugin like UpdraftPlus or BackupBuddy. This gives you a safety net in case something goes wrong during the troubleshooting process.
✅ 2. Clear Your Cache (It Might Be That Simple)
Sometimes, your browser or caching plugin is the culprit—not the update itself.
Clear your browser cache (Ctrl+Shift+R or Command+Shift+R on most browsers)
If you use a caching plugin (like WP Super Cache or W3 Total Cache), clear your site cache too
Now try updating WordPress again.
✅ 3. Use Troubleshooting Mode to Find Plugin Conflicts
Conflicting plugins are a frequent reason for failed updates.
You can use the Health Check & Troubleshooting plugin to safely test your site:
Install and activate the plugin
Enable troubleshooting mode—this disables all plugins temporarily (just for you)
Try updating again
If it works, re-enable plugins one by one until the error returns
That last plugin activated is your likely culprit.
✅ 4. Check Your Hosting Settings
Shared hosting plans often limit memory and execution time, which can stop updates mid-process.
Ask your host:
What’s the PHP memory limit? (It should be at least 256MB)
What’s the maximum execution time? (Aim for 300 seconds)
Can they increase these limits for better stability?
Sometimes, simply switching to a better hosting plan solves everything.
✅ 5. Try a Manual WordPress Update
If automatic updates aren’t working, a manual update might do the trick.
Here’s a simple guide:
Download the latest WordPress version from WordPress.org
Unzip the files on your computer
Use FTP software like FileZilla to connect to your website
Replace the wp-admin and wp-includes folders with the new ones
Do not touch the wp-content folder (it holds your themes and plugins)
Open your site—if needed, it will ask to update the database. Just click the button
Done right, this is a safe and effective fix.
✅ 6. Adjust File Permissions (If You’re Getting Permission Errors)
WordPress needs the correct file permissions to update itself.
Use a plugin like WP File Manager or ask your hosting provider to set:
Folders to 755
Files to 644
These permissions allow WordPress to work smoothly without opening security risks.
✅ 7. Stuck in Maintenance Mode? Here’s How to Exit
Sometimes an update gets interrupted, leaving your site stuck in maintenance mode with this message:
“Briefly unavailable for scheduled maintenance. Check back in a minute.”
To fix this:
Log into your hosting account (e.g., cPanel or via FTP)
Go to the root folder of your WordPress site
Delete the file named .maintenance
Refresh your site—it should return to normal
This is one of the easiest fixes on the list.
💬 When You Should Call in the Experts
If you’ve tried everything and the update still won’t work—or if you're unsure about any step—it’s perfectly okay to ask for help.
Here’s who you can turn to:
Your web hosting support team
A WordPress specialist
Or a reliable web development company like Websenor
✅ Final Thoughts: Keep WordPress Simple with Websenor
WordPress update errors can seem intimidating, but most are fixable with a calm, step-by-step approach—even if you're not a tech expert. The key is to:
Back up first
Rule out the simple causes
Test safely before changing live settings
Know when to ask for help
If managing updates or troubleshooting problems ever feels like too much, Websenor is here to take the weight off your shoulders. Our team specializes in WordPress maintenance, bug fixing, and website performance tuning—so you can focus on growing your brand while we handle the backend.
Let Websenor be your WordPress safety net. With us, your website stays secure, updated, and stress-free.
0 notes
Text
Calculate Prices Based on Distance For WooCommerce
If you're running a WooCommerce store and need to charge customers based on their delivery distance, then the Calculate Prices Based on Distance for WooCommerce plugin is the perfect solution for you. This plugin allows store owners to set up dynamic pricing that changes based on how far the customer is from the store or warehouse.
Why Use Distance-Based Pricing in WooCommerce?
For businesses that rely on delivery services—such as food delivery, courier services, logistics, or even furniture stores—charging a flat shipping rate may not always be practical. Some customers may live closer and should pay less, while those farther away should pay more. Distance-based pricing helps achieve:
Fair Pricing: Customers pay according to the actual distance.
Cost Optimization: Covers fuel and transportation costs accurately.
Better Profit Margins: Ensures you don’t undercharge for long-distance deliveries.
Key Features of the Plugin
Automated Price Calculation – The plugin automatically calculates the delivery cost based on distance.
Google Maps API Integration – Ensures accurate distance measurement between store and customer location.
Custom Pricing Rules – Define different price slabs based on distance thresholds.
Support for Multiple Locations – Works well for businesses with multiple warehouses or branches.
Flexible Unit Measurement – Supports both kilometers and miles.
Easy Configuration – Simple settings panel within WooCommerce.
Real-Time Cost Display – Customers can see the delivery charges before placing an order.
How to Set Up the Plugin
Install & Activate the plugin from the WordPress Plugin Directory.
Obtain a Google Maps API Key and configure it within the plugin settings.
Set Up Pricing Rules – Define base prices, per-km or per-mile costs, and maximum limits.
Test the Pricing Calculation by simulating different delivery addresses.
Save Changes & Go Live!
Best Use Cases
Food & Grocery Delivery: Charge delivery fees dynamically based on the customer’s location.
Furniture & Large Item Shipping: Ensure long-distance deliveries are appropriately priced.
Courier & Logistics Companies: Offer real-time pricing for distance-based shipments.
Service-Based Businesses: Charge for home visits or service calls based on travel distance.
Final Thoughts
The Calculate Prices Based on Distance for WooCommerce plugin is a must-have for any store that needs to charge customers fairly based on distance. It enhances customer satisfaction, improves cost recovery, and simplifies the pricing process. Whether you're a restaurant, logistics provider, or eCommerce store delivering large items, this plugin ensures you never lose money on delivery costs.
Ready to optimize your WooCommerce store’s delivery pricing? Download and install the plugin today!
#Distance-based delivery fee WooCommerce#WooCommerce price calculation by delivery distance#WooCommerce per kilometer shipping rate#WooCommerce dynamic shipping cost calculator#WooCommerce automated distance-based shipping rates#Best WooCommerce plugin for distance-based delivery fees#WooCommerce per km delivery charge setup#WooCommerce real-time distance-based shipping cost#Best WooCommerce plugins for dynamic shipping pricing#WooCommerce distance-based delivery pricing setup tutorial#Cheapest way to set up WooCommerce distance-based pricing
1 note
·
View note