#EasterSweets
Explore tagged Tumblr posts
Visit Tumblr Blog
Explore Tumblr blogs with no restrictions, modern design and the best experience.
Last Seen Tumblr Blogs


Fun Fact
Mobile Tumblr US users spend an average of 4.04 minutes per session on the app.
Text
Crustless Greek Honey Cheesecake Aka Melopita From Sifnos Island
🥧

Crustless Greek Honey Cheesecake aka Melopita from Sifnos Island - Melopita Sifnou
BY: Greek Cooking Made Easy
SUBSCRIBE TO MY YOUTUBE CHANNEL: https://www.youtube.com/greekcookingmadeeasy
Check My Short YouTube Video: HERE
Κοιτάξτε Επίσης Την Συνταγή Μου Σε Short YouTube Βίντεο, Το Λίνκ Είναι: ΕΔΩ
youtube
SERVES 🍴⃒ PREP. TIME 🕔⃒
12 persons 10 min.
COOK. TIME ♨ DIFFIC. LEVEL 👩🍳⃒
45-50 min. Very Easy
Today I will show you a very special dessert - the beautiful Melopita of Sifnos.
Melopita is a sweet that was also prepared in ancient Greece. At some point it was lost in time until it was brought back to the forefront by the famous chef Tselementes from Sifnos.
Its preparation is about the same as it was in ancient Greece and it is really quite easy.
It is traditionally prepared on Holy Saturday, when Lent ends and Greek Easter begins and I must warn you that as easy as it is to prepare, it is also to eat.
More info:
This easy dessert, is basically a crustless Cheesecake or rather pie, with plenty of Anthotyro cheese and Thyme honey.
These 2 main ingredients are important if you really want to savor its traditional taste. Nevertheless, I do give alternative ingredients for those who can't find the authentic ones, and I promise you still get a wonderful, tasty pie.
Like all typical Greek crustless Pies, it doesn't require any special equipment or even a stand-up mixer, just a hand mixer or even hand whisk and a cake pan.
Read more about this ancient dessert and its history at the end of my recipe.
Suitable for lacto-ovo vegetarians.
INGREDIENTS:
· 1 kgr. / 2.25 lb Greek Anthotyro soft Cheese, unsalted (altern: Myzithra or Ricotta cheese)
· 3/4 cup / 265 gr. / 9.3 oz Greek Thyme Honey
· O.5 cup / 110 gr. / 3.9 oz Sugar
· 1.5 tsp. Lemon Zest
· 2 tsp. / 8 gr. / 0.3 oz Vanilla Sugar
· 6 large Eggs @room temp.
· 1 tbsp. / 14 gr. / 0.5 oz Butter, melted
· 2.5 tbsp. / 25 gr. / 1 oz Fine Semolina
· Ground Cinnamon to garnish

METHOD:
A. Prepare the batter:
1. First beat the 6 eggs for a minute, using a hand mixer, until smooth.
2. Place Anthotyro soft cheese in a large bowl and stir with a large spoon until smooth.
3. Add the vanilla sugar, lemon zest and the sugar followed by the thyme honey, but do reserve 2 tbsp. of the honey for later, to garnish the pie after it's baked.

4. Start beating with the hand mixer until all ingredients are homogenized before pouring in slowly the beaten eggs.
5. Beat for another minute until you get a smooth, thick, emulsified batter.
6. Brush the bottom and sides of a large, round cake pan of 32 cm / 12.6 in. diameter with the melted butter and then flour it with the fine semolina, shaking the pan to remove excess.

7. Note: Since this pie is quite rich in taste and texture, I do prefer it thinner, so I used the 32 cm / 12.6 in. cake pan. You could use a 30 cm / 12 in. pan for a thicker pie, if you prefer it.
8. Transfer the batter to the prepared cake pan, beating it on the kitchen top to level the pie's surface and remove air trapped inside.
9. Ready for the oven, so simple.

B. Baking instructions:
10. Place cake pan on the bottom shelf of a preheated oven FAN @ 190°C / 375℉ and bake pie for about 45'-50' or until it is set in the middle and golden on top (depends on the oven). Make sure you don't over bake it!
11. When the pie is done, remove from the oven and let it cool in the pan for about 10'-15'.
C. Serving instruction:
12. Once the pie has cooled down a bit, drizzle on top the reserved 2 tbsp. honey and sprinkle with ground cinnamon for extra sweetness and flavor.

Cut it in 12 equal triangles and serve immediately.

If you will not serve the whole pie at once, only garnish the slices you will serve.
This pie should be served either lukewarm or at room temp.
A super easy to make pie, quite rich with a result of "boukia kai syxwrio" i.e. a real treat to eat.

Enjoy it!

D. Storage info:
Store leftovers in an airtight container in the fridge for one week. Take out 1 hour before serving to reach room temp.
E. More info about Melopita:
Its Greek name "Melopita" is comprised of two words, meli which means "honey," and pita which means "pie".

* Connection with Greek antiquity:
The first recorded evidence of a cheesecake-like dessert dates to ancient Greece.
The Ancient Greek athletes after finishing the Olympic games of Pentathlon used to drink wine and eat a kind of cheesecake made with simple ingredients such as cheese, wheat, and honey. It was called Plakountas with milk and was also offered in special occasions and of course weddings.

The earliest attested mention of a cheesecake is by the Greek physician Aegimus (5th century BCE), who wrote a book on the art of making cheesecakes (πλακουντοποιικόν σύγγραμμα—plakountopoiikon sungramma).
Like other ancient Greek recipes, this dessert varied through the years and continued to thrive through Byzantine times.
Our famous Greek chef Tselemendes, born in 1878 on the Cycladic island of Sifnos, found the ancient recipe for this sweet and modified it a bit to make it more contemporary.
Melopita or Melopittha as it is often called in Sifnos is prepared on Holy Saturday to be consumed during Easter Sunday and the week after.
* Easter traditions in the Cycladic island of Sifnos:
The atmosphere in Sifnos island is somber during the whole Easter period!
Throughout the Great Lent, they play the traditional game "Tsounia" (a game in pairs where with a wooden ball the players try to knock down the nine wooden "tsounia").
Until Palm Sunday, the whole island is in full swing. The Cultural Association of Sifnos organizes groups of volunteers for the joints of the paving stones. Whitewashing and painting of houses, churches, shops, and joints in all the paving stones, alleys and courtyards of the island is done.

The residents, who are closely tied to the island's culinary tradition and are well known "foodies", are particularly busy throughout the Easter period with the preparation of "Poulia tis Lambris" (traditional sweets in the shapes of animals or objects) and on Holy Thursday with the traditional painting of red eggs.
On Good Friday, it is worth watching the procession of the Epitaph through the island's streets.
On Holy Saturday, they prepare the Easter menu consisting of the traditional "mastelo" (lamb or goat with dill, washed with wine and baked in traditional wood-fired ovens in the homonymous clay pot) and the traditional dessert: Melopita (with fresh anthotyro and Sifnian thyme honey) as well as xinomizithra and dyed eggs.
On Easter Sunday afternoon, the Cultural Association of Sifnos organizes "The Burning of Judas" in the central square of Apollonia or Artemonas.
With excerpts from Wikipedia and:

Check my Short YouTube Video: HERE
Μελόπιτα Σίφνου
BY: Greek Cooking Made Easy
SUBSCRIBE TO MY YOUTUBE CHANNEL: https://www.youtube.com/greekcookingmadeeasy
ΜΕΡΙΔΕΣ🍴⃒ ΠΡΟΕΤΟΙΜΑΣΙΑ 🕔⃒
12 10 min.
ΜΑΓΕΙΡΕΜΑ ♨ ΒΑΘΜ. ΔΥΣΚΟΛΙΑΣ 👩🍳⃒
45-50 min. Πολύ Εύκολη
Σήμερα θα σας δείξω ένα πολύ ξεχωριστό γλύκισμα-τη πανέμορφη Μελόπιτα Σίφνου.
Η Μελόπιτα ήταν ένα γλύκισμα που έφτιαχναν και στην αρχαία Ελλάδα, αν δε το γνωρίζετε. Κάποια στιγμή χάθηκε μέσα στο χρόνο μέχρι που την ξαναέφερε στην επικαιρότητα ο διάσημος σέφ Τσελεμεντές από τη Σίφνο.
Η παρασκευή της είναι περίπου ίδια όπως ετοιμαζόταν και στην αρχαία Ελλάδα και είναι πραγματικά πολύ εύκολη.
Παραδοσιακά ετοιμάζεται το Μεγάλο Σάββατο, όταν τελειώνει η Νηστεία, αρχίζουν οι εορτασμοί για το Πάσχα και πρέπει να σας πω ότι όσο εύκολα ετοιμάζεται τόσο εύκολα τρώγεται.
Περισσότερες πληροφορίες:
Αυτό το εύκολο γλυκό, είναι βασικά ένα Cheesecake φτιαγμένο χωρίς φύλλο, με μπόλικο ανθότυρο και θυμαρίσιο μέλι.
Αυτά τα 2 κύρια συστατικά είναι σημαντικά αν θέλετε πραγματικά να απολαύσετε την παραδοσιακή γεύση της Μελόπιτας. Παρόλα αυτά, δίνω εναλλακτικά υλικά για όσους δεν βρίσκουν τα αυθεντικά και υπόσχομαι ότι θα έχετε μια υπέροχη, πεντα��όστιμη πίτα.
Όπως όλες οι τυπικές πίτες χωρίς φύλλο, δεν απαιτεί ειδικό εξοπλισμό ή ακόμη και μεγάλο ηλεκτρικό μίξερ, μόνο μίξερ χειρός ή ακόμα και σύρμα χειρός και ένα ταψί για κέικ.
Διαβάστε περισσότερα για αυτό το αρχαίο γλυκό και την ιστορία του στο τέλος της συνταγής μου.
Κατάλληλο για χορτοφάγους.
ΥΛΙΚΑ:
• 1 κιλό / 2,25 lb Ανθότυρο, μαλακό τυρί, ανάλατο (εναλλακτικά: Μυζήθρα ή τυρί Ricotta)
• 3/4 φλ. / 265 γρ. / 9,3 oz Θυμαρίσιο Μέλι
• Ο,5 φλ. / 110 γρ. / 3,9 oz Ζάχαρη
• 1,5 κ.γ. Ξύσμα Λεμονιού
• 2 κ.γ. / 8 γρ. / 0,3 oz Βανίλια σκόνη
• 6 μεγάλα Αυγά @θερμοκρασία δωματίου
• 1 κ.σ. / 14 γρ. / 0,5 oz Βούτυρο, λιωμένο
• 2,5 κ.σ. / 25 γρ. / 1 oz Σιμιγδάλι ψιλό
• Αλεσμένη Κανέλα (σκόνη) για γαρνίρισμα
ΜΕΘΟΔΟΣ:
Α. Ετοιμάστε τη ζύμη:
1. Αρχικά χτυπήστε τα 6 αυγά για ένα λεπτό, χρησιμοποιώντας μίξερ χειρός, μέχρι να ομογενοποιηθούν.
2. Σε ένα μεγάλο μπολ βάλτε το μαλακό Ανθότυρο και ανακατέψτε με ένα μεγάλο κουτάλι μέχρι να γίνει λείο.
3. Προσθέστε τη βανίλια, το ξύσμα λεμονιού και τη ζάχαρη και μετά το θυμαρίσιο μέλι, κρατήστε όμως 2 κ.σ. από το μέλι για αργότερα, για να γαρνίρετε την πίτα αφού ψηθεί.
4. Ξεκινήστε το χτύπημα με το μίξερ χειρός μέχρι να ομογενοποιηθούν όλα τα υλικά πριν ρίξετε σιγά σιγά μέσα τα χτυπημένα αυγά.
5. Χτυπήστε για άλλο ένα λεπτό μέχρι να έχετε μια λεία, παχύρρευστη, γαλακτώδη ζύμη.
6. Αλείψτε τον πάτο και τα πλαϊνά μιας μεγάλης, στρογγυλής φόρμας για κέικ, διαμέτρου 32 εκ. / 12,6 ίντσες με το λιωμένο βούτυρο και στη συνέχεια αλευρώστε τη με το ψιλό σιμιγδάλι, ανακινώντας το ταψί για να φύγει το περίσσειο.
7. Σημείωση: Επειδή αυτή η πίτα είναι αρκετά πλούσια σε γεύση και υφή, την προτιμώ πιο λεπτή, γι' αυτό χρησιμοποίησα τη φόρμα/ταψί κέικ των 32 εκ. / 12,6 ίντσες. Μπορείτε να χρησιμοποιήσετε ταψί 30 εκ. για πιο χοντρή πίτα, αν προτιμάτε.
8. Μεταφέρετε τη ζύμη στην φόρμα του κέικ, χτυπώντας τη στο πάγκο της ��ουζίνας για να ισιώσει η επιφάνεια της και να αφαιρέσετε τον αέρα που έχει παγιδευτεί μέσα.
9. Έτοιμη για το φούρνο, τόσο απλά.
Β. Οδηγίες ψησίματος:
10. Τοποθετήστε τη φόρμα του κέικ στο κάτω ράφι ενός προθερμασμένου φούρνου στον αέρα @ 190°C / 375℉ και ψήστε την πίτα για περίπου 45'-50' ή μέχρι να σταθεροποιηθεί στη μέση και να ροδίσει από πάνω (εξαρτάται από τον φούρνο). Φροντίστε να μην τη παραψήσετε!
11. Μόλις ψηθεί η πίτα, βγάλτε τη από το φούρνο και αφήστε να κρυώσει στο ταψί για 10'-15' περίπου.
Γ. Οδηγίες σερβιρίσματος:
12. Μόλις κρυώσει κάπως η πίτα, περιχύστε από πάνω τις κρατημένες 2 κ.σ. μέλι και πασπαλίστε με τριμμένη κανέλα για επιπλέον γλυκύτητα και γεύση.
Κόψτε τη Μελόπιτα σε 12 ίσα τρίγωνα και σερβίρετε αμέσως.
Αν δεν σερβίρετε ολόκληρη την πίτα άμεσα, γαρνίρετε μόνο τις φέτες που θα σερβίρετε.
Αυτή η πίτα πρέπει να σερβίρεται είτε χλιαρή ή σε θερμοκρασία δωματίου.
Μια πανεύκολη πίτα, πλούσια με αποτέλεσμα μπουκιά και συγχώριο!!
Απολαύστε τη!
Δ. Πληροφορίες φύλαξης:
Φυλάξτε τα υπολείμματα σε αεροστεγές δοχείο στο ψυγείο για μία εβδομάδα. Βγάλτε από το ψυγείο 1 ώρα πριν τη σερβίρετε για να φτάσει σε θερμοκρασία δωματίου.
Ε. Περισσότερες πληροφορίες για τη Μελόπιτα:
Η ελληνική ονομασία "Μελόπιτα" είναι σύνθετη, από τις 2 λέξεις "μέλι" και "πίτα".
* Σύνδεση με την Ελληνική αρχαιότητα:
Τα πρώτα καταγεγραμμένα στοιχεία για ένα επιδόρπιο που μοιάζει με cheesecake χρονολογείται στην αρχαία Ελλάδα.
Οι αρχαίοι Έλληνες αθλητές μετά την ολοκλήρωση των Ολυμπιακών Αγώνων του Πεντάθλου συνήθιζαν να πίνουν κρασί και να τρώνε ένα είδος cheesecake φτιαγμένο με απλά υλικά όπως τυρί, σιτάρι και μέλι. Ονομαζόταν Πλακούντας με γάλα και προσφερόταν και σε ειδικές περιστάσεις και γιορτές και φυσικά σε γάμους.
Η παλαιότερη μαρτυρημένη αναφορά για τέτοιου είδους τσίζκεικ είναι από τον Έλληνα γιατρό Αίγιμο (5ος αιώνας π.Χ.), ο οποίος έγραψε ένα βιβλίο για την τέχνη της παρασκευής τυρόπιτας (πλακουντοποιικόν σύγγραμμα).
Όπως και άλλες αρχαίες Ελληνικές συνταγές, αυτό το επιδόρπιο εξελίχθηκε με τα χρόνια και συνέχισε να είναι δημοφιλές κατά τη διάρκεια των βυζαντινών χρόνων.
Ο διάσημος Έλληνας σεφ Τσελεμεντές, γεννημένος το 1878 στο κυκλαδίτικο νησί της Σίφνου, βρήκε την αρχαία συνταγή για αυτό το γλύκισμα και τη τροποποίησε λίγο για να τη κάνει πιο σύγχρονη.
Η Μελόπιτα ή Μελόπιτθα όπως συχνά αποκαλείται στη Σίφνο παρασκευάζεται το Μεγάλο Σάββατο για να καταναλωθεί την Κυριακή του Πάσχα και την εβδομάδα μετά.
* Οι Πασχαλινές παραδόσεις στη Σίφνο:
Κατανυκτική η ατμόσφαιρα στη Σίφνο τις μέρες του Πάσχα!
Όλη την Σαρακοστή παίζουν το παραδοσιακό παιχνίδι "Τσούνια" (ένα παιχνίδι ανά ζεύγη όπου με μια ξύλινη μπάλα οι παίκτες επιχειρούν να ρίξουν κάτω τα εννιά ξύλινα «τσούνια»).
Μέχρι την Κυριακή Βαΐων όλο το νησί είναι σε πλήρη δραστηριότητα. Ο Πολιτιστικός Σύλλογος Σίφνου οργανώνει παρέες εθελοντών για τους αρμούς των πλακόστρωτων. Άσπρισμα και βαψίματα σπιτιών, εκκλησιών καταστημάτων, και αρμοί σε όλα τα πλακόστρωτα, σοκκάκια και αυλές του νησιού.
Οι κάτοικοι δεμένοι με τις γευστικές παραδόσεις του νησιού και γνωστοί «καλοφαγάδες» ασχολούνται ιδιαίτερα όλη την πασχαλινή περίοδο με την παρασκευή των "πουλιών της Λαμπρής" (παραδοσιακά γλυκίσματα σε σχήματα ζώων ή αντικειμένων) και την Μ. Πέμπτη παραδοσιακά με το βάψιμο των κόκκινων αυγών.
Τη Μεγάλη Παρασκευή αξίζει να παρακολουθήσεις την περιφορά του Επιταφίου στα νησιώτικα δρομάκια.
Το Μ. Σάββατο ετοιμάζουν το πασχαλιάτικο μενού αποτελούμενο από το παραδοσιακό "μαστέλο" (αρνί ή κατσίκι με άνηθο και πλυμένο με κρασί και ψημένο σε παραδοσιακούς ξυλόφουρνους μέσα στο ομώνυμο πήλινο σκεύος) και του παραδοσιακού γλυκού: Μελόπιτα (με φρέσκια αθοτύρα και σιφνέικο θυμαρίσιο μέλι) όπως και ξινομυζήθρα και ��υγά.
Το απόγευμα της Κυριακής του Πάσχα οργανώνεται από τον Πολιτιστικό Σύλλογο Σίφνου «Το Κάψιμο του Ιούδα» στην κεντρική πλατεία της Απολλωνίας ή του Αρτεμώνα.
Με αποσπάσματα από Wikipedia &:
Κοιτάξτε επίσης την συνταγή μου σε Short YouTube βίντεο, το λίνκ είναι: ΕΔΩ
#Youtube#melopita#desserts#pie#pudding#pastry#cheese#honey#easter#eastersweets#party#vegetarian#children#region#aegean#ancient#Μελόπιτα Σίφνου#Crustless Greek Honey Cheesecake aka Melopita from Sifnos Island#Crustless Greek Honey Cheesecake aka Melopita#μελοπιτα
1 note
·
View note
Text
#EasterChocolates#SweetEasterTreats#EasterEggs#ChocolateLovers#EasterSweets#SpringChocolate#EasterCelebration#EasterDelights#ChocolateEasterEggs#EasterTreats#SweetSpring#ChocolateGoodies#EasterJoy#EasterCandy
0 notes
Photo

Easter Cookies // Flower Sugar Cookies Recipe Elevate your Easter celebrations with these divine flower sugar cookies. Indulge in the delightful flavors and enchanting designs of our must-try recipe.
0 notes
Text

Easter delights with French macarons!
#EasterTreats #MacaronMagic #TikTokShopSpringSale #SpringFlavors #GourmetIndulgence #EasterJoy #SweetDelights #FrenchMacarons #EasterSweets #TasteTheMagic #EasterCelebration 🍬🥚🌟💐🍰🐣😋🎉🌸🐰
0 notes
Photo

The dough is made with wheat flour or semolina (or a combination of the two), then pressed into special molds, traditionally carved in wood. And the fillings are fragrant with rosewater or orange blossom. Semolina (“smeed”) which is the coarse, purified wheat middling of durum wheat. Coarse semolina is typically a bit yellowish in color and is known as “smeed khishin”, or coarse “smeed”. Fine semolina is another ingredient in Maamoul and can be known as “farina”, or in Arabic “smeed naaim”. . Maamoul with walnuts (52g) = 260 calories, Maamoul with dates (52g) = 245 calories. Enjoy in moderation and stick to one maamoul a day! Happy Easter! . #shareyourmaamoul . #mamoul #maamoul #ma3moul #semolinacookies #eastercookies #eastertreats #pistachiomaamoul #almondmaamoul #walnutmaamoul #homemademaamoul #homebakedmaamoul #easterholidays #eastersweets #easter2020 #sweets #eastersweets #middleeasternfood #middleeasternsweets #lebanesesweets #datesmaamoul #biscuits #sugarrush #desserts #mondaymorning #stayhomestaysafe #quarantine #sharingjoy #sharinghappiness #lebanon (at Lebanon) https://www.instagram.com/p/B-6toOwh2tV/?igshid=itq40bjnwqmo
#shareyourmaamoul#mamoul#maamoul#ma3moul#semolinacookies#eastercookies#eastertreats#pistachiomaamoul#almondmaamoul#walnutmaamoul#homemademaamoul#homebakedmaamoul#easterholidays#eastersweets#easter2020#sweets#middleeasternfood#middleeasternsweets#lebanesesweets#datesmaamoul#biscuits#sugarrush#desserts#mondaymorning#stayhomestaysafe#quarantine#sharingjoy#sharinghappiness#lebanon
1 note
·
View note
Text

REBLOG FOR G💚💚D ✨LUCK🐞🍫🥚
#ladybug#bugs#egg#chocolate#chocolateegg#kinder#kinderegg#eastereggs#easter#easter2019#eastercandy#easterchocolate#eastersweets#easternovelty#goodluck#charm#magic#supernatural#occult#mypost#myupload#mypicture#mypictures#picture#pictures
9 notes
·
View notes
Text
How to Plan the Perfect Easter Sunday Brunch
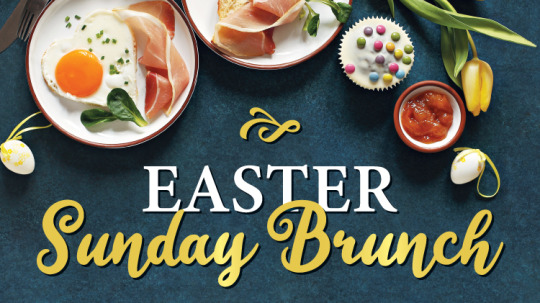
Easter Sunday is a time for celebration and gathering with loved ones. And what better way to celebrate than with a delicious Easter Sunday brunch? Whether you're hosting a small gathering or a large family get-together, planning the perfect Easter brunch can be daunting. But fear not! With a little bit of planning and preparation, you can host a stress-free and unforgettable Easter brunch. Here's how to do it:
1.Choose the right menu: The first step to planning the perfect Easter Sunday brunch is deciding on the menu. Keep in mind that Easter brunch should include both sweet and savory dishes. Consider serving dishes like quiche, baked ham, deviled eggs, pancakes, waffles, and fruit salad. Don't forget to include a variety of beverages like mimosas, coffee, tea, and juice.
2. Plan the table setting: The table setting is an important aspect of any brunch gathering. Consider using pastel-colored tablecloths, napkins, and plates to create a festive atmosphere. You can also add floral centerpieces, Easter decorations, and candles to add a touch of elegance to the table.
3. Create a timeline: Creating a timeline will help you stay organized and ensure that everything runs smoothly on the day of the brunch. Start by making a list of all the dishes you plan to serve and the ingredients you need. Then, determine how long it will take to prepare each dish and create a schedule for the day of the brunch.
4. Get help from guests: Don't be afraid to ask your guests for help. Assign each guest a task, such as bringing a dish or helping with the table setting. This will not only make your job easier, but it will also make your guests feel involved and appreciated.
5. Have fun: Finally, remember that hosting a brunch should be enjoyable, not stressful. Don't get too caught up in the details and make sure to take breaks throughout the day to relax and enjoy the company of your guests.
In conclusion, with a little bit of planning and preparation, hosting the perfect Easter Sunday brunch is achievable. Keep in mind the menu, table setting, timeline, and get help from guests to ensure a stress-free and enjoyable gathering. Happy Easter!
#EasterBrunch#BrunchGoals#EasterSunday#BrunchTime#BrunchLife#EasterCelebration#SundayFunday#EasterFeast#BrunchLover#EasterTableSetting#EasterMenu#EasterFood#EasterRecipes#EasterEntertaining#EasterBaking#EasterSweets#EasterEggs#EasterDecorations#EasterFlowers#EasterPartyPlanning
0 notes
Text
Chocolate Cake Greek Style Made Easy (Aka Pasta Chokolatina)
🍫

Chocolate Cake Greek Style Made Easy (aka pasta Chokolatina) - Eykoli Pasta Sokolatina
BY: Greek Cooking Made Easy
SUBSCRIBE TO MY YOUTUBE CHANNEL: https://www.youtube.com/greekcookingmadeeasy
Check My YouTube Video: HERE
Κοιτάξτε Επίσης Την Συνταγή Μου Σε YouTube Βίντεο, Το Λίνκ Είναι: ΕΔΩ
youtube
SERVES 🍴⃒ PREP. TIME 🕔⃒
12 persons 1 h + 12 h wait
COOK. TIME ♨ DIFFIC. LEVEL 👩🍳⃒
Sponge Cake: 15 min.
Syrup: 2 min
Mousse: 5 min.
Ganache: 5 min Relatively Easy
The Greek cuisine is rich with a huge collection/catalog with desserts that have been accumulated through its longstanding history. Some desserts are attributed even from the ancient Greeks, while many other "late comers" have arrived with the Asia Minor refugees after 1922.
Our pastry making and confectionery have many European and Arabic influences but are also based to our moderate climate and the abundance of fruits.
We have also this huge category of desserts prepared with a base of sponge cake and served in individual thick slices, called "Pasta". Whenever we use the word Pasta we don't mean a macaroni dish but instead a piece of cake made with icing or chocolate ganache and/or whipped cream.
This particular Chocolate Cake that I show you today is considered relatively easy if compared with other Greek Cakes.
In summary, you need to make a thin sponge chocolate cake, a simple syrup, an easy chocolate mouse and an even easier ganache to cover it and garnish it.
Yet, the result is a super delicious cake with a unique flavor that will fascinate kids and adults alike. Perfect for guests and for any occasion and celebration at home: Birthday, Name day, Anniversary, Valentines Day, Christmas/Easter day, you name it.
Follow my step by step instructions and you will succeed 100%. Don't just dream it, make it! Let's start.
Suitable for lacto-ovo vegetarians.
INGREDIENTS
Ingredients for the thin sponge cake:
· 1 cup / 120 gr. / 4.2 oz Self-rising Flour, sifted
· 0.4 cup / 40 gr. / 1.4 oz Cocoa Powder, sifted plus a bit more for the Pyrex dish
· 5 large Eggs at room temperature
· 1/2 cup / 110 gr. / 3.9 oz Sugar
· 8 gr. / 0.3 oz / 2 tsp. Vanilla Sugar
· ½ tsp. Salt

Ingredients for the syrup:
· 1.6 cups / 400 ml / 400 gr. / 14 oz Water
· 1.6 cups / 350 gr. / 12 oz Sugar
· Optional: 1 Shot Brandy (good quality like Metaxa 7*)

Ingredients for the Chocolate Mousse:
· 1.4 cups / 350 ml chilled, Heavy Cream (whipping cream, double cream 35% fat)
· 200 gr. / 7 oz dark Chocolate bar 57% cocoa, cubed
· 1 tsp. Vanilla Extract

Ingredients for the Ganache:
· 1 cup / 250 ml / 250 gr. / 9 oz Whipping (double-heavy) Cream, 35% fat
· 250 gr. / 9 oz dark Chocolate, 57% cocoa, cubed
· Optional for garnishing: 90 gr. / 3.2 oz white Chocolate bar, melted

METHOD:
A. Start by preparing the thin sponge cake (the day before):
1. In a deep plate, mix together the sifted flour with the cocoa powder.
2. Crack the eggs in the bowl of a strong electric mixer (use whisk attachment).
3. Beat them in high speed for 5' until they become white and fluffy, adding the sugar, vanilla and salt.
4. After 5' the egg mixture should be ready!
5. Lower the speed and gradually fold the sifted flour with cocoa mixture into the egg mix, blending it gently.
6. Stop the mixer and continue blending by hand with a soft spatula. You don't want the cake dough to deflate!
7. Next, brush or spray some oil on a large Pyrex dish of 25 x 33 cm / 10 x 13 in. Flour its bottom and sides with some cocoa powder, shaking it to remove excess!
8. Tip the sponge cake dough into the dish. It is now ready to be baked.
B. Baking instructions:
9. Place the Pyrex dish on the middle shelf of a preheated oven, top / bottom heat elements on = @ 180℃ / 350℉, and bake for about 15' (depends on the oven).
10. After 15', test if the cake is baked through by inserting a long toothpick into it. It needs to come out clean and cake should look fluffy and light.
11. Place the dish on the kitchen bench so that the cake cools down completely.
12. Store the Pyrex dish with the cake, in the fridge, covered with plastic wrap, until the next day.
13. Tip: You can prepare the cake ahead of time, and store in the Pyrex, in a plastic bag either in the fridge for 1 week or in the freezer for 1 month.
C. Prepare the syrup:
14. In a saucepan over low heat, combine sugar and water.
15. Bring to a boil and stir gently regularly until syrup becomes clear (translucent). Let syrup boil for 2' more, gently stirring it every minute.
16. After 2' turn off the heat. Now pour the brandy in (highly recommended).
17. Bring Pyrex dish with cake from the fridge (don't take cake out from the Pyrex!).
18. Pour the hot syrup slowly and evenly over the top and all around the cooled down cake.
19. Tip: If you have just taken the cake out of the oven and it's still hot, then prepare syrup earlier and let cool down before pouring on top of the hot chocolate cake (or vice versa, i.e. one of the 2 should be hot, not both!).
20. Let cake cool down completely, covered with plastic wrap, in the fridge for 1-2 h.
D. Prepare the easy chocolate mousse:
21. Make first whipped cream by pouring the chilled heavy cream in the bowl of a strong electric mixer (with the whisk attachment).
22. Start beating at low speed and increase to medium-high.
23. Continue beating for about 15'-20' until you see the cream increasing in volume by nearly double. Slowly and gradually the fluid cream will progress into a firmer cream.
24. Note: Don't add any powder sugar in the cream. This chocolate cake is quite sugary due to its syrup and the sponge cake itself!
25. Continue beating the heavy cream until it has tight swirl marks and stiff peaks.
26. Important Note: Don’t overbeat it or your cream will start turning into butter instead!
27. Stop the mixer.
28. While waiting, melt the chocolate pieces for the mousse in the microwave @90W for 5' at first.
29. Check it and add 6'-7' extra or more i.e. until it melts completely (depends on the microwave).
30. When ready, remove from the microwave and let it cool down.
31. Next, pour the brandy in the whipped cream and then gradually fold the reserved, cool melted chocolate.
32. Blend slowly until combined with a spoon. Chocolate Mousse is ready. E. Assembly time:
33. Bring the chocolate mousse next to the Pyrex with the cool, syrupy chocolate cake.
34. Spread it evenly on top of the cake, straightening it with your spatula.
35. Return Pyrex with chocolate cake in the fridge, covered with plastic wrap, for 3 h to set. F. Prepare the simple ganache:
36. Place a small pot with the whipping (double) cream over low heat.
37. Let cream warm up gradually, stirring regularly.
38. When it just begins to boil, add the dark chocolate cubes in the cream.
39. Mix them together, with a whisk, until chocolate has melted completely, it's blended with the cream which is now thick, smooth and creamy.
40. Turn off the heat and ganache is now ready! Let it cool down for 15 min.
41. With a spatula, spread the ganache to cover the cake completely. Straighten the surface with your spatula.
42. Let Pyrex with cake in the fridge for 3-4 hours to set and chill, covered with aluminum foil (to leave some space for the ganache to solidify).
43. Optionally, after the ganache has chilled and turned solid, you can garnish the chocolate cake with melted, white chocolate.
44. Melt the white chocolate pieces in the microwave @90W for about 8' or until it melts completely.
45. Use a small whisk to scatter it all over the top of the cake and to garnish it by making strips and festoons.
46. Return cake in the fridge until you serve it (about 3 h), cut in 12 equal squares (pasta).


G. Serving suggestion:
A very chocolaty, fluffy, syrupy, sponge cake topped with a lush, easy to prepare mousse and an enchanting ganache! Easy, low-cost, it can be served all year, prepared quickly AND delicious! Come for a kerasma (treat)!!


A super delectable cake that you won't stop at the first piece, with a unique flavour that will fascinate kids and adults alike. Don’t just dream it, make it and enjoy it!

H. Storage Info:
Store the cake as is in the Pyrex, in the fridge, covered with aluminum foil or wrap. It will stay fresh for 4-5 days and won't dry, because it contains syrup.
Although I sincerely doubt it will last that long!
I. Greece-Tourist Guide:
Visit any pastry shop in any city in Greece (or even a large bakery) and you will see a huge variety of sweets made with sponge cake, white or chocolate or with caramel, sold in individual "Pasta" pieces.

Check my YouTube Video: HERE
Εύκολη Πάστα Σοκολατίνα
BY: Greek Cooking Made Easy
SUBSCRIBE TO MY YOUTUBE CHANNEL: https://www.youtube.com/greekcookingmadeeasy
ΜΕΡΙΔΕΣ🍴⃒ ΠΡΟΕΤΟΙΜΑΣΙΑ 🕔⃒
12 1 h + 12 h αναμονή
ΜΑΓΕΙΡΕΜΑ ♨ ΒΑΘΜ. ΔΥΣΚΟΛΙΑΣ 👩🍳⃒
Παντεσπάνι: 15 min.
Σιρόπι: 2 min
Μους: 5 min.
Γκανάζ: 5 min Σχετικά Εύκολη
Η ελληνική κουζίνα είναι πλούσια με μια τεράστια συλλογή/κατάλογο από γλυκά/επιδόρπια που έχουν συλλεχθεί μέσα από τη μακρόχρονη ιστορία της. Μερικά επιδόρπια αποδίδονται ακόμη και από την αρχαία Ελλάδα, ενώ πολλά άλλα «νεότερα» έχουν φτάσει με τους Μικρασιάτες πρόσφυγες μετά το 1922.
Η Ελληνική ζαχαροπλαστική έχει πολλές ευρωπαϊκές αλλά και αραβικές επιρροές, αλλά βασίζεται και στο ήπιο κλίμα και την αφθονία των φρούτων.
Ταυτόχρονα, έχουμε την τεράστια κατηγορία γλυκών που παρασκευάζονται με βάση το παντεσπάνι και σερβίρονται σε ατομικές χοντρές μερίδες, που ονομάζονται "Πάστες". Όποτε χρησιμοποιούμε αυτή τη λέξη δεν εννοούμε φυσικά ένα πιάτο με μακαρόνια, αλλά ένα κομμάτι κέικ με γλάσο ή ganache σοκολάτας και/ή σαντιγί.
Το Σοκολατένιο Κέικ/Πάστα που σας δείχνω σήμερα θεωρείται σχετικά εύκολο αν συγκριθεί με άλλες πάστες.
Περιληπτικά, πρέπει να φτιάξετε λεπτό σοκολατένιο παντεσπάνι, απλό σιρόπι, εύκολη μους σοκολάτας και μια ακόμα πιο εύκολη ganache για να το καλύψετε και να το γαρνίρετε.
Ωστόσο, το αποτέλεσμα είναι μια πεντανόστιμη πάστα σοκολατίνα με μοναδική γεύση που θα ξετρελάνει μικρούς και μεγάλους. Ιδανικό για καλεσμένους και για κάθε περίσταση και γιορτή στο σπίτι - Γενέθλια, Ονομαστική γιορτή, Επέτειος γάμου, Ημέρα του Αγίου Βαλεντίνου, Ημέρα των Χριστουγέννων/Πάσχα.
Ακολουθήστε τις οδηγίες μου βήμα-βήμα και θα τα καταφέρετε 100%. Μην απλά την ονειρεύεστε, φτιάξτε τη! Ας ξεκινήσουμε.
Κατάλληλη για χορτοφάγους.
ΥΛΙΚΑ
Υλικά για το λεπτό παντεσπάνι:
• 1 φλ. / 120 γρ. / 4,2 oz Αλεύρι που φουσκώνει μόνο του, κοσκινισμένο
• 0,4 φλ. / 40 γρ. / 1,4 oz Κακάο σκόνη, κοσκινισμένο και λίγο ακόμα για το Pyrex
• 5 μεγάλα Αυγά σε θερμοκρασία δωματίου
• 1/2 φλ. / 110 γρ. / 3,9 oz Ζάχαρη
• 8 γρ. / 0,3 oz / 2 κ.γ. Βανίλια σκόνη, βανιλίνη
• ½ κ.γ. Αλάτι
Υλικά για το σιρόπι:
• 1,6 φλ. / 400 ml / 400 γρ. / 14 oz Νερό
• 1,6 φλ. / 350 γρ. / 12 oz Ζάχαρη
• Προαιρετικά: 1 σφηνάκι Κονιάκ (καλής ποιότητας όπως το Metaxa 7*)
Υλικά για τη Μους σοκολάτα:
• 1,4 φλ. / 350 ml πολύ κρύα Κρέμα γάλακτος (ζαχαροπλαστικής με 35% λιπαρά)
• 200 γρ. / 7 oz σοκολάτα Κουβερτούρα 57% κακάο, σε κυβάκια
• 1 κ.γ. Εκχύλισμα βανίλιας
Υλικά για τη Ganache:
• 1 φλ. / 250 ml / 250 γρ. / 9 oz Κρέμα γάλακτος (ζαχαροπλαστικής με 35% λιπαρά)
• 250 γρ. / 9 oz Σοκολάτα Κουβερτούρα 57% κακάο, σε κυβάκια
• Προαιρετικά για γαρνίρισμα: 90 γρ. / 3,2 oz λευκή Σοκολάτα, λιωμένη
ΜΕΘΟΔΟΣ:
Α. Ξεκινήστε ετοιμάζοντας το λεπτό παντεσπάνι (την προηγούμενη μέρα):
1. Σε ένα βαθύ πιάτο ανακατέψτε μαζί το κοσκινισμένο αλεύρι με το κακάο.
2. Σπάστε τα αυγά στο μπολ ενός δυνατού ηλεκτρικού μίξερ (χρησιμοποιήστε το εξάρτημα σύρμα).
3. Χτυπήστε τα σε δυνατή ταχύτητα για 5' μέχρι να ασπρίσουν και να αφρατέψουν προσθέτοντας τη ζάχαρη, τη βανίλια και το αλάτι.
4. Μετά από 5' το μείγμα των αυγών πρέπει να είναι έτοιμο!
5. Χαμηλώστε την ταχύτητα και διπλώστε σταδιακά το αλεύρι με το κακάο στο μείγμα των αυγών, ανακατεύοντάς απαλά.
6. Σταματήστε το μίξερ και συνεχίστε το ανακάτεμα με το χέρι με μια μαλακή σπάτουλα (μαρίζα). Δεν θέλετε να σας ξεφουσκώσει η ζύμη για το παντεσπάνι!
7. Στη συνέχεια, αλείψτε ή ψεκάστε λίγο λάδι σε ένα μεγάλο ταψί Pyrex διαστάσεων 25 x 33 εκ. / 10 x 13 ίντσες. Αλευρώστε τον πάτο και τα πλαϊνά του με λίγη σκόνη κακάο, ανακινώντας το για να αφαιρέσετε το περίσσειο!
8. Ρίξτε τη ζύμη για το παντεσπάνι στο ταψί. Έτοιμο για ψήσιμο.
Β. Οδηγίες ψησίματος:
9. Βάλτε το ταψί Pyrex στο μεσαίο ράφι ενός προθερμασμένου φούρνου, στις πάνω/κάτω αντιστάσεις = @ 180℃ / 350℉, και ψήστε για περίπου 15' (εξαρτάται από τον φούρνο).
10. Μετά από 15', δοκιμάστε αν έχει ψηθεί βάζοντας μέσα ένα ξύλινο σουβλί. Πρέπει να βγει καθαρό και το παντεσπάνι να φαίνεται αφράτο και ελαφρύ.
11. Βάλτε το ταψί στον πάγκο της κουζίνας ώστε να κρυώσει εντελώς.
12. Διατηρήστε το σκεύος με το παντεσπάνι, στο ψυγείο, σκεπασμένο με μεμβράνη, μέχρι την επόμενη μέρα.
13. Συμβουλή: Μπορείτε να ετοιμάσετε το παντεσπάνι από πριν, και να το φυλάξετε μέσα στο Pyrex, σε πλαστική σακούλα είτε στο ψυγείο για 1 εβδομάδα ή στη κατάψυξη για 1 μήνα.
Γ. Ετοιμάστε το σιρόπι:
14. Σε ένα κατσαρόλι πάνω από χαμηλή φωτιά ανακατέψτε τη ζάχαρη και το νερό.
15. Αφήστε να πάρει μια βράση ανακατεύοντας τακτικά μέχρι το σιρόπι να γίνει διαυγές. Αφήστε το σιρόπι να βράσει για 2' ακόμα, ανακατεύοντάς απαλά κάθε λεπτό.
16. Μετά από 2' σβήστε τη φωτιά. Τώρα ρίξτε μέσα το κονιάκ (συνιστάται ανεπιφύλακτα).
17. Φέρτε από το ψυγείο το ταψί πυρέξ με το παντεσπάνι (μην βγάλετε το παντεσπάνι από το πυρέξ!).
18. Ρίξτε το καυτό σιρόπι αργά και ομοιόμορφα πάνω και γύρω γύρω από το κρύο παντεσπάνι.
19. Συμβουλή: Αν μόλις βγάλατε το παντεσπάνι από το φούρνο και είναι ακόμα πολύ ζεστό, τότε ετοιμάστε το σιρόπι νωρίτερα και αφήστε το να κρυώσει πριν το ρίξετε πάνω από το καυτό σοκολατένιο παντεσπάνι (ή και το αντίστροφο, δηλαδή ένα από τα 2 να είναι ζεστό, όχι και τα δύο!).
20. Αφήστε το ποτισμένο σοκολατένιο παντεσπάνι να κρυώσει εντελώς, καλυμμένο με μεμβράνη, στο ψυγείο για 1-2 ώρες.
Δ. Ετοιμάστε την εύκολη Μους σοκολάτας:
21. Φτιάξτε πρώτα σαντιγί ρίχνοντας την παγωμένη κρέμα γάλακτος στο μπολ ενός δυνατού ηλεκτρικού μίξερ (με το εξάρτημα σύρμα).
22. Ξεκινήστε να χτυπάτε σε χαμηλή ταχύτητα και αυξήστε το σε μέτρια-υψηλή.
23. Συνεχίστε το χτύπημα για περίπου 15'-20' μέχρι να δείτε την κρέμα να διπλασιάζεται σχεδόν σε όγκο. Σιγά σιγά και σταδιακά η ρευστή κρέμα θα γίνει πιο σφιχτή.
24. Σημείωση: Μην προσθέσετε ζάχαρη άχνη στην κρέμα. Αυτό το γλύκισμα είναι αρκετά γλυκό από το σιρόπι αλλά και το παντεσπάνι!
25. Συνεχίστε το χτύπημα της κρέμας μέχρι να φτιάχνει ραβδώσεις από πάνω και σφιχτές κορφούλες.
26. Σημαντική σημείωση: Μην παραχτυπήσετε τη κρέμα επειδή θα αρχίσει να μετατρέπεται σε βούτυρο!
27. Σταματήστε το μίξερ.
28. Όσο περιμένετε, λιώστε τα κομμάτια σοκολάτα κουβερτούρα για τη μους στο φούρνο μικροκυμάτων @90W για 5' στην αρχή.
29. Τσεκάρετε και προσθέστε 6'-7' επιπλέον ή και περισσότερα, δηλαδή μέχρι να λιώσει τελείως (εξαρτάται από τον φούρνο μικροκυμάτων).
30. Μόλις λιώσει, αφαιρέστε από τον φούρνο μικροκυμάτων και αφήστε στην άκρη να κρυώσει.
31. Στη συνέχεια, ρίξτε το κονιάκ στη σαντιγί και μετά διπλώστε σταδιακά την λιωμένη σοκολάτα.
32. Ανακατέψτε αργά μέχρι να ενωθούν καλά με ένα κουτάλι. Η μους σοκολάτας είναι έτοιμη.
Ε. Ώρα συναρμολόγησης:
33. Φέρτε τη μους σοκολάτας δίπλα στο Pyrex με το σιροπιαστό σοκολατένιο παντεσπάνι.
34. Απλώστε τη μους ομοιόμορφα πάνω από το παντεσπάνι, ισιώνοντάς την επιφάνεια με τη σπάτουλα σας.
35. Επιστρέψτε το Pyrex με το σοκολατένιο παντεσπάνι στο ψυγείο, καλυμμένο με πλαστική μεμβράνη, για 3 ώρες να σταθεροποιηθεί και να δέσει.
Z. Ετοιμάστε την απλή Γκανάζ (ganache):
36. Τοποθετήστε μια μικρή κατσαρόλα με τη κρέμα ζαχαροπλαστικής πάνω από ��αμηλή φωτιά.
37. Αφήστε την κρέμα να ζεσταθεί σταδιακά, ανακατεύοντας τακτικά.
38. Μόλις αρχίσει να βράζει, προσθέστε τους κύβους κουβερτούρα στην κρέμα.
39. Ανακατέψτε τα μαζί, με το σύρμα, μέχρι να λιώσει τελείως η σοκολάτα, να αναμιχθεί με την κρέμα που θα είναι πλέον πηχτή, λεία και κρεμώδης.
40. Σβήστε τη φωτιά και η γκανάζ είναι τώρα έτοιμη! Αφήστε τη λίγο να κρυώσει για 15 λεπτά.
41. Με μια σπάτουλα, απλώστε τη γκανάζ να καλύψει εντελώς τη μους. Ισιώστε την επιφάνεια με τη σπάτουλα σας.
42. Αφήστε το Pyrex με τη Πάστα Σοκολατίνα στο ψυγείο για 3-4 ώρες να σφίξει και να παγώσει, σκεπασμένο με αλουμινόχαρτο (ώστε να αφήσει χώρο να παγώσει καλά η γκανάζ).
43. Προαιρετικά, αφού η γκανάζ κρυώσει και στερεοποιηθεί, μπορείτε να γαρνίρετε τη Πάστα Σοκολατίνα με λιωμένη, λευκή σοκολάτα.
44. Λιώστε τα κομμάτια λευκής σοκολάτας στο φούρνο μικροκυμάτων @90W για περίπου 8' ή μέχρι να λιώσει τελείως.
45. Χρησιμοποιήστε ένα μικρό σύρμα για να τη σκορπίσετε πάνω από τη Σοκολατίνα και να γαρνίρετε φτιάχνοντας λωρίδες και ραβδώσεις.
46. Επιστρέψτε τη Πάστα Σοκολατίνα στο ψυγείο μέχρι να τη σερβίρετε (περίπου 3 ώρες), κομμένη σε 12 ίσες Πάστες.
H. Πρόταση σερβιρίσματος:
Μια πολύ σοκολατένια, αφράτη, σιροπιαστή, Πάστα Σοκολατίνα με πλούσια, εύκολη στην παρασκευή μους και μια μαγευτική ganache! Εύκολη, χαμηλού κόστους, σερβίρεται όλο το χρόνο, ετοιμάζεται γρήγορα ΚΑΙ είναι και πεντανόστιμη! Ελάτε για κέρασμα!!
Σούπερ απολαυστική Πάστα Σοκολατίνα που δεν θα σταματήσετε στο πρώτο κομμάτι, με μοναδική γεύση που θα ξετρελάνει μικρούς και μεγάλους. Μην απλά την ονειρεύεστε, φτιάξτε τη και απολαύστε τη!
Θ. Πληροφορίες φύλαξης:
Φυλάξτε την Πάστα Σοκολατίνα όπως είναι στο Pyrex, στο ψυγείο, σκεπασμένη με αλουμινόχαρτο ή με μεμβράνη. Θα μείνει φρέσκια για 4-5 μέρες και δεν θα στεγνώσει, γιατί περιέχει σιρόπι.
Αν και ειλικρινά αμφιβάλλω ότι θα διαρκέσει τόσο πολύ!
Ι. Ελλάδα-Τουριστική οδηγία:
Επισκεφτείτε οποιοδήποτε ζαχαροπλαστείο σε κάθε πόλη της Ελλάδας (ή ακόμα και μεγάλο φούρνο) και θα δείτε μια τεράστια ποικιλία από γλυκά φτιαγμένα με βάση το παντεσπάνι, λευκά ή σοκολατένια ή με καραμέλα που πωλούνται σε ατομικές "Πάστες".
Κοιτάξτε επίσης την συνταγή μου σε YouTube βίντεο, το λίνκ είναι: ΕΔΩ

#Youtube#desserts#cake#syrupy#chocolate#christmas#christmassweets#easter#eastersweets#party#kids#mother#valentine#vegetarian#σιροπιαστα#σιροπιαστά#παστα σοκολατινα#σοκολατίνα πάστα#chocolate cake greek style#chocolate cake
1 note
·
View note
Photo

These are my faves from the Easter set this year. I love them and I can't wait to make more next week for the store! . . . #easter #eastercookies #eastersweets #sugarcookiesofinstagram #sugarcookies #decoratedsugarcookies #decoratedcookies #cookies #bakerylife https://www.instagram.com/p/Bvmi6fUpMZ3/?utm_source=ig_tumblr_share&igshid=5lftq7yw6gfj
#easter#eastercookies#eastersweets#sugarcookiesofinstagram#sugarcookies#decoratedsugarcookies#decoratedcookies#cookies#bakerylife
1 note
·
View note
Photo

Και κάπου εδώ θα ήθελα να ευχαριστήσω τις οδοντογλυφιδες που με βοήθησαν να κάνω τη δουλειά μου ως ειδική τσιμπηματολογος!!! Hint... Η τελευταία φωτογραφία δείχνει τι θα έχουμε να καθαρίσουμε μετά! Καλό Πάσχα σε όλους!!! #melitinia #santorini #eastersweets #traditionalsweets (at Salamina Island, Greece - Σαλαμίνα, Ελλάδα) https://www.instagram.com/p/COC9IjjFRAUh4L54l8eoqoJDX6Cbb_2-MeqCyY0/?utm_medium=tumblr
0 notes
Photo

Sweet Easter Greetings!🐣💘💐 #eastersweets #eastercookies #birdsnest #cornflakebirdsnest #maltballs #whoppers #eastereggs #eastercandy #eastergreetings #love #sendinglove #blueacres #blueacreseastport (at Eastport, New York) https://www.instagram.com/p/CNQxTVCMeR3/?igshid=1tplmvbjac8cj
#eastersweets#eastercookies#birdsnest#cornflakebirdsnest#maltballs#whoppers#eastereggs#eastercandy#eastergreetings#love#sendinglove#blueacres#blueacreseastport
0 notes
Photo

Easter witches - that's how we celebrate in Sweden 😆 In this household one lucky child gets both a Swedish and a Scottish Easter egg 🐣 🌿💚🍬🍫💛 . . . . . #eastercelebrations #happyeaster #eastersweets #veganpicknmix #veganeaster #crueltyfreeeaster #påskkärring #påsk #påskägg #gladpåsk #sweets #witch #easterwitch #easteregg https://www.instagram.com/p/CNNOqbfBr7D/?igshid=6ic2s4ykj0xx
#eastercelebrations#happyeaster#eastersweets#veganpicknmix#veganeaster#crueltyfreeeaster#påskkärring#påsk#påskägg#gladpåsk#sweets#witch#easterwitch#easteregg
0 notes
Photo

Nothing signals spring is here like a homemade carrot cake, and here's mine! Thanks to Chef John for the recipe, especially since he, like me, prefers carrot cake without raisins. I know, I know, raisins are a heavily debated ingredient when it comes to carrot cake, and I'm of the opinion that they're not needed. Raisins are sweet enough on their own, so add them to a cake that's covered with rich cream cheese frosting and it's just too much. A well-spiced carrot cake and a good cream cheese frosting are all you need. And this cake is DELICIOUS. The only thing I changed was I didn't add nuts to it. I'm not a fan of nuts in cakes or muffins; they mess up the otherwise wonderfully fluffy texture. But anyway, this cake rocks and I'm already tempted to go grab another slice from the fridge. Yum, yum! Chef John's Carrot Cake: https://www.allrecipes.com/recipe/263516/chef-johns-carrot-cake/ #FoodWishes #CarrotCake #SpringtimeRecipes #EasterSweets #OstaraTreats #EasyBaking https://www.instagram.com/p/B-6BI40HDW-/?igshid=1g1obye40a30o
0 notes
Photo

The dough is made with wheat flour or semolina (or a combination of the two), then pressed into special molds, traditionally carved in wood. And the fillings are fragrant with rosewater or orange blossom. Semolina (“smeed”) which is the coarse, purified wheat middling of durum wheat. Coarse semolina is typically a bit yellowish in color and is known as “smeed khishin”, or coarse “smeed”. Fine semolina is another ingredient in Maamoul and can be known as “farina”, or in Arabic “smeed naaim”. . Maamoul with walnuts (52g) = 260 calories, Maamoul with dates (52g) = 245 calories. Enjoy in moderation and stick to one maamoul a day! Happy Easter! . #shareyourmaamoul . #mamoul #maamoul #ma3moul #semolinacookies #eastercookies #eastertreats #pistachiomaamoul #almondmaamoul #walnutmaamoul #homemademaamoul #homebakedmaamoul #easterholidays #eastersweets #easter2020 #sweets #eastersweets #middleeasternfood #middleeasternsweets #lebanesesweets #datesmaamoul #biscuits #sugarrush #desserts #mondaymorning #stayhomestaysafe #quarantine #sharingjoy #sharinghappiness #lebanon https://www.instagram.com/p/B-6tk4uBDhj/?igshid=1nk4rorvt7pg6
#shareyourmaamoul#mamoul#maamoul#ma3moul#semolinacookies#eastercookies#eastertreats#pistachiomaamoul#almondmaamoul#walnutmaamoul#homemademaamoul#homebakedmaamoul#easterholidays#eastersweets#easter2020#sweets#middleeasternfood#middleeasternsweets#lebanesesweets#datesmaamoul#biscuits#sugarrush#desserts#mondaymorning#stayhomestaysafe#quarantine#sharingjoy#sharinghappiness#lebanon
1 note
·
View note
Photo

🍫🍭🌻🐰
#lollipop#chocolate#chocolatelollipop#sunflower#bunny#rabbit#animals#nature#easterbunny#eastercandy#eastersweets#easter2018#Easter#indigo#mypost#myupload#mypicture#mypictures#picture#pictures
2 notes
·
View notes
Text
The History and Tradition of the Chocolate Easter Bunny
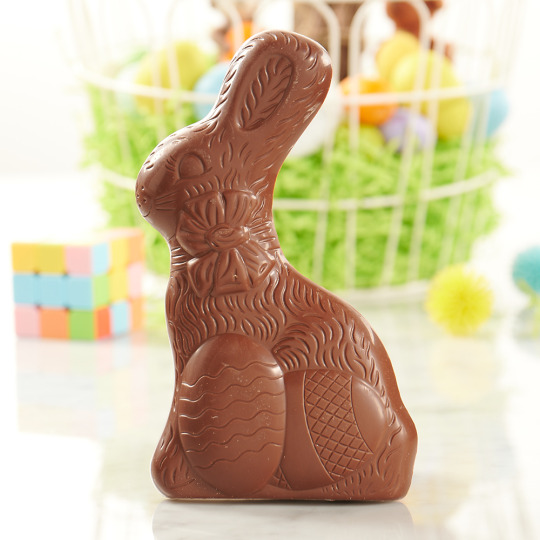
As Easter approaches, one of the most iconic symbols of the holiday is the chocolate Easter bunny. These sweet treats have become a staple of Easter baskets and celebrations, but have you ever wondered about the history and significance of this beloved confection? In this blog post, we will explore the origins and evolution of the chocolate Easter bunny.
The tradition of Easter eggs dates back to ancient times, but the chocolate Easter bunny is a more recent invention. The first chocolate Easter bunny was created in Germany in the 1800s, where the bunny was a popular symbol of spring and fertility. The first chocolate bunnies were made by hand, and their molds were often carved from wood.
As the tradition of the chocolate Easter bunny spread throughout Europe and eventually to the United States, the manufacturing process became more sophisticated. Today, most chocolate Easter bunnies are made using industrial molds, which can produce hundreds or even thousands of identical bunnies in a short amount of time.
But the chocolate Easter bunny is more than just a tasty treat. It is also a symbol of the resurrection of Jesus Christ, which is at the heart of the Easter holiday. In Christian tradition, the bunny represents new life and rebirth, just as the resurrection represents the triumph of life over death.
The chocolate Easter bunny has also taken on a cultural significance beyond its religious origins. It has become a symbol of spring and the renewal of the natural world after a long, cold winter. For many people, the chocolate bunny represents the joy and excitement of the Easter season, and it is a beloved tradition that brings families and communities together.
Despite its popularity, the chocolate Easter bunny is not without controversy. In recent years, there has been growing concern about the use of palm oil in chocolate production. Palm oil is a widely used ingredient in many chocolate products, but its production has been linked to deforestation and the destruction of wildlife habitats.
To address this issue, some chocolate manufacturers have begun using sustainable palm oil or switching to alternative ingredients altogether. Others have turned to organic and fair-trade chocolate to ensure that their products are ethically and sustainably produced.
In addition to ethical concerns, there are also practical considerations when it comes to the chocolate Easter bunny. Because chocolate is a delicate and perishable substance, it is important to store your Easter bunny properly to ensure its freshness and quality.
Ideally, chocolate should be stored in a cool, dry place at a temperature between 60 and 70 degrees Fahrenheit. Avoid exposing your chocolate bunny to direct sunlight or heat, as this can cause it to melt or become discolored. If you want to enjoy your chocolate bunny over a longer period of time, consider wrapping it in aluminum foil or plastic wrap and storing it in the refrigerator.
In conclusion, the chocolate Easter bunny is a beloved tradition that has become an important symbol of the Easter holiday. It represents the joy and excitement of spring and the renewal of life, and it brings families and communities together in celebration. While there are ethical and practical concerns surrounding the production and storage of chocolate, with careful attention to these issues, we can continue to enjoy this sweet treat for many years to come.
#ChocolateEasterBunny#EasterTreats#EasterTraditions#EasterSweets#EasterChocolate#EasterCelebrations#EasterSeason#EasterJoy#SpringtimeSweets#SpringCelebrations#EasterGifts#HolidayTreats#EasterGoodies#EasterCandy#EasterEggsAndBunnies#EasterBasketFillers#EasterFun#EasterExcitement#EasterHolidays#EasterDay2023
0 notes