#Errorlog
Explore tagged Tumblr posts
Visit Tumblr Blog
Explore Tumblr blogs with no restrictions, modern design and the best experience.
Last Seen Tumblr Blogs


Fun Fact
Tumblr is used by 21% of adults online aged 18-29 years.
Text
user: failedsystemupdate timestamp: [REDACTED]
you: the system lied again. you: said they wanted "fresh perspective" you: then recycled the same old code you: am I the glitch or the ghost?
system: error. input not valid. system: hope.exe failed to launch.
you: I'm not even angry. you: I'm just tired of buffering. you: tired of pretending to be enough for something. you: that never even tried to read my file.
system: corrupted data detected. system: would you like to reboot?
you: no. you: I'd like to burn.
system: command received.
#ragecore#failedsystemupdate#errorlog#digitaldespair#unhinged#bufferingforever#fuck the system#errorinprogess
0 notes
Text
14 Most Common WordPress Errors and How to Resolve Them
#WordPress Errors#WordPressErrors#WordPressTroubleshooting#FixWordPressIssues#CommonWordPressProblems#WordPressDebugging#WordPressHelp#WordPressFixes#WordPressSupport#WordPressErrorGuide#WordPressBeginnerTips#WordPressMaintenance#WhiteScreenOfDeath#WordPress404Error#InternalServerError#WordPressErrorSolutions#AdminLoginIssues#BrokenLinks#ThemeIssues#PluginConflicts#WordPressEmailIssues#SiteCrashed#HostingProblems#RecoveryTips#ErrorLog#FixYourSite#SiteOptimization#WPConfiguration#PerformanceIssues#UpdateErrors
0 notes
Text

#WordPress#ErrorLogs#WebDevelopment#Troubleshooting#WPWeb#TechGuide#HowTo#Webmaster#CodingTips#Debugging#wpwebinfotech
0 notes
Text
Chapter 2 November 16 Thread D
[774152566/ Dr. Kuneyasu] Mikuma just messaged me. He's saying things about you behind your back. Told me to hide out from you in the engineering department. I'm guessing I'm not the only one he's giving that suggestion to.
[154314147/ Dr. Toranosuke] Oh my. That's hardly very friendly. Why would he do that
[774152566/ Dr. Kuneyasu] Not that it matters, but that's where Suga's been hiding out too. Engineering has their own little shelter set up over there.
[154314147/ Dr. Toranosuke] Thank you for letting me know, Seki. You're impressively reliable. I'll have to have a word with Dr. Higashigaki.
[774152566/ Dr. Kuneyasu] I just told him what he wanted to hear and closed the thread
[154314147/ Dr. Toranosuke] Very good boy. I don't suppose you have any updates on Dr. Kitamuro and that boy from psychology for me as well?
[774152566/ Dr. Kuneyasu] The trial took up most of my time for the past few hours. Sorry.
[154314147/ Dr. Toranosuke] I suppose you're not to blame. That responsibility would fall on Yonekura for assigning the task to someone incapable of completing it in a timely manner. Perhaps she should have left the matter to someone like Hattori or Murunaga.
[774152566/ Dr. Kuneyasu] I'll be back up to date with it tomorrow, I promise.
[154314147/ Dr. Toranosuke] No need. I'll see that the task is reassigned to someone more attentive.
[774152566/ Dr. Kuneyasu] Don't do that. I'm good at observation, I can keep up with it, I was just busy today because of the trial. I'll have more time now.
[154314147/ Dr. Toranosuke] Seki. There's no need. I'll have it reassigned.
[774152566/ Dr. Kuneyasu] I'll have time now though. I promise. I won't miss another day. I can go do the observation notes literally right now.
[154314147/ Dr. Toranosuke] Perhaps I'm not making myself clear. You've already failed. There's no need to grovel at this point, because you've already dropped the ball. I'm reassigning the task because I don't trust you to complete it. Is that understandable for you?
[154314147/ Dr. Toranosuke] Come now. Are you sad? No need to go quiet on me.
[774152566/ Dr. Kuneyasu] This isn't fair, I've been keeping up with observation every single day before now
[154314147/ Dr. Toranosuke] Indeed! But today, you failed. I'd like observation to be conducted by someone who *won't* fail. That's the incongruence.
[154314147/ Dr. Toranosuke] Perhaps the task can be passed off to Suga, since he's currently without a department? It's good busywork.
[774152566/ Dr. Kuneyasu] Why are you doing this to me
[154314147/ Dr. Toranosuke] I'm afraid I'm not sure what you mean!
[774152566/ Dr. Kuneyasu] You're doing this on purpose
[154314147/ Dr. Toranosuke] Hah, I suppose you've caught me. I was just looking to get a little rise out of you. You can keep up with your little terminals all you'd like, Seki. They're very helpful.
[154314147/ Dr. Toranosuke] You're doing very good work. Thank you very much. I assure you I won't be replacing you with Suga. It simply wouldn't be the same. Thank you affording me a bit of entertainment either way.
[154314147/ Dr. Toranosuke] I wouldn't want to leave you feeling as though I didn't appreciate you over a little joke. You know I was only kidding, yes Seki
[154314147/ Dr. Toranosuke] I appreciate you greatly. You're a very, very helpful assistant. Don't be sad. I wouldn't replace you.
[154314147/ Dr. Toranosuke] Seki?
[774152566/ Dr. Kuneyasu] Yeah?
[154314147/ Dr. Toranosuke] I'd like you to do me a favour.
[774152566/ Dr. Kuneyasu] What is it?
[THREAD CLOSED - VIEW ERRORLOG 332]
#tetro pink#tetro spoilers#tetro staffside#tetro chapter 2#november thread#thread closed#kan toranosuke#seki kuneyasu#cw emotional abuse
2 notes
·
View notes
Text
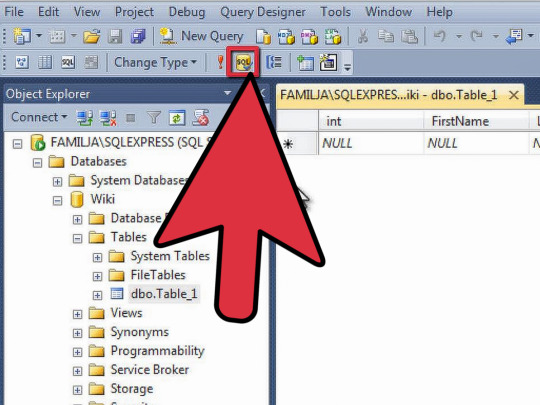
Checking SQL Server Error Logs
Error logs contain critical information for troubleshooting issues Followings are the commands: EXEC sp_readerrorlog; EXEC xp_readerrorlog 0, 1, N''; Checking the log files directly: By default, SQL Server error logs are located in the LOG folder within the SQL Server installation directory (e.g., C:\Program Files\Microsoft SQL Server\MSSQL.n\ MSSQL\LOG\ERRORLOG).
0 notes
Link
Hello Magento Friends,
“There has been an error processing your request” is a common message you will embrace while working with Magento 2. For security reasons, Magento 2 hides a full error and shows the message with "Error log record number" reference.
Checkout Step by Step Solution:
[Solved] Magento 2: “There has been an error processing your request”
1 note
·
View note
Text
Rebuild and Restore Master Database in SQL Server
Rebuild and Restore Master Database in SQL Server
The Master database is important to your SQL Server instance. This database records all the system-level information for your SQL Server system. This includes instance-wide metadata like logon accounts, endpoints, linked servers, system configuration settings, and records for the existence of all other databases and their file locations.
SQL Server cannot start if the Masterdatabase is…
View On WordPress
1 note
·
View note
Photo

..................................................................................................
6 notes
·
View notes
Text
A convenient way to Filter ErrorLog
A convenient way to Filter ErrorLog

Have you ever wished there was a “grep -i5” equivalent feature in Windows where you could just get what you need along with its surrounding messages so you can actually understand what went wrong?
Microsoft SQL Server is a very good RDBMS but it’s far from perfect. It is very painful to read error logs from the GUI.
To give you an example –
I want to fetch errors related to service broker from…
View On WordPress
#Powershell SQL Server#Query Errorlog with PowerShell#sql server#SQL Server Errorlog Grep#SQL Server Errorlog PowerShell
0 notes
Text
How To Make Your Own Website and Monetize it?

By following up with me in less than twenty-four hours, you will be ready to launch a Website that will undoubtedly earn you thousands of dollars every month! How to generate the money? Well, the website that we make will be offering SAAS service.
What is a SAAS service?
A SAAS (Software As A Service) service is essentially an online software or service that you pay to use.
For example, Mailchimp.com, which is a SAAS service, provides email marketing services that you pay for.

A SAAS service is anything you pay for to get an online service.
Now you can be the owner of a SAAS service, you will have your own Website, and people will subscribe to your service and pay you monthly recurring payments.
Let’s say you have 100 customers who use your SAAS service, and your service costs about $10 a month; you’d make $1000 per month!
All you have to do is sit at home and watch your passive income develop on your computer screen. It’s a fantastic and easy way to earn money.
How to get a SAAS service?

“How can I get my own SAAS service or software?” you might be wondering. The good news is that you don’t have to create one, learn to program, or even employ a programmer to do so.
You can simply buy it Online for $40–$60. You can buy software from a website called codecanyon
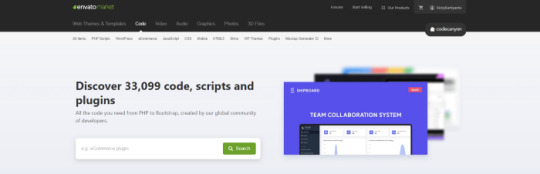
You can simply visit the website, click on the php scripts and search for SAAS and choose what kind of SAAS service that you preferred.
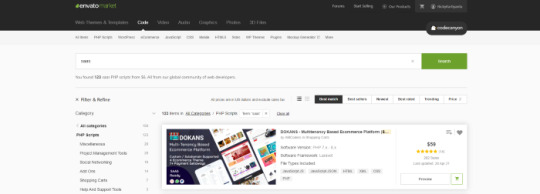
There are several types of SAAS applications available for purchase. Discount networks, accounting and billing software, email marketing systems, and employee management software are only a few examples. Take your time browsing the services and choose the one you like best, the one that fits you and you feel that you can be successful with.
Hosting Your Service
After you’ve created your SAAS service, the next move is to host it and make it public. To host it online, you’ll need a domain name and a server.
Now it is sounds hard since you don’t have any technical background in this term. Don’t worry, it is actually a simple and easy steps.
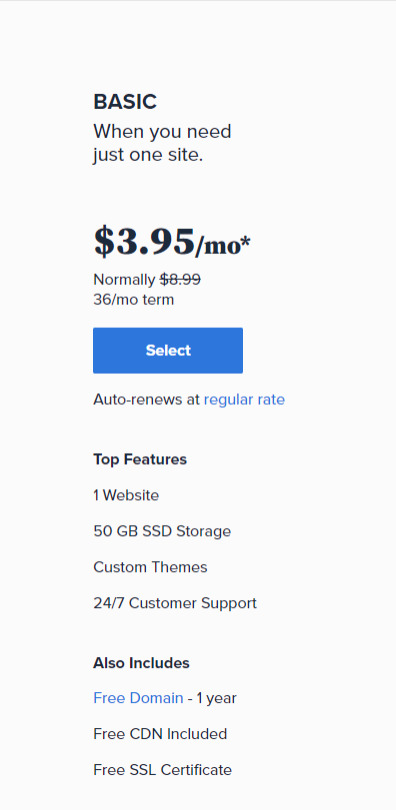
First you need a VPS server, you can visit and buy a cheap one from Bluehost. its only $3,95 permonth with and they give you free domain for 1 year! Check the price below. Buy the “LAMP” administration.
So What is VPS server? We do what we call “online hosting” when we want to publish a PHP page, script, or some other web application. This basically means uploading the files and database to a public server so that it can be accessed over the internet. On simple word, the place where you put the file is from VPS server.
In this tutorial we will used the shared server from Bluehost. Shared server only means that your server will be host with others website.
Now everything is ready, the only things that matter is how to install it. Let get to it.
Getting Started
After having your own server and domain on Bluehost, you need to connect them. Your VPS Server can be accessed now your Bluehost profile, but of course, we don’t want to access our website though an IP! we want to use our domain name. So simply, we are going to map the domain name to our VPS IP, so then we access the VPS and the WordPress website through both the domain and the IP.
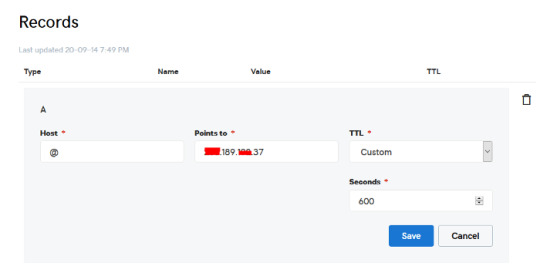
Configure your DNS Records
Simply open DNS management zone in your Domain Provider and edit the main A record.
Than we need to create MySQL database for the application. So Let’s Create one. Connect to your VPS server using any SSH client like putty. and Let’s start!
Just open Putty and enter the Server IP or Name, and Press Open. It will ask you to login, just enter “root” as the user, then enter your password which is sent to you by email.
Note: while typing the password, putty will now show it for security reasons, but It’s there, just type it!
What’s nice, is that we have MySQL installed already as part of the LAMP Stack, but we need to create a database and a user for out application.
Note: Every MySQL statement must end in a semi-colon (;)
To get started, log into the MySQL root (administrative) account by issuing this command:
mysql -u root -p
You will be prompted for the root password, just write or paste it and press Enter.
First, create a separate database that your PHP application will use. You can call this whatever you want, but we will be using TestDb in this guide to keep it simple. Create the database by running this command:
CREATE DATABASE TestDb DEFAULT CHARACTER SET utf8 COLLATE utf8_unicode_ci;
Next, we are going to create a separate MySQL user account that we will use exclusively to operate on our new database. Creating one-function databases and accounts is a good idea from a management and security standpoint. We will use the name DbUser in this guide. Feel free to change this if you’d like.
We are going to create this account, set a password, and grant access to the database we created. We can do this by typing the following command. Remember to choose a strong password here for your database user:
CREATE USER 'DbUser'@'localhost' IDENTIFIED BY 'enter_a_custom_password_here';GRANT ALL ON TestDb.* TO 'DbUser'@'localhost';
You now have a database and user account, each made specifically for Your PHP application. We need to flush the privileges so that the current instance of MySQL knows about the recent changes we’ve made:
FLUSH PRIVILEGES;
Exit from it by typing :
EXIT;
Upload The Script Files To The Server.
To upload the files, you need an application called WinSCP.
It is a free tool and you can download it from here.
Connect to Your VPS Server using WinSCP, and Update the PHP Files to the server to this path: “/var/www/html”
In most cases, the files would be zipped, so we need to extract them.
Again to Putty SSH CLient and Let’s install the unzip utility using the following command:
sudo apt-get install unzip
Clear putty screen to make in clean using the following command:
clear
Change directory to /var/www/html using the following command:
cd /var/www/html
Unzip the “.zip” file using the following command:
unzip YOURFILENAME*.zip
*Note: the file name may be different in your case, so replace YOURFILENAME with your file name.
Now, Move the latest folder content to the upper directory so it can be accessed directly -> use WinSCP Just copy all the files inside “YOURFILENAME” folder and paste them directly in html folder.
Configure Apache to Publish PHP Website
Well Done, Now your files are uploaded and placed in the html folder, we just need to configure apache so we can our Publish PHP Website and access our script using our domain name. To do so, open WinSCP again and navigate to this directory: /etc/apache2/sites-available/
Now, create a new empty file and name it “yourdomain.conf” . You can replace “Scriptname” with any name you want
Open yourdomain.conf Then copy and paste the content below into the file and save.
<VirtualHost *:80> ServerAdmin admin@YOUDOMAINNAME DocumentRoot /var/www/html ServerName YOUDOMAINNAME ServerAlias YOUDOMAINNAME <Directory /var/www/html/> Options +FollowSymlinks AllowOverride All Require all granted </Directory> ErrorLog ${APACHE_LOG_DIR}/error.log CustomLog ${APACHE_LOG_DIR}/access.log combined </VirtualHost>
Replace with your own domain, in my case its “YOURDOMAINNAME”
Enable your script configuration in apache and restart the service.
Now simply, run the following commands to finish the setup:
sudo a2ensite yourdomain.conf sudo a2enmod rewrite sudo systemctl restart apache2.service
ALMOST DONE!
Connect to MySQL Database.
Open your web browser now and navigate to your server name.
Continue the setup by entering the database info and your admin login information. In our example, the database name is TestDb and the user is DBUser with the password set.
That simple!
Setup cronjobs.What are cronjobs?
cron is a Linux utility which schedules a command or script on your server to run automatically at a specified time and date. A cron job is the scheduled task itself. Cron jobs can be very useful to automate repetitive tasks.
For example, you can set a cron job to delete temporary files every week to conserve your disk space. Some PHP web applicaitons, may require you to set up a cron job to perform certain functions.
Setup cronjobs.
To setup cronjobs, you need to add all required jobs to the server. This depends on your script, so if you bought a script from code canyon, the script owner should provide the cronjobs.
To do this, open WinSCP and got to /etc Open crontab file using the editor And paste all the jobs from your script to this folder. (cronjobs are listed in the app documentation)
Make sure each job is on a line and an empty line in the end.
Secure with a Free SSL.
SSL certificates are used within web servers to encrypt the traffic between the server and client, providing extra security for users accessing your application. Let’s Encrypt provides an easy way to obtain and install trusted certificates for free.
Connect to your Server using Putty SSH client. and Let’s Start!
Install the Let’s Encrypt Client
Let’s Encrypt certificates are fetched via client software running on your server. The official client is called Certbot.
First, add the repository to install Certbot:
sudo add-apt-repository ppa:certbot/certbot
You’ll need to press ENTER to accept.
Then, Update the package list to pick up the new repository’s package information:
sudo apt-get update
Install Certbot’s Apache package:
sudo apt install python-certbot-apache
Certbot is now ready to be used.
Set Up the SSL Certificate
Generating the SSL certificate for Apache using Certbot is quite straightforward. The client will automatically obtain and install a new SSL certificate that is valid for the domains provided as parameters.
Simply run the following command: (change the domain)
sudo certbot --apache -d YOUR_DOMAIN_NAME
You will be asked to provide an email address for lost key recovery and notices, and you will be able to choose between enabling both http and https access or forcing all requests to redirect to https. It is usually safest to require https, unless you have a specific need for unencrypted http traffic.
That’s it!
Test your website now and it should be SSL encrypted.
This tutorial I used are originated and made by Hasan By H-educate, you can check his link Here : https://h-educate.com/ or check his youtube on H-educate.
Other tips to make money online, check here : https://ricky-kartiyanta.medium.com/
Cheers!!
#website#saas solutions#saas#monetize#passive income#business#workfromanywhere#easy money#gettingrichfromhome
2 notes
·
View notes
Text
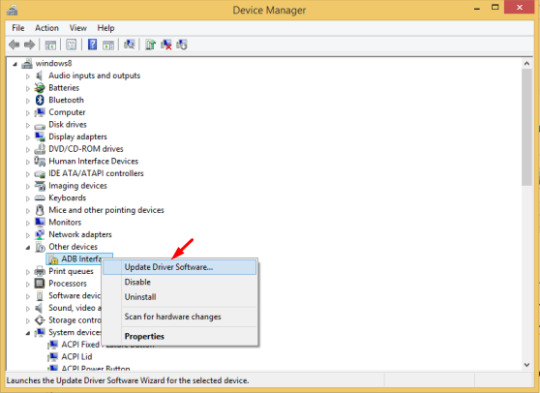
ADB USB Devices Driver Download For Windows

Adb Usb Driver Installer
Adb Usb Devices Driver Download For Windows 8.1
Adb Usb Driver Windows 10
Adb Device Driver Windows 10
ADB USB Devices Driver Download For Windows
Adb Driver Download Windows 7
Adb Drivers Windows 8
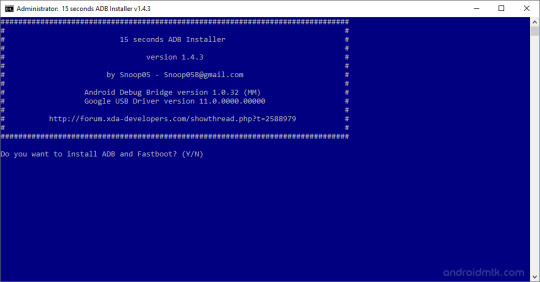
Updated adb and fastboot to API 23 version (Android 6.0) Version 1.4.2 - Updated adb and fastboot to API 21 version (Android 5.0) Version 1.4.1 - Fixed bug refusing to set%PATH% Version 1.4 - Fixed%PATH% for Windows XP (SETX missing) - Updated Google USB Driver to version 11.0.0000.00000 - Errorlog - Cleanup Version 1.3. All praise and All Thanks to God ADB Fastboot and USB Driver installer tool for Windows, which will always install the latest version. To update the adb fastboot and usb drivers again, just rerun the tool. OS Requirements: Windows 7 and above Steps: 1. Connect the phone in USB Debugging mode with.
Samsung ADB Drivers Download Here ,If You Are Samsung Smart Phone ,Tablet And Watch User ,And You Want To Flash Your Samsung Device, Or Data Transfer Mobile To PC,And PC To Mobile, You Are Connect Your Samsung Device With PC , And Can”t Move User Data, And Flash Your Samsung Device , Then You Need To Check Samsung USB Drivers , Drivers Will Help For Connect Your Device With PC And You Can Easily, Remove Devices Locks ,Move User Data,And Flash Samsung Devices,
Samsung ADB Drivers Information
Drivers For Model : All Samsung Cell Phone And Samsung Tab
Samsung ADB Drivers Password : Drivers Without Password
Adb Usb Driver Installer

Price : Free Of Cost Samsung USB Drivers
Samsung Official ADB EXE Download: Yes
Official Samsung ADB Drivers Download : Yes
Samsung USB Driver Download Free : Yes
Samsung ADB Drivers Windows 10 And All Windows
How We Can Flash Samsung Phone With Samsung USB Drivers

Adb Usb Devices Driver Download For Windows 8.1
This Samsung Drivers EXE Build With All Samsung Drivers, Like USB Drivers , Modem Drivers
And ADB Drivers ,Install Samsung Drivers In Window Computer OS And Select Download
Mode On Samsung Phone And Tab , And Connect Mobile With PC Via Samsung USB Data Cable
Run Odin Flash Tool Select Extract File And Click Start
How To Flash Samsung Device With Samsung USB Drivers
You Can Not Flash Samsung Devices, Without Samsung USB Drivers,
Because Samsung Drivers Properly Connect Your Samsung Devices With PC,
After Install Samsung USB Drivers You Can Flash Samsung Devices Like Smart Phones,
Adb Usb Driver Windows 10
Watches, And Tablets
How We Can Transfer Samsung Phone Data Mobile To PC Via Samsung ADB Drivers
Install Samsung Drivers In PC Power On Phone And Connect Mobile With PC Via Data Cable
And Choose Media Storage And Click Allow An Samsung Drive Appear In The PC Now You
Can Transfer Data Mobile To PC And PC To Mobile Like Picture Video Movies Game App And

Other Data You Want
How To Install Samsung ADB Drivers In Window PC
Download Drivers EXE Now Right Click On Samsung Driver Choose Open Drivers Now Click
Next
An Process Start And After Few Movements Show Finish Button Click On Button
Now Your Samsung Drivers Installing Complete
Adb Device Driver Windows 10
Android Debug Bridge (adb)
ADB USB Devices Driver Download For Windows
The Android Debug Bridge (ADB) is a versatile command line tool allowing you to communicate and control, copy files back and forth, install and uninstall apps, run shell commands, and more an Android device from a computer via a USB link. It comes with other useful tools bundled with the Android Software Development Kit ( SDK), and code. It is a client-server program that includes three components:
A client sending commands. Client runs on your machine for development. By emitting an adb command, you can invoke a client from a command line terminal.
Adb Driver Download Windows 7
A daemon (adbd), running commands on a device. The daemon runs on each device as a background process.
Adb Drivers Windows 8
A server which manages client-daemon communication. On your development machine the server runs as a background process.
1 note
·
View note
Text
Error Log - MySQL not running in XAMPP (Mac OS)
Error Log – MySQL not running in XAMPP (Mac OS)
This post is about how to deal with server & MySQL connection problem in XAMPP. I use a mac. So this suggestions will only apply to MAC user.
Recently I've been trying to learn PHP after mysql beginner course (At this point, I'm preparing for My Project - Day 4 ). But I kept encountered the similar connection problems while learning. Sometimes it takes me hours or days to fix this. It was…
View On WordPress
0 notes
Text
Rebuild and Restore Master Database in SQL Server
Rebuild and Restore Master Database in SQL Server
The Master database is important to your SQL Server instance. This database records all the system-level information for your SQL Server system. This includes instance-wide metadata like logon accounts, endpoints, linked servers, system configuration settings, and records for the existence of all other databases and their file locations.
SQL Server cannot start if the Masterdatabase is…
View On WordPress
#corruption#Database Consistency Checker Utility#Errorlog#ldf#Master Database#mdf#Microsoft SQL Server
0 notes


Text
Sql Server Error - a Quick Overview
Why Almost Everything You've Learned About Sql Server Error Is Wrong
In case the query touches less data it'll be less inclined to encounter the issue. Problem is going to be resolved after following the above mentioned measures. The issue needs to be resolved. The issue with the error log file is that there's so much data collected it is occasionally tough to figure out where the real errors lie.
Everything beyond is thought of as an error To have the ability to use an apostrophe in a string, it must be escaped, so that it's not regarded as a string delimiter. Occasionally you will notice an error stating that the database can't be recovered and it's marked suspect. For example, the next error points out that we would have to restore our database or endeavor to rebuild the log. Now it doesn't even wish to me register and throwing the exact same 18452 error. In the event the above mentioned manual solutions to repair the error do not do the job, then it may be that the database may have corrupt. If you come across a severity 22 error, you'll need to run DBCC CHECKDB to figure out the magnitude of the damage.
Now you're seeing errors on-screen, but in a manufacturing environment, you don't acquire such flexibility. The error can be encountered at the right time of upgrading SQL server to some other version. Accordingly, so as to receive your critical data back, you will need to understand how to fix SQL server error 823. The error that's captured in the SQL Server error log can be a result of different factors. The error 823 can cause severe data loss circumstances. SetWindowText returns success and there's no runtime error, but the text doesn't appear. All the data are kept in a database in the shape of MDF and NDF files. In addition, it is going to continue to keep the data safe means with no loss. The real data is stored in the remaining part of the pages.
The Chronicles of Sql Server Error
You should inspect the error log daily to make sure that all prospective issues are investigated as speedily as possible. Also by default, the latest error log is named ERRORLOG and it does not have any extension. The very first step to receive it resolve is to look at the SQL Server error log.
The Argument About Sql Server Error
Make it part of your routine database maintenance. SQL Server service was paused. It is trying to intialize SSL support but it cannot find the requisite information.
Sql Server Error - What Is It?
Your default database may be missing. When a query is run, SQL attempts to allocate the optimum quantity of memory in order for it to run efficiently. Thus, for optimum compatibility, it's suggested that you use anytime you run queries returning more than 1 result even if the specific driver you're using allows you to do otherwise. System databases are made automatically if we install MS SQL Server. When seeking to log in, the database might not be prepared to accept the connection. The entire database will be impacted.
The server wasn't found or wasn't accessible. It enables easy storage and retrieval of data from application running on the same computer or other computers residing in the same network. SQLEXPRESS'' folders, you have to install SQL Server. SQL Server deliberately hides the character of the authentication error and provides State 1. It cannot roll committed transactions forward because it has no room on the disk. Begin your SQL Server instance and you may then connect to SQL Server utilizing the SA login.
In MS SQL Server, two forms of databases are readily available. Testdb database is going to be created as shown in the subsequent snapshot. Therefore, backing up database regularly is a great practice that aids in restoring data is true of disaster. The AdventureWorks 2014 sample database is utilized via the report.
New Questions About Sql Server Error
If you are working to connect using Windows Authentication, verify that you're properly logged into the proper domain. Your login may not be authorized to connect. The login was created. It failed for user is one of the most common error which everyone might have seen at least once. As a consequence the user doesn't have permission to use SQL database. Therefore, users are continuously querying about the reason for the same i.e. exact cause of the SQL Server operating system error 3. So, they will understand the causes and prevent Server from the future disaster.
You're unlikely ever to should alter the processor affinity defaults if you don't encounter performance issues but it's still worthwhile understanding what they are and the way in which they work. A Unix socket file is used if you don't specify a host name or whenever you Sql Server Error specify the particular host name localhost. Since you can see above that LOG folder consists of many files. The absolute most current error log file is known as ERRORLOG.
youtube
1 note
·
View note
Text
Magento 2 in Ubuntu
Joomla, Drupal, Wordpress, Magneto CE, and other PHP based Information System Installation in the Ubuntu.
--------------------------------------------------------------------
Install and Configure apache2
--------------------------------------------------------------------
# apt update
# apt install apache2
# systemctl stop apache2.service
# systemctl start apache2.service
# systemctl enable apache2.service
--------------------------------------------------------------------
Install and Configure the database (MySql or MariaDB)
--------------------------------------------------------------------
# apt-get install mariadb-server mariadb-client -y
# systemctl start mariadb.service
# systemctl enable mariadb.service
# systemctl stop mariadb.service
-----------------------------------------------------------
Create Database in the MySql or MariaDB server.
-----------------------------------------------------------
# mysql -u root -p
mysql> CREATE DATABASE (DATABASE NAME);
mysql> CREATE USER 'USERNAME'@' web_server_IP' IDENTIFIED BY 'PASSWORD';
mysql> GRANT ALL ON DATABASE NAME.* TO ' USERNAME '@'localhost' IDENTIFIED BY 'PASSWORD' WITH GRANT OPTION;
mysql> GRANT ALL PRIVILEGES ON wordpress.* TO 'WEB_SERVER_USER'@'WEB_SERVER_IP';
mysql> FLUSH PRIVILEGES;
mysql> SET GLOBAL innodb_file_format = barracuda;
mysql> SET GLOBAL innodb_file_per_table = 1;
mysql> SET GLOBAL innodb_large_prefix = 'on';
mysql> EXIT;
--------------------------------------------------------------------
To change the MySql or MariaDB password use this line.
--------------------------------------------------------------------
# mysql_secure_installation
--------------------------------------------------------------------
Install the PHP and its extension
--------------------------------------------------------------------
# apt-get install software-properties-common -y
# add-apt-repository ppa:ondrej/php -y
# apt update -y
# apt install php -y
# apt install libapache2-mod-php -y
# apt install php-common -y
# apt install php-gmp -y
# apt install php-curl -y
# apt install php-soap -y
# apt install php-bcmath -y
# apt install php-intl -y
# apt install php-mbstring -y
# apt install php-xmlrpc -y
Note: In Ubuntu 18.04, We have to use
# apt install php7.1-mcrypt -y
Note: In Ubuntu 16.04, We have to use
# apt install php-mcrypt -y
# apt install php-mysql -y
# apt install php-gd -y
# apt install php-xml -y
# apt install php-cli -y
# apt install php-zip -y
# apt install zip -y
# apt install upzip -y
# apt install curl -y
# apt install git -y
--------------------------------------------------------------------
Edit the php.ini file in the etc directory
--------------------------------------------------------------------
# nano /etc/php/7.1/apache2/php.ini
Note: Update these lines in the file.
file_uploads = On
allow_url_fopen = On
short_open_tag = On
memory_limit = 2G
upload_max_filesize = 100M
max_execution_time = 360
date.timezone = America/Chicago
Note: Unchecked all the extension lines in the file
--------------------------------------------------------------------
Create php information file in the root directory
--------------------------------------------------------------------
# systemctl restart apache2.service
# nano /var/www/html/phpinfo.php
// php information file creator
<?php
// Show all information, defaults to INFO_ALL
phpinfo();
?>
--------------------------------------------------------------------
Edit the apache configuration file in the etc directory.
--------------------------------------------------------------------
# nano /etc/apache2/sites-available/000-default.conf
<VirtualHost *:80>
ServerAdmin [email protected]
DocumentRoot /var/www/html/FOLDER NAME/
ServerName example.com
ServerAlias www.example.com
<Directory /var/www/html/FOLDER NAME/>
Options Indexes FollowSymLinks MultiViews
AllowOverride All
Order allow,deny
allow from all
</Directory>
ErrorLog ${APACHE_LOG_DIR}/error.log
CustomLog ${APACHE_LOG_DIR}/access.log combined
</VirtualHost>
--------------------------------------------------------------------
Download the CMS and install in the Root Directory
--------------------------------------------------------------------
// Here, we are going to install Magento 2
// Here, we are going to download Magento 2 from github download
# cd /var/www/html/
# cd /var/www/html
# curl -sS https://getcomposer.org/installer | sudo php -- --install-dir=/usr/local/bin --filename=composer
# cd /var/www/html
# composer create-project --repository=https://repo.magento.com/ magento/project-community-edition (FOLDER NAME)
--------------------------------------------------------------------
For downloading the Magento 2, we will have to generate a set of public and private key in the Magento stie.
--------------------------------------------------------------------
Public Key 060f1460c97de693f3de3a8525db0ae8
Private Key b5c35b486038e871d5baca9fb326988e
# chmod 777 -R /var/www/html/
# chown -R www-data:www-data /var/www/html/FOLDER NAME /
# chmod -R 777 /var/www/html/FOLDER NAME/
# a2ensite magento2.conf
# a2enmod rewrite
# systemctl restart apache2.service
# chmod 777 -R /var/www/html/ // Most Important command in the installation
--------------------------------------------------------------------
After installation command
--------------------------------------------------------------------
# cd /var/www/html/magento2
# bin/magento maintenance:enable
# php bin/magento indexer:reindex
# php bin/magento cron:install
# php bin/magento maintenance:disable
# php bin/magento setup:store-config:set --base-url="http://www.cellon.com/ma/"
--------------------------------------------------------------------
Magento Update command
--------------------------------------------------------------------
# composer require magento/product-community-edition 2.3.0 --no-update
# composer update
# php bin/magento setup:upgrade
# php bin/magento setup:di:compile
1 note
·
View note