#Export MySQL Table Data into CSV File
Explore tagged Tumblr posts
Visit Tumblr Blog
Explore Tumblr blogs with no restrictions, modern design and the best experience.
Last Seen Tumblr Blogs


Fun Fact
Tumblr has been banned in Indonesia for providing people with access to pornographic content.
Text
🚀 Professional Database Designer | Expert in ERD & Data Modeling 🚀
Struggling to visualize your database structure? I create clear, efficient Entity-Relationship Diagrams (ERDs) that simplify complex data and improve your system’s performance.
🔹 Tailored ERD designs for your unique business needs 🔹 Support for Oracle, MySQL, SQL Server, PostgreSQL & more 🔹 Scalable and optimized database models 🔹 Detailed documentation & expert consultation included
Let’s turn your data into a powerful asset!
👉 Hire me on PeoplePerHour now: https://www.peopleperhour.com/hourlie/professional-database-designer-erd/524486
DatabaseDesign #ERDDesign #DataModeling #DataArchitecture #DatabaseExpert #SQLDatabase #DataManagement #TechSolutions #PeoplePerHour #FreelancerLife #ITConsulting #BusinessIntelligence #DataDriven #SoftwareDevelopment #CustomDatabase #DataEngineering #DatabaseConsultant #TechFreelancer #DatabaseOptimization #DataVisualization #SystemDesign #CloudDatabase #TechSupport
0 notes
Text
🚀 Power BI MySQL Integration: The Ultimate No-Code Guide to Real-Time Analytics
📈 Why Power BI MySQL Integration is a Game-Changer
In today’s data-first world, real-time insights are more than a luxury—they’re a necessity. According to recent studies, 80% of companies are investing in data analytics to gain a competitive edge. Without accurate, up-to-date data, business decisions can miss the mark.
That's why integrating your MySQL database with Power BI can be a total game-changer.
Imagine pulling live sales data from MySQL straight into Power BI dashboards—no manual exports, no code, no delays. It’s not just about saving time (though it can cut reporting time in half)—it’s about making better, faster, smarter decisions.

🔍 What is Power BI and MySQL? Why Should You Care?
Before jumping into the “how,” let’s understand the “why.”
💡 Power BI: The Visual Storyteller
Power BI is a powerful data visualization tool by Microsoft. It helps you create interactive dashboards, reports, and analytics that help decision-makers see the bigger picture.
🗃️ MySQL: The Backbone of Your Data
MySQL is one of the world’s most popular open-source relational database systems. It can handle massive amounts of structured data—and it’s the go-to for many organizations' back-end systems.
🤝 The Magic of Integration
By connecting Power BI to MySQL, you combine MySQL’s data storage strength with Power BI’s visualization brilliance. That means:
Real-time reporting
Automated dashboards
Zero manual effort
And the best part? With Konnectify, you don’t need to write a single line of code to get started.
⚙️ What You Need for Power BI MySQL Integration
To get your integration up and running, you’ll need:

🧩 How to Connect Power BI to MySQL (Step-by-Step)
Let’s walk through how to get everything set up—whether you’re a data novice or a pro.
Step 1: Download MySQL Workbench
Start by managing your MySQL databases with MySQL Workbench. You can download it from the official MySQL site.
Step 2: Install the MySQL ODBC Connector
You’ll need the MySQL ODBC driver so Power BI can connect to your MySQL database.
Go to MySQL's official site and download the ODBC Connector for Windows or Mac.
Install it and take note of the DSN name you create.
Step 3: Connect MySQL to Power BI Desktop
Open Power BI Desktop
Click Get Data > MySQL Database
Enter your server address and database name
Authenticate using your credentials
Click Connect, and boom—your MySQL tables are now visible in Power BI
🔄 Automate Data Sync Between Power BI and MySQL with Konnectify
Manual syncing is a thing of the past. Here’s how to automate the entire workflow using Konnectify:
Step-by-Step Konnectify Setup
Log into Konnectify Go to your Konnectify dashboard and sign in.
Choose MySQL from the App Marketplace
Set Your Trigger Example: "New data entry in MySQL."
Create Your Action Example: "Create row in Power BI dashboard."
Customize Workflow Use Konnectify’s visual editor to map fields, add filters, and set conditions.
Activate It Click "Activate" and your workflow starts running 24/7.
Now, every time your MySQL database updates, Power BI reflects it instantly—zero manual work.
🔎 Real-World Use Cases for Power BI and MySQL Integration
Let’s explore how different departments can use this integration to transform workflows and drive results.
1. 📊 Automate Financial Reports in Power BI
With Konnectify pulling MySQL data into Power BI:
Financial dashboards update automatically
No need to manually extract CSV files
Get real-time metrics like revenue, expenses, and profit margins
Organizations using real-time analytics saw a 20% increase in operational efficiency.
2. 💸 Analyze Sales Performance with Live MySQL Data
Sales teams can monitor:
Conversion rates
Customer acquisition cost
Regional performance
Power BI helps visualize this sales data and spot trends or bottlenecks—all in real-time, thanks to MySQL integration.
3. 🏷️ Manage Inventory with Real-Time Dashboards
Inventory dips below minimum stock? Trigger alerts.
With Power BI + MySQL:
Track current stock levels
Monitor restocking needs
Visualize inventory turnover
Set up Power BI dashboards that refresh automatically as MySQL updates your stock records.
4. 🛠️ Track Customer Support KPIs
Integrate your helpdesk MySQL tables and watch:
Response times
Ticket resolution rates
SLA compliance metrics
All of this is visualized in Power BI without pulling a single report manually.
5. 📅 Project Management & Timelines
By integrating MySQL with Power BI:
Track project deadlines
Monitor team performance
Visualize tasks at risk of delay
Project managers can act faster using data-driven alerts and Gantt-style dashboards in Power BI.
📅 How to Set Up Real-Time Dashboards in Power BI
Once your integration is live:
Go to Power BI Service
Create a dashboard using your connected MySQL data
Pin visuals and set refresh schedules
Optional: Set up alerts for KPIs
With Konnectify automating your backend sync, your Power BI dashboards are always accurate.
🔒 Is It Secure to Integrate Power BI with MySQL?
Yes if you follow best practices:
Use secure credentials (OAuth or 2FA if possible)
Install the latest ODBC Connector versions
Limit data access to essential users
Monitor logs via Konnectify’s dashboard
Both Power BI and MySQL are enterprise-grade platforms with robust compliance and encryption standards.
✨ Why Konnectify is the Best Tool for Power BI MySQL Integration
Konnectify is more than just a connector. It’s a complete automation platform that lets you:
Connect 150+ apps, including CRMs, email tools, cloud storage, and ERPs
Build visual workflows with drag-and-drop logic
Monitor errors, delays, and sync status
Save hundreds of hours on manual tasks
And yes no coding required.
🧠 FAQs: Power BI MySQL Integration
Q1: Is Power BI compatible with MySQL? ✅ Yes. Power BI supports MySQL through ODBC and native connectors.
Q2: Do I need a premium Power BI account? ❌ No. Power BI Desktop works with MySQL even on the free tier.
Q3: Can I connect multiple MySQL databases? ✅ Yes. Konnectify allows multiple workflows across various databases.
Q4: What if MySQL has sensitive data? 🔐 Use encryption, access control, and filtered queries to secure data.
Q5: Will the integration slow down MySQL? ❌ No. With proper indexing and sync schedules, performance remains stable.
Q6: Is Konnectify safe to use? ✅ Absolutely. It uses encrypted tokens, secure OAuth, and follows GDPR compliance.
🏁 Final Thoughts: It’s Time to Sync Smarter
Gone are the days of juggling spreadsheets, exporting CSVs, or waiting on IT teams to build custom connectors. With Power BI MySQL integration via Konnectify, you unlock:
Real-time analytics
Fully automated dashboards
Insights that move your business forward
Stop manually syncing data—start automating it today.
#it services#saas#saas development company#saas platform#information technology#saas technology#b2b saas#software#software development#ipaas
0 notes
Text
Data import and export in R
R is a versatile tool that can handle a wide range of data sources, making it a go-to language for data analysis and statistical computing. Whether you’re working with CSV files, Excel spreadsheets, or databases, R provides powerful functions and packages to import and export data efficiently. In this section, we’ll explore how to import data from various sources and export your results back into different formats.
Importing Data from CSV Files
CSV (Comma-Separated Values) is one of the most common formats for storing and exchanging data. R has built-in functions to read and write CSV files, making it easy to import data for analysis.
Using read.csv():
The read.csv() function is used to read data from a CSV file into a data frame.# Importing a CSV file data <- read.csv("path/to/your/file.csv") # Display the first few rows of the data head(data)
Customizing the Import:
You can customize how the data is imported by using additional arguments such as header, sep, and stringsAsFactors.# Importing a CSV file with custom settings data <- read.csv("path/to/your/file.csv", header = TRUE, sep = ",", stringsAsFactors = FALSE)
header = TRUE: Indicates that the first row contains column names.
sep = ",": Specifies the separator used in the CSV file.
stringsAsFactors = FALSE: Prevents character strings from being converted into factors.
Importing Data from Excel Files
Excel is another widely used format for storing data, especially in business environments. R provides several packages to read and write Excel files, with readxl and openxlsx being two popular options.
Using readxl Package:
The readxl package allows you to read Excel files without needing to install external dependencies.# Install and load the readxl package install.packages("readxl") library(readxl) # Importing an Excel file data <- read_excel("path/to/your/file.xlsx", sheet = 1) # Display the first few rows of the data head(data)
sheet = 1: Specifies which sheet to read from the Excel file.
Using openxlsx Package:
The openxlsx package offers more flexibility, including writing data back to Excel files.# Install and load the openxlsx package install.packages("openxlsx") library(openxlsx) # Importing an Excel file data <- read.xlsx("path/to/your/file.xlsx", sheet = 1) # Display the first few rows of the data head(data)
Importing Data from Databases
R can also connect to various databases, allowing you to import large datasets directly into R. The DBI package is a standard interface for communication between R and databases, and it works with several backend packages like RMySQL, RPostgreSQL, and RSQLite.
Using DBI and RSQLite:
Here’s an example of how to connect to a SQLite database and import data.# Install and load the DBI and RSQLite packages install.packages("DBI") install.packages("RSQLite") library(DBI) library(RSQLite) # Connect to a SQLite database con <- dbConnect(RSQLite::SQLite(), dbname = "path/to/your/database.sqlite") # Importing a table from the database data <- dbGetQuery(con, "SELECT * FROM your_table_name") # Display the first few rows of the data head(data) # Disconnect from the database dbDisconnect(con)
Connecting to Other Databases:
Similar procedures apply when connecting to MySQL, PostgreSQL, or other databases, with the appropriate backend package (RMySQL, RPostgreSQL, etc.).
Importing Data from Other Sources
R supports data import from various other sources such as: JSON: Using the jsonlite package.
XML: Using the XML or xml2 packages.
Web Data: Using the httr or rvest packages to scrape data from websites.
SPSS, SAS, Stata: Using the haven package to import data from statistical software.
Here’s an example of importing JSON data:# Install and load the jsonlite package install.packages("jsonlite") library(jsonlite) # Importing a JSON file data <- fromJSON("path/to/your/file.json") # Display the first few rows of the data head(data)
Exporting Data from R
Once you’ve processed or analyzed your data in R, you may want to export it for reporting, sharing, or further use.
Exporting to CSV:
The write.csv() function allows you to export data frames to a CSV file.# Exporting data to a CSV file write.csv(data, "path/to/save/your/file.csv", row.names = FALSE)
row.names = FALSE: Prevents row names from being written to the file.
Exporting to Excel:
If you used the openxlsx package, you can also write data frames to Excel files.# Exporting data to an Excel file write.xlsx(data, "path/to/save/your/file.xlsx")
Exporting to Databases:
You can use the dbWriteTable() function from the DBI package to export data back into a database.# Connecting to the database con <- dbConnect(RSQLite::SQLite(), dbname = "path/to/your/database.sqlite") # Writing data to a new table in the database dbWriteTable(con, "new_table_name", data) # Disconnecting from the database dbDisconnect(con)
Best Practices for Data Import and Export
Data Validation: Always inspect the first few rows of your imported data using head() to ensure it has been read correctly.
Customizing Imports: Use the various arguments available in the import functions to handle specific file structures or formatting issues.
Keep a Clean Workspace: After importing and exporting data, clean up your workspace by removing temporary objects or closing database connections to prevent memory issues.
Full details available at https://strategicleap.blogspot.com/
0 notes
Text
So... for some reason I decided to get an old mysql database into sqlite and here is what I learned:
You can't just grab the sql export from your database software and throw it at sqlite, ibhad to manually create the tables (thanks sqlitebrowser) as the typing is not the same between mysql and sqlite (this should have been obvious).
For best results export the table structures and data as two different files and then edit or manually recreate tablea and then you can import the data with some minor handling.
This is the simplest way I found how to do it, but its definitely not the best, but it sure seem easier to me than doing it with CSV.
Or maybe that was the better way to do it, I'm not sure, I'm no expert
0 notes
Text
Use ChatGPT to Export Data from a WordPress Database
New Post has been published on https://thedigitalinsider.com/use-chatgpt-to-export-data-from-a-wordpress-database/
Use ChatGPT to Export Data from a WordPress Database
Retrieving data from a WordPress site can be a nightmare. Site data could reside in several places. Pulling from these various sources isn’t easy.
Websites that feature eCommerce or memberships are prime examples. Each plugin may store data in a different spot. Some create separate database tables. Others use the default WordPress locales.
Export plugins exist that help in some – but not all – circumstances. For example, you might be able to export customer orders. However, grabbing additional data not directly related to those orders may not be possible.
Writing a custom query is another option. But you’ll need to know your way around PHP and MySQL. Not everyone has the expertise to do so.
Artificial intelligence (AI) can help. As I discovered, tools like ChatGPT can do the dirty work. It simplified the process and saved me loads of time. Perhaps it saved my sanity as well.
Here’s how to use AI to get what you need from the WordPress database.
Before We Get Started
There are a few items we should mention before starting:
Back up Your Site’s Database or Create a Local Copy of Your Site None of what we’re doing here should hurt your database. However, create a fresh backup – just in case.
You can also create a local copy of your site for experimenting. That enables you to work without the risk of harming your production website.
Have Access to a ChatGPT Account We’re using ChatGPT for this demo. Therefore, you’ll want to have access to a free account. You can follow along and experiment.
Other AI tools, such as Google Gemini, may also work. The point is to use an AI tool that will generate code.
Also, a warning: Use caution when generating code. AI tools can make mistakes! Review the code before using it.
What Are You Doing with the Data? There are a couple of things you can do with the data you retrieve:
Display the data on the front end of your site;
Download a CSV file that contains the data;
You’ll want to determine this beforehand. The process is a bit different depending on your choice.
Oh, and you’ll also need access to your site’s database. Access to your theme is required for displaying data on the front end.
Retrieving User Data from Different Plugins
Now, onto our experiment. Let’s take a common sticking point and try to make sense of it.
Our fictional website has two purposes. We sell various products with WooCommerce. Customers come to our site, create accounts, and order from us.
On the other side of the coin, we also sell memberships. Our members pay for access to exclusive content. We use the Restrict Content Pro plugin to power this feature.
Both WooCommerce and Restrict Content Pro have reporting features. For example, we can find out how many members we have. Or the number of WooCommerce customers.
But what if we want to combine this data? There’s no straightforward way to do this. So, let’s see if AI can help.
Step 1: Find the Data You Want
The first step is to determine what data you want to retrieve. Then, you’ll need to find the data inside the WordPress database.
Our goal is to create a CSV export file that includes users who are:
A customer in our WooCommerce shop AND…
Have an active membership via Restrict Content Pro;
Data isn’t always easy to locate. In some cases, you may need to reference plugin documentation. Or contact their technical support. A thorough database search can help if all else fails.
In our case, WooCommerce and Restrict Content Pro create custom database tables. That will make our job a bit easier.
WooCommerce table names use the ‘wp_wc‘ prefix.
Restrict Content Pro table names use the ‘wp_rcp‘ prefix.
We’ll also want to bring in data from the ‘wp_users‘ and ‘wp_usermeta‘ tables. That allows us to tie customer and membership data to specific users.
With that in mind, we’ll look for the following information:
Data Type Database Table Column User ID wp_users ID First Name wp_usermeta Meta Key: first_name Last Name wp_usermeta Meta Key: last_name Customer ID wp_wc_customer_lookup customer_id Membership Status wp_rcp_memberships status Membership Level ID wp_rcp_memberships object_id
Step 2: Ask ChatGPT to Create a Database Query
Next, we’ll ask ChatGPT for some help. We’ll want to provide a clear explanation of the task.
Here’s the prompt I used:
I'd like to create a MySQL database query for a WordPress website. I only want to retrieve users who have both a WooCommerce Customer ID and a membership via Restrict Content Pro. Here is the data I'd like to retrieve: From the wp_users database table: ID From the wp_usermeta database table: Meta Key: first_name Meta Key: last_name From the wp_wc_customer_lookup database table: customer_id From the wp_rcp_memberships database table: status object_id
Step 3: Get the Response
ChatGPT’s response included a code snippet and a detailed explanation of it (view the full response). The snippet joins multiple database tables together to produce a single report.
So, how do we see if it works? We can run the query in a tool that connects to the site’s database. I’m using a local website that includes AdminerEvo.
You could also use phpMyAdmin, MySQL Workbench, or similar apps. ChatGPT can even provide instructions for whatever app you’re using.
I’ve pasted the query into the SQL Command screen inside AdminerEvo.
Step 4: Study the Results
The results are in! Our fictional website has 198 users. 15 of them have a paid membership. There are also 200 product orders.
So, how many are WooCommerce customers and Restrict Content Pro members? A grand total of seven.
The query results returned the columns we requested. From here, we can tweak things further or export the data.
Going Further with AI
Our example query may seem simple. However, bringing together data from multiple plugins is challenging. A custom solution is often the only solution.
I’m no coding expert. Thus, figuring out how to get data became frustrating. Thankfully, AI has proven to be a terrific tool for the job.
It’s one of the areas where this technology shines. Many of us struggle to write this sort of code on our own. Writing a prompt describing what we want isn’t so bad, however.
There are also opportunities to take things further. We could change our prompt to display data on a WordPress page. Or return data relevant to the currently logged-in user.
A working knowledge of PHP and MySQL can take you a long way. So, experiment and see what you can accomplish. And be sure to add up all the time you save in the process!
Related Topics
Top
#Accounts#ai#ai tools#app#apps#artificial#Artificial Intelligence#artificial intelligence (AI)#back up#backup#change#chatGPT#code#Code Snippet#coding#columns#command#content#data#Database#Design#display#documentation#easy#explanation#Features#Full#gemini#Google#Google Gemini
0 notes
Text
CodeIgniter 4 Export MySQL Table Data into CSV File Tutorial
Inside this article we will see the concept of CodeIgniter 4 Export MySQL Table Data into CSV File format. Article contains the classified information about this topic. You will get the whole idea to dump your database data into CSV file.
If we have an application which basically built for reporting then we need some kind of function which export tabular data into CSV format.
0 notes
Photo

CodeIgniter is an Application Development Framework - a toolkit - for people who build web sites using PHP. Its goal is to enable you to develop projects much faster than you could if you were writing code from scratch, by providing a rich set of libraries for commonly needed tasks, as well as a simple interface and logical structure to access these libraries. CodeIgniter lets you creatively focus on your project by minimizing the amount of code needed for a given task. CSV file is been used for data import, export, and generating a report between two date. If you have huge data available in the MySQL database and you only require a specific date range data but the file contains all records and you need it on your own. In this tutorial, I show how you can export MySQL database data in CSV format by date range with PHP. I am using jQuery UI for datepicker. In Controller
//Getting the vlaue from View Page using Post
$from_date = $this->request->getPost('from_date');
$to_date = $this->request->getPost('to_date');
// Pass the vlaue in Model
$var = ModelName::Function Name Of Model Name ('TableName',$from_date,$to_date);
// file creation to Generate CSV
//In Model
// Define here function Public static function
//Function Name of Controller //($table,$from_date='',$to_date)
{ //DB Connect //Using Builder
$builder = $db->table($table) //Select Query Select('*')
//Where Condition
//Here month is the Table Column name
// $from_date & $to_date - getting from Controller ->where('month BETWEEN "'. date('Y-m-d', strtotime($from_date)). '" and "'. date('Y-m-d', strtotime($to_date)).'"') ->get()->getResultArray(); }
1 note
·
View note
Text
How to Extract Product Data from Walmart with Python and BeautifulSoup

Walmart is the leading retailer with both online stores as well as physical stores around the world. Having a larger product variety in the portfolio with $519.93 Billion of net sales, Walmart is dominating the retail market as well as it also provides ample data, which could be utilized to get insights on product portfolios, customer’s behavior, as well as market trends.
In this tutorial blog, we will extract product data from Walmart s well as store that in the SQL databases. We use Python for scraping a website. The package used for the scraping exercise is called BeautifulSoup. Together with that, we have also utilized Selenium as it helps us interact with Google Chrome.
Scrape Walmart Product Data
The initial step is importing all the required libraries. When, we import the packages, let’s start by setting the scraper’s flow. For modularizing the code, we initially investigated the URL structure of Walmart product pages. A URL is an address of a web page, which a user refers to as well as can be utilized for uniquely identifying the page.
Here, in the given example, we have made a listing of page URLs within Walmart’s electronics department. We also have made the list of names of different product categories. We would use them in future to name the tables or datasets.
You may add as well as remove the subcategories for all major product categories. All you require to do is going to subcategory pages as well as scrape the page URL. The address is general for all the available products on the page. You may also do that for maximum product categories. In the given image, we have showed categories including Toys and Food for the demo.
In addition, we have also stored URLs in the list because it makes data processing in Python much easier. When, we have all the lists ready, let’s move on for writing a scraper.
Also, we have made a loop for automating the extraction exercise. Although, we can run that for only one category as well as subcategory also. Let us pretend, we wish to extract data for only one sub-category like TVs in ‘Electronics’ category. Later on, we will exhibit how to scale a code for all the sub-categories.
Here, a variable pg=1 makes sure that we are extracting data for merely the first URL within an array ‘url_sets’ i.e. merely for the initial subcategory in main category. When you complete that, the following step might be to outline total product pages that you would wish to open for scraping data from. To do this, we are extracting data from the best 10 pages.
Then, we loop through a complete length of top_n array i.e. 10 times for opening the product pages as well as scrape a complete webpage structure in HTML form code. It is like inspecting different elements of web page as well as copying the resultants’ HTML code. Although, we have more added a limitation that only a part of HTML structure, which lies in a tag ‘Body’ is scraped as well as stored as the object. That is because applicable product data is only within a page’s HTML body.
This entity can be used for pulling relevant product data for different products, which were listed on an active page. For doing that, we have identified that a tag having product data is the ‘div’ tag having a class, ‘search-result-gridview-item-wrapper’. Therefore, in next step, we have used a find_all function for scraping all the occurrences from the given class. We have stored this data in the temporary object named ‘codelist’.
After that, we have built the URL of separate products. For doing so, we have observed that different product pages begin with a basic string called ‘https://walmart.com/ip’. All unique-identifies were added only before this string. A unique identifier was similar as a string values scraped from a ‘search-result-gridview-item-wrapper’ items saved above. Therefore, in the following step, we have looped through a temporary object code list, for constructing complete URL of any particular product’ page.
With this URL, we will be able to scrape particular product-level data. To do this demo, we have got details like unique Product codes, Product’s name, Product page URL, Product_description, name of current page’s category where a product is positioned, name of the active subcategory where the product is positioned on a website (which is called active breadcrumb), Product pricing, ratings (Star ratings), number of reviews or ratings for a product as well as other products suggested on the Walmart’s site similar or associated to a product. You may customize this listing according to your convinience.
The code given above follows the following step of opening an individual product page, based on the constructed URLs as well as scraping the products’ attributes, as given in the listing above. When you are okay with a listing of attributes getting pulled within a code, the last step for a scraper might be to attach all the product data in the subcategory within a single frame data. The code here shows that.
A data frame called ‘df’ would have all the data for products on the best 10 pages of a chosen subcategory within your code. You may either write data on the CSV files or distribute it to the SQL database. In case, you need to export that to the MySQL database within the table named ‘product_info’, you may utilize the code given below:
You would need to provide the SQL database credentials and when you do it, Python helps you to openly connect the working environment with the database as well as push the dataset straight as the SQL dataset. In the above code, in case the table having that name exists already, the recent code would replace with the present table. You may always change a script to evade doing so. Python provides you an option to 'fail', 'append', or 'replace' data here.
It is the basic code structure, which can be improved to add exclusions to deal with missing data or later loading pages. In case, you choose to loop the code for different subcategories, a complete code would look like:
import os import selenium.webdriver import csv import time import pandas as pd from selenium import webdriver from bs4 import BeautifulSoup url_sets=["https://www.walmart.com/browse/tv-video/all-tvs/3944_1060825_447913", "https://www.walmart.com/browse/computers/desktop-computers/3944_3951_132982", "https://www.walmart.com/browse/electronics/all-laptop-computers/3944_3951_1089430_132960", "https://www.walmart.com/browse/prepaid-phones/1105910_4527935_1072335", "https://www.walmart.com/browse/electronics/portable-audio/3944_96469", "https://www.walmart.com/browse/electronics/gps-navigation/3944_538883/", "https://www.walmart.com/browse/electronics/sound-bars/3944_77622_8375901_1230415_1107398", "https://www.walmart.com/browse/electronics/digital-slr-cameras/3944_133277_1096663", "https://www.walmart.com/browse/electronics/ipad-tablets/3944_1078524"] categories=["TVs","Desktops","Laptops","Prepaid_phones","Audio","GPS","soundbars","cameras","tablets"] # scraper for pg in range(len(url_sets)): # number of pages per category top_n= ["1","2","3","4","5","6","7","8","9","10"] # extract page number within sub-category url_category=url_sets[pg] print("Category:",categories[pg]) final_results = [] for i_1 in range(len(top_n)): print("Page number within category:",i_1) url_cat=url_category+"?page="+top_n[i_1] driver= webdriver.Chrome(executable_path='C:/Drivers/chromedriver.exe') driver.get(url_cat) body_cat = driver.find_element_by_tag_name("body").get_attribute("innerHTML") driver.quit() soupBody_cat = BeautifulSoup(body_cat) for tmp in soupBody_cat.find_all('div', {'class':'search-result-gridview-item-wrapper'}): final_results.append(tmp['data-id']) # save final set of results as a list codelist=list(set(final_results)) print("Total number of prods:",len(codelist)) # base URL for product page url1= "https://walmart.com/ip" # Data Headers WLMTData = [["Product_code","Product_name","Product_description","Product_URL", "Breadcrumb_parent","Breadcrumb_active","Product_price", "Rating_Value","Rating_Count","Recommended_Prods"]] for i in range(len(codelist)): #creating a list without the place taken in the first loop print(i) item_wlmt=codelist[i] url2=url1+"/"+item_wlmt #print(url2) try: driver= webdriver.Chrome(executable_path='C:/Drivers/chromedriver.exe') # Chrome driver is being used. print ("Requesting URL: " + url2) driver.get(url2) # URL requested in browser. print ("Webpage found ...") time.sleep(3) # Find the document body and get its inner HTML for processing in BeautifulSoup parser. body = driver.find_element_by_tag_name("body").get_attribute("innerHTML") print("Closing Chrome ...") # No more usage needed. driver.quit() # Browser Closed. print("Getting data from DOM ...") soupBody = BeautifulSoup(body) # Parse the inner HTML using BeautifulSoup h1ProductName = soupBody.find("h1", {"class": "prod-ProductTitle prod-productTitle-buyBox font-bold"}) divProductDesc = soupBody.find("div", {"class": "about-desc about-product-description xs-margin-top"}) liProductBreadcrumb_parent = soupBody.find("li", {"data-automation-id": "breadcrumb-item-0"}) liProductBreadcrumb_active = soupBody.find("li", {"class": "breadcrumb active"}) spanProductPrice = soupBody.find("span", {"class": "price-group"}) spanProductRating = soupBody.find("span", {"itemprop": "ratingValue"}) spanProductRating_count = soupBody.find("span", {"class": "stars-reviews-count-node"}) ################# exceptions ######################### if divProductDesc is None: divProductDesc="Not Available" else: divProductDesc=divProductDesc if liProductBreadcrumb_parent is None: liProductBreadcrumb_parent="Not Available" else: liProductBreadcrumb_parent=liProductBreadcrumb_parent if liProductBreadcrumb_active is None: liProductBreadcrumb_active="Not Available" else: liProductBreadcrumb_active=liProductBreadcrumb_active if spanProductPrice is None: spanProductPrice="NA" else: spanProductPrice=spanProductPrice if spanProductRating is None or spanProductRating_count is None: spanProductRating=0.0 spanProductRating_count="0 ratings" else: spanProductRating=spanProductRating.text spanProductRating_count=spanProductRating_count.text ### Recommended Products reco_prods=[] for tmp in soupBody.find_all('a', {'class':'tile-link-overlay u-focusTile'}): reco_prods.append(tmp['data-product-id']) if len(reco_prods)==0: reco_prods=["Not available"] else: reco_prods=reco_prods WLMTData.append([codelist[i],h1ProductName.text,ivProductDesc.text,url2, liProductBreadcrumb_parent.text, liProductBreadcrumb_active.text, spanProductPrice.text, spanProductRating, spanProductRating_count,reco_prods]) except Exception as e: print (str(e)) # save final result as dataframe df=pd.DataFrame(WLMTData) df.columns = df.iloc[0] df=df.drop(df.index[0]) # Export dataframe to SQL import sqlalchemy database_username = 'ENTER USERNAME' database_password = 'ENTER USERNAME PASSWORD' database_ip = 'ENTER DATABASE IP' database_name = 'ENTER DATABASE NAME' database_connection = sqlalchemy.create_engine('mysql+mysqlconnector://{0}:{1}@{2}/{3}'. format(database_username, database_password, database_ip, base_name)) df.to_sql(con=database_connection, name='‘product_info’', if_exists='replace',flavor='mysql')
You may always add additional complexity into this code for adding customization to the scraper. For example, the given scraper will take care of the missing data within attributes including pricing, description, or reviews. The data might be missing because of many reasons like if a product get out of stock or sold out, improper data entry, or is new to get any ratings or data currently.
For adapting different web structures, you would need to keep changing your web scraper for that to become functional while a webpage gets updated. The web scraper gives you with a base template for the Python’s scraper on Walmart.
Want to extract data for your business? Contact iWeb Scraping, your data scraping professional!
#web scraping#data mining#walmart data scraping#web scraping api#big data#ecommerce#data extraction#scrape walmart
3 notes
·
View notes
Text
Which Is The Best PostgreSQL GUI? 2021 Comparison
PostgreSQL graphical user interface (GUI) tools help open source database users to manage, manipulate, and visualize their data. In this post, we discuss the top 6 GUI tools for administering your PostgreSQL hosting deployments. PostgreSQL is the fourth most popular database management system in the world, and heavily used in all sizes of applications from small to large. The traditional method to work with databases is using the command-line interface (CLI) tool, however, this interface presents a number of issues:
It requires a big learning curve to get the best out of the DBMS.
Console display may not be something of your liking, and it only gives very little information at a time.
It is difficult to browse databases and tables, check indexes, and monitor databases through the console.
Many still prefer CLIs over GUIs, but this set is ever so shrinking. I believe anyone who comes into programming after 2010 will tell you GUI tools increase their productivity over a CLI solution.
Why Use a GUI Tool?
Now that we understand the issues users face with the CLI, let’s take a look at the advantages of using a PostgreSQL GUI:
Shortcut keys make it easier to use, and much easier to learn for new users.
Offers great visualization to help you interpret your data.
You can remotely access and navigate another database server.
The window-based interface makes it much easier to manage your PostgreSQL data.
Easier access to files, features, and the operating system.
So, bottom line, GUI tools make PostgreSQL developers’ lives easier.
Top PostgreSQL GUI Tools
Today I will tell you about the 6 best PostgreSQL GUI tools. If you want a quick overview of this article, feel free to check out our infographic at the end of this post. Let’s start with the first and most popular one.
1. pgAdmin
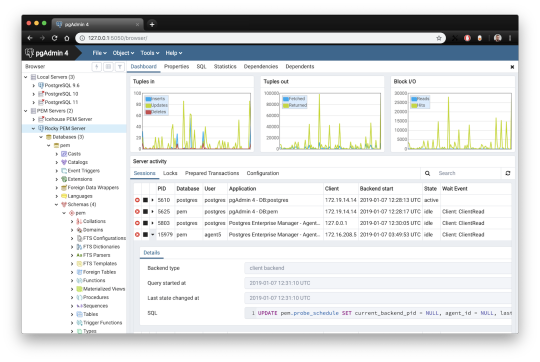
pgAdmin is the de facto GUI tool for PostgreSQL, and the first tool anyone would use for PostgreSQL. It supports all PostgreSQL operations and features while being free and open source. pgAdmin is used by both novice and seasoned DBAs and developers for database administration.
Here are some of the top reasons why PostgreSQL users love pgAdmin:
Create, view and edit on all common PostgreSQL objects.
Offers a graphical query planning tool with color syntax highlighting.
The dashboard lets you monitor server activities such as database locks, connected sessions, and prepared transactions.
Since pgAdmin is a web application, you can deploy it on any server and access it remotely.
pgAdmin UI consists of detachable panels that you can arrange according to your likings.
Provides a procedural language debugger to help you debug your code.
pgAdmin has a portable version which can help you easily move your data between machines.
There are several cons of pgAdmin that users have generally complained about:
The UI is slow and non-intuitive compared to paid GUI tools.
pgAdmin uses too many resources.
pgAdmin can be used on Windows, Linux, and Mac OS. We listed it first as it’s the most used GUI tool for PostgreSQL, and the only native PostgreSQL GUI tool in our list. As it’s dedicated exclusively to PostgreSQL, you can expect it to update with the latest features of each version. pgAdmin can be downloaded from their official website.
pgAdmin Pricing: Free (open source)
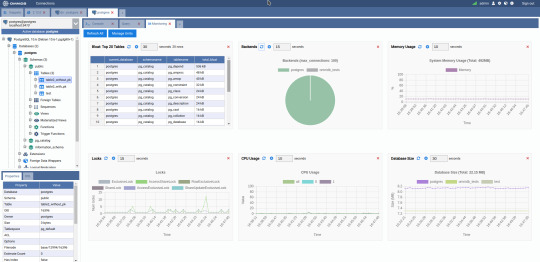
2. DBeaver

DBeaver is a major cross-platform GUI tool for PostgreSQL that both developers and database administrators love. DBeaver is not a native GUI tool for PostgreSQL, as it supports all the popular databases like MySQL, MariaDB, Sybase, SQLite, Oracle, SQL Server, DB2, MS Access, Firebird, Teradata, Apache Hive, Phoenix, Presto, and Derby – any database which has a JDBC driver (over 80 databases!).
Here are some of the top DBeaver GUI features for PostgreSQL:
Visual Query builder helps you to construct complex SQL queries without actual knowledge of SQL.
It has one of the best editors – multiple data views are available to support a variety of user needs.
Convenient navigation among data.
In DBeaver, you can generate fake data that looks like real data allowing you to test your systems.
Full-text data search against all chosen tables/views with search results shown as filtered tables/views.
Metadata search among rows in database system tables.
Import and export data with many file formats such as CSV, HTML, XML, JSON, XLS, XLSX.
Provides advanced security for your databases by storing passwords in secured storage protected by a master password.
Automatically generated ER diagrams for a database/schema.
Enterprise Edition provides a special online support system.
One of the cons of DBeaver is it may be slow when dealing with large data sets compared to some expensive GUI tools like Navicat and DataGrip.
You can run DBeaver on Windows, Linux, and macOS, and easily connect DBeaver PostgreSQL with or without SSL. It has a free open-source edition as well an enterprise edition. You can buy the standard license for enterprise edition at $199, or by subscription at $19/month. The free version is good enough for most companies, as many of the DBeaver users will tell you the free edition is better than pgAdmin.
DBeaver Pricing
: Free community, $199 standard license
3. OmniDB
The next PostgreSQL GUI we’re going to review is OmniDB. OmniDB lets you add, edit, and manage data and all other necessary features in a unified workspace. Although OmniDB supports other database systems like MySQL, Oracle, and MariaDB, their primary target is PostgreSQL. This open source tool is mainly sponsored by 2ndQuadrant. OmniDB supports all three major platforms, namely Windows, Linux, and Mac OS X.
There are many reasons why you should use OmniDB for your Postgres developments:
You can easily configure it by adding and removing connections, and leverage encrypted connections when remote connections are necessary.
Smart SQL editor helps you to write SQL codes through autocomplete and syntax highlighting features.
Add-on support available for debugging capabilities to PostgreSQL functions and procedures.
You can monitor the dashboard from customizable charts that show real-time information about your database.
Query plan visualization helps you find bottlenecks in your SQL queries.
It allows access from multiple computers with encrypted personal information.
Developers can add and share new features via plugins.
There are a couple of cons with OmniDB:
OmniDB lacks community support in comparison to pgAdmin and DBeaver. So, you might find it difficult to learn this tool, and could feel a bit alone when you face an issue.
It doesn’t have as many features as paid GUI tools like Navicat and DataGrip.
OmniDB users have favorable opinions about it, and you can download OmniDB for PostgreSQL from here.
OmniDB Pricing: Free (open source)
4. DataGrip

DataGrip is a cross-platform integrated development environment (IDE) that supports multiple database environments. The most important thing to note about DataGrip is that it’s developed by JetBrains, one of the leading brands for developing IDEs. If you have ever used PhpStorm, IntelliJ IDEA, PyCharm, WebStorm, you won’t need an introduction on how good JetBrains IDEs are.
There are many exciting features to like in the DataGrip PostgreSQL GUI:
The context-sensitive and schema-aware auto-complete feature suggests more relevant code completions.
It has a beautiful and customizable UI along with an intelligent query console that keeps track of all your activities so you won’t lose your work. Moreover, you can easily add, remove, edit, and clone data rows with its powerful editor.
There are many ways to navigate schema between tables, views, and procedures.
It can immediately detect bugs in your code and suggest the best options to fix them.
It has an advanced refactoring process – when you rename a variable or an object, it can resolve all references automatically.
DataGrip is not just a GUI tool for PostgreSQL, but a full-featured IDE that has features like version control systems.
There are a few cons in DataGrip:
The obvious issue is that it’s not native to PostgreSQL, so it lacks PostgreSQL-specific features. For example, it is not easy to debug errors as not all are able to be shown.
Not only DataGrip, but most JetBrains IDEs have a big learning curve making it a bit overwhelming for beginner developers.
It consumes a lot of resources, like RAM, from your system.
DataGrip supports a tremendous list of database management systems, including SQL Server, MySQL, Oracle, SQLite, Azure Database, DB2, H2, MariaDB, Cassandra, HyperSQL, Apache Derby, and many more.
DataGrip supports all three major operating systems, Windows, Linux, and Mac OS. One of the downsides is that JetBrains products are comparatively costly. DataGrip has two different prices for organizations and individuals. DataGrip for Organizations will cost you $19.90/month, or $199 for the first year, $159 for the second year, and $119 for the third year onwards. The individual package will cost you $8.90/month, or $89 for the first year. You can test it out during the free 30 day trial period.
DataGrip Pricing
: $8.90/month to $199/year
5. Navicat

Navicat is an easy-to-use graphical tool that targets both beginner and experienced developers. It supports several database systems such as MySQL, PostgreSQL, and MongoDB. One of the special features of Navicat is its collaboration with cloud databases like Amazon Redshift, Amazon RDS, Amazon Aurora, Microsoft Azure, Google Cloud, Tencent Cloud, Alibaba Cloud, and Huawei Cloud.
Important features of Navicat for Postgres include:
It has a very intuitive and fast UI. You can easily create and edit SQL statements with its visual SQL builder, and the powerful code auto-completion saves you a lot of time and helps you avoid mistakes.
Navicat has a powerful data modeling tool for visualizing database structures, making changes, and designing entire schemas from scratch. You can manipulate almost any database object visually through diagrams.
Navicat can run scheduled jobs and notify you via email when the job is done running.
Navicat is capable of synchronizing different data sources and schemas.
Navicat has an add-on feature (Navicat Cloud) that offers project-based team collaboration.
It establishes secure connections through SSH tunneling and SSL ensuring every connection is secure, stable, and reliable.
You can import and export data to diverse formats like Excel, Access, CSV, and more.
Despite all the good features, there are a few cons that you need to consider before buying Navicat:
The license is locked to a single platform. You need to buy different licenses for PostgreSQL and MySQL. Considering its heavy price, this is a bit difficult for a small company or a freelancer.
It has many features that will take some time for a newbie to get going.
You can use Navicat in Windows, Linux, Mac OS, and iOS environments. The quality of Navicat is endorsed by its world-popular clients, including Apple, Oracle, Google, Microsoft, Facebook, Disney, and Adobe. Navicat comes in three editions called enterprise edition, standard edition, and non-commercial edition. Enterprise edition costs you $14.99/month up to $299 for a perpetual license, the standard edition is $9.99/month up to $199 for a perpetual license, and then the non-commercial edition costs $5.99/month up to $119 for its perpetual license. You can get full price details here, and download the Navicat trial version for 14 days from here.
Navicat Pricing
: $5.99/month up to $299/license
6. HeidiSQL
HeidiSQL is a new addition to our best PostgreSQL GUI tools list in 2021. It is a lightweight, free open source GUI that helps you manage tables, logs and users, edit data, views, procedures and scheduled events, and is continuously enhanced by the active group of contributors. HeidiSQL was initially developed for MySQL, and later added support for MS SQL Server, PostgreSQL, SQLite and MariaDB. Invented in 2002 by Ansgar Becker, HeidiSQL aims to be easy to learn and provide the simplest way to connect to a database, fire queries, and see what’s in a database.
Some of the advantages of HeidiSQL for PostgreSQL include:
Connects to multiple servers in one window.
Generates nice SQL-exports, and allows you to export from one server/database directly to another server/database.
Provides a comfortable grid to browse and edit table data, and perform bulk table edits such as move to database, change engine or ollation.
You can write queries with customizable syntax-highlighting and code-completion.
It has an active community helping to support other users and GUI improvements.
Allows you to find specific text in all tables of all databases on a single server, and optimize repair tables in a batch manner.
Provides a dialog for quick grid/data exports to Excel, HTML, JSON, PHP, even LaTeX.
There are a few cons to HeidiSQL:
Does not offer a procedural language debugger to help you debug your code.
Built for Windows, and currently only supports Windows (which is not a con for our Windors readers!)
HeidiSQL does have a lot of bugs, but the author is very attentive and active in addressing issues.
If HeidiSQL is right for you, you can download it here and follow updates on their GitHub page.
HeidiSQL Pricing: Free (open source)
Conclusion
Let’s summarize our top PostgreSQL GUI comparison. Almost everyone starts PostgreSQL with pgAdmin. It has great community support, and there are a lot of resources to help you if you face an issue. Usually, pgAdmin satisfies the needs of many developers to a great extent and thus, most developers do not look for other GUI tools. That’s why pgAdmin remains to be the most popular GUI tool.
If you are looking for an open source solution that has a better UI and visual editor, then DBeaver and OmniDB are great solutions for you. For users looking for a free lightweight GUI that supports multiple database types, HeidiSQL may be right for you. If you are looking for more features than what’s provided by an open source tool, and you’re ready to pay a good price for it, then Navicat and DataGrip are the best GUI products on the market.
Ready for some PostgreSQL automation?
See how you can get your time back with fully managed PostgreSQL hosting. Pricing starts at just $10/month.
While I believe one of these tools should surely support your requirements, there are other popular GUI tools for PostgreSQL that you might like, including Valentina Studio, Adminer, DB visualizer, and SQL workbench. I hope this article will help you decide which GUI tool suits your needs.
Which Is The Best PostgreSQL GUI? 2019 Comparison
Here are the top PostgreSQL GUI tools covered in our previous 2019 post:
pgAdmin
DBeaver
Navicat
DataGrip
OmniDB
Original source: ScaleGrid Blog
3 notes
·
View notes
Text
Sqlite For Mac Os X

Sqlite For Mac Os X El Capitan
Sqlite Viewer Mac
Sqlite Mac Os X Install
If you are looking for an SQLite Editor in the public domain under Creative Commons license or GPL (General Public License) i.e. for free commercial or non-commercial use. Then here is a shortlist of the SQLite Editor that is available on the web for free download.
SQLite is famous for its great feature zero-configuration, which means no complex setup or administration is needed. This chapter will take you through the process of setting up SQLite on Windows, Linux and Mac OS X. Install SQLite on Windows. Step 1 − Go to SQLite download page, and download precompiled binaries from Windows section. Core Data is an object graph and persistence framework provided by Apple in the macOS and iOS operating systems.It was introduced in Mac OS X 10.4 Tiger and iOS with iPhone SDK 3.0. It allows data organized by the relational entity–attribute model to be serialized into XML, binary, or SQLite stores. The data can be manipulated using higher level objects representing entities. Requirements: Free, ideally open source Browse schema, data. Run queries Bonus if updated in near real time when the file is. SQLite viewer for Mac OS X. Ask Question Asked 5 years, 10 months ago. Active 4 years, 3 months ago. Viewed 504 times 3. I need to inspect an SQLite file on Mac. Since I develop on Windows, Linux and OS X, it helps to have the same tools available on each. I also tried SQLite Admin (Windows, so irrelevant to the question anyway) for a while, but it seems unmaintained these days, and has the most annoying hotkeys of any application I've ever used - Ctrl-S clears the current query, with no hope of undo.
These software work on macOS, Windows, Linux and most of the Unix Operating systems.
SQLite is the server. The SQLite library reads and writes directly to and from the database files on disk. SQLite is used by Mac OS X software such as NetNewsWire and SpamSieve. When you download SQLite and build it on a stock Mac OS X system, the sqlite tool has a.
1. SQLiteStudio
Link : http://sqlitestudio.pl/
SQLiteStudio Database manager has the following features :
A small single executable Binary file, so there is need to install or uninstall.
Open source and free - Released under GPLv2 licence.
Good UI with SQLite3 and SQLite2 features.
Supports Windows 9x/2k/XP/2003/Vista/7, Linux, MacOS X, Solaris, FreeBSD and other Unix Systems.
Language support : English, Polish, Spanish, German, Russian, Japanese, Italian, Dutch, Chinese,
Exporting Options : SQL statements, CSV, HTML, XML, PDF, JSON, dBase
Importing Options : CSV, dBase, custom text files, regular expressions
UTF-8 support

2. Sqlite Expert
Link : http://www.sqliteexpert.com/download.html


SQLite Expert though not under public domain, but its free for commercial use and is available in two flavours.
a. Personal Edition
Sqlite For Mac Os X El Capitan
It is free for personal and commercial use but, covers only basic SQLite features.
But its a freeware and does not have an expiration date.

b. Professional Edition
It is for $59 (onetime fee, with free lifetime updates )
It covers In-depth SQLite features.
But its a freeware and does not have an expiration date.
Features :
Visual SQL Query Builder : with auto formatting, sql parsing, analysis and syntax highlighting features.
Powerful restructure capabilities : Restructure any complex table without losing data.
Import and Export data : CSV files, SQL script or SQLite. Export data to Excel via clipboard.
Data editing : using powerful in-place editors
Image editor : JPEG, PNG, BMP, GIF and ICO image formats.
Full Unicode Support.
Support for encrypted databases.
Lua and Pascal scripting support.
3. Database Browser for SQLite
Link : http://sqlitebrowser.org/
Database Browser for SQLite is a high quality, visual, open source tool to create, design, and edit database files compatible with SQLite.
Database Browser for SQLite is bi-licensed under the Mozilla Public License Version 2, as well as the GNU General Public License Version 3 or later.
You can modify or redistribute it under the conditions of these licenses.
Features :
You can Create, define, modify and delete tables
You can Create, define and delete indexes
You can Browse, edit, add and delete records
You can Search records
You can Import and export records as
You can Import and export tables from/to text, CSV, SQL dump files
You can Issue SQL queries and inspect the results
You can See Log of all SQL commands issued by the application
4. SQLite Manager for Firefox Browser
Link : https://addons.mozilla.org/en-US/firefox/addon/sqlite-manager/
This is an addon plugin for Firefox Browser,
Features :
Manage any SQLite database on your computer.
An intuitive hierarchical tree showing database objects.
Helpful dialogs to manage tables, indexes, views and triggers.
You can browse and search the tables, as well as add, edit, delete and duplicate the records.
Facility to execute any sql query.
The views can be searched too.
A dropdown menu helps with the SQL syntax thus making writing SQL easier.
Easy access to common operations through menu, toolbars, buttons and context-menu.
Export tables/views/database in csv/xml/sql format. Import from csv/xml/sql (both UTF-8 and UTF-16).
Possible to execute multiple sql statements in Execute tab.
You can save the queries.
Support for ADS on Windows
Sqlite Viewer Mac
More Posts related to Mac-OS-X,
More Posts:
Sqlite Mac Os X Install
Facebook Thanks for stopping by! We hope to see you again soon. - Facebook
Android EditText Cursor Colour appears to be white - Android
Disable EditText Cursor Android - Android
Connection Failed: 1130 PHP MySQL Error - MySQL
SharePoint Managed Metadata Hidden Taxonomy List - TaxonomyHiddenList - SharePoint
Execute .bin and .run file Ubuntu Linux - Linux
Possible outages message Google Webmaster tool - Google
Android : Remove ListView Separator/divider programmatically or using xml property - Android
Unable to edit file in Notepad++ - NotepadPlusPlus
SharePoint PowerShell Merge-SPLogFile filter by time using StartTime EndTime - SharePoint
SQLite Error: unknown command or invalid arguments: open. Enter .help for help - Android
JBoss stuck loading JBAS015899: AS 7.1.1.Final Brontes starting - Java
Android Wifi WPA2/WPA Connects and Disconnects issue - Android
Android Toolbar example with appcompat_v7 21 - Android
ERROR x86 emulation currently requires hardware acceleration. Intel HAXM is not installed on this machine - Android
1 note
·
View note
Text
Laravel 10 Export MySQL Table Data into CSV File Tutorial
Inside this article we will see the concept of Laravel 10 Export MySQL Table Data into CSV File Tutorial. Article contains classified information about How To export data in CSV format in laravel application.
If we have an application which basically built for reporting then you need some kind of function which export tabular data into CSV format. This function is for admin purpose.
0 notes
Text
How to Connect MySQL to Power BI (Without Writing a Single Line of Code!)
Data is a big deal. No, scratch that data is everything when it comes to making smart business moves. And that’s exactly why 80% of companies are investing heavily in data analytics.
If you’re still stuck manually exporting and importing data between MySQL and Power BI, you’re wasting valuable time. The good news? You can automate the entire process and get real-time insights without writing a single line of code. Sounds amazing, right?
This guide will walk you through how to integrate MySQL with Power BI, automate data syncs, and level up your analytics game effortlessly.

Why Should You Connect Power BI with MySQL?
Before we jump into the steps, let’s break down why this integration is a game-changer.
Power BI & MySQL: A Perfect Match
🔹 Power BI → A top-tier data visualization tool that helps you create stunning dashboards and reports.
🔹 MySQL → One of the most widely used open-source databases, perfect for handling massive amounts of structured data.
When you connect MySQL to Power BI, you get the best of both worlds—rock-solid data storage with real-time, interactive visualizations. Imagine not having to manually refresh reports or pull CSV files every time your data updates.
The best part? Thanks to SaaS integration platforms like Konnectify, you don’t need a developer to make it happen.
💡 Fact: Automating data syncs can save up to 50% of the time spent on manual reporting.
How to Connect MySQL to Power BI (Step-by-Step Guide)
What You’ll Need
✔️ A Power BI account ✔️ A MySQL database ✔️ MySQL ODBC Connector (This acts as the bridge between MySQL and Power BI) ✔️ A Konnectify account to automate the integration
Step 1: Install MySQL ODBC Connector
1️⃣ Head over to the MySQL official website and download MySQL Workbench if you don’t have it. 2️⃣ Install the MySQL ODBC Connector this is what allows Power BI to talk to MySQL.
Step 2: Connect MySQL Database to Power BI
1️⃣ Open Power BI Desktop 2️⃣ Click on Get Data → MySQL Database 3️⃣ Enter your server details and credentials 4️⃣ Click Connect to pull in your MySQL tables
🚀 Boom! Your data is now inside Power BI. But let’s take it a step further—let’s automate the entire process so you never have to manually refresh again.
Automate MySQL Data Sync with Power BI Using SaaS Integration
Here’s where Konnectify makes life ridiculously easy.
Instead of manually updating reports, Konnectify automates everything with zero coding.
How to Set Up Konnectify for MySQL → Power BI Automation
1️⃣ Log into Konnectify 2️⃣ Select MySQL from the app marketplace 3️⃣ Set up a trigger like “New data entry in MySQL” 4️⃣ Choose an action like “Create row in Power BI” so your reports update automatically 5️⃣ Customize your workflow with Konnectify’s drag-and-drop builder and hit Activate
And that’s it! Your Power BI dashboard now updates in real-time whenever MySQL gets new data. 🎉
💡 Real-World Example: A finance team using MySQL to store transactions can automatically generate financial reports in Power BI without touching a spreadsheet.
🔗 Want a more detailed walkthrough? Check out this step-by-step guide from the Konnectify blog.
5 Game-Changing Use Cases for Power BI + MySQL Integration
Still wondering why this setup is worth it? Here’s how real businesses are using it:
1. Automate Financial Reports 💰
Sync MySQL’s financial data with Power BI to auto-generate revenue dashboards and track expenses in real-time.
✅ Fact: Real-time analytics can boost operational efficiency by 20%.
2. Analyze Sales Data 📊
Use Power BI to visualize sales trends, customer acquisition costs, and churn rates straight from MySQL.
3. Manage Inventory in Real-Time 📦
No more stockouts! Set up dashboards to track inventory levels and trigger alerts when stock is low.
4. Monitor Customer Support Performance 🎧
Track response times, ticket volume, and resolution rates with live MySQL data in Power BI.
5. Improve Project Management 🚀
Connect Power BI and MySQL to track deadlines, workloads, and team performance all automated!
Frequently Asked Questions (FAQs)
1. Can I Connect Power BI to MySQL Without Coding?
Yes! With SaaS integration via Konnectify, you can set up MySQL-Power BI sync without writing a single line of code.
2. How Can I Get Real-Time Updates in Power BI from MySQL?
Automate it using Konnectify. Any updates in MySQL will instantly reflect in Power BI dashboards no manual refresh needed.
3. Why Use Konnectify for MySQL + Power BI?
No coding needed—anyone can use it
Automates reporting so you don’t have to
Works with 150+ apps, making it the best SaaS integration tool for automation
Final Thoughts
Let’s be real—manual data exports are a waste of time. If you want real-time Power BI dashboards, integrating MySQL is a must. And with SaaS integration tools like Konnectify, you can set up automated syncs in minutes—no coding required.
🔗 Want to see how it works? Check out the full guide here: How to Connect Power BI to MySQL Database.
Now go automate your analytics and thank yourself later! 🚀
#it services#saas development company#saas platform#saas#saas technology#software#b2b saas#information technology#software development#ipaas
0 notes
Text
Open sqllite database with sql studio

#OPEN SQLLITE DATABASE WITH SQL STUDIO HOW TO#
#OPEN SQLLITE DATABASE WITH SQL STUDIO PORTABLE#
#OPEN SQLLITE DATABASE WITH SQL STUDIO ANDROID#
#OPEN SQLLITE DATABASE WITH SQL STUDIO SOFTWARE#
We provide you with the SQLite sample database named chinook. The chinook sample database is a good database for practicing with SQL, especially SQLite. Introduction to chinook SQLite sample database
#OPEN SQLLITE DATABASE WITH SQL STUDIO HOW TO#
At the end of the tutorial, we will show you how to connect to the sample database using the sqlite3 tool. Then, we will give you the links to download the sample database and its diagram. It is even available for Raspberry Pi, however, we highly recommend using the Raspberry Pi 4B model.Summary: in this tutorial, we first introduce you to an SQLite sample database. It is available for Windows, Linux, and macOS. The supported database engines are PostgreSQL, MySQL, SQLite, Redshift, SQL Server, CockroachDB, and MariaDB.īeekeeper supports SSL connection, SQL auto-completion, multiple tabs, SQL query saving, edit tables, and exports to CSV, JSON, JSONL, and SQL of course.
#OPEN SQLLITE DATABASE WITH SQL STUDIO SOFTWARE#
7- Beekeeper Studioīeekeeper Studio is an open-source, multi-platform, free SQL database manager for many SQL databases including SQLite.īeekeeper is popular among developers, database administrators, and DevOps, originally created by Matthew an experienced software engineer who created Beekeeper for ease of use. It features a query manager, shortcuts, terminal interface, and works on Windows, Linux, and macOS. Sqlectron is an open-source, free lightweight SQL manager to manage various SQL databases including SQLite.Ĭurrently, Sqlectorn supports MariaDB, MySQL, Oracle DB, PostgreSQL, Microsoft SQL server, and Cassandra DB
#OPEN SQLLITE DATABASE WITH SQL STUDIO ANDROID#
Sqlite manager is a simple SQLite debugging tool for Android, to help developers access, manage, perform SQL queries on Android apps. SQLite features a database comparison where you can compare two database files, a history manager to track all executed SQL commands and user scripts, charts, query shortcuts, and an extension pack to extend its functionalities. Sqlite-guiis a legacy SQLite manager for Windows systems, aims to aid developers and normal user access, and manage SQLite database files.ĭespite it is coming with a productive GUI, it also offers a terminal mode and several unique versions like the ability to build a local web-based or browser-based apps based on its built-in REST API web server. License: GNU General Public License (GPL) v3.0. SQLiteStudio is available for Windows, Linux, and macOS. SQLiteStudio work seamlessly on multiple database at the same time, as SQL statements can run on multiple database simultaneously. With SQLiteStudio you an import CSV and populate the data into tables, as well as export the data in SQL statements, CSV, JSON, PDF, XML, and HTML.
#OPEN SQLLITE DATABASE WITH SQL STUDIO PORTABLE#
The app comes with advanced SQL code editor, custom SQL functions, a rich history option, drag-and-drop support, and portable editions. It was originally written in Tcl/Tk, then rewritten in C++/Qt for better performance. SQLiteStudio is a desktop app for browsing, editing, and managing SQLite databases. With DB Browser, you can review your SQL log, execute SQL queries, and review your database structure without breaking a sweat. SQLite DB Browser for SQLite is a lightweight SQLite database client for macOS, Windows with the portable option, and Linux.ĭB Browser for SQLite or (DB4S), helps users to create database files, create/edit and remove tables, search records, import/ export data as CSV or as text, and take database backups. It works smoothly on iPhone, and iPad as well. Despite its lightweight, it comes with great benefits for developers and seamless integration with the system. SQLiteFlow is a native SQLite editor for macOS and iOS systems.
0 notes
Text
Mactrack plugin cacti

Mactrack plugin cacti install#
Mactrack plugin cacti update#
If you find any potential issues, please use GitHub Issues Feature RequestsĪt first it's recommend to discuss your feature request with the Cacticommunity. If you need additional help, please visit ourforums Possible Bugs Recent upgrades seen other contributors helpingout including Jimmy Connor (cigamit), Mark Brugnoli-Vinten (netniV) andCarlimeunier. ReportIt was created and written by Andreas Braun (browniebraun) with numerouscontributors over the years. At least change tothe Cacti Webinterface and check the settings under'Console->Settings->Reports'. Same has to be ensured for the export folder. ReportIt does not require that your webserver has write access to any folder.But if the history function should be in use, you will have to ensure that theuser, who executes the calculation of your scheduled reports via Crontab oranother scheduler, will have write access to the folders called 'tmp' and'archive'. Go to the plugin management console and click on 'install'.The upgrade process will start automatically! After it has finished you canenable ReportIt with a click on 'enable'. It's strongly recommended to make a backup of your cactidatabase and your ReportIt folder before! If you're using the default archivefolder of 0.6.x save it first!!!Īfter that replace your existing ReportIt folder with the new one stored in thisdownload archive. To upgrade an existing version of ReportIt please ensure that its release numberis v0.4.0 or above. Update ReportIt's settings under 'Configuration/Settings/Reports'.
Mactrack plugin cacti update#
Start Cacti and update your realm permissions under 'Utilities/UserManagement'. Go to the Plugin Management Console and click on 'Install'. Unpack the tar-file into the plugins folder. The Installation of ReportIt is similar to other plugins:
Fast report generation: PHP extension 'php_rrdtool'.
Optional: To use the full set of ReportIt's functionalities additionalextensions are required To upgrade 'ReportIt' release 0.4.0 or higher is required.Ī prior version (0.1, 0.2, 0.3.0, 0.3.1, 0.3.2 or 0.4.0a) has to be completelyuninstalled (mysql tables as well)!
Mactrack plugin cacti install#
Working in localtime supports change to DST and vice versaĪutomatic dispatch of scheduled reports via emailīefore you install 'ReportIt', check the following requirements: Provides rounding with binary or decimal SI-Prefixes Scheduled reporting with sliding time frames Individual configuration of working days, working time, timezone and subheadsper data item Featuresĭefinition of individual report templates by using measurands and variables ina mathematical wayĭefinition of report configurations depending on report templates and withdifferent data items This plugin creates tabular reports which can be exported to CSV, SML and XML aswell.
0 notes
Text
PHPMyAdmin is a free software tool written in PHP, intended to handle the administration of MySQL over the Web interface. phpMyAdmin supports a wide range of operations on MySQL and MariaDB. In this article we look at how you install PHPMyAdmin on Kali Linux & Debian Linux system. Most frequent database operations – (managing databases, tables, columns, relations, indexes, users, permissions, etc) can be performed via the web console, while you still have the ability to directly execute any SQL statement. Core Features of phpMyAdmin An intuitive cool web interface Support for most MySQL features Import data from CSV and SQL Export data to various formats: CSV, SQL, XML, PDF, ISO/IEC 26300 – OpenDocument Text and Spreadsheet, Word, LATEX, and others Administering multiple servers Creating PDF graphics of your database layout Creating complex queries using Query-by-example (QBE) Searching globally in a database or a subset of it Transforming stored data into any format using a set of predefined functions, like displaying BLOB-data as image or download-link The following is the procedure to follow while installing PHPMyAdmin on Kali Linux or any other Debian based system. Step 1: Update System Start by ensuring the system is updated. sudo apt update sudo apt upgrade Because of kernel updates a reboot may be required. sudo reboot Step 2: Install PHP and Apache on Kali Linux The next step is the installation of PHP, required modules and Apache Web Server. sudo apt -y update sudo apt -y install wget php php-cgi php-mysqli php-pear php-mbstring libapache2-mod-php php-common php-phpseclib php-mysql Confirm installation of PHP by checking the version: $ php --version PHP 7.4.11 (cli) (built: Oct 6 2020 10:34:39) ( NTS ) Copyright (c) The PHP Group Zend Engine v3.4.0, Copyright (c) Zend Technologies with Zend OPcache v7.4.11, Copyright (c), by Zend Technologies Step 3: Install MariaDB / MySQL database Server Since you’re using phpMyAdmin to administer MySQL or MariaDB database server you should have database server already installed. You can also reference our guides below. How To Install MariaDB on Kali Linux How To Install MySQL 8.0 on Kali Linux Once the database server is installed and running you can then proceed to install phpMyAdmin on Kali Linux and Debian system. Step 4: Install PHPMyAdmin on Kali Linux From the phpMyAdmin downloads page you should be able to check the latest release. Use wget command line tool to download the latest version of phpMyAdmin: wget https://www.phpmyadmin.net/downloads/phpMyAdmin-latest-all-languages.tar.gz Extract downloaded archive file using tar: tar xvf phpMyAdmin-latest-all-languages.tar.gz Move the folder created from extraction to /usr/share/phpmyadmin directory. rm -f phpMyAdmin-latest-all-languages.tar.gz sudo mv phpMyAdmin-*/ /usr/share/phpmyadmin Create directory for phpMyAdmin temp files. sudo mkdir -p /var/lib/phpmyadmin/tmp sudo chown -R www-data:www-data /var/lib/phpmyadmin We also need to create a directory where phpMyAdmin configuration files will be stored. sudo mkdir /etc/phpmyadmin/ Copy configuration template to the directory we just created. sudo cp /usr/share/phpmyadmin/config.sample.inc.php /usr/share/phpmyadmin/config.inc.php Edit the file /usr/share/phpmyadmin/config.inc.php and set secret passphrase: $ sudo vim /usr/share/phpmyadmin/config.inc.php $cfg['blowfish_secret'] = 'H2TxcGXxflSd8JwrXVlh6KW4s2rER63i'; Configure Temp directory by adding this line in the file. $cfg['TempDir'] = '/var/lib/phpmyadmin/tmp'; Step 5: Configure Apache web Server Create a new Apache configuration file for phpMyAdmin. sudo vim /etc/apache2/conf-enabled/phpmyadmin.conf Paste below contents to the file. Alias /phpmyadmin /usr/share/phpmyadmin Options SymLinksIfOwnerMatch DirectoryIndex index.php AddType application/x-httpd-php .php
SetHandler application/x-httpd-php php_value include_path . php_admin_value upload_tmp_dir /var/lib/phpmyadmin/tmp php_admin_value open_basedir /usr/share/phpmyadmin/:/etc/phpmyadmin/:/var/lib/phpmyadmin/:/usr/share/php/php-gettext/:/usr/share/php/php-php-gettext/:/usr/share/javascript/:/usr/share/php/tcpdf/:/usr/share/doc/phpmyadmin/:/usr/share/php/phpseclib/ php_admin_value mbstring.func_overload 0 AddType application/x-httpd-php .php SetHandler application/x-httpd-php php_value include_path . php_admin_value upload_tmp_dir /var/lib/phpmyadmin/tmp php_admin_value open_basedir /usr/share/phpmyadmin/:/etc/phpmyadmin/:/var/lib/phpmyadmin/:/usr/share/php/php-gettext/:/usr/share/php/php-php-gettext/:/usr/share/javascript/:/usr/share/php/tcpdf/:/usr/share/doc/phpmyadmin/:/usr/share/php/phpseclib/ php_admin_value mbstring.func_overload 0 # Authorize for setup AuthType Basic AuthName "phpMyAdmin Setup" AuthUserFile /etc/phpmyadmin/htpasswd.setup Require valid-user # Disallow web access to directories that don't need it Require all denied Require all denied Require all denied Restriction to specific IP addresses or network address block can be set with a configuration which looks similar to below. Require ip 127.0.0.1 192.168.10.0/24 Finally restart Apache web server to read the changes. sudo systemctl restart apache2 Confirm Apache service has been started without any error: $ systemctl status apache2 ● apache2.service - The Apache HTTP Server Loaded: loaded (/lib/systemd/system/apache2.service; disabled; vendor preset: disabled) Active: active (running) since Fri 2022-01-22 14:49:54 EST; 11min ago Docs: https://httpd.apache.org/docs/2.4/ Process: 7502 ExecStart=/usr/sbin/apachectl start (code=exited, status=0/SUCCESS) Main PID: 7513 (apache2) Tasks: 11 (limit: 2274) Memory: 57.8M CPU: 656ms CGroup: /system.slice/apache2.service ├─7513 /usr/sbin/apache2 -k start ├─7515 /usr/sbin/apache2 -k start ├─7516 /usr/sbin/apache2 -k start ├─7517 /usr/sbin/apache2 -k start ├─7518 /usr/sbin/apache2 -k start ├─7519 /usr/sbin/apache2 -k start ├─7751 /usr/sbin/apache2 -k start ├─7757 /usr/sbin/apache2 -k start ├─7758 /usr/sbin/apache2 -k start ├─7759 /usr/sbin/apache2 -k start └─7760 /usr/sbin/apache2 -k start Step 6: Open phpMyAdmin Web interface Access phpMyAdmin Web interface on http://[ServerIP|Hostname]/phpmyadmin Use your database credentials – username & password to login. The root user credentials can also be used to authenticate. phpMyAdmin dashboard is displayed upon a successful login. You can now use phpMyAdmin for all database management tasks in your software development cycle. Below are more guides we have on Kali Linux.
0 notes
Text
Laravel 8 Import Export Excel & CSV File Example

Laravel Excel is intended to be a PHPSpreadsheet with a Laravel flavour. It is a simple and elegant wrapper for PhpSpreadsheet that simplifies exports and imports. PhpSpreadsheet is a php-based library that allows you to read and write spreadsheet file formats such as Excel and LibreOffice Calc. The following features are available in Laravel Excel:
Laravel Excel Features
- Collections can be easily exported to Excel. - For improved performance, export queries with automatic chunking. - Export queues for improved performance. - Export Blade views to Excel with ease. - Import to collections is simple. - Reading the Excel file in chunks is recommended. - Import inserts should be handled in batches. This laravel maatwebsite/excel tutorial is ideal if you want to create simple import and export, excel file functionality. By the end of this tutorial, you will be able to download and import Excel and CSV files directly from the database in the Laravel application.
Step 1: Install Laravel Project
To begin, launch Terminal and enter the following command to create a new Laravel project: composer create-project --prefer-dist laravel/laravel laravel-excel Alternatively, if you have the Laravel Installer installed as a global composer dependency: laravel new laravel-excel
Step 2: Configure Database Details
Following that, installation Go to the project's root directory, open the.env file, and configure the database as follows: DB_CONNECTION=mysql DB_HOST=127.0.0.1 DB_PORT=3306 DB_DATABASE= DB_USERNAME= DB_PASSWORD=
Step 3: Install maatwebsite/excel package
You can install Laravel Excel using composer. This command must be executed in order for the installation to take place. composer require maatwebsite/excel You can include the following code in the config/app.php file. 'providers' => , 'aliases' => , Execute the vendor, then publish the command and configuration. php artisan vendor:publish --provider="MaatwebsiteExcelExcelServiceProvider" --tag=config This will generate a new configuration file called config/excel.php.
Step 4: Generate Fake Data and Migrate Table
The user table is migrated in the first step. We proceeded to the second step after the migration was completed successfully. php artisan migrate The fake record is created in the second step. Tinker is used to generate the fake records in this case. You can use a different method depending on your needs. php artisan tinker You must run this command after opening the tinker to generate the fake records in our database. User::factory()->count(100)->create();
Step 5: Create a Routes
In this step, we will create a route to handle file import and export requests. use AppHttpControllersUserController; Route::get('/file-import',)->name('import-view'); Route::post('/import',)->name('import'); Route::get('/export-users',)->name('export-users');
Step 6: Create Import Class
Maatwebsite provides a method for creating an import class, which we must use in the controller. As a result, it would be an excellent way to create a new Import class. As a result, you must execute the following command and modify the following code in that file: php artisan make:import ImportUser --model=User app/Imports/ImportUser.php Read the full article
0 notes