#Furniture refinishing
Text

In my spare time, I refinish furniture and seeing it come together in the end always makes me feel so good. Nothing works so well on your mental health than getting a hobby where you work with your hands; head empty, only hobby ✨
#furniture refinishing#mcm#midcentury#midcentury modern#furniture#hobby#love working with my hands 😏#head empty
40 notes
·
View notes
Text
I haven't had the mental capacity for illustration, but I did refinish and paint a table!


40 notes
·
View notes
Text

I bought this dresser a few months ago for $25 off fb marketplace bc I really liked the shape and design and I thought well I bet I could take off the paint and make it nicer it looks like wood under there


and it was!!!! It’s so so so pretty I’m really happy!! The striping on the little panel near the bottom!!!!!!
before you ask no I don’t have woodworking experience no I didn’t know what I was doing and no I don’t know what the wood is :’) if you do know something about woodworking I am sorry for my mistakes but it was my first time please forgive me
my roommates have been very kind and patient with this taking up half of our tiny garage for months and now also a third of our living room for several days. hopefully i can take it upstairs into my room tonight or tomorrow so I can finally have a goddamn dresser instead of two sets of plastic drawers stacked on top of one another
I want to add a few final details (I think I will paint the exposed, non-veneer parts black again just to unify it and add the gold back into the grooves) but im honestly so relieved to be essentially done Jesus Christ I will not work on such a large project again soon
anyways. hi everyone long time no post I moved and refinished a dresser I guess.
#cyanoupdates#my art#?????#I guess it’s art#it’s. certainly something#I’m so relieved the drawers no longer squeak that was my biggest fear#when I first pulled the drawers out they squeaked like the devil himself it was so horrid#furniture#woodworking#furniture refinishing
53 notes
·
View notes
Text

𝐑𝐞𝐟𝐢𝐧𝐢𝐬𝐡𝐞𝐝 𝐚𝐧𝐭𝐢𝐪𝐮𝐢𝐭𝐲
𝗁𝗍𝗍𝗉s://instagram.com/cottagesandbungalows
14 notes
·
View notes
Text
The best part of my furniture project- the tape peel reveal! For both of these paint colors having been clearance-shelf mistints that I couldn't have chosen on purpose if I wanted to, I'm really happy at how they all look together.
64 notes
·
View notes
Video
youtube
How to Refinish and Remove Stains on Antique Marble Top Table
#youtube#refinishing#furniture#furniture refinishing#stain removal#marble#marble top table#how to manifest#how to
4 notes
·
View notes
Text
Trunk Redesign? Refurbishment? Refinish?

I bought a trunk from a neighbor and decided that it would be my prop box to store all the junk I make.
I don't think it's actually that old, I was hoping it was a proper wooden trunk, and I'm pretty sure it was originally dark blue. I ripped out the ugly paper lining and (poorly) replaced it with a vinyl wallpaper. The exterior was painted with acryllic hooker's green but I may repaint it a sage green. The interior shelf? Drawer? Insert? was lined with a cheap blue "velvet". There was some leather handles but they were rotted away so I ripped them off and couldn't decide on a replacement yet. I may also add some vintage looking casters to make it easier for me to move around.


#larp props#cosplay props#props#lightsaber#furniture restoration#furniture refinishing#trunks#steampunk#victorian
4 notes
·
View notes
Text
What you think your Saturday night with your Big Titty Goth Girlfriend TM will look like

What it actually looks like

#goth aesthetic#goth girl#goth gf#goth home#diy goth#diy#gothic#gothic furniture#gothic homemaking#furniture refinishing
16 notes
·
View notes
Text
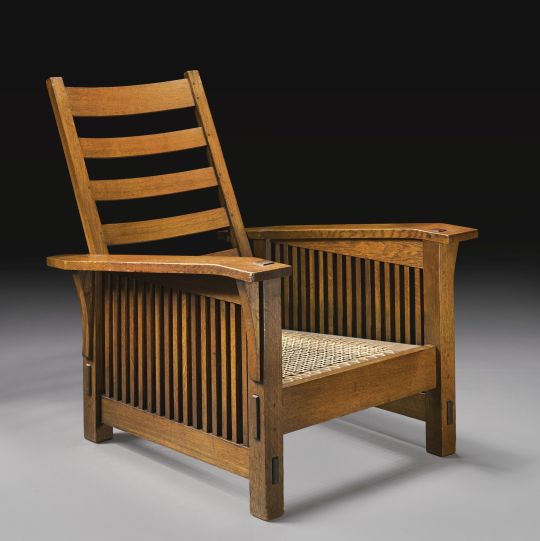
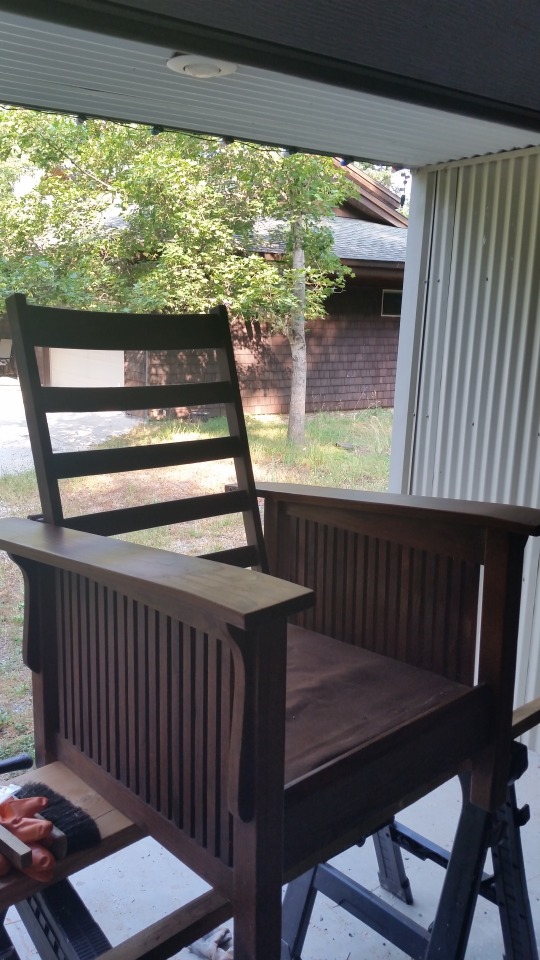
Going to try and refinish my Morris/Stickley chair. Its just a replica and not anything like the original. I'm tempted to take the pieces apart and put in tenons with dowels etc and recreate the function in the original.
12 notes
·
View notes
Text


Another refurbished piece, this time we got a Mersman side table :) the walnut grain is so pretty can’t wait to get a pic of it in the proper light so you can’t see that grain work babbyyy
14 notes
·
View notes
Text
MCM Shelf Saga
Part 4 - A Shitshow of a Finale
[Part 3]
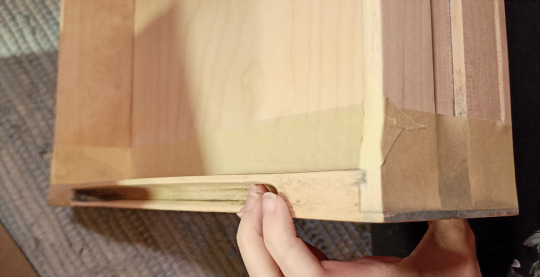
So, onto the drawers. First, there's a little bit of prep work to do
One of the drawers had not just bad stains on the bottom of it, but the bottom piece had never even been properly inserted into its place. So I did the good ol' trick of removing the whole bottom piece, flipping it around (to use the untouched bottom side as the top) and put it back in its place, this time all the way into the little slot
Worked great
And then I had to deal with the veneer damage I had caused to one of the drawer fronts
Since this was my first time even attempting veneer patching, I figured I should just try to focus on the worst bits of damage instead of trying to address all the damage? Because I was worried I'd just make it worse, so it'd be better to start small?
So I picked the worst parts and very carefully made made the worst chips bigger so I could cut out itty bitty veneer bits to fill them in with (there were a few more but I don't want this post to be a million photos long)

Once I had made sure the pieces would fit in by caaarefully filing them down to the right size, I glued them down, put some painters tape on top (to try to keep the glue from spreading), left something heavy sitting on top and just left them to dry
Once done, I came back to sand down the patches (since the veneer I had was a bit thicker than the original veneer)

And. Yeah. It's not great. Mind you, unlike in North America, I can't just go to a big store and buy whatever veneer my heart desires, the only veneer I could buy (as far as I know) was a set of three different veneer sheets the size of paper sheets. So I didn't have much options with matching the veneer at all.
That all aside, it was my first attempt at veneer patching, and considdering that I think I did pretty decent. If anything I regret just not doing all the damaged spots because some of the dents are really bad even if they didn't go through the original veneer
But it is what it is
I decided it was good enough, and proceeded to tape the sides of the drawers for a cleaner(?) finish
And onto the staining
Still looks like shit
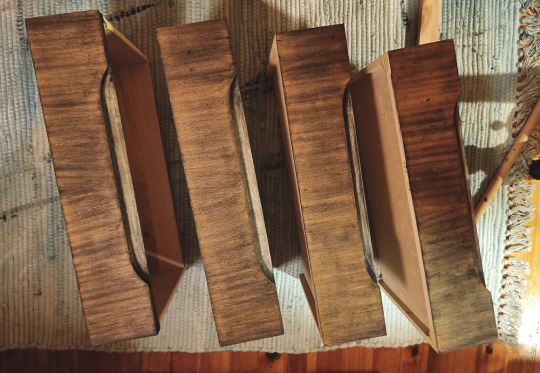
I think this was after the first coat??? Honestly it's been so long I can't remember, it must've been just the first coat
But, I kept on building up coats to get a darker and darker color on the drawer fronts
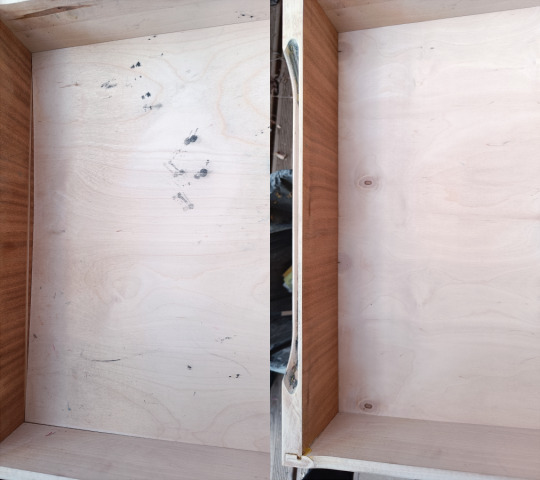
Once I figured it was dark enough I moved onto staining the veneer on the inside of the drawers, mainly in the hopes of hiding the paint stains that the paint remover and sanding failed to remove

It did not work
Fortunately, it's on the inside, ain't nobody gonna see it, it's fine, whatever, this project was going so fucking bad at this point I no longer cared

This was good enough
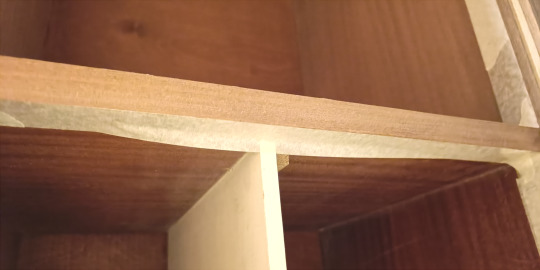
And it was onto staining the main unit.
Now unfortunately, due the place I was working in being so bloody cramped I couldn't get decent photos of the unit during the waxing process
I did attempt to make the inside of the unit look semi-decent by masking off where I wanted the wax to go, but... This ended up not working to my advantage, as I had taped just a smidge too close to the edges, meaning when I later put the drawers in, you could see small slivers of the raw wood peek out. So I ended up having to do lots of patching on the drawer-side of the unit. But whatever
Think these are photos of the first coat? As usual, looked like absolute shite
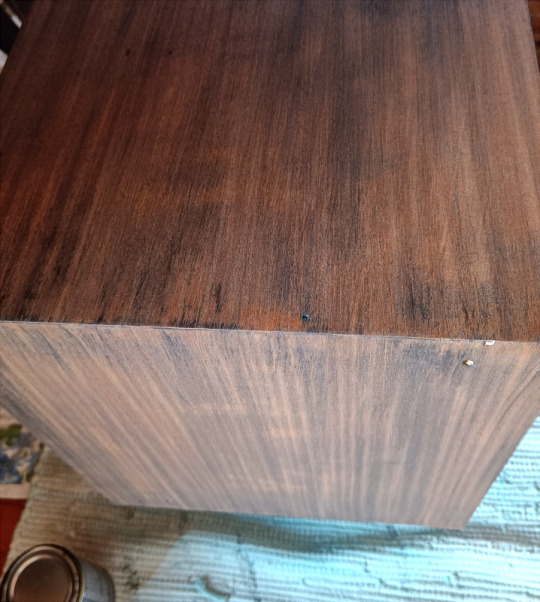

But I kept on going, building up more and more layers of wax until I eventually gave up and called it done
But, with the main unit stained, it meant that every piece of the shelf was finished! I could move onto reassembling it!
After some final touches
First, I had to deal with the brass rods that were used to hold up the shelves
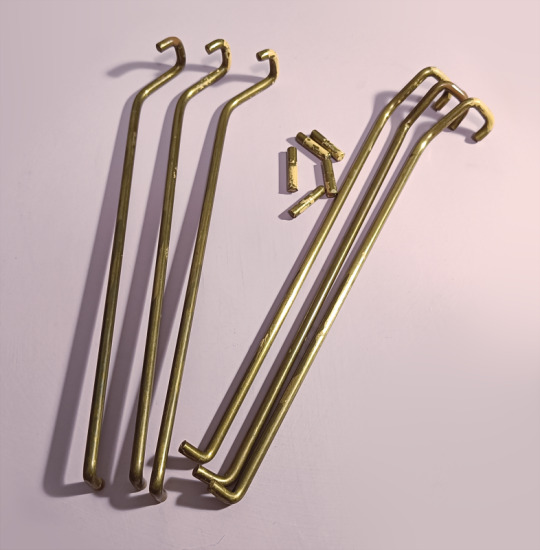
Now at first I couldn't even tell for sure if they were brass or not, like considderng the age of the shelf I figured they should be, but when I asked my dad for a second opinion he was convinced they'd be just iron or steel
Regardless, these were original pieces to the shelf so I did want to use them, but as you can see, they were still covered in paint
I attempted removing them with just nail polish remover, since acetone does remove many types of paint, but it wasn't quite as effective as I was hoping it'd be. I also checked online if acetone could damage metals and it could actually stain/damage brass??? So I figured I'd try something else
Some people suggest using boiling water and baking soda to remove paint from metal, and this should be a safe option with brass (if the rods were brass). So I boiled some water, picked a big enough bowl that could handle hot water, put the rods in the bowl, sprinkled a healthy dose of baking sode on top, gently poured the water, sprinkled a bit more baking soda on top, and then left foil over the bowl to try to keep the dish warm for a longer time
And then I just let it sit for almost two hours
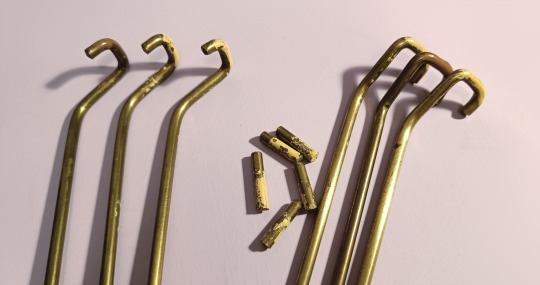
After which, I came back and gently rubbed the rods with a sponge and to my pleasant surprise, the paint residue did just slide off with a little effort

So the paint was removed, and the rods were already looking a bit shinier!
Now, I don't know what kind of a trick of light this was, but genuinely, in person at this point the cleanest, shiniest parts of the rods were looking like silver. I was becoming convinced that dad had been right and the rods were actually steel or something, and I had no idea if I could get them to look clean
But to my confusion, my dad was the one who was now convinced that the rods must be brass
I dunno, I was confused, but I figured, I have my brass polish stuff, I could TRY polishing the rods with them and see if they clean up.

They did
Immidiately proving that they were brass
So I just proceeded to polish the rods!
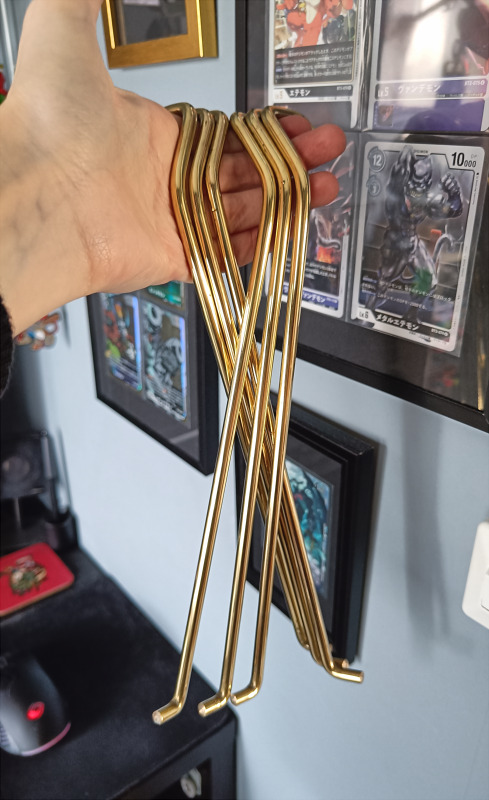
Shiny! Sparkly! I didn't clean them up as well as one could have, but they turned out plenty clean enough, nobody is going to see whatever staining remains on them
But with that done, it was time for assembling!
After getting some missing pieces!
See, when dad helped me disassemble the shelf on our patio, one of the tiny brass dowels that were also used to hold up the shelves had fallen off and under our patio. So that one was a lost cause and needed to be replaced. There was no way to replace it with brass and tbh it was going to be quite hidden anyways, so I asked my dad if he could get a small steel dowel to do the job. And he did, so that was one thing
The other, more important thing was the screws/bolts/nuts/whatever
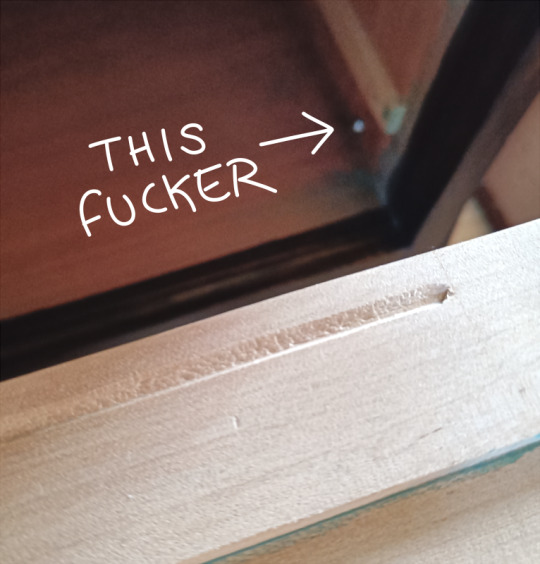
See the sidepieces of the whole piece were originally attached to the sides of the main unit with bolts, but the right side ones had sunken in so deep into the wood, that the only way to detach the right sidepiece from the unit was by cutting the bolt off. So we were lacking half the hardware for the shelf
So we went and bought new ones, brought the whole thing up to my room and assembled it here. And all was good
Until I realized the top and bottom drawers couldn't go into the unit, because the bolts/nuts were much bigger than the original ones, so they stuck out too much and stopped the drawers from sliding in
Which was a problem
Now dad was able to cut down the ends of the bolts to make them shorter, but the nut was still a problem
But I looked at the sides of the drawers
And the top and bottom drawers both had channels on them right where they would've rubbed against the original nuts
I just had to make the channel bigger
Now the top drawer wasn't even that bad since the nut was at the back of the unit, so the channel I had to carve for it was only like 3 cm long or something
But it still sucked, because the only way I could do it was with a knife. It took hours. And it hurt my wrists so bad
But I managed to get the top drawer done, I could do it with the bottom too. It just had to go all the way across the side of the drawer.


Carving that shit out took me like 5 hours. I can not put into words how bad it hurt my wrists. Genuinely, so painful.
But I got it done.
Now there were a few other things that I didn't bother documenting but I want to note because I had to do those before this project was completed.
First, when we brought the main unit to my room the side of it did get a scratch that I had to spend a few days patching. In hindsight I probably would've been fine if I had just brushed some wax over it, but I thought it'd turn out better if I sanded the scratched area first and then waxed it. It ended up being a lot more work than I wanted to, but it got done eventually.
Also, as I mentioned before, I had to patch those small parts on the inside of the unit to make sure there wasn't raw wood peeking out from places I didn't want them to show (around the drawers).
And, hilariously, the brass rods used to hang the shelves didn't actually want to fit into the holes of the sidepieces. Like I tried even hammering them in and they just did not fit, so I had to file down the specific holes I wanted to use until they were big enough that I could put the rods in and put up the shelves
Last but not least, I used some candlewax on the groove of the sliding door and the sides of the drawers to make them slide smoother (worked great, easiest part of the project)
And I want to note that there's some things I could still do to this piece. I could get some fabric or felt to protect the insides of the drawers so they don't get dirty, and I really should get some clear wax or topcoat to patch the finish on the inside of the main unit (when I had to sand down the paint and revealed raw wood). But if I want to do either of these things, I can do them later. For now, this shelf is completed
It looks like shit

An absolute fucking shitshow
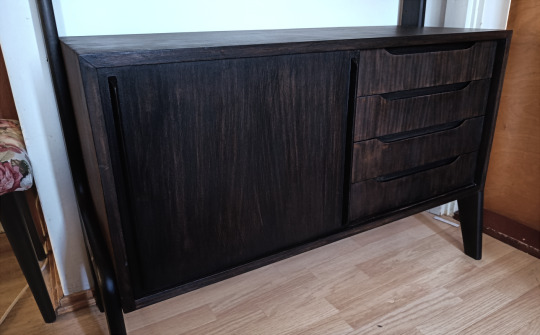
Complete and utter trainwreck


The brass turned out nice tho

Moral of the story: Never use any wood product that isn't Osmo ever again. Osmo would not have failed me like this. And I'd still argue it's better than how it started.
Thanks for coming along with me on this trainwreck
Part 1 / Part 2 / Part 3
#Moon posting#Refinish Diary#diy#furniture refinishing#furniture restoration#I'm just glad it's fucking done man#I started working on this in April??? Good fucking lord???#Now I just put all my shit onto this shelf since it replaced a worse shelf that I had to empty out before this could be brought in
3 notes
·
View notes
Text


I have gold leafed a plastic quarter machine capsule and now feel oddly powerful. I can make anything TACKY!
Actually, it was a test for the cabinet I’m planning on gold leafing. Over all, the process is super easy. Way more so than I was afraid it would be. Also pleasingly inexpensive. Glue and seal coat were about $4 each, “gold” leaf( it’s technically gilding metal, which is a brass alloy) was $4 for a pack of 20.
I just followed the instructions on the glue- brush it on smooth, wait 30-60 min until its dried clear and gotten super sticky. Then just apply the leaf to the glue, and gently brush over it to burnish down the leaf and brush excess of the non glued areas. Really, the hardest part is that the leaf requires a delicate touch. Its VERY thin, maybe half the thickness of aluminum foil.
4 notes
·
View notes
Text
Crafter Heaven
Maika Daughters
(more…) “”

View On WordPress
#Crafts#custom furniture#decor#DIY#furniture#furniture refinishing#interior design#Maika Daughters#Postaday#upcycled
4 notes
·
View notes
Text

The tables are DONE!

I really like how these ended up! They're very 70's, very bold, and i think they'll really help brighten up the new shitty lil apartment. Here's the Before picture to see how much better they look now:

47 notes
·
View notes
Text
Maintaining the beauty and functionality of your home requires regular attention and care. Whether you’re looking to breathe new life into a beloved piece of furniture or ensure the longevity of your log home, Livingston Enterprises is here to help. With expertise in furniture refinishing and log home repairs, we offer comprehensive services that transform and preserve the treasures in your home.
0 notes
Last Seen Blogs

figureskating-confessions
Figure Skating Confessions

gongzone
. * ' - ,

seoforall2222
Untitled


zdgnnssvb
无标题