#Get mouse coordinates javascript
Explore tagged Tumblr posts
Visit Tumblr Blog
Explore Tumblr blogs with no restrictions, modern design and the best experience.
Last Seen Tumblr Blogs


Fun Fact
The “We are the 99%” Tumblr blog became the slogan for the Occupy Wall Street movement.
Text
Get mouse coordinates javascript

GET MOUSE COORDINATES JAVASCRIPT UPDATE
GET MOUSE COORDINATES JAVASCRIPT CODE
Subtract offsetLeft from clientX and offsetTop from clientY.
GET MOUSE COORDINATES JAVASCRIPT CODE
To get the mouse coordinates relative to an element on the page, we had to JavaScript Code is given below, clientX and clientY property returns the horizontal and vertical coordinates of the mouse cursor which are then displayed inside. The mousemove event is triggered at an element when the user's mouse is moved In my experience, though, as long as you're using this hook on smaller components that don't have a big DOM impact, you should be just fine.Copied! import Įvent on a div element or on the window object.
GET MOUSE COORDINATES JAVASCRIPT UPDATE
Use this hook in the small “leaf node” components near the bottom of the tree.įor maximum performance, you can use a library like React Spring or Framer Motion, which will allow you to update values without triggering React renders. So let’s set a handler on mousemove to track coordinates and remember them. The only way to get coordinates is to listen for mouse events, like mousemove, and take coordinates from the event object. There’s no function like getCurrentMouseCoordinates(). It shouldn't be used in a top-level component like App or Homepage, since that will cause a huge chunk of your React tree to re-render very often. Unfortunately, there’s no way to get current mouse coordinates in JavaScript.
HTML Code
Coordinates of your mouse: hover over this container
There is all the HTML code for the Mouse Coordinates.
I hope you enjoy our blog so let’s start with a basic HTML structure for the Mouse Coordinates. Note that Processing can only track the mouse position when the. That said, you do still need to be a bit careful where you use this hook. We use HTML, Css, and javascript for this Mouse Coordinates. A DOM element whose position we want to transform the mouse coordinates to. The system variable mouseX always contains the current horizontal coordinate of the mouse. No matter how hard I tried, I couldn't come up with a contrived scenario where the throttle actually improved performance (while still updating often enough for smooth animations). event method to find the coordinates of the mouse when it is clicked. In testing, though, it seemed to make performance worse. Show Converted Mouse Coordinates Of An Element With Javascript. Originally, this hook included “throttle” functionality, which would limit the updates to a user-specified interval. If you like simplicity but still want cross-browser. This can be dozens and dozens of times a second. Top 5 Answer for javascript - How do I get the coordinates of a mouse click on a canvas element. This component will re-render whenever the user moves the mouse.
0 notes
Text
Track Mouse Position In jQuery - Coords.js
A tiny jQuery script that tracks mouse movement events and gets the current cursor position (horizontal and vertical coordinates) relative to Window using the JavaScript MouseEvent API.
Demo
Download

4 notes
·
View notes
Text
Install firebug mac

#Install firebug mac mac os
#Install firebug mac full
In addition to providing news on probable date of exam, result and hall ticket publication, we publish news on answer key publication as soon as official answers are provided by organizations. If you are a student aspiring to get into renowned educational institutions or if you are looking for the job opportunity that will settle your career, then IIWBR an education based website is the one stop solution to get all the relevant information on latest exam and recruitment notice and important notification on other administrative and academic procedure. Our aim is to serve the youth of India for education and employment. Through this website, our team provides the latest information related to education and job. We started this website to help the students and job seekers. You may also want to see the complete list of enhancements of Firebug 2.0.Is one of the best educational and job portals in India.
#Install firebug mac mac os
monospace is now used also on Mac OS instead of Monaco.
Clear Activation List confirmation can be bypassed.
getContextMenuItems() now provides the mouse coordinates.
Added possibility to modify a panel's tab.
Clicking and hovering the error badge have different actions than the toolbar button.
Search field and search options popup got redesigned.
Pressing the search field shortcut selects the previously entered text.
Current panel's name is displayed as placeholder.
Added option to copy cookies to the clipboard as JSON (hidden behind preference ).
It is now indicated that the panel is initially sorted by the timeline.
Headers in net requests can be collapsed.
Added context menu option to set a breakpoint on a function.
Exceptions and return values of functions are shown and return values can even be modified.
Added shortcut Alt + W for creating a watch expression from the current Script Panel selection.
Breakpoint condition editor auto-completion uses variables in scope.
Added an option to only stop the script execution on uncaught exceptions.
Notification is shown when the source cache got exceeded.
Source Edit Mode now has line numbers and syntax highlighting.
Color values can now be displayed as authored.
Edit Mode now has line numbers and syntax highlightingĮvents Side Panel * Integrated EventBug into Firebug by creating a new Events side panel within the HTML Panel.
XPath can now be copied as relative and absolute path.
#Install firebug mac full
Hovering cropped attributes now displays their full value.Added auto-completion for CSS styles within the style attribute.Added auto-completion for HTML attributes and SVG attributes.Clicking > allows adding a new attribute to an element.Changed Alt + double-click to Alt + click for editing the selected element.Added Ctrl + E as shortcut for editing the selected element.All classes of an element are listed inside the Element Path.Allowed to change the indention within the Command Editor.Added option to pretty-print the source.Switching to the Console panel now always focuses the Command Line.The Command Editor now has an auto-completion like the Command Line.Log message counter was moved to the left.Console API is now also available in web workers.Added menu option to control log message grouping.Mutation Observers are listed when executing getEventListeners on an HTML element.Clicking the bracket of a logged array shows it inside the DOM Panel.Added preference to define whether to group console messages.Your pages are taking a long time to load, but why? Did you go crazy and write too much JavaScript? Did you forget to compress your images? Are your ad partner's servers taking a siesta? Firebug breaks it all down for you file-by-file. Let Firebug be your eyes and it will measure and illustrate all the offsets, margins, borders, padding, and sizes for you. When your CSS boxes aren't lining up correctly it can be difficult to understand why. Once you've found what you're looking for, Firebug gives you a wealth of information, and lets you edit the HTML live.įirebug's CSS tabs tell you everything you need to know about the styles in your web pages, and if you don't like what it's telling you, you can make changes and see them take effect instantly. Firebug also gives you fine-grained control over which websites you want to enable it for.įirebug makes it simple to find HTML elements buried deep in the page. You can open Firebug in a separate window, or as a bar at the bottom of your browser. Firebug is always just a keystroke away, but it never gets in your way.
0 notes
Text
Latest version adobe flash player for windows 7

#Latest version adobe flash player for windows 7 update#
#Latest version adobe flash player for windows 7 upgrade#
#Latest version adobe flash player for windows 7 windows 10#
#Latest version adobe flash player for windows 7 software#
#Latest version adobe flash player for windows 7 code#
#Latest version adobe flash player for windows 7 code#
Just click through the online configurator to get your HTML code which uses SWFObject, a standards-friendly JavaScript Library.īy Florian Plag, Kirchstr. | Easily embed Flash content in a web page. Official MPEG-4 Video Support (Codecs: H.264 + AAC).Flash Player 10.2 (10.2.152.26 / February 2011) Adobe Flash Player 32 is the high-performance, lightweight, highly expressive application runtime that provides uncompromised viewing of expressive applications, content, and videos across browsers, mobile phones, devices and operating systems.Acoustic Echo Cancellation (desktop only).Last official version for mobile browsers.new multithreaded video decoding architecture.Gaming: Mouse lock, relative coordinates, right and middle -click support.The following lists show the major releases of the Flash Player with some of their main features. Adobe flash player freeload - Adobe Flash Player is both a sophisticated and striking client runtime, allowing users to receive high-quality content on their computers.
#Latest version adobe flash player for windows 7 update#
The preferred FLV video clip layout is also based upon Flash, as well as Flash Player enables playback of FLV data.Source: (last update here: September 2015) Old Flash Player Versions As Flash is a multimedia system, lots of audio file formats such as MP3 can be embedded within Flash content. Flash has actually been used to offer special results for internet site user interfaces, to act as a web video clip platform, and is the basis of several totally free video games that can be played straight from the internet browser.įlash Player works either in conjunction with the internet browser, or can be utilized to play discrete.SWF documents individually. Adobe recommends that you uninstall Flash Player from your computer.
#Latest version adobe flash player for windows 7 windows 10#
For the most part, however, this program brings faster, much better graphics that even those who do not comprehend just what a plug-in does will certainly appreciate Adobe Flash Player 2021 for WindowsĪdobe Flash Player 2021 is a cost-free Android application that allows customers to see content developed with the Adobe Flash platform. Adobe Version: 32 freeloadware Windows 7 Windows 8 Windows 10 - English 10 /10 Once an essential plugin for browser, as of DecemAdobe Flash Player is no longer supported. Mac individuals must understand that it calls for OS X 10.6 or higher running on an Intel system to work properly. Once it is quit, it will reactivate immediately, yet it leaves a frustrating message on top of every open browser tab reporting the noticeable fact that it has crashed. Blink Player 11 goes through cold up the browser, providing a prompt at the top of a tab saying the player isn’t responding, with a timely to stop it. This version is configured to make use of system resources a lot more effectively and also give boosted high-resolution bitmap assistance for even more comprehensive and accelerated videos as well as graphics.Īdobe Flash 2021 is not without a couple of defects, and customers of Google Chrome are most likely to encounter them. Flash Player is capable of viewing multimedia contents, executing rich Internet applications, and streaming audio and video.
#Latest version adobe flash player for windows 7 software#
Internet developers will certainly discover it has better integration with web browsers’ JavaScript console. Adobe Flash Player (formerly Macromedia Flash Player and FutureSplash Player, and known in Internet Explorer, Firefox, and Google Chrome as Shockwave Flash) is computer software for content created on the Adobe Flash platform. And also while it can be accessed from the toolbar of your internet browser, we don’t advise tinkering around with this plug-in unless you’re a seasoned specialist. This isn’t a program that will project for many users– it works primarily in the background.
#Latest version adobe flash player for windows 7 upgrade#
For those making use of other internet browsers, you might be motivated to upgrade depending on your settings. If you use Google Chrome, there is no need to download Adobe Flash Player 2021, as it comes as part of the download package.
0 notes
Text
11/2 API Lab - Assignment
Throughout the second half of this week me and my group have worked on the API assignment. All in all, despite various challenges, it was a fun task
Finding an API. Exploring potential API or library ideas.
To start off, we first had to find an API or library to use. We each considered different API with a set of questions in mind. What API/library would be interesting to explore? How does the API work? What application can it have for other projects and for interaction design in general? Since our project deals with personal finance, I thought it would be interesting to develop some sort of way to represent data in a visual way using an API or library.
You constantly hear about infection rates of covid on the news but for me, it can sometimes be hard to grasp many people actually get infected and to visualize the situation from a geographical perspective. And so just like our chosen HMW for our project, I thought it would be helpful to visualize the data, in this case covid cases, instead of just thinking of it as a number. For this reason, my idea for the assignment was to use a covid API as well as google maps api. The reason google api would work well is because we could then visualise the number of covid cases on a map using pings as google has a pin feature built in. The rest of the group also thought this sounded like a good idea.
Integrating the API & getting the template for the arduino as well as making the final prototype + final thougths
To start off, we focused on the google maps API. It was more complicated that we initially thought and spent quite some time of it. The documentation was quite beneficial though. https://developers.google.com/maps/documentation/javascript.
There was just a lot of content to go through in the documentation and navigating to find what we needed, a trend that would continue when we wanted to get data from the API later on. After generating the Key from the API we set it up using the function initmap() as well as making the actual map with let map: google.maps.Map;. Then we just needed some css to declare the visual properties of the map. We had some non code related issues here that were time consuming, namely actually accessing the API due to google restrictions. Not worth going into detail but it simply took some time and tutorials to get past.
The process of connecting the arduino was not to difficult since we had seen the same schematics before. However we were all a bit rusty on the JS side of controlling and communicating with the arduino so it was a slower process that we'd have liked. The hardest part however and what lead us to not pursue the covid API idea and to just stick with the google maps API was how extensive googles API was. It wasnt as straight forward as we had initially thought. Specifically, it took us a while find the latitude and longitude which we needed. We wanted to make an led light flash when at a certain place in the world with your cursor. This seemingly essential part of a map API was to our inexperienced eyes buried in the layers of data when trying to find it in the console. Our end goal was to get the coordinates of a users mouse and pass those to a function that checks if you are above or below the equator. If you are, then we tell the aruduino to increase its brightness of the led lamp and if you're below it dims it.
This was quite a step down in my mind from the original covid idea of having a LED blink depending on covid infection concentration in a geographical location but it was still nice that it worked in the end. It was also unfortunate that we didnt have time to implement the joystick in our project. We wanted to have the joystick control where you were looking on the screen. In order to do this we started out writing a bit of code that would take control of your cursor with the goal of a joystick controlling it but we didnt have time to finalise this before the exhibition.
Once I get access to my own arudino board I would very much like to eventually expand upon this project with an integration of the covid API.
The code we wrote is documented in the submitted zipped folder containing the html, css, js and ino file. Media such as images and a video will be in a separate
0 notes
Text
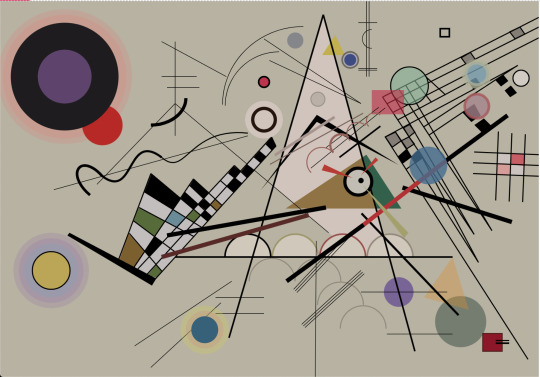
Assignment 1
https://editor.p5js.org/eryan4/sketches/7eR-_9MO1
^link to live code
Kandinsky painting recreated in javascript using p5js then animated. (Link to live site above).
The painting recreation stage of this started as challenging then became more systematic and simply tedious. My main techniques were to open the painting itself in illustrator to get the exact coordinates of where elements of the code should go. I also coded a tool so that when I clicked it gave me the coordinates of the mouse. This helped a lot and acted as a drawing tool on the page, as I could copy the coordinates of a shape I clicked out into the code.
The animation stage was quite challenging but once I understood what I was doing it got easier. I mainly used translate(); scale(); and rotate(); as well as some loops and if() business. The scale of some of the circles is controlled by the position of the mouse. Other elements are freely rotating certain points or they move across the page. I set the background to not redraw every time so that the animated composition has turned into more of a drawing machine. However, when you hold the mouse down, the background refreshes and the moving pieces slow down to give the viewer a moment of clarity.
1 note
·
View note
Text
Website SEO Checker | Website Analyzer | Free SEO Analysis Tool
The Importance of Website Analysis/Analytics Tools in SEO
Site Security Tests assume a crucial part with regards to information base security. The axiom "Programmers are a stride ahead" is a truism that is old however significant. However, with the Web analyzer offering free profound security examination for the site, you can take assurity that your site is in safe hands. DDOS assaults, animal power, and entrance hacks are going on consistently at a wide scale. Web Analyzer runs a free sweep on these and tells you where the bottlenecks and weaknesses lie with-in your site.
We have seen innovative organizations recruiting white hack programmers to take care of there site and let them assault the site for any expected weaknesses to fix them later. Be that as it may, when the genuine assault happens no one realize what turned out badly. Web analyzer is a complex instrument that keeps you refreshed about your site fixes ahead of time and runs a full review on the site which separates him from other programming.
Discovery Testing:
It runs discovery testing by examining each website page and discovering escape clauses in the code/script or at the worker level.
Instruments like these are some assistance for site analyzer as they simply need to enter the site URL and run a sweep and hold the rest to the apparatus. Web analyzer will even give a full mechanized report to dissect and fix the mistakes or bugs(Website analyzer).
Analyzers need not have any earlier programming language to get familiar with the product. Web analyzer is made exclusively on the moto "Find and Fix the issues". It makes the work any individual searching for issues in the site a lot simpler. By reviewing and executing these wellbeing boundaries, Web analyzer will ensure that the site is working at a really undeniable degree of safety.
Web analyzer will run a sweep for the accompanying:
1. Cross-site prearranging (XSS)
2. SEL infusion and XPath infusion
3. JavaScript and Ajax work examination
4. Blocking intermediary
5. Document incorporation
6. Broken Verification and Meeting The board
7. Lacking Vehicle Layer Assurance
8. Infusing counterfeit Cross Headers
9. DDOS assaults Security
10. Confirming the SSL Declaration
11. CMS Security Investigation
12. Savage Power Assaults
Web analyzer will mechanize a significant number of the sweeps for the end-client and will help in making quick and exact reports.Examining a site is taken care of by one now and then to perceive spaces of solid point and disadvantage of a site for advancement purposes. A site investigation is likewise the assurance of extent and finding of information relevant to a particular webpage to assess its present status on the web.
Site investigation is also a complete review of a site – its design, unmistakable quality, and utility. The reason for the examination is to distinguish spaces of advancement for a site and gives exact headings on an approach to play out the ideas. It's ideal for an organization that hasn't changed their site in an incredibly significant stretch of time however has some extensive traffic taking care of it, or for an organization that is inside the commercial center for a rebuild. It's constantly better to encourage the investigation done before you go into an update of a site – this way the organization that at last forms your new site can have a decent arrangement from where to start their work.
Suggested for you: How Much Do Large Corporations Spend on SEO?
Best Free Website Analysis/Analytics Tools for Great SEO Success
site investigation examination web optimization apparatuses large information business-outline work area chart office-work .There is an assortment of apparatuses out there for site investigation and bunches of them are free. Out of them, 16 best web examination devices are exemplified here. Some can investigate one explicit element of a page and others can give a total evaluation to the page as a whole. Most of them will assist with your SEO exercises. These free site examination apparatuses will help you comprehend, what's going on your site and will likewise give you an understanding and will permit you to support the experience and drive greater commitment on your site. Examination with a couple of them that looks fascinating and helpful ( Website checker).

1. Google Analytics
The best free web investigation instrument is Google Analytics. This monster web crawler offers such highlights, for which contenders may charge. Its design is very direct and assists with giving a knowledge into the crowd and their coordination for different items. This apparatus permits you to person to person communication locales, web journals, sites, and so on It can likewise furnish you with an adaptable report. It not just assists you with getting sorted out your information in a superior manner yet additionally assists you with effectively coordinating with different other Google items.
Google Analytics is additionally quite possibly the best free weblog examination instruments accessible available. There are a few reports that don't appear to be accessible; nonetheless, the charts and exact reports make it very intriguing. A few organizations have the booking in permitting a monster organization like Google direct admittance to their site measurements, while different organizations detest requiring a bug put on their pages to follow them.
2. Hotjar
Hotjar a web examination device that is not difficult to work because of its unconstrained warmth maps which furnish you with a pragmatic understanding into all your information. This device is allowed to use at an essential level giving highlights like replay meetings of the site guests, gadget based warmth maps, the instrument will assist you with understanding the discussion pipe of the purchasers and structure an examination of the parts that don't perform well. The best thing about this instrument is that it gets refreshed routinely with new highlights, giving the clients a consistent involvement with utilizing this web examination device.
3. Open Web Analytics (OWA)
Another free apparatus for web examination is open web investigation (OWA). This is open-source programming where you can store a lot of information with no breaking point. This has similar highlights as some other web examination device however has some other beneficial choices. Open web examination will give you data like deals, references, guest areas, some information, and networks, and so forth Other than that, OWA additionally gives you three unmistakable highlights, for example, heat maps; it resembles a tracker that shows where the guest has tapped on your site, second is it permits you to record the mouse developments of the guests, and perceive how they explore your page, in conclusion it gives you DOM, Document Object Model, which permits you to have code scraps of the connections, pictures, and fastens where the guest has clicked.
4. Bitly
Bitly is most popular as a free connection shortener, as it abbreviates the connections and saves space. It gives you the productivity to share those abbreviated connections and break down the presentation. Bitly likewise offers the choice to mark your URL as it gives better acknowledgment, and marked URLs additionally increment peruser's commitment on the site. It has numerous different highlights excessively separated from shortening the connections like; you can gauge your substance through the investigation foundation of Bitly and its enhanced connections make it simple to burn-through content paying little mind to which gadget you are utilizing. This device comes in both free and paid alternatives relying upon the sort of involvement you need to have with your web examination apparatus.
5. Google Search Console
Google Search Console is another free instrument for web investigation, which reports to you about the traffic and execution of your site proposes approaches to fix issues, and furthermore helps you in making your site sparkle. This apparatus upgrades the substance by breaking down the snaps and impacts on the site. It additionally informs you about issues on the site and helps you in fixing them. This device will improve your site through screen tests and will reveal to you its situation on Google search.
6. Matomo Analytics
This is an open-source web investigation instrument, which gives you a justifiable report of how the guests are getting to your site. This instrument gives you 100% responsibility for information so no outside source can investigate the working of your site. This device gives you crude admittance to the information and furthermore permits you to relocate the information between other facilitating choices. They have an inherent GDPR (General Data Protection Regulation) and PII (Personally Identifiable Information) so you can figure out how to regard client security in a superior manner.
7. GTmetrix
GTmetrix controlled by Lighthouse is a web examination apparatus that has a set-up of various alternatives and highlights that upgrades your site making it simple and clear to utilize. This apparatus gives you an itemized evaluation of your site with beacon measurements, web vitals, and different other investigation alternatives. It investigates your website page for execution advancement and significant knowledge. Its primary occupation is to zero in on the exhibition lattice of the guest and measure their experience on your site. It tracks the exhibition of the site through observing, outwardly alluring diagrams, setting cautions about different conditions, and so forth This apparatus can likewise examine your website page on cell phones.
8. Bing Webmaster Tools
This free web examination device will give you a knowledge perspective on your site, and will help you in rolling out vital improvements, and will likewise up the ante of your webpage. Bing Webmaster Tools will send you reports about the expanding traffic on your site, will refresh you about the thing individuals are looking for, and will likewise send you customized messages and cautions for your site. This apparatus has different sub-devices like SEO devices, indicative devices, and revealing devices. The SEO highlight will permit you to have the backlinks and report on catchphrase research. This apparatus will assist you with revealing different SEO issues, and will manage you on the most proficient method to act in a superior manner. This instrument additionally gives tight security and protection to your site.
9. Ubersuggest
Ubersuggest is a free across the board SEO device shaped by Neil Patel, prime supporter of NP Digital. This instrument offers you full admittance to verifiable information in type of outwardly appealing charts. It will help you pass through the gigantic measure of site traffic, and will approach more catchphrases. This device will have a traffic analyzer that will outline the pages and catchphrases on your site. There is additionally a SEO analyzer that will furnish you with an area outline. This apparatus will likewise give you watchword ideas, content thoughts, and a backlink of information.
10. BuiltWith
BuiltWith is a free web investigation apparatus that prompts market examination, deals knowledge, and age. This device helps in lead age by getting to information on the site, deciding the innovation utilized in the site, foreseeing the future patterns of the site, and through cutting edge sifting of lead lists.BuiltWith helps you in examining the market through its examination and exploration instruments, API access, information inclusion, and CRM incorporations. Another component offered by this apparatus is deals knowledge, i.e., helps you in making convincing proposals to the clients and have educated discussions with them.
11. Site Grader
It is one of the most loved apparatuses on the rundown because of its different usefulness and ease of use. You'll have a broad report split into shifted areas with an examination of the page and recommended changes. While the grader is valuable to cause you to comprehend where you stand, the ideas are similarly significant in light of the fact that they help you pinpoint the territories for development, and bunches of them are regularly beautiful simple.
Source Url -: https://www.siteanalysistool.com/blogs/Website-SEO-Checker-%7C-Website-Analyzer-%7C-Free-SEO-Analysis-Tool-43
0 notes
Text
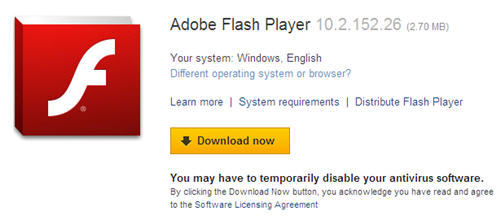
Adobe Flash Player 10.2 Free Download Mac

Mac users interested in Flash player os x 10.5.8 generally download: Flash Player 26.0 Free Flash Player 10.1 is Adobe's last version of the popular Flash player. Adobe Flash Player 10.2. Adobe Flash Player for Mac OS X. Flash player free download.rar; Vita flash player.
Adobe Flash Player Install For All Versions
Adobe Flash Player Version 10.0.0下载
Adobe Flash Player
What's new?
Staying Secure
Ensure your Flash Player installation is secure and up to date. Simply select 'Allow Adobe to install updates' during the installation process or choose this option anytime in the Flash Player control panel.
Gaming
Take your gaming to the next level with Flash Player's incredible Stage 3D graphics. Smooth, responsive, and incredibly detailed games are a click away. We've even added support for game controllers so come get your game on!
High Performance
Experience hardware accelerated HD video with perfect playback using Flash Player. Recent improvements allow supported Flash content and games to continue to deliver responsive feedback even when your CPU is maxed.
JavaScript is currently disabled in your browser and is required to download Flash Player. Click here for instructions to enable JavaScript.
Version 32.0.0.453
Your system:
, English
About:
Adobe® Flash® Player is a lightweight browser plug-in and rich Internet application runtime that delivers consistent and engaging user experiences, stunning audio/video playback, and exciting gameplay.
Installed on more than 1.3 billion systems, Flash Player is the standard for delivering high-impact, rich Web content.
Optional offer:
Terms & conditions:
By clicking the 'Update now' button, you acknowledge that you have read and agree to the Adobe Software Licensing Agreement.
Note: Your antivirus software must allow you to install software.
Total size: 14.9 MB
A cross-platform browser plug-in that delivers breakthrough web experiences.
Downloads
668.7K
4.9K
45.2K
938
Adobe Flash Player Install For All Versions
4.3
50 Ratings
-
0 Ratings
Adobe Flash Player Version 10.0.0下载
Adobe Flash Player is the high performance, lightweight, highly expressive client runtime that delivers powerful and consistent user experiences across major operating systems, browsers, mobile phones and devices.
Installed on over 750 million Internet-connected desktops and mobile devices, Flash Player enables organizations and individuals to build and deliver great digital experiences to their end users.
Immersive experiences with Flash video, content and applications with full-screen mode.
Low-bandwidth, high-quality video with advanced compression technology.
High-fidelity text using the advanced text rendering engine.
Real-time dynamic effects with filters for Blur, DropShadow, Glow, Bevel, Gradient Glow, Gradient Bevel, Displacement Map, Convolution, and Color Matrix.
Innovative media compositions with 8-bit video alpha channels.
Blend modes, radial gradient, and stroke enhancements.
Additional image formats: GIF, Progressive JPEG, and PNG.
Top new features in Flash Player
Stage 3D accelerated graphics rendering
Explore a new architecture for high-performance 2D/3D GPU hardware accelerated graphics rendering by Adobe, which provides low-level Stage3D APIs for advanced rendering in apps and gives framework developers classes of interactive experiences.
Native 64-bit support
Flash Player can now take advantage of native support for 64-bit operating systems and 64-bit web browsers on Linux®, Mac OS, and Windows®.
Multi-threaded video decoding
Deliver live streaming and real-time interactive video with improved playback performance and increased frame rates of high bit rate content running on Windows, Mac OS, and Linux.
Enhanced mouse controls and relative coordinates
Create immersive, panoramic games for new classes of content, including first-person games that take advantage of infinite scrolling, mouse lock, relative mouse coordinates, and right- and middle-click events.
- Includes security fixes.
11.2.202.235
05.06.12
Free
English
3.94MB
Windows XP / 2003 / Vista / Windows7 / XP64 / Vista64 / Windows7 64
Windows Media Player Firefox Plugin allows you to use Windows Media Player inside of Firefox.
Free
Free
adds dozens of new features to Facebook and is highly customizable.
Free
Free
A cross-platform browser plug-in that delivers breakthrough web experiences.
A cross-platform browser plug-in that delivers breakthrough web experiences.
0 notes
Text
How to Generate Mazes Using Depth-First Algorithm

In this tutorial, we will learn how to generate mazes using depth-first algorithm. To do this firstly, I will define the problem, then I will explain the algorithm and finally demonstrate the implementation in Javascript. We will use P5js to demonstrate the working of the maze generation. Read Also: Solving the 8 puzzle problem using A* (star) algorithm
Introduction to Maze Generation
A maze is a path or collection of paths, typically from an entrance to a goal. Maze generation is the process of designing the layout of passages and walls within a maze by using a computer program. In this tutorial, we will concentrate only on the generation of the maze and not on solving how to traverse a maze. Before continuing with the tutorial take a look at the final implementation below using P5js. (Note: Although I have used pre tag, yet the formatting is not retained. Not sure how to solve the formatting issue). Click on the Play button to see the maze generation in action. Read Also: What Are C# Delegates And How To Use Them
How to Generate Mazes
The goal is to create a layout of passages and walls within a maze using Javascript. Before we can solve the problem we will need to model the problem. But what is meant by Modelling the Problem? In generic terms, modelling a problem is the art of formulating the problem at hand in terms of precisely described, well-understood building blocks and logic to reach a solution. In computer science, proper modelling is the key to applying algorithmic design techniques to any real-world problems. Real-world applications involve real-world problems. You might be working on a system that simulates air traffic in and around an airport, you might be working on optimizing the dispatch of delivery vans for an e-commerce application, or you might be working to search through patterns in a large image set. To solve such problems you will use some sort of modelling techniques to reduce the problem in terms of rigorously defined abstract structures such as graphs, trees, permutations, sets and so on.
Depth-First Algorithm
We will use the depth-first search algorithm to solve our problem of maze generation. We will implement the depth-first algorithm with a stack. This approach is one of the simplest ways to generate a maze using a computer program. To do this we will first create a grid of cells to represent the room structure. For our problem we will only have 4 sided cells, each cell starting with four walls. The program will start from a random cell, then selects a random neighbour cell that has not yet been visited. The program then removes the wall between the two cells and marks the new cell as visited. It also adds it to the stack to facilitate backtracking. When a cell is found to have no unvisited neighbours the program backtracks through the path by popping cells from the stack until it reaches a cell that has an unvisited neighbour. This process continues until every cell has been visited, causing the program to backtrack all the way back to the starting cell.
Implementation of Maze Generation Using Javascript
I will demonstrate the implementation of the above algorithm P5 Javascript API. The reason to choose P5 is convenience and experimentation of ideas with Javascript. First of all, let’s define a few variables that are global in nature. These will be used for drawing of the grid and finally the maze.

The array Directions refer to sort of enumeration of the wall direction for a cell. CELL_WIDTH and CELL_HEIGHT are the width and height of each cell in terms of pixels. OFFSET is an offset from the top left corner of the canvas to start drawing the grid. Cell A cell is an independent unit of a grid. For our problem, we will model the cell with 4 walls. Each cell comprises of an x, y position, a boolean flag to indicate whether or not the cell has been visited and 4 boolean flags to indicate which walls need to be drawn. The cell is constructed with an x and y coordinate.

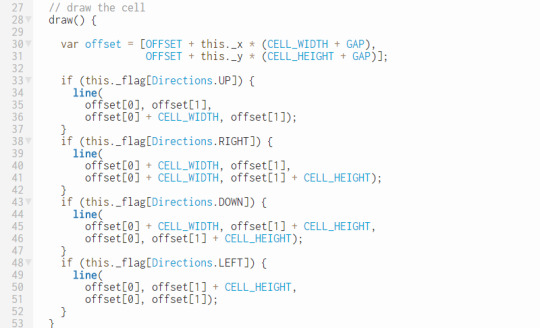
Utility function to set the colour of the wall lines using P5 API.

Utility function to draw the 4 walls of the cell based on the flag values of which walls are present for the given cell. A value of true for the boolean type means wall exists and a value of false means the wall is taken down by the algorithm as the cell was visited.
Mouse The mouse is the red colour block that moves while searching. This is just for visual purposes. With every visit to a cell, the mouse moves to the location of that cell. This shows the movement of the search visually.

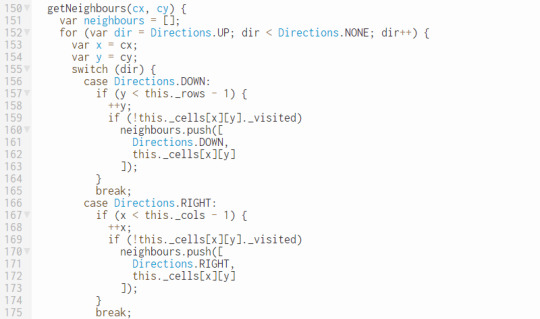
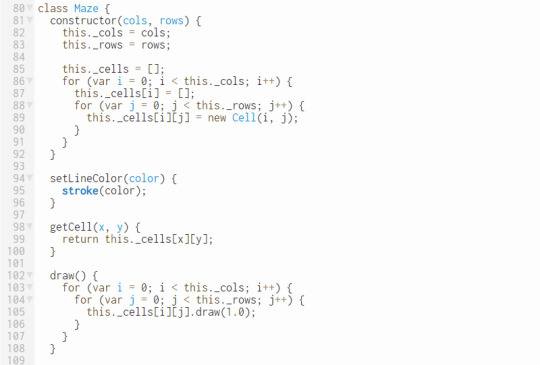
Maze The Maze class comprises the list of cells as a 2d array. Besides, a few utility functions, there are two main functions to the Maze class. They are getNeighbours and removeCellWall. Get Neighbours The getNeighbours function returns a list of cells that are neighbours to a given cell and have not been visited.

Remove Cell Wall The removeCellWall function removes a wall of the current cell based on the direction from where it came and the wall of the neighbour cell from where it came.

Other Utility functions of Maze The other utility functions include setting the line colours of the walls, getting a specific cell given its coordinates and drawing of the maze. These functions are simple and self-explanatory.
Maze Generator The MazeGenerator class handles the generation of the mesh using the generateNext function. This function handles the exploring of the neighbours, adding them to the stack, marking them visited and popping from the stack if no neighbours are found.

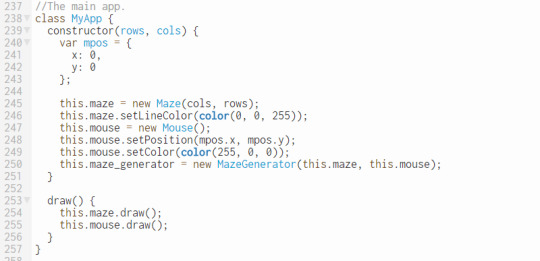
The Main App The main app called MyApp just encapsulates MazeGenerator, Maze and the Mouse into a simple class (for convenience).
Read the full article
0 notes
Text
Teatv apk: Install TeaTV APK On Android TV Box & FireStick/FireTV (2019)

Teatv apk or TeaTV app is the app where you can see almost on every android user mobile. TeaTV will make you very easy to connect the Multiple platforms like TeaTV Firestick, TeaTV on FireTV, TeaTV Android Box, TeaTV apk, TeaTV iOS and even Tea TV for windows. Most of the People love to Enjoy the movies and the Best TV shows by relaxing on the bed and also while you traveling to the other place. You will have a Great time with Teatv apk. You can simply watch the top and Popular movies using this TeaTV Apk. You simply open this app and start watching your favorite movies when you get free time. If you are the Lover of the Movies and do you love watching the Movies every time or when you get the free time then TeaTV apk will help you out to spend your time joyful. You will be seen the Movies which comes daily wise and uploaded the new content every time. If you are using this TeaTV apk on your Android device then you will be notified for every new movie updates including the trailers and TV shows. Psiphon handler VPN
TeaTV APK:
Still, If you have not understood complete that what is a TeaTV is then in a simple way it is one of the best and popular app to stream the regular movies and TV shows with having the best speed without lagging the video. TeaTV also provides the Latest movies and the tv shows on the dashboard on the app under the entertainment categories. You will also get notified with all the latest updates of the videos. This is one Best Source to get Entertainment stuff where you cannot get from most of the Sources. Download & Install TeaTV APK App on Android Box: Just follow the below steps if you have the Andriod devices like MI-BOX the Android TV player & NVIDIA SHIELD which is an Android TV option. These are the best step by step guide how to download and install it on the TeaTV APK. Before you Start Downloading and installing the App on Android Box you just have to allow the “Unknown sources” which is one important thing to do. To do this Follow the Steps below. First, You have to Goto the Settings > More settings > security > Unknown sources. Now simply allow it by tapping on it to start installing the TeaTv on your android mobile. Now Download the TeaTV APK app Link or type this link URL into the web browser that you use. Here you will be seeing the TeaTV page where you will also have a link to download the TeaTV app for your android phone. Simply Click on the download link of TeaTV apk File. Once it finished the downloading, adjust goto the home screen of the Android box remote open the Es File Explorer app. This app you will get it from the Google play store. After you have finished the downloading Open the app and goto local then open the download folder to find the TeaTV APK app file. Now click on the TeaTV .apk file then simply follow the steps below to install the TeaTV .apk file and you have to wait for some time until it finishes the App. When done with the TeaTV APK App is successfully installed on the android box you will be going to see the TeaTV APK icon on the app room of android box. That's all now you can Enjoy watching the HD and Latest Movies only on the TeaTV apk app. Download & Install TeaTv FireStick/FireTV: Now let me explained How to Download and install TeaTV FireStick. You will be going to have the best guide where you can be the best and simple guide to understand each and every point that make you understand completely. First, you have to Download the TeaTV APK then its time to go to the Installation process that is also very easy once you have followed this guide Completely to TeaTV Apk. Also when you are using the Unknown SOurce apps which are not available in the Offical Apps stores like Google Play store and App store then You have to use any VPN for this Firestick/Fire TV/ Fire TV Cube kinds of usages to be the safe from all these issues. TeaTV app is mainly Designed for the Andriod Devices where you can easily able to access on the full screen of an android phone and it always works perfectly this Phones. But the TeaTV APK will only work and its functions on the Mouse on the Devices like FireStick/FireTV. For the Mouse function, you just have to have the Mouse Toggle. If you don't know much about this including the Download and installation then simply Follow the steps below.

How to Install Mouse Toggle For FireStick/FireTV: Here you have to Allow the “Unknown Sources” which you have done in the above steps. DO the same thing that you have done in the above Method. Enable to the ADB Debugging If its already On then Go for the next step. Also, the TAB enables the JavaScript should be enabled. Download the Mouse Toggle and follow this simple code given below. Mouse Toggle 1.11: Fire TV 1, 2 & Fire TV Cube and Fire TV Stick 1 & 2. TV Cube: troypoint.com/mouse Mouse Toggle 1.06: Fire TV 3 and Fire TV Edition Tv Cube: troypoint.com/mouse106 After this prompted now you can install the Mouse Toggle. In case if you found any issues then Follow this Troubleshoot. Go to Settings >> device >> developer options >> ADB Debugging Turn off then Turn On. Install TeaTV Step by step Guide: First Goto the Main menu of the TV and Scroll down to the settings. In the Settings, you will also see an Option of Fire TV Just click on it. Now select the device options. Then turn on the “Unknown Sources”. It will ask for the Conformation popup massage just you have to click on the Turn On button. Now using the Remote you can go to the search icon that is located on the Top left side of the screen. In this Search box you have to search for Downloader or else you can also give it by voice search. You will see the list of the results that contain downloader, You just have to click on the downloader option which is first in the list. Now download the downloader app from there by clicking on the app. Open the Downloader App after it finished the Downloading. Just allow all the prompt if any comes in front of you. Enter the URL on the URL box and Click OK from the Remote. Just type https://troypoint.com/tea on the address bar and then click on GO. Then you just have to wait for some time until it completed downloads. Click on the Install after it's completed the downloading. Now click 0n the Done. Finally, open the TeaTV app on FireStick and enjoy watching the latest movie and the Tv shows that you like and what are available. Features & Details: TeaTV APK APP: The best thing is the Easy interface that can be understood by everyone. You will have also a Mouse essential empowered on a Firestick or Fire TV. You will also get the various connection which is available in 720 and 1080 high Definition. Watching the Trailer instead of only seeing the tile of the Movie that has more attention to then simply texts. TeaTV enables the video previews that can have more attention to the viewer and you will also know what is this content is all about. You can also see the “Comparable Movies or TV Shows” to confirm the endpoint of it and it is one of the best features. You have to click on the Play button to start watching the content of it also make sure to see a preview before view the Full content. You will also get the more features of TeaTV to have the best thing can be done for a user. You can also have the Additional features within the TeaTV. By simply coordinating the Trakt.tv & Real-Debrid account you can improve the viewability and the more content that you can see on the app. Also, there are the Features you will get after mixing them up. TeaTv Download & Install On Android Phone/Tablet: Now Coming to the TeaTV app on the Android phone you can simply download it from the google play store. Once you have found an app on the Stor Just click on the Install button to Install on your Android mobile. In case if you are not able to find the then installation process then simply Click on the download link and then Simply you can install it and start using on your Android mobile. Final words: This is the complete guide about the "TeaTV APK" runs on Android TV Box, Android Phones, iOS devices, Amazon FireStick, Fire TV. There are the Multiple ways operates the devices that can very useful to you in all the way. We also hope that you have learned How to download & Install TeaTV Apk App on Android TV Box & FireStick/Fire TV. Read the full article
0 notes
Text
Creating Your Own Gravity and Space Simulator
Space is vast. Space is awesome. Space is difficult to understand — or so people tend to think. But in this tutorial I am going to show you that this is not the case. Quite the contrary; the laws that govern the motion of the stars, planets, asteroids and even entire galaxies are incredibly simple. You could argue that if our Universe was created by a developer, she sure was concerned about writing clean code that would be easy to maintain and scale.
What we are going to do is create a simulation of the inner region of our solar system using nothing but plain old JavaScript. It will be a gravitational n-body simulation where every mass feels the gravity of all the other masses being simulated. To spice things up, I will also show how you can enable users of your simulator to add planets of their own to the simulation with nothing but a little bit of mouse drag action, and in doing so, cause all sorts of cosmic mayhem. A gravity or space simulator would not be worthy of its name without motion trails, so I will show you how to create some fancy looking trails, too, in addition to some other shenanigans that will make the simulator a little bit more fun for the average user.
See the Pen Gravity Simulator Tutorial by Darrell Huffman (@thehappykoala) on CodePen.
You will find the complete source code for this project in the Pen above. There is nothing fancy going on there. No bundling of modules, or transpilation of TypeScript or JSX into JavaScript; just HTML markup, CSS, and a healthy dose of JavaScript.
I came up with the idea for this while working on a project that is close to my heart, namely Harmony of the Spheres. Harmony of the Spheres is open source and very much a work in progress, so if you enjoy this tutorial and got your appetite for all things space and physics related going, check out the repository and fire away a pull request if you find a bug or have a cool new feature that you would like to see implemented.
For this tutorial, it is assumed that you have a basic grasp of JavaScript and the syntax and features that were introduced with ES6. Also, if you are able to draw a rectangle onto a canvas element, that would help, too. If you are not yet in possession of this knowledge, I suggest you head over to MDN and start reading up on ES6 classes, arrow functions, shorthand notation for defining key-value pairs for object literals and const and let. If you are not quite sure how to set up a canvas animation, go check out the documentation on the Canvas API on MDN.
Part 1: Writing a Gravitational N-Body Algorithm
To achieve the goal outlined above, we are going to draw on numerical integration, which is an approach to solving gravitational n-body problems where you take the positions and velocities of all objects at a given time (T), calculate the gravitational force they exert on each other and update their velocities and positions at time (T + dt, dt being shorthand for delta time), or in other words, the change in time between iterations. Repeating this process, we can trace the trajectories of a set of masses through space and time.
We will use a Cartesian coordinate system for our simulation. The Cartesian coordinate system is based on three mutually perpendicular coordinate axes: the x-axis, the y-axis, and the z-axis. The three axes intersect at the point called the origin, where x, y and z are equal to 0. An object in a Cartesian space has a unique position that is defined by its x, y and z values. The benefit of using the Cartesian coordinate system for our simulation is that the Canvas API, with which we will visualize our simulation, uses it, too.
For the purpose of writing an algorithm for solving the gravitational n-body problem, it is necessary to have an understanding of what is meant by velocity and acceleration. Velocity is the change in position of an object with time, while acceleration is the change in an object's velocity with time. Newton's first law of motion stipulates that every object will remain at rest or in uniform motion in a straight line unless compelled to change its state by the action of an external force. The Earth does not move in a straight line, but orbits the Sun, so clearly it is accelerating, but what is causing this acceleration? As you have probably guessed, given the subject matter of this tutorial, the answer is the gravitational forces exerted on Earth by the Sun, the other planets in our solar system and every other celestial object in the Universe.
Before we discuss gravity, let us write some pseudo code for updating the positions and velocities of a set of masses in Cartesian space. We store our masses as objects in an array where each object represents a mass with x, y and z position and velocity vectors. Velocity vectors are prefixed with a v — v for velocity!
const updatePositionVectors = (masses, dt) => { const massesLen = masses.length; for (let i = 0; i < massesLen; i++) { const massI = masses[i]; mass.x += mass.vx * dt; mass.y += mass.vy * dt; mass.z += mass.vz * dt; } }; const updateVelocityVectors = (masses, dt) => { const massesLen = masses.length; for (let i = 0; i < massesLen; i++) { const massI = masses[i]; massI.vx += massI.ax * dt; massI.vy += massI.ay * dt; massI.vz += massI.az * dt; } };
Looking at the code above, we can see that — as outlined in our discussion on numerical integration — every time we advance the simulation by a given time step, dt, we update the velocities of the masses being simulated and, with those velocities, we update the positions of the masses. The relationship between position and velocity is also made clear in the code above, as we can see that in one step of our simulation, the change in, for example, the x position vector of our mass is equal to the product of the mass's x velocity vector and dt. Similarly, we can make out the relationship between velocity and acceleration.
How, then, do we get the x, y and z acceleration vectors for a mass so that we can calculate the change in its velocity vectors? To get the contribution of massJ to the x acceleration vector of massI, we need to calculate the gravitational force exerted by massJ on massI, and then, to obtain the x acceleration vector, we simply calculate the product of this force and the distance between the two masses on the x axis. To get the y and z acceleration vectors, we follow the same procedure. Now we just have to figure out how to calculate the gravitational force exerted by massJ on massI to be able to write some more pseudo code. The formula we are interested in looks like this:
f = g * massJ.m / dSq * (dSq + s)^1/2
The formula above tells us that the gravitational force exerted by massJ on massI is equal to the product of the gravitational constant (g) and the mass of massJ (massJ.m) divided by the product of the sum of the squares of the distance between massI and massJ on the x, y and z axises (dSq) and the square root of dSq + s, where s is what is referred to as a softening constant (softeningConstant). Including a softening constant in our gravity calculations prevents a situation where the gravitational force exerted by massJ becomes infinite because it is too close to massI. This "bug," if you will, in the Newtonian theory of gravity arises for the reason that Newtonian gravity treats masses as point objects, which they are not in reality. Moving on, to get the net acceleration of massI along, for example, the x axis, we simply sum the acceleration induced on it by every other mass in the simulation.
Let us transform the above into code for updating the acceleration vectors of all the masses in the simulation.
const updateAccelerationVectors = (masses, g, softeningConstant) => { const massesLen = masses.length; for (let i = 0; i < massesLen; i++) { let ax = 0; let ay = 0; let az = 0; const massI = masses[i]; for (let j = 0; j < massesLen; j++) { if (i !== j) { const massJ = masses[j]; const dx = massJ.x - massI.x; const dy = massJ.y - massI.y; const dz = massJ.z - massI.z; const distSq = dx * dx + dy * dy + dz * dz; f = (g * massJ.m) / (distSq * Math.sqrt(distSq + softeningConstant)); ax += dx * f; ay += dy * f; az += dz * f; } } massI.ax = ax; massI.ay = ay; massI.az = az; } };
We iterate over all the masses in the simulation, and for every mass we calculate the contribution to its acceleration by the other masses in a nested loop and increment the acceleration vectors accordingly. Once we are out of the nested loop, we update the acceleration vectors of massI, which we can then use to calculate its new velocity vectors! Whowie. That was a lot. We now know how to update the position, velocity and acceleration vectors of n bodies in a gravity simulation using numerical integration.
But wait; there is something missing. That is right, we have talked about distance, mass and time, but we have never specified what units we ought to use for these quantities. As long as we are consistent, the choice is arbitrary, but generally speaking, it is a good idea to go for units that are suitable for the scales under consideration, so as to avoid awkwardly long numbers. In the context of our solar system, scientists tend to use astronomical units for distance, solar masses for mass and years for time. Adopting this set of units, the value of the gravitational constant (g in the formula for calculating the gravitational force exerted by massJ on massI) is 39.5. For the position and velocity vectors of the Sun and planets of the inner solar system — Mercury, Venus, Earth and Mars — we turn to NASA JPL's HORIZONS Web-Interface where we change the output setting to vector tables and the units to astronomical units and days. For whatever reason, Horizons does not serve vectors with years as the unit of time, so we have to multiply the velocity vectors by 365.25, the number of days in a year, to obtain velocity vectors that are consistent with our choice of years as the unit of time.

To think, that with the simple equations and laws discussed above, we can calculate the motion of every galaxy, star, planet and moon contained within this dazzling cosmic panorama captured by the Hubble Telescope, is nothing short of awe-inspiring. It is not for nothing Newton’s theory of gravity is referred to as "Newton’s law of universal gravitation."
A JavaScript class seems like an excellent way of encapsulating the methods we wrote above together with the data on the masses and the constants we need for our simulation, so let us do some refactoring:
class nBodyProblem { constructor(params) { this.g = params.g; this.dt = params.dt; this.softeningConstant = params.softeningConstant; this.masses = params.masses; } updatePositionVectors() { const massesLen = this.masses.length; for (let i = 0; i < massesLen; i++) { const massI = this.masses[i]; massI.x += massI.vx * this.dt; massI.y += massI.vy * this.dt; massI.z += massI.vz * this.dt; } return this; } updateVelocityVectors() { const massesLen = this.masses.length; for (let i = 0; i < massesLen; i++) { const massI = this.masses[i]; massI.vx += massI.ax * this.dt; massI.vy += massI.ay * this.dt; massI.vz += massI.az * this.dt; } } updateAccelerationVectors() { const massesLen = this.masses.length; for (let i = 0; i < massesLen; i++) { let ax = 0; let ay = 0; let az = 0; const massI = this.masses[i]; for (let j = 0; j < massesLen; j++) { if (i !== j) { const massJ = this.masses[j]; const dx = massJ.x - massI.x; const dy = massJ.y - massI.y; const dz = massJ.z - massI.z; const distSq = dx * dx + dy * dy + dz * dz; const f = (this.g * massJ.m) / (distSq * Math.sqrt(distSq + this.softeningConstant)); ax += dx * f; ay += dy * f; az += dz * f; } } massI.ax = ax; massI.ay = ay; massI.az = az; } return this; } }
That looks much nicer! Let us create an instance of this class. To do so, we need to specify three constants, namely the gravitational constant (g), the time step of the simulation (dt) and the softening constant (softeningConstant). We also need to populate an array with mass objects. Once we have all of those, we can create an instance of the nBodyProblem class, which we will call the innerSolarSystem, since, well, our simulation is going to be of the inner solar system!
const g = 39.5; const dt = 0.008; // 0.008 years is equal to 2.92 days const softeningConstant = 0.15; const masses = [{ name: "Sun", // We use solar masses as the unit of mass, so the mass of the Sun is exactly 1 m: 1, x: -1.50324727873647e-6, y: -3.93762725944737e-6, z: -4.86567877183925e-8, vx: 3.1669325898331e-5, vy: -6.85489559263319e-6, vz: -7.90076642683254e-7 } // Mercury, Venus, Earth and Mars data can be found in the pen for this tutorial ]; const innerSolarSystem = new nBodyProblem({ g, dt, masses: JSON.parse(JSON.stringify(masses)), softeningConstant });
At this moment, you are probably looking at how I instantiated the nBodyProblem class and asking yourself what is up with the JSON parsing and string-ifying nonsense. The reason for why I went about passing the data contained in the masses array to the nBodyProblem constructor in this way is that we want our users to be able to reset the simulation. However, if we pass the masses array itself to the constructor of the nBodyProblem class when we create an instance of it, and then set the value of the masses property of this instance to be equal to the masses array when the user clicks the reset button, the simulation would not have been reset; the state of the masses from the end of the previous simulation run would still be there, and so would any masses the user had added. To solve this problem, we need to pass a clone of the masses array when we instantiate the nBodyProblem class or reset the simulation, so as to avoid modifying the masses array, which we need to keep pristine and untouched, and the easiest way of cloning it is to simply parse a string-ified version of it.
Okay, moving on: to advance the simulation by one step, we simply call:
innerSolarSystem.updatePositionVectors() .updateAccelerationVectors() .updateVelocityVectors();
Congratulations. You are now one step closer to collecting a Nobel prize in physics!
Part 2: Creating a Visual Manifestation for our Masses
We could represent our masses with cute little circles created with the Canvas API's arc method, but that would look kind of dull, and we would not get a sense of the trajectories of our masses through space and time, so let us write a JavaScript class that will be our template for how our masses manifest themselves visually. It will create a circle that leaves a predetermined number of smaller and faded circles where it has been before, which conveys a sense of motion and direction to the user. The farther you get from the current position of the mass, the smaller and more faded out the circles will become. In this way, we will have created a pretty looking motion trail for our masses.
The constructor accepts three arguments, namely the drawing context for our canvas element (ctx), the length of the motion trail (trailLength) that represents the number of previous positions of our mass that the trail will visualize and finally the radius (radius) of the circle that represents the current position of our mass. In the constructor we will also initialize an empty array that we will call positions, which will — quell surprise — store the current and previous positions of the mass that are included in the motion trail.
At this point, our manifestation class looks like this:
class Manifestation { constructor(ctx, trailLength, radius) { this.ctx = ctx; this.trailLength = trailLength; this.radius = radius; this.positions = []; } }
How do we go about populating the positions array with positions and making sure that we do not store more positions than the number specified by the trailLength property? The answer is that we add a method to our class that accepts the x and y coordinates of the mass's position as arguments and stores them in an object in the array using the array push method, which appends an element to an array. This means that the current position of the mass will be the last element in the positions array. To make sure we do not store more positions than specified when we instantiated the class, we check if the length of the positions array is greater than the trailLength property. If it is, we use the array shift method to remove the first element, which represents the oldest stored position of the positions array.
class Manifestation { constructor() { /* The code for the constructor outlined above */ } storePosition(x, y) { this.positions.push({ x, y }); if (this.positions.length > this.trailLength) this.positions.shift(); } }
Okay, let us write a method that draws our motion trail. As you have probably guessed, it will accept two arguments, namely the x and y positions of the mass we are drawing the trail for. The first thing we need to do is to store the new position in the positions array and discard any superfluous positions stored in it. Then we iterate over the positions array and draw a circle for every position and voilà, we have ourselves a motion trail! But it does not look very nice, and I promised you that our trail would be pretty with circles that would become increasingly smaller and faded out according to how close they were to the current position of our mass in time.
What we need is, clearly, a scale factor whose size depends on how far away the position we are drawing is from the current position of our mass in time! An excellent way of obtaining an appropriate scale factor, for our intents and purposes, is to simply divide the index (i) of the circle being drawn by the length of the positions array. For example, if the number of elements allowed in the positions array is 25, element number 23 in that array will get a scale factor of 23 / 25, which gives us 0.92. Element number 5, on the other hand, will get a scale factor of 5 / 25, which gives us 0.2; the scale factor decreases the further we get from the current position of our mass, which is the relationship we want! Do note that we need a condition that makes sure that if the circle being drawn represents the current position, the scale factor is set to 1, as we do not want that circle to be either faded or smaller, for that matter. With all this in mind, let us write the code for the draw method of our Manifestation class.
class Manifestation { constructor() { /* The code for the constructor outlined above */ } storePosition() { /* The code for the storePosition method discussed above */ } draw(x, y) { this.storePosition(x, y); const positionsLen = this.positions.length; for (let i = 0; i < positionsLen; i++) { let transparency; let circleScaleFactor; const scaleFactor = i / positionsLen; if (i === positionsLen - 1) { transparency = 1; circleScaleFactor = 1; } else { transparency = scaleFactor / 2; circleScaleFactor = scaleFactor; } this.ctx.beginPath(); this.ctx.arc( this.positions[i].x, this.positions[i].y, circleScaleFactor * this.radius, 0, 2 * Math.PI ); this.ctx.fillStyle = `rgb(0, 12, 153, ${transparency})`; this.ctx.fill(); } } }
Part 3: Visualizing Our Simulation
Let us write some canvas boilerplate and bind it together with the gravitational n-body algorithm and the motion trails, so that we can get an animation of our inner solar system simulation up and running. As mentioned in the introduction to this tutorial, I do not discuss the Canvas API in any great depth, as this is not an introductory tutorial on the Canvas API, so if you find yourself looking rather bemused and or perplexed, make haste and change this state of affairs by heading over to MDN’s documentation on the subject.
Before we continue, though, here is the HTML markup for our simulator:
<section id="controls-wrapper"> <label>Mass of Added Planet</label> <select id="masses-list"> <option value="0.000003003">Earth</option> <option value="0.0009543">Jupiter</option> <option value="1">Sun</option> <option value="0.1">Red Dwarf Star</option> </select> <button id="clear-masses">Reset</button> </section> <canvas id="canvas"></canvas>
Now, we turn to the interesting part: the JavaScript. We start by getting a reference to the canvas element and then we proceed by getting its drawing context. Next, we set the dimensions of our canvas element. When it comes to canvas animations on the web, I do not spare any expenses in terms of screen real estate, so let us set the width and height properties of the canvas element to the width and height of the browser window, respectively. You will notice that I have drawn on a peculiar syntax for setting the width and height of the canvas element in that I have declared, in one statement, that the width variable is equal to the width property of the canvas element which, in turn, is equal to the width of the window. Some developers frown upon the use of this syntax, but I find it to be semantically beautiful. If you do not feel the same way, you can deconstruct that statement into two statements. Generally speaking, do whatever you feel most comfortable with, or if you find yourself collaborating with others, what the team has agreed on.
const canvas = document.querySelector("#canvas"); const ctx = canvas.getContext("2d"); const width = (canvas.width = window.innerWidth); const height = (canvas.height = window.innerHeight);
At this point, we are going to declare some constants for our animation. More specifically, there are three of them. The first is the radius (radius) of the circle, which represents the current position of a mass, in pixels. The second is the length of our motion trail (trailLength), which is the number of previous positions that it includes. Last, but not least, we have the scale (scale) constant, which represents the number of pixels per astronomical unit; Earth is one astronomical unit from the Sun, so if we did not introduce this scale factor, our inner solar system would look very claustrophobic, to say the least.
const scale = 70; const radius = 4; const trailLength = 35;
Let us now turn to the visual manifestations of the masses we are simulating. We have written a class that encapsulates their behavior, but how do we instantiate and work with these manifestations in our code? The most convenient and elegant way would be to populate every element of the masses array we are simulating with an instance of the Manifestation class, so let us write a simple method that iterates over these masses and does just that, which we then invoke.
const populateManifestations = masses => { masses.forEach( mass => (mass["manifestation"] = new Manifestation( ctx, trailLength, radius )) ); }; populateManifestations(innerSolarSystem.masses);
Our simulator is meant to be a playful affair, so it is only to be expected that users will spawn masses left and right and that after a minute, or so, the inner solar system will look like an unrecognizable cosmic mess, which is why I think it would be decent of us to provide them with the ability to reset the simulation. To achieve this goal, we start by attaching an event listener to the reset button, and then we write a callback for this event listener that sets the value of the masses property of the innerSolarSystem object to a clone of the masses array. As we cloned the masses array, we no longer have the manifestations of our masses in it, so we call the populateManifestations method to make sure that our users have something to look at after having reset the simulation.
document.querySelector('#reset-button').addEventListener('click', () => { innerSolarSystem.masses = JSON.parse(JSON.stringify(masses)); populateManifestations(innerSolarSystem.masses); }, false);
Okay, enough setting things up. Let us breathe some life into the inner solar system by writing a method that, with the help of the requestAnimationFrame API, will run 60 steps of our simulation a second and animate the results with motion trails and labels for the planets of the inner solar system and the Sun.
The first thing this method does is advance the inner solar system by one step and it does so by updating the position, acceleration and velocity vectors of its masses. Then we prepare the canvas element for the next animation cycle by clearing it of what was drawn in the preceding animation cycle using the Canvas API’s clearRect method.
Next, we iterate over the masses array and invoke the draw method of each mass manifestation. Moreover, if the mass being drawn has a name, we draw it onto the canvas, so that the user can see where the original planets are after things have gone haywire. Looking at the code in the loop, you will probably notice that we are not setting, for example, the value of the mass’s x coordinate on the canvas to massI times scale, and that we are in fact setting it to the width of the viewport divided by two plus massI times scale. Why is this? The answer is that the origin (x = 0, y = 0) of the canvas coordinate system is set to the top left corner of the canvas element, so to center our simulation on the canvas where it is clearly visible to the user, we must include this offset.
After the loop, at the end of the animate method, we call requestAnimationFrame with the animate method as the callback, and then the whole process discussed above is repeated again, creating yet another frame — and run in quick succession, these frames have brought the inner solar system to life. But wait, we have missed something! If you were to run the code I have walked you through thus far, you would not see anything at all. Fortunately, all we have to do to change this sad state of affairs is to proverbially give the inner solar system a kick in its rear end (no, I am not going to fall for the temptation of inserting a Uranus joke here; grow up!) by invoking the animate method!
const animate = () => { innerSolarSystem .updatePositionVectors() .updateAccelerationVectors() .updateVelocityVectors(); ctx.clearRect(0, 0, width, height); const massesLen = innerSolarSystem.masses.length; for (let i = 0; i < massesLen; i++) { const massI = innerSolarSystem.masses[i]; const x = width / 2 + massI.x * scale; const y = height / 2 + massI.y * scale; massI.manifestation.draw(x, y); if (massI.name) { ctx.font = "14px Arial"; ctx.fillText(massI.name, x + 12, y + 4); ctx.fill(); } } requestAnimationFrame(animate); }; animate();

Our visualization of Mercury, Venus, Earth and Mars going about their day-to-day business of running circles around the sun. Looks pretty neat.
Woah! We have now gotten to the point where our simulation is animated, with the masses represented by dainty little blue circles stalked by marvelous looking motion trails. That is pretty cool in itself, if you were to ask me; but I did promise to also show how you can enable the user to add masses of their own to the simulation with a little bit of mouse drag action, so we are not done quite yet!
Part 4: Adding Masses with the Mouse
The idea here is that the user should be able to press down on the mouse button and draw a line by dragging it; the line will start where the user pressed down and end at the current position of the mouse cursor. When the user releases the mouse button, a new mass is spawned at the position of the screen where the user pressed down the mouse button, and the direction the mass will move is determined by the direction of the line; the length of the line determines the velocity vectors of the mass. So, how do we go about implementing this? Let us run through what we need to do, step by step. The code for steps one through six go above the animate method, while the code for step seven is a small addition to the animate method.
1. We need two variables that will store the x and y coordinates where the user pressed down the mouse button on the screen.
let mousePressX = 0; let mousePressY = 0;
2. We need two variables that store the current x and y coordinates of the mouse cursor on the screen.
let currentMouseX = 0; let currentMouseY = 0;
3. We need one variable that keeps track of whether the mouse is being dragged or not. The mouse is being dragged in the time that passes from when the user has pressed down the mouse button to the point where he releases it.
let dragging = false;
4. We need to attach a mousedown listener to the canvas element that logs the x and y coordinates of where the mouse was pressed down and sets the dragging variable to true.
canvas.addEventListener( "mousedown", e => { mousePressX = e.clientX; mousePressY = e.clientY; dragging = true; }, false );
5. We need to attach a mousemove listener to the canvas element that logs the current x and y coordinates of the mouse cursor.
canvas.addEventListener( "mousemove", e => { currentMouseX = e.clientX; currentMouseY = e.clientY; }, false );
6. We need to attach a mouseup listener to the canvas element that sets the drag variable to false, and pushes a new object representing a mass into the innerSolarSystem.masses array where the x and y position vectors are the point where the user pressed down the mouse button divided by value of the scale variable.
If we did not divide these vectors by the scale variable, the added masses would end up way out in the solar system, which is not what we want. The z position vector is set to zero and so is the z velocity vector. The x velocity vector is set to the x coordinate where the mouse was released subtracted by the x coordinate where the mouse was pressed down, and then you divide this number by 35. I will be honest and admit that 35 is a magical number that just happens to give you reasonable velocities when you add masses with the mouse to the inner solar system. Same procedure for the y velocity vector. The mass (m) of the mass we are adding is set by the user with a select element that we have populated with the masses of some famous celestial objects in the HTML markup. Last, but not least, we populate the object representing our mass with an instance of the Manifestation class so that the user can see it on the screen!
const massesList = document.querySelector("#masses-list"); canvas.addEventListener( "mouseup", e => { const x = (mousePressX - width / 2) / scale; const y = (mousePressY - height / 2) / scale; const z = 0; const vx = (e.clientX - mousePressX) / 35; const vy = (e.clientY - mousePressY) / 35; const vz = 0; innerSolarSystem.masses.push({ m: parseFloat(massesList.value), x, y, z, vx, vy, vz, manifestation: new Manifestation(ctx, trailLength, radius) }); dragging = false; }, false );
7. In the animate function, after the loop where we draw our manifestations and, before we call requestAnimationFrame, check if the mouse is being dragged. If that is the case, we’ll draw a line between the position where the mouse was pressed down and the mouse cursors current position.
const animate = () => { // Preceding code in the animate method down to and including the loop where we draw our mass manifestations if (dragging) { ctx.beginPath(); ctx.moveTo(mousePressX, mousePressY); ctx.lineTo(currentMouseX, currentMouseY); ctx.strokeStyle = "red"; ctx.stroke(); } requestAnimationFrame(animate); };

The inner solar system is about to get a lot more interesting — we can now add masses to our simulation!
Adding masses to our simulation with your mouse is not more difficult than that! Now, grab your mouse and unleash some mayhem on the inner solar system.
Part 5: Fencing off the Inner Solar System
As you will probably have noticed after adding some masses to the simulation, celestial objects are very shenanigan-prone in that they have a tendency to dance their way out of the viewport, especially if the added masses are very massive or they have too high of a velocity, which is kind of annoying. The natural solution to this problem is, of course, to fence off the inner solar system so that if a mass reaches the edge of the viewport, it will bounce back in! Sounds like quite a project, implementing this functionality, but fortunately doing so is a rather simple affair. At the end of the loop where we iterate over the masses and draw them in the animate method, we have insert two conditions: one that checks if our mass is outside the bounds of the viewport on the x-axis, and another that does the same check for the y axis. If the position of our mass is outside of the viewport on the x axis we reverse its x velocity vector so that it bounces back into the viewport, and the same logic applies if our mass is outside of the viewport on the y axis. With these two conditions, the animate method will look like so:
const animate = () => { // Advance the simulation by one step; clear the canvas for (let i = 0; i < massesLen; i++) { // Preceding loop code if (x < radius || x > width - radius) massI.vx = -massI.vx; if (y < radius || y > height - radius) massI.vy = -massI.vy; } requestAnimationFrame(animate); };
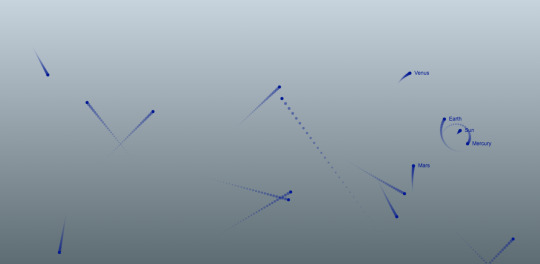
Absolute madness! Venus, you silly planet, what are you doing out there?! You are supposed to be orbiting the Sun!
Ping, pong! It is almost as though we are playing a game of cosmic billiards with all those masses bouncing off the fence that we have built for the inner solar system!
Concluding Remarks
People have a tendency to think of orbital mechanics — which is what we have played around with in this tutorial — as something that is beyond the understanding of mere mortals such as yours truly. Truth, though, is that orbital mechanics follows a very simple and elegant set of rules, as this tutorial is a testament to. With a little bit of JavaScript and high-school mathematics and physics, we have reconstructed the inner solar system to a reasonable degree of accuracy, and gone beyond that to make things a little bit more spicy and, therefore, more interesting. With this simulator, you can answer silly what-if questions along the lines of, "What would happen if I flung a star with the mass of the Sun into our inner solar system?" or develop a feeling for Kepler's laws of planetary motion by, for example, observing the relationship between the distance of a mass from the Sun and its velocity.
I sure had fun writing this tutorial, and it is my sincere hope that you had as much fun reading it!
The post Creating Your Own Gravity and Space Simulator appeared first on CSS-Tricks.
😉SiliconWebX | 🌐CSS-Tricks
0 notes
Text
ELI5: Why can't bots check 'I am not a robot' checkboxes?
Actually, clicking the box is a rather trivial part of what those CAPTCHAs are looking for. What they're actually looking for are things like:
did the 'user' instantly move their mouse to the exact coordinates of the box, or did they traverse thru the page like a human would?
is the user scrolling to the box, or are they remotely executing javascript to trigger a scroll to the box?
how long after page load did the user find the box? Too quickly is obviously a red flag, but taking too long is also. commonly, to get around reCAPTCHA you'll need to find out 4-5 areas to click in addition to the initial click. The way that most people do this is using CAPTCHA services, which are real people solving them and returning the answer to you (i.e. for a text captcha, you'd send them the image and they'd send back the letters/numbers). The way you do this with reCAPTCHA is sending a screenshot of the computer, and you are returned the coords that you're supposed to click on to answer the question properly. [e: apparently this method is old, and a new method where the CAPTCHA is actually served up to the person within the service that will solve it for you!] However, it usually doesn't take a legitimate human 5 minutes to answer a few questions about 9 images. if you take too long, they'll make you do another image check challenge.
basically, it's really, really difficult to make a bot move the mouse, scroll, and react naturally to a page load. and even if you do manage to fool reCAPTCHA, you'll be thrown to a few image tasks which may serve to block you out from the website completely, due to the reasons mentioned above.
Explain Like I`m Five: good questions, best answers.
#eli5#explanations#easy explanations#explain like i am five#explain me#explain like I am 5#captcha#robot
2K notes
·
View notes
Text
Introduction to JavaScript

What is JavaScript?
JavaScript was at first made to "make site pages live".
The programs created using this language called as Scripts. They can be composed right in a website page's HTML and run consequently as the page loads.
Scripts are given and executed as plain text. They needn't bother with uncommon planning or accumulation to run.
Right now, JavaScript is altogether different from another Programming Languages like.
Why is it called as JavaScript?
When JavaScript was made, it first called as: "LiveScript". Yet, Java was mainstream around then, so it was concluded that situating another dialect as Java would help.
In any case, as it developed, JavaScript turned into a completely autonomous language with its own determination called ECMAScript, and now it has no connection to Java by any means.
Today, JavaScript can execute in the browser, yet in addition on the server, or entirely any gadget that has a unique program called the JavaScript motor.
The program has an embedded engine now and again called a "JavaScript virtual machine".
What can JavaScript do in-browser?
Present day JavaScript is a "safe" programming language. It doesn't give low-level access to memory or CPU, since it was at first made for programs which don't require it.
JavaScript's capacities extraordinarily rely upon the condition it's running in. For example, Node.js supports functions that permit JavaScript to read/write files, perform network requests, and so forth.
In-program JavaScript can do everything identified with website page control, cooperation with the client, and the webserver.
For example, in-program JavaScript can:
Add new HTML to the page, change the current substance, adjust styles.
Respond to client activities, run on mouse clicks, pointer developments, key presses.
Send demands over the system to remote servers, download and transfer records (purported AJAX and COMET innovations).
Get and set treats, pose inquiries to the guest, show messages.
Recollect the information on the customer side ("nearby capacity").
What CAN'T JavaScript do in-browser?
JavaScript's capacities in the program are restricted for the client's security. The point is to keep a malicious page from getting to private data or hurting the client's information.
Instances of such limitations include:
JavaScript on a website page may not peruse/compose subjective records on the hard circle, duplicate them or execute programs. It has no immediate access to OS capacities.
Present day programs permit it to work with documents, yet the entrance is restricted and possibly gave if the client does certain activities, such as "dropping" a record into a program window or choosing it by means of a <input> tag.
There are approaches to collaborate with camera/mouthpiece and different gadgets, yet they require a client's express consent. So a JavaScript-empowered page may not guilefully empower a web-camera, watch the environment and send the data to the NSA.
Various tabs/windows for the most part don't think about one another. In some cases they do, for instance when one window utilizes JavaScript to open the other one. Be that as it may, even right now, from one page may not get to the next in the event that they originate from various locales (from an alternate area, convention or port).
This is known as "A similar Origin Policy". To work around that, the two pages must concur for information trade and contain an uncommon JavaScript code that handles it.
What makes JavaScript unique?
There are at any rate three incredible things about JavaScript:
Full coordination with HTML/CSS.
Basic things are done basically.
Supported by all browsers.
JavaScript is the main program innovation that joins these three things.
That is the thing that makes JavaScript a unique language. That’s why it is widely used for creating browser interfaces. So, JavaScript likewise permits to make servers, versatile applications, and so on.
Languages "over" JavaScript
The language structure of JavaScript sometimes falls short for everybody's needs. Various individuals need various highlights.
That will be normal, since undertakings and prerequisites are diverse for everybody.
So as of late a plenty of new dialects showed up, which are transpiled (changed over) to JavaScript before they run in the program.
Current apparatuses make the transpilation quick and straightforward, really permitting engineers to code in another dialect and auto-changing over it "in the engine".
Conclusion
JavaScript was at first made as a program just language, yet is presently utilized in numerous different situations too.
Today, JavaScript has a remarkable situation as the most generally received program language with full incorporation with HTML/CSS.
There are numerous dialects that get "transpiled" to JavaScript and give certain highlights. It is prescribed to investigate them, at any rate quickly, subsequent to acing JavaScript.
For more details about Full Stack Online Course CLICK HERE
Contact us for more details +919989971070 or visit us www.visualpath.in
#Full Stack Online Training#full stack training#full stack training in Hyderabad#Full Stack Training in Ameerpet#Full Stack Developer Online Training
0 notes
Text
Javascript Sux
Hey all, it’s Fuller again, back to describe the most annoying time I’ve had programming in months. The Patreon game this month is a prologue to a Twine game that may or may not be continued further in the coming months. Twine is an easy-to-use tool for writing narratives and interweaving branching story paths. However, Twine also allows for Phaser.io projects to be run alongside it, which is an engine we at DANG! used in school. It was perfect: what could possibly go wrong? Oh yeah, it’s in Javascript.
The first step to making a brief interaction for your Phaser project is to copy someone else’s half finished code first. This way, the project loads up on it’s own and you don’t have to slog through how the engine works again. This is a pro tip that I always recommend.
Once I’d yoinked!™ my team member’s code, it was time to get to work. This meant switching out the art assets for the scene I was working on, which meant I really just had to rename some stuff, no brain power required, the perfect task. Next I had to put those art objects in the correct location on screen, using my tried and true technique: keep guessing until you get it right. This is literally what I did. I ended up with numbers like x = 190, y = 454 for the coordinate of the arm. Surely there’s a better way to do this, right? A good question. Of course there is! Write some code that moves the art object along wherever your cursor is, and whenever you click the mouse button, it says the current coordinates of the mouse. This allows you to align up your assets and record the perfect coordinates! But I didn’t do this, that’s just what a smart person would do.
Next I needed the arm to swing up to toss the pebbles, which I guess is a spoiler. Huh. OK sorry to spoil but this is what I was working on and now that I’ve written it I’m not legally allowed to erase it (that’s how writing in pen works). Now you could do this by rotating the arm but you need it to rotate around the correct pivot, which is called an anchor. And again, use the patented technique of guessing until you find the perfect spot.
Well now that the arm moves, the pebble has to spawn and start its arc at the release point. Again, a smart person would use the same technique as before, but why be smart when you can be lazy (that’s right, we’re gonna guess again). Next we gotta do a little bit of physics simulation, so I made up numbers for the acceleration of gravity until it felt right, which ended up being 1 (the result of hours of science).

Now here’s where Javascript really got in my way. I made this slick additional pebble movement for when it dips below the surface of the water, and needed to add a splash. Now the splash needed to be at the location of the pebble when it hits the surface of the water, but still have the pebble continue to move afterwards. And here’s where Javascript is awful. Whenever you assign a value in Javascript (of a class object), it is passed by reference, which means if you change the value of the original, it will also change your newly assigned to variable as well. This meant that the splash would continually move with the pebble as it sank underwater and while it looked kinda trippy, it mostly looked dumb.
This took most of a day to find a work-around for, and it’s just stupid. No other programming language works like this, and no programming language should work like this. It’s nonsensical. Ultimately I had to create a copy of the pebble, and have the copy sink while the original stayed put, this way the splash wouldn’t move as the original no longer moved. It’s ridiculous. It’s nonsense. It’s Javascript.
1 note
·
View note
Text
A DIY Web Accessibility Blueprint
The summer of 2017 marked a monumental victory for the millions of Americans living with a disability. On June 13th, a Southern District of Florida Judge ruled that Winn-Dixie’s inaccessible website violated Title III of the Americans with Disabilities Act. This case marks the first trial under the ADA, which was passed into law in 1990.
Despite spending more than $7 million to revamp its website in 2016, Winn-Dixie neglected to include design considerations for users with disabilities. Some of the features that were added include online prescription refills, digital coupons, rewards card integration, and a store locator function. However, it appears that inclusivity didn’t make the cut.
Because Winn-Dixie’s new website wasn’t developed to WCAG 2.0 standards, the new features it boasted were in effect only available to sighted, able-bodied users. When Florida resident Juan Carlos Gil, who is legally blind, visited the Winn-Dixie website to refill his prescriptions, he found it to be almost completely inaccessible using the same screen reader software he uses to access hundreds of other sites.
Juan stated in his original complaint that he “felt as if another door had been slammed in his face.” But Juan wasn’t alone. Intentionally or not, Winn-Dixie was denying an entire group of people access to their new website and, in turn, each of the time-saving features it had to offer.
What makes this case unique is that it marks the first time in history in which a public accommodations case went to trial, meaning the judge ruled the website to be a “place of a public accommodation” under the ADA and therefore subject to ADA regulations. Since there are no specific ADA regulations regarding the internet, Judge Scola decided the adoption of the Web Content Accessibility Guidelines (WCAG) 2.0 Level AA to be appropriate. (Thanks to the hard work of the Web Accessibility Initiative (WAI) at the W3C, WCAG 2.0 has found widespread adoption throughout the globe, either as law or policy.)
Learning to have empathy
Anyone with a product subscription service (think diapers, razors, or pet food) knows the feeling of gratitude that accompanies the delivery of a much needed product that arrives just in the nick of time. Imagine how much more grateful you’d be for this service if you, for whatever reason, were unable to drive and lived hours from the nearest store. It’s a service that would greatly improve your life. But now imagine that the service gets overhauled and redesigned in such a way that it is only usable by people who own cars. You’d probably be pretty upset.
This subscription service example is hypothetical, yet in the United States, despite federal web accessibility requirements instituted to protect the rights of disabled Americans, this sort of discrimination happens frequently. In fact, anyone assuming the Winn-Dixie case was an isolated incident would be wrong. Web accessibility lawsuits are rising in number. The increase from 2015 to 2016 was 37%. While some of these may be what’s known as “drive-by lawsuits,” many of them represent plaintiffs like Juan Gil who simply want equal rights. Scott Dinin, Juan’s attorney, explained, “We’re not suing for damages. We’re only suing them to follow the laws that have been in this nation for twenty-seven years.”
For this reason and many others, now is the best time to take a proactive approach to web accessibility. In this article I’ll help you create a blueprint for getting your website up to snuff.
The accessibility blueprint
If you’ll be dealing with remediation, I won’t sugarcoat it: successfully meeting web accessibility standards is a big undertaking, one that is achieved only when every page of a site adheres to all the guidelines you are attempting to comply with. As I mentioned earlier, those guidelines are usually WCAG 2.0 Level AA, which means meeting every Level A and AA requirement. Tight deadlines, small budgets, and competing priorities may increase the stress that accompanies a web accessibility remediation project, but with a little planning and research, making a website accessible is both reasonable and achievable.
My intention is that you may use this article as a blueprint to guide you as you undertake a DIY accessibility remediation project. Before you begin, you’ll need to increase your accessibility know-how, familiarize yourself with the principles of universal design, and learn about the benefits of an accessible website. Then you may begin to evangelize the benefits of web accessibility to those you work with.
Have the conversation with leadership
Securing support from company leadership is imperative to the long-term success of your efforts. There are numerous ways to broach the subject of accessibility, but, sadly, in the world of business, substantiated claims top ethics and moral obligation. Therefore I’ve found one of the most effective ways to build a business case for web accessibility is to highlight the benefits.
Here are just a few to speak of:
Accessible websites are inherently more usable, and consequently they get more traffic. Additionally, better user experiences result in lower bounce rates, higher conversions, and less negative feedback, which in turn typically make accessible websites rank higher in search engines.
Like assistive technology, web crawlers (such as Googlebot) leverage HTML to get their information from websites, so a well marked-up, accessible website is easier to index, which makes it easier to find in search results.
There are a number of potential risks for not having an accessible website, one of which is accessibility lawsuits.
Small businesses in the US that improve the accessibility of their website may be eligible for a tax credit from the IRS.
Start the movement
If you can’t secure leadership backing right away, you can still form a grassroots accessibility movement within the company. Begin slowly and build momentum as you work to improve usability for all users. Though you may not have the authority to make company-wide changes, you can strategically and systematically lead the charge for web accessibility improvements.
My advice is to start small. For example, begin by pushing for site-wide improvements to color contrast ratios (which would help color-blind, low-vision, and aging users) or work on making the site keyboard accessible (which would help users with mobility impairments or broken touchpads, and people such as myself who prefer not using a mouse whenever possible). Incorporate user research and A/B testing into these updates, and document the results. Use the results to champion for more accessibility improvements.
Read and re-read the guidelines
Build your knowledge base as you go. Learning which laws, rules, or guidelines apply to you, and understanding them, is a prerequisite to writing an accessibility plan. Web accessibility guidelines vary throughout the world. There may be other guidelines that apply to you, and in some cases, additional rules, regulations, or mandates specific to your industry.
Not understanding which rules apply to you, not reading them in full, or not understanding what they mean can create huge problems down the road, including excessive rework once you learn you need to make changes.
Build a team
Before you can start remediating your website, you’ll need to assemble a team. The number of people will vary depending on the size of your organization and website. I previously worked for a very large company with a very large website, yet the accessibility team they assembled was small in comparison to the thousands of pages we were tasked to remediate. This team included a project manager, visual designers, user experience designers, front-end developers, content editors, a couple requirements folks, and a few QA testers. Most of these people had been pulled from their full-time roles and instructed to quickly become familiar with WCAG 2.0. To help you create your own accessibility team, I will explain in detail some of the top responsibilities of the key players:
Project manager is responsible for coordinating the entire remediation process. They will help run planning sessions, keep everyone on schedule, and report the progress being made. Working closely with the requirements people, their goal is to keep every part of this new machine running smoothly.
Visual designers will mainly address issues of color usage and text alternatives. In its present form, WCAG 2.0 contrast minimums only apply to text, however the much anticipated WCAG 2.1 update (due to be released in mid-2018) contains a new success criterion for Non-text Contrast, which covers contrast minimums of all interactive elements and “graphics required to understand the content.” Visual designers should also steer clear of design trends that ruin usability.
UX designers should be checking for consistent, logical navigation and reading order. They’ll need to test that pages are using heading tags appropriately (headings are for semantic structure, not for visual styling). They’ll be checking to see that page designs are structured to appear and operate in predictable ways.
Developers have the potential to make or break an accessible website because even the best designs will fail if implemented incorrectly. If your developers are unfamiliar with WAI-ARIA, accessible coding practices, or accessible JavaScript, then they have a few things to learn. Developers should think of themselves as designers because they play a very important role in designing an inclusive user experience. Luckily, Google offers a short, free Introduction to Web Accessibility course and, via Udacity, a free, advanced two-week accessibility course. Additionally, The A11Y Project is a one-stop shop loaded with free pattern libraries, checklists, and accessibility resources for front-end developers.
Editorial review the copy for verbosity. Avoid using phrases that will confuse people who aren’t native language speakers. Don’t “beat around the bush” (see what I did there?). Keep content simple, concise, and easy to understand. No writing degree? No worries. There are apps that can help you improve the clarity of your writing and that correct your grammar like a middle school English teacher. Score bonus points by making sure link text is understandable out of context. While this is a WCAG 2.0 Level AAA guideline, it’s also easily fixed and it greatly improves the user experience for individuals with varying learning and cognitive abilities.
Analysts work in tandem with editorial, design, UX, and QA. They coordinate the work being done by these groups and document the changes needed. As they work with these teams, they manage the action items and follow up on any outstanding tasks, questions, or requests. The analysts also deliver the requirements specifications to the developers. If the changes are numerous and complex, the developers may need the analysts to provide further clarification and to help them properly implement the changes as described in the specs.
QA will need to be trained to the same degree as the other accessibility specialists since they will be responsible for testing the changes that are being made and catching any issues that arise. They will need to learn how to navigate a website using only a keyboard and also by properly using a screen reader (ideally a variety of screen readers). I emphasized “properly” because while anyone can download NVDA or turn on VoiceOver, it takes another level of skill to understand the difference between “getting through a page” and “getting through a page with standard keyboard controls.” Having individuals with visual, auditory, or mobility impairments on the QA team can be a real advantage, as they are more familiar with assistive technology and can test in tandem with others. Additionally, there are a variety of automated accessibility testing tools you can use alongside manual testing. These tools typically catch only around 30% of common accessibility issues, so they do not replace ongoing human testing. But they can be extremely useful in helping QA learn when an update has negatively affected the accessibility of your website.
Start your engines!
Divide your task into pieces that make sense. You may wish to tackle all the global elements first, then work your way through the rest of the site, section by section. Keep in mind that every page must adhere to the accessibility standards you’re following for it to be deemed “accessible.” (This includes PDFs.)
Use what you’ve learned so far by way of accessibility videos, articles, and guidelines to perform an audit of your current site. While some manual testing may seem difficult at first, you’ll be happy to learn that some manual testing is very simple. Regardless of the testing being performed, keep in mind that it should always be done thoroughly and by considering a variety of users, including:
keyboard users;
blind users;
color-blind users;
low-vision users;
deaf and hard-of-hearing users;
users with learning disabilities and cognitive limitations;
mobility-impaired users;
users with speech disabilities;
and users with seizure disorders.
When you are in the weeds, document the patterns
As you get deep in the weeds of remediation, keep track of the patterns being used. Start a knowledge repository for elements and situations. Lock down the designs and colors, code each element to be accessible, and test these patterns across various platforms, browsers, screen readers, and devices. When you know the elements are bulletproof, save them in a pattern library that you can pull from later. Having a pattern library at your fingertips will improve consistency and compliance, and help you meet tight deadlines later on, especially when working in an agile environment. You’ll need to keep this online knowledge repository and pattern library up-to-date. It should be a living, breathing document.
Cross the finish line … and keep going!
Some people mistakenly believe accessibility is a set-it-and-forget-it solution. It isn’t. Accessibility is an ongoing challenge to continually improve the user experience the way any good UX practitioner does. This is why it’s crucial to get leadership on board. Once your site is fully accessible, you must begin working on the backlogs of continuous improvements. If you aren’t vigilant about accessibility, people making even small site updates can unknowingly strip the site of the accessibility features you worked so hard to put in place. You’d be surprised how quickly it can happen, so educate everyone you work with about the importance of accessibility. When everyone working on your site understands and evangelizes accessibility, your chances of protecting the accessibility of the site are much higher.
It’s about the experience, not the law
In December of 2017, Winn-Dixie appealed the case with blind patron Juan Carlo Gil. Their argument is that a website does not constitute a place of accommodation, and therefore, their case should have been dismissed. This case, and others, illustrate that the legality of web accessibility is still very much in flux. However, as web developers and designers, our motivation to build accessible websites should have nothing to do with the law and everything to do with the user experience.
Good accessibility is good UX. We should seek to create the best user experience for all. And we shouldn’t settle for simply meeting accessibility standards but rather strive to create an experience that delights users of all abilities.
Additional resources and articles
If you are ready to learn more about web accessibility standards and become the accessibility evangelist on your team, here are some additional resources that can help.
Resources
Interactive WCAG 2.0—an awesome full version of the WCAG 2.0 guidelines that allows you to filter success criteria by responsibility.
tota11y—tota11y is an easy-to-use accessibility visualization tool from Khan Academy.
The A11Y Project—a ton of libraries, checklists, and accessibility resources for front-end developers.
Web Accessibility by Google: Developing with Empathy—a free two-week eLearning course that is geared toward experienced front-end developers.
“Top Twenty-Five Awesome Accessibility Testing Tools for Websites”—a compiled list of twenty-five automated accessibility testing tools with a brief description of each one.
Articles
“Why Designing for Accessibility Is Simply Good Business”—lists seven business-savvy benefits of having an accessible website.
“Accessibility Is Part of UX (It Isn’t a Swear Word)”—an awesome article that addresses how the separation of HTML and CSS affects navigation, layout, and more.
“Reframing Accessibility for the Web”—addresses negative stereotypes, ableism, and how to integrate accessibility into your testing process.
“What Does Responsive Web Design Have to Do with Accessibility?”—discusses how responsive web design improves UX and accessibility.
“Ten Guidelines to Improve the Usability and Accessibility of Your Site”—helps you identify the “low-hanging fruit” of accessibility issues and shows you how to fix them.
http://ift.tt/2GoF8gD
0 notes
Text
A DIY Web Accessibility Blueprint
The summer of 2017 marked a monumental victory for the millions of Americans living with a disability. On June 13th, a Southern District of Florida Judge ruled that Winn-Dixie’s inaccessible website violated Title III of the Americans with Disabilities Act. This case marks the first trial under the ADA, which was passed into law in 1990.
Despite spending more than $7 million to revamp its website in 2016, Winn-Dixie neglected to include design considerations for users with disabilities. Some of the features that were added include online prescription refills, digital coupons, rewards card integration, and a store locator function. However, it appears that inclusivity didn’t make the cut.
Because Winn-Dixie’s new website wasn’t developed to WCAG 2.0 standards, the new features it boasted were in effect only available to sighted, able-bodied users. When Florida resident Juan Carlos Gil, who is legally blind, visited the Winn-Dixie website to refill his prescriptions, he found it to be almost completely inaccessible using the same screen reader software he uses to access hundreds of other sites.
Juan stated in his original complaint that he “felt as if another door had been slammed in his face.” But Juan wasn’t alone. Intentionally or not, Winn-Dixie was denying an entire group of people access to their new website and, in turn, each of the time-saving features it had to offer.
What makes this case unique is that it marks the first time in history in which a public accommodations case went to trial, meaning the judge ruled the website to be a “place of a public accommodation” under the ADA and therefore subject to ADA regulations. Since there are no specific ADA regulations regarding the internet, Judge Scola decided the adoption of the Web Content Accessibility Guidelines (WCAG) 2.0 Level AA to be appropriate. (Thanks to the hard work of the Web Accessibility Initiative (WAI) at the W3C, WCAG 2.0 has found widespread adoption throughout the globe, either as law or policy.)
Learning to have empathy
Anyone with a product subscription service (think diapers, razors, or pet food) knows the feeling of gratitude that accompanies the delivery of a much needed product that arrives just in the nick of time. Imagine how much more grateful you’d be for this service if you, for whatever reason, were unable to drive and lived hours from the nearest store. It’s a service that would greatly improve your life. But now imagine that the service gets overhauled and redesigned in such a way that it is only usable by people who own cars. You’d probably be pretty upset.
This subscription service example is hypothetical, yet in the United States, despite federal web accessibility requirements instituted to protect the rights of disabled Americans, this sort of discrimination happens frequently. In fact, anyone assuming the Winn-Dixie case was an isolated incident would be wrong. Web accessibility lawsuits are rising in number. The increase from 2015 to 2016 was 37%. While some of these may be what’s known as “drive-by lawsuits,” many of them represent plaintiffs like Juan Gil who simply want equal rights. Scott Dinin, Juan’s attorney, explained, “We’re not suing for damages. We’re only suing them to follow the laws that have been in this nation for twenty-seven years.”
For this reason and many others, now is the best time to take a proactive approach to web accessibility. In this article I’ll help you create a blueprint for getting your website up to snuff.
The accessibility blueprint
If you’ll be dealing with remediation, I won’t sugarcoat it: successfully meeting web accessibility standards is a big undertaking, one that is achieved only when every page of a site adheres to all the guidelines you are attempting to comply with. As I mentioned earlier, those guidelines are usually WCAG 2.0 Level AA, which means meeting every Level A and AA requirement. Tight deadlines, small budgets, and competing priorities may increase the stress that accompanies a web accessibility remediation project, but with a little planning and research, making a website accessible is both reasonable and achievable.
My intention is that you may use this article as a blueprint to guide you as you undertake a DIY accessibility remediation project. Before you begin, you’ll need to increase your accessibility know-how, familiarize yourself with the principles of universal design, and learn about the benefits of an accessible website. Then you may begin to evangelize the benefits of web accessibility to those you work with.
Have the conversation with leadership
Securing support from company leadership is imperative to the long-term success of your efforts. There are numerous ways to broach the subject of accessibility, but, sadly, in the world of business, substantiated claims top ethics and moral obligation. Therefore I’ve found one of the most effective ways to build a business case for web accessibility is to highlight the benefits.
Here are just a few to speak of:
Accessible websites are inherently more usable, and consequently they get more traffic. Additionally, better user experiences result in lower bounce rates, higher conversions, and less negative feedback, which in turn typically make accessible websites rank higher in search engines.
Like assistive technology, web crawlers (such as Googlebot) leverage HTML to get their information from websites, so a well marked-up, accessible website is easier to index, which makes it easier to find in search results.
There are a number of potential risks for not having an accessible website, one of which is accessibility lawsuits.
Small businesses in the US that improve the accessibility of their website may be eligible for a tax credit from the IRS.
Start the movement
If you can’t secure leadership backing right away, you can still form a grassroots accessibility movement within the company. Begin slowly and build momentum as you work to improve usability for all users. Though you may not have the authority to make company-wide changes, you can strategically and systematically lead the charge for web accessibility improvements.
My advice is to start small. For example, begin by pushing for site-wide improvements to color contrast ratios (which would help color-blind, low-vision, and aging users) or work on making the site keyboard accessible (which would help users with mobility impairments or broken touchpads, and people such as myself who prefer not using a mouse whenever possible). Incorporate user research and A/B testing into these updates, and document the results. Use the results to champion for more accessibility improvements.
Read and re-read the guidelines
Build your knowledge base as you go. Learning which laws, rules, or guidelines apply to you, and understanding them, is a prerequisite to writing an accessibility plan. Web accessibility guidelines vary throughout the world. There may be other guidelines that apply to you, and in some cases, additional rules, regulations, or mandates specific to your industry.
Not understanding which rules apply to you, not reading them in full, or not understanding what they mean can create huge problems down the road, including excessive rework once you learn you need to make changes.
Build a team
Before you can start remediating your website, you’ll need to assemble a team. The number of people will vary depending on the size of your organization and website. I previously worked for a very large company with a very large website, yet the accessibility team they assembled was small in comparison to the thousands of pages we were tasked to remediate. This team included a project manager, visual designers, user experience designers, front-end developers, content editors, a couple requirements folks, and a few QA testers. Most of these people had been pulled from their full-time roles and instructed to quickly become familiar with WCAG 2.0. To help you create your own accessibility team, I will explain in detail some of the top responsibilities of the key players:
Project manager is responsible for coordinating the entire remediation process. They will help run planning sessions, keep everyone on schedule, and report the progress being made. Working closely with the requirements people, their goal is to keep every part of this new machine running smoothly.
Visual designers will mainly address issues of color usage and text alternatives. In its present form, WCAG 2.0 contrast minimums only apply to text, however the much anticipated WCAG 2.1 update (due to be released in mid-2018) contains a new success criterion for Non-text Contrast, which covers contrast minimums of all interactive elements and “graphics required to understand the content.” Visual designers should also steer clear of design trends that ruin usability.
UX designers should be checking for consistent, logical navigation and reading order. They’ll need to test that pages are using heading tags appropriately (headings are for semantic structure, not for visual styling). They’ll be checking to see that page designs are structured to appear and operate in predictable ways.
Developers have the potential to make or break an accessible website because even the best designs will fail if implemented incorrectly. If your developers are unfamiliar with WAI-ARIA, accessible coding practices, or accessible JavaScript, then they have a few things to learn. Developers should think of themselves as designers because they play a very important role in designing an inclusive user experience. Luckily, Google offers a short, free Introduction to Web Accessibility course and, via Udacity, a free, advanced two-week accessibility course. Additionally, The A11Y Project is a one-stop shop loaded with free pattern libraries, checklists, and accessibility resources for front-end developers.
Editorial review the copy for verbosity. Avoid using phrases that will confuse people who aren’t native language speakers. Don’t “beat around the bush” (see what I did there?). Keep content simple, concise, and easy to understand. No writing degree? No worries. There are apps that can help you improve the clarity of your writing and that correct your grammar like a middle school English teacher. Score bonus points by making sure link text is understandable out of context. While this is a WCAG 2.0 Level AAA guideline, it’s also easily fixed and it greatly improves the user experience for individuals with varying learning and cognitive abilities.
Analysts work in tandem with editorial, design, UX, and QA. They coordinate the work being done by these groups and document the changes needed. As they work with these teams, they manage the action items and follow up on any outstanding tasks, questions, or requests. The analysts also deliver the requirements specifications to the developers. If the changes are numerous and complex, the developers may need the analysts to provide further clarification and to help them properly implement the changes as described in the specs.
QA will need to be trained to the same degree as the other accessibility specialists since they will be responsible for testing the changes that are being made and catching any issues that arise. They will need to learn how to navigate a website using only a keyboard and also by properly using a screen reader (ideally a variety of screen readers). I emphasized “properly” because while anyone can download NVDA or turn on VoiceOver, it takes another level of skill to understand the difference between “getting through a page” and “getting through a page with standard keyboard controls.” Having individuals with visual, auditory, or mobility impairments on the QA team can be a real advantage, as they are more familiar with assistive technology and can test in tandem with others. Additionally, there are a variety of automated accessibility testing tools you can use alongside manual testing. These tools typically catch only around 30% of common accessibility issues, so they do not replace ongoing human testing. But they can be extremely useful in helping QA learn when an update has negatively affected the accessibility of your website.
Start your engines!
Divide your task into pieces that make sense. You may wish to tackle all the global elements first, then work your way through the rest of the site, section by section. Keep in mind that every page must adhere to the accessibility standards you’re following for it to be deemed “accessible.” (This includes PDFs.)
Use what you’ve learned so far by way of accessibility videos, articles, and guidelines to perform an audit of your current site. While some manual testing may seem difficult at first, you’ll be happy to learn that some manual testing is very simple. Regardless of the testing being performed, keep in mind that it should always be done thoroughly and by considering a variety of users, including:
keyboard users;
blind users;
color-blind users;
low-vision users;
deaf and hard-of-hearing users;
users with learning disabilities and cognitive limitations;
mobility-impaired users;
users with speech disabilities;
and users with seizure disorders.
When you are in the weeds, document the patterns
As you get deep in the weeds of remediation, keep track of the patterns being used. Start a knowledge repository for elements and situations. Lock down the designs and colors, code each element to be accessible, and test these patterns across various platforms, browsers, screen readers, and devices. When you know the elements are bulletproof, save them in a pattern library that you can pull from later. Having a pattern library at your fingertips will improve consistency and compliance, and help you meet tight deadlines later on, especially when working in an agile environment. You’ll need to keep this online knowledge repository and pattern library up-to-date. It should be a living, breathing document.
Cross the finish line … and keep going!
Some people mistakenly believe accessibility is a set-it-and-forget-it solution. It isn’t. Accessibility is an ongoing challenge to continually improve the user experience the way any good UX practitioner does. This is why it’s crucial to get leadership on board. Once your site is fully accessible, you must begin working on the backlogs of continuous improvements. If you aren’t vigilant about accessibility, people making even small site updates can unknowingly strip the site of the accessibility features you worked so hard to put in place. You’d be surprised how quickly it can happen, so educate everyone you work with about the importance of accessibility. When everyone working on your site understands and evangelizes accessibility, your chances of protecting the accessibility of the site are much higher.
It’s about the experience, not the law
In December of 2017, Winn-Dixie appealed the case with blind patron Juan Carlo Gil. Their argument is that a website does not constitute a place of accommodation, and therefore, their case should have been dismissed. This case, and others, illustrate that the legality of web accessibility is still very much in flux. However, as web developers and designers, our motivation to build accessible websites should have nothing to do with the law and everything to do with the user experience.
Good accessibility is good UX. We should seek to create the best user experience for all. And we shouldn’t settle for simply meeting accessibility standards but rather strive to create an experience that delights users of all abilities.
Additional resources and articles
If you are ready to learn more about web accessibility standards and become the accessibility evangelist on your team, here are some additional resources that can help.
Resources
Interactive WCAG 2.0—an awesome full version of the WCAG 2.0 guidelines that allows you to filter success criteria by responsibility.
tota11y—tota11y is an easy-to-use accessibility visualization tool from Khan Academy.
The A11Y Project—a ton of libraries, checklists, and accessibility resources for front-end developers.
Web Accessibility by Google: Developing with Empathy—a free two-week eLearning course that is geared toward experienced front-end developers.
“Top Twenty-Five Awesome Accessibility Testing Tools for Websites”—a compiled list of twenty-five automated accessibility testing tools with a brief description of each one.
Articles
“Why Designing for Accessibility Is Simply Good Business”—lists seven business-savvy benefits of having an accessible website.
“Accessibility Is Part of UX (It Isn’t a Swear Word)”—an awesome article that addresses how the separation of HTML and CSS affects navigation, layout, and more.
“Reframing Accessibility for the Web”—addresses negative stereotypes, ableism, and how to integrate accessibility into your testing process.
“What Does Responsive Web Design Have to Do with Accessibility?”—discusses how responsive web design improves UX and accessibility.
“Ten Guidelines to Improve the Usability and Accessibility of Your Site”—helps you identify the “low-hanging fruit” of accessibility issues and shows you how to fix them.
http://ift.tt/2GoF8gD
0 notes