#Gpose Tips & Guides
Explore tagged Tumblr posts
Visit Tumblr Blog
Explore Tumblr blogs with no restrictions, modern design and the best experience.
Last Seen Tumblr Blogs


Fun Fact
Tumblr was the first site to host the blog for President Barack Obama in 2011.
Text
So I got this ask in my inbox, and though I was going to answer it in my asks, I think a little, actual post-tutorial would be best. But first, a disclaimer, as I like to cover my bases:
By no means am I an artist; my process is very much a case-by-case basis, and I edit as I need to for each picture that I do end up editing. My method is far from perfect but it is one that works for me for -my character-, so you may have to experiment on your own using these tips to find a method that suits your wants.
This little guide is using ClipStudio Paint, but you can get the same/similar results with really any photo editing program you choose that has brushes (GIMP, PaintTool Sai, Photoshop, Photopea (which is free), etc)
I'm going to use a painted over face texture as an example (basically a face diffuse I just painted over with it's base skintone), versus a full-on gpose shot (this way I can get a good swatch/an approximate measure of what skintone I'm used to working on).
Big Tip: ALWAYS WORK IN LAYERS, this way you can adjust everything accordingly without going back a million steps.
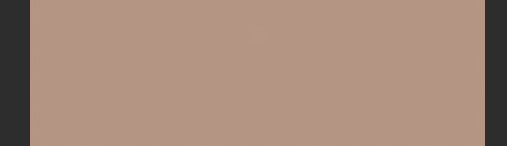
Use a basic soft-spray brush for your base, and pick a color a few shades lighter than the skintone you're working on (use your color-picking tool, it is your best friend). Set your first work layer to "add (glow), and make a little splotch like this. You can either leave it as is or blur it out/adjust the layer opacity if you desire, but again, it all depends on the state of your gpose/where you're adding it. I often blur out the edges to help blend it into the skin more naturally, on a low setting as to not erase it completely.
Before & after adjusting blur/opacity:


Next, you'll want a basic shimmer brush; there are dozens of free ones out there, so look around and experiment! Just like before, you're gonna want to make another layer, but this time, set it to white (or gold/copper if your character has medium/darker skintones, as it flatters them more and doesn't wash them out where as white is more for fair skintones).
Unfortunately, I can't seem to find the source of the shimmer brush I use, but what works for me may not work for you so it would be best to look at what's available and what suits your tastes more.
Now, working in layers using the "add (glow)" effect, slowly build up the shimmer, first, adding a quick couple swipes, then build it up. Once you're satisfied, focus more on the center
TIP: If you want to make it look more natural, when building your layers, blur out the edges a small bit to hide any possible lines and creases.


And that's pretty much it! Adding shimmer effects is all about trial and error, and just simply adding shimmer where your character catches the light.
I'd post examples but a lot of my shimmer examples are on very much lewd gposes and I'm not trying to get tumblr staff mad at me.
And again, another disclaimer: this is not a one-size-fits-all-guide, I seriously cannot emphasize enough that the best thing for you to do is just EXPERIMENT, this is merely a guideline to give you a lil push in the right direction. Editing gposes is supposed to be fun, and the best way to get experience is to simply practice and learn your tools with your own hands.
I hope this helps, and have fun gposing!

#OOC#ffxiv gpose#Gpose Tips & Guides#Whew I am sincerely sorry for the lengthy guide#But I do hope this helps take some of the intimidating factors out of editing#Also remember I am not an artist#I am just a goth dumbass who someone trusted with a tablet and CSP#Now go and do a crime my children
46 notes
·
View notes
Text
I started with no Reshade/Gshade, and no posing tools, and did just fine - and you can/are as well! Just combine various expressions with various emotes and pause them at just the right time! (It's a lot of mashing the 1 button to catch the perfect moment...lol) Use the in-game color filters to make them pop! Find areas with cool lighting! Find photography studios in various houses or apartments (I just found one in my alt's apartment building on accident a couple days ago - someone has already done the work for you in that case!).
You don't need flashy bokeh or whatever - lots of cool effects already exist in game in the environment around you! The Sights of Eorzea Discord has lots of resources on taking good pictures, and also has a nice compendium of cool locations in the world to utilize for interesting shots! If you can't use all the wacky tools others have, you can still take cool shots! You can even edit them in another program afterwards to brighten or darken or add effects, and it doesn't require any photoshop knowledge or the like, unless you want to learn more about those programs - I just usually use my built-in Windows photo editor, or the one on my phone! Never feel limited by what you have access to, or your technical knowledge.
Besides, we all start somewhere, after all! No one was perfect from their very first Gpose shot they ever took... I've surreptitiously gone back and deleted many of my early gpose shots, even, because I looked back and was like "Wow my understanding of lighting was real bad" and I cringe... but like Jake says in Adventure Time:

I'm flipping through el tumbles, and I'm seeing everyone's WoLs, and I am like demn these are some cool Warriors of Light. And I see them with perfect lighting and excellent posing and the colours and I am like I am in love your WoL needs to be loved. I see a picture of a Warrior of Light with perfect bokeh, seeing them just pop out in a field of tasteful blur, and I am like nice. I see another one with just the freshest glam and I'm like what a cool character. I see an image with someone shrouded in darkness and smoke with reds and purples and I am like whew that is sick.
And then there's this.

#gpose#ffxiv gpose#gpose tips#gposers#seriously that discord is amazing#the person who made it has made SO many guides that they share on tumblr too#and plenty are about how to do things without extra tools#you can do it!#I still have old shots that people are shocked to find out weren't done with reshade or the like!#I just didn't want to mess with all that back when I was still new and learning gpose stuff#no matter your reason for not using it...you can still stuff just as pretty or cool or exciting as anyone else
136 notes
·
View notes
Text
SEA'S COMMUNITY COMPENDIUM UPDATE
We have a massive one today! Huge thanks to a close friend of mine who sent me every single bookmark of xiv resources she had. 💖
Additionally, a good handful of these resources were sourced from a list originally created by @rinhkitty, which you can find here. I have tried to include the more recent/active of the lot, so it's not a one-for-one. Thank them for a lot of the large scale resources you'll find below! ✨
As of 04/12, I have added the following resources (in no particular order) to Sea's Community Compendium for FFXIV Creatives:
LARGE SCALE
GARLAND TOOLS — Contains XIV resources such as Garland Data, everything database, crafting lists and equipment calculators; Garland Bell, gathering timers, collectable resources and hunt windows; and FFXIV Fisher, daily fishing windows, bait paths and catch checklist. Maintained by Clorifex Ezalor of Zalera.
TEAMCRAFT — Create crafting lists and collaborate with others, set gathering alarms, simulate crafting rotations, and more!
CAT BECAME HUNGRY - FFXIV ANGLER — Contains everything and anything to know about fishing including specific fish guides, location, baits, aquarium fish and more!
FFXIV - CRAFTING AS A SERVICE — Crafting information and planning for FFXIV!
FFXIV GARDENING — The FFXIV Gardening Database is a collection of everything related to gardening in Final Fantasy XIV: A Realm Reborn. It was created to organize and visualize the results obtained from crossbreeding.
SIGHTSEEING LOG HELPER — This tool will help those trying to complete their pesky Sightseeing Log by letting them know upcoming weather patterns for each zone!
EUREKA TRACKER — For everything and anything to do with Eureka mobs, tracking and weather patterns.
FFLOGOS — for tracking of items/actions related to Eureka.
FFXIVSQUADRON — A comprehensive tool that helps you assess the success rate of various squadron missions.
FFXIV CHOCOBO COLOUR CALCULATOR — Will calculate what chocobo feed you will need to get from your current colour to your desired colour. *rng not included.
FFXIV HOUSING — A site specialising in the documentation of all housing items available in game.
HOUSING SNAP — A compilation of player-made housing designs. Can be used for inspiration or places to visit!
MISC
NPC CHAT BUBBLES — Would you like more NPC chat bubbles for edits? Say no more! Created by @alexoisxiv.
OLD TUMBLR LAYOUT BY PIXIEL — While not XIV specific I know a lot of people aren't fans of the new Tumblr layout, so this is a fix that will revert it to an as close as possible approximation of the new one. I won't tag the creator as I don't think they're in the xiv community, but it's run by @/pixiel!
HOW TO CURSE LIKE AN ISHGARDIAN — Do you want to make the church blush? Do you want to incur the wrath of Halone? @stars-and-clouds has compiled a list of appropriate curses/swear words for you!
FINAL FANTASY XIV SIDEQUEST GUIDE - HEAVENSWARD EDITION — maintained by @chatty-moogle, this guide explores interesting sidequests in Heavensward that will give you more information about the lore, titbits about locals and other interesting information!
TRUST BANNERS FOR XIV — If you have ever wondered how people mimic the Trust banners used in XIV, look no further! @locke-rinannis has a template for you.
MAKING USE OF RECOMMENDATIONS — created by @autumnslance, this guide will help you make your recommendations tab useful rather than annoying.
BOTANICA EORZEA — A guide to the flora of Eitherys and her reflections, including fungi and seedkin. For reference in writing and roleplaying. Maintained by @tinolqa.
GPOSE TIPS — A tutorial on how to achieve clarity and detail in your XIV screenshots! Created by @aryalaenkha.
UI MACRO MENUS — A guide on how to use macros to create small UI menus for XIV. Written by @diskwrite-ffxiv.
TYPHON GATE RESEARCH — Created by @mcstronghuge, these are the statistically best places for your character to stand for the Typhon Gate!
CHANGELOG
HYDAELYN HEALTH HAVEN has been removed at the request of the owner.
Moved THE BALANCE higher on the list to reflect alphabetical sorting, excluding names that start with The.
Misc formatting as needed.
Added some additional clarification around large-scale discords/spaces; in particular: Large-scale community discords such as the XIV Reddit Discord, Hunts, GPOSE promotions and broad-space roleplay servers that harbour a large number of people and are publicly available to all. These may not have an RP focus but will assist in other aspects of the game. Also includes well-known tools/resources that are utilised by large groups of people and assist in gameplay elements.
Added a quick-jump menu to the bottom of each of the table of contents menus to assist in navigation.
Want to submit? You can either fill out the google form here, send me an ask with the relevant information contained on the Compendium, or join my Discord at SEAFLOOR (21+ only)!
I am sure there's probably a couple of things I have missed or links/formatting that might be broken. Please don't hesitate to let me know if anything is out of place. I'm going to take a break now. I'm pretty sure that's the biggest edit that's ever going to occur on this document!
#final fantasy xiv#ffxiv#crystal rp#crystal roleplay#。・゚゚・ — sea's community compendium#。・゚゚・ — sea speaks
162 notes
·
View notes
Note
I'm sure you've answered this before but I'm super curious if you might have a place you maybe share tips for post processing gposes?
Heya! Actually never recieved ny questions about it lol
I never really made a guide/tutorial of how I edit bcs I just use knowledge/process that I also apllied on digital illustration (it's been a year that i dont draw anymore but for around 6 years I made freelancer work and even more time just as a hobbie!) this also helps with compositions and colors sometimes!
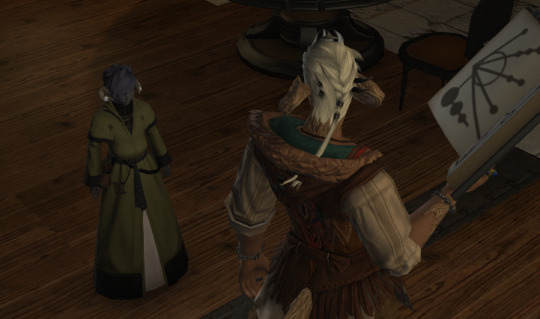
Ok, so. My use of post process will depend on the pic mostly! Sometimes I'll do more and others i'll do less. I can show some pics with no post (gshade only) & with post, and explain a little.. dunno if it will be useful tho!

This one my main nitpick was with the polygons sticking out, as the 3D models are not 100% smooth, and with the way I pose they can get worse sometimesl ol take a look specially on the arms/forearms, blonde's dress on shoulders.. I also corrected the light and small bits of shadows on the bun's face with blend tool. Eyes highlights and little dot at the blonde's mouth corner

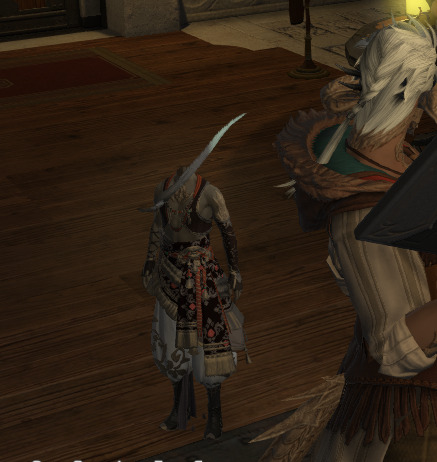
Here I too mostly worked on smoothing the face shadows as they had no transition and that bothered me. Also the top left lip corner had a weird shadow bcs of the weird posing that I fixed (sometimes if better to fix this kind o ting on post then fight with the model in game bcs that can become frustrating!) The smoke and pacticles effect was with StageDepth.fx on gshade!

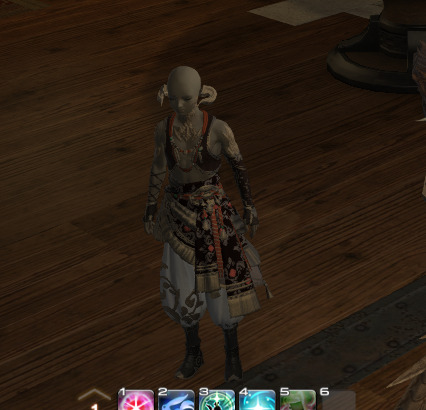
This one was mostly face light reflections (specially blonde's face and eyes! And her glove too, forgot that) and miqo's mouth/cheeck corner was too harh so I smoothed a little! Obviusly the tube effect, and I think some more light reflections, like miqo's vest lapel and tie. The blu light effect was achieved with ktisis light actor and the red was from the in game cauldron. The light depth and contrast was achieved using RTGI.fx from MartysMods iMMERSE pack!

Here was more fx like the dus and movement blur. Ronka's face (eyes and inner of mouth that had shadows) And characters face shadows that were too light! In the first, the bike mount was with movement enabled so it already had a little ground dust!

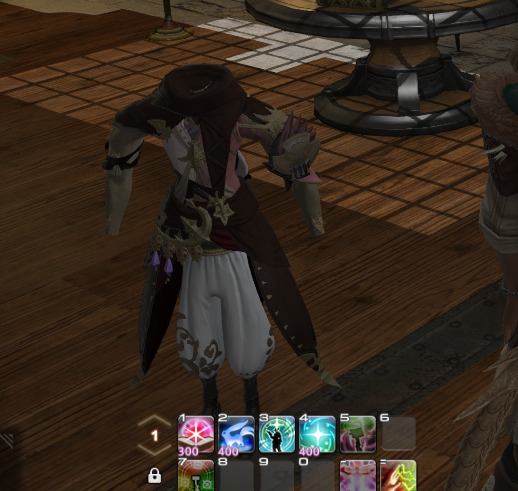
This one had basically just the spell effects and better blur on bg. The face was only frown lines under the inner eye corner!
Some other pics I didn't use post at all, not even for color correction, like tose down here


This ^ one I only did color correction for the white sky light that was too f strong lol the leaves are stage depth too!
Sorry again for the long ass answer and post :')
44 notes
·
View notes
Text
How to make a child model in Anam/Ktisis!
Disclaimer: I am NOT an expert in the use of these mods! I'm still very new and learning the ins and outs of them! This method worked for me, and maybe there are better ways to do it, but I'm just explaining how I created my baby Shiun. If you know of a better way, or have any tips and tricks, please feel free to comment or reblog with your advice for the sake of other gpose newbies! :D Link to Ktisis's download page | Link to Anam's download page Guide and Tips/Warnings below the cut! Hope this helps <3
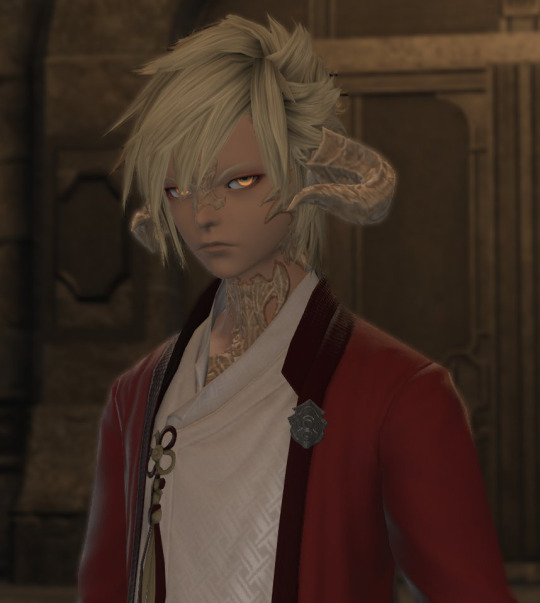
Summon your partner in crime. So first off, I equipped my summoner job stone and summoned my trusty companion, Carbie.
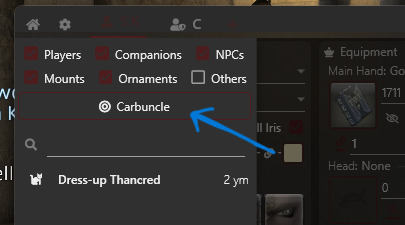
2. Add your Carbie to your actors. Open up Anam and add your carbie to your list of actors, by clicking the plus sign at the top of the menu next to your character's name (remember that with Anam, you can only edit appearances OUTSIDE of gpose). Click on the little button labeled "Carbuncle" to add them.
3. Turn your Carbie into a person. With your Cabie selected, go to the "Import NPC" at the bottom right and pull up the list. Find an NPC that is the same race as your desired character and select it. In this example, I just chose the first au ra NPC I saw in the list. (You can also directly choose your desired race in the customize menu and start from scratch, but I just do it the Import way, lol) ⚠️As far as I've experienced, it's a 50/50 chance on whether or not you can alter the age of your character's actor directly. Every time I've tried this, it breaks the model and never works the way it should. For simplicity's sake, I've always just used my friend Carbie.


4. Change the age of your new actor. Now if you look at the top left of the Anam window, there's a series of dropdowns next to "Race."

What you want is the bottom right menu. Click it and you'll see "Old," "Normal," and "Young." Clicking "Young" will turn your carbie into the child version of the race it's currently disguised as!
5. Customize and boot up gpose! Now you can customize them to be the adorable mini version of your beloved WoL/OC!! The bones are compatible with Ktisis and should be as easy to manipulate and pose as adult models. If you use the Carbie method as I have in this explanation, you can simply hide your main model in the default Gpose menu for pictures.
Some things to keep in mind! ----
⚠️Not every race has a child model. The only races that have child models are:
au ra - male & female
hyur - male & female
elezen - male & female
miqo'te - female only
⚠️It is very likely that the models will break or look a little funky when you first spawn them. They have a very limited number of faces, and a limited number of available hairstyles. If you choose an option the game does not have, it will create some... interesting results. Most other customizations beyond skin color, hair color, and eye color will also likely not work (tail type/length, jaw type, etc.).
Left: invalid face selected --- Right: invalid hairstyle selected
Usually, faces 1 & 2 are the only viable options, and hairstyles 1-5 are okay. (Note: the pictures of the hairstyle icons will NOT match the hairstyle on the model.)
⚠️Clothing is also fairly limited! I'm not sure what dictates what child models can and cannot wear, so as far as I know, it's just a game of trial and error. You'll know immediately if an article of clothing isn't compatible lmaoo. Hats... rarely ever work...
✨Don't forget that you can save your model's data! When your model is customized to your liking, click "Export" at the bottom right of the menu to save the data to Anam. That way, you can load the appearance immediately without rebuilding it every time!
It's a mixed bag of what will and won't work on the model. My best advice is to experiment and play around with it! It took me a little bit to figure all of this out, so hopefully this silly little explanation helps out all the other new gposers out there :)
If you have any questions, please don't hesitate to reach out and ask! I'll do my best to help! I may edit this as I go to correct things and/or add onto it!
#ffxiv#ff14#final fantasy xiv#ffxiv gpose#ffxiv resources#ktisis#anamnesis#hope this little guide is useful :)#make sure to read the comments/reblogs for extra info!!
153 notes
·
View notes
Note
About the expression tips - would you be able to explain how you're moving the features around? Cause when I try to move the eyebrows for example, the two bones I have to work with can't move in a way that looks natural with the movement options I'm given, if that makes sense? Like for a surprised or worried face, raising the eyebrow bones just makes the skin and textures stretch awkwardly, but that seems to be the only way to move them? How do you make your expressions not look weirdly exaggerated? ;w;
Ok, so I want to answer this question in two parts:
Something about certain faces/eyebrow options in the character creator are easier to move than others with Anamnesis for some reason. For example, Aedric's eyebrows are longer/have an arch and are therefore easier to move around without stretching oddly, while G'raha's eyebrows are shorter and sometimes look a little weird if I move them a certain way/angle. I have spent many a night attempting to wrangle that catboy's eyebrows, let me tell you. It honestly comes with practice, as I can attest my earlier gposes don't look as good as my current ones. lol
And here's the actually helpful answer! Something you can do that's great for Anamnesis beginners and masters alike is using the vanilla expressions from good ol' vanilla gpose, itself! There's a way to do this purely in Anamnesis to get the shape of the brows/face that you want, and then you can tweak with custom posing accordingly. You get to it by selecting the arrow that I've circled in red below after you are already in gpose and have frozen your state:
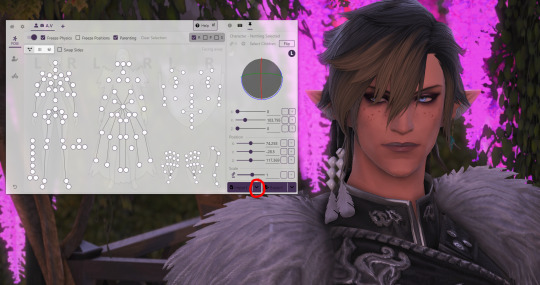
Then, select the option that says "Expression."
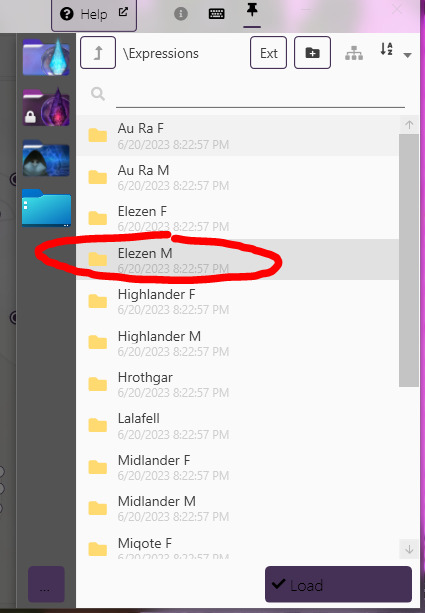
Next, choose this purple file:

Select the Expressions folder:

Select the race/gender of the character you are posing. In this example since I have my elezen guy I'm posing, I select Elezen M:
You now have access to every vanilla expression in game!
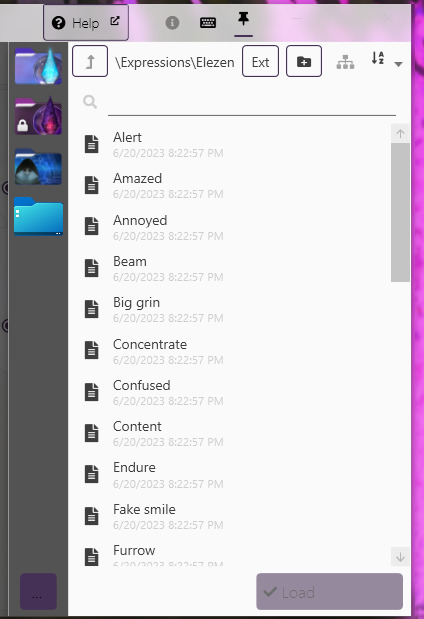
Choose whichever you like. This can be used as a base to get started on the custom expression you want to make, as a way to get started. For this example, I chose "Amazed." This will move the face "bones" so I can use this as a base if I wanted to.
Vanilla Amazed face:
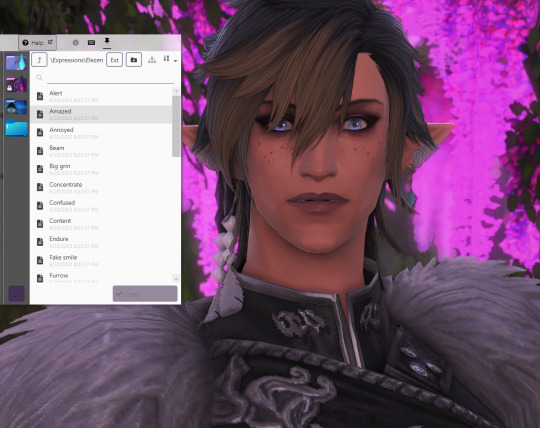
Now, with just a little custom tweaking:

In the red circle are your main "eyebrow movement" bones. These will move the inner and outer halves of each eyebrow up and down in fine-tuned increments. I honestly don't even touch the Y axis and Z axis for eyebrows ever. I only ever use X axis for brows.
For the certain tricky eyebrows I mentioned in answer 1, this technique helps move the brows to a more natural-looking place before tweaking them, especially if you're just starting out on your custom posing journey.
I hope this was a helpful guide! Feel free to try it out and reblog with/comment with your gposes if you need any further help! Happy posing! :D
151 notes
·
View notes
Note
Hey Lia!! Happy Halloween!! I was wondering, you do REALLY GOOD facial posing, and that's like...the one thing I struggle with. Do you have any tips on how you make your expressions?
Hi Anon! Happy Halloween!! Hope you are having a fangtastic-ly spooky night 🦇🦇🦇🦇
I would LOVE to give you tips on expression posing but um... well I'll be honest, since the dawntrail update I've been learning from the ground up how to built out expression using the new bones. Really all i've been doing is loading in expression that exist in game and giving them the slightest tweeks... I will say, I've moved from anamnesis to ktisis which works a lot better for custom facial expressions. Most of the mouth bones are dependent to bone position and not rotation, and anamnesis does not handle bone position changes all that well pre dawntrail.
this thread here has a good breakdown on how to best tackle each bone (using ktsis)
I believe there was also a tutorial from @nerimaemae that explained their process/approach to the fantastic facial rig manipulation seen in their gposes. I can't find it right now so you might have to go digging for it ^^; (sorry for the direct tag nerimaemae but I'd like to make sure they go to the right spot!)
Really cannot stress enough that I just kinda play around until the face is showing what I think it should show. Sometimes it also helps to make the expression yourself, feel what muscles are working around the face, then transfer those muscle sensations onto the face rig... if that makes sense? It helps to exaggerate and push things a little farther than the basic in-game expressions for sure.
aaah I wish I could be more helpful... I think a lot of what makes a good expression work is the hours spent trying things out and learning first hand how the rig interacts with the character model. Get messy, make mistakes, reload an autosave here and there, etc.
Best of luck with your gposing endeavours! The more you do it, the better you'll get :)
7 notes
·
View notes
Text

hi hello there
I've been wondering if any of you would appreciate some sort of informal guide on some gpose tips?
I'm not tooting my own horn here, it's just I've gotten some comments/tags on asking how I do expressions and fabrics.
#if there's anything in specific you want to know/see maybe you could write in the comments#not that i've ever made a guide before but#ffxiv#gpose
11 notes
·
View notes
Text
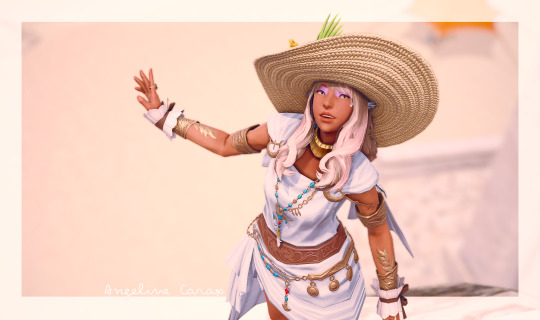


Angeline's Closet -- 001 -- the Angeline
the Outfit. Perfect balance of relaxed and ready, soft and sturdy, for the white mage on the go. Key elements: floppy hat, comfortable boots, weathervane rod. Follow where it guides.
✦✧✩✫✧✩✫✧✩✫✧✩✫✧✩✫✧✩✫✧✩✫✧✩✫✧✩✫✦
Done using @leonaquitaine's Gpose tip guides, focusing primarily on the Facial expressions and Portrait photography ones. Next: actually learning lightning controls!!
I don't remember exactly when this outfit first really came together, but it happened largely all at once. The amaro-topped Crystarium rod cemented it. Nothing else could really be more her - though one day I hope I can secure a cool glowy version!
Taken in the courtyard outside of the house, indeed off camera right.
26 notes
·
View notes
Note
Some questions: can you teach me what you use to take your pics and how to use it?
Also is it worth doing this sort of thing if I dont actually want to mod how my character looks? I’ve grown rather fond of how she looks and I also like the idea that what I see on my screen is what other people see on theirs.
You mean what plugins I use to take gposes?
I couldn't give you a full guide on how to use these, there's a lot of ground to cover and it has been done already by people who are much better at this than me, but i wrote down the tools and a few pointers under the cut.
Also, why would it not be worth it to take gposes of vanilla characters? Mods are about expanding your options, but vanilla is just as good. I mean sure, some vanilla textures are a bit crunchy, but so what? I still use them. I guess it all depends on what you consider "worth it".
For posing, there's either ktisis or anamnesis - I've used both of these. Ktisis will require you install the dalamud plugin first (the github page details how to install them). Anamnesis doesn't, but from what I understand the future of this tool is uncertain? I'm not up to date on the question though. Both will allow you to do pretty much the same thing, but anamnesis is in a different window while ktisis shows you the posing controls within ffxiv.
Then there's reshade for shading, filters and such.
For both posing and reshade presets, if you're just getting started I'd recommand downloading some premade poses and presets you like. There's a lot available, and it's much easier to start that way if you're learning the tools. You can find some on sites like the glamour dresser or xivmodarchive (warning though if you don't turn off nsfw on xivmodarchive you're gonna get a lot of it in your searches).
Both tools can be a bit otherwhelming at first, but starting by importing some premades and see what you like is already a good start! You can learn and look up guides as you go and as you want to expand on how you use them, but you don't need a full understanding of every tool in ktsis / ananmnesis or every option in reshade to get started and have fun with it.
There's a lot of guides and tips on all sorts of things out there! Not only on these plugins, but also on how to fully use the vanilla gpose interface (lighting, angles, etc.), which is as much if not even more important.
Hope that helps!
8 notes
·
View notes
Text
✨Directory of Tags✨
A directory to all my tags for easy sorting and navigation purposes. Most (if not all, really) of them are pretty self-explanatory.

✨Tags For Garry's Characters✨
💙 Arley's Tags
#arley marston
#arley aesthetic
#arley tag
#about arley
#arley meta // #arley lore
💗 Arley's Ship Tags
#arleofard // #arley x leofard
#arleycred // #arley x thancred
#arleycred dynamic
#arleycred tag
🤍 Thancred's Tags
#thancred
#thancred content
#thancred tag
💚 J'ahden's Tags
#j'ahden kaji
#denny aesthetic
#denny tag
#about denny
#denny meta // #denny lore
💗 J'ahden's Ship Tags
#j'ahitra // #j'ahden x y'mhitra
#j'ahdaba // #j'ahden x j'ludaba
#j'ahdaba dynamic
#j'ahdaba tag
💜 Rymmgeim's Tags
#rymmgeim junghyltwyn
#rymm aesthetic
#rymm tag
#about rymm
#rymm meta // #rymm lore
🤍 General Character Tags
#msqverse // #rpverse
#the epilogue // #grandkids
#modern au
#ooc // #ic
#oc questions
#oc trends
#other ocs // #friend ocs

✨Tags For Garry's Stuff✨
#garry originals
#garry writes
#garry art
#garry ocs
#garry gposes
#garry screenshots
#garry glams
#garry reviews
#garry muses
#garry rambles
#garry shitposts
#garry tags
#garry meta
#garry tag // #garry vibe
#about garry
#garry asks
#garry answers
#garry reads
#personal stuff
#got tagged
#almost-texts -> #basically texts
#wips
#q
#srb // #bump
#tag rambling
#reblogged for additions
#formlessfist tags are mine
✨Tags For Other Stuff✨
#ffxiv
#ffxiv gpose
#navigation
#masterposts
#glam inspo
#gpose inspo
#gpose guides
#gpose tips
#mods wishlist
#ask games
#tag games
#to read
#to do later
#other ocs // #friend ocs
#ffxiv writing
#other writing // #friend writing
#art by op // #friend art
#other gpose // #friend gpose
#silliness
#ffxiv shitposts
#comics
#headcanons
#game mechs
#litcrit
#analysis // #critique // #thoughts
#literary analysis
#lore analysis
#meta analysis
#character analysis
#ship analysis
#translation
#localization
#dialogue
#language differences
#references
#resources
#guides
#news // #ffxiv news
#polls
#not ffxiv
1 note
·
View note
Note
Have you ever thought about doing a quick tutorial on lighting and suggested shaders or presets to use for those looking to switch up their pose game and try new things? I would be interested in learning a few new things from other creators, I'm sure others would as well!
This is definitely something I've been considering but just haven't gotten around to.
I was in the middle of doing something like that before, but then the issues with the DT benchmark popped up so I decided to perhaps wait until after DT launches and settles down a bit to do a bit of a guide on what I do with my own gposes.
This way I can learn how things will look with the new graphics as well as lighting/shader fixes, since those will drastically change lighting and even maybe how some shaders look.
By far I am not the best gposer out there but it does make me happy to know some folks like my stuff enough to want tips and advice from me, so it's definitely something I'll be looking into doing post 7.0 ^_^
#Anonymous#OOC#Thank you for the ask!#I'll definitely be looking into doing something in the future after 7.0#Especially if folks are interested#Maybe even a bit of an editing tutorial on how I edit my photos
3 notes
·
View notes
Text
here's the visual guide to how i do it! i'm sure different folks might do it differently or be able to add to it, but for simplicity, here are the parameters i almost always go change when gposing :)
(under the cut since there's a bunch of screenshots)
first of all, you do want to turn off depth of field within the gpose interface. it doesnt play that well with the reshade depth of field, and will leave weird light artefacts around your character
(please click on the pics tumblr is killing the quality...)

then, in reshade, the shader you're going to be looking at is called ADOF [qUINT_dof.fx]
there's a bunch of parameters you can modify in there, and i encourage you to play with them to see what each does! but here are the ones i use the most.
the first one is the far blur curve. it simply changes how far the blur point is. the closer to your character and to 0, the more things will be blurred. but by putting it further away / at a higher value, you can create different planes with different levels of blur.

then, i often modify the "bokeh maximal blur size" parameter. what it does is pretty simple: change how blurred the background is (the background that is affected by the far blur curve, that is!). higher value = higher level of blur
you can also modify the parameter just under it, "gaussian blur width", for extra blur if that's what you're looking for.

and finally, if you're looking for a bit of nice bokeh, you can start by modifying the "bokeh intensity" parameter. as the name implies, the higher value on bokeh intensity, the more bokeh. you can also play around with all of the sliders underneath that one, they change the shape and color of your bokeh
if you want strong shapes in your bokeh but they don't seem to appear, make sure you have gaussian blur width set to 0, and lower the bokeh maximal blur size a bit, that usually does it.

there, it's just a few tips but i hope it's clear and helps you!
genuine question for someone still new to reshade and anamnesis
how the hell do you guys get the depth to look so good? I've been struggling with trying to like, really blur out the background and I don't know if it's something you can do with reshade or if it's done in post processing through like Photoshop? I'd like some help xD
129 notes
·
View notes
Text
Hi everyone! It's been a hot minute since I did a Compendium update, but I promise I'm not dead. For those who don't know, I got a new job! That meant pretty much the entirety of October was spent wrapping up my old job, going to my new site and trying to learn the new one. I'm on break in approximately two weeks, yay! ☃️
These updates will take on a wintery/Starlight theme to celebrate the season, much like All Saints. I hope you enjoy.
Additionally, myself and the lovely folks at SEAFLOOR are having a Catch up (for) Starlight Challenge! You should join us if you're interested. ❄️
However, without further the following communities have been added to Sea's Community Compendium for XIV Creatives.
LARGE SCALE
The Help Lines—We are a community-based discord to be used to play the critically acclaimed MMORPG Final Fantasy XIV. We host almost all content including DRS and BA, Raiding, Deep Dungeons, Blue Mage and more. Our mission is to create a welcoming space for any individual in need of assistance to reach out and accomplish their FFXIV goals in a toxicity-free environment.
The Aether Entertainer—Founded in 2021 on Aether, The Aether Entertainer is player-made virtual magazine covering music, theatre, art, current events, and Eorzean popular culture.
LORE
Final Flowery XIV—Compiled by ann0yance(bsky)/@sa8oteur, this guide explores the various flowers in XIV, comparing them to their real-world equivalents and meanings.
On Elementals, Accountability and Criticism—An essay written by @morgana96 that explores the lore of elementals and their place in Gridania (and beyond)!
MISC
Vanilla Gpose Tips by Winterdeepelegy—A how-to guide on effectively utilising the vanilla gpose tools to create visually stunning screenshots, written by @winterdeepelegy.
WoL Reference Sheet—Created by @coldshrugs, a handy WoL reference sheet you can build in Canva!
NA GPOSE Studio/Themed Housing Directory—A player-made repository of North American Gpose studios and themed houses!
CHANGELOG
The Scholar's of Nym—The link has been modified at the request of the owner.
Skystone Co.—Has been removed at the request of its owner.
UI Macro Menus—The link has been modified to accurately reflect the bookmark.
Have you thought about joining our Tumblr Community? You can find it here!

Want to submit? You can either fill out the google form here or send me an ask with the relevant information!
Is my space suitable for the Compendium? Most of the time, yes! Below the read more is some more information/stipulations. This is all publicly available on the document. 🦌
Below are the following things I do not accept on the Compendium:
Personal/Single-Character LFC ads. (Though these get posted to the SEAFLOOR Tumblr Community when I find them!)
Content intended for or can be used for bullying, harassment and OOC gossip. E.g. ‘Secrets’ blogs, receipts, callout posts, etc. This does not include IC tabloid blogs or other ventures used to generate roleplay.
Communities that do not have an RP/writing element (large-scale exempt).
Anything I find personally distasteful or goes against the spirit of this project.
Common-sense rule applies.
I want to put my community on the Compendium but we have an application process. Is this okay?
Yes! Just note somewhere in your application that's a requirement. The only thing that is mandatory for the Compendium is that you must be open to new members or have a public-facing/accessible facet. There's no point advertising a community if no one can join it in some way!
I want to put my Community on the compendium but I only have x number of members —
Also totally okay! People don't start with large communities. Activity is a must but, whether your server has two or two thousand members, if you're looking for new people to join, I'd love to help you find people.
I want to put my community/resource on the Compendium but I worry its too niche?
Okay, and? If your Eorzean Fishing Alliance has four members but you roleplay every second weekend, I still want to know about it. The same goes for resources; if it's relevant to the game, it'll be useful to someone.
How active does a community need to be?
If you find a community has not been active in about two/three months, send me a message and I'll take a look at it. Communities have ebbs and flows, especially event spaces that may take hiatuses depending on member interest/life events. I'm not strict in my implementation provided a space isn't dead. If a link or anything is broken, contact me asap!
I have [insert a question not stated here]?
No drama! Send me an ask or use the #Compendium channel in my Discord!
#final fantasy xiv#ffxiv#ffxiv community#final fantasy xiv roleplay#ffxiv roleplay#。・゚゚・ — sea speaks#。・゚゚・ — sea's community compendium#i hope i haven't forgotten anyone it's just been a bit!!#care u all kiss
35 notes
·
View notes
Text
Post-Processing Guide: Image Quality
So you went and took that perfect screenshot! Now it's time to share it around, but you noticed a certain graininess, a certain fuzziness when posting it on Twitter or Eorzea Collection. So what's going on? Well, let's understand some concepts related to digital images: namely formats, how they influence images in simple operations like crop and resize, and how to prevent loss of quality.
Resolution
This is the easiest concept to explain; the higher the number of pixels, the more detail the image will have. For example, a screenshot taken at standard 2K resolution (2048 x 1090) will have 2,211,840 pixels, while a 4K (4096 x 2160) will pack more details at 8,847,360 pixels.
That also affects file sizes, if you ever hear me crying about the size of my screenshots folder.
There's a myriad of resolutions and formats out there; for more information, check out this Wikipedia entry about display resolutions.

Digital Image Formats
There are many different digital image formats, but the 2 most common for XIV photography are JPEG and PNG - each with its own advantages and disadvantages.
PNG is a lossless format, meaning no data is lost when the image is saved. This results in higher-quality images, but also files that are larger.
JPEG is a lossy format, meaning some data is lost when the image is saved. This data loss can result in artifacts, such as blockiness and color banding. However, JPEG files are smaller than other formats.
The issue with JPEG is that its data loss is cumulative: Each time that you edit and save the file, a little bit of information is lost. Also, depending on the chosen compression level, the loss is quite noticeable. The image below shows how much noise (wrong data) is actually introduced by each compression level:

Crop and Resize
When you crop an image, you are removing pixels from the edges, often to give focus to a specific subject. In this scenario, the loss of information is irrelevant.
But when resizing- often to decrease the size of the image to better adapt it to a target site- you're losing detail, and the chosen interpolation algorithm may influence how much of the original image is used to help determine the result. Here's an example with a 20% resize, using raw pixel mapping on the left and linear sampling on the right. Notice the antialiased result that creates a much better effect:

Keep in mind that different programs may present the interpolation options in different ways. For example, this is how GIMP displays its options when resizing:

So with all that said, how should we proceed to preserve as much as possible of the original data?
How to Prevent Loss of Quality
Use a high-resolution image. The higher the resolution, the more detail the image will have, and the less likely you are to lose considerable quality when cropping or resizing. Nya Nya has an excellent guide about resolution upscale (a method that allows you to take a 4K screenshot on a 2K native resolution, for example) here. I highly recommend a read!
Use a lossless image format. Lossless formats, such as PNG, do not lose any data when the image is saved. This will help to prevent loss of quality when cropping or resizing.
Keep resizing to a minimum. The more you resize an image, the more likely you are to introduce artifacts or jitter. If you need a close-up, for example, take a close-up screenshot and resize it a little bit instead of cropping around a small area in a larger full-body image.
When scaling down, use interpolation methods that take more data from the original image into consideration, like Linear or Cubic, instead of raw interpolation.
Resize and save images in the expected resolution of a target site. For example, Eorzea Collection uses 339x570 for its vertical shot; cropping and resizing your image to this resolution will prevent artifacts from being introduced by the site's own resizing algorithm.
TL;DR: Keep the resolution high, the changes to a minimum, and save as PNG.
Let me know if you have any questions!
270 notes
·
View notes
Text
A while back @lunarosewood23 asked for gpose help so I thought I would put together a post with some general advice and links to tutorials in case it’s helpful to anybody else.
Basic tutorials & guides I had on hand... General & important screenshot lighting tips courtesy of @kukurubean My tutorial about taking commission reference screenshots
*note that 5.1 gave us the character lighting slider which is at the bottom of the lighting menu. We now also have an overall brightness adjustment slider
Some more tips... - put /gpose on a hotbar. Seriously. It sounds dumb but typing “/gpose” every time is obnoxious. You can find it under your Actions menu. - try creative compositions. Don’t always center your character/subject in the frame. Try taking several different shots with different framing and see how you like them. Move the camera around!!! - experiment with emote + expression combinations. You can do this VERY easily now that the entire emote selection menu exists under the button with the little running person in the gpose menu. - try battle skills & spells! Simply hit the ability, and go into gpose--it will save the last action you used. You can change the expression and also turn off effects to make things less flashy once you’re in gpose (you’ll find this button in the top of the menu). HINT: if the desired ability requires a target, make use of your local training dummies. Just don’t accidentally erase the action by using a mount to get to somewhere pretty first! - turn off your gpose icon for maximum plausible deniability! Go to System Configuration > Other Settings > Uncheck “switch online status to Camera Mode when active” and have fun taking sneaky screenshots of your friends or shamelessly gposing with NPCs in busy areas
All of this is good stuff to know, but really....the only reason I’ve gotten any better at taking screenshots is because I spend a lot of damn time taking screenshots. Have fun, experiment and practice. Try out the built-in color filters and effects. Find a location where the lighting just really slaps and take a ton of pics of your character to see how they turn out! And please, zoom in so we can see them too :)
#hope this helps#i feel like i wasn't as thorough as i wanted to be but#a lot of this stuff is just good habits!#and seriously just... use it a LOT#find what works for you!#emily blabs#gpose#gpose tips#screenshot guide
174 notes
·
View notes