#Graphic Design Software For Beginners
Explore tagged Tumblr posts
Visit Tumblr Blog
Explore Tumblr blogs with no restrictions, modern design and the best experience.
Last Seen Tumblr Blogs


Fun Fact
1,644 Tumblr posts in 1 second.
Text

Cute Christmas Cat and Dog - Festive Pet Friends Classic , from 25 – 50 % off
#Christmas T-shirt Design Horribly Wrong!#t shirt design#print on demand#Wrong#Horribly Wrong#Design Horribly Wrong#shirt Design Horribly Wrong#T-shirt Design Horribly Wrong#T-shirt Design#Christmas T-shirt Design#Christmas#T-shirt#Design#t shirt design for beginners#custom tshirt design#passive income#christmas t-shirt design#clothing design software#shirt maker#graphic design#t-shirt design horribly wrong#t-shirt#make your own clothes#knit fabrics
0 notes
Text
Advanced Photoshop Techniques: Elevate Your Design Skills
Introduction
Once you've mastered the basics of Photoshop, diving into advanced techniques can significantly enhance your creative projects and workflow. These advanced skills will allow you to push the boundaries of your creativity, creating professional-grade designs that stand out. In this guide, we'll explore a variety of advanced Photoshop techniques to help you elevate your work.
1. Mastering Layer Styles and Blending Modes
Understanding and utilizing advanced layer styles and blending modes can create stunning effects and bring your designs to the next level. Layer styles like Bevel & Emboss, Drop Shadow, and Gradient Overlay can add depth and dimension to your designs. Experiment with blending modes such as Multiply, Screen, Overlay, and Soft Light to blend layers creatively and achieve unique visual effects.
2. Advanced Masking Techniques
Mastering advanced masking techniques allows for precise control over image adjustments and compositions. Using layer masks, you can seamlessly blend multiple images or selectively apply adjustments to specific areas. Refine Edge and Select and Mask tools help create intricate selections for complex subjects like hair or transparent objects, ensuring smooth and realistic composites.
3. Non-Destructive Editing with Smart Objects
Smart Objects offer a powerful way to apply transformations and filters non-destructively, preserving the quality of your original images. Convert layers to Smart Objects before resizing, warping, or applying filters. This way, you can make changes without degrading the image quality, and you can always revert to the original state if needed.
4. Creative Use of Filters and Effects
Applying creative filters and effects can transform your images and add unique artistic touches. Use the Liquify filter for surreal distortions, the Oil Paint filter for a painterly look, or the Tilt-Shift filter for miniaturization effects. Combine multiple filters and effects to develop your own signature style, and use the Filter Gallery to preview combinations.
5. Advanced Retouching and Healing Techniques
Advanced retouching and healing techniques can help you achieve professional-quality results in portrait and product photography. The Healing Brush and Clone Stamp tools are excellent for removing blemishes, imperfections, and unwanted elements. Frequency Separation is a technique that separates texture and color, allowing for precise and natural-looking skin retouching.
6. Using Actions and Scripts to Automate Workflow
Automating repetitive tasks with actions and scripts can streamline your workflow and save valuable time. Photoshop Actions record a sequence of steps that you can apply to multiple images with a single click. Scripts, written in JavaScript, offer even more advanced automation possibilities, such as batch processing and complex adjustments.
7. Creating Complex Selections with Channels
Channels provide a powerful method for creating complex selections, especially when dealing with intricate details like hair or fur. By isolating the color information in different channels, you can create precise masks. Use the Alpha channel to store and refine selections, combining them with layer masks for detailed compositing work.
8. Advanced Typography and Text Effects
Elevate your text designs with advanced typography techniques and text effects that stand out. Use Layer Styles to add shadows, glows, and textures to your text. Explore the capabilities of the 3D Text tool to create dynamic and realistic text effects. Combine text with clipping masks and layer blending modes for creative and impactful typography.
9. 3D Effects and Compositing
Explore the world of 3D in Photoshop to create immersive effects and complex composites. Use the 3D workspace to build, texture, and light 3D objects. Integrate 3D elements with 2D images to create realistic scenes. Experiment with depth maps, extrusions, and 3D layers to add an extra dimension to your designs.
10. Leveraging the Power of Camera Raw
The Camera Raw filter offers advanced tools for photo editing, providing greater control over exposure, color, and detail. Use Camera Raw to make global adjustments, such as correcting white balance, enhancing contrast, and sharpening details. The local adjustment tools, like Graduated Filter and Adjustment Brush, allow for precise, targeted edits to specific areas of your image.
Conclusion
By incorporating these advanced Photoshop techniques into your skill set, you can push the boundaries of your creativity and produce professional-grade designs. Mastering layer styles, blending modes, and advanced masking techniques will refine your compositing skills, while non-destructive editing and automation will streamline your workflow. Embrace the power of Photoshop's advanced features, and watch your design capabilities soar.
#photoshop#onlineducation#hrishionlinebuddhi#onlinelearing#career#course#graphic design#Photoshop#graphic design tutorials#Photoshop tutorials#learn graphic design online#best graphic design software#free Photoshop course#graphic design courses#advanced Photoshop techniques#graphic design certification online#Photoshop for beginners#graphic design inspiration#Photoshop tips and tricks#online graphic design degree#how to use Photoshop#graphic design portfolio examples#free graphic design resources#graphic design trends 2024#Photoshop editing techniques#graphic design jobs
0 notes
Text
Which software is best for graphic design for beginners?
Starting your journey into graphic design can be exciting, but also overwhelming—especially when it comes to choosing the right software. There are dozens of tools available, each offering different features and functions. If you're a beginner, you might be wondering:
Which software is best for learning and practicing graphic design?
In this blog, we’ll explore the most popular and beginner-friendly graphic design software in 2025, along with their strengths, use cases, pricing, and why each one could be the right fit for you.
Why Software Matters for Beginners
Before we jump into the list, let’s clarify why your choice of software is so important as a beginner:
Ease of Use: You need a tool with a gentle learning curve so you don’t get frustrated early on.
Cost-Effective: Budget matters. Many beginners prefer free or low-cost options.
Community and Resources: A large user base means more tutorials, templates, and support.
Versatility: Good beginner software lets you create a range of designs—from logos to social media posts and print materials.
Top Graphic Design Software for Beginners
Here are the best tools to consider in 2025:
1. Canva (Best for Absolute Beginners)
Platform: Web-based, iOS, Android Price: Free with premium subscription options (Pro at approx. $12.99/month)
Why it’s great:
Canva is arguably the most beginner-friendly graphic design tool available today. With its intuitive drag-and-drop interface, thousands of templates, and ready-to-use elements, it's perfect for non-designers or people just starting out.
Best For:
Social media graphics
Posters and flyers
Presentations
Simple logo and branding design
Pros:
No design experience required
Easy to use with pre-made templates
Large library of stock images and icons
Real-time collaboration
Cons:
Limited advanced design capabilities
Not suitable for complex vector artwork or professional illustration
Verdict: If you're brand new to design and want to create beautiful content quickly, Canva is your go-to.
2. Adobe Express (Formerly Adobe Spark)
Platform: Web-based, iOS, Android Price: Free with optional premium features
Why it’s great:
Adobe Express is Adobe’s answer to Canva, built for quick and easy content creation. It’s ideal for beginners who want the reliability of Adobe but without the complexity of Photoshop or Illustrator.
Best For:
Social media content
Basic video editing
Branded graphics
Flyers and web pages
Pros:
Very beginner-friendly
Auto-resize features for social media
Syncs with Adobe Creative Cloud
Tons of beautiful templates
Cons:
Limited creative freedom compared to full Adobe tools
Templates are highly templated — less room for uniqueness
Verdict: Great choice for beginners who want Adobe’s quality with Canva-like simplicity.
3. Adobe Illustrator (Best for Learning Industry Standards)
Platform: Windows, macOS Price: Subscription-based (~$20.99/month)
Why it’s great:
If you’re serious about graphic design as a career or long-term skill, starting with Adobe Illustrator is a smart move. It’s the industry standard for vector design, used by professionals worldwide for logos, branding, and illustrations.
Best For:
Logo design
Vector illustrations
Icons and infographics
Typography and branding
Pros:
Professional, high-quality output
Widely used in design jobs and agencies
Tons of tutorials and community resources
Supports complex vector editing
Cons:
Steep learning curve
Costly for some beginners
Requires powerful hardware
Verdict: Illustrator is best if you’re ready to commit to learning and want to work professionally in design.
4. Affinity Designer (Great Photoshop/Illustrator Alternative)
Platform: Windows, macOS, iPad Price: One-time purchase (~$69.99)
Why it’s great:
Affinity Designer offers professional-grade tools without the subscription model of Adobe. It’s sleek, fast, and very popular among designers looking for budget-friendly alternatives.
Best For:
Vector and raster design in one app
Logo and print design
UI/UX design
Pros:
One-time purchase — no monthly fees
Powerful vector + pixel editing
Clean, intuitive interface
Affordable
Cons:
Fewer third-party resources and plugins than Adobe
Smaller learning community
Verdict: Perfect for beginners who want advanced features without the Adobe subscription.
5. Gravit Designer (Best Free Vector Tool)
Platform: Web-based, Windows, macOS, Linux, Chrome OS Price: Free (Pro version ~$49/year)
Why it’s great:
Gravit Designer is a free vector design tool that works directly in your browser. It’s a solid Illustrator alternative for beginners who don’t want to download heavy software.
Best For:
Vector graphics
Icons and UI design
Marketing materials
Pros:
Works across platforms and devices
Clean, easy-to-learn interface
Supports export to multiple file types
Cons:
Requires Pro version for full features
Can lag with complex designs
Verdict: Excellent choice for beginners who want free software to start learning vector design.
6. GIMP (Best Free Photoshop Alternative)
Platform: Windows, macOS, Linux Price: Free and open-source
Why it’s great:
GIMP (GNU Image Manipulation Program) is a powerful, free alternative to Photoshop. It’s open-source and offers many of the features you’ll find in premium software.
Best For:
Photo editing
Web graphics
Digital painting
Pros:
Completely free
Strong community support
Plugin-rich and customizable
Cons:
Not as polished as Photoshop
Steeper learning curve than Canva or Express
Verdict: Ideal if you're interested in photo editing and want a free tool with robust features.
How to Choose the Right Software as a Beginner
Here are a few questions to ask yourself: QuestionBest MatchDo I want to make Instagram posts and flyers quickly?Canva / Adobe ExpressDo I want to learn professional design tools?Adobe Illustrator / Affinity DesignerIs budget a major concern?GIMP / Gravit DesignerDo I want to design logos and vector art?Illustrator / Affinity Designer / GravitAm I planning to freelance or get a design job?Illustrator or Affinity Designer
Final Thoughts
Choosing the best graphic design software as a beginner depends on your goals, interests, and budget. If you just want to explore design casually, Canva or Adobe Express will get you started without overwhelming you. But if you're aiming for a design career or professional work, learning Adobe Illustrator or Affinity Designer is a valuable investment.
0 notes
Text

bog tour - countdown to 1 year of games
T MINUS 1 DAY - decide what I write next!
If you've been seeing my posts so far, you may have noticed I started 16 days before April 1st, but only have 15 games. Well, today is a bit of a mix of things! I'll have an overview of stats, overall reflections on my first year of games, future plans and sneak peaks, and, get this, a poll of some current ideas I have, so you, my lovely blog readers can decide what game I write next, so stay tuned till the end of the post for that!
Stats
Gross revenue: $545.38USD Payments: 152 Views: 6,568 Downloads: 1,304 Itch followers: 1,304 8 of my 15 games are wetland themed!
Reflections
Gosh, where do I even start! I think one of the best things this little venture into ttrpg design has given me is community! From the unofficial Wanderhome discord server giving me my very first foray into ttrpg content with prompts for playbooks aaaages ago, to joining KiwiRPG, Aotearoa's collective of ttrpg designers, to the Creekside Community Center, which is the full of the most lovely welcoming cool people (I mostly lurk but when I do post, everyone is so kind?!), to my little tumblr ttrpg design circle. People being excited about my games with me is delightful!!!
I could mention boring things like formatting, layout, graphic design, font, software, art, and more, but eh.
Instead I'll mention the sheer innovation present in indie ttrpgs. I've seen some of the most creative, genius, well-crafted content in my entire life within indie ttrpgs spaces, and sometimes they have 2 comments and have the worst formatting you've ever seen, or are just on a google doc.
Instead I'll mention that way that the community enfolds beginners and people who need assurance.
The themes that I've explored in my ttrpg design, many of which I am not yet ready to explore directly, instead needing the distance but also closeness of the lense of ttrpgs.
Community is such a key part of ttrpg design, at least to me, and I feel so held by these communities. Thank you to every person who's interacted with my games, whether by playing, rbing, liking, or even just looking at them. If you've left a review, or a comment, or an emoji reaction on a discord promo message I wrote, ngā mihi nunui.
I hope, in the next year, I can make more games about being Māori. About being takatāpui. About being queer. About hope. About determination. About endurance. About love. About community care. And yes, about wetlands.
Future plans/sneak peaks
I've got two games in progress right now! One is Star Waka, a game about Māori spaceship crews. I have previously posted some small snippets, but have decided to start fresh so no sneak peaks of that besides what the playbooks will (likely, maybe) be:
Ringatoi - the Artist
Rangatira - the Chief
Kaikaranga - the Caller
Kairarangā - the Weaver
Kaumatua - the Elder
Tohunga - the Expert
Rangatahi - the Youth
Kaitiaki - the Guardian
As well, I've got a whole game finished, which I'll be releasing... tomorrow, on my 1 year anniversary! Here's a sneak peak:

What should I write next?
Thank you if you've made it through these bog tour posts, or even if you've come straight to this poll, thanks too! So, here goes, which should I write next?
16 notes
·
View notes
Text
¿Qué Distribución de Linux Deberías Usar Según tus Intereses? / Which Linux Distribution Should You Use Based on Your Interests?
Introducción / Introduction
Español: Linux ofrece una vasta gama de distribuciones, cada una diseñada para diferentes intereses y necesidades. Ya sea que te enfoques en el desarrollo de software, la administración de sistemas, la creación de contenido multimedia, o simplemente busques una alternativa a Windows o macOS, hay una distribución de Linux que se adapta a ti. Además, Linux proporciona ventajas significativas sobre otros sistemas operativos en muchos de estos escenarios. En este blog, exploraremos cuál distribución es ideal según tus intereses y las razones por las que Linux puede ser una mejor opción en comparación con Windows o macOS. Presentaremos esta información de manera accesible para tanto hispanohablantes como angloparlantes.
English: Linux offers a wide range of distributions, each designed for different interests and needs. Whether you focus on software development, system administration, multimedia creation, or simply seek an alternative to Windows or macOS, there’s a Linux distribution that suits you. Additionally, Linux offers significant advantages over other operating systems in many of these scenarios. In this blog, we’ll explore which distribution is ideal based on your interests and why Linux might be a better choice compared to Windows or macOS. This information will be presented in a way that is accessible to both Spanish and English speakers.
1. Ubuntu: Ideal para Principiantes, Desarrollo y Diseño Gráfico / Ubuntu: Ideal for Beginners, Development, and Graphic Design
Español: Ubuntu es la elección perfecta para quienes son nuevos en Linux o buscan una distribución estable y fácil de usar para el desarrollo de software. Su amplia compatibilidad con aplicaciones como GIMP, Inkscape y Blender también la convierte en una excelente opción para diseñadores gráficos e ilustradores. Además, Ubuntu ofrece soporte para una variedad de herramientas de desarrollo, lo que la hace ideal para programadores.
English: Ubuntu is the perfect choice for those new to Linux or looking for a stable and user-friendly distribution for software development. Its broad compatibility with applications like GIMP, Inkscape, and Blender also makes it an excellent choice for graphic designers and illustrators. Additionally, Ubuntu offers support for a variety of development tools, making it ideal for programmers.
2. Fedora: Para Desarrolladores, Seguridad y Creación de Contenido Multimedia / Fedora: For Developers, Security, and Multimedia Creation
Español: Fedora se destaca por estar a la vanguardia en términos de tecnología y seguridad. Es una distribución ideal para desarrolladores y aquellos interesados en seguridad informática. Además, Fedora es compatible con una amplia gama de software para edición de video, audio y animación, como Kdenlive, Audacity y Blender, lo que la convierte en una opción sólida para creadores de contenido multimedia.
English: Fedora stands out for being at the forefront of technology and security. It’s an ideal distribution for developers and those interested in cybersecurity. Additionally, Fedora supports a wide range of software for video editing, audio production, and animation, such as Kdenlive, Audacity, and Blender, making it a solid choice for multimedia content creators.
3. Debian: Para Administradores de Sistemas, Usuarios Avanzados y Diseño 3D / Debian: For System Administrators, Advanced Users, and 3D Design
Español: Debian es conocida por su estabilidad, lo que la hace ideal para administradores de sistemas y usuarios avanzados. Su entorno sólido también es adecuado para diseñadores 3D que buscan un sistema confiable para trabajar con software como Blender o FreeCAD. Debian proporciona un entorno de trabajo predecible y seguro, ideal para manejar proyectos de gran escala y complejidad.
English: Debian is known for its stability, making it ideal for system administrators and advanced users. Its solid environment is also suitable for 3D designers looking for a reliable system to work with software like Blender or FreeCAD. Debian provides a predictable and secure work environment, ideal for handling large-scale and complex projects.
4. Arch Linux: Para Usuarios Avanzados, Personalización Extrema y Jugadores / Arch Linux: For Advanced Users, Extreme Customization, and Gamers
Español: Arch Linux es la distribución preferida por aquellos que desean un control total sobre su sistema. Es ideal para usuarios avanzados que buscan personalización extrema y desean optimizar su sistema para el rendimiento en juegos. Arch te permite configurar tu entorno de juego con precisión, optimizando el rendimiento con herramientas como Steam y Proton para jugar títulos de Windows en Linux.
English: Arch Linux is the preferred distribution for those who want full control over their system. It’s ideal for advanced users seeking extreme customization and who want to optimize their system for gaming performance. Arch allows you to finely tune your gaming environment, optimizing performance with tools like Steam and Proton for playing Windows titles on Linux.
5. Linux Mint: Alternativa a Windows para Escritorio y Creadores de Contenido / Linux Mint: Windows Alternative for Desktop Users and Content Creators
Español: Linux Mint ofrece una experiencia de usuario familiar para aquellos que buscan una alternativa a Windows, siendo particularmente amigable para el uso en escritorios. También es una excelente opción para creadores de contenido que necesitan una distribución simple y efectiva para trabajar con herramientas como OBS Studio, GIMP y Audacity. Mint combina facilidad de uso con estabilidad, facilitando la transición desde Windows.
English: Linux Mint offers a familiar user experience for those seeking an alternative to Windows, being particularly user-friendly for desktop use. It’s also an excellent choice for content creators who need a simple and effective distribution for working with tools like OBS Studio, GIMP, and Audacity. Mint combines ease of use with stability, making the transition from Windows smooth.
6. Pop!_OS: Para Desarrolladores, Gamers y Diseño 3D / Pop!_OS: For Developers, Gamers, and 3D Design
Español: Pop!_OS es una distribución basada en Ubuntu, optimizada para desarrolladores y jugadores. Incluye soporte nativo para GPUs, lo que la hace ideal para jugar y trabajar en proyectos de diseño 3D con software como Blender. Además, su enfoque en la productividad y el flujo de trabajo eficiente la convierte en una excelente opción para desarrolladores que buscan un entorno de trabajo optimizado.
English: Pop!_OS is a Ubuntu-based distribution optimized for developers and gamers. It includes native GPU support, making it ideal for gaming and working on 3D design projects with software like Blender. Additionally, its focus on productivity and efficient workflow makes it an excellent choice for developers looking for an optimized work environment.
Ventajas de Linux Sobre Windows y macOS / Advantages of Linux Over Windows and macOS
Español: Linux ofrece diversas ventajas sobre Windows y macOS, incluyendo:
Costo: La mayoría de las distribuciones de Linux son gratuitas, lo que reduce significativamente el costo en comparación con las licencias de Windows o macOS.
Seguridad: Linux es conocido por su robusta seguridad, con menos vulnerabilidades a malware debido a su arquitectura y modelo de permisos.
Rendimiento: Linux es más eficiente en el uso de recursos, ofreciendo mejor rendimiento, especialmente en hardware más antiguo o limitado.
Personalización: Con Linux, tienes un control total sobre tu sistema, permitiendo ajustar cada aspecto según tus necesidades, lo que es ideal para usuarios avanzados y creadores de contenido.
English: Linux offers several advantages over Windows and macOS, including:
Cost: Most Linux distributions are free, significantly reducing costs compared to Windows or macOS licenses.
Security: Linux is known for its robust security, with fewer vulnerabilities to malware due to its architecture and permission model.
Performance: Linux is more resource-efficient, offering better performance, especially on older or limited hardware.
Customization: With Linux, you have full control over your system, allowing you to tweak every aspect to fit your needs, ideal for advanced users and content creators.
Conclusión / Conclusion
Español: Elegir la distribución de Linux adecuada puede mejorar significativamente tu experiencia, dependiendo de tus intereses y necesidades. Desde Ubuntu y Fedora para principiantes y desarrolladores, hasta Arch Linux para usuarios avanzados y jugadores, y Pop!_OS para creadores de contenido y diseño 3D, hay una distribución que se adapta a cada perfil. Linux ofrece notables ventajas sobre Windows y macOS, convirtiéndose en una opción atractiva para una amplia variedad de usuarios.
English: Choosing the right Linux distribution can significantly enhance your experience, depending on your interests and needs. From Ubuntu and Fedora for beginners and developers, to Arch Linux for advanced users and gamers, and Pop!_OS for content creators and 3D design, there’s a distribution that fits every profile. Linux offers notable advantages over Windows and macOS, making it an attractive option for a wide range of users.
#Linux#DistribucionesLinux#Ubuntu#Fedora#Debian#ArchLinux#LinuxMint#PopOS#AlternativaWindows#SistemaOperativo#PersonalizaciónLinux#VentajasLinux#LinuxVsWindows#LinuxVsMac#DesarrolloSoftware#AdministraciónSistemas#SeguridadLinux#RendimientoLinux#DiseñoGráfico#Videojuegos#Animación#Diseño3D#CreaciónDeContenido#Ilustración#Multimedia
30 notes
·
View notes
Text
Masterpieces in Pixels: The Best of Digital Photo Artwork
When Technology Meets Imagination
Once, the masterpiece was born of brush and canvas. Today, some of the world's most breathtaking compositions begin with a stylus and screen. Welcome to the world of digital art painting, where creativity knows that there is no limit and pixels do not become poetry.
This article is a celebration of the digital renaissance - showing iconic digital photo artifacts, spotting impressive artists, and revealing how the technique is changing the visual stories.
The Rise of Digital Art: A New Chapter in Art History
The development of art has always been powered by equipment—stone, charcoal, oil, and acrylic. The digital era brought a new set of devices: graphic tablets, photo-editing software, and 3D rendering engines.

Why Digital Art Painting Deserves the Spotlight
Critics once rejected digital art as "less real," but the world of art has moved. Today, digital photo artwork is displayed in major galleries, collected as NFTs, and used in gaming, film, fashion, and advertising.
Here’s what makes it stand out:
Versatility: From photorealism to essence, digital equipment suits every style.
Efficiency: Premous, again, and layers use the experiment risk-free.
Exception: Artists worldwide can cooperate, share, and sell their work.
Digital Masterpieces That Inspire
Let's dive into some standout examples that show the emotional and technical depth of digital art painting.
1. “Portrait of the Future” by Artgerm
A hyper-detailed science-fiction portrait that mixes Eastern aesthetics with the Western comic book effect. The signature of the artgerm is possible with the work of the complex layer in Photoshop.
2. “City of Light” by Beeple
One of the most famous digital artists of our time creates a dystopian world with quality like Bipal cinema. Their daily rendering leads the boundaries of digital storytelling.
3. “Dreams in Bloom” by Ross Tran
This colorful, chaotic, and joyful piece shows how digital equipment can reflect an artist's personality. Ross's bold brushstrokes and unique character design make their work immediately recognizable.
Behind the Scenes: How Digital Art Paintings Are Created
Creating a digital work includes more than just software. It is a process filled with vision, technology, and story.
Step-by-step Process:
Sketching the concept —just like traditional art.
Blocking in shapes and color —using layers for flexibility.
Adding depth and lighting—digital brushes simulate texture and light.
Refining details—highlights, shadows, effects, and final polish.

Meet the Masters: Influential Digital Artists
Loish (Lois van Baarle)
Known for its dreamy characters and expressive brushwork, depiction and animation of bridges in a vibrant digital style.
Feng Zhu
Concept artist for games like Star Wars and Transformers, Feng brings cinematic flair to every digital stroke.
Magdalena Pagowska
Their fantasy-themed digital photo artifacts featured a mixture of realism and imagination, often accompanied by ethereal light and flowing texture.
How to Appreciate Digital Art
It is not certain how to read digital paintings. Here are things to see:
Brush technique: Is it painterly, smooth, or textured?
Lighting: Does it evoke a mood?
Composition: How are the elements balanced?
Emotion: What story is it telling?
Digital does not mean. In fact, with repetition and the ability to use it, digital art often captures deep emotional nuances.
Getting Started: Become a Digital Creator Yourself
Inspired? You can try your hand at digital art painting even as a beginner. Here’s how:
Beginner Tools: Try free apps like Krita or use an iPad with Procreate.
Learn the Basics: Study traditional drawing—digital is just a new medium.
Take Courses: Platforms like Skillshare, Udemy, and YouTube are goldmines.
Join the Community: Reddit, ArtStation, and Discord groups provide support and feedback.
The best way to improve? Just keep creating. Even the best artists started with stick figures.
The Digital Canvas: What's Next?
Technology leads the limits of creativity.
AI-assisted painting tools are helping artists generate ideas faster.
Augmented and virtual reality art is becoming more interactive.
NFTs and blockchain have created new art markets and collector experiences.

Celebrating Creativity in the Digital Age
Digital art painting is proof that artistry is not limited by medium. Whether it is painted on a canvas or prepared on a tablet, what matters is the story that tells it, and it is a feeling.
In Pixel, these works reflect the same passion, technology, and surprise that are hanging any oil painting in a museum. So next time you see a digital artwork, look closely - you can gaze into the future of art.
4 notes
·
View notes
Text
The Ultimate Guide to Online Media Tools: Convert, Compress, and Create with Ease
In the fast-paced digital era, online tools have revolutionized the way we handle multimedia content. From converting videos to compressing large files, and even designing elements for your website, there's a tool available for every task. Whether you're a content creator, a developer, or a business owner, having the right tools at your fingertips is essential for efficiency and creativity. In this blog, we’ll explore the most powerful online tools like Video to Audio Converter Online, Video Compressor Online Free, Postman Online Tool, Eazystudio, and Favicon Generator Online—each playing a unique role in optimizing your digital workflow.
Video to Audio Converter Online – Extract Sound in Seconds
Ever wanted just the audio from a video? Maybe you’re looking to pull music, dialogue, or sound effects for a project. That’s where a Video to Audio Converter Online comes in handy. These tools let you convert video files (MP4, AVI, MOV, etc.) into MP3 or WAV audio files in just a few clicks. No software installation required.
Using a Video to Audio Converter Online is ideal for:
Podcast creators pulling sound from interviews.
Music producers isolating tracks for remixing.
Students or professionals transcribing lectures or meetings.
The beauty lies in its simplicity—upload the video, choose your audio format, and download. It’s as straightforward as that
2. Video Compressor Online Free – Reduce File Size Without Losing Quality
Large video files are a hassle to share or upload. Whether you're sending via email, uploading to a website, or storing in the cloud, a bulky file can be a roadblock. This is where a Video Compressor Online Free service shines.
Key benefits of using a Video Compressor Online Free:
Shrink video size while maintaining quality.
Fast, browser-based compression with no downloads.
Compatible with all major formats (MP4, AVI, MKV, etc.).
If you're managing social media content, YouTube uploads, or email campaigns, compressing videos ensures faster load times and better performance—essential for keeping your audience engaged.
3. Postman Online Tool – Streamline Your API Development
Developers around the world swear by Postman, and the Postman Online Tool brings that power to the cloud. This tool is essential for testing APIs, monitoring responses, and managing endpoints efficiently—all without leaving your browser.
Features of Postman Online Tool include:
Send GET, POST, PUT, DELETE requests with real-time response visualization.
Organize your API collections for collaborative development.
Automate testing and environment management.
Whether you're debugging or building a new application,Postman Online Tool provides a robust platform that simplifies complex API workflows, making it a must-have in every developer's toolkit.
4. Eazystudio – Your Creative Powerhouse
When it comes to content creation and design, Eazystudio is a versatile solution for both beginners and professionals. From editing videos and photos to crafting promotional content, Eazystudio makes it incredibly easy to create high-quality digital assets.
Highlights of Eazystudio:
User-friendly interface for designing graphics, videos, and presentations.
Pre-built templates for social media, websites, and advertising.
Cloud-based platform with drag-and-drop functionality.
Eazystudio is perfect for marketers, influencers, and businesses looking to stand out online. You don't need a background in graphic design—just an idea and a few clicks.
5. Favicon Generator Online – Make Your Website Look Professional
A small icon can make a big difference. The Favicon Generator Online helps you create favicons—the tiny icons that appear next to your site title in a browser tab. They enhance your website’s branding and improve user recognition.
With a Favicon Generator Online, you can:
Convert images (JPG, PNG, SVG) into favicon.ico files.
Generate multiple favicon sizes for different platforms and devices.
Instantly preview how your favicon will look in a browser tab or bookmark list.
For web developers and designers, using a Favicon Generator Online is an easy yet impactful way to polish a website and improve brand presence.
Why These Tools Matter in 2025
The future is online. As remote work, digital content creation, and cloud computing continue to rise, browser-based tools will become even more essential. Whether it's a Video to Audio Converter Online that simplifies sound editing, a Video Compressor Online Freefor seamless sharing, or a robust Postman Online Tool for development, these platforms boost productivity while cutting down on time and costs.
Meanwhile, platforms like Eazystudio empower anyone to become a designer, and tools like Favicon Generator Online ensure your brand always makes a professional first impression.
Conclusion
The right tools can elevate your workflow, save you time, and improve the quality of your digital output. Whether you're managing videos, developing APIs, or enhancing your website’s design, tools like Video to Audio Converter Online, Video Compressor Online Free, Postman Online Tool, Eazystudio, and Favicon Generator Online are indispensable allies in your digital toolbox.
So why wait? Start exploring these tools today and take your digital productivity to the next level
2 notes
·
View notes
Text
Certificate in VFX Course: Launch Your Career in Visual Effects

The world of Visual Effects (VFX) is where imagination meets technology. From Hollywood blockbusters to streaming series and video games, VFX artists create stunning visuals that captivate audiences. If you're looking for a fast-track way to enter this exciting industry, a Certificate in VFX Course in Pune could be your ideal starting point.
This blog will guide you through what a VFX certificate program offers, why it’s valuable, and how it can kickstart your career.
What is a Certificate in VFX Course?
A Certificate in VFX Course is a short-term, skill-focused program that trains students in essential visual effects techniques. Unlike long-term degrees, these courses provide hands-on training in industry-standard software and workflows, making them perfect for beginners and professionals looking to upskill quickly.
Why Choose a Certificate Course?
✅ Faster Entry into the Industry – Complete training in months, not years. ✅ Affordable & Focused Learning – Learn only what’s relevant to VFX jobs. ✅ Industry-Recognized Certification – Adds credibility to your resume. ✅ Placement Opportunities – Many institutes offer job assistance.
What Will You Learn in a VFX Certificate Course?
A well-structured Certificate in VFX Course in Pune covers:
1. Foundations of VFX
Understanding compositing, rotoscoping, and green screen techniques.
Basics of CGI (Computer-Generated Imagery).
2. Industry-Standard Software
Adobe After Effects – For motion graphics and compositing.
Nuke – For high-end film compositing.
Maya/Blender – For 3D modeling and animation.
Houdini – For dynamic simulations (fire, smoke, water).
3. Specialized VFX Skills
Matchmoving – Integrating CGI into live-action footage.
Particle & Dynamics – Creating explosions, dust, and weather effects.
Digital Matte Painting – Crafting realistic backgrounds.
4. Real-World Projects
Work on mock film scenes, advertisements, or game trailers.
Build a portfolio to showcase your skills to employers.
Who Should Enroll in a VFX Certificate Course?
This course is ideal for: 🎬 Film & Media Students – Enhance your skills for better job prospects. 💻 Graphic Designers & Animators – Expand into high-demand VFX roles. 🎮 Gamers & Content Creators – Learn to add professional VFX to videos. 🖌️ Creative Enthusiasts – No prior experience? Start fresh with structured training.
Why Pursue a Certificate in VFX Course in Pune?
Pune has emerged as a hub for media, animation, and VFX education, offering: ✔ Top-Notch Institutes – Learn from industry-experienced trainers. ✔ Internship Opportunities – Gain real studio experience. ✔ Affordable Cost of Living – Study without financial stress. ✔ Growing Media Industry – Pune hosts gaming studios, ad agencies, and post-production houses.
Career Opportunities After a VFX Certificate
After completing the course, you can work as:
VFX Artist (Films, OTT, Ads)
Compositing Artist
Motion Graphics Designer
3D Modeler/Animator
Roto/Paint Artist
Salaries for entry-level VFX artists start at ₹3-5 LPA, with experienced professionals earning much higher.
How to Choose the Right VFX Certificate Course?
Before enrolling, check: 🔹 Course Syllabus – Does it cover the latest software and techniques? 🔹 Faculty Experience – Are trainers from the VFX/film industry? 🔹 Placement Record – Do past students get hired? 🔹 Student Reviews – What do alumni say about the institute?
Final Thoughts
A Certificate in VFX Course in Pune is a smart investment if you want to break into the VFX industry quickly. With hands-on training, industry exposure, and a strong portfolio, you can land exciting roles in films, gaming, and advertising.
2 notes
·
View notes
Text
Unleash Your Creative Potential: Join the Best Graphic Design Courses in Andheri at Reliance Animation Academy

Reliance Animation Academy in Andheri is where creative journeys begin and careers take flight. In today’s visually-driven world, design is no longer just decoration—it’s the language of brands, the driver of engagement, and the core of digital storytelling. Whether it’s the logo of your favorite startup or the animation in your favorite reel, design is shaping everything.
If you’re passionate about visuals, creativity, and building a meaningful career, this is the right place to start. With hands-on training, real-world assignments, and expert mentorship, the academy’s industry-relevant graphic design courses in Andheri prepare you to succeed in today’s digital-first economy.
Why Graphic Design Courses in Andheri Are a Smart Career Move in 2025
Graphic design has evolved from an optional skill into a business essential. In 2025, brands don’t just want good design—they need it to thrive.
Here’s why more students, freelancers, and professionals are enrolling in graphic design programs:
Digital-first businesses rely on consistent design for social media, websites, and marketing campaigns
Packaging and branding directly influence purchasing decisions
Motion graphics dominate online platforms, from ads to entertainment
Startups, influencers, and creators use visuals to build trust and credibility
Global freelance and remote design opportunities are increasing every day
With the right training, portfolio, and mindset, you can be part of this creative revolution—starting now.
Key Skills You’ll Learn in Graphic Design Courses in Andheri
At Reliance Animation Academy in Andheri, design education goes far beyond software. The programs are structured to make you think like a designer, solve real problems, and communicate visually with impact.
You’ll learn to:
Creative Thinking & Ideation Develop the ability to translate abstract ideas into purposeful designs that solve real-world challenges.
Master Professional Design Tools Work hands-on with:
Adobe Photoshop
Illustrator
InDesign
CorelDRAW
Figma & Adobe XD for UI/UX
After Effects for motion graphics
Understand Visual Design Principles Learn the fundamentals of color theory, typography, layout design, and composition to create aesthetically balanced and functional visuals.
Explore Motion Graphics & Animation Enhance your static visuals with animation and transitions—perfect for digital storytelling, advertising, and social media content.
Develop Communication & Client Skills Present your work confidently, incorporate feedback effectively, and collaborate on real-time design projects.
Design Courses Offered at Reliance Animation Academy in Andheri
The academy provides specialized, job-ready courses that combine creative thinking with technical skills. Whether you’re a beginner or looking to specialize further, there’s a course for you.
Advanced Program in Web Design & UI/UX
Learn to create responsive websites and user-friendly app interfaces
Tools covered: Figma, Adobe XD, HTML/CSS basics
Ideal for those targeting roles in web and digital product design
Advanced Program in Motion Graphics
Dive into motion design, kinetic typography, transitions, and video editing
Build content suitable for advertising, YouTube, OTT platforms, and more
Certificate Program in 3D Interior Visualization Pro
Learn to produce realistic architectural walkthroughs and renders
Master software like 3ds Max, V-Ray, and SketchUp
Perfect for architects, interior designers, and visualizers
Certificate Program in Graphics Pro
Gain end-to-end skills in graphic design, branding, layout, packaging, and digital ads
Suitable for freshers or professionals wanting a structured upskilling path
Certificate Program in Digital Photography Pro
Get in-depth knowledge of DSLR photography, lighting setups, image composition, and editing
Tailored for fashion, event, lifestyle, and product photography careers
All courses are supported with real-world projects and portfolio-building assignments to ensure students graduate job-ready.
Why Choose Reliance Animation Academy in Andheri
The academy isn’t just about teaching design—it’s about nurturing designers. With a focus on experiential learning and professional readiness, here’s what makes it stand out:
Mentors with real-world experience in design, media, and animation
Practical, studio-style classrooms and equipment
Real assignments that simulate agency work
Career support, placement guidance, and one-on-one feedback
A vibrant community of learners, creators, and mentors
Reliance Animation Academy doesn’t just give you a certificate—it prepares you for the real world.
Career Opportunities After Completing Graphic Design Courses in Andheri
Once you complete your training, a wide range of creative careers becomes accessible to you. Depending on your chosen specialization, you can explore roles like:
Graphic Designer – for marketing agencies, branding firms, or corporate creative teams
UI/UX Designer – designing digital products for startups and enterprises
Motion Graphics Artist – animating ads, explainer videos, or YouTube content
3D Visualizer – working on high-end visuals for real estate and architectural firms
Freelance Illustrator or Photographer – offering your services locally or globally
These roles aren’t limited by geography. With a strong portfolio and the right skills, you can work with clients from anywhere in the world.
Who Can Enroll in Graphic Design Courses in Andheri
You don’t need prior experience or an art background to get started. These programs are built for learners at all stages.
Best suited for:
Students (10th or 12th pass) exploring creative careers
College students seeking practical skills and certifications
Working professionals looking to switch to a creative industry
Freelancers or hobbyists aiming to turn passion into income
Entrepreneurs wanting to design their own brand assets
Whether you’re starting fresh or reskilling after years, the academy offers you a guided, practical learning path.
How to Get Started at Reliance Animation Academy in Andheri
Starting your creative journey is simple:
Visit the campus or apply online
Schedule a free counseling session
Choose a course that aligns with your interests
Submit required documents
Begin your classes and start building your professional design portfolio
EMI payment options and scholarships are available for eligible students. The team ensures a smooth and supportive admission process from day one.
Why This Is the Perfect Time to Join Graphic Design Courses in Andheri
Design is no longer an optional skill—it’s the language of marketing, branding, and communication in the digital age. With short attention spans and visual-first content dominating every platform, the demand for skilled designers continues to grow.
By enrolling now, you can:
Start building a high-quality, job-ready portfolio
Train with expert mentors and real industry tools
Learn by doing—through practical assignments and client-style projects
Explore freelance or full-time roles in India and abroad
Get ahead of the competition by gaining real skills, faster
Contact Reliance Animation Academy in Andheri
Website: www.relianceacademyandheri.com Phone: +91 93213 30003 Email: [email protected] Location: 2nd Floor, B-Wing, Crystal Plaza, New Link Road, Opp. Infinity Mall, Andheri West, Mumbai – 400053 Google Maps: Click to Navigate
2 notes
·
View notes
Text

Furry Friends Festive Moment: Dog, Cat, and Christmas, from 25 – 50 % off
#Christmas T-shirt Design Horribly Wrong!#t shirt design#print on demand#Wrong#Horribly Wrong#Design Horribly Wrong#shirt Design Horribly Wrong#T-shirt Design Horribly Wrong#T-shirt Design#Christmas T-shirt Design#Christmas#T-shirt#Design#t shirt design for beginners#custom tshirt design#passive income#christmas t-shirt design#clothing design software#shirt maker#graphic design#t-shirt design horribly wrong#t-shirt#make your own clothes#knit fabrics
0 notes
Text
The Future of Design: Learn Graphic Designing in Ahmedabad
In today’s digital-first world, graphic design has become the backbone of communication. Whether it’s branding, social media, advertising, or UI/UX design — creativity paired with design software is in high demand. If you're someone passionate about visuals and creativity, enrolling in a graphic design course in Ahmedabad can be your gateway to a future-proof and rewarding career.
Why Graphic Design is the Future
Graphic design is no longer limited to magazines and posters. It plays a central role in every digital platform and marketing strategy. Businesses, content creators, YouTubers, influencers, and startups are constantly looking for skilled designers to create eye-catching visuals that convert. With technology evolving rapidly, designers with up-to-date training are in high demand globally.
This is where a professionally structured graphic design course in Ahmedabad can give you a competitive edge. The city is emerging as a design and tech hub, offering you the perfect environment to learn and grow.
What Makes Ahmedabad Ideal for Learning Graphic Design?
Ahmedabad is home to a growing design community, reputable institutes, and a thriving creative culture. Many young talents from across Gujarat and India choose Ahmedabad to start their design education. The city offers a blend of traditional art and modern digital trends — creating the perfect learning atmosphere.
Joining a graphic design course in Ahmedabad means you'll gain access to experienced mentors, hands-on projects, and industry-relevant tools such as Adobe Photoshop, Illustrator, InDesign, and CorelDRAW.
Key Benefits of Learning Graphic Designing
Here are some top advantages of taking up a graphic design course:
Creative freedom: Bring your ideas to life through visuals.
High demand: Every business needs designers — from startups to global companies.
Freelance or full-time: Choose the career model that fits your lifestyle.
Work across industries: Be it tech, fashion, education, or entertainment — designers are everywhere.
Upgrade your skills: With digital marketing and web development, graphic design enhances your skill set and job value.
Whether you're a student, working professional, or someone planning a career shift, a graphic design course in Ahmedabad can help you gain the skills and confidence to thrive.
What You Will Learn
A standard certificate course in graphic design typically includes:
Basics of design principles and typography
Image editing and layout design
Logo and branding design
Portfolio building with real-world projects
Introduction to UI/UX fundamentals
Graphic design is a powerful skill with unlimited potential. By enrolling in a graphic design course in Ahmedabad, you’re investing in a creative future with countless career possibilities.
About the Website
Kshitij Vivan is one of the top animation and design training institutes in Ahmedabad. Their specialized certificate course in graphic design is built for beginners and aspiring professionals looking to master modern tools and techniques. With experienced faculty, real-time projects, and career guidance, Kshitij Vivan helps you unlock your full design potential.
3 notes
·
View notes
Text

The Art of Graphic Design: A Guide for Creatives
Graphic design is everywhere—on the websites we browse, the advertisements we see, and the products we buy. It’s an art form that blends creativity with functionality to communicate messages visually. Whether you're a budding designer or just curious about the field, this article will guide you through the essentials of graphic design.
What is Graphic Design?
Graphic design is the process of creating visual content to communicate information, ideas, or emotions. It involves a combination of typography, imagery, color, and layout to produce eye-catching and effective designs.
Key Elements of Graphic Design
Typography – The style, arrangement, and appearance of text. Choosing the right fonts can set the mood and tone of a design.
Color Theory – Colors evoke emotions and create a visual hierarchy. Understanding complementary and contrasting colors is crucial.
Composition & Layout – The arrangement of elements in a design impacts readability and flow. A well-structured layout ensures clarity and engagement.
Imagery & Icons – Photos, illustrations, and icons add depth and context to a design.
White Space – Also known as negative space, it helps improve readability and creates balance in a design.
Popular Graphic Design Tools
To create stunning visuals, designers use various software and tools, including:
Adobe Photoshop – Best for image editing and manipulation.
Adobe Illustrator – Ideal for vector-based illustrations and logos.
Canva – A user-friendly tool for beginners.
Figma – Popular for UI/UX and web design.
Trends in Graphic Design (2024)
Graphic design evolves with time, and staying updated with trends is essential. Here are some of the current design trends:
Minimalist Aesthetics – Clean, simple, and clutter-free designs are in demand.
Bold Typography – Oversized, eye-catching fonts make a statement.
Retro & Nostalgic Styles – Vintage colors and fonts bring back the charm of past decades.
3D & AI-Generated Designs – Technology is pushing design to new levels.
Final Thoughts
Graphic design is a powerful tool for storytelling and brand identity. Whether you’re creating logos, social media graphics, or web designs, understanding the principles of design can help you create visually appealing and impactful work.
#graphic design#adobe illustrator#design#professional design#professional design services#logo design#creative logo#brand identity#logo designer#logo
2 notes
·
View notes
Note
would you happen to have a flight sim recommendation? Ive seen you post about using them and wondered which one you thought would be best
Depends what you're looking for.
The two big players are Microsoft Flight Simulator and X-Plane.
MSFS is very pretty, it has some decent tutorials built-in, and there's a huge array of content for it, but, at least on my computer, it runs somewhat unstably. It's also very accessible, bordering on hand-holding, which can be good if you're new to flight sims but can also get very old very quickly once you know what you're doing. It's also designed for a gamepad primarily, and you can play it on Xbox. I think its a a little over-designed actually. There's a ton of aftermarket planes available, mostly thru the in-game browser. There might be freeware, i haven't really looked into it.
X-Plane is less pretty, the graphics are maybe a tiny bit more dated, you don't get the photorealistic scenery, but the flight dynamics are much, much more realistic. The difference is hard to explain succinctly but the long and short of it is that, on average, a well designed aircraft for X-Plane will feel "more real" than one in MSFS. X-Plane is also usable on Windows, Mac, and Linux. There's a lot of aftermarket content for it, but less than MSFS, although last i checked there's a larger portion of freeware. It's also a little more persnickty vis-a-vis installation and management. X-Plane also comes with a utility to help you make airplanes for it, though you have to provide the 3D modeling software (like blender) yourself.
Overally, it really boils down to what you want in your flight simulator
MSFS
Pros:
Photorealistic Scenery
Wide variety of assistance
Highly accessible tutorials
Lots of aftermarket content
Available on Windows and Xbox
Cons:
Less realistic flight dynamics
Pretty graphics means higher system requirements
Can be overbearing if you're experienced with flight sims
Designed for a gamepad first and foremost, feels somewhat awkward with the old fashioned joystick, mouse, and keyboard
X-Plane
Pros:
More realistic Flight Dynamics
Built-in plane maker utility
Runs on Windows, Linux, and Mac
Slightly more generous system requirements
Takes up waaaaaaaaaay less space (my install, which has a shitload of aftermarket content in it, takes up 30gb less than my vanilla MSFS install)
Great if you're familiar with flight sims or flying in general
Cons:
Finicky installation and content management compared to MSFS. If you're used to digging in folders and installing mods that way, you won't have any trouble with it, but if you're not experienced with that its got a bit of a learning curve (and you should learn that! it's a great skill!)
Scenery is more generic than MSFS, particularly outside of major cities
Requires a computer, not available on PS5 or Xbox (Imo this is a pro, not a con, but if you don't have a gaming computer its obviously a problem)
Less aftermarket content available
Requires a bit of manual configuration to get going right
Fewer tutorials
Now, I understand it sounds like MSFS is "better" but i really feel that X-Plane is the better choice if you're going to get seriously into this stuff. That being said, i have both, and I play both, but I play X-Plane a whole lot more. If you're brand-new at flight simming, i'd recommend getting MSFS, but don't splurge for the super-deluxe editions. If you've simmed before, i can't recommend X-Plane enough.
TL;DR: MSFS is good for beginners, X-Plane is better for anyone beyond beginner level.
7 notes
·
View notes
Text
5 Free Software Tools to Create Stunning Images for Social Media and Blog Posts
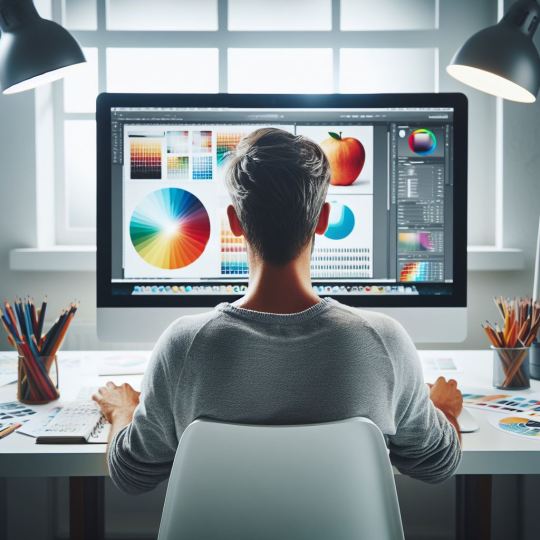
Alright, guys, today we're diving into the world of image creation for social media and featured blog posts. Whether you're a seasoned content creator or just starting out on your blogging journey, having eye-catching images is essential for grabbing your audience's attention and driving engagement. But with so many image editing tools out there, which ones should you use? Well, fear not, because I've rounded up the best free software for creating images that will take your social media game to the next level. Let's dive in!
Canva: First up on our list is Canva – the ultimate graphic design tool for beginners and pros alike. With Canva, you can create stunning images for social media, blog posts, presentations, and more, all with drag-and-drop simplicity. Choose from thousands of pre-designed templates, fonts, and graphics, or start from scratch and let your creativity run wild. Canva's intuitive interface and extensive library of assets make it a must-have tool for any content creator.
Adobe Express: Next up, we have Adobe Express – a powerful design tool from the creators of Photoshop and Illustrator. With Adobe Express, you can create stunning graphics, web pages, and video stories in minutes, right from your browser or mobile device. Choose from a variety of professionally designed templates, customize with your own photos and text, and share your creations across all your social media channels with ease. Plus, its seamless integration with other Adobe products makes it a no-brainer for anyone already using Adobe's creative suite.
PicMonkey: Another great option for creating eye-catching images is PicMonkey. With PicMonkey, you can easily edit photos, create graphics, and design collages without any technical know-how. Choose from a wide range of filters, effects, and overlays to give your images that extra pop, or use PicMonkey's powerful design tools to create custom graphics from scratch. Plus, with PicMonkey's user-friendly interface and intuitive features, you'll be creating stunning images in no time.
Pixlr: If you're looking for a free alternative to Photoshop, look no further than Pixlr. With Pixlr, you can edit photos, create collages, and design graphics with ease, all from your web browser or mobile device. Choose from a variety of editing tools, filters, and effects to enhance your images, or start from scratch and let your creativity run wild. Plus, with Pixlr's cloud-based platform, you can access your projects from anywhere and collaborate with others in real-time.
GIMP: Last but not least, we have GIMP – the GNU Image Manipulation Program. While GIMP may not have the most user-friendly interface, it's a powerful open-source alternative to expensive image editing software like Photoshop. With GIMP, you can retouch photos, create custom graphics, and design stunning visuals for your social media and blog posts. Plus, with a little bit of practice, you'll be amazed at what you can accomplish with this free, feature-packed tool.
In conclusion, creating eye-catching images for social media and featured blog posts doesn't have to break the bank. With these free software options, you can easily design stunning visuals that will grab your audience's attention and drive engagement. So why wait? Start creating today and take your content to the next level!
#SocialMediaMarketing#BloggingTips#GraphicDesign#ContentCreation#VisualContent#DigitalMarketing#FreeTools#Canva#AdobeSpark#PicMonkey#Pixlr#GIMP#ContentCreators#VisualMarketing#SocialMediaImages#BlogGraphics#adobeexpress#photoshop alternatives
9 notes
·
View notes
Text
How to Create Designs That Work for Your Print-on-Demand Business
Running a print-on-demand business is both exciting and challenging. Whether you're selling on platforms like Redbubble or managing your own store, creating designs that resonate with your audience is the key to success. But how do you craft designs that not only look great but also sell? In this blog post, I’ll guide you through the process of creating designs that work for your print-on-demand business, with tips and tricks tailored to help you stand out in a competitive market. Let’s dive in!
Why Design Matters in Print-on-Demand
In the world of print-on-demand, your designs are your product. Unlike traditional retail, you’re not selling physical inventory—you’re selling ideas. Your customers are drawn to your creativity, so your designs need to:
- Capture attention: Bold, unique designs stand out in search results.
- Resonate with your audience: People buy designs that align with their personality, values, or interests.
- Fit the product: A design that looks great on a t-shirt might not work on a mug or phone case.
Understanding these principles is the first step to creating designs that work for your business.
Step 1: Know Your Niche
The most successful print-on-demand businesses are niche-focused. Instead of trying to appeal to everyone, target a specific audience.
- Research your audience: Who are they? What are their interests, hobbies, or values?
- Find trending niches: Use tools like Google Trends or Redbubble’s trending searches to discover what’s popular.
- Create for your passion: If you’re passionate about your niche, it will show in your designs.
For example, if your niche is cozy, minimalist designs, you could create products that appeal to people who love hygge-inspired aesthetics.
Step 2: Brainstorm Unique Design Ideas
Once you’ve identified your niche, it’s time to brainstorm ideas. Here’s how to get started:
- Use keyword research: Tools like Redbubble’s search bar or Pinterest Trends can help you find popular themes.
- Look for inspiration: Check out competitors, social media, or even nature for fresh ideas.
- Think seasonally: Holidays, seasons, and special events are great opportunities for themed designs.
Pro tip: Keep a notebook or digital folder for design ideas. Inspiration can strike at any time!
Step 3: Master the Tools of the Trade
You don’t need to be a professional graphic designer to create stunning designs. With the right tools, anyone can make high-quality artwork.
- Free design tools: Canva, GIMP, and Inkscape are great for beginners.
- Professional software: Adobe Photoshop and Illustrator offer advanced features for experienced designers.
- Mockup generators: Use tools like Placeit to see how your designs will look on products.
If you’re new to design, start simple. Minimalist designs with clean lines and bold typography are often bestsellers.
Step 4: Optimize Your Designs for Products
Not all designs work on every product. To maximize sales, tailor your designs to fit specific items.
- Consider placement: A design that looks great on a t-shirt might need adjustments for a mug or sticker.
- Use high-resolution files: Print-on-demand platforms require high-quality images to ensure sharp prints.
- Test your designs: Upload them to mockup tools to see how they look on different products.
For example, if you’re creating a design for a phone case, make sure the key elements aren’t cut off by the edges or camera hole.
Step 5: Write SEO-Friendly Titles and Tags
Even the best designs won’t sell if no one can find them. That’s where SEO comes in.
- Use relevant keywords: Include terms your audience is searching for, like “minimalist phone case” or “funny coffee mug.”
- Write descriptive titles: Instead of “Cool Design,” try “Retro Sunset Design for T-Shirts and Stickers.”
- Add detailed tags: Use a mix of broad and specific tags to improve your visibility.
For example, if your design is a cozy winter illustration, your tags might include “winter mug,” “cozy vibes,” and “holiday gift ideas.”
Step 6: Promote Your Designs
Creating great designs is only half the battle—you also need to market them.
- Leverage social media: Share your designs on Instagram, Pinterest, and TikTok.
- Engage with your audience: Respond to comments and messages to build a loyal following.
- Collaborate with influencers: Partner with creators who align with your niche to reach a wider audience.
You can share behind-the-scenes content, like your design process or mockups, to connect with your audience on a personal level.
Step 7: Analyze and Improve
Finally, track your performance to see what’s working and what’s not.
- Check your analytics: Platforms like Redbubble provide insights into your sales and traffic.
- Experiment with new designs: Test different styles, themes, or niches to see what resonates.
- Listen to feedback: Pay attention to customer reviews and comments to improve your designs.
Remember, success in print-on-demand is a marathon, not a sprint. Keep learning and adapting as you go.
Final Thoughts
Creating designs that work for your print-on-demand business takes time, creativity, and strategy. By understanding your niche, mastering design tools, and optimizing your listings for SEO, you can build a successful shop that stands out from the crowd.
You have the power to turn your ideas into products that people love. So, what are you waiting for? Start creating today and watch your business grow!
Looking for unique, cozy designs that inspire and stand out? Visit my Redbubble shop to explore a collection of creative products made just for you!
#Print-on-demand business#Redbubble tips#How to create designs#Print-on-demand design tips#Redbubble design ideas#Niche marketing for POD#How to sell on Redbubble#Print-on-demand success#Redbubble SEO tips#Best tools for POD#Graphic design for beginners#Trending print-on-demand niches#How to optimize designs#Print-on-demand marketing#Redbubble product ideas#Cozy design inspiration#Minimalist design tips#Seasonal design ideas#How to use Canva for POD#Redbubble mockup tips#Passive income with POD#How to sell art online#Redbubble shop strategies#Print-on-demand trends#How to grow a POD business#Print-on-demand branding#Redbubble keyword research#Social media for POD#Redbubble artist tips
3 notes
·
View notes
Text
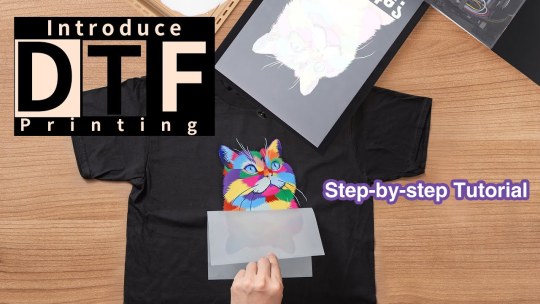
DTF Transfer Printing for Beginners: A Comprehensive Guide to Printing DTF Transfers at Home
As custom apparel and personalized items continue to gain popularity, creative enthusiasts are looking for efficient and affordable ways to produce high-quality prints from the comfort of their homes. Direct-to-Film (DTF) transfer printing has emerged as an accessible and versatile method for producing vibrant designs on various surfaces, especially textiles. DTF printing offers the advantage of application on a range of materials while maintaining exceptional color fidelity and detail. This article will introduce beginners to the DTF printers printing process, the equipment and materials needed, step-by-step instructions for printing transfers at home, tips for successful application, and the benefits of incorporating DTF printing into your crafting repertoire.
Understanding DTF Transfer Printing
DTF transfer printing is a relatively new technology that combines elements from both Direct-to-Garment (DTG) and traditional heat transfer methods. DTF printing involves printing designs onto a special film using specific inks that offer excellent adhesion and durability. The printed film is then coated with a layer of adhesive powder, which, when heated, bonds securely to the fabric. This process differentiates DTF from other transfer methods, providing vibrant prints, the ability to work with a wide variety of fabrics, and ease of application. For beginners, understanding the mechanics of DTF printing is essential for achieving high-quality results and exploring the potential of this versatile printing method.
Equipment and Materials Needed
To embark on your DTF printing journey, you'll need a collection of essential equipment and materials. The primary equipment required is a DTF printer, specifically an inkjet printer that can accommodate DTF transfer films. You’ll also need DTF inks, which are specifically formulated for this printing process, along with adhesive powder that helps form a strong bond between the transfer and fabric. Other necessary items include DTF transfer film, heat press, a weeding tool for removing excess film, and protective sheets to place between the fabric and heat press for safe application. While it may seem like a considerable investment upfront, many of these items can be purchased gradually as you become more comfortable with the process.
Step-by-Step Process for Printing DTF Transfers
Once you have gathered the necessary equipment and materials, the process of printing DTF transfers can begin.
1. Design Creation: Start by creating your design using graphic design software (like Adobe Illustrator or CorelDRAW) or purchasing premade designs. Ensure your design is in a compatible format and sized appropriately for your project.
2. Printing: Load the DTF transfer film into your printer. Print your design, ensuring to set it for "mirror" mode so that the image transfers correctly when applied to the fabric.
3. Adhesive Application: Once printed, sprinkle the adhesive powder evenly onto the wet ink immediately after printing. Gently shake off any excess powder.
4. Curing: Use a heat source, such as a heat press, to cure the transfer. This generally involves setting the heat press to a specific temperature (around 160-180°C) and applying even pressure for roughly 20-30 seconds. This step helps melt the adhesive powder into the print.
5. Weeding: Allow the transfer to cool, then weed out the unwanted areas of the film using a weeding tool, leaving you with your desired design.
6. Pressing on Fabric: Place your fabric on the heat press, position the transfer film (ink side down), apply the heat press again for another 10-15 seconds, and then let it cool before peeling off the film backing.
Tips for Successful DTF Transfers
To achieve the best results with DTF transfer printing, several tips can help ensure success. Begin by investing time in acclimating yourself to the equipment and practicing with various designs and fabrics. Experiment with different print settings, as printing at the right resolution and using suitable profiles for DTF printing can significantly influence the final output. It's also important to use high-quality DTF films and inks, as these will directly affect the vibrancy and durability of your prints. Lastly, always remember to conduct washing tests on fabric after the initial applications; this will provide insight into the longevity and durability of your DTF transfers and help you adjust your processes accordingly.
Benefits of DTF Printing for DIY Enthusiasts
For those interested in custom apparel, DTF transfer printing offers multiple benefits. One significant advantage is its versatility; DTF printing can be applied to a wide range of fabrics, including cotton, polyester, and blends. This flexibility enables crafters to experiment with different materials and styles without being restricted to specific substrates. Additionally, DTF transfers deliver vibrant colors and intricate details, making them ideal for creating striking designs on clothing. The process is also relatively straightforward compared to other printing methods, often requiring less upfront investment and offering rapid turnaround times for small batch production. Overall, DTF printing not only encourages creativity but also offers an efficient way to produce high-quality custom items.
Final Thought
In summary, DTF transfer printing provides an exciting opportunity for beginners and craft enthusiasts to produce professional-quality prints from home. By understanding the mechanics behind the process, gathering the right equipment, and following the steps outlined, you can start your venture into the world of custom printing today. Embrace the versatility and ease of DTF printing to create personalized apparel and accessories that reflect your unique style. As you gain experience and confidence, your creative possibilities will expand, allowing you to explore the full potential of DTF transfer printing. So grab your supplies, start experimenting, and watch your designs come to life through this innovative medium!
6 notes
·
View notes