#HTTP-Server
Explore tagged Tumblr posts
Visit Tumblr Blog
Explore Tumblr blogs with no restrictions, modern design and the best experience.
Last Seen Tumblr Blogs


Fun Fact
Tumblr was named as a finalist in Lead411’s New York City Hot 125 in Aug 2010.
Text
MicroPython mit ESP32: Einrichten eines HTTP-Servers

In diesem Beitrag zeige ich dir, wie du mit deinem ESP32 und MicroPython einen einfachen HTTP-Server einrichtest und eine kleine Webseite auslieferst. Im letzten Beitrag habe ich bereits gezeigt, wie man einen Access Point erstellt und sich mit dem Handy verbindet. Hier möchte ich nun den nächsten Schritt wagen und eine kleine Webseite ausliefern, die zunächst eine Begrüßung anzeigt und anschließend die Sensordaten eines DHT11-Sensors vom Rich Shield von Open Smart darstellt. Dadurch erhältst du eine interaktive Möglichkeit, die Daten deines ESP32 über das Web zu überwachen und anzuzeigen. https://youtu.be/klbPSt14XbA
Was ist ein HTTP-Server?
Ein HTTP-Server ist ein Programm, das auf einem Computer oder Mikrocontroller läuft und Anfragen von Webbrowsern entgegennimmt. Wenn du eine Webseite in deinem Browser öffnest, sendet der Browser eine Anfrage an den HTTP-Server, der die gewünschte Seite zurückschickt. Der Server sorgt also dafür, dass Webseiten und Daten an deinen Browser geliefert werden. Für deinen ESP32 bedeutet das, dass du mit einem HTTP-Server die Daten deines Mikrocontrollers über eine Webseite anzeigen kannst. So kannst du zum Beispiel Sensordaten in Echtzeit überwachen und auf einer Webseite anzeigen lassen.
Was du benötigst
Um dieses Projekt durchzuführen, benötigst du die folgenden Komponenten und Werkzeuge: - ESP32 D1 R32 Board* - MicroPython Firmware auf dem ESP32 - Entwicklungsumgebung (z.B. Thonny oder uPyCraft) - DHT11 Sensor (zbsp. vom Rich Shield von Open Smart) - Ein Gerät (z.B. Smartphone oder Laptop) zur Verbindung mit dem Access Point Im ersten Schritt richten wir einen Access Point (AP) ein, damit du eine direkte Verbindung zu deinem ESP32 herstellen kannst. Ein Access Point ermöglicht es, dass dein ESP32 ein eigenes WLAN-Netzwerk erstellt, mit dem du dich verbinden kannst. Dies ist besonders praktisch, wenn kein anderes WLAN in der Nähe verfügbar ist oder du eine isolierte Verbindung für dein Projekt benötigst. Hinweis von mir: Die mit einem Sternchen (*) markierten Links sind Affiliate-Links. Wenn du über diese Links einkaufst, erhalte ich eine kleine Provision, die dazu beiträgt, diesen Blog zu unterstützen. Der Preis für dich bleibt dabei unverändert. Vielen Dank für deine Unterstützung!
Programmieren eines kleinen HTTP-Server mit MicroPython auf dem ESP32
Im ersten Schritt richten wir einen Access Point (AP) auf dem ESP32 ein, damit du eine direkte Verbindung zu deinem Mikrocontroller herstellen kannst. Dazu verwenden wir den folgenden MicroPython-Code aus dem letzten Beitrag: import network # Access Point erstellen ap = network.WLAN(network.AP_IF) ap.active(True) ap.config(essid='ESP32', password='12345678', authmode=network.AUTH_WPA_PSK) while ap.active() == False: pass print('Access Point aktiv') print(ap.ifconfig()) try: while True: pass except KeyboardInterrupt: ap.active(False) Dieser Code aktiviert einen abgesicherten Access Point mit dem Namen / der SSID "ESP32" und dem Passwort "12345678". Sobald der AP aktiv ist, kannst du dich mit deinem Gerät verbinden. Im nächsten Schritt programmieren wir einen einfachen HTTP-Server, der eine kleine Webseite ausliefert, die "Hallo Welt!" anzeigt: import network import socket # Access Point erstellen ap = network.WLAN(network.AP_IF) # WLAN-Objekt für den Access Point erstellen ap.active(True) # Access Point aktivieren # SSID und Passwort für den Access Point festlegen ap.config(essid='ESP32', password='12345678', authmode=network.AUTH_WPA_PSK) while ap.active() == False: # Warten bis der Access Point aktiv ist pass # Access Point aktiv und Konfiguration anzeigen print('Access Point aktiv') print(ap.ifconfig()) # HTTP-Server einrichten addr = socket.getaddrinfo('0.0.0.0', 80) # Adresse und Port für den HTTP-Server festlegen (Port 80) s = socket.socket() # Socket erstellen s.bind(addr) # Socket an die Adresse binden s.listen(1) # Socket für eingehende Verbindungen vorbereiten # HTTP-Server gestartet und Adresse angezeigt print('Server läuft auf', addr) while True: cl, addr = s.accept() # Auf eine eingehende Verbindung warten print('Client verbunden von', addr) r = cl.recv(1024) # Daten von der Verbindung empfangen (hier nicht verwendet) # HTTP-Antwort erstellen response = """ HTTP/1.1 200 OK ESP32 Webserver
Hallo Welt!
""" cl.send(response) # HTTP-Antwort an den Client senden cl.close() # Verbindung schließen Dieser Code richtet zunächst einen gesicherten Access Point mit der SSID "ESP32" und dem Passwort "12345678" ein. Sobald der Access Point aktiv ist, startet er einen HTTP-Server auf Port 80. Der Server antwortet auf eingehende Anfragen mit einer einfachen HTML-Seite, die "Hallo Welt!" anzeigt. Wenn das kleine Programm gestartet wird, dann werden die Daten des AP in der Kommandozeile ausgegeben sowie dass der Server läuft. MPY: soft reboot Access Point aktiv ('192.168.4.1', '255.255.255.0', '192.168.4.1', '0.0.0.0') Server läuft auf ('0.0.0.0', 80) Wenn wir nun den Browser öffnen und die IP-Adresse des Access Point eingeben, erhalten wir als Antwort eine kleine Webseite mit dem Text "Hallo Welt!".

Erstellen einer kleinen Webseite mit Sensordaten des DHT11 Sensors mit MicroPython auf dem ESP32
In den letzten Beiträgen habe ich dir das Rich Shield von Open Smart schon detailliert vorgestellt und auch gezeigt, wie man den DHT11 Sensor ausließt.

Rich Shield von Open Smart Wenn du dieses kleine, nützliche Shield nicht hast, dann kannst du dir recht einfach die Schaltung auch selber nachbauen, du benötigst hierzu: - einen ESP32 D1 R32*, - einen DHT11 Sensor*, - drei Breadboardkabel*, - ein 170 Pin Breadboard*
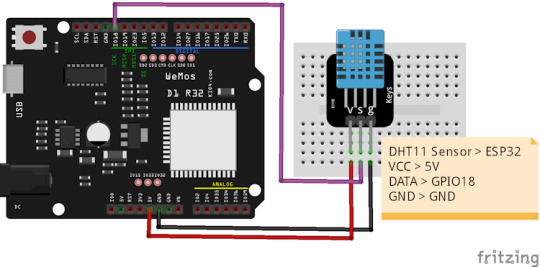
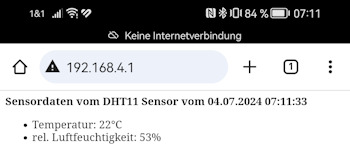
Schaltung - ESP32 D1 R32 mit DHT11 Sensor als Baustein auf einer Platine Nachfolgender Code erstellt einen Access Point und baut einen HTTP-Server auf. Wenn man auf die Adresse des Servers 192.168.4.1 zugreift werden die Sensordaten ermittelt und auf einer Seite ausgeliefert. import network import socket import dht from machine import RTC, Pin dht11 = dht.DHT11(Pin(19, Pin.IN)) # Liefert einen Zeitstempel def getTimestamp(): rtc = RTC() currentDateTime = rtc.datetime() year = currentDateTime month = currentDateTime day = currentDateTime unknown = currentDateTime hour = currentDateTime minutes = currentDateTime seconds = currentDateTime #prüfen ob die Werte kleiner 10 sind, #wenn ja wird eine führende Null angefügt if int(month) < 10: month = "0" + str(month) if int(day) < 10: day = "0" + str(day) if int(hour) < 10: hour = "0" + str(hour) if int(minutes) < 10: minutes = "0" + str(minutes) if int(seconds) < 10: seconds = "0" + str(seconds) textFormat = "{0}.{1}.{2} {3}:{4}:{5}" return textFormat.format(day, month, year, hour, minutes, seconds) # erstellt und öffnet einen Access Point def openAccessPoint(): # Access Point erstellen ap = network.WLAN(network.AP_IF) # WLAN-Objekt für den Access Point erstellen ap.active(True) # Access Point aktivieren # SSID und Passwort für den Access Point festlegen ap.config(essid='ESP32', password='12345678', authmode=network.AUTH_WPA_PSK) while ap.active() == False: # Warten bis der Access Point aktiv ist pass # Access Point aktiv und Konfiguration anzeigen print('Access Point aktiv') print(ap.ifconfig()) # HTTP-Server einrichten addr = socket.getaddrinfo('0.0.0.0', 80) # Adresse und Port für den HTTP-Server festlegen (Port 80) s = socket.socket() # Socket erstellen s.bind(addr) # Socket an die Adresse binden s.listen(1) # Socket für eingehende Verbindungen vorbereiten # HTTP-Server gestartet und Adresse angezeigt print('Server läuft auf', addr) openAccessPoint() while True: # eine Messung durchführen dht11.measure() txtTimestamp = getTimestamp() txtTemperatur = "Temperatur: " + str(dht11.temperature()) + "°C" txtLuftfeuchtigkeit = "rel. Luftfeuchtigkeit: "+ str(dht11.humidity()) + "%" cl, addr = s.accept() # Auf eine eingehende Verbindung warten print('Client verbunden von', addr) r = cl.recv(1024) # Daten von der Verbindung empfangen (hier nicht verwendet) # HTTP-Antwort erstellen response = """ HTTP/1.1 200 OK ESP32 Webserver Sensordaten vom DHT11 Sensor vom {timestamp} - {temperatur} - {luftfeuchtigkeit} """.format(timestamp=txtTimestamp, temperatur=txtTemperatur, luftfeuchtigkeit=txtLuftfeuchtigkeit) cl.send(response) # HTTP-Antwort an den Client senden cl.close() # Verbindung schließen Bei jedem Zugriff auf den Server wird die IP-Adresse des Clients auf der Kommandozeile ausgegeben. MPY: soft reboot Server läuft auf ('0.0.0.0', 80) Access Point aktiv ('192.168.4.1', '255.255.255.0', '192.168.4.1', '0.0.0.0') Client verbunden von ('192.168.4.2', 37230) Client verbunden von ('192.168.4.2', 37238) Client verbunden von ('192.168.4.2', 37244) Client verbunden von ('192.168.4.2', 37252) Auf der kleinen Webseite werden jetzt die Sensordaten inkl. einem Zeitstempel ausgegeben. Jedes Mal, wenn wir jetzt die Webseite aktualisieren, werden auch neue Sensordaten ausgelesen und ausgeliefert.
Automatisches Aktualisieren nach x Sekunden Wir können mit einem Meta-Tag refresh auch die Webseite automatisch nach x-Sekunden aktualisieren lassen. Der nachfolgende Code läßt eine Seite alle 60 Sekunden aktualisieren: Um jetzt die Webseite alle 5 Sekunden zu aktualisieren, müssen wir die Antwort vom Server wiefolgt anpassen: # HTTP-Antwort erstellen response = """ HTTP/1.1 200 OK ESP32 Webserver Sensordaten vom DHT11 Sensor vom {timestamp} - {temperatur} - {luftfeuchtigkeit} """.format(timestamp=txtTimestamp, temperatur=txtTemperatur, luftfeuchtigkeit=txtLuftfeuchtigkeit)
Troubleshooting
Nachfolgend möchte ich dir ein paar Fehler und deren Lösungen aufzeigen welche in zusammenhang mit diesem Beitrag aufgetreten sind. Fehler: OSError: EADDRINUSE Die Fehlermeldung "OSError: EADDRINUSE" tritt in der Regel auf, wenn ein Programm versucht, einen Netzwerkport zu öffnen, der bereits von einem anderen Prozess verwendet wird. Traceback (most recent call last): File "", line 53, in OSError: EADDRINUSE Die Lösung ist hier recht einfach, es muss einmal die Verbindung des Mikrocontrollers vom Computer getrennt werden und ein paar Sekunden gewartet werden. Danach sollte es wieder funktionieren. Fehler: Connection lost -- GetOverlappedResult failed (PermissionError(13, 'Zugriff verweigert', None, 5)) Diese Fehlermeldung tritt häufig auf, wenn Programme unter Windows mit Dateien, Netzwerkressourcen oder anderen Systemressourcen interagieren und die erforderlichen Berechtigungen nicht korrekt konfiguriert oder gegeben sind. Connection lost -- GetOverlappedResult failed (PermissionError(13, 'Zugriff verweigert', None, 5)) Use Stop/Restart to reconnect. Process ended with exit code 1. Die Lösung ist hier das zum einen das Tool Thonny neugestartet wird, manchmal ist auch ein Rechnerneustart notwendig. Eine weitere Lösung kann in diesem Fall der austausch des USB-Datenkabel sein. Ich bekomme den Fehler ebenso wenn der Mikrocontroller mit einem normalen Micro-USB Datenkabel über eine Dockingstation mit dem PC verbunden ist. Wenn ich den Mikrocontroller nun direkt mit einem höherwertigen Kabel mit dem PC verbinde dann klappt die Verbindung.
Ausblick auf Teil2
In diesem Beitrag habe ich dir nun gezeigt wie einfach es ist einen kleinen HTTP-Server auf dem ESP32 mit MicroPython zu erstellen und Webseiten auszuliefern. Im nächsten Beitrag möchte ich dir zeigen wie du die auf dem Rich Shield von Open Smart verbauten LEDs über die Webseite steuern kannst.

Rich Shield mit aktivierten LEDs Bleib also gespann was noch alles folgt... Read the full article
0 notes
Text


IIIIII've got what you neeeeeed. And what you need is a bigass cottage.
Babygirl, it's big af. You're gonna need:
A flat, wide, open zone - like in Kozama'uka
The Heels plugin - this shit's raised to avoid ground collision so you gotta rise with it if you RP in it
To tell me how much you like this mod - come on man I worked hard gimmie gimmie
BE CONSIDERATE TO YOUR PAIRING PARTNERS. TURN IT OFF WHEN NOT IN USE.
#ffxiv#ffxiv mods#ffxiv mod#it's done done done done done#the biggest one i've made and probably the last one of this scale#just takes too long to make but is VERY pretty with my shaders like wow#ringing the dinner bell come get yer daggum mod#also for those who like to watch suffering live there's a discord server#there are no perks or benefits. only suffering. https://discord.com/invite/C6s6QmAUsd
47 notes
·
View notes
Text
DAFTAR ID GACOR

SITUS SLOT ⚡️ TERBARU ⚡️ ANTI RUNGKAT

2 notes
·
View notes
Note
*hides something in your pocket when you are not looking*

YUME?! YAAHHA that’s so cute
(also i feel like i should pass on that my bf wants to join me the next time i come into your world LMAO)
#which is funny to me bc he carries me so… ur world would be like childs play to him#we have matching genshin sigs have i shown yall#i know i showed the network server 🥹#anyways HI YUME#how have you been sweetheart?#— 🎟️ yume#the archon’s disciples 💙#> entry to the opera epiclese ✉️#https-furina
11 notes
·
View notes
Text
why's it so hard to set up a custom minecraft server...
#like cmon I have a public facing server already#I know it works since the logs dont show any errors#and like ive tried running the exact same hardware+software setup on my local network#but like unfortunately the public facing server only has IPv6#and I cant connect cause my ISP only issues IPv4#and the other people I want to play with probably only have v4 as well#I guess the hosting provider I have technically has a v4->v6 proxy to allow ppl with v4 only to connect to their servers#but it only passes through http imap and smtp traffic#so its pretty much useless for what I want to do#and like so far finding a proxy service that actually does what i want it to do seems impossible#like PLEASE I WANNA PLAY MINECRAFT WITH SOMEONE ELSE#I DONT WANNA SPEND TIME TRYING TO FIGURE OUT HOW TO GET THE SERVER RUNNING
3 notes
·
View notes
Text
I am so happy to share this Art Swap I was apart of, that is hosted in @artistreeio Discord server! Many artist coming together to show off our unique styles, and show support for each other! Mine is # 27
Please check out the other artist links here, and show your friends!
#I am so happy to share this Art Swap I was apart of#that is hosted in @artistreeio Discord server! Many artist coming together to show off our unique styles#and show support for each other! Mine is#27#Please check out the other artist links here#and show your friends!#https://lnk.bio/ArtistreeInspiredByReDrawYourChildhoodArt#artistree#collage#artswap#artistsupportartists#digital#art#fantasy
11 notes
·
View notes
Text
Victorian Government data published on dark web
youtube
#ausgov#politas#auspol#tasgov#taspol#australia#invasion of privacy#privacy#internet#cybernews#cybersecurity#cyberattack#vicpol#vicgov#russia#http proxy#proxy service#proxy servers#dark web#darkweb#i.t.#information technology#it#infotech#cyber security#security#tor#onion#onions#ransom
6 notes
·
View notes
Text
#Hone your skills in this novel blend of action RPG and complex combat system. Experience new gameplay with an isometric view. Improve your c#observe your enemies#and come up with strategies against them. Show your prowess as a brave warrior!#Achilles: Legends Untold is available now on Steam and Epic Game Store for $19.99 / EUR 18.99.#You can also join our Discord server for the latest updates and to have a chat with the devs.#Achilles: Legends Untold Steam Page:#https://store.steampowered.com/app/13...#Achilles: Legends Untold Epic Games Store Page:#https://store.epicgames.com/en/p/achi...#achilleslegendsuntold#gaming#gameplay#gamingchallenge#soulslike#arpg#AchillesLegendsUntold#SpiderCaveUpdate#AdventureAwaits#Gaming#NewUpdate#BraveTheDepths#ChallengeYourself#NewEnemies#DeadlyTraps#ConquerYourFears#DownloadNow#Steam#EpicGameStore#DiscordCommunity#ChatWithDevs
2 notes
·
View notes
Text
So, Discord has added a feature that lets other people "enhance" or "edit" your images with different AI apps. It looks like this:

Currently, you can't opt out from this at all. But here's few things you can do as a protest.
FOR SERVERS YOU ARE AN ADMIN IN
Go to Roles -> @/everyone roles -> Scroll all the way down to External Apps, and disable it. This won't delete the option, but it will make people receive a private message instead when they use it, protecting your users:

You should also make it a bannable offense to edit other user's images with AI. Here's how I worded it in my server, feel free to copypaste:
Do not modify other people's images with AI under ANY circumstances, such as with the Discord "enhancement" features, amidst others. This is a bannable offense.
COMPLAIN TO DISCORD
There's few ways to go around this. First, you can go to https://support.discord.com/hc/en-us/requests/new , select Help and Support -> Feedback/New Feature Request, and write your message, as seen in the screenshot below.

For the message, here's some points you can bring up:
Concerns about harassment (such as people using this feature to bully others)
Concerns about privacy (concerns on how External Apps may break privacy or handle the data in the images, and how it may break some legislations, such as GDPR)
Concerns about how this may impact minors (these features could be used with pictures of irl minors shared in servers, for deeply nefarious purposes)
BE VERY CLEAR about "I will refuse to buy Nitro and will cancel my subscription if this feature remains as it is", since they only care about fucking money
Word them as you'd like, add onto them as you need. They sometimes filter messages that are copypasted templates, so finding ways to word them on your own is helpful.
ADDING: You WILL NEED to reply to the mail you receive afterwards for the message to get sent to an actual human! Otherwise it won't reach anyone
UNSUSCRIBE FROM NITRO
This is what they care about the most. Unsuscribe from Nitro. Tell them why you unsuscribed on the way out. DO NOT GIVE THEM MONEY. They're a company. They take actions for profit. If these actions do not get them profit, they will need to backtrack. Mass-unsuscribing from WOTC's DnD beyond forced them to back down with the OGL, this works.
LEAVE A ONE-STAR REVIEW ON THE APP
This impacts their visibility on the App store. Write why are you leaving the one-star review too.
_
Regardless of your stance on AI, I think we can agree that having no way for users to opt out of these pictures is deeply concerning, specially when Discord is often used to share selfies. It's also a good time to remember internet privacy and safety- Maybe don't post your photos in big open public servers, if you don't want to risk people doing edits or modifications of them with AI (or any other way). Once it's posted, it's out of your control.
Anyways, please reblog for visibility- This is a deeply concerning topic!
19K notes
·
View notes
Text
Discord has added generative AI features to servers.
Here are THREE THINGS you need to do today.
1️⃣ YOUR SERVER
Go into server settings -> roles -> Default permissions
Search for "external apps" and disable it

2️⃣ YOUR FEEDBACK
Access Discord support -> https://support.discord.com/hc/en-us/requests/new
Go into Help & Support > Feedback/New Feature Request
Denounce generative AI and request the feature be removed. Bring up privacy concerns for yourself, your data, and for minors.
You will get an automatic reply to this request- PLEASE REPLY TO THE EMAIL TO PUSH IT TO THE TEAM or else it will get discarded.
3️⃣ ON MOBILE
Access your app store
Leave a 1 star review and publicly denounce generative AI and Discord's use of it
Reblog this to spread the word, I'm tired of the enshittification of the things I use in my day to day life.
19K notes
·
View notes
Link
#Automation#backup#cloudstorage#collaboration#dataprivacy#database#Docker#filesharing#HTTPS#Install#Linux#networking#Nextcloud#Nextcloudsetup#open-source#reverseproxy#Security#self-hosted#Server#systemadministration
0 notes
Text
➮𝐃𝐀𝐅𝐓𝐀𝐑
➮𝐋𝐎𝐆𝐈𝐍
➮𝐈𝐃 𝐋𝐈𝐌𝐈𝐓𝐄𝐃

#Serverkilat66#Serverkilat 66#Server kilat66#Server kilat 66#Serverkilat66.com#Serverkilat66.org#Serverkilat66.site#Serverkilat66.https
1 note
·
View note
Text
Cybercriminals are abusing Google’s infrastructure, creating emails that appear to come from Google in order to persuade people into handing over their Google account credentials. This attack, first flagged by Nick Johnson, the lead developer of the Ethereum Name Service (ENS), a blockchain equivalent of the popular internet naming convention known as the Domain Name System (DNS). Nick received a very official looking security alert about a subpoena allegedly issued to Google by law enforcement to information contained in Nick’s Google account. A URL in the email pointed Nick to a sites.google.com page that looked like an exact copy of the official Google support portal.
As a computer savvy person, Nick spotted that the official site should have been hosted on accounts.google.com and not sites.google.com. The difference is that anyone with a Google account can create a website on sites.google.com. And that is exactly what the cybercriminals did. Attackers increasingly use Google Sites to host phishing pages because the domain appears trustworthy to most users and can bypass many security filters. One of those filters is DKIM (DomainKeys Identified Mail), an email authentication protocol that allows the sending server to attach a digital signature to an email. If the target clicked either “Upload additional documents” or “View case”, they were redirected to an exact copy of the Google sign-in page designed to steal their login credentials. Your Google credentials are coveted prey, because they give access to core Google services like Gmail, Google Drive, Google Photos, Google Calendar, Google Contacts, Google Maps, Google Play, and YouTube, but also any third-party apps and services you have chosen to log in with your Google account. The signs to recognize this scam are the pages hosted at sites.google.com which should have been support.google.com and accounts.google.com and the sender address in the email header. Although it was signed by accounts.google.com, it was emailed by another address. If a person had all these accounts compromised in one go, this could easily lead to identity theft.
How to avoid scams like this
Don’t follow links in unsolicited emails or on unexpected websites.
Carefully look at the email headers when you receive an unexpected mail.
Verify the legitimacy of such emails through another, independent method.
Don’t use your Google account (or Facebook for that matter) to log in at other sites and services. Instead create an account on the service itself.
Technical details Analyzing the URL used in the attack on Nick, (https://sites.google.com[/]u/17918456/d/1W4M_jFajsC8YKeRJn6tt_b1Ja9Puh6_v/edit) where /u/17918456/ is a user or account identifier and /d/1W4M_jFajsC8YKeRJn6tt_b1Ja9Puh6_v/ identifies the exact page, the /edit part stands out like a sore thumb. DKIM-signed messages keep the signature during replays as long as the body remains unchanged. So if a malicious actor gets access to a previously legitimate DKIM-signed email, they can resend that exact message at any time, and it will still pass authentication. So, what the cybercriminals did was: Set up a Gmail account starting with me@ so the visible email would look as if it was addressed to “me.” Register an OAuth app and set the app name to match the phishing link Grant the OAuth app access to their Google account which triggers a legitimate security warning from [email protected] This alert has a valid DKIM signature, with the content of the phishing email embedded in the body as the app name. Forward the message untouched which keeps the DKIM signature valid. Creating the application containing the entire text of the phishing message for its name, and preparing the landing page and fake login site may seem a lot of work. But once the criminals have completed the initial work, the procedure is easy enough to repeat once a page gets reported, which is not easy on sites.google.com. Nick submitted a bug report to Google about this. Google originally closed the report as ‘Working as Intended,’ but later Google got back to him and said it had reconsidered the matter and it will fix the OAuth bug.
10K notes
·
View notes
Text

i’m crying and i can’t tell which emotion it is 😭😭😭
#bell always makes me CACKLE im losing it#the server is nothing but a NIGHTMARE 👹#— 🌊 inner thoughts#https-furina
3 notes
·
View notes
Text
SERVERLAOS 76༆༆𝙻𝙸𝙽𝙺 𝚁𝙴𝚂𝙼𝙸 𝙾𝚁𝙸𝙶𝙸𝙽𝙰𝙻 𝚃𝙴𝚁𝙱𝙰𝙸𝙺 𝙳𝙰𝙽 𝚃𝙴𝚁𝙿𝙴𝙲𝙰𝚈𝙰 𝚂𝙴 𝙰𝚂𝙸𝙰 𝟸𝟶𝟸𝟻
༆-𝐃𝐀𝐅𝐓𝐀𝐑
༆-𝐋𝐎𝐆𝐈𝐍
༆-𝐈𝐃 𝐋𝐈𝐌𝐈𝐓𝐄𝐃

SERVERLAOS76 ⚜️ 𝗟𝗜𝗡𝗞 𝗥𝗘𝗦𝗠𝗜 ✅SERVERLAOS76 ⚜️ 𝗟𝗜𝗡𝗞 𝗢𝗙𝗙𝗜𝗖𝗜𝗔𝗟 𝗪𝗗 ✅SERVERLAOS76 ⚜️ 𝗟𝗜𝗡𝗞 𝗔𝗡𝗧𝗜 𝗣𝗛𝗜𝗦𝗜𝗡𝗚 ✅


#Serverlaos 76#Serverlaos 76.https#Serverlaos76#Serverlaos 76.site#Server laos 76#Serverlaos 76.com#Server laos76#Serverlaos 76.org
0 notes