#How to Clear RAM Cache in Windows 10
Explore tagged Tumblr posts
Visit Tumblr Blog
Explore Tumblr blogs with no restrictions, modern design and the best experience.
Last Seen Tumblr Blogs


Fun Fact
Total funding amounts to $125.3M.
Video
youtube
How to Clear RAM Cache in Windows 10/11 (2023) | 🚀 Make Computer Faster
0 notes
Text
How Do I Connect Cricut to Computer: A Step-by-Step Guide
How do I connect Cricut to computer? This was a question I got on one of my blogs a week ago. Not only this, but I also received similar questions regarding connection from many readers. Since none of my posts has a complete guide to Cricut connection in one single guide, I tried to write this.
Without thinking twice, dive into this blog and explore the steps one by one. In this blog, I have answered how do I connect my Cricut to my computer via Bluetooth. Let’s start now!
What Do I Need to Connect My Cricut to a Computer?
In order to learn how do I connect Cricut to computer, you have to first understand what you need before connecting to your Cricut. As we know, the connection is a part of the Cricut setup, meaning we are actually setting up our machines. So, there are things that are required before setup. Let’s get a look into it:
Cricut machine
Power cable to connect your Cricut to a wall outlet
A flat surface like a table for keeping the machine on
A Windows/Mac computer with the following system requirements:
For Windows
Operating System – Windows 10 or later (64-bit)
RAM – Minimum 4GB
Disk – 2 GB free
CPU – Intel Dual Core or equivalent to AMD processor
Display – 1024px x 768px screen resolution
Connectivity – A USB port/Bluetooth connection
For Mac
Operating System – macOS 11 or later
CPU – 1.83 GHz
RAM – Minimum 4GB
Display – Minimum 1024px x 768px screen resolution
A USB port or Bluetooth is required
Disk – 2GB
How Do I Connect Cricut to Computer (Windows)?
You will need to set up your Cricut on a Windows PC, which requires a connection. Since the connection is part of the Cricut setup, you must use a compatible Windows PC, such as Windows 10 or a later version. I have explained the easy steps I followed to connect my Cricut to a Windows computer.
Here are the easy steps to connect your Cricut to a computer on a PC:
First, you need to look for a flat surface to place your Cricut.
Here, ensure the distance is no more than 15 feet from the PC.
Afterward, go to the Start menu and select a gear icon to open Settings.
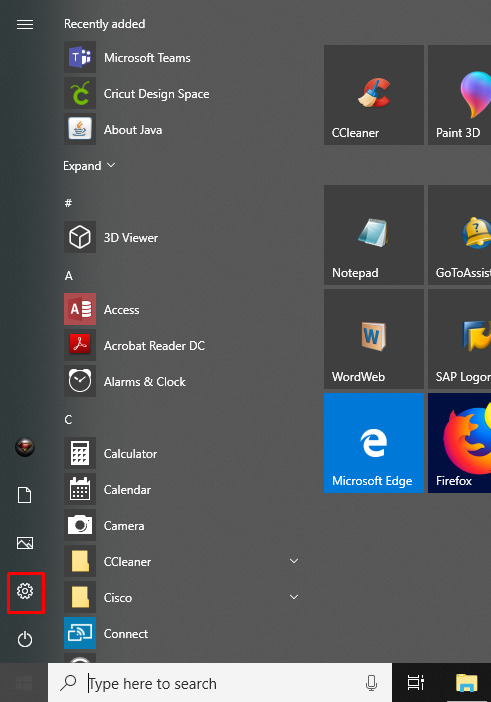
As you click on Settings, you will move to another screen, where you need to click on Devices.

Verify if your Bluetooth is ON, then go to Add Bluetooth or other device.
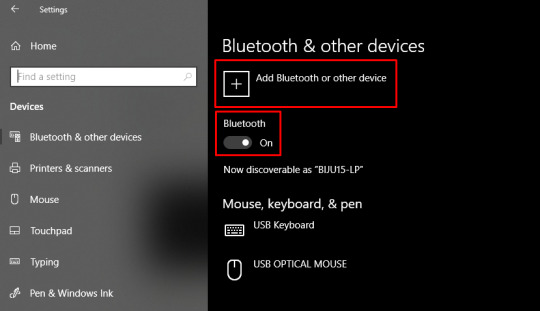
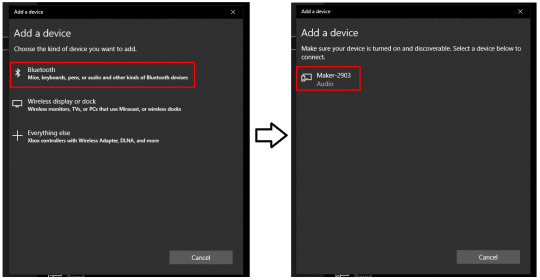
Next, select the Bluetooth option and wait for your PC to detect your Cricut machine.
Select it as it is visible in the open list, and your pairing will be done.
How Do I Connect Cricut to Computer (Mac)?
Mac users need to follow the following steps. However, the placements of Cricut and your computer are almost the same as for Windows. Here are the easy steps to connect your Cricut to a computer on a Mac:
Review if your computer is powered on or off.
After that, move to the Apple menu and choose the System Preferences option.
Now, go to the Bluetooth app on your Mac computer.
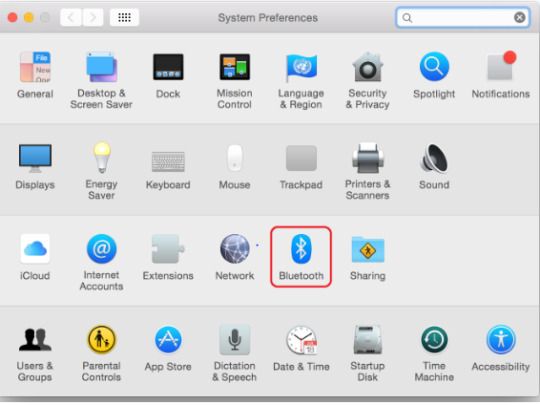
Afterward, turn on the Bluetooth.
Next, select the detected Cricut model from the available list.
Last but not least, you have connected your Mac computer to your Cricut.
FAQs
Question 1: What is the “Connect to Computer via Bluetooth” screen on Cricut?
Answer: The “Connect to Computer via Bluetooth” usually appears during the setup of Cricut Maker 3 or Cricut Explore 3. It happens because the Cricut Design Space app has detected an AMD Ryzen chip on your desktop. Actually, there is a problem with some Windows AMD Ryzen chips that may cause problems when you try to connect your Cricut via a USB cable. Therefore, Cricut recommends you use a Bluetooth connection for these computers.
Question 2: What should I do if my Cricut won’t connect?
Answer: If your Cricut is not connecting to your device, then you need to try the following useful tips:
You need to clear the cache and history of the web browser.
Run a scan on your computer for potential malware.
Defragment the hard disk.
Ensure your firewall or antivirus is blocking Cricut connections.
Question 3: Are all Bluetooth dongles compatible with Cricut machine?
Answer: According to Cricut’s official website, CSR (Cambridge Silicon Radio) Bluetooth dongles are incompatible with the Cricut machine. However, if you want to use a Bluetooth dongle, you need to use one that supports audio devices. Cricut doesn’t guarantee that all dongles will connect to your machine, but those that support audio devices are more likely to be able to connect.
Conclusion
To learn how do I connect Cricut to computer, I have explained all the steps carefully. Before that, I also mentioned things that were required before the Cricut setup. In it, I have especially discussed the system requirements. Make sure your Cricut meets the requirements so that you can do the setup in no time. To have an error-free, smooth connection with the Cricut software, go to this write-up and follow the steps mentioned above.
Read more: install cricut design space app
cricut.com/setup mac
Cricut Design Space
Cricut New Machine Setup
Source: How Do I Connect Cricut to Computer
#How Do I Connect Cricut to Computer#Cricut New Machine Setup#install cricut explore air 2#cricut design space#cricut explore 3#cricut.com/setup#design space signin#cricut.com/setup mac#cricut.com/setup windows
0 notes
Text
youtube
How To Clear RAM Cache In Windows 10 / 11 Laptop (2024) | Make Your PC Run More Faster (Easy Way)
0 notes
Text
How To Clear Up Ram

When you’ve used all the available RAM on your PC or laptop you might notice the system taking way to long to complete tasks, for instance, opening the This PC on Windows 10 or open software from the start menu. This is due to all the physical and available RAM on your system is completed used. Now to make your work smoother you have to clean the computer of yours.
How To Clear Up Ram On Iphone
Free Ram Cleaner For Windows 10
Here, we are typing 'Clear Unused RAM' and hit on the 'Next' button. Once the shortcut is created, switch to the desktop and double-click on the shortcut to clear memory cache on Windows. Method 2: Clear General Cache Disk Cleanup is an integrated feature of Microsoft Windows that. Restarting the PC is a common but effective fix for many computer issues, so is for the issue-insufficient RAM space. You can free up RAM on Windows 10 by rebooting the PC, which can help reset all the running programs and completely clear RAM.
Now you’re thinking, how do I free up ram on windows 10? there are some ways or methods that can be used to free up ram on the computer to boost the speed of the system processing without getting more ram. In this article, we are going to share some of the easy ways to free up ram on Windows 10 PC or laptop without having a hassle.
15Final Words
What is RAM? And Its Use on Computer

Well, RAM (Random Access Memory) is stored in the chipset on your computer motherboard same goes for the laptop. On this chipset, the computer store the short terms data in technical terms the RAM is the hub of the storage for all the programs and activities running on the computer system.
The computer used this stored information to complete the tasks while getting the data on the same time. So technically, when you used all the ram of your computer this may cause slow processing and you might seem all the programs and applications start processing slowing.
Overall the speed of your computer system performance will be decreased. To speed up your computer performance and processing can be easily increased again by cleaning some of the RAM storage on your system. Use below given methods to free up the RAM without hassle.
How To Free up ram on Windows 10 (15 Ways)
If you’re struggling with low Windows 10 system performance or 100% memory usage, High CPU. Then use these methods to free up memory on your computer system to speed up the performance and reduced memory usage.
Restart The Computer System
The Ram is volatile memory, you’ll lose its contents when your computer turned off. Restarting your computer system will clear memory saved on RAM and reset all the running programs and applications. However, this method won’t clear the complete memory but it will boost up the processing speed of the system. By cleaning up apps running on the background on Windows 10.
Update The Windows 10 & Softwares
It is most important to run an updated version of applications and software including Windows to get better system performance.
You must update all the software on your computer system along with the Windows 10 updates. For this Press Windows + I to open Windows settings. Go to the Updates & Security section and click on Windows update > check for updates.
How To Clear Up Ram On Iphone
Lookup RAM Usage
Before getting started the clean of RAM in Windows, you must see what program or application causing the RAM usage for this to follow these below-given steps.
Press Ctrl+Shift+ ESC buttons together to open Task Manager.
Now, Click on More Details to expand the full utility.
Under the Processes tab, click on the Memory heard to sort the app which using more memory
For more deep information regarding the system memory usage, you can go to the Performance tab. Under the CPU section click on Memory to complete an overview of the RAM usage on your computer system. Click on the Open Resource Monitor at the bottom of the Task Manager to get more information.
Use Low Memory Management Web Browsers
If you’re using the default web browser such as Microsoft Edge or Internet Explorer on Windows 10. Then you must try to change the web browser such as Google Chrome or Firefox. Both web browser has low memory management feature that consumes less memory of the RAM. Technically these two browsers are best for memory management on Windows 10 for fast web suffering and downloading.
Remove Bloatware Apps
You must don’t know some of the bloatware apps that you’ve installed on your Windows 10 PC that you’re currently not using them. Such as Skype, WhatsApp, Facebook, Messenger, and many more. These bloatware apps use more RAM of the computer.
If you don’t really need these apps on your computer. Then follow below-given steps to remove apps from Windows 10 PC to free up memory of the computer.
Go to the Start Menu and type in the search bar “Apps and features” and open it.
Now, Scroll to the bloatware app for example “WhatsApp”. Then click on it.
Select the “Uninstall” button to remove it from the PC.
Follow the on-screen uninstallation process to successfully remove the application.
After that restart, the PC to see the performance improvement or Else move to the next method.
Disable Startup Programs & Apps
If you’re using your Windows 10 computer for more than a year. Then you’ve downloaded and installed fair more software and some of this software and now some of that software was no longer in use. By using the third method Lookup Ram usage, Now you know which program using more memory and some of these apps are on startup.
This means the startup apps will automatically start running when you start your computer system. So to avoid this you can disable the startup apps on Windows 10 to boost up the memory of RAM.
Follow these below-given steps to disable startup programs.
1. Press Ctrl+Shift+ESC buttons together to open Task Manager.
2. Now, Go to the Startup tab.
3. Right-Click on the app that you no longer use on your PC.
4. From the pop-menu, select the “Disable” button.
Clear Web Browser Cookies & Cache Files
If you’re using the web browser on a regular basis to open different types of websites daily. Well, you must that every website has its cookies and cache that will be saved into the computer memory. When visited that website, Basically the cookies and cache help the web browser to load the web page faster for the next time when you open that website.
So, if you’ve haven’t cleared the cache on the web browser that you’re using on your computer for far longer. Then you’ve saved cookies and caches in GB that consuming the memory of the RAM. You can easily free up the RAM by clearing the cookies and cache of the web browser.
Note: After removing the cookies and cache in a web browser all the auto-login credentials will be deleted. You need to again login into the website.
To clear Cache and Cookies from a web browser (Google Chrome)
1. Open the Web Browser using the Start Menu or Desktop Shortcut.
2. Now Click on the (…) icon given at the right top corner to open the menu list.
3. Select, then Settings from the popup menu.
4. Navigate to the Privacy and Security section.
5. Now, Clear the Browsing Data, Cookies, Cache.
For the different web browsers such as Microsoft Edge, Firefox, etc. There are different steps to clear the browsing history along with cookies and cache files.
Disable Background Apps
In Windows 10 lots of apps were running on the background of the system that cannot be seen in the display screen. However, these apps are consuming memory of the RAM and some of these apps are malware that affects computer running performance.
To increase the performance of the computer along with RAM memory, you’ve to stop the background running apps on the Windows 10.
Free Ram Cleaner For Windows 10
1. Press Windows + I keys from the keyboard to open Windows Settings.
2. Go to the Privacy section.
3. Scroll down the left side panel. Then select “Background Apps” from the panel.
4. Now, disable the app that no longer in use.
Apps are often to run on the background of the computer system. This enables the apps to send notifications and update the software automatically which consumes lots of RAM memory without taking your permission. So you can easily turn off background apps on Windows 10 that are no longer useful.
Turn off Visual Effects
Windows 10 comes with pre-install visual effects such as tooltips, menus, and many more. This visual effect consumes lots of RAM space on the device, however, these visual effects won’t cause many issues. But if you’re device has lesser RAM then, in this case, you can disable visual effects to speed your computer performance by reducing the RAM storage.
To disable visual effects on Windows 10 follows –
1. Press Windows + E keys to open the File Explorer window.
2. Now, Right-Click on the This PC and choose Properties.
3. Go to the Advanced System Settings.
4. After, this Click on the Settings option given at the Performance section.
5. Click on “Adjust for the best performance”.
Now all the visual effects will be disabled with these settings. In case if you want to customize the visual effect settings and click on custom and select any visual effect that you want to use or like.
Modify Virtual Memory on Windows 10
In Windows, the page file that used hard disk storage and works as virtual memory and you can make adjustments in virtual memory to speed your computer and free up RAM on Windows 10.
Follow the steps to change virtual memory on Windows.
1. Open Control Panel using the Start Menu.
2. Change the Category view to Small icon (if needed)
3. Click on the “Advanced System Settings” to open it.
4. After this, on the Advanced tab, Select the Settings given under the Performance panel.
5. Switch to the Advanced tab again and click on the Change button.
Remove Web Browser Extensions
We all used Google Chrome, Firefox, or Edge browser on Windows 10. It doesn’t matter which browser you’re using on your system. However, to get additional features such as download any video from the web page we used web extension.
Technically, these extensions carry malware with them into your PC that used lots of the RAM. For instance, you can see using the Task Manager in the processes tab. Sometimes the Google Chrome using lots of RAM this is because of the extensions that you’ve installed on the Chrome browser.
To free up the ram on Windows 10 remove the unwanted web extensions from the web browser that you’re used on a daily basis such as Google Chome.
Clear Page File Before Turning off PC
When you restart your PC the page files don’t get cleared because they are stored in the memory of the RAM technically the short term files store in hard drive. So after the shutdown of the PC, the page files don’t remove the file still remain the same and consume the memory of the RAM.
Technically, clearing the page files from the PC hard drive will free up the RAM space on your computer system. Fortunately, you can make page files deleted automatically when the system shutdown. To do that follow below-given steps.
Type “Registry Editor” in the start menu search bar.
On the pop-up window select “Yes” to allow Registry Editor.
On the left, scroll to, and select “HKEY_LOCAL_MACHINE ” > “SYSTEM” > “CurrentControlSet. ”
Find and choose “Control ” > “Session Manager.”
Now, choose “Memory Management.”
Select “ClearPageFileAtShutdown.”
Enter the number “1” under the value data and hit OK.
Tip: Copy and paste this link to the registry editor to avoid steps
Final Words
All these methods helped you to clear the RAM of your computer system to boost system performance. These steps help me out a lot of increase my laptop gaming performance on Windows 10. Because due to this I ‘ve free up lots of RAM storage on the device.
Unlike me, you can also try all these methods to free up the RAM on Windows 10 PC or laptop to get smoother computer experience.
Related Articles:
1 note
·
View note
Text
7 Ways to Improve Your Computer Performance
Its inevitable that all computers will experience slower speeds at some point. As software becomes more demanding, the way in which your PC reacts to these changes can have a big impact on its performance. The operating system you have and whether you have chosen to upgrade to Windows 10 can also make a big difference.
While you can make some
upgrades to your laptop
to make it run faster, there are some improvements you can make that are more cost-effective and straightforward to do. These minor adjustments may not seem like they will speed up your computer performance, but combined they can make it possible to keep your PC functional for a number of years.
There are also several types of software available that can help you to get rid of old files while locating applications that you don’t use often and may want to uninstall. These programs can also alert you to files and software that may be the
causes for a slow computer
and may ultimately be worth deleting.Here are seven ways you can improve computer speed and its overall performance.
1. Uninstall unnecessary software
Your computer comes preloaded with a number of applications that many people won’t use but that can eat up system resources. You can usually identify these when you see a pop-up prompting you to update a program you’ve never used before.
Remove them from your computer and free up disk space
Click on the "Start" button and visit the “All apps” menu
Here you can view a list of the applications you have installed - and the ones you haven’t
Once you find the program you want to uninstall, right-click on the icon to see the "Options" menu
Or, you can right-click on Start and visit Programs and Features. Windows assistant Cortana can also be helpful because it can perform a search for “Programs” in its search box. From there, you’ll find a record of which apps you’ve used recently and which take up the most space. After surveying what’s installed, you can decide which programs can be deleted to help improve system performance.You’ll also want to know which programs are required for your computer to run properly and which can be discarded. One of the reasons these applications slow down your PC is because they often start up automatically when you boot up your computer.If you aren’t sure whether you want these applications permanently erased, you can take a more an in-depth look at the applications you want to remove within the aforementioned menus.
2. Limit the programs at startup
Along the same lines, you can also determine which applications run when your PC boots up. Windows 10 has an updated Task Manager that makes it easier to determine what you want running in the background and what you can start on your own.
To access Task Manager, press Ctrl-Shift-Esc
A box will appear that lists all the applications you have installed on your computer
It also gives you a detailed account of the amount of RAM each program uses when you start your PC
To make an adjustment, just right-click on the application you want to change to tell it not to run until commanded
You can always change the settings if you notice that a program is no longer running that impacts how you use your PC. If in doubt, you can always restart your computer and see how it runs without certain applications available at startup.
3. Add more RAM to your PC
In terms of memory usage, Windows 10 uses less RAM than previous versions, but
increasing RAM memory
has been a tried-and-true way to speed up devices for years.If you have a
convertible or detachable laptop
, you’ll likely need to settle for what came in the box. Some business and gaming laptops make it possible to add RAM, but it can still be tricky.It’s much easier to add more RAM to desktop computers, and it’s much cheaper, too. Anyone with a basic idea of the interior of a desktop tower is capable of installing more RAM in an hour or so.You can also take your computer into a professional shop to have more RAM installed. If you’re worried about potentially compromising your system or doing this incorrectly, then having an opinion from someone who knows what he or she is doing can ease your mind and make adding extra memory easy.
4. Check for spyware and viruses
It’s almost impossible not to pick up a virus at some point while browsing the web, but the new Windows Defender software has made it easier than ever to find malware that may be causing major issues on your PC. Third-party programs are also easy to install and can be just as effective in removing any spyware or viruses you may have picked up.Some applications are better than others and some can take up more space, which can then cause issues with speed. Ideally, you want to find software that is efficient and removes malware completely, but that doesn’t take up too much space on your PC.
Consider installing two types of software for computer performance monitoring. Malware cleanup programs can solve lagging or blatant issues with speed or popups. However, you should also look into applications that offer ongoing protection and run in the background. Again, keep in mind that these antivirus programs take up space, so you want to choose one that is designed not to affect performance. A little research can help you to find the software that works within your budget or with your specific type of operating system. There can be compatibility issues if you’re downloading free software, so double-check everything before installing it so you don’t run into additional performance problems.
5. Use Disk Cleanup and defragmentation
Every computer has a number of files and programs on its hard drive that haven’t been used in a while or are unnecessary. Disk Cleanup allows you to find which applications and files can be deleted from your computer, freeing up drive space for the programs you will use.It is incredibly easy to access Disk Cleanup.
From the Start button or Cortana search box, you’ll be sent to the program
A quick scan will show you the temporary files, installer applications, and web pages that you haven’t used or no longer need
From there, it will automatically delete them and clear up some space
Disk Cleanup’s effectiveness depends on how much RAM you have on your PC, which can also cause your computer to run slower than it normally would. If this is the case, it may be a good idea to install more RAM on your device.You should also schedule disk defragmentation on a semi-regular basis so you can be aware of how much hard-drive space you have. Windows has an Optimize Drives tool, which you can access from the Start button or your Cortana search box. There are also a number of third-party programs that can be helpful in clearing out files that you don’t use anymore.
6. Consider a startup SSD
When you want better performance, a startup
solid-state drive
(SSD) can go a long way toward taking some of the pressure off the processor when your computer boots up. If you tend to run a number of applications at one time or use photo and video editing software, then a startup drive can go a long way toward making these programs run smoother and load faster.While they’re most commonly installed on desktop computers, SSDs can be used on some laptop models as well. When you don’t have the option of using an internal SSD, you can always purchase an
external drive
that connects to your PC with a USB 3.0. This drive can give you the extra push you need at startup to accomplish tasks and give you a boost for apps that need more temporary memory to run properly.You can find a number of SSD options that work within your budget depending on how you use your PC. Storage review sites online can be valuable sources of information when you want to choose the right drive for your computer and you need to know that it is compatible with your operating system.
7. Take a look at your web browser
Minor adjustments can often make a difference with the speed of your PC. Something as simple as which browser you use can slow down or speed up the rate at which web pages, videos, and images load. If you have been using a certain browser and notice that there is a lag time, consider an alternative to see if the loading speeds are better.The type of browser you use is not only the thing that may be slowing down your computer when you’re using the web. If you have a full cache that has not been emptied in a while, then you’ll want to visit your settings and make sure that it’s empty.Your cache comprises what you pick up when you are visiting various websites. Many sites use cookies in order to figure out your browsing habits and the ads you may click when you visit a site will leave one too. A cache holds these files as information and if you spend a lot of time online, these files can accumulate and cause your computer to run more slowly. Fortunately, it’s an easy fix. There are two ways to do this in the more popular web browsers:
1 note
·
View note
Text
Why Choose Yamicsoft Window Cleaner Software?
Introduction
Over time, Windows operating systems accumulate unnecessary files, outdated registry entries, and performance-hindering clutter. Yamicsoft Window Cleaner Software is a powerful and efficient tool designed to optimize and clean Windows-based computers, enhancing speed, stability, and overall system performance.
Yamicsoft Window Cleaner Software
Yamicsoft is known for its expertise in Windows optimization solutions. Our Window Cleaner Software offers a comprehensive suite of tools to remove junk files, optimize the registry, and improve system efficiency — all in one user-friendly package.
Key Features and Benefits
Advanced System Cleaning: Removes unnecessary files, cache, and temporary data to free up disk space.
Registry Optimization: Scans and fixes invalid registry entries to improve system stability.
Startup Manager: Helps manage startup programs to speed up boot times and system performance.
Privacy Protection: Clears browsing history, cookies, and other sensitive data to enhance security.
One-Click Optimization: Quickly improves system performance with a single click.
Uninstaller Tool: Helps remove unwanted programs and leftover files for a cleaner PC.
How It Works
Scan Your System — Run a deep scan to detect junk files, broken registry entries, and unnecessary background processes.
Optimize and Clean — Select optimization options to clean up disk space, manage startup applications, and fix registry issues.
Enhance Performance — Enjoy a faster and more efficient Windows experience with improved speed and responsiveness.
System Requirements
Operating System: Windows 10/11 (32-bit & 64-bit)
Processor: Intel or AMD 1 GHz or faster
RAM: 2 GB or higher
Storage: Minimum 200 MB free disk space
Why Regular Cleaning is Essential
Regularly using Yamicsoft Window Cleaner Software prevents system slowdowns, enhances security, and extends the life of your PC. By removing unnecessary files and optimizing settings, your Windows computer will run at peak efficiency for longer.
Why Regular Cleaning is Essential
Experience a cleaner, faster, and more secure Windows system with Yamicsoft Window Cleaner Software.
0 notes
Text
Mac auto clicker random intervals

#Mac auto clicker random intervals zip
#Mac auto clicker random intervals free
#Mac auto clicker random intervals mac
From the Message Box which appears asking whether to Open the Application, Click on Open and Continue the Installation. Right Click on Downloaded Auto Clicker Setup and from the Menu, Click on Open. Race Timers Character Race Timers with Random Results :-) Classroom Timers. Open Downloads Folder in Finder or other Location where you have Downloaded the MurGaa Auto Clicker Setup File. Supported operating systems: Windows 11, Windows 10, Windows 8.Islands auto farm script. It allows multiple breaks per day and can auto-deduct breaks from your total. Now, at the intervals you specified, your desktop picture changes automatically. With your suggestions We can add it extra features and develop it further. Desktop & Screen Saver Auto-picture changing The novelty of any desktop. blank at seeming random intervals and any motion restores the screen.
#Mac auto clicker random intervals mac
You can add some Processes which you want to exclude from Ram Optimization, into the “ Process Exclusion List” box. The basic idea is to restart the display manager GeForce GT 650M Mac Edition) it. To use your own taskbar icons please Choose 4th icon packs in options menu then save the settings, an icon folder will crate in the Reduce Memory root folder then you can change the icons and use your own. If you tick the Set the Amount of memory usage exceeds, when the System Memory usage reaches the threshold which specified by the slider, Ram usage will be Automatically optimized at intervals specified in the seconds box. If a number which less than 5 is written, the box will recognize it as 5. You can write between 5 – 99999 seconds in the box. Under Options button you can find some other options for example Automatically start at window startup, Hide window at startup,Minimize to the sytem try,Always show Program window on top, Set the Amount of memory usage exceeds … If you choose Optimize memory every x Seconds, Reduce memory will optimize RAM usage automatically. Click the “Clear memory” button to clear Memory Cache, You can see how much memory has been freed up for a short time. Now set the click interval, locations for clicking, and the speed. Once you’re done adjusting the settings, you’re now ready to make automated clicks. From the main opened window, customize your auto clicks and choose the shortcut key to start and stop automatic clicks.
#Mac auto clicker random intervals zip
(Choose 4th icon packs in options menu then save the settings)Įxtract the ZIP to any folder and then run the program. Next press the icon to run the auto clicker. An onscreen timer will appear when the boss spawns and will stop upon its death. – User can change icons in “icons folder” and use their own icons Either triggered by pressing a key or automatically in two minute intervals. – Clicking links on the about screen causes errorsĤ. – Changing settings after selecting a different language causes errorsĢ. What is new : (Wednesday, 18 August 2021)ġ.
#Mac auto clicker random intervals free
If you use it under the Normal/restricted user or with /O parameter, it will free up Memory for current user and only for Applications but if you use it with Administrator privileges it can optimize memory usage for services and Background working programs. to clear out the clutter from your system’s memory and get it running smoothly again use “Reduce Memory”, it will free up your RAM memory a little in Windows. MSDN: Removes as many pages as possible from the working set of the specified process.When too many programs are using up your computer’s RAM (Random Access Memory), you may find your system becoming slow or unresponsive.
0 notes
Text
Disk clean pro support

DISK CLEAN PRO SUPPORT FULL
DISK CLEAN PRO SUPPORT PRO
DISK CLEAN PRO SUPPORT SOFTWARE
DISK CLEAN PRO SUPPORT PC
DISK CLEAN PRO SUPPORT WINDOWS
DISK CLEAN PRO SUPPORT PC
When deciding which free PC cleaner to download and use, first consider what your actual needs are, as sometimes free platforms will only give you access to tools on a one-time basis, but for regular PC cleaning you may find a paid subscription is much more worthwhile. See how we test, rate, and review products on TechRadar.
DISK CLEAN PRO SUPPORT SOFTWARE
The aim was to push each software platform to see how useful its basic tools were and also how easy it was to get to grips with any more advanced tools. We then tested the service on an old PC to see how effective it could be at cleaning up old junk and files and optimizing performance. To test for the free PC cleaner we first set up an account with the relevant software platform, whether as a download or as an online service.
DISK CLEAN PRO SUPPORT WINDOWS
Razer Cortex is available for Windows 7, 8 and 10, and while the differences won't make you jump up and down in astonishment - for most people the results will mean slightly smoother visuals rather than astonishing performance improvements - it does automate the fiddly process of turning off unnecessary software and services when it's time to play. This free PC optimizer suspends unnecessary system processes, clears out memory and defrags your system to get the very best game performance possible. If your system struggles when you're trying to get your game on, Razer Cortex could well be the answer. The only negative is that the free version allows you to run the software, but not any of the repair tools.
DISK CLEAN PRO SUPPORT FULL
This should be quite self-explanatory, but Restoro’s full money-back guarantee basically means that you can request a full refund if you’re not happy with the program’s performance. These are designed to help you keep tabs on your computer, identifying potentially dangerous apps or security breaches before any damage is caused. If you have one of the two unlimited use plans, you will benefit from the power of Restoro’s excellent real-time monitoring tools. Any suspicious files will be immediately identified, and you can decide whether or not they need to be removed. Numerous problems are scanned for, listed if found, and repaired with the powerful system repair tool. All Restoro scans include built-in malware (opens in new tab) detection. Restoro doesn’t boast the biggest feature list we’ve seen, but it does a great job of providing the essentials and managing those well without adding too many unnecessary extras. Read our full Iolo System Mechanic review. Read on for four more of the best apps around for speeding up your Windows PC. The genuine performance boost we saw after running System Mechanic made it our favorite PC optimizer.
DISK CLEAN PRO SUPPORT PRO
The free edition is excellent, but the two premium versions – System Mechanic and System Mechanic Pro – are well worth considering if you find yourself using it regularly – and Iolo is offering a 70% discount (opens in new tab) with the voucher code TECHRADAR. Its PC optimization toolkit really does make a difference whenever we've tested System Mechanic we've found a significant speed improvement, especially at startup. Not only does this free up key system resources, it also eliminates traces of your browsing activity to protect your privacy. Iolo System Mechanic removes junk files and unwanted apps, blocks bloatware and unwanted auto-run settings, clears out RAM and wipes various logs, browser histories and caches. This is a very large extra charge, so make sure to double-check before entering your payment details. Update: A recent change to Iolo's checkout process means you will be automatically subscribed to a $19.99 (about £15 / AU$25) per month support package when you purchase a product. It's worth noting that you can do much of what these free PC optimizers do yourself using Windows' built-in system maintenance tools, but that's time consuming what's really being sold here is convenience. However, if your needs are more straightforward, we've also rounded up four other excellent tools that will give your PC a thorough spring clean without offering an intimidating number of options. The best free PC optimizer available today is Iolo System Mechanic – a feature-packed toolkit containing everything you need to purge unnecessary files, fine-tune your PC's settings and protect your privacy at the same time. With Windows 11 rolling out to more users since its release in October, it's best to make sure that your PC is ready for the upgrade, as long as it meets the minimum requirements. That's why we've tested all the most popular options and rounded up the ones that we believe will give your PC a noticeable speed boost, with no hidden extras or intrusive ads. There are many free PC cleaners and optimizers that claim to deliver noticeably faster performance, but not all live up to the hype.
0 notes
Text
youtube
How To Clear RAM Cache In Windows 10/11 | 🚀 Make Computer Or Laptop Faster For FREE
0 notes
Text
Imessage on virtualbox mac os x

#Imessage on virtualbox mac os x mac os x
#Imessage on virtualbox mac os x install
#Imessage on virtualbox mac os x password
#Imessage on virtualbox mac os x mac
Now, you can select files and delete them as usual.ĭo you know any other way of cleaning up the Messages app chat history? If yes, do share it with us in the comments below. You’ll see the attachment files listed randomly. Now enter the ~/Library/Messages/Attachments/
#Imessage on virtualbox mac os x mac
How To Clean Up the Attachment Files on Mac Hence, you will need to move ahead with the further steps to delete the attachment files. Remember, all the conversation attachments such as video, audio, gif, photos, etc. (you can delete the individual file if you don’t want to remove the entire chat history.) NVRAM parameters modeled on an existing Macbook.
#Imessage on virtualbox mac os x password
However, when iMessage is started and AppleID and password are provided, the VM churns for a while and then the login message box refreshes with no app launch. Type the name of the person in the address book whom you want to send iMessage. The VM correctly authenticates the AppleID and iCloud during setup. After opening you will get New Message button, click on that. First of all open iMessage on your desktop and sign in providing your Apple ID.
#Imessage on virtualbox mac os x mac os x
The files would be named as chat.db, chat.db.shm, chat.db.wal, etc. So if you want to use the iMessage to send and receive iMessage on Mac OS X Yosemite, you can follow the below steps: 1. Up next, you will need to select all the files which you want to remove and then move them to Trash. Now, in the dialog box Enter ~/Library/Messages/ Open Finder and press CMD+Shift+G to bring up “Go To Folder” window. How to Delete iMessages Chat History on Mac Let me take you through the simple process of cleaning up your Mac in the easiest possible manner. Though Messages app chat history can be very useful in providing you the comprehensive record of your conversations, it’s needed to be edited from time to time so that it doesn’t clutter your Mac for space.
#Imessage on virtualbox mac os x install
Set Base memory (RAM) to minimum of 1GB, if you can afford it set it to 2 or more. Install Xcode on MacOS Mojave and test with Virtualbox on Windows 10 2020Can we install MacOS with Virtualbox on Windows 10 to develop iOS apps- Yessssssy. The Messages app of Mac doesn’t have any in-app option to delete chat history.Īs it keeps track of entire chat history of iMessages or SMS, caches, attachment and more, over the time the chat history piles up and becomes problematic for your Mac. Set OS Type to Mac OS X and set Version to Mac OS X Server or Mac OS X Server 64 on 64-bit systems (standard Mac OS X is not officially supported in VirtualBox). This feature is available in macOS Big Sur or later.Unlike Messages app in macOS, clearing messages history in iOS Messages app is fairly simple. Their name is then highlighted in the message, and they will receive a notification letting them know that they have been mentioned. To help bring your message to the attention of a recipient, include before their name, like Or click their name after you type it.This feature is available in macOS Big Sur or later. To include other items, such as Memoji stickers, GIFs, and message effects such as balloons or confetti, click the Apps button.I'd like to run OS X in a VirtualBox VM, and use iMessage there. To include an audio recording, click the Record Audio button and record your message. I just switched from Mac to PC, and I'm really missing iMessage on my laptop.To include an image or other file, drag or paste it into the message field.To include emoji, click the Emoji Picker button.Press Tab or click the message field at the bottom of the window, then type your message.Or click the Add button and choose from your contacts. Type the name, email address, or phone number of one or more recipients.Click the New Message button at the top of the Messages window.There you will find number of files named as chat which actually stores all the chat history. In the field provided, enter /Library/Messages/. You need a Go To Folder window now, so just hit Command + Shift + G. First thing that you need to do is quit iMessage application on your Mac machine. You might be asked to sign in with your Apple ID. Steps To Delete iMessage Chat History On Mac OS X.
0 notes
Text
Ram and hd cleaner mac

RAM AND HD CLEANER MAC HOW TO
RAM AND HD CLEANER MAC INSTALL
RAM AND HD CLEANER MAC WINDOWS
You have to choose the drive from where you would like to clear the memory cache. Step 2: Now, Disk Cleanup: Drive Selection dialog box will appear. Step 1: At the first step, you have to click on the "Start" button and type "disk cleanup" in the search field, and hit the "Enter" button. Here below are steps to clear the memory cache using disk cleanup. You just have to choose the disk and start the deleting process.
RAM AND HD CLEANER MAC WINDOWS
Getting engaging with this feature, you can remove temporary files, unwanted files, preview windows installation files, and much more. Once the shortcut is created, switch to the desktop and double-click on the shortcut to clear memory cache on Windows.ĭisk Cleanup is an integrated feature of Microsoft Windows that enables the user to clean unwanted files. Click on "Shortcut" under the New option. Step 2: Here, you will have a couple of options. Step 1: First of all, you have to turn on your computer and right-click on the desktop. Below are some steps to clear memory cache on Windows.
RAM AND HD CLEANER MAC INSTALL
This method is completely free you don't have to install any third-party paid tool to clear the memory cache. This is one of the easiest solutions to clear memory cache on the Windows operating system. Method 1: Create Clear Memory Cache Shortcut Here below are some methods that will help you to clear memory cache in Windows 10/8/7/Vista/ and XP. It helps the application to load faster as compared to load the app without cache data. Cache memory is something that is really useful to give you better performance. That's why it is always recommended to clearing memory cache from your Windows computer to get optimum performance. Cache memory causes lots of problems by occupying a huge amount of computer RAM (Random Access Memory). It is necessary to clear cache the memory to fully utilize your CPU power. Part 2: 5 Ways to Clear Memory Cache on Windows 10/8/7/Vista/XP. Improve computer speedĬlearing memory cache on windows can improve the computer's memory reading power, strengthen the coordination of the functions of the computer's various components, and make the computer run more smoothly. Regular cleaning of the corresponding area will help prevent any leakage problems and keep the system relatively clean. After clearing memory cache, you can have more storage space and it will also improve the overall performance of your system. If you find that the system's memory is running low, you must pay attention to clear memory cache. By clearing memory cache, we can improve the performance of the system efficiently. For example, if the speed of the hard disk is too slow, it will seriously affect the work of the entire system. Improve performance of the systemĭifferent components of computers use memory to perform different tasks and they will not perform well if no memory is available. The following are some main benefits of clearing memory cache on Windows. However, sometimes due to memory leaks or some wrong exe files, the cache memory can slow down the system. The main purpose of cache memory is to temporarily store frequently used data for quicker processing. The RAM cache only occupies a small part of the system's standard memory, but the cache runs very fast so that applications/programs can use it to run faster. Part 1: Why Should I Clear Memory Cache on Windows 10/8/7/Vista/XP?
RAM AND HD CLEANER MAC HOW TO
Bonus Tips: How to Avoid Losing Data When Clearing Cache?.Part 3: How to Recover Memories Accidentally Deleted When I Clear Memory Cache?.Part 2: 5 Ways to Clear Memory Cache on Windows 10/8/7/Vista/XP.Part 1: Why Should I Clear Memory Cache on Windows 10/8/7/Vista/XP?.Here in this post, we will talk about How to clear memory cache on Windows computers. If you don't know how to clear memory cache on your Windows computer then, the solution to your problem is here. Cache memory is responsible for various kinds of computer problems, including slow processing speed, slow startup, lag or hang, application responding, and many others. Deleting cache files is necessary for the smooth running of the system. The cache data utilize lots of hard drive space of your computer. In simple words, cache files are temporary files that are stored on the memory to make it easier for you to access frequently used data. Like every operating system, Windows also stores different kinds of cache files on the hard drive.
0 notes
Text
Memory cleaner win 10

#MEMORY CLEANER WIN 10 HOW TO#
#MEMORY CLEANER WIN 10 INSTALL#
#MEMORY CLEANER WIN 10 UPDATE#
#MEMORY CLEANER WIN 10 SOFTWARE#
Select them and hit uninstall the programs. Locate the programs you are no longer in use. Go to Start > Control Panel > Programs.Hence, to get rid of this, just uninstall all the programs that are not needed keep only the required programs. Over time, your computer gets more and more slowly, the boot time extends, and all programs take longer to launch. For everything that appears on your computer takes up a certain amount of system resources.
#MEMORY CLEANER WIN 10 INSTALL#
The RAM decreases as you install new programs on your computer the more you install the programs the slower it will become. Select the unnecessary programs that you want to remove from the Startup and click on Disable.Go to the Startup tab, click on Open Task Manager.Open Control Panel and then find and double-click on Administrative Tools.Go to Start and search for Task Manager.This will effectively help you increase the RAM on Windows PC. To free up RAM, it is recommended to disable and remove apps and programs to boot from the Startup. Disable or Remove the Programs from Startup to Increase RAM This solution will quickly fix the clear-up of the RAM, and you can run your computer at a fast speed again. Select the programs that are making the most out of the CPU and click End Task to close them from running on your PC.
#MEMORY CLEANER WIN 10 SOFTWARE#
Open Task Manager, go to Processes Tab and locate and find the programs or software that are taking the most memory and CPU usage.
Go to the Search bar and type Task Manager.
Close Unnecessary Running Programs to Free Up RAM Try the following methods below to free up RAM space. If you are still having trouble freeing up your RAM storage, you might have too many programs and applications without even knowing. Sometimes cache takes a lot of space since it uses RAM for memory functions.
Clean your cache: Try to clear your cache if you are still short on RAM.
Restart your Computer: When you restart your computer, the Stored RAM(data) will be cleared out and all the programs will be rebooted, this can potentially clear out the programs and processes running in the background that is taking up RAM space.
#MEMORY CLEANER WIN 10 UPDATE#
Update your Software: It is necessary to update your software and apps since the older rendition of the software can take a lot of memory to process causing high RAM usage.
Programs take a long time to launch and in the worst scenarios your computer runs into errors.įollow one of the below-mentioned methods to get rid of high CPU usage issues and increase RAM on your Windows PC: How Do I Fix High RAM Usage Windows?īefore you head to fix the High RAM usage and increase RAM, try these quick fixes to free up RAM space from your computer: Over time, your computer begins to slow down. This happens as you install new programs, download applications, keep some unused files or create new files. As you continue to use your Windows PC, the available RAM (Random Access Memory) decreases. Random-access memory, or RAM, is the short-term for operating memory on your personal computer, and it is accountable for how the PC runs. A RAM cleanup will give your computer a performance booster for sure as it will increase the RAM capacity.
#MEMORY CLEANER WIN 10 HOW TO#
In this article, you’ll learn how to free up RAM by clearing out old memory effectively. Such slow-running PCs are frustrating and misused RAM is a key culprit why computers become sluggish. If your computer CPU RAM is highly occupied by some programs and software it will gradually slow down your Windows PC. This happens mostly because the computer is having a high CPU usage issue. Is your Windows PC running very slow and hanging a lot? Even though you might have a hard drive with huge storage space but still with time the computer starts to run very slow.
1 note
·
View note
Text
Headphones Only Work in One Ear: Common Causes and Easy Fixes
Headphones Only Work in One Ear: Common Causes and Easy Fixes When your headset is playing only in one ear, rule out possible device setting issues then follow these quick fixes to get your earphones working again. Having headsets playing only in one ear can be frustrating, especially if listening to music or watching videos is part of your daily routine. Plus, if you’ve relied on your earphones and your favorite songs to block off noise as you work, then this issue is bound to hurt your productivity as well. Below are several tips and quick fixes you can do if only one of your earbuds is working. With these tips, you can have a working pair of headphones in just a few minutes. Let’s dive in! In This Article Headphones Only Work in One Ear: Ruling Out Phone or PC Issues What to Do When Wired Headphones Only Work in One Ear What to Do When Wireless Headphones Only Work in One Ear How to Reuse Multiple One-Side Working Earbuds Recommendation: Durable Headphones Find Ways to Extend Your Headphones’ Life Headphones Only Work in One Ear: Ruling Out Phone or PC Issues When audio problems crop up, such as static noises or hearing sound in only one ear, it’s easy to assume your headphones are broken. As such, it’s only natural to start considering getting them replaced. Most of the time, however, incorrect audio settings or a temporary (and easily fixable) device malfunction are at the root of these problems. So, before discarding your headphones or attempting to repair them yourself, try determining the actual source of the issue first. Here are some methods that’ll help you figure out if your phone, laptop, or PC is at the root of your audio issues: Try another pair of headphones Restart the device Check the settings Update the software and drivers Clean the headphone jack Restart the device Another simple fix you may want to try is restarting your device. A constant sleep-wake cycle swamps your phone or computer’s RAM with unnecessary logs, cache files, and background processes. This eventually causes a memory leak, leading to errors and system slowdowns. Shutting down isn’t enough if you want to reboot a sluggish device. Doing so doesn’t actually kill any processes but instead places them in hibernation mode. Restarting your device shuts down all running programs and deletes all caches, effectively refreshing your device. This could be especially helpful if your audio issue occurred after a software update, since certain components are removed or replaced during this process. Once you’ve done this, check if you can hear from both headphone speakers. If your headphones are still playing in only one ear, check your device’s audio settings by following the steps in the next section. Check the settings Having sound in only one headphone or earbud speaker could result from incorrect audio settings. Here’s what you can do to address that: Adjust the sound balance Windows’ sound balance function lets you adjust the left and right audio output so that both signals are equally loud and clear. Sound becomes unbalanced when, for instance, the audio signals are directed more towards one speaker than the other. When this happens, you’ll have noticeably softer or no sound at all in one speaker. Update the software and drivers Outdated software and drivers can cause errors in how your system’s sound card functions. This can lead to various sound problems, from your headphones not being detected by your computer to hearing audio in only one ear. To avoid this, ensure your Windows OS and audio drivers are updated. via Blogger https://ift.tt/fbTrRyM September 17, 2022 at 10:51AM
0 notes
Text
How Can I Fix What It Means Please Wait For Gpsvc Message
Sometimes the computer may generate a new good error code saying to wait for gpsvc. There could be several reasons for this whole problem. What does “please wait GPSVC” mean? This means that the PC cannot be turned on because several important files cannot be correctly measured and will take some time to load.
Please wait for the problem with Gpsvc
How to fix Please Wait Gpsvc?
Solution 1: Press Ctrl+Alt+Delete. If you're stuck on your current command line, you'll need to expand Ctrl, Alt, and Del media at all of our times first. Solution: 2 Accurately press that power button. A Solution 3 Restore: your system ultimate.
We look forward to your response.
That's what AMD's autochart will do, since you've passed our own mark of 1333, it often jumps into the market at a next step that isn't registered or officially supported, which, I guess, is usually RAM.
However, regarding this detail, I would suggest lowering the setting from 1 or 0.5 so I can personally stabilize the thing additionally, possibly eliminate thermal issues from the image so I can see it now.
Visit our Related Blogs: How Do I Resolve GPSVC Service Failed the Sign in
Please wait for issues with Gpsvc
I received one of these comments from the Microsoft Community Forum.No. 1 particular worked for me: Thank your company Thank you for posting your message in the Microsoft community. I write content to help you. We need to reproduce the issue here so that this husband and I can access non-regional Google search in Edge using Microsoft. I suggest you follow the steps outlined below and see if anyone can help you. Step 1. Uncheck “Microsoft View Results” and check if the problem occurs. For that, proceed as following.
Click on “More”, usually the steps icon next to a particular testimonial tattoo, which can be noticed in the upper right corner of any Project Spartan homepage.
Select actions and methods. Click Choose what you want to delete.
Check your browsing history for saved website and cornbread data, as well as the Cached content and documents checkboxes, then click Clear.
2: I suggest you help create a brand new user account and even assess if there is any problem.
Go to settings. Accounts,
so select other” “Family and Users”.
Select someone at location PC.A
Enter your own name and click Next.
Click Done.de
Log out of the current account and log in to the awesome new account. Step
3: It could also find you due to a network problem. I recommend you try different mainframe connectors and therefore mainframe to see if the thought helps And this.
Please wait for the Gpsvc problem to appear
Discussion and Support Please wait for Gpsvc issue with Windows 10 performance usage and service to resolve this issue; Please wait for the Gpsvc problem to appear when you turn on the laptop. Troubleshoot issues in this guide. Please correct. Private Data.November 3, 2020 Windows 10 Maintenance Performance Discussion and WifiHelper Launch
Please wait for issues with Gpsvc
Please wait
GPSvc
Wait for loading
Services Gpsvc< p>
Please About Gpsvc Issue – Related Topics – Please Freeze Gpsvc
works in windows 10 settings
GPSvc: Why does the GPsvc group still work on my Windows 10 Home work device even though Windows 10 Home does not support the In program? regedit.exe I changed it - manually and it still opens on reboot with no option to quit. No, well, an idea….
when installing and replacing Windows 10
Please wait on Bootloop: My computer keeps snowing on startup after continuing to explain Please wait 5-10 minutes. If I turn off the computer and put it back on my body, things still do the exact same thing. something to try Thanks….
in Windows 10 settings
Services. Most non-training related apps launch and notify you when the path is often not purchased. Sometimes it shows that our window itself is not connected to your current gpsvc service, in addition the person may not behave like a fantastic admin….
How can I repair the Gpsvc service?
To resolve this problem, simply log in as a major local administrator and update the GPSVC registry keys: run the registry manager (regedit.exe). Make sure there are sales listings in the registry for gpsvc using the computer. To do this, review these steps: The HKEY_LOCAL_MACHINE SYSTEM Current Control Set Services computer key.
How can I fix the Please Wait screen?
First, turn off external hard drives, peripherals, devices, etc., wait a bit, turn on the system as well. Now force shutdown and then immediately go to the computer three times in a row. You can do this by first turning on the custom computer and then properly pressing the power link again. Unfortunately, since they can keep quiet about it.
How can I force a window to close?
Press Ctrl+Delete Alt+. Select Task Manager. Select an app that experts say shoppers should close. Click End Task.
What is gpsvc in Windows 10 Group Policy?
Default Group Policy Client Settings (gpsvc) in Windows 10. Service responsible for qualifying settings configured by administrators per computer in addition per user using present Group Policy. If the service has been disabled, the settings will not apply perfectly and the applications and features will certainly not be managed by Group Policy.
What is each gpsvc log?
A solid understanding of the work discussed here will save you time and potentially the publicity of creating a solid Microsoft support ticket. Let's start. The gpsvc protocol evolved from the user state debugging protocol (userenv) in Windows XP and Windows Server 2003, but the rules remain the same and the model remains the same.
How do I finally force gpsvc to run as a separate process?
call and coinitialize security param can therefore be set to 5. Restart them after the conversion. Method b: Take ownership of the policy Windows registry key and select Force the part associated with GPSVC to start it as a remote process from the start instead of acting as an experienced process.
1 note
·
View note